In order to make better artistic and design choices, the Fluent and Empowered Designer should have answers to 5 essential questions. In this article, I present the second essential question: What Should I Create?
Selma got by very well in life by asking her teachers, and in subsequent years, her bosses, what she should do. She followed their instructions to the letter, and was particularly good at coloring within all the lines. Everyone was always pleased with her work. So pleased, in fact, that her current boss promoted her into a designer position.
In her new position, she was to work with construction, architectural and interior design firms. She was to assist them and guide them into choosing textiles with which to incorporate into their interior and exterior building plans.
When she met with various clients, she started byasking them to tell her what they wanted. But no one could really articulate much more than general ideas about colors. For Selma, this was disconcerting. She thought she could do a great job, but needed more information and direction. These were never forthcoming.
At the core of Creativity is the ability to generate options, and then narrown them down. Creativity is not innate; it is developed. Creativity is a muscle requiring attention and practice. This is something Selma never really worked on.
This was critical for Selmer, as well as any other designer, in order to flourish and succeed, to be able to answer these 5 essential questions, now with question 2.
QUESTION 2: How do you decide what you want to create? What kinds of things do you do to translate your passions and inspirations into design?
Applying yourself creatively can be fun at times, but scary at other times. It is work. You are creating something out of nothing. There is an element of risk. You might not like what you end up doing. Your friends might not like it. Nor your family. You might not finish it. Or you might do it wrong. It may seem easier to go with someone else’s project.
Applying creativity means developing abilities to generate options and alternatives, and narrowing these down to specific choices. It means developing an ease and comfort generating fix-it strategies when approaching unknown situations or problematic ones. It means figuring out how to translate inspiration into design in a way that inspires others and taps into their desires. It means differentiating yourself from other designers as a measure of your originality. Creative people…
Set no boundaries and set no rules. They go with the flow. Don’t conform to expectations.
Play. They pretend they are kids again.
Experiment. They take the time to do a lot of What Ifs and Variations On A Theme and Trial and Error.
Keep good records. They make good notes and sketches of what seems to work, and what seems to not work.
Evaluate. They learn from their successes and mistakes.
As designers gain more and more creative experiences, they begin to assemble what I call a Designer’s Tool Box. In this virtual tool box are a set of thinking routines, strategies and fix-it strategies whichhave worked well in the past, are very workable in and of themselves, and are highly adaptive when used in unfamiliar situations. Every designer should develop their own Tool Box. This vastly contributes to adaptability and success in creative thinking and application.
Creativity
Creativity isn’t found, it is developed. Creativity is a phenomenon where both something new and, at the same time, somehow valuable is created. While some people come to creativity naturally, in fact, everyone can develop their creative ability.
Thinking creatively involves the integration and leveraging of three different kinds of ideas — insight and inspiration, establishing value, and implementing something.
We work through creative thinking through divergence (that is, generating many possibilities), and convergence (that is, reducing the number of these possibilities).
Kierkegaard — and I apologize for getting a little show-off-y with my reference — once described Creativity as “a passionate sense of the potential.” And I love this definition. Passion is very important. Passion and creativity can be summed up as some kind of intuitive sense made operational by bringing all your capabilities and wonderings and technical know-how to the fore. All your mechanical and imaginative abilities grow over time, as do your abilities for creative thinking and applications. Creativity isn’t inherently natural. It is something that is developed over time as you get more and more experience in design.
You sit down, and you ask, What should I create?
For most people, especially those getting started, the answer to this question is very basic. They look for patterns and instructions in magazines or how-to books or websites online. They let someone else make all the creative choices for them. The singular creative choice here is picking what you want to make. And, when you’re starting, this is OK.
As you grow as a designer, and feel more comfortable with materials and techniques, you can begin to make additional choices. You can choose your own colors. You can make simple adaptations, such as tweaking colors or placements or dimensions or proportions.
Eventually in your designer career, however, you will want to confront the Creativity issue head on. You will want to decide that pursuing your innermost designer, no matter what pathway this takes you along, is the next thing, and right thing, to do. That means you want your projects or objects to reflect your artistic hand. You want to develop a personal style. You want to come up with your own designs.
Sometimes creativity seems insurmountable, after finishing one project, to decide what to do next. Exercising your creative abilities can sometimes be a bear. But it’s important to keep pushing on. Challenging yourself. Developing yourself. Turning yourself into a designer. And pursuing opportunities to exercise your creative talents even more, as you enter the world of design.
Types of Creativity
Creativity has two primary components: (1) originality, and (2) functionality or value.
The idea of originality can be off-putting. It doesn’t have to be. The projects or objects, so creatively designed, do not have to be totally and completely new and original. The included design elements and arrangements do not have to be solely unique and never been done before.
Originality can be seen in making something stimulating, interesting or unusual. It can represent an incremental change which makes something better or more personal or a fresh perspective. It can be something that is a clever or unexpected rearrangement, or a great idea, insight, meaningful interpretation or emotion which shines through. It can include the design of new patterns and textures. It can accomplish connections between seemingly unrelated phenomena, and generate solutions. It can be a variation on a technique or how material gets used. It can be something which enhances the functionality or value of the piece.
Creativity in design marries that which is original to that which is functional, valued, useful, worthwhile, desired. These things are co-dependent, if any creative project is to be seen as successful.
For designers, creativity is not the sketch or computer aided drawing. It is not the inspiration. It is not the piece which never sees the light of day. Creativity requires implementation. And for designers, implementation is a very public enterprise.
How Do We Create?
It’s not what we create, but how we create!
The creative process involves managing the interplay of two types of thinking — Convergence and Divergence. Both are necessary for thinking creatively.
Divergent thinking is defined as the ability to generate or expand upon options and alternatives, no matter the goal, situation or context.
Convergent thinking is the opposite. This is defined as the ability to narrow down all these options and alternatives.
The fluent designer is able to comfortably weave back and forth between divergence and convergence, and know when piece or project is finished, and when the final choices will be judged as successful.
Brainstorming is a great example of how creative thinking is used. We ask ourselves What If…? How about…? Could we try this or that idea…? The primary exercise here is to think of all the possibilities, then whittle these down to a small set of solutions.
Many people begin to explore design as a hobby, avocation, business or career. This requires, not only strong creativity skills, but also persistence and perseverance. A lot of the success in this pursuit comes down to an ability to make and follow through on many artistic and design decisions within a particular context or situation. Developing this ability — a fluency, flexibility and originality in design — means that the designer has to become empowered to answer these 5 essential questions: (1) whether creating something is a craft, an art or design, (2) how they think creatively, (3) how they leverage the strengths of various materials and techniques, and minimize weaknesses, (4) how the choices they make in any one design evoke emotions and resonate, and (5) how they know their piece is finished and successful.
Design is more than the application of a set of techniques. It is a mind-set. This fluency and empowerment enable the designer to think and speak like a designer. With fluency comes empowerment, confidence and success.
Maital, Shlomo. “How IBM’s Executive School Fostered Creativity,” Global Crisis Blog, April 7, 2014. Summarizes Louis R. Mobley’s writings on creativity, 1956.
March, Anna Craft. Creativity in Education. Report prepared for the Qualifications and Curriculum Authority, March, 2001.
Seltzer, Kimberly and Tom Bentley. The Creative Age: Knowledge and Skills for the New Economy. Demos, 1999.
Torrance, E. P. The Torrance Tests of Creative Thinking-Norms-Technical Manual Research Edition-Verbal Tests, Forms A and B-Figural Tests, Forms A and B. Princeton, NJ: Personnel Press, 1966.
Torrance, E. P. The Torrance Tests of Creative Thinking-Norms-Technical Manual Research Edition- Verbal Tests, Forms A and B- Figural Tests, Forms A and B. Princeton, NJ: Personnel Press, 1974.
Turak, August. “Can Creativity Be Taught,” Forbes, May 22, 2011.
For years, I fretted. I worried, and fretted, and paced up and down, and down and up. I rubbed my hands in the way that worried people rub their hands. I shouldn’t go. I would not go.
To my niece’s wedding.
My only niece.
Of my only sister.
My niece who I had hoped and prayed and prayed some more that she would never get married. Why couldn’t she just live with the guy? Why marry? Marriage is an encumbrance. It’s an outdated, middle ages kind of thing that denigrates women under the guise of “protecting them”. They sign a contract giving themselves over to the man, vowing to obey. Respect. Follow. Bear babies. Cook. Clean. Even earn a living, if he can’t.
Yet the man keeps the power. His voice to God. Her voice through his to God.
Marriage. Not for me.
And I didn’t want to go.
Too afraid I’d say something or do something to upset people.
Because they would be there.
Those cousins.
And their children.
And their children’s children.
Too many of them, and only one of me.
But my cousins had rejected me because I was gay.
And that hurt.
And then that rejection became an idea of rejection and a symbol of rejection, and I thought how often in life, from when I was very young, to when I was much, much older, — how often in life had I been rejected for some label or category or reason having nothing to do with me. Rejected as a Jew. Rejected as gay. Rejected by friends. Rejected by strangers. Rejected by family.
So toxic.
Didn’t want to deal with this.
Preferred avoidance.
Thought over and over again what excuses I could give my sister.
I thought about this when my niece was 13.
I thought about this when she was 18.
Then 20, and 23, and 24 and finally 28, when I had to make a choice.
My sister and her family were very close to these cousins, closer to them in most ways than to me. Years ago, my sister used to invite me for Thanksgiving and for Passover. And she invited all these cousins, as well. She liked to give a party.
Partying with these cousins was too toxic for me, so I made excuses. Too busy at work. Things too slow in business so couldn’t afford it. Had other things scheduled.
For me to feel comfortable, my sister’s choice would have to have been “ME”, not “THEM”. I felt bad. I felt guilty. I didn’t want to put my sister in this situation. It was easier to come up with an excuse.
But year after year, the situation took its toll. Rejection — a symbol, but painful nonetheless. Not because of the act itself, but the symbolic power of the act to affect me — Rejection — put a wedge between my sister and myself. I did not have the self-confidence, and I didn’t value myself enough, to prevent caving in before this symbolically powerful act of rejection because I was gay.
And I didn’t have to deal with this as long as I stayed hundreds of miles away from New Jersey and Maryland and Virginia and Florida. Tucked safely in middle Tennessee.
The wedding was in March.
The previous summer, I decided I would go. Not exactly sure what changed my mind, perhaps a feeling of familial obligation, perhaps putting my sense of self to the test, perhaps wanting to try out all that good food and cake and drink specially prepared for the occasion. My sister plans the best parties.
I offered to make bracelets for all the bridesmaids.
I wasn’t just being a good guy here. Jewelry and design are at the core of my identity. The jewelry I design is the result of my choices. Choices about colors. Choices about the placement of lines, shapes and forms. Choices about the clasp and how to attach it. Choices about materials and techniques.
My inner being. On display. Irrefutable.
My choices have little to nothing to do with the label “JEW”.
Nor do my choices have much to do with the label “GAY”.
They are about me. A Designer.
Reflected in my jewelry.
And would be on display.
Accept or reject my jewelry.
And you accept or reject me.
On my terms.
My own terms.
Me.
My essence.
My resonance.
My jewelry.
This was my chance to shine. I was going to create a special bead woven design for these bracelets. Something frilly and girly for a wedding, but something also indicative of my style. Something that would not take too much work, but would look very rich and substantial.
I designed what I thought would be the perfect bracelet. A mix of stitches. Great looking beads. Had movement and dimension. But I was struggling to find the perfect color palette. The bracelet was made up of 4 colors, and a 4-color color scheme is one of the most difficult to work with — especially when it comes to beads, which are not available in all colors, let alone 4 colors which could specifically work in a specific color scheme in this specific bracelet.
While I was struggling to pick colors, Dara, my niece, had been doing a little online research, as well. She found two bead-strung bracelets on Etsy that she particularly liked, and shared these with me.
No, No, No!!!
My first reaction was Horror! Oh No!, she wants something bead strung and so non-artisan looking. Making these up would not signify to my terrible cousins nor to my good cousins, who I was all about. As Jayden, my partner, said, buy all the parts and do it quick. You’re not close to your niece, so who cares. But to me, although the work involved would be minimal — it would not be enough of a gift for the wedding.
Don’t get me wrong. These two bracelets were very attractive. They were just so out of sync with everything I wanted to do, and everything I wanted to accomplish. And I had to ask myself: give Dara what she wants, or go off in a different direction?
The question was kind of rhetorical. Of course, I’d give Dara what she wanted. But what to do. How can I construe, mold, fashion, arrange the bracelet to be reflective of me? Jewelry designer Me. Bead artist Me. Worthy cousin to be awed and ooh’ed over Me.
The bracelet Dara wanted was 3 strands of 6mm round fire polish beads in two coordinating colors which matched the color of her bridesmaid dresses. The beads were staggered in a V-shape like bowling pins, each section separated by a diagonally placed 3-hole spacer bar.
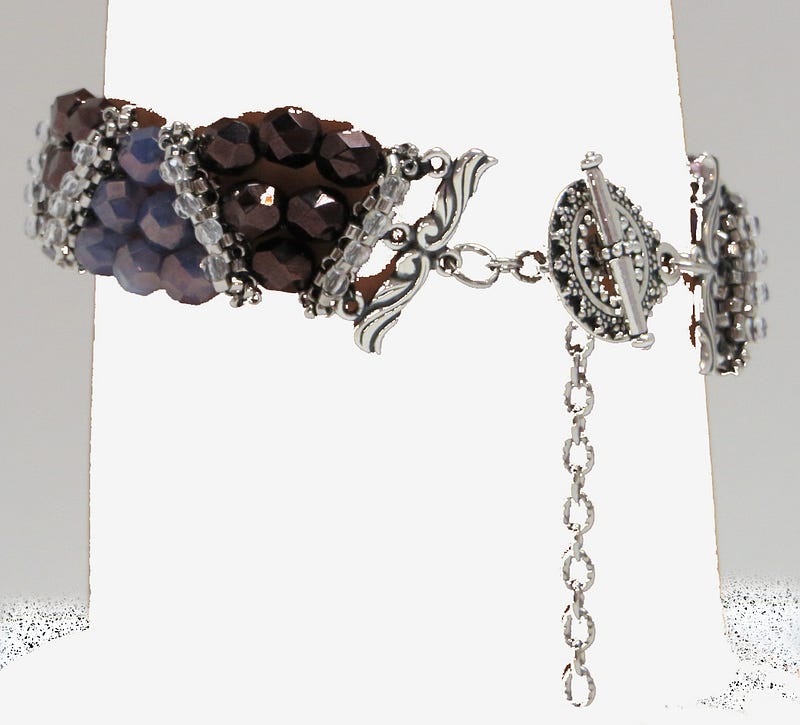
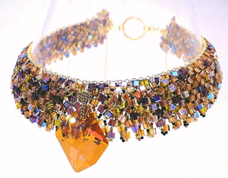
Bead woven spacer bar, with right angle weave sides and flat peyote top and bottom, top embellished with Austrian crystal beads
I thought long and hard about how I could make this general design my own. A few weeks passed. And an idea came to me. I could bead weave the spacer bars. I could alternate right angle weave and flat peyote to create a stable, rectangular shape. The right angle weave sections would be the two sides, which would allow me to build in the “holes”. The flat peyote would be the top and the bottom, which would allow me to build in a shape-supporting structure. I would embellish the tops of the bars with 2mm round Austrian crystal beads, and I would create bead woven end caps on either side of the bar, to give the bars a finished and polished look. Then I would use needle and thread to string everything up.
That was my answer.
It was a good one.
So, first, I set about coming up with the bead woven pattern for my spacer bars. This did not take very long because I had a clear idea about what I wanted in my head. What was not in my head, however, was how long to make the bars and how many holes each should have. And would they work in the whole composition.
I ended up making 5 test bracelets, each requiring 11 spacer bars, and each with some variety in the design or placement of the spacer bars, and in the attachment strategy for the clasp.
Now I had three key tasks finished: (1) The design of the spacer bars (2) The construction plan for the bracelet (3) The construction plan for attaching the clasp
Next, selecting the right colors of beads.
First off, I wanted to use 6mm round Austrian crystal beads, instead of Czech glass.
There were images of the bridesmaid dresses on line, but the actual color skirted that area between blue teal and green teal, and not every computer screen showed the color exactly. It became critical to the choice of colors, given some limited choices available in the Swarovski line in this range, whether the dress was more on the green side or more on the blue side.
My sister said Blue.
My niece said Green.
My sister was supposed to send me a fabric sample, but she lost it.
I mocked up 3 bracelets, one all blue teal, one a mix of blue and green teal, and one more green teal.
My sister picked the green.
My niece picked the mix of blue and green.
And my gut, from looking at the computer images, was telling me it should be all blue.
Impasse.
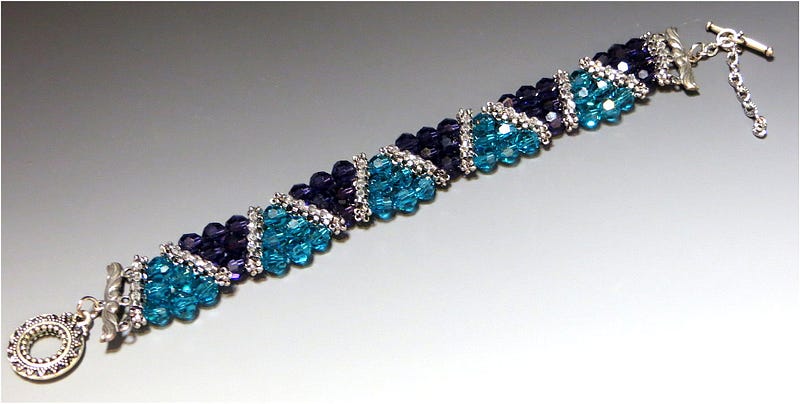
I went with my gut, and settled on all blue, actually a mix of capri blue and Caribbean opal.
Dara’s Bracelet w/Austrian crystal beads
There were four bridesmaids. I asked my niece to get their wrist measurements. One the bridesmaids had a very, very thin wrist. Would my design work for her? I agonized over it. The sections were very rigidly organized, and I’d have to remove a whole section at a time. Luckily, this worked OK.
The only other hitch that came up had to do with the availability of the parts.
In another color palette using Czech glass
I designed the piece in September. The wedding was in March. In November, I tried to acquire enough clasps and end bars for the clasp assembly, and found out that both the clasp and end bar I had chosen were either out of stock until the following April, or no longer manufactured.
So began the desperate hunt for these parts. The end bars had to be 22mm wide, or very close to that, with 3 holes and 3 holes spaced out evenly across the bar. Most 3-hole end bars were around 15mm wide. Found some in Israel, which while no longer manufactured, the supplier had just the amount I needed left in stock. Easily found a substitute clasp.
Then there were the beads. Again, I’m in November. The capri beads were out of stock from my supplier, and 2 of my alternative suppliers, but due back by December. The Caribbean opal beads were out of stock, and not due back anytime soon. I found a supplier who charged a little bit more for these, but got enough for my needs.
Whew!
It was a few weeks before the wedding, and I was wondering if my choice to attend was the right one. Over and over and over again, I played out in my head what I would or would not say to my very prejudiced relatives. One part of me wanted me to be pleasant but distant. Another part of me wanted me to say something pointed and ugly.
I asked each of my friends, what they would do. I wanted so badly to be pointed and ugly. I was leaning in that direction. Of course, I didn’t want to upset my sister or my niece.
I thought back on the event that started it all. It was really so insignificant. An expected invitation never came. But I hadn’t planned on going. I expected to receive an invitation, however. Because everyone expected me to receive an invitation. We all had been planning vacations and things to do around this invitation. For well over a year at that point. We had been planning. All of us. When we were going to arrive, where we were going to stay, and what we were going to do. And while I didn’t plan on going, I expected the invitation.
I’m a firm believer that every few years, we each go through a life crisis. When we are babies, we have to resolve a crisis of finding out who to trust, and who not to. A few life crises later, we’re in puberty, having to resolve whether we’re still a kid, or some kind of adult. Several life crises after puberty, we go through a mother of all life crisis — what we call Mid-Life Crisis. This crisis is filled with anger, frustration, regret, disappointment, fear.
Eventually we come to terms with mid-life. That’s what I did. And then I had a sudden, almost primal, no, yes it was primal, urge to reconnect with my family. I had grown apart from my sister and father and brother. From my first cousins in Florida and those in New Jersey, New York and Maryland. And from their children, my new second cousins. And I was feeling the need to re-connect. Post mid-life I felt the need to re-connect.
And I did.
I slowly began to let everyone know I was gay. They kinda knew and suspected already. But I made it official. Pretty much everyone except my sister was supportive at some level. Eventually she got used to it.
I was invited to my cousin Michele’s oldest son’s wedding. And then, over the next few years, to some other weddings and bar and bat mitzvahs and special occasions. I re-connected. I was happy. Soon there were the occasional phone calls and emails. A few of my cousins sent out the periodic mass emails, and I was on their lists. I kept up with their newsy news and not-so-newsy news, their shared successes, their joys in life, and the every-so-often sadnesses. I felt included. Supported.
It was important to everyone, and you could tell, because they spent so much time doing it, to anticipate the next event we’d all attend. The next event was the marriage of my cousin Michele’s middle son.
It was to be a June wedding. I got a phone call sometime in April from my sister. “Did you get your invitation yet?” And a day later, from my cousin Leslie. “Did you get your invitation yet?” And obviously the answer was, No! Not yet. I kept checking the mail for several days, and then it began to dawn on me that I wasn’t invited. I wasn’t going to be invited. And if not getting invited to an event that I wasn’t planning on going to wasn’t enough of a jolt and shock, both my cousins Michele and Paulette dropped me from their almost daily mass email lists.
I was person non-grata. Why?
I asked myself, Why?
And I asked some cousins, Why?
And it became known that the Why was because I was gay.
And that was that.
Excluded again.
Of course, I wanted my sister to make the choice not to go.
She went.
And that put a wedge in our relationship that never really healed, because it was irreconcilable.
And I got very depressed for a few months afterwards.
And this what otherwise would have been a little incidental event, over the years, took on more and more negative meanings for me. I think of the event, and I also think of all times I struggled for acceptance and inclusion as a Jew. I think of my sister, and I also think of all the times I struggled for acceptance and inclusion as a Jew. I think of how my parents, in the face of all the times I struggled for acceptance and inclusion as a Jew and was physically or emotionally punished by the powers that be for trying to step outside this imposed boundary referred to as “Jew”, looking the other way. Pretending there were no issues. Telling me over and over again that I lived in a Christian world and had to accept that fact. Accept lower grades just because I was Jewish. Accept exclusion from student activities just because I was Jewish. Accept the fact that I couldn’t play with my friends who went to the local country club, accept the fact that I had difficulty getting dates with Christian girls, except when they wanted me to show up on their doorsteps and shove this “Jewish thing, monstrosity” into their parents face, even accept the fact that barely a day went by without someone accusing me of killing Christ.
And you can see where all this goes. Getting rejected as gay brought up deeper feelings of getting rejected as a Jew.
So I wasn’t invited to a wedding. So my relationship with my sister and her family never became close — at least for a long while. So I no longer kept up with my cousins and second cousins and all their offspring. So I had some issues with my parents and my school and the dominant Christian culture. That’s largely behind me. Not an obsession. But the oncoming wedding of my sister’s daughter forced me to focus on these things again.
Thank God the wedding only lasted a weekend.
True to form, my sister threw a grand event people are probably still talking about.
In the few months leading up to the wedding, I concentrated on designing the bridesmaids bracelets. As I determined how I would make the pieces my own, I got very excited. I developed a very clever and professional way to bead weave the 3-hole separator bars. I combined Right Angle Weave and Flat Peyote, using the structural and inherent properties of each in a strategic way. This allowed be to create holes in the sides through when to thread the strands, and structural support to allow the bars to keep their shape.
I kept thinking that, while the bridesmaids would find the bracelets appealing and desirable, they would never appreciate the amount of thought, work and insight involved in their construction. So, I decided I would later turn this piece into a kit and a workshop. This piece was a great example of my evolving ideas and writings about the architectural bases of bead weaving stitches.
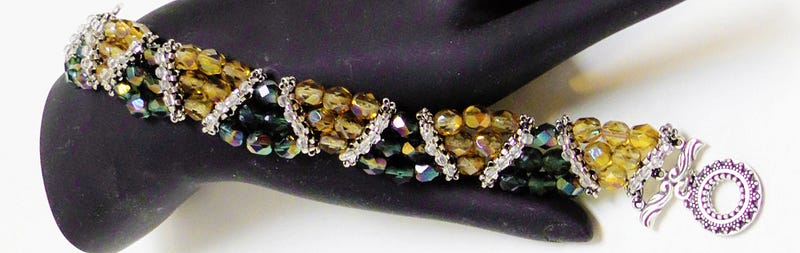
Dara’s bracelet in Czech glass
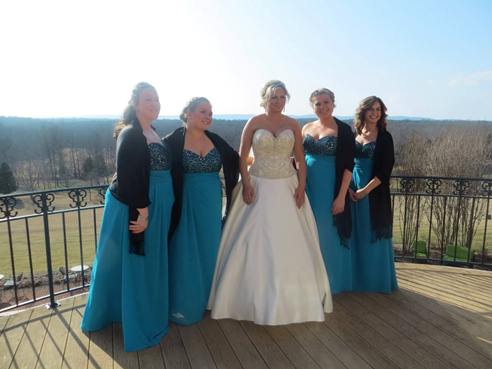
The wedding itself was beautiful, and went off without a hitch. The food was terrific. The location romantic. The flowers and bridal gown beautiful. There were over 200 guests. And about 60 of those I was trying to avoid.
I arrived a day earlier. One of my cousins, whom I do speak with occasionally, arrived at the airport at the same time. After we checked in at our hotel, we went to lunch and unloaded about all the relatives. She and I have similar opinions about these people.
In the late afternoon, I stopped by the Bridal Suite, where they had set up to greet guests arriving early and staying at the hotel. You walked into the equivalent of a living room. Off to the left were a bedroom, kitchenette and bathroom. Off to the right were a dining room and an outdoor patio. It was in the 30’s and wet and snowy, so no one went out there.
As more and more people gathered in the Suite, I found myself talking to some folks in the dining room. And then, one by one, two by two, three by three, these cousins I wanted to avoid started filling up the center room. And I found myself backing up against the far dining room wall, seemingly pushing myself into the wall and through it, or so it felt to me. My mind left the room and merged into the wall. I desperately looked for an opening where I could run through the living room and out the door. But more and more people came flooding in. I was having trouble catching my breath, slowly going into panic.
At last, an opening. I escaped. Hyperventilating. I went up to my room, and waited until I regained some composure. My panic attack had run its course.
Twenty minutes later, I returned to the Bridal Suite, bridesmaids bracelets in hand. I had put each into its own jewelry box, with the name of the bridesmaid written on a card in each box. They were going to take the bridal pictures in the morning, and I wanted to be sure they were wearing their bracelets. And I secretly wanted a lot of these people crowding this Bridal Suite to get a glimpse of what I had made.
As I had thought, they loved the bracelets — they were beautiful — but were clueless about design. That “full” feedback is so very important to me, but often missing.
Luckily the colors of the bracelet perfectly matched the dresses.
But First, If You Have Not Already Done So, Make These Particular Choices Right Now
Pick a date. It might be easiest, from an accounting standpoint, to pick January 1st. But you can pick any date. This is the date your business has been founded, and your business obligations (discussed below) begin.
Define your fiscal year.It would be easiest to make your fiscal year January 1 through December 31. But any 12-month bounded period which works best for you would be acceptable.
Set your goals for success. Everyone’s goals will be different. You might want to sell a few things occasionally. You might want some steady extra income. You might want to be financially self-sufficient.
Determine what business organizational type you want now, and how you might want to evolve into the future. These range from hobbyist to sole proprietor to partnership to various types of corporate arrangements.
The purpose of this article is to provide the how-to knowledge you will need to know to get started in your design business, whether making jewelry or other crafts, or working on projects involving design. While the specific names of some licenses and registrations will vary by locality, there will be comparable things where you live.
NOTE: The information in this section is a guide. It is not a substitute for sitting down with an accountant, lawyer or business consultant.
Specifically, I want to demystify and review with you these things:
1) Getting federal, state, local licenses and registrations
2) How to protect your intellectual property 3) What form of business? Sole proprietor, partner, corporation, limited liability corporation.
1) Registrations and Licenses
You register and get licenses for your business for several reasons. First, you will be setting up accounts with various government agencies. This allows you to collect money for them, and then transmit that money to them on a regular basis. This might be sales taxes, payroll taxes, property taxes, income taxes, business census information, and on and on.
The account numbers associated with each registration or license, in turn, allow you to present yourself as a business. They make you look more official and give you more legitimacy. They open doors for you to get deep wholesale and manufacturer discounts.
But, after you register or receive a license, each is associated with some application fees, some have annual renewal fees, some have income or property tax levies, most require periodic paperwork and more involved accounting and bookkeeping.
So, to get the benefits of lower business costs to you, you will incur some additional monetary and time costs. You will have to decide at what point in time becoming an official business is right for you.
Let’s look at some of these things I have had to get doing business in Tennessee. Most of the application forms can be found totally or partially online.
STATE
a. Registration to Collect Sales Taxes (called a “tax number”, “wholesale number”, or “resale number”)
This registration sets up an account so that you can collect sales taxes on each of your in-state taxable sales, and then transmit these sales taxes to the state. You only have to register once. There is a small registration fee, but this is a one-time fee only.
The application will ask if you will be doing more than $4500. (or some similar amount) of sales within the current year. If not, you do not need to register. However, even if you don’t think you will, this does not prohibit you from saying Yes. Saying Yes means you will start to incur costs (fees, taxes, paperwork), and have to be more organized as a business. But it also means you will be able to purchase inventory at wholesale prices.
After a few years, the state will review your activity. If less than $4500/year (or that similar amount required by your state), they will de-activate your number. You can simply and easily ask them to re-activate it.
Handled in Tennessee by the state Department of Revenue.
b. Business registration number (you might end up with separate business registration numbers for the city, county and state you do business in, or there might be a single number used by all three).
This number allows you to pay business income taxes (to your city, county and state), usually once a year. In Tennessee, this is collected each April 15th. Tennessee also collects a registration renewal fee each year.
In Tennessee, handled by the state Department of Revenue.
c. State Employment Account Number. (It might be called a State Unemployment Account Number in other locales).
If you have employees, and thus collect payroll taxes, you need this number to submit these taxes to the state. Typically, you pay these quarterly. You only have to register once for this.
In Tennessee, handled by the state Department of Labor and Workforce Development.
LOCAL CITY AND COUNTY
a.Business License from the county you live in (from County Clerk)
You use this number to submit business county income and property taxes. You renew this annually.
b. Business License from the city you live in (from City Clerk)
You use this number to submit business city income and property taxes. You renew this annually.
NOTE: If you register for a State Re-Sale Number, the State will eventually inform your local county and city. Your county and city will check if you have registered your business with them. If not, they will find you. This works in reverse, as well. If you register with the city and county, they will inform the State, and the State will eventually find you.
c. Business Property Taxes (sometimes called Use Taxes; in Tennessee, called Schedule B)
Each year you send the state and/or county and/or city a list of your business property assets. About 6–8 months later, you get an invoice due notice from the state/county/city indicating how much business property taxes you owe.
Your business property is: displays, tools, register, telephone, computer, fax, credit card machine, copier, furniture and the like; things that will be around longer than 1 year. Some states might consider major (meaning costly) software, such as accounting software, business property. Other states do not.
You do not have to list everything, but you have to list somethings. Many people who first get started think that if everything — tables, calculators, computers, phone, etc. — are old and used, or given to them by someone else, that their value is $0.00. It is not. Here you would estimate the value or depreciated value at the time you consider the first day of your business. You can check auction sites online, like Ebay, to gauge current values.
If you are leasing any equipment, you would list this separately.
Your business property is NOT: inventory, consumable supplies (such as paper, ink, staples, and the like), the parts you use to make your jewelry. It is not something assumed to be used up within a year.
In Tennessee, the state uses a different depreciation schedule than the Federal Government. Your property, from the State’s standpoint, never gets fully depreciated as on your Federal taxes. You cannot expense your property for state purposes, although you can for Federal purposes. This means you have to keep separate Assets Lists for the state and for the Federal government.
d. State Unemployment Insurance Form — if you have employees, you will be submitting state payroll taxes (SUTA) collected on their behalf to the state, usually quarterly.
FEDERAL GOVERNMENT
Federal Income Tax Forms (available from the US Internal Revenue Service online)
Each year, you summarize your revenues and costs on an income tax form (really a series of forms, beginning with a Form 1040). Depending on what form of business (discussed below) you are organized as, you will have different forms to fill out. Learn how to do most of this by yourself without having to pay an accountant or tax attorney. This will save you a lot of money. Use these professionals for the more difficult, confusing parts of the tax code requirements. Besides the Form 1040 Income Tax Return, you will be completing one or more of the forms below.
Most of these are handled by the US Internal Revenue Service. All the forms are available online. Some can be submitted electronically; others, you submit by mail.
a. 1040-ES You will need to submit estimated income taxes to the Internal Revenue Service (IRS) at least quarterly. You do this online, and easily done by yourself. When you do your annual taxes, you will reconcile these payments on your form 1040.
You will be paying these online through the IRS website.
b.Schedule C — You use this form if you are a sole proprietorship to report your revenues and expenses, as well as the total value of your inventory on the last day of the year. This is a form you should be able to fill out yourself.
The only tricky part is that in the expenses section, when it asks for the Costs of Inventory, it is asking only for the costs of the inventory that you have sold during the year. This is NOT all your inventory costs. The inventory bought but not sold during the year is treated as if it were cash. [In your inventory management procedures, you need to be able to accurately track the costs of your inventory that has sold within the current year, so you can deduct these costs from your revenue, thus reduce your tax burden if you are showing a profit.]
c. Schedule SE — self employment taxes. You have to pay both the employer and the employee payroll taxes (so double-paying on yourself as the sole proprietor), if you show a profit on your Schedule C. This can end up being a big number. This is a form you can complete by yourself.
d. Schedule K — If your form of business is a partnership, you will be completing a Schedule K to document your revenues, expenses and profit distributions. This can be a very confusing form, so it is a good idea to have an accountant complete this. On this form, it will indicate where various calculated subtotals or totals should go on the 1040 form, which is something you can do yourself.
e. Form 1120 — If your form of business is an S-corporation, you will be completing a Form 1120 to document your revenues, expenses, profit distributions and tax obligations. It is a good idea to have an accountant complete this.
f. Depreciation Form — This can be a confusing form The depreciation rules can change frequently. It is a good idea to have an accountant complete this form, at least the first time you have to fill it out. Then, perhaps, teach you how to fill this out in the future.
g. 941 Form — If you have employees, you will be submitting payroll taxes collected on their behalf to the Federal Government, usually monthly or quarterly, and reconciling all your payroll tax deposits quarterly.
You will be submitting these taxes online, and will need to set up an account through the IRS to do so.
h. 940 Form — If you have employees, you will be submitting federal unemployment taxes (FUTA), at least annually, but quarterly if these exceed $100.00 in a quarter.
You will be submitting these taxes online, and will need to set up an account through the IRS to do so.
i. Federal EIN (or, FEIN) Number. You can apply for this online through the Internal Revenue Service. This Employer Identification number is a tax identificationnumber (sometimes referred to as your TIN number) similar to a Social Security Number (also a TIN), but attached to a business rather than an individual. You need this number if you have employees and are collecting payroll taxes on their behalf and have to submit these taxes to the federal government.
However, if you do not have employees, this number is still useful to have On various forms and applications you will be filling out for your business, you will be asked to put down either your FEIN number or your Social Security Number. The FEIN makes you look more of an official business. There are no fees or costs involved by having this number. However, the first year after you applied, you will have to complete a Form 940. On this form, you can indicate that you have no employees and will not need to complete this form again.
They will not deactivate your FEIN number, even after indicating you have no employees.
OTHER
a) At some point, you may want to purchase business insurance. If you are working out of your home, this may be problematic. The zoning laws in most places forbid businesses in areas zoned residential. Most business insurance packages will not cover a business if they are violating any law, in this case, zoning. Your homeowners insurance may or may not cover things related to your business.
b) If you have 5 or more employees (that’s the number of people, not the number of full time equivalents), you will need to purchase Workers Compensation Insurance. You do this through a private insurance company.
c) You will need a set up where you can process credit cards.
d) You will need a bank account. You can either set up a business account or use your personal account.
You will need checks preprinted with your business name on them. If you are using a personal account, get business-size checks printed up. If your business type is a sole proprietorship, whether the account is personal or business, your business name is your personal name. So you would have them print something like this, where DBA stands for Doing Business As:
Warren Feld DBA Warren Feld Jewelry
e) You will need an organized way (either in-house, or with an accountant or bookkeeper) to track your costs and revenues, and liabilities and assets.
f) You will need an organized way to store all your receipts during the year, and then all your receipts from prior years. You need to store all your receipts and ledgers for 10 years.
2) Protecting Your Intellectual Property
Trademarks and Service Marks
You will want to protect your business name, your slogan, your logo. A legal trademark or service mark expands the protections available to you. A trademark or service mark protects anything you use to identify your brand and differentiate it from other companies. These prevent other businesses from using any of these things, as long as you are actively using them yourself. If you stop actively using these, you lose your trademark or service mark rights to them.
Each State you do business in, as well as the US as a whole, offer opportunities to protect your trade or service mark. You can prevent someone else from using your business name, or product name, or logo, by registering this name or logo with the state(s), or US. You would put a TM next to the name you’ve trademarked, such as Be Dazzled BeadsTM
A US Trademark would protect you anywhere in the United States. The rules can be a little confusing. It is important to know ahead of time that you cannot trademark an adjective. For a US Trademark, I would suggest working with a trademark attorney. The trademark plus lawyer fees will be costly.
State trademarks protect you in the state you have the trademark in. This should include the state you do business in. It can include other states, as well. In Tennessee, this process is especially inexpensive and easy to do. You would not need to consult a lawyer here. For most designers, a state trademark coupled with some smart marketing and branding would be more than sufficient.
In Tennessee, trademarks and service marks are handled by the Tennessee Secretary of State. For the United States, these are handled by the US Patent and Trademark Office.
Copyrights
Copyright is another form of legal protection. You can copyright advertising copy, brochures, other marketing materials, instructions, jewelry designs, project designs, articles and other written materials critical to your business.
Copyrights can be done two ways. 1) Through the US Library of Congress 2) Using a Post Office strategy
At this point, your document is considered copyrighted. The issue for you is if someone violated that copyright and you went to court to contest this, this would not be sufficient evidence for the courts.
Library of Congress: You can get an official certificate of copyright by submitting an application to the US Library of Congress. Your copyright starts the date the application is submitted. There is a minimal fee. It usually takes about one year before you actually receive the certificate. Courts usually require this certificate as evidence.
US Post Office: You can put your material in a self-addressed, stamped envelope and mail this Registered/Certified to yourself. On the outside of the envelope, write what is inside. When you receive it, however, DO NOT OPEN IT. The post mark date will be evidence of copyright. This will usually hold up in court.
NOTE: It is difficult to copyright a specific jewelry or project design. While there is no legal rule about what constitutes a copyright violation of the design, it is generally accepted that merely a 10% difference would not be a violation. That 10% difference might be a different clasp, a slightly different pattern, or a different color scheme (though the courts allow you some flexibility with color issues).
NOTE: It is expensive to contest a copyright violation in court. This might run $3,000 per incident.
The US Copyright Office will often reject jewelry and other creative project designs for lacking authorship because they consist of common or usual shapes and forms. When submitting your application, you should present a well-reasoned argument, based on basic principles of art and design composition, form and function, as to why your jewelry and patterns should be copyrighted.
You can also copyright a “collection of jewelry”, but you can’t add new designs to the collection, without getting new copyrights. In the collection, the pieces would need to share design elements and sensibilities, and these would need to be obvious.
Copyrights last for the life of the designer plus 70 years. Use form VA (Visual Arts). It usually takes about a year for the paperwork to go through, but your piece is considered copyrighted from the date you submitted your application.
3) What Form of Business?
Your form of business determines what tax forms you fill out each year. You can set y our business up as an unofficial or an official one.
One way you can set up your business is as an unofficial hobbyist. Here you do not need to register your business or getting any local, county, state, and federal licenses and accounts. Typically, your state or province that you do business in will have some kind of benchmark. In Tennessee (circa 2020), if you were going to make less than $4500. per year in sales, you would not have to register your business. You could make sales and not worry about collecting sales tax. You would not pay a business income tax to the city, county and state. You would not pay business property taxes. You would still, however, have to report your income to the government entities which collect personal income taxes. Virtually no paperwork. No worries.
Another way you can set up your business is as an official business entity. As you make your sales, you would also be accumulating money, such as sales taxes, which you would have to transmit on a regular basis to one government agency of another. You will begin to incur some monetary costs (business income and property taxes, and some bookkeeping / accounting costs, for example). You will begin to incur some time costs (securing and maintaining licenses and registrations; monthly, quarterly and annual reports to fill out; more time spent bookkeeping and accounting). However, a BIG ADVANTAGE!!! Is that you will be positioned to buy your inventory (and displays and furnishings) at steeper discounts, thus, make more money.
If you plan on becoming more than a hobbyist, you will need to organize and register your business as to its tax structure. Again, your options are:
(a) sole proprietorship
(b) partnership
c) limited liability corporation
(d) incorporation
Sole Proprietorship: Here you are the owner of the business and solely in charge.
If you are a sole proprietorship, your business name is your own name, and the name you use for your business is your DBA (Doing Business As) name. On various tax forms and registrations, you would list your own name where it asks for the business name, and there usually is a DBA line under this to type in your actual business name.
Sole Proprietorship Advantages: You will have less accounting and associated costs to contend with. Completing your state and federal tax forms will be easier. The business profits are your income, and are taxed as an individual.
Sole Proprietorship Disadvantage:This form of business does not protect you from liability damages. However, you can use your business insurance policy to provide a lot of protection here.
Partnerships: Here 2 or more people get together and form a business together. Partnerships, like marriages, are fraught with the potential for disharmony. Who makes what decisions? How are disagreements adjudicated? What happens to the relationship over time, particularly if the interests of any one partner begin to change?
If you are a partnership, your business name is your actual business name, and you would use your Federal EIN Number as your TIN.
Things partners should think about:
a) You have a deep, honest series of discussions about each of your strengths and weaknesses, and what you can bring to the business
b) You write up a partnership agreement which — details who will do what when — how you will distribute profits — how you will cover losses — how decisions for the business are to be made, especially when there are disagreements — rules for what happens when a partner wants to leave the business, or if all the partners want to dissolve the business — rules for how to handle growth, expansion, taking on new partners, managing employees
c) You notarize the agreement, and everyone gets a copy
Partnership Advantages:Two heads are better than one, usually. Share a lot of the administrative burdens. More accounting requirements and costs, but not as much as incorporation. Your business profits are your income as this profit is allocated among the partners, and taxed as an individual.
Partnership Disadvantages: This form of business does not protect you from liability damages. However, you can use your business insurance policy to provide a lot of protection here. It is difficult to share the responsibilities as partners.
From my experience, while one partner might be the “creative” one, and the other partner might be the “business one”, partnerships work best when both partners learn and take on both creative and administrative tasks.
Incorporation: Incorporating a business is essentially creating a separate entity (as if it were a person), thereby making the business separate from the owner (in a sense, the business has a life of its own). As a separate entity, the corporation exists independent from the shareholders/owners and its employees.
If you are a corporation, your business name is your actual business name, and you would use your Federal EIN Number as your TIN.
Incorporating Advantages: The advantages of incorporating a small business include: Personal asset protection. Both corporations and LLCs (limited liability corporations) allow owners to separate and protect their personal assets. In a properly structured and managed corporation or LLC, owners should have limited liability for business debts and obligations.
Incorporating Disadvantages: The administration costs are more expensive with a corporation than with a partnership or a sole proprietorship. Administration costs include incorporation costs, annual financial statements and annual corporate income tax return. If you are not an accountant, paying someone to do these can be very costly. Losses in an incorporated business can’t be personally claimed. The corporation is taxed first, and if it distributes profits to its owners, they are taxed again on the same money for their personal income taxes — a double taxation.
Limited Liability Corporation: Small businesses can avoid this double-taxation by taking advantage of the options given to a corporation by the states. Some options include incorporating as an S-corporation or filing as a Limited Liability Company (LLC). These options allow the taxable income to flow directly to the shareholders/members without being taxed twice, while at the same time, maintaining the benefits of incorporation. You still end up with a lot of accounting requirements and expenses. You are protected from liability damages incurred by the business, but you can also use your business insurance to cover a lot of this liability protection without all the accounting issues.
If you are a LLC corporation, your business name is your actual business name, and you would use your Federal EIN Number as your TIN.
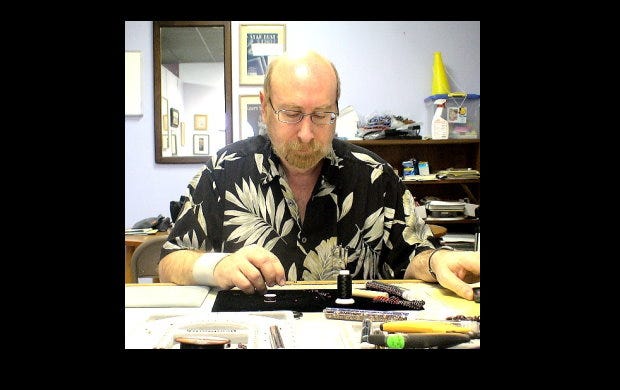
Designed Impacts was a management consulting firm I started in 1980. In the late 1990s and early 2000s, I worked with several large corporations on internet marketing. Today, I provide management and marketing assistance and training to jewelry designers under the Warren Feld Jewelry company name. Image Source, Feld, 2020
STRATEGIC MANAGEMENT: How Do You Start and Run A Business Selling Creative Products?
Between Commerce and Art
Many people learn design in order to sell what they make. Designers create websites. They create interiors and exteriors. They build things. They craft things. They make art. All in an effort to make some money.
In today’s world, designers who sell what they create must become savvy in both regular retail selling, that is, directly business-to-customer, as well as internet retail, or virtually business-to-customer. This might seem too complex. Too overwhelming. Too impossible. Too boring. There are a lot of tensions here between commerce and art, not least of which is having to introduce your creative products publicly and persuade people to buy them. Creative thinking is not the same as business thinking. This makes many creatives uncomfortable.
Let Business Concerns Influence Your Artistic Choices
OK, you want to sell your work. But there is always this nagging question: To what extent do (and should) business concerns influence the artistic choices you make?
If you want to be in business, then I’d say, “A Lot!” But this isn’t what a lot of artists like to hear. Design is not the same as painting a painting or sculpting a sculpture. With paintings or sculptures, the artist does not need to communicate interactively with the viewer in order to create the product and that product be deemed successful. Design, instead, is more of an interactive art. It is like architecture, where success can only be created through some kind of meaningful interaction with others, and only be defined as successful as the product is introduced publicly.
Selling your pieces is merely another phase of this interactive art, but, as a business, selling creative products sometimes forces upon you some more limits and refinements. You have to market to audiences. You may have to make trade-offs between visual appeal and functionality. You may have to standardize things to be able to make the same thing over and over again. You may have to work in a production mode and repeat making certain designs, rather than freely creating and designing anew each time. You have to price things so that they will sell, and you have to price things so that you can make a sufficient profit. You shouldn’t undersell yourself, like offering discounts to family, friends and co-workers, lest you run out of money.
You have to conform to prevalent styles and colors and forms. You have to make things that will photograph well. You have to make things that clients want and are willing to buy. You may end up with a lot of “one size fits all,” because producing too much variety in sizes, shapes, colors and sizes could overwhelm you financially.
You find that if you want to make your designs into a successful business, you may have to compromise with yourself, your artistic drives and sensibilities. You may have to limit what you offer. In order to make that sale. In order to make a profit. And stay in business.
A Good Business Selling Creative Products involves: — Putting your artwork on a sound cost/revenue footing — Developing market-driven (what they want) strategies as opposed to product-driven ones (what you want) — Pricing your work for sale — Implementing various selling strategies — Compromising artistic and design choices, in the interest of the business
Why Designers Fail In Business: Some Key Reasons
Over and over again, I have seen one designer after another fail as a business. Usually the reasons why keep repeating themselves with each designer.
1. A reluctance to learn how to conduct oneself as a business
2. Gets bored
3. A fear of marketing your own things
4. Trying to please all audiences
5. Doesn’t do homework on the competition
1. A reluctance to learn how to conduct oneself as a business.
Many designers get so excited after making their first sale, that they think they don’t have to get too involved with business principles. They misunderstand their “business” as a “project-by-project” endeavor. Make something, sell it. Doesn’t matter what the price. Doesn’t matter to whom. Doesn’t matter if making the work in the first place is in line with the resources you currently have, or will drive you in debt in order to get those resources. All that matters is the count — the number of pieces or designs you have sold.
Designers need to focus, not with the count, but on what’s called Velocity, instead. You need to have in place sufficient strategies for keeping your money turning over at a constant rate. You make something. You sell it. You reallocate the money you just made to reinvesting in more inventory, replacing the inventory you sold, evaluating the pros and cons of the sale that just happened, adjusting accordingly, and strategizing how to keep this velocity going at a constant, or ever-increasing, velocity or rate. If you can’t maintain this rate, you go in the hole.
And artists need to keep good records, and implement good accounting principles so they can monitor and evaluate the data about velocity.
2. Gets Bored.
People who get started are very excited. They’ve made a lot of pretty pieces or designs, and someone has bought some of them. But then you need to leave your creative mode, and enter a production mode. You need to discipline yourself to make the same things over and over again, particularly in the first 2 or 3 years of your business. Many designers quickly lose interest.
3. A fear of marketing your own things
You won’t succeed without marketing. Marketing is more than advertising. It includes all forms of self-promotion. It includes doing research on your markets and market niches. It incluces how to reach your potential clients in these markets, how to get their attention, how to get them to translate this attention into needs and wants and desires, and how to get them to part with some money.
Many artists are shy about self-promotion. Time to train yourself, if this is you, to get over it.
4. Trying to please all audiences
When people get started, they are reluctant to use the “No” word. They want to please everyone. But when you get started, you can’t. It will put you out of business.
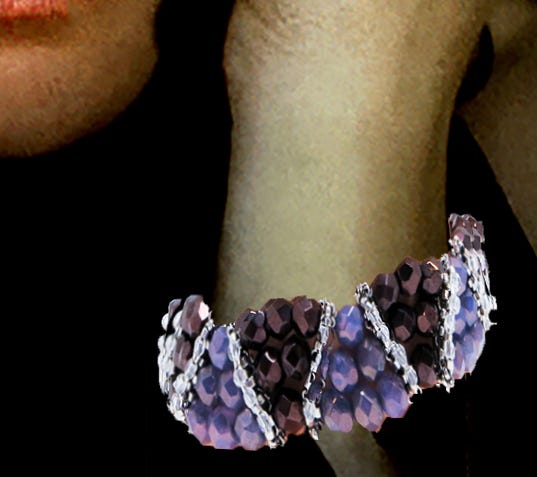
Let’s say you are a jewelry designer, and have some jewelry for sale that is predominantly purple. Someone at work loves the jewelry, but asks if you can make it in red. If you don’t have an inventory of red beads, and will have to go out and buy them, it may make this sale foolish, from a business standpoint. You can’t buy just one bead at a time; you need to buy strands or packages of these beads — many more parts than you would need to make one piece of jewelry for this customer.
When you start in business, you need to pursue a strategy of depth, rather than breadth. As a digital designer, you want to invest in a limited number of software applications, equipment, and related resources, and narrow your focus on the types of projects you undertake. As a jewelry or crafts designer, you want to buy a limited number of pieces, colors, sizes and shapes of materials in large enough quantities to get adequate price breaks. So, initially, your designs will be limited, as well. If someone asks you to develop a project or design that is outside your budgeted resources, you need to be able to say No!. No! to your family. No! to your friends. No! to the people you work with.
Source, Feld, 2013
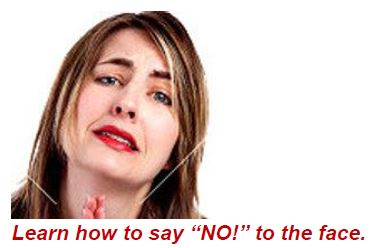
In my experience, such as the situation for the jewelry designer with red vs purple beads above, when you say No!, the potential customer tends to make a face. Pitiful. Angry. Frustrated. Sad. Pleading. If you can wait 60 seconds, in almost every case, the customer stops making this face, and says, in our jewelry example, for instance, “OK, I’ll take what you have in purple.”
60-seconds. That’s how long you have to wait without responding. Only 60-seconds before that person gives up and stops making the Face. It always amazes me, but so many jewelry and other designers can’t wait those 60 seconds. They cave.
And don’t give these people discounts. They’re already getting it cheaper, than if they bought the same design in a store, or purchased the design services from a large corporation. One major way your business will get built up is word-of-mouth. You don’t want some of that information to include extremely low price expectations. If you are stuck giving low prices, you will never be self-supporting in your business.
5. Doesn’t do homework on the competition
You need to understand how other designers you compete with function as a business.
How do they define their markets? How do they price things? What kinds of inventory, software and equipment do they own? What kinds do they NOT own? Where do they advertise? How do they promote themselves? How do they staff up, contract out, or learn the necessary skills to get the jobs done within the set time-frame? How do they define their competitive advantage — that is, all the reasons people should buy from them, rather than from anyone else, like you? Where do they sell things? What seems to work better for them? How do they figure out the best place — real or virtual — to link their product and product message to the customers most likely to need, want and buy their designs?
You can find a lot of this out by Googling. You can look for designers in your field and occupation. Directories of designers. You can plug in a designer’s website, and see where they are listed, and who lists them. You can look at their work. Often, you can discover many of their clients. You can look at reviews.
Can I Make Money?
Some designers are only interested in selling the occasional piece or project. Others want to create a steady flow of some extra income. Still others want to be financially self-sufficient as a designer.
Whatever your personal goal and commitment, can you make money? The answer is YES… That is, if you are smart about it.
Your friends and relatives might tell you that living as a creative designer “Is not practical,” or a warning “Don’t quit your day job.”
I won’t lie to you. It’s tough. It requires commitment and perseverance. It requires some introverted skills and some extroverted skills. It requires managing a process that includes some creative elements and some business and administrative ones. But you can do it.
First, Goals. Sit down and write down some do-able sets of goals for your business. Some sets of goals will be on the creative side; others on the business side.
One set of goals should answer the question: How are you going to manage the design process (from inspiration to aspiration to finished product to marketing and selling your products)?
Another set of these goals should answer the question: How are you going to maintain your cash flow throughout the whole year?
After you start implementing your goals, at some point you should be able to ask a friend: Did I achieve my goals or not?
Second, Time. Organize your time. You need to spend a certain amount of time with creative activity. Another block of time on business, administrative and marketing activities. And a certain amount of time for reflection and evaluation and self-care. You need to maintain balance between the personal and the professional, and between the creative and the administrative.
Third, Limits. Do not try to do too many different projects or work with too many different kinds of design elements and components at the same time — particularly in your first 3 years in business.
As your business grows, you’ll reach a point where you have enough cash flow — that Velocity of sales — that you can begin to broaden your efforts, meeting more of the needs of your current clients, and expanding the options for new clients.
Fourth, Realism. Do not go for roofs before setting foundations. Learn about materials and techniques in a developmental order. Things will make much more sense and be easier to accomplish as you advance your skills and endeavors.
Last, Supports. You can’t do everything by yourself. Find compatriots. Find a mentor. Share or coordinate some workloads. Be sure you structure in ways to be accountable and get feedback.
CHOOSING CLASPS AND CLASP ASSEMBLIES AND SUPPORT SYSTEMS
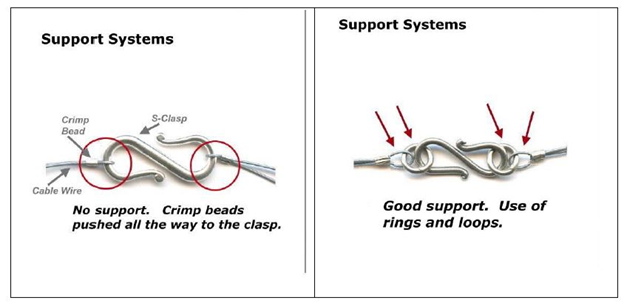
In Jewelry Design, when we speak of “choosing a clasp,” we are referring to something broader than the clasp itself. We are referring to what is called the “Clasp Assembly”. The “Clasp Assembly” is everything that has to come together in order to attach your beadwork to the clasp. The “CLASP ASSEMBLY” usually consists of several parts. Besides the Clasp itself, there are probably jump rings and connectors, crimp beads, clamps or other jewelry findings. If we had an S-clasp, the clasp assembly would also include 2 soldered rings (one on each side) plus, if using a cable wire, the loop created with the cable wire and crimp bead which attach and secure the wire around the soldered rings.
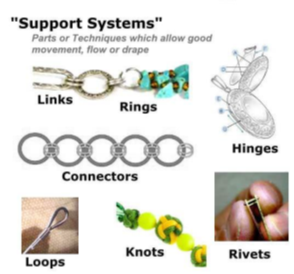
The “Clasp Assembly” is a more specific term for the more general jewelry-design terminology called a Support System. The Clasp Assembly is the most important support system in any piece of jewelry. In any one piece, there are usually 1 or more support systems. In a bracelet, you might only have the one support system — the clasp assembly. In a necklace you might have three or five. You want your clasp assembly to be able to adjust to your wearer’s movements somewhat independently of how your beadwork adjusts to this movement. Often, you want the clasp to stay in one place, while the beadwork moves to and fro, out and in, up and down, with the wearer’s movements. This only works if you build support systems into your piece. When you see someone whose necklace has turned around on her neck, this is an example of poor Design. This is not natural to necklaces. Usually the poor design has to do with insufficient support systems built into the necklace.
The most obvious support systems or joints are interconnected “rings” and “loops” and “knots.” Other support systems include “hinges” and “rivets” among other concepts. The support systems through a necklace or bracelet play several roles, and are similar to the joints in your body. They aid in movement. They prevent any one piece from being adversely affected by the forces this movement brings to the piece. They make the piece look and feel better, when worn. They keep segments within the piece from getting too stiff or too tight or too rigid. They help absorb excess force placed on your components because of movement, keeping them from cracking, splitting apart or breaking.
With needle and thread bead stringing, one of the more important support system is the knot you tie to secure your beadwork to the clasp. The knot absorbs excess force. It allows the bracelet or necklace to move easily on and with your body. Because of this support function that knots play, it usually is NOT a good idea to apply glue to the knots. This would cause the knots to stiffen up, create lots of tension on the thread, and cause it to break from force and movement. They would lose their support function.
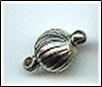
The best clasp is one that has no moving parts. These include toggles, buttons, slides, S-clasps, and hook & eye clasps.
One clasp element that we jewelry designers call a “moving part” is a tongue. If a metal piece is bent into a “V” or “Arch” shape, and is forced to move back and forth as it gets pushed in and pulled out of the basic clasp, we consider this a moving part. When you bend metal back and forth, it breaks. When metal is bent into a V or Arch, and is pushed/pulled, it will break. In any clasp, where you have a metal part that is bent back and forth in use, we call this a moving part.
The clasp should be proportional to the beads used in the piece. The full Clasp Assembly should be proportional to the piece as a whole. If half your bracelet is taken up by the Clasp Assembly, then there’s a problem here.
Don’t forget that you can also use clasps in a way where they can be worn on the front, not just behind the neck. They can be used to sit on the side or on the bottom. Clasps which are very decorative are used in this way.
All clasps work well in necklaces. In bracelets, however, care and consideration should be paid to how difficult or easy it is to secure and undo the clasp — especially if the wearer has to accomplish these steps by her or himself.
In better pieces, the clasp seems as if it is an organic and integral part of the rest of the piece. It does not feel as it were an add-on.
Types of clasps:
I never knew there were so many choices
So many little parts. So many little things. Are you supposed to know what to do with them all? Do you really need that many? I never learned how to use all these things. What are they for?
I thought, when I started, there was just one kind of clasp. Or maybe two. I didn’t even know how to use these things.
When I started stringing beads, I always used my favorite clasp at the time — the lobster claw. I put a lobster claw on everything, and any old lobster claw I could find, no matter what it was made of. The guy-proof special. The student-proof special. The special that always worked and that everyone knew how to operate.
The tricky part, though, was what to put on the other side. It needed a ring, but what kind of ring? If you used a jump ring, the split in it was often difficult to adjust so that there was no gap. Even if you adjusted it so there was no gap, after wearing your necklace a few times, suddenly there was a gap. The string pulled through. Or the lobster claw pulled through. The top of the lobster claw broke or bent out easily. You couldn’t always manipulate and operate the thing. That mechanical mechanism inside was designed for people with very small hands, long and narrow fingers and even longer finger nails.
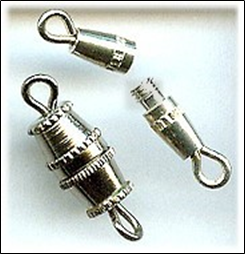
I never liked the barrel clasps — another very guy-proof special. The threads always stripped on me. Or they would unscrew themselves, as my body moved my necklace, and the necklace moved the clasp. Some had eye-lets, and these would always break — again from moving back and forth, and up and down, and back and forth and up and down. Metal breaks when you bend it back and forth. These broke.
At one point, I graduated to toggle clasps. These were and are considered the best clasps. They are considered the easiest to get on and off and the most secure. But I never really liked them personally because they were always out of proportion to my necklace and bracelet designs. Always too big. Always unsexy. And the less expensive ones broke. Virtually all toggles are cast, and cast pieces break when confronted with excess force. They crumble and break. Especially the cheaper ones.
Most people, however, buy either Toggle Clasps or Lobster Claws.
Over the years, I discovered that there are many types of clasps, and each had pros and cons in terms of usability and durability. My personal favorites are variations on the Hook & Eye Clasp. These don’t compete with my beadwork. You can always find something that coordinates with the beads. They pass the “Guy Test” — guys can figure out how to open and close them. But these are my choices I make for myself. Everyone needs to decide which types of clasps they prefer and under what circumstances.
There really isn’t a perfect clasp for every situation.
For most clasps, you usually attach your bead work to separate rings on each end (preferably a soldered ring, if this will work), and then attach the rings to either side of the clasp. In a similar way, if using a cable wire, you don’t want to push your crimp bead all the way up to the clasp. You want to allow a small loop in the cable wire between the crimp and the clasp. You want to build in support, jointedness and movement. You want the clasp to be able to rest on the neck (or the wrist), and not move when the wearer moves. You want the beadwork, on the other hand, to be able to move freely and independently of the clasp, as the wearer moves. If there is any resistance to movement in your piece, if things are too stiff, everything breaks — the clasp breaks, the string breaks, the beads break. If you can’t build in sufficient support systems into your piece, you might as well have a mannequin for a client.
Some more clasps:
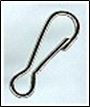
SPRING RING
This is the cheapest and worst clasp. I really hate these. Its mechanical mechanism breaks easily. Too easily. But, on the other hand, it is also sleek and dainty, and there are few other clasps which are. If you are making a dainty piece, and you know it will only be worn occasionally, you might get away with using this clasp. Otherwise, if you’ve bought a piece with a spring ring clasp, you’ll probably want to replace it before it breaks.
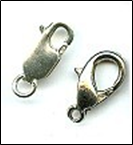
LOBSTER CLAW
This is a very popular style, but it has some weak design elements. The lip (top curved part) is not designed to handle excess force that comes from tugging or pulling. Its mechanical mechanism breaks easily. Often the levers are difficult to maneuver. However, this clasp does pass the guy test. Guys can figure out how to open and close it. It’s relatively inexpensive. There are many styles of lobster claws, so you usually can always find something which can work with the design and flow of your piece. These clasps are OK for inexpensive to moderate pieces. They are inappropriate for more expensive pieces of jewelry, say over $200.00. When I see lobster claws on expensive pieces of jewelry, this is usually a sign that there are other construction flaws in the piece.
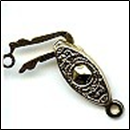
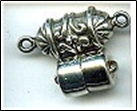
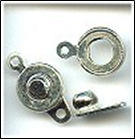
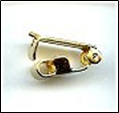
PEARL or SAFETY CLASP
These are clasps that if the hook comes undone, something catches it before the necklace or bracelet falls off. Very popular clasp, and a traditional element in many pieces, such as a pearl-knotted necklace or a Victorian style necklace. In fact, you would be hard-pressed to use an alternative clasp in a pearl-knotted necklace or vintage piece, because people expect to see this type, or similar type of clasp, such as a filigree box clasp. Not a great design, however. The hook element must be bent back and forth many times as it is taken in and out of the clasp. It’s a moving part. This causes it to break sooner than later.
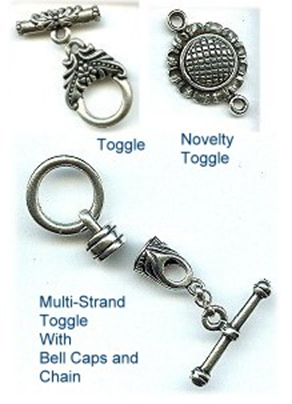
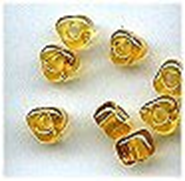
TOGGLE and BUTTON CLASPS
If the Toggle Clasp visually fits with your design, this is considered the best clasp. It is considered the easiest to get on and off, and the most secure. Almost every toggle has been cast, and the ring and the bar are very tightly engineered to work with each other. NEVER mix and match rings and bars. Always use these as a set.
The main drawback, for me, of the toggle clasp, is that they tend to look bulky, often presenting a visual issue for me. They do make novelty toggles, such as the sunflower one pictured above, or a leaf and stem or flower and stem or butterfly and butterfly wing. These work.
Another major thing to keep in mind with toggle clasps is that the last half inch or so of beads on the side of the piece connected to the bar, must be small enough to slip the width of the bar PLUS the width of these beads far enough through the circle part of the toggle, that you can seat the bar correctly, like in a saddle. When using larger beads in your piece, you might need to begin and end your strand with smaller beads.
For multiple strand pieces, you would typically add a string of jump rings or a piece of chain to the bar side, and stagger each strand up the chain. Say you have a 3-strand necklace. You could add a 3-link piece of chain to the bar side. You would attach one strand to the top link; the second strand to the middle link; and the third strand to the bottom link. In this way, when you pull the bar through the ring, you are only pulling 1 thickness of beads plus the bar through the hole — not three multiple thicknesses of beads. You do not need to do this on the ring side, but many people do, for symmetry purposes.
Most people use toggles. What a lot of people don’t know is that you should not mix and match your rings and bars. Toggles should always be used as a set. When you go into a store to buy these, if they sell them mix-and-match, you don’t want to buy there. In a large store like ours, if you’re putting a bunch of toggles on a tray, be sure you know what goes with what. When they get bagged up at the register, be sure there’s no confusion about what goes with what. And store them so that there is no confusion about what goes with what.
You can make your own toggle-style clasps, using buttons or large beads. You have so many more colors, looks, textures to play with, when using buttons and beads, rather than the premade clasps you would find in the store. One side of your piece is a button and the other side is a loop. The button can be a real button, or a large bead. The great thing about button clasps is that you can incorporate the clasp as part of the design of the piece. You can match colors and beads that blend right in with the piece itself.
In a bead strung piece, you would tie off a button or large bead at one end, string your beads on, and make a loop with your stringing material at the other end. You would come back through about 2–3” through the beads in your piece, to anchor off your stringing material. To make this loop attractive, people cover it with seed beads, like size 11/0, 8/0 or 15/0 seed beads. Some designers use 15/0 or 13/0 sized charlottes. Charlottes are seed beads with one facet on one side of each bead. Using charlottes ups the visual perception of the value of the piece, though not the cost of doing so.
For bead-woven bracelets, the button clasp (a form of a toggle) sometimes works better from a design standpoint.
Making the button clasp:
The hardest part in making a button clasp is the button hole. If the hole is too small, it’s hard to get the button or bead in and out. If the hole is too large, the button or bead can slide out and the piece will be lost.
To make the button hole (loop), attach a thread to the piece, preferably a little further back from the end of the piece. Where exactly you locate the button loop depends on your design; however, in most pieces, stepping back from the edge ends up with a better looking and more durable product.
After anchoring the thread to the piece where you want it, now string several small beads — usually size 11/0 or size 8/0 seed beads — until you have a line of beads when looped, will fit snugly over your button or bead. Some designers like to use size 13/0 charlottes to cover the loop. This makes the loop feel like it’s an attractive metal piece.
Bring the needle and thread around and anchor the loop to the piece.
Tie it. Now bring your needle and thread back through the loop, one or more additional times (until it’s getting very tight inside the bead), reinforcing the bead hole.
Now tie it off, and weave the loop end into the piece, hiding the end of the thread.
Now, take your bead or button, and attach it to the other end of your bracelet. Ideally, you want to step the bead or button a bit back from the edge. When choosing a bead, it must be large enough for the loop to be secured underneath it.
Do not attach a bead or button flush to the surface of the piece. Allow enough space for the loop to clasp underneath it. This is easily achieved by placing a size 11/0 or 8/0 seed bead between your piece and the bead or button. Or make a tight loop of beads to connect the surface of the piece through the button shank. When making this kind of loop, usually size 15/0 seed beads work best.
If the bead is elongated, you must anchor it at the center, not through either end. Otherwise, there would be no place for the loop to clasp beneath the bead.
There is not a sure-fire way to measure a loop to fit perfectly over a button or bead. So don’t beat yourself up if you don’t get it right the first time or two. As a general rule of thumb, the length of the loop should be a bit more than twice the diameter of the button or bead. Keep practicing and you will get to a point where it will work by instinct.
So, to repeat, you would preferably locate the loop and the button a little bit back from each edge of the piece. When you start at the edge, this is the weakest part of the piece, and the pulls and tugs on the clasp will start to tear at this edge. Also, if you start at each edge, when you put the loop over the button, you’ll have an area of skin showing. When you set both the loop and button back a ways from the edge, when you put the loop over the button, it draws the two edges together.
If we look at the button from the side of the piece, you would want to put an 11/0 or 8/0 seed bead between the button and the surface of the piece. This accomplishes two things. First, when the loop goes over the button, it will rub on a bead, not the threads. This prevents these threads from fraying. It also turns out that when the loop goes over the button and rests on a bead, it sits it better, thus reducing the amount of back and forth movement that occurs as the bracelet is worn on the wrist.
S-CLASPS
From a functional standpoint, this is a great necklace clasp. From a usability standpoint, however, it’s a disaster. Most people don’t know how to use these properly. When you don’t use them properly, they don’t function as well.
The simple S-Clasp Assembly consists of an S-shaped piece and 2 soldered rings (one on each side). These rings are your “support system” or “jointedness”. They allow the S-clasp to maintain its position behind the neck, and the beadwork to move freely, as the wearer moves.
Using these: First you do your beadwork. Then you tie off each end to the soldered rings. Then you position each hook-arm relative to the spine. On one side of the “S”, you should position the hook-arm so the O-ring cannot slide out, as if the arm had been soldered to the spine. On the other side of the “S”, you need to position the hook-arm so that the O-ring can slide out, but only with some resistance by the hook.
Most people are clueless about the need to position the hook-arms, and how you do it. So they end up bending each arm back and forth, and they break off, or they slip off the soldered rings. And the S-clasp doesn’t rest securely behind the neck, or allow the beadwork to move freely as the person moves.
S-clasps come in a wide range of styles and prices.
HOOK & EYE CLASPS
This is a very good clasp for necklaces, but not as functionally good as the toggle or S-clasps. This is the type of clasp that I prefer to use on my pieces. It is very user friendly. These don’t compete with my beadwork as “art.”
The hook and eye clasp consists of two parts — a hook and a ring or figure 8. If you can position the hook so that the O-ring can slide out, but only with some resistance by the hook, you can use this both on bracelets and necklaces. If the hook-arm is a cast piece and will not move, they tend to only work with necklaces.
Always assume your wearer is right handed. When the wearer reaches back behind her neck for the hook, she should be grabbing this with her right hand.
These come in many styles and price points.
People can usually and easily figure out how to use these. They don’t compete with the artistry of your beadwork.
They have a slight functional flaw in that the hook can work itself free from the ring, when the piece is worn. If you can do this with your piece, you want the hook to face up, (not down).
A choker clasp is special kind of hook and eye clasp. These are usually for multiple strand pieces. The “ring” side is a length of chain, so that the hook can attach in more than one place. This makes the length adjustable. I find it useful to build in some length-adjustability into all my pieces. This is easy to do with hook and eye clasps.
MAGNETIC CLASPS
People in general hate clasps, so they love these. These work well in necklaces. While people love these for bracelets, functionally they pose some issues. To open and close a magnetic clasp, you never pull them apart. This weakens the settings for the magnets, and the magnets eventually pop out. Instead, slide the two sides apart, or crack them open like a nut, or as if one side was on a hinge. Never pull. You can see on a bracelet how the wearer might be tempted to pull them open. The bracelet wearer may also pull on the beadwork itself to open the clasp, thus weakening the bracelet.
Always do some extra reinforcement on the two ends of your pieces where they attach to the clasp.
Magnets come in different strengths, but are not labeled as such. You need to test the strength before you use them.
I suggest adding a safety chain to a bracelet. We hear over and over again stories of how people lost their bracelets to the ravages of an all-too-metallic environment. They’ve lost them to the refrigerator door. One woman lost hers to a car door on her visit to the mall. Luckily for her, when she returned to her car — There it was!
SNAP CLASPS
Snap clasps are like the snaps you have on a blouse or pair of pants. These are usually used in bead woven pieces, but they can be used on strung pieces. They are generally easy to get open and closed. They become part of the piece and its design itself, thus not competing with the artistry of the bead weaving. These clasps do wear out, as they are repeatedly opened and closed. There are many manufacturers and brands of these clasps, and variations in styles. The best ones are made of brass or steel, and have the “male” part be as square-ish as possible. If the base is too narrow, the ring slips off easily.
BARREL CLASPS AND SCREW CLASPS
Barrel clasps are very popular with college age and early 20’s. Never use a sterling silver barrel clasp. As the silver softens at body temperature, the threads soften and strip. Barrel clasps have a weak design element on each end where the clasp is to be connected to the ends of the piece. Most barrel clasps use a type of eye pin/head pin, and these break as they get bent back and forth from movement. With barrel clasps, you should always use another intervening ring — a jump ring, split ring or soldered ring — to attach your beadwork to the clasp.
For most types of clasps and other jewelry findings, though not all, you need to use an intervening ring — a soldered ring, a split ring or a jump ring . You attach your beadwork to the ring and the ring to the clasp or finding. Only in this way will you get enough support and jointedness.
Screw clasps tend to look like a bead with a loop on either side.
Usually, one side, sometimes both sides, screw open. These are very attractive and work very well to maintain the organic flow of your piece. However, the threads strip easily, and it’s difficult to readily figure out how to screw/unscrew the loop out from the bead. Usually the wearer ends up ruining the clasp after a few wearings, since it’s difficult to figure out which way to turn each screw-end — especially while wearing the piece — and the threads strip.
FOLDOVER CLASP
These clasps are found on a lot of jewelry. They are pretty easy to attach. They are pretty easy for the wearer to use them. On one side of the clasp, there is a closed loop. This is attached to one end of the piece, usually with a jump ring. It is fixed. The other end is a tongue that snaps over a base and is held in place by friction. This tongue slips over a ring on the other side of the piece, and then tightly onto its base. After opening and closing this clasp several times, the tongue tends to bend upward, thus losing its friction-based tight close. You can use a chain-nose pliers to push the tongue back and regain the friction. Eventually this tongue breaks off.
FRICTION CLASP or BAYONETTE CLASP
Here a curved metal tube on one side slips into a curved metal tube on the other, and is held in place by friction. Or, in another design, a straight pin is pushed into a rubber tube, where the rubber tube fits snugly around the pin, holding it in place. These come long and sleek, or squat and fat.
The friction clasp pictured above looks great on sleek pieces. For most of these, it’s easy to slip beads or charms over the clasp without having to partially or fully dis-assemble it. These are usually soldered or glued and clamped on to the piece. You need to pay attention to the size of the internal diameter of the opening. You want your cable wire or cord to fit snugly into this opening. Put some glue (any glue except Super Glue, and preferably a jewelers glue like E6000 or Beacon 527) on the cable wire or cord. Stick it in. Use a chain nose pliers to clamp the ends down snug. Don’t clamp them flat. When you clamp them flat, it looks weird and annoying.
NOTE: Super Glue has few uses in jewelry. The jeweler’s version of Super Glue is called G-S Hypo Cement, which takes longer to set. Super Glue dries like glass, so the bond becomes like a piece of glass. Movement causes the bond to shatter like a piece of glass. And the broken bond looks like a broken piece of glass.
The jeweler’s glues, like E6000 and Beacon 527 dry like rubber. The bond acts like a shock absorber.
BOX CLASP
The basic design here is a box where a bent piece of metal (called a tongue) slips into one side of the box, and is held in place by an internal latch. We consider the tongue and the internal latch moving parts, since these move back and forth and can break.
Box Clasps often look great, but they don’t last a long time. The internal latch often wears out. The tongue is bent up and down each time it is place in or removed from the clasp. After too many times, the metal breaks. It’s hard to find replacements. What’s nice about these are that they come in a wide range of prices and styles, and can adapt easily to the organic sensibility of your piece. Great for moderately priced jewelry. Functionally a bit of a risk for more expensive jewelry, but visually may be just what the designer ordered.
Sterling box clasps pose a problem, if the clasp rests on the wrist or neck. Sterling softens at body temperature. When the internal latch softens, it releases the tongue. Jewelry coming out of Mexico is notorious for this happening. Say you have a problematic clasp. You don’t have to throw it away. You can use larger beads on either side of the clasp, so that it never rests on the skin.
LANYARD CLASP
This is a wire that is bent into a clasp shape. One end of the wire overlaps that of the other side, and is “springy”. These clasps will lose their “springy-ness” over time. I like to use these clasps with hemp necklaces. They work well with thick cords. They have a primal feel about them.
From a design theory perspective, the base of the clasp is an interesting element. It is basically an arch pinched at its base. This completely changes the mechanical properties of the arch, turning it into a spring. The spring absorbs all the force of the arm, when the arm is bent back and forth to open and close the clasp. If this arch were a V-shape, bending it back and forth would break it. In the Curved-Shape, bending back and forth will also break it. But pinching it, the movement is accommodated by and the forces absorbed by the clasp.
Lanyard clasps come very functional like that pictured. They come fancier, as well. Some of the fancier ones are good substitutes for lobster claws. Lanyard clasps are widely used in name-badge lariats and necklaces.
SLIDE CLASP
These are made for multi-strand necklaces and bracelets, from 2-strand to 9-strand. They are basically two inter-fitting tubes with loops soldered onto them. They are very sleek. They come plain and patterned. They don’t compete with your beadwork. They work for bracelets and necklaces. This is one of the only clasps that has been coming down in price over time. The market is telling you that this is a good clasp, and I agree with the market.
I especially like these clasps for bracelets. They have a way of keeping all the strands of a multi-strand piece laying nicely and separately and spread out. With a lot of other clasps, the multiple strands overlap, get entangled, and don’t lay as well as intended. Usually, one person, wearing a bracelet using these slide clasps, can maneuver these on and off without much difficulty. Another plus.
In many flat, wide beadwoven pieces, I often suggest sewing these in place to use as the clasp.
You do not need to use any intervening rings with this clasp.
DOOR KNOCKER CLASPS
Here we have a loop with a slight opening, with a bar and knob that moves from the base of the loop, over and into the slight opening. These are attractive. They are relatively easy to use. They do lose their friction in holding the knob into the opening. With these, two removable loops hold the beadwork in place, so you could make many strands of bead work, ending each with a soldered ring wide enough to slip the clasp, and use them interchangeably with this clasp. Or you could use this clasp when you want to change the number of strands of beads you want to wear at one time.
So often, designers struggle to figure out the reasons why their designs did not feel finished or as successful as they could be. They get so caught up in the here and now of design that they forget to study what was, and fail to sufficiently anticipate what will happen when that design is introduced publicly — to the client, to the client’s client and to the world.
Clients sense this. When the designer does not share, or at least anticipate, the understandings and expectations of the client, the project could go awry. The designer could end up expending many non-billable hours trying to adjust, tweak, re-do, re-conceive the project. And the whole process ends up not feeling good. Unfulfilling. A chore.
Often the core of the problem is the design approach to the project. Designers like to follow a linear process of design. This is an unfortunate remnant of the scientific management philosophy prevalent in the 1930’s. A belief that everything can be reduced to a progressive series of steps, performed in an objective, almost-scientific way. Processed from a beginning, through a middle, and leading to an end. No iteration or back and forth. Little trial and error. Objectively gather information and data. Analyze it. Formulate a hypothesis. Test it. Draw conclusions. Set goals, objectives and activities accordingly. Organize resources. Arrange things in a pleasing manner and implement. Evaluate. Happy client, happy life.
But, as we all know, things aren’t so linear. They aren’t so clear-cut and pat. They are not so perfectly objective and universally understood. We have all felt these things:
Working with imperfect information.
Often inarticulate clients.
Or clients not understanding or appreciating or anticipating what you are trying to do.
Some limits to the access to resources we want and need.
Not fully skilled in every single technique that might come to bear.
Can often get caught up in our heads, sometimes over-thinking, other times not thinking enough.
A fear of failing to know when enough is enough.
A weak sense of what happens when we introduce our designs publicly.
Never fully sure if we have achieved acceptable results.
Design should not be seen as a set of steps per se. Rather, design is a way of thinking. That way of approaching the professional task with fluency, flexibility and comprehension. Here the designer must provide a sense of the underlying intellect in the design of the project, or else others cannot appreciate or anticipate what the designer was trying to accomplish. They need to sense the designer’s thought process all along the way.
Towards this end, we want designers to get socialized into a disciplinary literacy as they pursue design as an occupation and profession. They need to learn how design differs from art. Achieving a harmony and some variety in design — the goal in an art project — often falls short of client expectations. There’s that “It’s nice, but…” or “Where’s the WOW factor I was looking for…” or “I like it, but I’m not sure how I’m going to use it…”.
And professional, experienced designers need to learn how to tell when enough is enough. That is, they need to have this automatic, intuitive sense when if they added or subtracted one more thing from their design, it would not be as good.
One useful type of tool, designers can resort to is called a Thinking Routine (see footnote 2). The Thinking Routine is any structured way of asking yourself questions which help you organize your thoughts. You should have several thinking routines in your designer tool-box. These aid you in applying that disciplinary literacy you are forever developing and improving upon.
One Thinking Routine I want to introduce you to here is called “Backward-Design” (see footnote 1).
How the designer begins the process of creating a design is very revealing about the potential for success. One of the things designers more literate in their discipline learn to do is called “Backward-Design.” The designer starts with determining how their finished project will be assessed, then works backward from there in specifying the tasks and methods to be employed.
The designer begins the process by articulating the essential shared understandings and desires against which their work will be evaluated and judged. The designer starts with questions about assessment, and then allows this understanding to influence all other choices going forward. The designer anticipates what evidence others will use in their assessments of what the designer is trying to do.
Given that the more successful designer “backward-designs,” he or she would begin the process by anticipating those understandings about how their work will be assessed. The first assessment is how others, particularly the client, but including the client’s audience(s) as well, will see the design as finished, complete, coherent, and parsimonious. The second assessment is how others will see the design as successful, satisfying, having the desired effect, contagious, and impactful.
The designer then is equipped to make three types of informed, purposeful choices:
1. Choices about composition
2. Choices about construction and manipulation
3. Choices about performance
These choices involve what to include and not include. How to organize and how not to organize. How to mesh things together and not mesh things together. How to introduce things publicly and not introduce things publicly.
Given what the client wants, your choices will be influenced by what evidence they will look for to know you have achieved it. These choices involve evidence about what tasks will be worthy to be accomplished, and the most efficient and effective ways to accomplish them. These choices signal that the designer really gets it and is ready to perform with understanding, knowledge and skill.
In backward-design, these choices emerge through dialect and communicative interaction. Choices about tasks are purposeful. Design is more seen and operated as an action, rather than an object.
When beginning the process of design, the designer thinks about assessment before beginning to think about what and how they will design. Designers do not wait until the end — what scientific management calls the evaluation step — of the process. Thinking backward as a strategy for problem solving really isn’t that difficult. While this may feel illogical or counter-intuitive, in the end it makes more sense.
Again, we can set up a backward-design process as a Thinking Routine. A Thinking Routine can help the designer internalize the backward-design process. It can help the designer sharpen their focus. The Routine becomes a way, used informally or formally based on your style, to structure the client intake process. It also becomes a way to force you to prioritize your tasks.
Here is a simple example useful for designers interested in backward-design, and which I call DESIGN FRAMEWORK.
How Do We Elicit This Information From The Client?
Critical here is the designer’s ability to elicit a lot of information from the client. Information about expectations. Past experiences. Things they like and dislike. What they want to happen at the end. Values, desires, worth, risks, rewards. What the client’s various audiences might expect and desire.
Understandings are often revealed through the exercises of comparing and contrasting or summarizing key ideas and images. We can provide pictures. We can take the client on an internet tour. We can ask the client to take us on an internet tour. During all this, we encourage the client to explain, interpret, apply, critique, empathize or reveal prior knowledge about and experience with. This gives us a lot of information to start with.
We can then seek to find specific examples of what the client has done in the past, or has tried to do recently. They can describe certain actions they have taken. They can share with you various products they have designed or had designed for them, and their feelings about these products. They can explain the “facts” as they present them. Or offer up “interpretations”.
We then have to step back from our interactions with the client, and ask ourselves: Does the information we have collected provide enough evidence for us to determine a task plan? Can we see patterns and themes emerging? Hard and fast convictions? Things loosely connected? Are the client’s understanding of the problem(s) to be solved consistent with those of the possible solution(s) which can be implemented?
Or is there still some ambiguity needing clarification? Are any expectations unrealistic? If so, we return to interacting with the client to gather more evidence of their desires and understandings about what they want to be accomplished.
The Successful Designer
The successful designer is one who can generate designs which are engaging and effective, as judged by the client (and perhaps by extension, the client’s various audiences).
The design process should allow the designer to identify and prioritize those tasks which are most relevant to or likely to achieve the end result. And in turn, reject or shorten tasks which do not.
The client should see the design as relevant, provoking, meaningful and energizing. The project should feel finished. It should meet the client’s understandings about what constitutes success. You do not want the client to walk away thinking the design was merely the result of an academic exercise. You do not want the client to think or feel you have sold them a cookie-cutter solution.
The design process itself should impact not only the final product, but the client him- or herself. It should elevate the client’s own sense of design and accomplishment. It should result in a client more competent when interacting with you and securing your services the next time.
____________________________________
FOOTNOTES
(1) Backward-Design. I had taken two graduate education courses; one in Literacy and one in Planning that were very influential in my approach to disciplinary literacy. One of the big take-away from Understanding by Design by Grant Wiggins and Jay McTighe, 2nd Edition, Association for Supervision and Curriculum Development, 2005, was the idea they introduced of “backward-design”. Their point is that you can better teach understanding [and my words, perform professionally] if you anticipate the evidence others will use in their assessments of what you are trying to do. When coupled with ideas about teaching literacy and fluency (see Literacy: Helping Students Construct Meaning by J. David Cooper, M. Robinson, J.A. Slansky and N. Kiger, 9th Edition, Cengage Learning, 2015), you can begin to introduce ideas about managing the design process in a coherent and alignable way.
Understanding by Designby Grant Wiggins and Jay McTighe, 2nd Edition, Association for Supervision and Curriculum Development, 2005.
Literacy: Helping Students Construct Meaning by J. David Cooper, M. Robinson, J.A. Slansky and N. Kiger, 9th Edition, Cengage Learning, 2015
(2) Thinking Routines. There are many different types of Thinking Routines. The Harvard Graduate School of Education has researched, evaluated and categorized these. These routines can be used in your own reflections with yourself, or as active tools when working with clients. They are used to help you understand and manipulate your world.
I remember our first date — a blind date — and we started the evening at a diner. I loved that our conversation was full and long and deep from the get-go. I remember asking you the thing you loved the most. You said jewelry making.
I thought, how wonderful. My date is creative. And artsy. And I love jewelry, too, I thought to myself. At the time. On that perfect blind-date you always imagine, but rarely, if ever, comes true. But it was true that night.
About six months later, as I was beginning to fall in love, the full meaning, richness, purpose, intent, motivation, dependency… heck, inner morality to the core of that line — I love jewelry making — became painfully clearer. It was going to be jewelry over me.
We were scheduled to see a play downtown. I had been waiting to see this play for months and was so looking forward to it. But, at the last minute, my now-soon-to-be fiancé was putting the final touches on a piece for a wealthy client, to be delivered at this very same time as this play.
“Can’t you re-schedule?” I asked, so certain the answer was to be Yes!
“Sorry, my client needs this for an event tomorrow. I have to see her tonight,“ was his response. “You can go without me.”
Well, well, well. I was a-steamin’. You can go without me burned into my skin. But, I thought, it was this one time thing, and I’ll get over it. I went to the play by myself.
I think it was the goddess Aphrodite who warned lovers that the essence of love between partners is either the essence of the mind or the essence of the soul. When it is the essence of the mind, the mutual attraction revolves around the things you do. When it is the essence of the soul, that mutual attraction revolves around the things you are.
What an idiot I was beginning to feel I was. I was getting into a mixed marriage. Without any preparation. With minimal understanding about essence of this or essence of that. Naïve. In love. Somehow mistaking the idea of jewelry from the practice of making it. When I had no desire to make it. And my fiancé did.
But it was only going to be this one time. I thought. I hoped. I pretended.
A year after our first blind date, we got married. My spouse-to-be made all the jewelry. All the jewelry I wore. All the jewelry for the bridesmaids. Even jewelry for the grooms. Even my mom. The jewelry was splendid. Sparkling. Rich. Romantic. It set the mood. It set the stage. And my wedding was almost perfect.
This jewelry was still getting crafted, however, 1 hour before the ceremony was to start. I was a bit frantic. In my mind, while I was picturing how this full day would go, I did not factor in having to set up a work table in the minister’s study, nor having to lug cases of jewelry parts and tools, nor having to repeatedly assure everyone — my mom, every bridesmaid, four of the groomsmen, my sister the flower girl — the jewelry would be ready on time. Why was I having to think about jewelry? All I wanted to think about was love.
We moved in together into my spouse’s apartment. I knew it was going to be a tight fit. Beads and stringing materials and pendants and stones and tools and equipment were everywhere. The dining room table. A table in the bedroom. Six TV trays. The coffee table. Storage bins in the kitchen. Boxes in all the closets. I said, “You’re going to have to make some room for me. And my things.”
“No problem,” was the response.
We have a problem Houston.
I was so accommodating then. I squeezed myself and my things between everything. I ate on plates on my lap, my drink always somewhat precariously positioned between my body and the arm of the couch. We ate out a lot. I didn’t unpack all my things, and left a lot in boxes.
Over time, I began to notice that I complemented the jewelry more than I got complemented back for anything. I would shower, and there would be seed beads in my hair. The rollers on the vacuum would frequently stop rolling because they were wound up in string. One afternoon, I was making myself a sandwich with some luncheon meat, cheese and vegetables, and I found myself subconsciously choosing each item based on its color resemblance to the piece of jewelry-under-construction sitting on my kitchen counter.
I was losing my essence of love.
To an unfinished piece of jewelry.
What in God’s humanity was happening?
The next few years, the making of jewelry took precedence over shared experiences. Cancelled evenings with friends. Watching TV alone. Few deep and fulfilling conversations about any topic — ANY OTHER TOPIC — than jewelry, jewelry parts, the securing of jewelry parts, the arranging of jewelry parts, the colors, shapes, textures and patterns of jewelry parts, whose jewelry parts were better than others, jewelry parts, jewelry parts, jewelry parts.
I stopped wearing jewelry. My spouse never noticed. I got jewelry for my birthdays. I got jewelry for Valentines’s Day. For Mother’s Day. For Christmas. For any occasion where a gift would have been nice, whether jewelry was the perfect gift or not.
I hate to admit this, and only admitting it under my breath, but I actually tried to make some jewelry. I thought it would bring us closer together. Maybe, I could cleverly transition our conversations away from jewelry if I could somehow speak the language and share the experience.
I discovered I hate making jewelry. I don’t have the patience. I’m somewhat creative, but not that interested in applying it — at least to the making of jewelry. While I think it did entwine our essences somewhat, it wasn’t enough for me. Or thee.
I didn’t know what to do next.
One night, we were making love, but it wasn’t going the way it should have been. There were some beads in the bed and got into places they shouldn’t have. There was some stringing material caught up in the blankets and started to wrap around my toes. My spouse began reciting colors to me as if you could color passion instead of feeling it. Had not the colors of my lips and the colors of my cheeks and the colors of my hands fit neatly into some artistic color scheme, I don’t think we would have ever completed the act.
That was it for me.
Enough.
“It’s your jewelry or me,” I shouted.
So, here I am, sitting in front of my computer, filling out my personal profile, my name, what I look like, and how I hate making jewelry.
“She’s CHEATING ME!” the woman from Rhode Island screamed into the phone. She could hardly catch her breath, the anger overtaking her ability to explain why she was calling.
“I read your article about Pricing and Selling on-line, and I’m not getting my $70.00 for my piece.”
She didn’t have to say anymore. I knew right off the bat she was talking about CONSIGNMENT. I recognize the anger. The frustration. The feeling that someone put something over on you, and you’re powerless to correct the situation. You don’t know what to do. You know the sweat, time and cost you put into all the pieces you let some stranger have, and now what do you do?
“I put 10 of my pieces of jewelry in her shop in Northern Rhode Island — not a big shop, no sales, except, this one piece sold, not in a major place,” she continued, taking breath after breath, to get it all out, in some way that made sense, and some way that kept her from losing it.
“What do I Do?”
“She sold my piece for $70.00, and didn’t give me my money?”
“Should she have given me my money right away?”
“Should I take my jewelry out of her shop?”
“Should I never do consignment again?”
She peppered me with questions, not waiting for an answer.
She indicated that the store owner told her that she paid her artists 30 days after a sale. Her customers had 30 days to return something. If the store owner paid before that time, she would be out the money. Store owners can set whatever policies they want, and in this case, I told the woman it was reasonable to wait 30 days, given the policy.
Of course, it had already been 7 weeks.
“Should she call her?” Her husband told her not to call yet. He didn’t want her to make waves, or ruin this opportunity to sell her jewelry.
“Call her,” I said. If the store owner said 30 days, then 30 days it should be.
Consignment may be a necessary evil, especially when you are getting started in the jewelry making business. But consignment is not the best situation to be in. Most stores that accept consignment do not understand the consignment business. As a result, when the time comes to pay the artists, there’s no cash flow.
In Consignment, the store is at greater risk than the artist. The store has to make space available for the pieces, and forgo the opportunity to get something else in that retail-real-estate that might do better. The store has to display the pieces, and keep them clean and presentable. The store has to train its sales staff so that they have sufficient information and motivation to make the sale. And, of course, there’s the tracking and accounting that goes with every consignment piece on sale.
Your best clue to whether a particular consignment situation is a good or better one, is the percentage split between the store or gallery owner and the artist. Given the level of risk each party assumes, the optimum distribution is 60/40 with the store or gallery getting the larger amount. But if the split is 40/60 or 50/50, this would be a acceptable sign as well.
However, when the split is 70/30 or 30/70 or outside this 60 and 40 range, yellow flags should go up. This shows that the store or gallery owner is not aware of the level of risk in their business. You probably won’t get paid on time, and not get paid without a lot of time spent yelling on the phone. Your pieces won’t be maintained. They won’t be displayed in a prominent place. No one will be trained or motivated to sell your pieces.
Just because you confront a potentially bad consignment situation doesn’t necessarily mean that you should walk away, however. There are a few prominent boutiques in Nashville that offer a 70/30 split between the store and the artist. They rarely pay their artists when the pieces sell. It takes a lot of screaming, “Bloody Murder!” before you get paid. But these are very prominent shops. Letting other stores and galleries know that you have pieces in these shops will open many doors for you. You might view the delayed payments and the effort to get your money as “marketing expenses.”
Other reasons you might settle for a bad situation: — You’re just getting started, and saying your pieces are in a shop anywhere has some marketing cache that goes with this — You can direct customers to this shop. At least you have a place to send people to view and purchase your work. You might not have a central base from which to work. Your main business might be doing craft shows, and here you can direct people to your jewelry between shows. — This might be the only game in town.
But otherwise, if consignment doesn’t have some added value for you, you want to minimize your consignment exposure.
When you negotiate consignment terms with a shop, try to:
1) Get a feel for the amount of consignment they do (and how long they have been doing this), the range of artists, the range of types of merchandise on consignment, and the types of customers they have
2) Get a 60/40, 50/50 or 40/60 split
3) Work with store or gallery owner on final retail pricing of your pieces.
4) Get a written contract
5) Get in writing if possible, but an oral agreement would suffice, to convert the situation to “wholesale terms”, if you pieces sell well. (Be sure to define what “selling well” might mean. Example: sell 10 pieces within next 6 months.)
6) Determine a specific date when to take your pieces out, or trade them out for new pieces. Usually it’s good to trade them out every 3–6 months.
7) Determine exactly how and when you will get paid, after any one piece sells. A 30-day waiting period is reasonable.
As to my friend in Rhode Island, I suggested she take her pieces out of this shop. She was expecting to get paid 30% after 30 days. It’s years later. She was never paid.
Making jewelry is such a happy endeavor. But is the designer always happy? Always ready to lay out all the parts, and get to it? Forever on top of the game? You are the jewelry designer. Alone, at first, with your thoughts. Your inspirations and aspirations. There is such a long path forward from selecting materials and arranging them in a satisfying way. Then you have to show your piece to others.
It is so scary, risky, fraught with anxiety, difficult to decide, sometimes impossible to fully visualize. Yes, you answer to yourself and your own sense of aesthetics and construction. But yet, you make things for other people to wear, perhaps to buy, perhaps to display, perhaps to comment and evaluate and criticize and tear to shreds. Or ‘like’ it on some level.
Befuddling. Yes, indeed.
And perhaps a bit overwhelming. Somewhat un-motivating. Somewhat problematic.
Head-Game
The act of making jewelry, at any point, in any and every situation, forces too many rules and social conventions upon you. Rules of construction. Rules of aesthetics. Rules of meaning. You must sift through all these rules, lest they paralyze you. So you choose what you want and think will work and think will be OK. And, yes, your choices are leading you in a direction of satisfaction and happiness — you are, after all, narrowing the feasible, the possible and the desirable. But you also find yourself partly or fully forced to be compliant to the expectations of others.
At this initial point, everything is not fully satisfying. You are trying to figure out what to do. What direction. What options. How should I start? What pieces do I need? What colors do I want to use? What clasp? Stringing material? Process of construction? Where will I find everything I need? What will they like? What will they want? Why will they pay for it?
Thoughtfully Alone
But, finally, these questions get some answers. You get to block out the world for a while. You get to be alone with your thoughts.
Yes, you have all the pieces picked. You have a sketch drawn out. And you begin to organize and assemble. You get in touch with your inner self. You rapidly search your cognitive rolodex, and settle in on the feelings and images and values and meanings and emotions you want to apply to your piece, and have that piece reflect. You positively go orgasmic with the colors you have selected and how these are arranged, and with your clever ideas to connect each element and fragment of your piece, one to the other. But at the same time, you go lethargic, meditative, rhythmic in the steps you take to make your piece, one step at a time, over and again, over and again, and once again.
Doubt and self-doubt rear their ugly heads. Will my idea work? Will my colors coordinate and blend? My materials mix? My artistic sense be maintained when subjected to my functional purposes? Can I translate what I see in my head to something real? How literal a path should I take from my inspiration to what I make? How far on a limb do I want to crawl?
When the jewelry designer sits down to make a piece of jewelry, how does it feel? The very act of making jewelry reconfirms for you the very act of being yourself. This feeling is other-worldly. You are the world, at least for this moment in time. This feeling is surreal. Creation in the absence of control.
Finally, you sit in front of your finished piece. You have created an object from nothingness. You have made the intangible tangible. You have forced objects and textures and patterns and colors into an uncharted space. You have transformed thread or wire or string and glass or metal or gemstone and sterling silver or gold-filled or pewter or brass into an expression of the personal. Your personal. You.
And for the moment, you have lived a befuddled life.
With many emotional highs and lows.
As loss of control, a whirlwind of creativity, and a reassertion of control.
And you smile.
Betwixt and Between
Design is a rite of passage. A voyage between the sacred and the profane. A relinquishing of control leading, by grit, perseverance and determination, to a re-imposition of control, structure, shape, silhouette, mass and construction.
You enter a period of liminality. Between the concluding night and the entering dawn. Somewhere above the ocean pouring over the horizon, but below the clouds in the sky along the far away horizon. You are thinking how to put words to your feelings of accomplishment. Set categories to the things you did, such as manipulating colors or materials. Determine forms and themes and segments and values and meanings. Explain all your feelings and choices and desires in words and concepts and phrases for others to recognize and understand.
This is a Rite of Passage. You must move from this ecstasy of your creative self to the reality that your jewelry is merely one object you are introducing into a complex and elaborated world. You must share what you have done with others, and, I know so well, can be very scary. Will they like it? Is there a place for this? Will they understand what I personally contributed to the design? Should I worry if someone might copy this? Or abuse it? Or abuse me in some way, as a designer?
Worldly
And as you successfully, so we hope, maneuver this Rite of Passage, and come out the other side, you return to this object before you. A piece of jewelry. Some metal, some stone, some string. You are ready to pick up that piece of jewelry off your work table, and show it to the world. Now you must sell its virtues. You must market its strengths and gloss over its weaknesses. How wearable is it? How beautiful? How appropriate for which person? In which context? How saleable? How usable?
The world impedes. Those ecstatic hours of creation, losing yourself in this process of essence, dreamily playing with colors, experimenting with arrangements, testing ideas about construction, are slowed down, are gone, are halted, until you begin to make your next piece.
In their place, your fun is tempered by history. By reality. By others determined that your creative self conforms to their ideas. And the ideas of their friends and acquaintances. And, in turn, their friends and acquaintances. Will your piece feel finished? Will they see it as coherent? Satisfying? Will the essence of your piece be contagious as it physically moves further and further away from you?
You are befuddled once again.
The process of designing jewelry is transformative.
The intangible is transformed into the tangible.
Sadness is transformed into happiness.
Shadow is transformed into light.
Inanimate objects are transformed into resonant ones.
The transformative powers of the jewelry designer are heroic. The designer overcomes the lethargy, the blah, the uninspired. The designer crafts functional beauty evoking response and emotion. The designer provides the key to the personal and social success of the wearer. The designer hopes to triumph, lest she or he fall into some kind of professional suicide, characterized by jeweler’s block, resistance, and many unfinished projects. Thus, becomes hero no more.
Is jewelry design, then, merely a cycle of vain-glorious misery? Some temporal happiness and joy following by some ill-defined period of existence? Full of doubts about whether the cycle will every complete itself, or re-start itself, even if it did?
So the question becomes, how do jewelry designers live with all this befuddlement? What keeps them happy? How can the successful jewelry designer think of himself or herself as a designer, fulfilled and happy,if he or she always lives in a world of uncertainty. If the designer personally dis-values their own work. If the designer doesn’t see himself or herself in his work. If the designer doesn’t imbue his or her work with meaning, life and force. If the designer never finishes what he or she started. If the designer substitutes quantity for quality. Or, if the designer only replays and reworks the works of others.
Then existence as a jewelry designer becomes futile.
One Principle of Jewelry Design Composition is called “PLANAR RELATIONSHIPS”. This primarily has to do with the placement of lines and planar surfaces within your piece, and how satisfying all this placement is, so that the lines and/or planes interrelate.
It turns out it is relatively easy to have lines and planes relate symmetrically. That is, it is easy to get people to be more satisfied with your pieces, if you makes things line up evenly to the right and to the left of your center point or line.
Conversely, it is not so easy when you try to create something asymmetrical. In fact, based on the art theory and cognitive psychology theory underlying this principle of planar relationships, I would say that, if your piece is asymmetrical, there must be something else on the person wearing the piece to create the illusion of symmetry. This might be the way the hair is styled, the pattern on a dress, the neckline silhouette of the dress, the shape and positioning of the person’s ears, and the like.
So, for those of you who have tried and succeeded, or tried and failed, to create asymmetrical pieces, how would you describe your design process? And people’s reactions to your piece? Or how it looked on the wearer? If successful, what kinds of things did you do in the design process, that worked in your favor?
Off-centered piece or someone wearing just one earring, can be disorienting and disturbing. How do you feel about asymmetrical pieces, or people wearing only one earring?
PLANAR RELATIONSHIPS
Planar Relationships refers to the degree the piece is not disorienting to the viewer, or particularly confusing in terms of what is up and what is down, or what is left and what is right.
People always need to orient themselves to their surroundings, so that they know what is up and what is down. They usually do this by recognizing the horizontal planes of the floor and the ceiling of a room (ground and sky outside), and the vertical planes of the walls of a room (buildings, trees and the like outside).
Jewelry must assist, or at least not get in the way of, this natural orienting process. It accomplishes this in how its “lines” are arranged and organized. If a piece is very 3-dimensional, then how its “planes” are arranged and organized becomes important, as well.
The goal here is to “see” the piece of jewelry, especially when worn, as something that is coherent, organized, controlled, and, especially, orienting.
Design elements we might use to achieve a satisfactory planar relationship within our piece:
— a strategic use of lines and planes
— shapes
— boundaries
— silhouettes
— contours
— symmetry, or, more difficult to achieve, a satisfying asymmetry
— a planar pattern in how each section of the piece relates to the other sections
— how sections of the piece interlock
— how we “draw and interrelate” parallel lines, perpendicular lines and curved lines within the piece
Example 1: Asymmetric Earrings
How can a person truly pull off wearing only one earring, or two very different earrings, one on each ear? After all, visually, it pulls the person off to one side, thus violating the basic orienting planar relationships. What about the composition of the earring, allows this to work; what about the composition doesn’t?
Example 2: Asymmetric Necklace
When wearing a necklace, where the clasp is worn on the side, instead of the back, sometimes this works, and sometimes it does not. Again, what about the composition of the necklace, allows this to work; what about the composition doesn’t?
With jewelry, asymmetry is a trend the pops up everyso often. In theory, it feels new, different, cool. It allows the wearer to assert a level of individuality and spirit. In practice, it can be awkward, but can be pulled off. As designers, when we want to achieve asymmetry, we have to fight off the brain’s natural tendency to want harmony and balance, thus symmetry.
The easiest way to achieve this is to use other environmental clues — hair styles, clothing styles, patterns in fabric — to assist. We can also play with things like volume, mass and color proportions, where both sides of a piece are visually different, but equal in either total volume, total mass or total color proportions, as if the piece of jewelry were a surrogate balance scale.
There are big bead people and little bead people. Some bead stringers like to say, “The older the person, the bigger the beads,” but I’m sure bead weavers would beg to disagree. For little bead people, there are thousands of colors and hundreds of shapes and sizes of what we call Seed Beads. These little bead people bead-weave, bead-string, and wire-work for all kinds of folks, situations.
The basic shape of seed bead is what we call “roundish” or “squared round”. They are round in the middle and squared on the ends. Sometimes the label “Seed Bead” refers to this specific shape; othertimes the label refers to the whole family of shapes.
There are many other shapes in this family of seed beads. For each shape listed below, they also come in different sizes and many different colors and finishes. These shapes include:
Cuts or Hex Cuts (seed beads that are cut from a six-sided hexagonal tube, rather than from a smooth cylinder, so that each bead has 6 sides)
Charlottes or True Cuts (single faceted roundish seed beads, thus each bead has only one faceted side) NOTE: Charlottes are made this way. True Cuts are accidents at the factory where the regular squared roundish seed beads haven’t cooled appropriately, and get flat on the size they were resting on.
Tri-Cuts (3 and more facets on roundish seed beads)
Bugles (tube shape, available in several lengths and diameters) Twist Bugles and Twists (very short tubes with a twist in them)
Nibblettes (1-hole flat rectangle bead) or Tila Beads (2-hole square rectangle bead)
Cubes or Squares
Triangles Some triangles have smooth, rounded edges; others have sharp edges. NOTE: In bead weavings, you can get a neat texture with the triangle — point / flat-surface / point / flat-surface/ point /flat-surface / etc.
Mini Fringe Drops or Raindrops (teardrops that are roundish, with a centered hole through the top)
Magatamas (teadrops that are more squarish, with an off-centered hole through the top)
Cylinder Beads (sometimes called by the major brand name which is Delica)
Superduos (one of many 2-hole seed beads)
…among others…
Just like the Druks and Fire Polish beads, and the crystal beads, seed beads are made in different countries, and knowing what country they come from, tells you a lot about their quality and usefulness.
The color names and color code numbers vary quite a bit from country to country. The actual shapes, sizes and color tones vary quite a bit, as well, making it difficult to mix beads from different countries within the same project.
CZECH SEED BEADS: The Czech Republic is one of the major sources for glass seed beads. The Czech Seed Bead is your minimal quality seed bead for jewelry making purposes. Anything lower in quality is useless for jewelry. All jewelry moves when worn, and this movement subjects each component to tremendous forces. Lower quality seed beads cannot hold up in the face of these forces. With lower quality seed beads, the holes are too sharp, the beads break easily under pressure, the finishes bleed into fabrics.
Thus, you need higher quality beads and other components for jewelry, than you would use for something stationery, like a beaded Christmas ornament.
So, I will give the Czech Seed Bead a grade of a “C”, and say that this is the lowest price you will pay, if you are using these for jewelry.
Most Czech seed beads come on hanks, and you usually buy these by the hank. You buy the whole hank. Hanks are usually 10–12 apprx 16”-strands tied off together; however, there is a lot of variation on what ends up getting tied together and labeled as a hank.
While most Czech seed beads on a hank are the same size, a sizeable number are not. If you are doing a pattern or a picture, you will either have to keep adding and subtracting beads as you go through the pattern, or you will have to cull all your beads up front so you are starting with the same sizes.
The hole size in these beads varies widely from bead to bead. The holes are too small to notice ahead of time. Many seed bead projects require that you go through the same bead with your needle and thread 5, 6, 7 or 8 or more times. If you can’t get that needle through one more time, often you are stuck. Sometimes you can compensate, but othertimes you just have to start over again.
These holes would be called “generally smooth”, but I think they are really pushing the marketing here. These holes are very rough.
You can have a high degree of trust on the finishes of these beads, but there are a sizeable number of colors that fade, bleed out or rub off.
Seed bead systems are set up like paint by number systems. There are many, many colors. Some colors of beads are made through the manipulation and coloration of glass alone. But you can’t make every color in these paint-by-number type systems using glass alone. Some processes for creating a color, such as galvanized, coated, lined, some metallics or dyed, are not always stable. When working with seed beads, you end up learning what these unstable colors are. Sometimes, the problems result when the beads rub onto something else; othertimes, the finishes react with chemicals like oils, or ammonia or sulfides on the skin or in sweat; still othertimes, sunlight lightens or fades them. Many pinks, reds and purples, as well as unusually bright colors are problematic.
If working with unstable colors, what you do is you spray your finished project with a clear fixative called Krylon. You buy this in an art or craft store. If it’s a baked on finish, the Krylon hardens the shell. If a dyed finish — remember glass looks like a sponge — using the Krylon is like putting a plug in each of the holes to keep the dye from leaching out.
Another thing you can do is dip your finished piece in Future clear acrylic floor wax, and then air dry it. This will stiffen your piece a bit, but also protect the finishes on your beads.
You can use a sealant. You purchase this in the paint section, usually near the metallic paints, of an art or craft store. Sealants may alter the colors a bit, and leave your project glossier.
JAPANESE SEED BEADS: I would give the Japanese seed beads a grade of an “A”. You buy these “loose” rather than on “hanks”. We usually get a big bag of beads and we re-tube these in the shop. The Japanese seed beads run about 1/3 more in price than the Czech ones.
Most of the beads in the tube are the same size.
They have a good size hole. The hole from bead to bead is the same size.
These holes are called “generally smooth”, meaning they look like a broken coke bottle, but no where’s near as rough as the Czech ones.
You can have the same trust on the finishes of the Japanese as you do with the Czech. It’s pretty much those same colors that fade, bleed out or rub off. [Again, you would use a clear Krylon fixative spray.]
There are 3 companies in Japan which manufacture seed beads. These are Miyuki, Toho, and Matsuno. It is often difficult to mix beads made by these different companies. The supposedly same-size beads actually vary in size from company to company. Miyuki and Toho beads are very regular and consistent in size from bead to bead. Matsuno beads are not. The color-palettes and underlying tonal qualities vary from company to company.
You will find that the color code numbers do not follow a strict pattern, say, all the reds or all the opaques or all the silver lines sharing a number series. The Japanese also frequently change the color names associated with each code. This can get confusing.
The “DON’T-USE-THESE-SEED-BEADS-FROM-THESE-COUNTRIES” Beads: For jewelry, you will definitely want to avoid using seed beads made in India, China, or Taiwan. These break easily, the finishes are very unreliable, hole sizes vary widely, holes are very sharp. These do not hold up well under the forces that jewelry is subjected to. They more easily discolor or bleed into fabrics.
Getting Started With Seed Beads: When starting with seed beads, we suggest that people try both the Czech and the Japanese, and see which ones they like best. The Japanese are more expensive than the Czech, but not that much more expensive. The Japanese ones are definitely easier to use.
However, one problem with the Japanese seed beads is that they are too perfect. Sometimes when your seed beads are too perfect, your outcome comes out like a paint-by-number Elvis on velvet. Because of the little irregularities from bead to bead in the Czech line, your outcome looks more organic, more artistic. If you were creating an ethnic looking piece, Japanese seed beads would make it look machine-made; Czech seed beads would make it look hand-made.
Buy all your seed beads upfront.Seed Bead colors vary from batch to batch. The color of the bead is affected by the barometric pressure outside the factory where and when they are made, and this is something the factory cannot control. Most seed bead projects take 40–60 hours to complete. That means, you need to buy all your beads, or even a little bit more, right up front. You might come back to the store 2 weeks later, and your 11/0–404 will be a different shade than that 11/0–404 now in the shop. So, find out about your store’s exchange policy. At our shop, we don’t give cash back. We do an even exchange or a store credit.
Above is an image of the same color from two different color batches.
Seed Beads Sizes — An Unusual Numbering System
Most of the seed bead styles use an unusual labeling system to denote sizes. For example, you have 18/0’s and 16/0’s and 15/0’s and 14/0’s and 13/0’s and 12/0’s and 11/0’s and 10/0’s and 8/0’s and 6/0’ and 5/0’s, and you get the picture. What these numbers mean — and had more meaning hundreds of years ago — is how many beads per inch. They don’t really work out as beads per inch, but for the main sizes between 18/0 and 6/0, they come close enough. But if you had to visualize whether an 8/0 is bigger or smaller than a 6/0, visualize beads per inch.
An aught-size may be written as a fraction (11/0), as a number followed by a degree symbol (11o), or simply as a number (11).
The most-used size for more art- and design-oriented projects is the 11/0. The most-used size for more craft-oriented projects is the 10/0. You would most likely find 11/0’s in a bead store, and most likely find 10/0’s in a craft store. Basically, the smaller the bead, the less gaps of light between each bead, and thus a stronger, more intense, and sharper result.
Native Americans like to use sizes 18/0 and 16/0, but you won’t find these in too many places outside areas catering to Native Americans. I remember once visiting a bead store in Gallop, New Mexico, and they had a wall full of hundreds of colors of 18/0 and 16/0 seed beads — — they took up as big an area as our 11/0’s take up in our shop. And we have a lot of 11/0s!
Believe me, even the 15/0’s scare me and put me on edge, because they are so small. I can’t imagine working with 16/0’s and 18/0’s!
Cautions:
Japanese seed beads tend to be a little larger than their Czech counterparts. So, an 11/0 Japanese seed bead will be little larger than a Czech 11/0.
Japanese seed beads are more tubular shaped. Czech seed beads are more saucer shaped.
The actual sizes of seed beads will vary by the finish on the bead. So, transparent amethyst will be smaller than transparent amethyst AB, which in turn is smaller than amethyst Ceylon, and this smaller than galvanized amethyst metallic.
There are three companies in Japan that make seed beads — Miyuki, Toho, and Matsuno. The shapes and actual sizes of the beads from each of these companies vary slightly. The consistency of seed beads within any batch and color is relatively high for Toho and Miyuki, but not so great with Matsuno. The stable/unstable finishes of colors is similar across brands. Most how-to books refer to Miyuki products. Toho has some very unusual colors.
E-Beads
In many pattern books, they tell you to use what’s called an E-Bead. Here they are referring to either a size 5/0 or size 6/0 seed bead. This vague label — E-Bead — was more useful pre-Internet. Today, since there is a size difference between 5’s and 6’s, pattern books can tell you exactly which size to get, and between stores and the internet, you can find exactly what you need. It seems, at times, that the only reason to preserve this vague naming convention is a snotty one — I know what this means and you don’t. Well, now you know what it means.
People started using this naming convention years ago, but in a slightly different way. Years ago, people were told they could substitute an E-bead — either a size 5/0 or 6/0 — for a 4mm round Druk. The 5’s and 6’s are close to 4mm. It’s very expensive and difficult to make a perfectly round bead. So a long time ago, people were telling other crafters that they could substitute a cheaper E-bead in projects where they would use a 4mm round Druk.
It’s also a bad naming convention in that all seed beads are E-Beads. E-Beads refers to how these were originally made. These beads all started as a long tube of glass. The tube was put through what looks like a bread slicer. The shape of the slicer was in the form of the letter E.
Cylinder Beads or Delicas
The cylinder beads or delicas are one of the few beads in the store that we weigh, before we put them into tubes. So these are like cocaine. The same color in a delica might be 3–10 times the price of that color in the squared roundish seed bead lines.
Today, there are many brands of cylinder beads. One of the original brands was “Delica” by Miyuki. Sometimes “Delicas” is used as the generic name, like Kleenex is sometimes used as a generic name. In older pattern books, they tell you to use Delicas. In newer pattern books, they tell you to use Cylinder beads.
There is a bad naming convention around these cylinder beads. Some places label their cylinder or delicas size as 11/0; others as 12/0. In this case, they are referring to the same bead. They are called 12/0’s because they are the same size as a 12/0 seed bead. They are called 11/0’s because they are used interchangeably with the slightly larger 11/0 seed bead. They are used interchangeably with the slightly larger bead because of the shape difference. A seed bead is basically a ball; a cylinder bead is a brick. That shape difference makes them interchangeable with the slightly larger bead.
I want to give you an idea of what it means to interchange seed beads (the squared roundish basic shape) and delicas (cylinder beads). I know, when I started beading and jewelry making, I had originally shied away from delicas, because of their price. But I use them regularly now.
Let’s go back to the example of the eyeglass leash. If your eyeglass leash was all seed beads, and you were standing against the light, you would see the ridges along the sides of the beads. If you used delicas, they line up perfectly. You would see a solid line of color. When people view a solid line of color, they see the piece as higher end.
Say you were in the eyeglass leash business, and did a low-end $20.00 market and a higher end $60.00 market. If you used seed beads in your $60.00 market, your pieces wouldn’t sell because they would look cheap. If you used delicas in your $20.00 market, your pieces wouldn’t sell either. These make the pieces seem out of place, and people avoid them. You use so few beads in a project like an eyeglass leash, that the cost differences are just fractions of a penny. But there are huge perceptual differences.
If you’re an artist doing two types of markets — low and high ends — you don’t necessarily have to come up with different designs for both markets. You can trade out seed beads and delicas within the same overall design, and play with people’s perceptions.
Suppose you wanted to do an amulet bag, or some kind of bead-weaving that approximates a piece of cloth. If you used seed beads, there would be little gaps of light between each bead. If your piece were a solid color, it would look less intense. If it were a pattern or a picture, it would look less sharp. If you used delicas, these line up perfectly like a brick wall. If the piece were a solid color, it would look more intense. If a pattern or a picture, it would look sharper.
With seed beads, they have little ridges on them, and when you try to move the piece, they catch on each other and the piece feels stiff. With cylinder beads, when you move the piece, it feels much more like a piece of cloth.
Now let’s say you wanted to do an amulet purse and went to the cash register with seed beads. These might ring up as $15.00. If you went to the register with delicas, these might right up as $150.00. There’s a lot of sticker shock at the register. But these kinds of projects take 40–60 hours to do. In this context, your biggest investment is your labor. The cost of the beads doesn’t seem quite so horrific. And in most situations, you get a better outcome with the delicas.
Cuts, Hex Cuts, Charlottes and True Cuts
People value brightness. They try all different kinds of strategies and manufacturing techniques to get their beads to be brighter and brighter and brighter. In crystal beads, they add lead. But lead is expensive. When they can’t afford lead, one technique is to facet the glass. A smooth, roundish glass surface absorbs most light that hits it, and reflects very little. A faceted glass surface absorbs less light and reflects more of it. That makes it seem, to the viewer, that it is brighter.
There are different types of faceted seed beads. The main type is called a Hex Cut, (often referred to simply as “cuts”). A hex cut seed bead has 6 faceted sides.
Another type of faceted seed bead is called a Charlotte or a True Cut. These beads have only one facet on each bead. So you see one flat surface and the rest is rounded. Charlottes are made that way. True Cuts are accidents at the factory where the regular seed beads are resting on a flat surface, but hadn’t cooled enough, so one side got flat.
Charlottes and True Cuts traditionally were mostly used in costuming. They are more and more used in jewelry. Picture the country music artist coming out on stage at the Ryman Auditorium — the mother church of country music. An area of her costume has been embroidered with Charlottes. Because of the 1-sided-facets of the charlottes, the faceted sides of these beads will face up randomly. As the spot lights hit the costume, the facets reflect the light back into the audience, but in a random, unpredictable way.
Suppose the costume had been embroidered with hex cuts. When the light hits the costume, all the facets are facing up in a very predictable way. These regularly positioned facets will reflect the light back into the audience in a predictable way.
The difference in effect is immediate. The unpredictable flashes of light into the audience, as reflected by the charlottes or true cuts, heightens the audiences’ experience with the performance. And this would be much moreso than had hex cuts been used instead. With hex cuts, the audience would soon be able to subconsciously predict the pattern of light bouncing off from the artist, and actually get a little bored from this.
It has always seemed to me that society has a strong bias against women and their ability to make choices. Men are decisive; women are not. That’s what society seems to say, So are women incapable of making choices in the pursuit of fashion Which bead color, color combination, style, silhouette? Which bead stitch? Which arrangement of beads and parts and pendants on a necklace? Which metal? Which stringing material? For women, so society seems to say, it seems the implications of any one choice are imbued with so many social and personal and cultural and situational issues, that it becomes too overwhelming to make.
The fact today, or I hope it is a fact today, however, is that we can use “women” and “choices” in the same meaningful and positive sentence. The pursuit of fashion knows no gender biases. Yet, this might be considered a relatively new phenomenon. For it was not always that way — or at least, as society viewed it. It took hundreds of years of feminism, strident and subtle, violent and passive, to change society’s views of how women think, and if they could think at all. There’s been a lot of kicking and screaming, put-downs and denials, resistance and sabotage, cruelty and abuse that has occurred during my lifetime, and before, to get to the place where women are today. Not all women that come into the bead store are as appreciative of their feminist sisters who opened so many doors and opportunities. And not all women are as aware of their gender-history, as they should be.
It was Darwin who wrote, in the latter part of the 19th century, that women were not as evolved as men. They were given equal amounts of protoplasm as men. But women were incapable of using that protoplasm. God made women to procreate. Procreation was a totally biological function, requiring no thought. Raising children was a biological function, requiring no thought. If forced to use their brains, women became ill, exhausted, infected, disordered. Only men had the will, ability and motivation to think. And in deference to women, men had to think for them, as well.
The 19th century thinkers were thus enlightened. The tasks of men required intelligence. The activities of women did not. Women lacked the ability to reason and comprehend general principals. Women would not have evolved at all if they had not been blessed, because of evolution, with men’s brains. The argument continued, if women had not been blessed with men’s brains, they would not have been able to procreate. And thus, the human species would have become extinct.
Craniologists, at the time, found that men’s brains were bigger than women’s brains, and thus concluded female inferiority. However, one scientist, proceeding along this same line of research, found out that, on average, German brains were 100 grams heavier than French brains. And this line of research ended abruptly, for fear of fomenting civil conflict. And so, too, ended any more research comparing the brain matter of women to that of men.
Physicists, at the time, speculated that each human organism had a finite amount of energy. Women had to expend so much energy on reproduction, that they did not have enough energy left over to think. Men had this excess energy, so they could think. Since women eat less than men, women also had a harder time generating new energy.
Educators, at the time, used Darwin’s explanations as reasons for denying women an education. Since women could not think logically, they could not be taught to do so. It was the widely held belief that women could not grasp knowledge.
Physicians, at the time, described all illnesses affecting women, as symptoms of one illness only — a disease of the womb. To cure any disease, meant some surgical, physically abusive and cruel treatment applied to the woman’s reproductive organs. A common prescriptive was to tell the woman to think less, in order to cure herself. Sleep more. Never touch a pen, brush or pencil as long as you will live.
Advice Columnists, at the time, and this is 1849 New York, advised women about their expenditures on dress. Do not delude yourself with appearance, they wrote.
– Do not permit fashion to impair your health — Do not allow dress to infringe on your delicacy — Do not allow unnecessary expenses on fashion — Do not spend too much time with fashion
In Boston (1840), one Advice Columnist went so far as to warn women to wholly lay aside their ornaments, as fast as possible, if they expected to have any sense of well-being. It was a mark of bad judgment for a woman to pursue fashion.
Wow! I think I need to knock Darwin, and certainly some of his contemporaries, down a few notches. And what does this all mean for beaders and jewelry designers and fashionistas? From the 19th century scientific point of view, a craft like beading or jewelry making would have to be primarily intuitive, requiring no thought or logic. It would have been beneath a man to do. For men to get involved with beading or jewelry making, it would have meant resisting evolution, and resisting progress.
Beading and jewelry making, from the Design perspective, are very much about making choices. Women are assumed and subsumed to be as capable as men. Beading and jewelry making are processes of construction, whether conceived and executed by women or men, which happen within an environment, and the results of which are judged as art, as the pieces are worn. There’s a lot of choice going on here. What goes together, and what does not. What will hold the structure of the piece together, and what will not. What you want to happen to the piece over time, and what you do not.
The Designer, whether woman or man, has to make the same kinds of choices, to be successful. Perhaps there are nuanced differences between women and men, in how they think through and come to any choice. I do not know. But the choices need to be made, nonetheless.
It’s always been a little confusing in society about how women should relate to their husbands, and how husbands should relate to their wives — especially while shopping for beads, clasps, stringing materials and other findings in a bead shop.
It’s not just in a bead shop. I remember coming home one winter vacation. My stepmother was a bit frantic. She was unable to cook my dad meals. The oven and 2 burners on the stove no longer worked. She had asked my dad if they could buy a new one, and he said “No.”.
I doubt my father truly understood what was getting asked of him. It seemed out of character for him to say No. But my stepmother was afraid to ask him again. So she was very stressed at having to prepare meals everyday on the two burners that were left. My father, and this was in character, never noticed her dilemma.
She felt the bible instructed her to abide by whatever my dad said. I took her aside. I told her firmly that in the Old Testament, and we’re Jewish, so we go by the Old Testament, it relates that the “woman” is the head of the household, and that the “man” is head of everything else. So, I further instructed, if the oven goes kaput, it’s her responsibility, under God, to get a new one. My father has no jurisdiction here.
Thus Anna found herself a new oven. And she gave my father the bill.
The bible is actually very confusing when it comes to delineating appropriate roles and relationships between men and women, and husbands and wives. Take the book of Genesis — the root of all things. It turns out, there were many, many, many versions of this first book of the bible. In some versions, Adam and Eve were equals. In other versions, Adam was more equal than Eve, and in still other versions, Eve was more equal than Adam. Some versions even threw in a 3rd party — Lilith. Dreadful Lilith. So we have stories where it’s Lilith vs. Adam and Eve. Lilith and Adam vs. Eve. Lilith and Eve vs. Adam. Lilith, Adam and Eve.
So, among these very ancient biblical and co-biblical texts, we have a plethora and cornucopia of sexual relationships, power relationships, gender relationships, and sexuality relationships. We have pairs and triplets, straight and gay, feminine and masculine. And it was up to a committee — probably all made up of men — to pick one of these many versions to incorporate into the official bible as the Book of Genesis. Guess which one they picked.
But if we were trying to sort out which version of the truth about Genesis was more correct, and more Godly and God-inspired, things would be somewhat confusing. It’s unclear if God had any plan about the relationships between men and women. Perhaps any thought about the relationships between men and women is trivial, when compared to creating the whole universe.
I don’t know.
And it’s clear that many other people don’t know.
When we look at how women relate to their husbands, when they come into the bead shop, we find many contemporary interpretations and re-enactments of these historical dilemmas. And we watch in amazement as husbands and wives play out their respective roles.
He drops her off, and goes elsewhere. He drops her off, and waits patiently. He drops her off, and waits impatiently. … waits sitting in the store … waits sitting in the car He is embarrassed to be seen in or near a bead shop.
He won’t get near a bead shop. He is someone who will drive her anywhere, anytime, any place. He loves what she does. He comes into the bead shop, and follows her up and down all the aisles, but says nothing. He comes into the bead shop, and follows her up and down all the aisles, and offers lots of advice.
He likes to make all the final decisions. He hates making any kind of decision. He likes to know exactly how much she spends. He prefers her not to tell him exactly how much she spends. He is never told what she spends. He is easily convinced that all her shopping will lead to something, like jewelry getting sold. He worries you haven’t bought enough. He tells her she really has enough already.
He tells her she needs to stop beading. He tells her she can’t continue to shop at bead stores. He figures the more she spends at the bead shop, the more he can spend on himself for his own hobbies and endeavors.
Should there be rules here? Should every woman show the same deference to her husband? Should every husband show the same deference, in return? Or should each woman be left to her own wiles and devices? Do husbands have shades of character, for which the wife must gracefully conceal, or relegate to some other universe, or trod on in spite of?
To gain some more insight here, you could almost create a HUSBANDS OF WOMEN WHO BEAD TAROT deck, to explain all the relationship variations and how these get expressed in the bead shop. For example,
THE FOOL Jalinda pays for her beads by check, and writes “Kroger” in the memo line. Kathy uses a secret bank account to pay for her beading supplies. Alice had returned home from a bead show with a small bag of beads. How much did you spend, her husband asked. $25.00, she replied, as she stashed her $1,032.00 bag of beads in her craft room. Sally has her system all worked out. She uses a joint checking account to pay for the part of her beads she wants her husband to see. She pays for another part of her beads with a personal checking account that her husband might accidentally see. And she pays for the last part of her beads with a check from her son’s bank account, which her husband will never see. These husbands are played for fools.
THE SAINT Jerome has taken an active interest in his wife’s hobby. He looks forward to their bead store trips. He’s very up on what she is doing, and what her goals are. He can do more than tag along as she goes up and down the aisles. He can actually shop for her on his own, and pick the right things she needs. This husband is what women often refer to as “highly evolved.”
THE EMPEROR Everytime Mark comes into the shop, he says, “I don’t ask her to go to tractor shops, why would I go to a bead shop?” These husbands have their own lives, separate from those of their wives, and no issues about that. On the one hand they show self-confidence; but on the other hand, they show a fear and an avoidance of things with which they don’t want to deal.
THE HANGED MAN This husband brings the wife to the bead shop, but sits off to the side, or sits in his car — often for hours. He has little interaction with his wife, but his just-enough-visible-presence strangely hangs over the shopping situation. This husband is unwilling to make an effort to share his wife’s endeavors. Netty had this kind of husband. They were Southern Baptist. After 22 years of marriage, her husband informed her that he believed God required that she now be subordinate to him. She couldn’t reconcile reality with her and his beliefs. So her trips to the bead store grew longer and longer and more frequent. She kept her husband waiting in the car while she spent his money on everything she could think of. About every 1 ½ to 2 hours, he would come into the store to check on her, and she would say, “It will just be a few more minutes, dear, go back to the car.” She’d make a funny face as he headed back for his car.
THE INVESTOR After his wife toils away for hours on end, but, come the next morning, decides she doesn’t like her evolving piece, and takes it apart, the husband asks, “How can you do that, after putting in all those hours!?#@ This husband shows disapproval, assuming his wife lacks vision and purpose.
You’ve seen all these husbands before. Few people have worked out the perfect husband-wife relationship. So the tensions get played out over and over again, with each trip to the bead store, as one or the other or both begin to shop.
The Design Question here — that is, the implications for finding inspiration and turning this into jewelry — is how well the woman manages her husband, and the roles required of each in their relationship, whatever type of relationship they have, when they shop for parts.
No matter what Tarot Card in the deck the husband seems to be. So no husband-type or behavior-pattern is better or more appropriate or more suited to finding oneself in Design. It’s a matter of, given a particular relationship, what choices does the woman (or her husband, for that matter) need to make, in order to get there?
Women get together and bead. They sit around a table. They talk. They gossip. They share bead stories. They share personal stories. They complain about the difficulties in life, and they extol the joys of living their lives. And they bead. At least a little. Some more than others. But it’s often difficult to tell if the talk is more important, or the beading. Or if all the talk is too distracting for some. Or not distracting enough.
Women get together and bead in classes. They get together and bead around the dining room tables in their homes. They attend workshops, and sit in a circle and bead. They join bead societies, and sit in a circle and bead. They arrange retreats so that they can sit in circles and bead. Why do so many woman like to sit around in a circle and talk and bead? Vera says it’s so I can get an education about women when I’m with women.
But anthropologists tell us this was always so. Women sat in circles and talked and crafted. The circles provided a measure of convenience. They provided a sense of safety. They allowed women to reconfirm their places within the group. They allowed women to learn the basic rituals in life, and to transfer this knowledge to their children. They offered women some sharing of responsibilities, especially for child raising.
It was because women so frequently came together to sit, circular, with one another, and because the tasks they did, while in these circles, were so involved and complex, that language was born. Women had a lot to say. They had to keep their children alive. They had to influence their child’s development. They had to balance the gathering of food with the rearing of children. A few guttural sounds, and the waving of hands, was insufficient. So a language of purpose was born, and the circles of women had one more added responsibility — keeping the language going.
Men, on the other hand, only needed a few sounds to get through their day. A “grunt” for “This is a good place to hunt.” A “grunt-grunt” for “Here comes the woolly mammoth”. And a “grunt-grunt-grunt” for “Run, here comes the woolly mammoth!”
Men also had an “Ah” for “This rock looks like it will sharpen up well.” They had an “Ah-Ah” for “I’ve made a sharp point with this rock.” There was an “Ah-Ah-Ah” for “Look at the spear I’ve made with this sharp rock point.” And then an “Aaaaaahhhh!” for “I speared myself with my sharp rock point!”
These grunts and ah’s would get the men through their day. They were sufficient.
But not for the women. Grunts and ah’s couldn’t capture ideas like, “Your baby threw up over me,” or, “Don’t eat those berries — they’re poisonous,” or, “These leaves and shoots would make a pretty dress.”
At first, in the earliest circles of women, various women would invent words, but they would talk across each other. [I’ve heard some say that this continues even until today.] Women had difficulty making themselves heard and understood. They might try shouting the word louder, or more frequently, or right into another woman’s face. But this probably precipitated fighting, perhaps a punch in the face. Early language use was probably a tower of Babel — no one speaking the same things.
To rein this in, to correct for this chaos, to bring order to language, rituals were born. By convincing all the women in a circle to perform in the same way, they could label each performance. And with each label, everyone could understand. Some rituals were religious. Some were social. Some social rituals were oriented around life cycle events, like birth, puberty, marriage and death. Some social rituals were oriented around the gathering and preparing of food. And other social rituals were oriented around making things. It was important that everyone perform in the same way, do the same things, and use the same labels for things. This had survival value.
Concepts were channeled into words. Words delineated activities and events. Women whose performance held closest to the words — as defined by the beliefs about the concepts underlying these words — had higher status. Women were keepers of the “word”, and those that did a better job of “keeping”, had higher status. These women were judged better. More right. More righteous. More proficient.
And beading and jewelry making were eventually born. Women used the small seeds and berries around them to adorn themselves. They added small shells, pieces off bushes and trees, and animal parts. They figured out ways to string these together and secure them in place. They developed the “Needle” and concepts for making and utilizing these needles. And women sought to preserve beading by performing it over and over again in the same way. And performing it within their tight circles. And with the smaller materials, objects and tools they had at hand.
Which brings us to men.
Men made jewelry, too. They made jewelry that did not need an elaborated language to inform them what to do. Given how men envisioned the design of hand-made things, they gravitated towards larger objects. Men hammered these. They put holes in things. They bent things into hooks, and rings, and connectors. Their jewelry was informed by strength. It didn’t take much of a language to demonstrate how to hammer things and make holes in things. They could easily teach others.
And this teaching was a source of power and strength. Men who could teach faster had higher status. Those that could develop tools to hammer and drill faster, cleaner, better, more exacting, using ever-harder and harder stones and other materials, continued to have higher status. Those that could build mechanical devices to achieve even better ends, secured their higher status.
For women, large, heavy tools and objects were inconvenient. They preferred smaller things they could manipulate, while gathering nuts and berries, and while nursing and caring for their children. Women relied on their fingers and hands in different ways than men. Some might suggest this was only a difference in scale; others might argue that these differences were significant. But the importance of the hand in craft was critical from the start.
As humans, for both WOMEN and men, their beading and jewelry making were informed by a sense of design. Undeniably, there was always a sense of design in craft. The degree to which WOMEN and men could implement their design sense, however, was limited by language and ritual. If they couldn’t provide a Name for something that they could envision in their mind, it was difficult to make it so. If they couldn’t create ways to teach themselves or others to recreate these Imaginations over and over again, the design concepts would be lost. And humanity would be lost. Or at least, set back.
Earliest humans most often assigned spiritual meanings to words and concepts associated with jewelry, to help them remember their sense of design. Some shapes and designs became strongly associated with social rules and social preservation. Eventually Art was born, and many more meanings could be assigned, and assigned in more complicated, elaborated ways. The expression of design would come to have many more pathways. It became much easier to progress with humanity. And more challenging. And more fulfilling.
Whether the ways of WOMEN or the ways of men were better at fostering jewelry, beading, design and creativity, … well, this battle is still getting fought out today.
Crystal is glass with lead in it. The more lead you put into the glass, the brighter the glass is. Lead causes health effects. If you looked at glass under a microscope, it would look like a sponge. Basically anything you put into glass, like lead or a dye, will leach out when the glass gets wet, such as when washing or sweating.
The negative health effects of lead result from an accumulation of lead in your body. It doesn’t really leave your body once there. The major way lead gets into your body is ingestion — through the mouth — but it can be absorbed through the skin. So, for jewelry, there is some concern with the older leaded crystal when it touches the skin, or when your hands touch the jewelry and you touch them to your mouth, or you put the jewelry in your mouth. The U.S. has done an incredible job of reducing lead exposure to the general population, but we still have some concerns with the older crystal beads.
The international community started regulating the amount of lead in glass crystal around 1970. They didn’t take it all out, or a big amount all at once. They’ve gradually reduced the amount of lead in crystal. Supposedly, the amount of lead in crystal today is an acceptable risk. They can’t take it all out because then there would be no crystal, and the world would fall apart.
It turns out, as you go back in time, there is more and more lead in crystal. The barrier to putting lead in crystal before regulation was the price of the lead, and lead always went up in price. So there’s more lead in the 1950’s than the 1960’s; more in the 1940’s than the 1950’s; more in the 1930’s than the 1940’s; and so forth. The crystal beads today seem very bright and attractive, but if you held them up next to beads from the 1930’s and 1920’s, the newer ones would look dull and uninteresting like plastic. If you are re-working old jewelry or working with old beads, ideally, you would want to either make things so they are worn over cloth, or put non-crystal beads on either side of your crystal ones, so they are raised above the skin.
Crystal beads are very, very popular. People really value that brightness. They are more expensive than regular glass, but not that much more expensive. These beads are always in high demand. They are always in short supply. The market for distributing and selling these beads is a bit screwy.
And this is the kind of bead that businesses actively try to scam their customers on. I want to give you a sense of what those scams are, and what questions to ask.
SCAM #1: Selling You New Stuff, But Labeling It As Old
The older crystal has much more lead in it, so is considerably brighter and more attractive. Way back when there were some very interesting colors, coloration effects and faceting effects, that only recently have been duplicated or equaled. But they can’t duplicate the brightness. The brightness results from the lead content, not the faceting. Almost all the old stuff has been collected up, so people are not used to seeing it, and seeing any comparisons between old and new. The new stuff looks bright and appealing. People are generally trusting, so it’s easy to get away with.
So you can go into jewelry stores, bead stores, antique stores, estate sales, flea markets, on-line, and see a lot of new stuff getting labeled as old. The old stuff is much more valuable and collectible. If you held the new stuff up next to the old stuff, it would tend to look like plastic.
You won’t be carrying around with you a color chart that shows you color brightness by year of manufacture. But there’s a pretty easy test. If someone says something is old — an old piece of jewelry, or a bag of old beads, hold out your hand straight ahead of you and into the air, and tell them to put it into your hand. If it’s old, your hand will drop. Even if it’s from 1970, your hand will drop. You’re just not used to how heavy things were, when they had a lot of lead in them. When you get back to the 1920’s, each bead is like a lead pellet. One bead will make your hand drop.
If you hand doesn’t drop, then maybe it’s not as old as they are saying, or maybe it’s new.
SCAM #2: Selling You Stuff From A Country Other-Than-Austria, But Telling You It’s Austrian
Just like the Druks and Fire Polish beads, crystal beads are made in many, many countries. Beads from different countries vary in quality, and again knowing what country they come from tells you about the quality and value. The scam here is selling you something from a lower quality country, and telling you it’s Austrian (the highest valued country). They either say they are going to give you a discount on the Austrian, or they pocket the difference.
Swarovski is a company based in Austria that makes the highest quality crystal, and the most expensive. They were the first company to make these, they have the best equipment, and are viewed as top of the line. While Swarovski has offices all over the world, they make these in Austria, (though we know today a lot of production is in China). There are other companies in Austria that either distribute these beads, or turn them into other kinds of jewelry components, but do not make these beads.
Another major source of crystal beads is The Czech Republic. A major Czech crystal manufacturer is Preciosa. Czech crystal usually runs about 10–15% less in cost than the Austrian. Swarovski does a lot of markting; the Czech companies do not. That price difference reflects the differences in marketing costs.
Some similarities and differences: Both the Czechs and the Austrians use the highest amount of lead allowed at any one time, so their beads are equally as bright.
The Austrians have a cultural preference for very sharp facets. The facets on these beads are so sharp that jewelry made with them can scratch the skin. The Czechs have a cultural preference for smoother facets. To the Austrians, the sharper facets make the beads look more like real diamonds. To the Czechs, smoother facets do. Americans seem to prefer the sharper facets. Remember, it’s primarily the lead that gives these pieces their brightness, not the faceting. The Czechs have been moving to sharper facets to compete with the Austrians, because America is the major market for these beads.
The Austrians start with a more intense color palette, and reinforce that intensity through slight modifications in the shape of the bead. You can see this best in the bi-cone, which they make a little less symmetrical and a little more saucer like. This affects how the light refracts through the glass, thus increasing the color intensity.
The Czechs use what I call crayon colors. What’s nice here is that if you are looking for basic colors, like a red-red, or a green-green, you are more likely and more easily to find this color in the Czech line — even though Swarovski offers hundreds of color choices. For example, to get a red-red in the Swarovski line, you would get a red-orange.
The Austrian crystal beads tend to be slightly different in size, because of this shape difference, than advertised. So, if you were purchasing a 4mm bicone, the Austrian crystal is actually 3x4mm; the Czech crystal (and crystal from any other country other than Austria) is 4x4mm. Austrian bicones are smaller than the size you see on their label.
The size differences in the round shape are more difficult to spot. Swarovski also altered its round shapes slightly in the early 2000’s. An 8mm round crystal from any other country would be 8mm x 8mm. From Austria, the older ones are 8mm x 7.5mm. The newer ones are 8mm x 8.5mm. Again, the slightly altered shape changes the way the light refracts through the beads, and enhances the color’s intensity.
In the image below, both 4mm ruby AB bicones would be labeled the same size and color. Both have the same lead content, so they are equally as bright. The Czech color is less intense than the Austrian. The Czech bead is slightly larger and more symmetrical than the Austrian.
If you went into a store to buy 4mm Austrian crystal bicones, you won’t have a chart with you that shows you color intensity by country of manufacture. However, all you would have to do is pull off a strand of 4mm round druks off the wall, or ask to see some 4mm round sterling silver beads. If the 4mm crystal beads you are looking at are the same size as anything else that is 4mm, then the crystal beads are NOT from Austria. In the bicones, the Austrian will always be a different size than the label.
One woman who took one of my classes told the story where she had gone into a bead store she hadn’t been in before, to buy 5mm Austrian crystal bicones. The beads were smaller than 5mm, so she thought she was getting ripped off. She said she threw a temper tantrum, cursing out the store owner, and storming out. You see, it was the company she had been buying them from originally that was ripping her off. Theirs were 5mm.
One problem that people often have when they buy crystal beads from different sources is that many sources will label their crystal beads “Austrian”, but one might send you true Austrian, and another might send you Czech. There’s nothing wrong with Czech crystal. You are getting an equivalent product. The problem that arises is that the actual colors will be different, as will be the sizes and shapes. So, you can order 4mm ruby AB bicones from two sources, and if one sends you Austrian and the other sends you Czech, these will be so different from each other in color, size and shape, that they won’t mix in the same piece.
Another major source of crystal beads is China. While China is working on coming out with a line of crystal equivalent to Swarovski, most Chinese crystal you’ll find on the US market uses considerably less lead, thus is a lot less bright, and more unattractive. This Chinese crystal runs about 1/3 the price of the Austrian crystal. If you held this Chinese crystal up next to Austrian crystal, you would immediately notice that it is cloudier and less bright than the Austrian.
However, when people sell Chinese crystal, they don’t hold it up next to Austrian crystal. They hold it up next to glass. It’s much prettier than glass. Plus, they are in the business of marketing and displaying Chinese crystal so it looks great at the point of sale. If asked, I usually tell people to think carefully before they buy this. At the point of sale, it’s cheap and it’s attractive. But when you take it home, you usually have nothing to mix it with. It’s too dull to mix with Austrian crystal; it’s too bright to mix with glass. However, if you are making fashion jewelry, the Chinese crystal might be the best choice. It is very inexpensive, but will definitely add that extra level of sparkle and brightness that people find so attractive. Moreover, the Chinese line has some interesting color effects and shapes that the Swarovski line does not.
Suppose you are very familiar with the realities of the crystal market. Say you are in the business of selling eyeglass leashes, and that you had been using Austrian crystals in your leash, and having to sell them for $20.00. You have a brainstorm. If you substitute Chinese crystals for Austrian crystals, you’ll be able to sell your eyeglass leashes for $10.00, and become a millionaire.
With this particular type of bead, this relationship based on cost doesn’t really play out. People really value that brightness, and are willing to pay for it. Say I had an eyeglass leash done with Chinese crystals at $10.00 side by side with one done with Austrian crystals at $20.00. I’d sell more at $20.00. Say I had my Chinese one alone. I wouldn’t sell that many more at $10.00, based on a cost projection, because people come to the situation with an expectation about brightness. People shop around. People go to Macy’s and look at tennis bracelets, and they go to Wal-Mart and look at tennis bracelets. Subconsciously, they see and know the difference, and they bring this understanding with them to any purchasing situation.
With Chinese crystal, you are definitely getting an inferior product. But how do you know what you’re buying? I’ve been in many bead stores, bead shows, on-line, and seen many people selling Other-Than-Austrian crystal, but having this labeled as Austrian.
SCAM #3: Selling You Grade “B” as Grade “A”
Crystal in the market can be sorted into two groupings, though they are rarely labeled as such. Grade “A” is perfect. Grade “B” may or may not have scratches and chips. This works like clothing and “irregulars.” Grade “B” comes from many sources. Stores that have these loose in a tray may be selling them out, and they’ve gotten bumped up and bruised in the trays. Some people cannibalize old jewelry. Distributors and manufacturers sell off cartons that have gotten roughed up somehow, through dropping cases, moving and the like.
These beads are so bright that it is difficult to examine them for scratches and chips over a sustained time without hurting your eyes. The only yellow flag that I can suggest is that, if you see these crystal beads getting sold on strands, I’d be more suspicious. When crystal beads come to a store, they come loose in an envelope. If you see them on strands, that means that someone had to pay someone to strand them.
A good reason to put them on strands is that they sell better on strands. But you can only do so many strands in an hour, so the price of these would reflect that extra effort.
Usually when I’ve seen grade B sold as grade A, they’ve been on strands. So I’d suggest examining the beads a little more closely, if you buy them on strands.
Scams Over Crystal Beads Are Easy To Get Away With
The reason so many businesses actively try to scam their customers on crystal beads, is that it’s easy to get away with. Customers are often in a frenzy to get beads which are always in short supply. There can be a lot of wheeling and dealing when distributors sell crystal beads, so often there is not a clear and strong relationship between the price and the cost of these beads. A small retail store may have an incredibly great price, and a national distributor might have an average price. Not all the distributors carry all the colors and all the sizes and all the shapes. Often, people, while on vacation, will see some color or shape at a local bead store, and assume they can find the same thing when they get back home. There are often notorious and seemingly unexplainable shortages of certain colors or shapes.
And Swarovski, in the 2000’s, began rebranding their crystal products as “Crystallized”, which only muddied the water more. You can’t trademark an adjective. What began happening is that many crystal producers and distributors around the world began re-naming themselves “Crystallized”-something. One Chinese company became “Chwarovski.” In January, 2010, Swarovski returned to “Swarovski”, dropping “crystallized.”