Design and Assemble Your Own Jewelry, The Complete Insider’s Guide
New book by Warren Feld
Learning Bead Stringing Is More Than Putting Beads On A String, And Tying On A Clasp
There is an art and skill to stringing beads. First, of course, is the selection of beads for a design, and the selection of the appropriate stringing material. Then is the selection of a clasp or closure, appropriate to the design and use of the piece.
You want your pieces to be appealing. You want them to wear well. You want someone to wear them or buy them. This means understanding the basic techniques, not only in terms of craft and art, but also with considerations about architecture, mechanics, and some sociology, anthropology and psychology.
In this book, I go into depth about:
1. Choosing stringing materials, and the pros and cons of each type
2. Choosing clasps, and the pros and cons of different clasps
3. All about the different jewelry findings and how you use them
4. Architectural considerations and how to build these into your pieces
5. How better designers use cable wires and crimp, as well as, use needle and thread to string beads
6. How best to make stretchy bracelets
7. How to make adjustable slip knots, coiled wire loops, and silk wraps
8. How to finish off the ends of thicker cords or ropes, so that you can attach a clasp
9. How to construct such projects as eyeglass leashes, mask chains, lariats, multi-strand pieces, twist multi-strand pieces, and memory wire bracelets
10. How different teaching paradigms — craft vs. art vs. design — might influence the types of choices you make
For Warren Feld, Jewelry Designer, (www.warrenfeldjewelry.com), beading and jewelry making have been wonderful adventures over 36+ years. These adventures have taken Warren from the basics of bead stringing and bead weaving, to pearl knotting, micro-macrame, wire working, wire weaving and silversmithing, and onward to more complex jewelry designs which build on the strengths of a full range of technical skills and experiences. http://www.warrenfeldjewelry.com
Because the history of pearls has been very much a part of the history of nobility, there have been many customs and social expectations that have arisen around pearls. One of these has to do with styles and lengths.
Graduated: Beads are graduated in size, with the largest in the center, and decreasing in size on either side towards the clasp.
Uniform: All the pearls are within .5mm of each other in size.
Choker: One or more strands worn just above the collarbone, typically 15 1/2″ to 16 1/2″.
Princess: 18″ length
Matinee: 22–24″ length
Opera: 30–32″ length
Continuous Strand: A necklace without a clasp, typically over 26″ in length so that it can slip over someone’s head.
Bib: A necklace with many strands, each one longer than the one above it.
Rope: 45″ or longer, sometimes referred to as a lariat.
A necklace enhancer, sometimes referred to as a “necklace shortener”, is like a ring with a latch on one side and a hinge on the other, which lets you open and securely close it. These are most often used with ropes, where you circle the rope over your head 2 or 3 times, to wear like a multi-strand choker. The necklace enhancer clips over the knots in the encircling strands, to secure them together and in place. If you cannot find a necklace enhancer, you might be able to use an S-clasp to achieve the same end.
Odd vs. Even number of strands: This is a personal choice. Traditionally, it was believed that an even number of strands was inappropriate and bad luck. It would be very unusual to see any royalty wear an even number of strands.
A necklace, or any type of jewelry, has a structure and an anatomy. Each part has its own set of purposes, functions and aesthetics. Understanding each type of structure or physical part is important to the designer.
If we looked at these sections of a necklace from solely an Art standpoint, we might primarily focus on the centerpiece of the jewelry and consider The Strap (and most other parts) as supplemental and less important to the piece, in a similar relationship as the frame to a painting or the pedestal to a sculpture.
However, jewelry is a 3-dimensional object serving both aesthetic as well as functional purposes. As such, we need to be more sensitive to the entire jewelry-anatomy and both its Art and Architectural reason for being. This kind of thinking is at the core of what makes jewelry design, as a discipline, different than art.
Typical structural parts of a necklace might include,
The Strap:The entire linear component of the piece, comprising Yoke, Clasp Assembly, and Frame
The Yoke:The part of The Strap behind the neck, typically 6–7” including clasp assembly
The Clasp Assembly:Part of The Yoke, and includes, not only the clasp itself, but rather all the pieces it takes to attach your Strap to the Clasp, including clasp, rings, loops or knots or crimps at ends of stringing material
The Frame:The visually accessible part of The Strap, connecting to The Yoke at The Break point. On a 16” necklace, The Frame might be 9–10”
The Break:The point where The Yoke connects to The Frame, often at the collar bone on either side of the neck. Very often, this point is one of a critical change in vector — that means, the angle The Frame lays radically changes from the angle of The Yoke. Think of this as an inflection point.
The Bail:A separate part which drops the centerpiece or pendant drop below the line of the Frame
The Focal Point, Centerpiece, or Pendant Drop: A part which emphasizes or focuses the eye, usually dropped below the line of The Frame, but is sometimes a separate treatment of The Frame itself
The Canvas:Typically the stringing material or foundation of the piece
The Embellishment:Things added to the surface or edge of The Canvas, The Strap, or the Centerpiece which serve as decorative, rather than structural or supportive roles
Each part of the body of a necklace poses its own special design challenges for the jewelry artist. These involve strategies for resolving such issues as:
— Making connections
— Determining angularity, curvature, and roundedness
— Transitioning color, pattern and texture
— Placing objects
— Extending lengths
— Adding extensions
— Creating balance and coherency
— Anticipating issues about compression, stretching, bending, load-bearing, and distortion
— Anticipating issues related to physical mechanics, both when the piece is static (not moving when worn) and dynamic (moving when worn)
— Keeping things organic, so nothing looks like an afterthought, or an outlier, or out of place, or something designed by a committee
— Determining which parts are critical to understanding the piece of jewelry as art as it is worn, and which parts are merely supplemental to the piece
The Strap
The Strap is that continuous line that extends from one end of the clasp to the other. The Strap may or may not consist of the exposed Canvas. The Strap typically delineates a silhouette or boundary. This usually sends the message to the viewer about where they may comfortably and appropriately place their gaze on the wearer’s body.
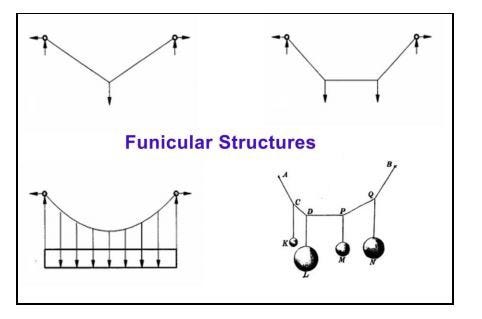
The Strap is a type of funicular structure. A funicular structure is one where something like a string or chain or cable is held up at two points, and one or more loads are placed on it. Loads increase tension. Loads lead to compression.
The placement can be centered or off-centered. If more than one object is placed on The Strap, each object can vary in mass, volume and weight. We do not want The Strap to break because of the weight or placement of any load or loads. We do want to control the resulting shape of the silhouette or curvature of The Strap which results from the weight or placement of any load or loads.
The span of The Strap is very sensitive to force and stress. A piece of jewelry may have more than one Strap. In this case, the span of each Strap, and their built in support and structural systems, must be tightly coordinated, if to respond optimally to forces and stresses.
The Yoke
The Yoke is one section of the Strap which is the part around the back of the neck, typically including The Clasp Assembly. The length of The Yoke, and whether the beginning and end parts of The Yoke should be exposed on the front of the body is something to be determined by the designer. The designer must also determine the proportional size of The Yoke relative to the remaining part of The Strap. The designer must determine what role the elements, such as beads, which comprise The Yoke, will play, and whether they should be an active part of the visual composition, and/or a critical part in the functional success of the piece, or merely supplemental. The Yoke balances the load requirements of the remaining Strap (The Frame), Bail and Pendant.
The Break
At the point The Yoke connects to the remaining Strap (called The Break leading to The Frame) on either side of the neck, this is a point of vulnerability, often assisted and reduced with the addition of support elements. Because it is at this point — The Break — where The Strap may alter its vector position in a dramatic way — that is, the angular positioning of the Strap at the point of The Break may vary a lot as The Strap continues around the front of the body — this is a major point of vulnerability.
There are always transitional issues at The Break. The designer needs to have strategies for managing these transitions. This might involve using visual cues and doing something with color or pattern/texture or rhythm or sizes. The designer might add support systems, such as rings, at this point. The designer must decide the degree The Frame should be visually distinct from The Yoke.
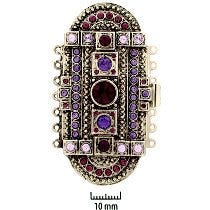
The Clasp Assembly
The Clasp Assembly is most often part of The Yoke. The Clasp Assembly includes, not just the clasp itself, but also all the other parts necessary to attach it to the Strap. There might be some additional soldered rings. There might be loops left at the ends of the stringing material. There might be crimp beads or knots or glue or solder.
Whenever choosing a clasp, it is more important to think in terms of choosing a clasp assembly. You might want to use a very attractive clasp, but it may take so many parts and turns to attach it to your beadwork, that you end up with a visually ugly clasp assembly.
Occasionally, The Clasp Assembly is part of The Frame. This will present a different set of architectural issues and considerations.
The Frame
The Frame is that part of The Strap which connects to either side of The Yoke at The Break.
Too often, when the designer does not recognize the Yoke as distinct from The Frame — even if the transition is to be very subtle — less-than-satisfying things happen. Proportions may be off. The piece may not lay or sit as envisioned. The Strap may have too much embellishment going too high up The Strap. Sometimes the balance between Yoke and Frame is off — too much Yoke and not enough Frame. The change in vector angles between The Yoke and The Frame may pose many architectural issues for the designer.
Bi-Furcated Frame: A Frame visually split in half, usually at the center and in two equal parts, with a centerpiece focal bead or pendant drop in the middle. Here the designer needs to think whether the two lengths should move in a coordinated fashion, or not.
The Focal Point, Centerpiece or Pendant Drop
While not every necklace has a focal point, centerpiece or pendant drop, most do. The Focal Point gives the viewer’s eye a place to rest or focus. Usually this is done with a Centerpiece or Pendant Drop.
Othertimes, The Focal Point is more integrated with The Strap. This might be created by graduating the sizes or beads or playing with color or playing with rhythm or playing with fringe.
A Centerpiece would be a part that extends beyond the line of The Frame, usually below it, around it, or in front of it. This forces transitional concerns between it and The Frame.
There should be a natural visual as well as functional transition from The Strap to The Focal Point, Centerpiece or Pendant Drop.
The Bail
The Bail is a part that drops the Centerpiece below the Frame, forcing additional transitional visual and functional concerns among Centerpiece, Bail and Frame. We are concerned about its impact on emphasis, harmony, balance, distribution of size and proportion, point, line, plane and shape. We are concerned about its ability to maintain stability, given the effects of gravity, the weight of the drop, and its relationship with and fit to The Frame of The Strap. Most Bails would be considered vertical structures.
The Canvas
The Canvas typically refers to the stringing materials. However, in a layered piece, may refer to any created “background or foundation” off of which or around which the main composition is built. The Canvas might be either a horizontal structure (like an arch or truss) or a vertical structure (like a wall or frame). It might be exposed, partially covered, or fully covered. It might change materials or construction systems along its length, such as transitioning from a cable wire to a chain.
It is important to know what The Canvas is made of, and how its function and appeal might improve or weaken as its Span is lengthened or shortened, widened or narrowed, over time. The steepness of its slope or positioning might also affect its integrity.
Sometimes more than one Canvas are interconnected. You can picture a necklace with additional strands crossing the chest from one side of The Strap to the other. You might also have a necklace where strands radiate out at angles from the neck and across the chest.
Architecturally, additional Canvases which span from one side to the other of a piece of jewelry operate like Trusses, Arches or Support Beams. These types of structures are referred to as Horizontal Structures.
The Embellishment
The Embellishment includes things like fringe, edging and surface decoration. Embellishments are decorative elements added for purposes of improving the visual appeal of a piece. Embellishments typically do not play any support or structural roles.
The Jewelry Designer makes many choices when creating a piece of jewelry. Lots of things to manage and accomplish.
Probably the two most important choices, right up front, in creating a wearable art-piece that will be around for future generations are your: (1) Stringing Material, and (2) Clasp
When you work with so many customers in a store, and so many students in classes, you begin to see that people are not necessarily that great in selecting clasps. Many are in a clasps-rut — they use the same clasp over and over again.
Others pick out clasps they find appealing, whether or not they would visually or functionally work with the piece they have made.
Few people anticipate how they are going to attach the clasp to their beadwork, often resulting in an overly long, awkwardly connected clasp assembly.
So, how to you go about choosing clasps?
Clasps always seem like they’ve been someone’s last thought. They should be the first thought. Or at least thought about concurrently with the design of the piece. But they should never be the last thought.
As clasps should be thought of in their entirety — as clasp assemblies. Clasp assemblies include all the rings, loops and other hardware necessary to attach the clasp to the beadwork. The clasp itself may be beautiful, but the entire clasp assembly may not be.
But many people get so excited creating their beadwork, that they forget about the clasp — until the last moment. You can tell when the jewelry maker hasn’t put much thought into their choice of clasp in many ways. Often, the clasp doesn’t look like it was meant to go with the bead work or general design. It might be out of proportion. It might be a different texture or sensibility. Its function — how you open and close it, while wearing your jewelry — might seem odd, perhaps unnatural. And not only does the choice of clasp seem as an after-thought, but how to attach to the bead work to that clasp seems un-thought out, as well.
So it’s not surprising, that when we were repairing jewelry on a regular basis, about 80% of the pieces to be fixed had broken at the clasp.
It is best to, in part, build your design around your clasp. If your piece has a centerpiece or focal point, then how does this link up to or coordinate with the clasp. At the least, when visualizing your beadwork, include an image of the clasp and how it is attached at both ends. The world is full of clasps. Not every clasp is a jeweler’s best friend. But it depends.
The clasp needs to visually fit with the beadwork. It needs to function as the artist intended. It needs to function in a way the wearer can relate to, use and handle. It needs to be appropriate for the piece and the context in which it is too be worn. It should not compete with the beadwork. It should complement it. Ideally, at least from a design perspective, your clasp should look and feel as if it were an integral part of the entire piece.
In a Gallery setting, if you are selling your jewelry there, you usually want a very functional, but not overwhelming, clasp. You are selling your beadwork, and you don’t want your clasp to compete with this.
In a Department Store, setting, however, often the clasp sells the piece. In this setting, choosing a clasp requires a different kind of logic, thinking and anticipation.
Some clasp-types are “expected” to be a part of the piece — even if the particular choice of type would not be the best choice in the world. Traditions dictate clasp choices in some situations.
The former owner of a local Tennessee pearl company was very frustrated with clasps. She sold a lot of finished pearl jewelry at very high prices, and had been using 14KT gold pearl and safety clasps. Her customers sent a lot of their pearl necklaces and bracelets back for repairs, because their clasps broke. And this company felt, because the prices of these pieces were very high, that they were obligated to replace the clasps and re-string these pearl-knotted pieces at no additional charge. 14KT clasps — particularly the pearl, safety and filigree box clasps — do not hold up well, because gold is a very soft metal.
Replacing clasps on a pearl-knotted piece is quite some job. You have to cut up the piece to free up each bead, and then you begin the knotting and finishing off processes again. It turns out, the 14KT clasps were not the only expensive part of the bracelets — making the knots between each pearl was the time-consuming and costly part.
She desperately wanted to reduce the number of repairs. Her first idea was to replace the pearl and safety clasps with other styles which were sturdier. However, these pieces didn’t sell. People wanted the pearl and filigree clasps. The designs of these clasps were so traditional and so locked into their expectations for what pearl-knotted jewelry should look like, that they would not compromise.
Her second effort, she tried replacing the 14KT pearl and filigree clasps with gold-filled ones which were stronger, but this made her customers very angry — they wanted 14KT gold.
So, her final strategy, she returned to using 14KT gold pearl clasps, and doubled her prices. She built in the cost of one repair into the prices she charged. And only then could she present her happy face to her customers, and her somewhat-happy face to herself when she was in private.
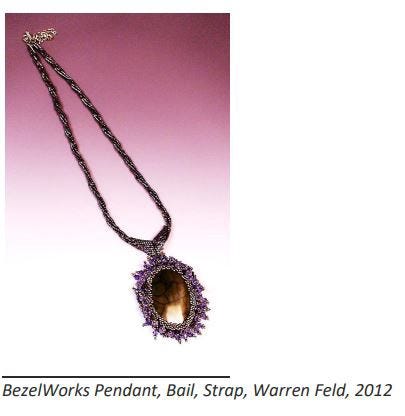
This is one of my favorite pieces, which, unfortunately, since it is small, it is difficult to create a decent image to post online.
The Pendant is an adaption of a segment in Cynthia Rutledge’s Tibetan Bangle Bracelet. The strap is beadwoven, and based on an antique chain I saw in an antique store in Nassau, The Bahamas. The strap takes longer to make than the pendant itself.
Tibetan Pendant with Strap
I have other pieces I’ve made, some of which I teach or have instructions/kits for, on my website. Warren Feld Jewelry
This is the first submission received for Land of Odds’s 2009 The Ugly Necklace Contest. Deadline is 3/15/09. On-line voting will begin at the end of May 2009.
I won 4th place in Swarovksi’s 2008 annual Create-Your-Own-Style contest with this piece. The theme was Naturally Inspired. There were 1200 entries. I named my piece, “Canyon Sunrise.” — Warren