So what prevents so many jewelry makers and other artist types from living their authentic lives? What prevents so many designers from making choices and taking advantage of opportunities which are not limited by anyone — not limited by friend or family or boss or colleague or perceptions of cultural and social norms?
Aloise was sitting there, fidgeting, only half listening to the discussion in my class about jewelry design, when, suddenly, unusually with a forceful voice and expression, she said, No one likes her stuff. No positive feedback in response to seeing any of her necklaces or bracelets or earrings. She loved her designs, she stated plainly, convincingly. But no one else seemed to. Her designs did not resonate with her friends and the people around her. She loved making jewelry. She loved her style. She loved the pieces and materials she was using. But, because of the nil-to-negative feedback, she never felt authentic as an artist.
If you saw her pieces, you would immediately come to the conclusion that there was no reason for the negative feedback, except, perhaps, that her pieces did not reflect the current fashion. Well conceived. Well-made. Clearly a point of view.
My response to her was simple: They are not the judge, you are. The problem for you is not your design skills. The problem is that you need to either to connect with a different audience, or, much more difficult, you need to learn how better to express what makes sense and has value for you in your own jewelry design work to your current audience. It’s like thinking your design process out loud — how you made choices about materials, techniques and composition.
Design Is A Tool For Expressing Authenticity
Authenticity and design are integral to each other. Design is a tool for expressing your authenticity. You will have difficulty feeling and expressing your authentic self in public without reference to good design. And, ultimately, you can’t have good design without an ability to express your authentic self. Cannot have one without the other.
Authenticity means conveying a sense of your being genuine. Real. True to your values. Consistent and coherent in how you relate your inspiration to your aspiration when creating a piece of jewelry. Then, continuing to be consistent and coherent as you implement your aspiration, understandably making changes and tweaks along the way, into your finished jewelry design. This requires a lot of honesty with yourself. A lot of self-reflection and what is called metacognition. Your jewelry becomes a sincere expression of you and you-the-creator’s vision.
That’s authenticity. The sum of all your choices in the design process. Technical. Artistic. Social. Philosophical. Each piece of jewelry you make is evidence to the world about all the choices you have made. Choices about translating vision into a tangible form. Selection of visual elements, product functionality, technology and technique. Accepting or rejecting client desires and hoped for experiences. Steering your business towards particular ideas about branding. Design can enhance. It can amplify. It can set boundaries. It can increase accessibility. Engage. Impact.
Gennifer refused! She refused to listen to me about how important it is to relate the materials you choose to your design goals. She made wrap bracelets, usually two bands around the wrist. She sold them for $300 each. Took her about 2 hours to make each one. The materials she used were cheap. If the price tag you put on your jewelry has no relationship to the effort and materials you put into it, you’re not being authentic.
A wrap bracelet consists of beads ladder-stitched between two pieces of leather. She used Indian leather, which dries out and cracks easily. Does not hold up. She stitched her beads with fishing line. Fishing line in sunlight and heat dries out and cracks. Very quickly. She used glass beads from China. Glass beads from China typically are a clear bead with a color coating. The side of all her beads along the full almost 20” length of the bracelet which touched the skin had lost their color. Originally black, they were now white with peeling black. No reinforcement was placed on either end, so, on either end, again pretty quickly, the stitching would start to break and the two supporting strands of leather would come apart.
Gennifer’s wrap bracelets probably had $10–12 of materials in them plus two hours of labor. Her $300 price tag was not representative of appropriate design. She should have upped the quality of her materials: Greek leather, Czech glass or gemstone beads, micro bead cord for the stitching. She should have reinforced both ends, such as using a silk wrap technique. Then her pieces would be durable and justify the price tag, and be much more authentic to herself as a designer. Or, she should charge what her pieces are really worth: perhaps $75–100. I’ve yet to meet one of her customers who has gotten more than six months of use out of her pieces. To me, if Gennifer thinks she is being authentic, I’d tell her it’s contrived.
About Authenticity
Authenticity is multiplex. It functions on several planes.
You have material authenticity. Given the value you want to assign to your piece, your choice of materials, and how you leverage them, should be the highest, appropriate quality in durability, sustainability and craftsmanship.
You have technical and technological authenticity. Your choice of techniques and technologies, and how you leverage them, should bring your design to that optimum (sometimes called parsimonious) point of efficiency and effectiveness. That is, that perfect point where you can maintain both shape and suppleness.
There is emotional authenticity. Good jewelry should resonate with the customer. It should evoke genuine emotions in line with your audience’s intended desire(s).
There is cultural authenticity. Good jewelry shows respect and acknowledges any cultural influences and inspirations, when design elements are borrowed or otherwise represented.
There is contemporary design authenticity. In contemporary design, the designer substitutes personal values and understandings for those of traditional socio-cultural norms and values which influence more traditional design. You must always show respect for tradition while concurrently using your own authentic self as the measure and rationale for successful design choices within any designing process. You must overcome pressures to conform and present a curated version of yourself.
Another type is personal authenticity. As a jewelry designer, you always have something to say. It can be simple such as what you think might be beautiful or wearable or appropriate for a certain situation. It might be more complex where you make a series of interrelated choices relating your values and desires to those of your client.
Dilemmas For The Designer
For me, I grew up with both parents and teachers discouraging me from pursuing my creative self through the arts. Doctor or lawyer. Basically, those were the two allowed choices, as I was steered and tracked and encouraged (or discouraged) over all my young and teenage years. [Parents, if your child tells you who they are, support them!]
Finally, in my early 20’s, having achieved some separation from my overbearing career police, I made an attempt for a few years to paint. Pretty. Ok technique. No reflection of who I was as a person except perhaps, in the choice of subject matter. I tried to convey emotions and meanings, but, primarily ended up with pretty paintings to decorate my apartment. Friends and family loved them. Sold a few. But none of this was coming together as a reflection of my authentic self. I was in my 20’s but hadn’t found anything authentic about me.
Twenty years later, when I began to make jewelry, I felt a strong connection. With jewelry, I had to create something meaningful for both myself and my client. Both our understandings. Both our values. Both our desires. Jewelry by its nature requires this kind of dialogue. That challenge stirred me. It forced me to come to grips by reflecting on what I wanted the object I created to be, and how that compared to what someone else wanted. Add on top of this was the fact the design had to account for the fact that the wearer moves around and never wants to look clownish. Jewelry design, under these circumstances, becomes very complex. And, as a result of all this thinking and concerning and anticipating and interacting, my sense of authenticity began to grow and clarify and grow and clarify some more.
From my experiences, and those of my students and colleagues, I can identify several dilemmas and challenges for the designer who wants to find their authentic self and successfully express it through the designing of jewelry.
The originality dilemma. You don’t design in a vacuum. And most certainly, many of the design choices you make have been influenced by other designers around you. Finding a balance between originality and the influence of others can be daunting. But think about it this way. Define ‘originality’ as differentiation. Your authenticity will emerge and shine by the way you differentiate yourself from other designers and influencers.
The art market dilemma. For many of us, we want some level of commercial success. Often this means compromising our integrity as we bow to things like fashion, market trends, client expectations, commercial requirements and limitations. Sometimes, when commercializing what we do, we use the label “authentic” to commodify our jewelry, when we are really stretching the imagination and legitimacy here. The challenge is to find balance between making a living and maintaining true authenticity.
The shared understanding dilemma. Successful design emerges from the insights and applications of the values and desires of the artist in coordination and conjunction with the assumptions, values and desires of the client. That might mean some compromising. Some give and take. Some less authenticity. The designer must decide to what degree personal integrity will be compromised in the design process.
The vulnerability dilemma. Since jewelry must be introduced publicly — for someone to wear, to be exhibited, to be sold, to be collected — the designer, of necessity, must open themselves up. Be exposed. Be given critique and criticism. There is doubt and self-doubt. There is a questioning of whether you are truly genuine. The designer is faced with determining how to overcome feelings of vulnerability and how much ego-self-protection they want to build into what they do.
The evolution dilemma. You grow, you learn, you change over time. What you thought was your authentic self (and all that that meant) earlier in your career may be different than what it is now and how you want to express it now. In a similar way, your authentic self may vary a bit from one context to another. This might result in a tension between the consistency and coherency of your body of work as these relate to your authentic self as you see / feel / sense it in the moment. The designer, in this case, must grapple with whether to change or not, or if so, how much to change. If you are already an established business with a strong brand identity, this becomes especially difficult to deal with. Changing your brand identity is especially hard. You don’t want to be rejected by or confuse your audience.
During my jewelry designing career, all these challenges confronted me. I can honestly say that there is a give and take, from piece to piece that I have designed, between achieving that authentic self, and having to make some compromises. Often, when I find I have had to compromise too much — usually to conform to my client’s wishes — I concurrently design a piece in the abstract, one I can create which majorly resonates with many aspects of my personal authenticity as an artist.
One last point. Look around at all the jewelry available for sale and that people wear. There is a lot of sameness. Standardization. Very machine-made looking. In some sense, lacking in personality and individuality. Infusing your jewelry design with your authentic self helps you differentiate yourself from mass-produced or superficial alternatives.
How someone actually goes about finding and expressing their authentic self varies from person to person. This isn’t a straightforward process. You the designer must be guided by your own self-reflection, empathy and commitment to your core values, beliefs and desires. You must strive to align your choices about design with your inner convictions.
And remember: Rogue Elephants are always authentic. They can be no other way.
_______________________________
I hope you found this article useful. Please consider sharing. Thank you for clicking the CLAP HANDS icon at the bottom of this article.
Design and Assemble Your Own Jewelry, The Complete Insider’s Guide
New book by Warren Feld
Learning Bead Stringing Is More Than Putting Beads On A String, And Tying On A Clasp
There is an art and skill to stringing beads. First, of course, is the selection of beads for a design, and the selection of the appropriate stringing material. Then is the selection of a clasp or closure, appropriate to the design and use of the piece.
You want your pieces to be appealing. You want them to wear well. You want someone to wear them or buy them. This means understanding the basic techniques, not only in terms of craft and art, but also with considerations about architecture, mechanics, and some sociology, anthropology and psychology.
In this book, I go into depth about:
1. Choosing stringing materials, and the pros and cons of each type
2. Choosing clasps, and the pros and cons of different clasps
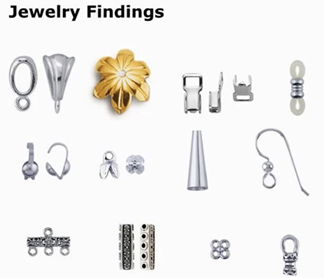
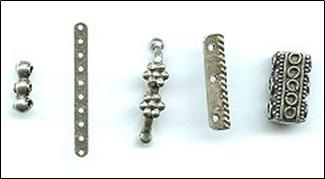
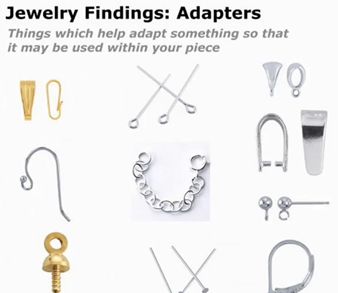
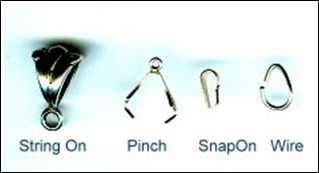
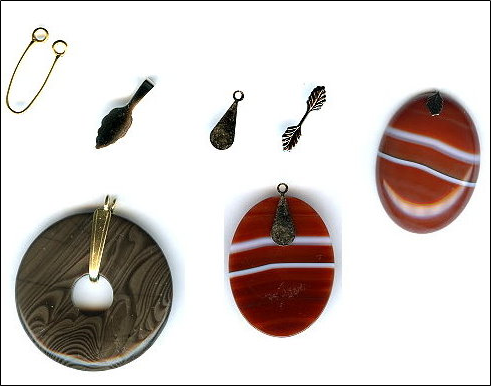
3. All about the different jewelry findings and how you use them
4. Architectural considerations and how to build these into your pieces
5. How better designers use cable wires and crimp, as well as, use needle and thread to string beads
6. How best to make stretchy bracelets
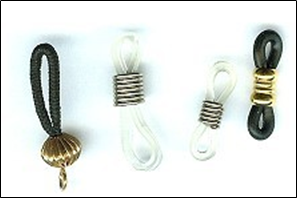
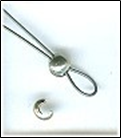
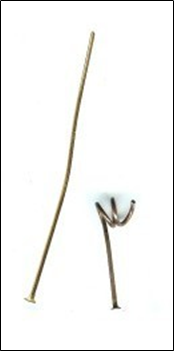
7. How to make adjustable slip knots, coiled wire loops, and silk wraps
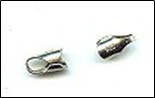
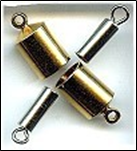
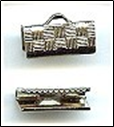
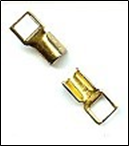
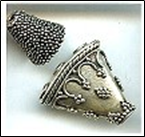
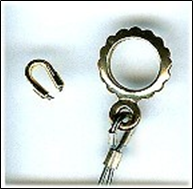
8. How to finish off the ends of thicker cords or ropes, so that you can attach a clasp
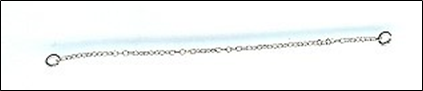
9. How to construct such projects as eyeglass leashes, mask chains, lariats, multi-strand pieces, twist multi-strand pieces, and memory wire bracelets
10. How different teaching paradigms — craft vs. art vs. design — might influence the types of choices you make
For Warren Feld, Jewelry Designer, (www.warrenfeldjewelry.com), beading and jewelry making have been wonderful adventures over 36+ years. These adventures have taken Warren from the basics of bead stringing and bead weaving, to pearl knotting, micro-macrame, wire working, wire weaving and silversmithing, and onward to more complex jewelry designs which build on the strengths of a full range of technical skills and experiences. http://www.warrenfeldjewelry.com
I looked around, and there was no one whose life I wanted.
No one’s routine. No one’s status or power or celebrity. No one’s legacy.
And yet, I wanted others to want my life, my values, my perspectives, my convictions. Even, though. Even, though. Even, though. Even, though, I was yet to live my full life or fully define and clarify my values, my perspectives, my too-often changing convictions.
I’m not poor, but I’m not wealthy either. I’m not wealthy enough to get a building named after me at some university, or to be included in those all-too-often pay-to-play opportunities such as getting a board seat in a prominent nonprofit organization. I can’t use money, position or power to impose my legacy on anyone. Of course, I fantasize that I can, but I can’t.
But I can try to live out my life in a purposeful way, and hope that some kind of legacy emerges from that. Results from that. Takes over from that. I have doubts that it will.
In any case, I have not lived my life in a straight-forward purposeful way. While there’s always some kind of purpose in the background, it doesn’t feel like I’m in charge. I might be too insignificant. Survival has probably been the biggest purpose. But there is no flow to my existence. There’s a dart in one way, then another. A jumping off a cliff or two. A few dead ends.
When I was 9 years old, I had an ultimate purpose. I thought I would fail as an adult guy if I didn’t get hairy arms. My friend Gary had hairy arms, but I did not. That bothered me. A lot. Gary would get to high school and be OK. I would not, at least with my currently hairless arms. No one would notice me. Listen to me. Let me participate with them in anything. Connect with me. No one. Not without hairy arms.
One day, I asked Gary how he got such hairy arms. He told me he ate a lot of peanut butter sandwiches. Well, I could do that. So, for the next several months, I ate a lot of peanut butter sandwiches. Every day. Sometimes 20 sandwiches a day. I didn’t get hairy arms, at least not then. But I did get fat.
My legacy.
Legacy And The Jewelry Designer
I didn’t begin making jewelry in order to leave a legacy. I began making jewelry to make money. That’s it. Didn’t care about beauty. Didn’t care about durability. Could care less if the buyer fulfilled their wishes and desires. Just give me the money.
But as I began to sense that Rogue Elephant somewhere out there waiting for me, things began to change. I designed some pieces for which I wanted to document — written patterns and sketches, photos, some sharing of information and photos. Then more pieces I wanted to preserve in memory.
As I created more custom pieces for people, particularly celebrity musicians and actors, I wanted to preserve these pieces rather than hand them off, so I made duplicates of these and showcased them.
My jewelry designs became more expressive. Impactful for people who wore or bought them. I created more ways to showcase them. Personal and business pages on all the social media sites. My own website. More frequent online posts. An artist statement and a portfolio. Workshops and kits to show others how to recreate these pieces. My jewelry was powerful enough to express my vision about the world and why people wear jewelry. My jewelry became a means for exploring how people become fluent in design. My jewelry became a framework through which to challenge and inspire others to think differently than craftsmen and differently than artists when designing their own jewelry creations.
I often wonder who will inherit my jewelry once I am gone. Will I be remembered for my design work and my design philosophy? Will my ideas endure?
When I received my own copy of this book and found the image for Little Tapestries/Ghindia, I felt a lot like in the movie Working Girl. There’s that last shot before the credits roll. The heroine finally gets into the executive suite and gets her own office. The camera focuses first on the window outside her office. Then it slowly pans back, eventually revealing hundreds and hundreds of office windows stacked up on the side of a tall skyscraper.
It turns out, it is not easy to do Ugly! Our brains are prewired with an anxiety response. We are preset to avoid snakes and spiders and anything that might harm us. So it is very difficult to design an ugly necklace. We are biased towards beauty and harmony and things which won’t upset us. To achieve a truly hideous result, you have to be a very accomplished jewelry designer. You gotta know your stuff. Intimately. Fluently.
Moreover, necklaces are arranged in a circle. The circle shape itself errs on the side of beauty, and anything arranged, ordered or organized, such as the component parts of a necklace, will err on the side of beauty.
To top things off, we required the necklace to be wearable. Design-wise, this was another push away from Ugly.
The contest had been inspired by some work I was doing. In the late 1990s, our business collapsed and we went bankrupt. One of the things we did was to start up the jewelry and bead business again from scratch. While we did that, to pay the bills, I worked remotely with two companies as a website marketer. One company was in New Hope, Pennsylvania; the other in Vancouver, British Columbia. I was in Nashville. Both companies would link me up to various clients, and I would optimize their websites for search engines and do various online promotions to get them more visibility.
One client was SureFit that made slip covers for chairs and couches. Every year, they held an Ugly Couch contest. I was involved with some of the marketing for their contest. This was the origin of my idea for ugly necklaces. While the criteria for the Ugly Couch contest were simply color / pattern / texture, the criteria for judging jewelry could be so much more elaborated. I took this contest and its judging criteria further into the realm of physiology, cognition and design. But still in ‘English’. Still focusing on the fun. But subtly introducing the design philosophy ideas.
We launched the first The Ugly Necklace Contest in 2002, and held it 10 times over the next 15 years.
Designers were asked to push themselves to make hard choices, such things as:
· Can I push myself to use more yellow than the purple warrants, and mix in some orange?
· Can I make the piece off-sided or disorienting, or not have a clear beginning, middle or end?
· Can I disrupt my pattern in a way that, rather than “jazz,” results in “discord?”
· Can I work with colors and materials and patterns and textures and placements and proportions I don’t like?
· Can I design something I do not personally like, and perhaps am unwilling, to wear around my neck?
· Can I create a piece of jewelry that represents some awful feeling, emotion or experience I’m uncomfortable with?
· Can I make something I know that others won’t like, and may ridicule me for it?
Because answering questions like these is not something people like to do, and in fact, avoid, jewelry designers who attempt to achieve “Ugly,” have to have a lot of control and discipline to override, perhaps overcome, intuitive, internally integrated principles of artistic beauty. The best jewelry designers, therefore, will be those designers who can prove that they can design a truly Ugly Necklace. These are designers who can break the boundaries of form, material and technique. That was the crux of the contest.
We often like to say that beauty (and by inference, ugly) is in the eye of the beholder. But once we utter that phrase, we deny the possibilities of design — and the perspective on beauty or ugly from the eye of the designer. If we are preset to create things that have some beauty to them, perhaps anyone then could create appealing jewelry. But, if we take away too much power to create from the designer — something beautiful or something ugly — we begin to deny the need for the designer in the first place. We leave too much to the situation, and too little to our abilities as jewelry designers to translate inspiration into aspiration into finished designs which emotionally affect those around us. We lose the experiencing of each individual designer’s choices in taking inspirations into finished designs. The challenge of designing an Ugly Necklace shows us that without the designer, there can be no design, no resonant beauty, no parsimonious attention to appeal, no true and full authenticity underlying a piece of jewelry.
We made the contest international. We launched it on-line. Our goal was to politely influence the entire beading and jewelry making communities to think in different terms and to try to work outside the box. We also wanted very actively to stimulate discussion about whether there are universal and practical design theories which underlie beadwork and jewelry design, and which can be taught. Or was everything merely a matter of subjective interpretation.
Very enlightening for me, for our judges, for our students, for the participants and the larger jewelry making community.
Definitely a legacy. Most definitely a lot of fun. But still not enough for me. I still felt I had so many disparate things to bring together under the banner Jewelry Designer. I didn’t know what. I didn’t know where to find it. Wasn’t sure what I was doing. My felt purpose was still cloudy.
Living Out Other People’s Legacies
I had to reach a much older age before I began to seriously think about my legacy. Yet, over the years, looking back, I think, for the most part, I was living out other people’s legacies. Sometimes perfectly, other times rejecting them.
My grandfather — my father’s father — in heavily accented, broken English, would say every time he saw me: You be pharmacist. All you need is one clerk. I’m sure that was my father’s wish as well. He wanted me to be a pharmacist and take over his pharmacy once he retired. I was always a big disappointment. Never even tried to become a pharmacist.
I attended Brandeis University in Waltham, Massachusetts, for my undergraduate work. It is a university made up primarily of minorities — Jews, blacks, Latinos, Asians, poor whites. The students colloquially called Brandeis a second rate Jewish Harvard, because whether student or professor or employee, as Jews (or, this extends to other oppressed minorities), when Brandeis was founded in the 1950s, Harvard’s doors were closed to them.
Brandeis has a strong commitment to social justice. It saturates you with that commitment. An infusion. You are told and guided and influenced and challenged to find Truth Until Its Innermost Parts. An emphasis on the importance of authenticity and integrity. A yearning for social justice seeps into your brain and blood and pores. You can never shake it off. It never leaves you. It has never left me.
But perhaps the most important and sustaining other person’s legacy I have been living has been that of my life partner, Jayden. Jayden and I were together over 36 years.
When I met Jayden, Jayden was James. We met in a local bar in Nashville. At the time, I had lived in Nashville a couple of years. I was trying to find friends and trying to date and was always disappointed. The people I was meeting were kind of dull. Not particularly worldly. And definitely not very creative. At the time, most Nashvillians my age left Nashville for other places where they were more likely to find a spouse. And then they would return to Nashville. People my age that I worked with or met here in Nashville were already married.
I dated both men and women. Virtually all of them were waiters, waitresses or hair dressers. At one point, I was so frustrated and so in need of a close human relationship, that I had a little conversation with God in my head. God, I said, the next very creative person I meet — man or woman — will be the way I want to go. I met James. I became gay.
James was the epitome of creativity. So was his whole family. Every craft you could think of, he was an accomplished artist. Leatherwork. Jewelry. Construction. Interior design. I could learn so much from him. He could teach me so much.
Originally from Alabama, James moved to Nashville. He was driving a truck at the time. It was during a recession, and he was having difficulty finding another job. At one point I asked what he could do, and he said he could design jewelry. I said, we could build a business around that.
During this same time, I was directing a nonprofit healthcare organization, and was burnt out. Feeling very disconnected, and wanting to do something else. I quit my job. Jumped into retail. The rest is history: garage sale to flea market to physical store to the addition of an online catalog (www.landofodds.com ).
Our relationship was always contentious. Lots of heated back and forth. Disagreements about life, about business, about friends and relationships. James had grown up in a home where physical and emotional abuse was the rule of the day. Both his father and his mother punished him, broke bones, poured grits on the floor and made him kneel on them for hours. His father was an iterant preacher, and when James was a boy, his father, in exchange for work or money, let other preachers sexually abuse him. James never had any sense of basic trust for anyone. As an adult, he had difficulty relinquishing control. Sometimes, I feel, he confused me with his father.
When we were together about 23 years, James decided he needed to become Jayden. He underwent all the surgeries, and lived the rest of life as a woman. By that time, our relationship long since had ceased to become romantic or sexual. We were very close friends. Business partners. We stayed together. Friends, therapists always questioned my continued loyalty. Given all the tensions in our relationship, why did I remain loyal? Why didn’t I just leave?
Jayden had opened up the world I needed to live in. I learned from her until the point where, to continue to develop as a professional and as an artist, I needed to rely on myself. Legacy was no longer imitation. It had become inspiration. I was becoming the jewelry designer Jayden had wanted to become, but lacked the skills, insights, and energy. I was living out her legacy. But I was finding my own path, too.
Her health was deteriorating rapidly.
I stayed.
Is Legacy The Same As Celebrity Status?
Professionally, I hit a spot where many people knew of me. I had a very positive, shining reputation. But I lacked that magnetic force which would bring people to me. I could offer a workshop, but not fill it with students. I could start an online discussion about jewelry design, but not get enough people to continue to discuss things.
Part of the problem was me. I was a slave to my retail store. I did not have enough free hours to get outside the store and network, whether in the Nashville area, or nationally, or even internationally. Perhaps, if I were out there more, I would have developed that magnetic force which I wanted.
One summer, I applied and was invited to do two workshops at the Bead & Button convention in Milwaukee. I did three workshops, one Japanese Fragrance Garden Bracelet, one ColorBlock Bracelet, and the other, Etruscan Square Stitch Bracelet. When we arrived and I began meeting people at the hotel, everyone knew who I was. In fact, they quoted back to me several of the things I had done, such as a jewelry design workshop in Cortona, Italy many, many years earlier. I was a little off guard. Very unexpected. Played well to my ego.
One of the participants in another contest we held through the store — All Dolled Up: Beaded Art Doll Competition — had made me a bead woven dreidel as a gift of appreciation. She told me how I had changed her life. Given her confidence as a designer. Allowed her to open doors for herself.
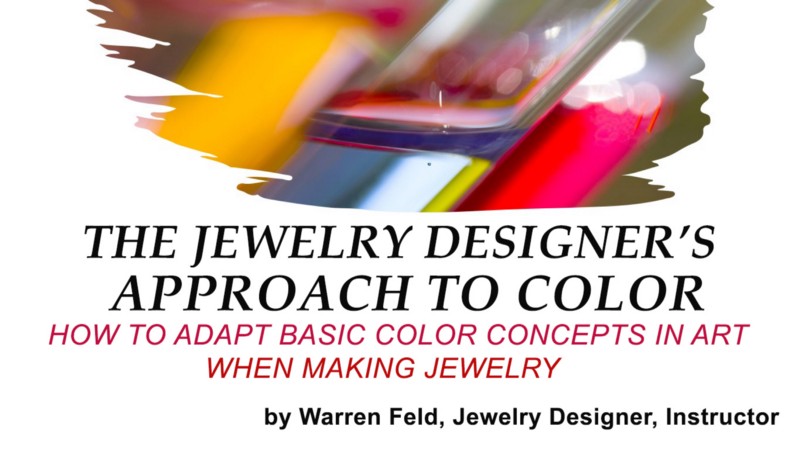
Another prominent national instructor, in a back-handed sort of way, forcefully told me she disagreed with my article about jewelry design and color (https://medium.com/@warren-29626/the-jewelry-designers-approach-to-color-bcd9754a83c3 ). In the article, I wrote you cannot paint with beads. She felt she could. I stick by my assessment: you can’t. Beads do not come in all colors. You cannot blend them. Because jewelry is worn and moves with the wearer, the impacts of light and shadow keep changing, and affect the appeal of the piece, given the context. A painting hangs on a wall. It doesn’t move.
I was surprised how many attendees at this conference, whom I never met, followed my career and activities — workshops in Cortona, Italy, other workshops, articles I had written, kits I had developed, TV programs I had been a guest on, enrichment travel cruise.
I got a little taste of the celebrity status I was looking for. But as a legacy, I do not know. I had some influence, some power to create a positive legacy. But I was still insignificant. I returned from Bead & Button, and back to my status: great reputation, but no magnetism. I still did not know what kind of legacy I wanted to leave. There were bits and parts floating around in my head and in the environment, but not coming together.
Why Do I Want To Leave A Legacy?
In college, I thought I wanted to be an urban planner. I was going to work for the Rouse Company — a company that built two planned urban developments — Columbia in Maryland and Reston in Virginia. I had a strong belief in physical determinism. I was going to physically create urban spaces for living, working, playing, entertaining, relaxing, vacationing. All these spaces would define for anyone who interacted with them the meaning of life.
I would have this visual representation of my legacy. I could gaze at it at my leisure. Or purposefully. I could watch people successfully living their lives as people within my physically-designed spaces. Immortality. Fulfillment. What a legacy!
That legacy was not to be. And it was probably a fallacy anyway. A pipe dream. A false prophet.
When I was 62, I applied and got accepted to Teach For America. I thought that perhaps here I might create my legacy as a teacher in an underserved school. After all, teachers have a big impact on their students.
Teach For America trains people, who do not necessarily have a degree in education, to become teachers in low income communities. The goal is to promote educational equity. If you ever get a chance to do this, I highly recommend it. It was one of the most rewarding and challenging things I ever did. And probably one of the most humiliating.
I ended up teaching middle school science and social studies. I was promised a science room, but ended up in a regular classroom. As a science teacher, I was responsible for conducting experiments. My classroom, however, did not have running water, any safety equipment, or other things necessary. I had 32 seats, but my class sizes ranged from 40 to 50. There were no supplies for conducting experiments. I had to buy these on my own. There were no aprons or goggles. Another teacher lent me some of hers which she had had to buy on her own.
As a teacher, I tried to do all the things my various instructors, as well as experienced teachers I interacted with, suggested I do. That first quarter, everything I did, and which they suggested, back-fired. I tried to assert some control, and my students took this as a challenge. I tried to present the required information, but my students never connected to it. They threw candy and pens at me while I was trying to teach. They were always talking. Playing with their cellphones. One student took a gallon of sanitary hand lotion, threw it out the 2nd story window, and busted out the windshield of a parked car below.
The administrators wanted me to teach SEL — Social Emotional Learning. I had no idea what that was. No one could give me a clear idea about it. Got lots of suggestions of things to try, and tried them, but never to the satisfaction of my administrators. They wanted me to coordinate with the other science and social studies teachers. That meant, teaching to the same standards on any particular day, and coordinating exams.
That was a problem for me. The standards, particularly in social studies, were so broad as to make them meaningless. For example, I had to teach the American Revolutionary War in 2 class sessions. In the first session, I was expected to cover 10 different battles. Ten battles in 50 minutes. The same amount of time it took Paul Revere to saddle up his horse.
Before the 3rd quarter started, I rebelled. My goals, by the end of the year, were to feel I was on the path towards becoming a good teacher, and that at least one student would learn one thing from me. I decided to reinterpret all the standards from the students’ point of view. I realized that I needed to find connections to each standard which the students could relate to. Not easy. Their life experiences were much more limited than I imagined. Even though we were in a city like Nashville with lots of accessible resources, my students’ worlds tended to be bounded by the couple of city blocks surrounding their homes. I would cover all the standards, but not everything each standard wanted me to cover. I would not coordinate with the other teachers.
I began to find my footing. By the end of the 4th quarter, literally the last week of the 4th quarter, I felt I was getting there. I found my teacher face and voice. Some students did learn some things from me. Overall, I loved the experience. Learned a lot about me. Became an even better teacher. I had hoped there was a legacy here that I could develop and leave. Not really. I was able, however, to incorporate many of the things I learned into teaching jewelry design, and ultimately writing articles and books about it.
Contemporizing Traditional Jewelry
A jewelry designer must deal with the rational and the reasonable. Those choices which are rational are based on reasons. The choices involve things like which design elements to include and exclude, how to include them, how to create compositional arrangements, and how to manipulate these parts and arrangements to create a satisfying whole which is both appealing and functional, how to introduce your pieces publicly.
Reasons justify everyday life. With traditional jewelry, those reasons are provided as well as bounded by social and cultural norms. These norms prescribe fixed frameworks and predetermined rules of composition. These norms prescribe how materials and techniques are to be selected and used. The focus is on universals. The norms allow emotional responses to beautiful, harmonious jewelry, but begin to restrict responses which get too edgy, too dramatic, too rebellious, too radical. Here one purpose of jewelry is to reconnect the individual with the broader goals and restrictions of society.
With contemporary jewelry, the designer substitutes that designer’s own reasons upon which to base rational choices for those found in culture and society. Contemporary does NOT necessarily refer to the use of unusual materials or unexpected compositions and silhouettes. Contemporary encompasses Anything reflective of a certain way of thinking. Here the designer’s personal values, desires, assumptions and perspectives inform what is rational. The client also, by wearing the jewelry, is expected to connect to the personal, not the societal or cultural. The key to design is the management of the subjective.
Towards this end, the designer might either rely on fixed, established rules of composition, or on violating them in some way. Materials and techniques become things to push to their limits. Responses to jewelry must go beyond emotions and enter the realm of resonance. One purpose of contemporary jewelry is to reconnect the individual with their inner self, their personal culture. It is the designer’s ability to channel his or her personal culture, and that of the client. Within the jewelry so created, these abilities form the basis of professional responsibilities and possibilities.
The contemporary jewelry designer is especially positioned to serve at the nexus of all this culture. The designer’s ability to think through and define what contemporary means becomes instrumental for everyone wearing their jewelry to successfully negotiate the day-to-day cultural demands of the community they live in. Designers have a unique ability to dignify and make people feel valued, respected, honored and seen. Each wearer and buyer stands at that precipice of acceptance or not, relevance or not. The jewelry designer has the power to push someone in one direction, or another. It is the jewelry designer who assists the client in transitioning from conformity to individuality.
This is a power that can form the basis of any designer’s legacy. We can most easily see this power in the designer’s attempts to contemporize traditional jewelry. Here we can begin to recognize and understand how the designer substitutes personal reason for that of the broader socio-cultural one.
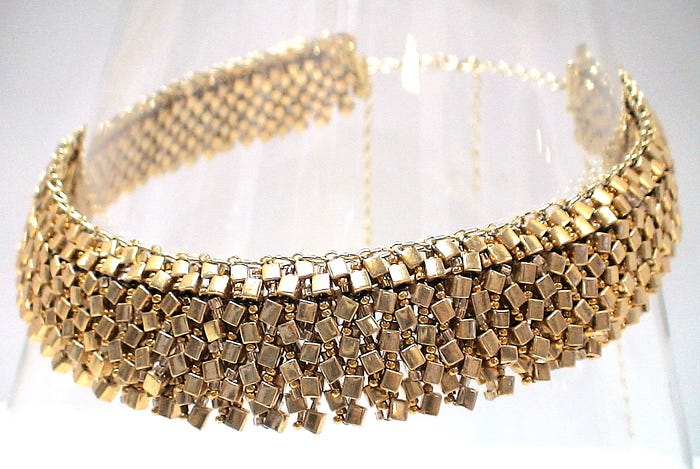
I was contracted to do a series of workshops in Cortona, Italy regarding Contemporizing Etruscan Jewelry with Toscana Americana (http://www.toscanaamericana.com) . I began with examining several pieces of Etruscan jewelry. For the Etruscans, jewelry was a display of wealth and a depository of someone’s wealth maintained and preserved as jewelry. Jewelry tended to be worn for very special occasions and was buried with the individual upon her or his death. One piece, an Etruscan Collar (http://www.warrenfeldjewelry.com/wfjecollar.htm ), was one I immediately connected with.
The challenge, here for me, was to create a sophisticated, wearable, and attractive piece that exemplified concepts about contemporizing traditional jewelry. I began to interpret and analyze it. I first broke it down in terms of its traditional components and sensibility. Next, I had to re-interpret the piece in terms of its characteristics and parts. These are the kinds of things the designer can control: colors, materials, shapes, scale, positioning, balance, proportions, # of elements, use of line/plane/point, silhouette, etc.
The designer would also try to surmise who, why and when someone might wear the piece. A final assessment would be made about how finished and successful the traditional piece would have been seen at the time it was made.
I researched what jewelry meant to the Etruscans, and how their jewelry compared to other societies around them. There is considerable artistry and craftsmanship underlying Etruscan jewelry. They brought to their designs clever techniques of texturing, ornamentation, color, relief, filigree, granulation and geometric, floral and figurative patterning. While their techniques were borrowed from the Greeks and other Mediterranean cultures, the Etruscans perfected these to a level of sophistication not seen before, and not often even today.
I designed each of these two contemporized pieces, each taking me in a slightly different direction in what it means to Contemporize Traditional Jewelry. The Vestment (http://www.warrenfeldjewelry.com/wfjecollar.htm) is definitely more literal, with a mix of Revival and Contemporized approaches. The Collar (http://www.warrenfeldjewelry.com/wfjecollar.htm) is more contemporized. The core technique for both was the Ndebele stitch.
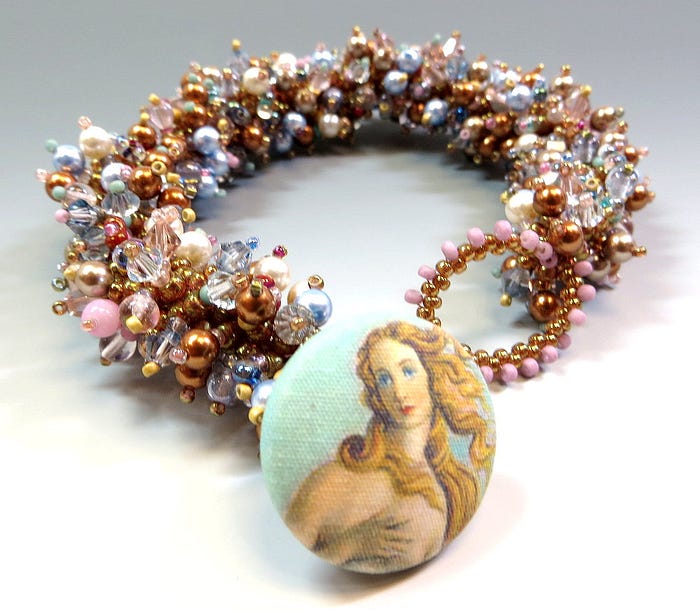
I worked with glass beads for the Cortona workshop. Then I took the Collar to the next level. I entered Swarovski’s 2008 Create-Your-Own-Style contest.
In the version I created for Swarovski, I used crystal beads instead of glass beads which posed additional problems. I could define distinct boundaries between colors when using glass. The crystal colors, however, tended to blend together. I needed distinct boundaries. I began by trying to create an Amber/Purple/Olivine (yellow-orange, violet and yellow-green) color palette. I found it very difficult to find a green to go with the amethyst and topaz. I tried olivine, light olivine, peridot, erinite, tourmaline, green tourmaline, and finally settled on lime. I’m not a big fan of lime — I tend to be yellow-phobic and lime is very yellow. But it was the only green that had the same underlying shades and tints as the amethyst and topaz. I added a lot of 2mm black crystal beads to my mix, to create a sense of framing and shadows.
No one says you have to leave a legacy. This may not be important to you. No crime, no foul. You can still find meaning and purpose in life. You can still pursue your Rogue Elephant without pursuing a legacy. For me, there is something I had wanted to happen, a purpose, a justification, a legacy. And I had wanted to see something reassuring in this direction before I died.
I am 70 when I am writing this. In a year I will be closing my shop and semi-retiring. Still working, but getting a chunk of responsibilities off my shoulders. I have mixed emotions. I am confronting that What Is My Purpose? thing. It isn’t easy to walk away from a prestigious position as a business owner in the community. Who am I, if I am no longer important around here?
Jewelry design has been more than a way to fill my time. It’s been, in great part, a mission. It’s been a mission to define it as a professional endeavor, with clear choices, responsibilities, and desired impacts. An authentic performance task. I have spent years clarifying technique, passion, and values. I want those understandings to be shared and continued. Legacy.
The future is always uncertain and unpredictable. There is no guarantee that the purpose and values I found in life, specifically as a jewelry designer, will continue beyond my death. But I feel responsible for at least trying.
I have turned my wanting a legacy into a rite of passage. Through writing, teaching and demonstration, I have attempted to transition from a life focused primarily on me, my goals and achievements, to one focused on leaving a lasting impression on the world. Challenging. Lots of time and resources devoted to this — something that may or may not happen. But all of this has not been a waste. It’s led to considerable personal growth, transformation and development.
Should I Leave A Legacy In A World I Do Not Respect?
One final question. The world at the moment is kind of messed up. I have to ask: Will my Rogue Elephant be here forever? With poaching, climate change, unchecked urbanization and deforestation, censorship, the rise of authoritarianism, displacements and migrations of tens of millions of people, I have to wonder. It feels like forces throughout the world are robbing people of core abilities underlying humanity: critical thinking, empathy, tolerance, and compassion. It is punishing any kind of questioning. It is turning people into technicians and allowing machines to take over many creative tasks.
I may leave a legacy, but it may not be a good fit anymore. It may fail.
It may not.
I will have to leave the answers to future generations.
CONQUERING THE CREATIVE MARKETPLACE: Between the Fickleness of Business and the Pursuit of Design
How dreams are made between the fickleness of business and the pursuit of jewelry design
This guidebook is a must-have for anyone serious about making money selling jewelry. I focus on straightforward, workable strategies for integrating business practices with the creative design process. These strategies make balancing your creative self with your productive self easier and more fluid.
Based both on the creation and development of my own jewelry design business, as well as teaching countless students over the past 35+ years about business and craft, I address what should be some of your key concerns and uncertainties. I help you plan your road map.
Whether you are a hobbyist or a self-supporting business, success as a jewelry designer involves many things to think about, know and do. I share with you the kinds of things it takes to start your own jewelry business, run it, anticipate risks and rewards, and lead it to a level of success you feel is right for you, including
· Marketing, Promoting, Branding: competitor analysis, developing message, establishing emotional connections to your products, social media marketing
· Selling: linking product to buyer among many venues, such as store, department store, online, trunk show, home show, trade show, sales reps and showrooms, catalogs, TV shopping, galleries, advertising, cold calling, making the pitch
· Resiliency: building business, professional and psychological resiliency
· Professional Responsibilities: preparing artist statement, portfolio, look book, resume, biographical sketch, profile, FAQ, self-care
SO YOU WANT TO BE A JEWELRY DESIGNER Merging Your Voice With Form
So You Want To Be A Jewelry Designer reinterprets how to apply techniques and modify art theories from the Jewelry Designer’s perspective. To go beyond craft, the jewelry designer needs to become literate in this discipline called Jewelry Design. Literacy means understanding how to answer the question: Why do some pieces of jewelry draw your attention, and others do not? How to develop the authentic, creative self, someone who is fluent, flexible and original. How to gain the necessary design skills and be able to apply them, whether the situation is familiar or not.
The Jewelry Journey Podcast “Building Jewelry That Works: Why Jewelry Design Is Like Architecture” Podcast, Part 1 Podcast, Part 2
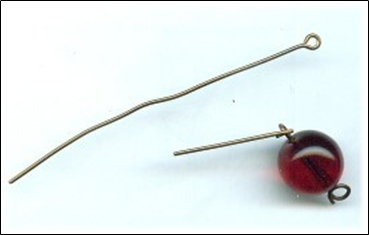
PEARL KNOTTING…Warren’s Way Easy. Simple. No tools. Anyone Can Do!
I developed a nontraditional technique which does not use tools because I found tools get in the way of tying good and well-positioned knots. I decided to bring two cords through the bead to minimize any negative effects resulting from the pearl rotating around the cord. I only have you glue one knot in the piece. I use a simple overhand knot which is easily centered. I developed a rule for choosing the thickness of your bead cord. I lay out different steps for starting and ending a piece, based on how you want to attach the piece to your clasp assembly.
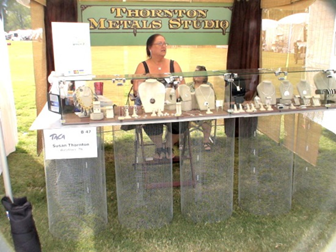
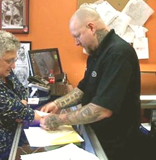
SO YOU WANT TO DO CRAFT SHOWS:16 Lessons I Learned Doing Craft Shows
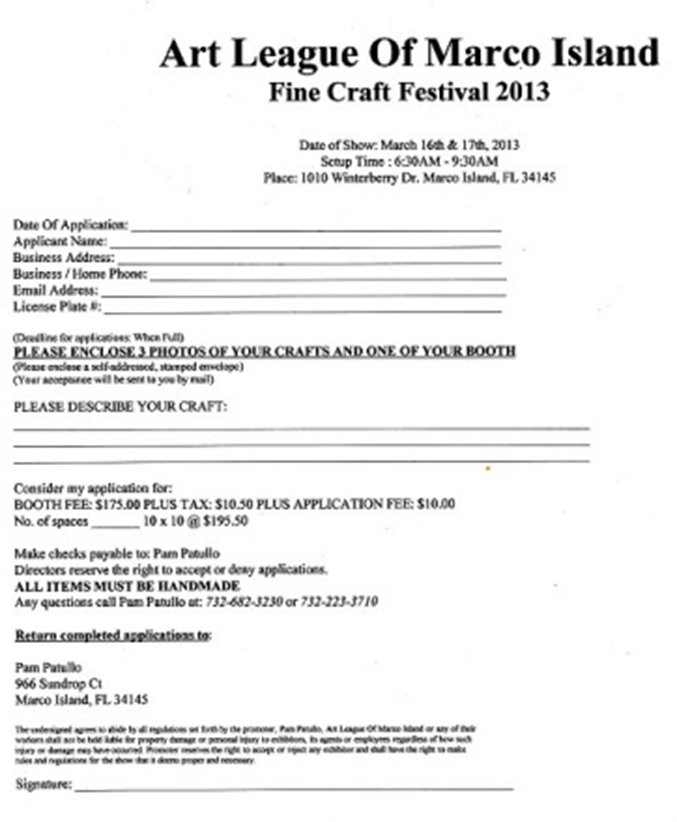
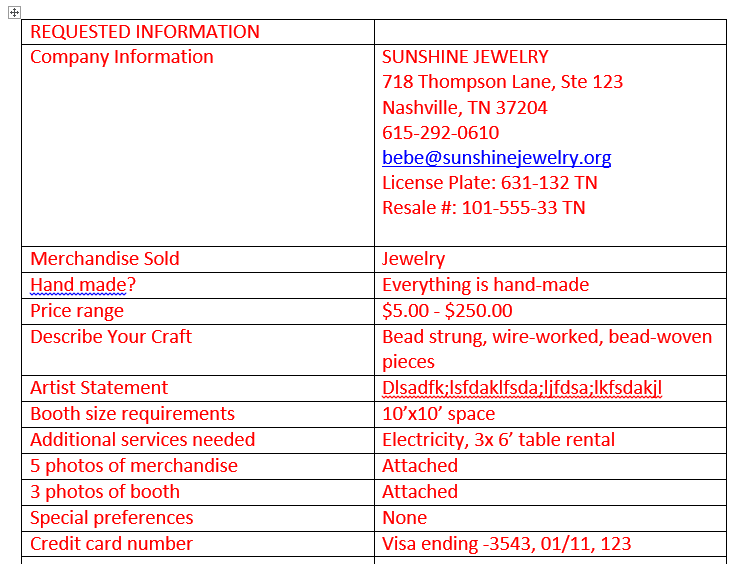
In this book, I discuss 16 lessons I learned, Including How To (1) Find, Evaluate and Select Craft Shows Right for You, (2) Determine a Set of Realistic Goals, (3) Compute a Simple Break-Even Analysis, (4) Develop Your Applications and Apply in the Smartest Ways, (5) Understand How Much Inventory to Bring, (6) Set Up and Present Both Yourself and Your Wares, (7) Best Promote and Operate Your Craft Show Business before, during and after the show.
In the beginning, and you know how it goes, created the heavens and the earth. Create. In the first section of Genesis, the word create gets used over and over and over again, as if, not only to emphasize its importance, but to marvel at the concept. A beautiful universe is created. Humankind is created. Animals are created. There’s a flood and a re-creation. Create, create, create.
There are two Hebrew words used in Genesis which hold the idea of create within them: bara, meaning to create, and asah, meaning to make or do. They are used interchangeably. Sometimes reserved to represent God and supernatural powers. Other times to represent the impacts of people creating things and what happens over time. The meaning of one word is not more important than the meaning of the other.
And I think those folks who compiled the various stories into the Bible tried to interrelate the idea of a God with the power to create with the idea of humans having the power to create. Create, create, create. As if they kept writing and writing and writing in an attempt to clarify and come to grips with for themselves what the awesome power of creation was inside themselves, and how to use that power. There is a freedom to be your authentic self, and that was celebrated.
And this is what I spoke about in the first sermon I gave as the unofficial, untrained, never-seeking-to-be, rabbi in Oxford, Mississippi.
The Jewish congregation in Oxford varied between 20 and 40 individuals over the 5 years I was there. Some were Jewish and some only interested in Judaism. Did not matter. Vinnie and Ralph had a beautiful home there, and converted part of their home to a sanctuary. Temples in Memphis and Jackson, Mississippi lent the temple a torah and several other religious items, and a collection of prayer books. The person who was serving as rabbi was a professor who was about to move away the year I came to Oxford. I spoke Hebrew and that was my only qualification. I become the rabbi. I officiated over a wedding, a bar and bat mitzvah, and services once a month.
CREATIVITY ISN’T FOUND, IT’S DEVELOPED
Kierkegaard — and I apologize for getting a little show-off-y with my reference — once described Creativity as “a passionate sense of the potential.” And I love this definition. Passion is very important. It is motivating. Creativity obviously important because it’s a way of thinking through things.
Passion and creativity can be summed up as some kind of intuitive sense made operational by bringing all your capabilities and wonderings and technical know-how to the fore. All your mechanical, imaginative and knowledge and skills grow over time, as do your abilities for creative thinking and applications. Creativity isn’t inherently natural. It is something that is developed over time as you get more and more experience designing jewelry.
You sit down, and you ask, what should I create? For most people, especially those getting started, they look for patterns and instructions in bead magazines or how-to books or websites online. They let someone else make all the creative choices for them. The singular creative choice here is picking what you want to make. And, when you’re starting, this is OK.
When you feel more comfortable with the materials and the techniques, you can begin to make additional choices. You can choose your own colors. You can make simple adaptations, such as changing out the bead, or changing the dimensions, or changing out a row, or adding a different clasp.
Eventually, however, you will want to confront the Creativity issue head on. You will want to decide that pursuing your innermost jewelry designer, no matter what pathway this takes you along, is the next thing, and right thing, to do. That means you want your jewelry and your beadwork to reflect your artistic hand. You want to develop a personal style. You want to come up with your own projects.
But applying yourself creatively is also work. It can be fun at times, but scary at others. There is an element of risk. You might not like what you end up doing. Your friends might not like it. Nor your family. Nor your client. You might not finish it. Or you might do it wrong. It always will seem easier to go with someone else’s project, already proven to be liked and tested — because it’s been published, and passed around, and done over and over again by many different people. Sometimes it seems insurmountable, after finishing one project, to decide what to do next. Exercising your creative abilities can sometimes be a bear.
But it’s important to keep pushing on. Challenging yourself. Developing yourself. Turning yourself into a bead artist or jewelry designer. And pursuing opportunities to exercise your creative talents even more, as you enter the world of design.
That describes me. I look for inspirations in the designs of other jewelry makers, in nature, in art, in tapestries, in textures and patterns which present themselves, usually in unexpected places.
Then I go through the mental gymnastics about how to translate these inspirations into a workable jewelry design. I write out a plan of action, and begin. As I incorporate changes, or reject first ideas, I document these. There is always a notepad and pen next to me as I create. When I come to an intellectual or technical fork in the road, I document this as well, and proceed, first down one leg, then back and down the other. I reflect on what works or works better, and document my thoughts.
I keep updating and improving on my original plan of action. Towards the completion of my project, I seek out the opinion of others. Is it satisfying to look at? To wear? To reconstruct following my notes? Can you see my original inspiration within my piece? To what extent does the piece reflect my style?
I Found Myself In Mississippi
I was a New Jersey boy, educated there and in Boston. My first move to the South was to North Carolina — Chapel Hill and Durham area — for my doctoral work in Public Health. Never thought I’d end up in Mississippi. Glad I did.
As I was finishing up my doctoral work in Public Health Administration, I applied for several jobs. My dream job was to work for a prominent consulting firm in Philadelphia. These people were always at the table with many government agencies to assist them developing requests for proposals. And, as a result, were at the front of the line in applying for and receiving grant funds. Most importantly, they specialized in both physical as well as social planning. I saw this as a chance to get closer to the urban development and physical planning activities I was more interested in than health care.
I got the job. Yeah! But 6 weeks later, they rescinded the offer. Reagan had just gotten elected as President. He immediately cut out many of the social and physical planning programs that this firm specialized in (and for which I had steered my training and education). This consulting firm felt it was not a good time to expand, and in fact, one year later, they closed their doors.
I thought it safest to apply for a teaching job at a university somewhere. I would wait things out. Surely, after Reagan, the next President would bring these programs back. Of course, they never came back. I decided if I was going to teach, which was not something I wanted to do at the time, I would make it into an adventure. I would locate myself in a place that I would not normally reside in. I concentrated on applying to the University of Iowa and to the University of Mississippi. Got offers from both, and I liked both, but I liked Mississippi a little better.
I lived in Mississippi for five years. I loved it!
What Is Creativity?
If you are going to become someone who makes things, then it is of the essence that you be very clear about what the concept of creativity is all about — about for yourself, about for your various audiences, about for anyone else who will critically interact with the objects you make.
We create. Invent. Discover. Imagine. Suppose. Predict. Delve into unknown or unpredictable situations and figure out fix-it strategies for resolution and to move forward. All of these are examples of creativity. We synthesize. Generate new or novel ideas. Find new arrangements of things. Seek out challenging tasks. Broaden our knowledge. Surround ourselves with interesting objects and interesting people. Again, these are examples of creativity.
Yet, creativity scares people. They are afraid they don’t have it. Or not enough of it. Or not as much as those other people, whom they think are creative, have. They don’t know how to bring it to the fore, or apply it.
But creativity shouldn’t scare you. Everyone has some creative abilities within themselves. For most people, they need to develop it. Cultivate it. Nourish it. They need to learn various tools and skills and understandings for developing it, applying it and managing it. Creativity is a process. We think, we try, we explore, we fall down and pick ourselves up again. Creativity involves work and commitment. It requires a lot of self-awareness — what we call metacognition — extremely important for all designers. It takes some knowledge, skill and understanding. It can overwhelm at times. It can be blocked at other times.
But it is nothing to be scared about. Creativity is something we want to embrace because it can bring so much self-fulfillment, as well as bring joy and fulfillment to others. Creativity is not some divine gift. It is actually the skilled application of knowledge in new and exciting ways to create something which is valued. Creativity can be acquired and honed at any age or any experience level.
For the jewelry designer, it’s all about how to think creatively. Thinking creatively involves the integration and leveraging of three different kinds of ideas — insight and inspiration, establishing value, and implementing something.
Insight. You see something out of nothing. You relate mass to space and space to mass. You begin with a negative space. Within this space, you add points, lines, planes and shapes. Forms and themes may emerge. As you add and arrange more stuff, the mass takes on meaning and content.
Value. You make connections which have meaning, purpose and value. All of a sudden there is desire. Desire hits you in the face. You express. Your expressions hit your various audiences in the face.
Implementation. You make something. You refine it. You change it. You introduce it publicly.
Every Little Mississippi Town Celebrates Creativity
Every little town and every city and every person and every business in Mississippi celebrated creativity. Fully engaged in the act of creating. In fact, they worshipped it. I worship it. I felt very connected. Liberated.
Oxford celebrates Faulkner. You go into the supermarket, and there is a Faulkner corner. Dress shop — Faulkner corner. Souvenir shop — Faulkner corner. Talk to any local native, and they can quote Faulkner, just like someone might quote the Bible. And as you travel around the state, you notice that every town has their artist-writer-musician celebrity. And they celebrate that person. They know that person’s biography intimately. Their works as if they had created them themselves. Cleveland has McCarty potters. Jackson has Eudora Welty. Indianola has B.B. King, who gave a free concert at the local high school every year, then took everyone to a local speakeasy for an after hours party. A hoot.
Edwards, Mississippi, between Jackson and Natchez, had the Mississippi Academy of Ancient Music. Tougaloo College decades ago took in a Polish communist academic refugee when no other institution would. In honor of this music professor, several people associated with the college bought an old, run down plantation home. They held chamber music concerts almost daily. In exchange for some southern hospitality, a room to sleep in and some food, musicians donated some strength and resolve to renovate and refurbish various parts of the plantation home. The Academy become a destination point for all the great musicians across America. Usually a chamber music performance every day, most of the day and some of the night. Perhaps taking a break or two to visit the black busy bee (speakeasy) down the block to imbibe, enjoy a different form of music, snooze a little, and dance.
I traveled up and down the Natchez Trace between Tupelo in the north and Natchez in the southeast. Each connected village and town showcased some craft or art or writer. Even a religious Mennonite colony showed that they too appreciate the human act of creation in honeys and cakes. In a sacred way. Not just for commercialization.
Types of Creativity
The idea of creativity gets all entangled with the idea of originality. Artists and designers can be so fickle about the idea of originality. Fickle to the point of not creating anything, for fear it would be seen as a copy of someone else’s work, perhaps someone who inspired them. Or for fear that someone would steal their ideas and designs. But originality is not a fixed idea when it comes to creativity. It is a flexible idea, contingent on the experience level of the designer.
The idea of originality can be off-putting. It doesn’t have to be. The jewelry, so creatively designed, does not have to be a totally and completely new and original design. The included design elements and arrangements do not have to be solely unique and never been done before.
Originality can be seen in making something stimulating, interesting or unusual. It can represent an incremental change which makes something better or more personal or a fresh perspective. It can be something that is a clever or unexpected rearrangement, or a great idea, insight, meaningful interpretation or emotion which shines through. It can include the design of new patterns and textures. It can accomplish connections among seemingly unrelated phenomena, and generate solutions. It can be a variation on a technique or how material gets used. It can be something that enhances the functionality or value of the piece.
Creativity in jewelry design marries that which is original to that which is functional, valued, useful, worthwhile, desired. These things are co-dependent — originality with value — if any creative project is to be seen as successful. For jewelry designers, creativity is not the sketch or computer aided drawing. It is not the inspiration. It is not the piece which never sees the light of day, because then it would represent a mere object, not jewelry.
Creativity requires implementation. And for jewelry designers, implementation is a very public enterprise.
I First Began To Paint
It was in Mississippi where I first began to paint.
I felt safe there. I had been told so many times that I had no artistic talent, or that I should concentrate on things other than art because I would not be able to make a living at it. Part of my brain told me I could not. Another part told me I could. I finally felt safe enough — I was in my early 20s — to try.
I felt the first painting I did was successful. The inspiration was a deteriorating Black Power poster stapled to a telephone pole. I painted what I saw, and embellished it a little to bring in a little more drama. I was pleased with it.
Now I wanted to see how realistically I could draw. Not something I’m great at. If I go very, very slowly, and concentrate deeply, I can draw realistically. But I’m impatient. It’s difficult for me. But I started a second piece. I created a collage of newspaper articles related to pharmacy. Then I drew, in different locations on the canvas, a pharmacist, the plant foxglove, a blood pressure cuff around a shoulder, and a glass mortar and pestle. Using oils, I painted these in. Unless you look closely, these become indistinguishable from the newsprint. Another success.
Several more paintings later, I felt positive that I had talent. But I began to get a little bored with painting. I had gotten into that doing something blue to hang above a blue couch mode. I wanted to have an impact on people. I wanted both to communicate my perspective on life, and see others responding to this. I wanted to respond to others responding to me. To get a deeper understanding of myself. To convey this deeper understanding in my art.
Painting wasn’t accomplishing that.
It didn’t move. It avoided changes in light, shadow, brightness, dimness, saturation, shading that I love so much with jewelry as it is worn.
I wasn’t passionate about painting.
What Shapes Your Creative Process?
Creative people, at least from my perspective, tend to possess a high level of energy, intuitiveness, and discipline. They are also comfortable spending a great deal of time quietly thinking and reflecting. They understand what it means to cultivate emotions, both within themselves, as well as relative to the various audiences they interact with. They are able to stay engaged with their piece for as long as it takes to bring it to completion. They fall in love with their work and their work process.
Creativity is not something that you can use up. To the contrary, the more you use your creativity, the more you have it. It is developmental, and for the better jewelry designer, development is a continual, life-long process of learning, playing, experimenting and doing.
To be creative, one must have the ability to identify new problems, rather than depending on others to define them. The designer must be good at transferring knowledge gained in one context to another in order to solve a problem or overcome something that is unknown. I call this developing a Designer Tool Box of fix-it strategies which the designer takes everywhere.
The designer is very goal-oriented and determined in his or her pursuit. But, at the same time, the jewelry designer also understands and expects that the design process is very incremental with a lot of non-linear, back-and-forth thinking and application. There is an underlying confidence and belief, however, that eventually all of this effort will lead to success.
I found I had all the necessary ingredients to become a very creative person. But I lacked context. Lacked direction. Lacked purpose. Lacked support. I was trying on lots of different contexts, but no Ta Dah’s! It was not until my late 30s, when I met my future partner Jayden, that I discovered jewelry. And it was a few years later after that, that designing and making jewelry tapped into my creative self in a way in which I found my passion. My impact. My context. My creativity. My Rogue Elephant.
How Do We Create?
It’s not what we create, but how we create!
The creative process, at its core, can be reduced to managing the interplay of two types of thinking — Convergence and Divergence. Both are necessary for thinking creatively.
Divergent thinking is defined as the ability to generate or expand upon options and alternatives, no matter the goal, situation or context.
Convergent thinking is the opposite. This is defined as the ability to narrow down all these options and alternatives.
Creativity then is questioning things. Setting things up apart from social norms, and determining whether social norms should apply. Setting things up in line with personal desires, preferences and assumptions, and determining if any of these should still make sense, given the context. Dealing and coping and understanding one’s creativity, as merely questioning and relating, questioning and categorizing, questioning and rejecting, becomes simple. Accessible. Do-able. Not so scary.
The fluent jewelry designer is able to comfortably weave back and forth between divergence and convergence, and know when the final choices are parsimonious, finished, and will be judged as resonant and successful.
Brainstorming is a great example of how creative thinking is used. We ask ourselves What If…? How about…? Could we try this or that idea…? The primary exercise here is to think of all the possibilities, then whittle these down to a small set of solutions.
Creative thinking, first, involves cultivating divergent thinking skills and exposing ourselves to the new, the different, the unknown, the unexpected. It is, in part, a learning process. Then, next, through our set of convergent thinking skills, we criticize, and meld, and synthesize, and connect ideas, and blend, and analyze, and test practicality, as we steer our thinking towards a singular, realistic, do-able solution in design.
Partly, what we always need to remember, is that this process of creative thinking in jewelry design also assists us finding that potential audience or audiences — weaver, buyer, exhibitor, collector, student, colleague — for our creative work. Jewelry is one of those special art forms which require going beyond a set of ideas, to recognizing how these ideas will be used. Jewelry is art only when it is worn. Otherwise, it is a sculptural object.
What Should I Create?
The process of jewelry making begins with the question, What Should I Create?
You want to create something which results in an emotional engagement. That means, when you or someone else interacts with your piece, they should feel some kind of connection. That connection will have some value for them. They might see something as useful. It may have meaning. Or it may speak to a personal desire. It may increase a sense of self-esteem. It may persuade someone to buy it. It may feel especially powerful or beautiful or entertaining. They may want to share it with someone else.
You want to create something that you care about. It should not be about following trends. It should be about reflecting your inner artist and designer — what you like, how you see the world, what you want to do. Love what you are making. Otherwise, you run the risk of burning out.
It is easier to create work with someone specific in mind. This is called backwards design. You anticipate how someone else would like what you do, want to wear it, buy it, and then let this influence you in your selection about materials, techniques and composition. This might be a specific person, or a type of person, such as a potential class of buyers.
Keep things simple and parsimonious. Edit your ideas. You do not want to over-do or under-do your pieces. You do not have to include everything in one piece. You can do several pieces. Showing restraint allows for better communication with your audiences. Each piece you make should not look like you are frantically trying to prove yourself. They should look like you have given a lot of thought about how others should emotionally engage with your piece.
There is always a lot of pressure to brand yourself. That means sticking with certain themes, designs or materials. But this can be a little stifling, if you want to develop your creativity. Take the time to explore new avenues of work.
You want to give yourself some time to find inspirations. A walk in nature. A visit to a museum. Involvement with a social cause. Participation in a ritual or ceremony. Studying color samples at a paint store. A dream. A sense of spirituality or other feeling. A translation of something verbal into something visual. Inspirations are all around you.
Permit Me Some Final Words
I continually am amazed that my passion honed in on the creation of jewelry. I don’t wear jewelry. I find it uncomfortable. I find it becomes a curtain and shield to who I am as a person. It’s an embellishment and I don’t want to be embellished. Yes, I am attracted to gemstones and their powerful emergent energies. But I prefer to touch them and hold them in my hand, much moreso than wearing them around my wrist or neck.
But that creative process of designing and making jewelry makes me feel so connected to other people. Fulfilling desires. Sometimes to the point of healing. This is so inherently satisfying to me. Driving me. Sustaining me for those pieces that take a very, very long time to conceptualize and make into a reality.
I also especially like taking something and making it more contemporary. More relevant to today’s expectations about what is more pleasing, more appealing, more satisfying. This means adding in more dimensionality, more movement, more tension between positive and negatives spaces, more incremental violations of color and other art theories. This means having intimate understandings of both materials and techniques, and how to leverage their strengths and minimize their weaknesses.
I never learned to be creative. I become creative slowly, developmentally, over-coming criticism and complaint. It took a lot of effort to recognize that I had various choices within which to express my creative impulses. It was almost happenstance that jewelry making became my passion. I’m grateful that it did.
CONQUERING THE CREATIVE MARKETPLACE: Between the Fickleness of Business and the Pursuit of Design
How dreams are made between the fickleness of business and the pursuit of jewelry design
This guidebook is a must-have for anyone serious about making money selling jewelry. I focus on straightforward, workable strategies for integrating business practices with the creative design process. These strategies make balancing your creative self with your productive self easier and more fluid.
Based both on the creation and development of my own jewelry design business, as well as teaching countless students over the past 35+ years about business and craft, I address what should be some of your key concerns and uncertainties. I help you plan your road map.
Whether you are a hobbyist or a self-supporting business, success as a jewelry designer involves many things to think about, know and do. I share with you the kinds of things it takes to start your own jewelry business, run it, anticipate risks and rewards, and lead it to a level of success you feel is right for you, including
· Marketing, Promoting, Branding: competitor analysis, developing message, establishing emotional connections to your products, social media marketing
· Selling: linking product to buyer among many venues, such as store, department store, online, trunk show, home show, trade show, sales reps and showrooms, catalogs, TV shopping, galleries, advertising, cold calling, making the pitch
· Resiliency: building business, professional and psychological resiliency
· Professional Responsibilities: preparing artist statement, portfolio, look book, resume, biographical sketch, profile, FAQ, self-care
SO YOU WANT TO BE A JEWELRY DESIGNER Merging Your Voice With Form
So You Want To Be A Jewelry Designer reinterprets how to apply techniques and modify art theories from the Jewelry Designer’s perspective. To go beyond craft, the jewelry designer needs to become literate in this discipline called Jewelry Design. Literacy means understanding how to answer the question: Why do some pieces of jewelry draw your attention, and others do not? How to develop the authentic, creative self, someone who is fluent, flexible and original. How to gain the necessary design skills and be able to apply them, whether the situation is familiar or not.
The Jewelry Journey Podcast “Building Jewelry That Works: Why Jewelry Design Is Like Architecture” Podcast, Part 1 Podcast, Part 2
PEARL KNOTTING…Warren’s Way Easy. Simple. No tools. Anyone Can Do!
I developed a nontraditional technique which does not use tools because I found tools get in the way of tying good and well-positioned knots. I decided to bring two cords through the bead to minimize any negative effects resulting from the pearl rotating around the cord. I only have you glue one knot in the piece. I use a simple overhand knot which is easily centered. I developed a rule for choosing the thickness of your bead cord. I lay out different steps for starting and ending a piece, based on how you want to attach the piece to your clasp assembly.
SO YOU WANT TO DO CRAFT SHOWS:16 Lessons I Learned Doing Craft Shows
In this book, I discuss 16 lessons I learned, Including How To (1) Find, Evaluate and Select Craft Shows Right for You, (2) Determine a Set of Realistic Goals, (3) Compute a Simple Break-Even Analysis, (4) Develop Your Applications and Apply in the Smartest Ways, (5) Understand How Much Inventory to Bring, (6) Set Up and Present Both Yourself and Your Wares, (7) Best Promote and Operate Your Craft Show Business before, during and after the show.
I could see through the panes in the door this tall man heading towards me. I waited anxiously, obviously her father, to greet me and let me in to wait for his daughter and our date. Excited. Nervous. Eager to see her and lead her to our transportation, some dinner, a movie, perhaps something else. I had prepared for this moment. Though one can never fully prepare. And I heard him turn the knob and begin to open the door.
He opened the door violently. Violently. As if it were very heavy. Or difficult to open, you know, when you add that extra pull or push. His face was stern. Angry. Full of frustration. He was winding up. Something I wasn’t prepared for, and hoped would never happen.
“Get out of here!” “Stay away from my daughter!”
And the door slammed in my face.
This had happened too many times before with other planned-for dates that never materialized. In junior high. In high school.
Arlene, that was her name, had accepted my invitation for a date, I thought, because she wanted to go out with me. I liked her. I thought she liked me. We shared high school classes. We talked often. I felt an attraction. But Arlene, like Anne, and Sue, and Mary, and Ginny before her, had one objective. To get back at her parents by bringing a Jewish boy into their lives.
That Jewish boy. Walking up the front walkway. Up the 3 stairs. Ringing the doorbell. Unsuspecting — the parents that is, not caring whether the boy suspected or not.
Slap. Bang. Slam.
The outcome was always the same.
I crawled back to my car. My mother the driver prepared to take us wherever we wanted to go. She sat there speechless. Quiet. Blinders on. “Let’s go back home,” I said quietly with rejection.
My parents never reacted. They never confronted. Never stood up for me in a very public way. “We live in a Christian society, and have to accept that fact.” That was the rule they lived by. That was the rule they wanted me to live by.
The rule was cruel. I rued it. I resented my parents for it. Yes, they loved me, but never enough to protect me.
Arlene, over the next three years, never spoke to me at school again.
We would all bury this encounter deep within our memories. Hoping it would be forgotten.
Outward Or Inward
Someone once told me, that at the point we are ready to enter the world of life and things, we have to make a choice. A choice between heading outward or inward. We might head for a job in the corporate world. Or do something very singular and private. We might surround ourselves with networks of friends. Or find ourself to be our best, perhaps only friend. We might organize group activities likes sports or shopping or travel with many friends, eager to make new friends and acquaintances, and feeling very comfortable at it. Or we might explore the world on our own, hike the Appalachian Trail, set up a small business, exercise at home, a bit uncomfortable, even fearful, should we have to interact with any human encountered.
In the summer after my 18th birthday, I turned very inward. Inward was an escape. An escape from a world that told me over and over again that, as a Jew, I was ugly. Less than. Dangerous. To be kept at a distance. Not worthy of reward. Not worthy of attention. Uncomfortable to be around. I was tired of trying to fit in. Exhausted competing and defending myself. Wary of getting hurt. Punished for something to which I did not know how to relate.
Left alone, leaving myself alone, I thought about becoming an artist, or at least to explore that side of me. In my freshman year in high school, I took an art class. I needed to see whether what I felt inside of me could actually be channeled into some creative expression. I was sure I had talent, but I never tested this. I knew my parents would disapprove. Because they disapproved.
I remember when one adult — Risa — whom I met through a community program in the next town befriended me. She saw a lot of talent in me. She asked to meet with my parents. She had many connections in the creative community in New York City. She asked their permission to take me to New York and introduce me. My parents said, “No.” That ended that.
Over the next several months, my parents would ask me over and over again, to reaffirm that I believed their decision was right. I succumbed. They told me I couldn’t make a living at art, and I shouldn’t try. I was insecure. I felt unsupported in every other aspect of life, and this would be another one. Art was not to be given a chance. I would not give it a chance. Not then.
Inward. More inward. Ever inward. There had to be something in me that I would discover by turning inward. I was a kid. A young adult. This was too tall a task at the time. To go inward. All that was there were a bunch of emotions. Not well managed. Fear. Anger. Doubt. Disappointment. Rejection. Uselessness. But, as I saw it, turning inward, I had no other choice.
That art class in high school, well, that didn’t help. My art teacher was obsessed with noses — Jewish noses, to be exact. Every figure I drew and every figure I sculpted was never acceptable to him. While I was creating these works of art, he kept asking me why my figures did not have Jewish noses. On the finished works of art, he down-graded me because my figures did not have Jewish noses.
I had a Jewish nose, at least at the time before I thought rhinoplasty would solve all my problems. By the way, it did not. I remember the doctor probing to make sure that the nose job was for cosmetic reasons, not deeply concerning psychological ones. I never let on. Nose job done. I was still Jewish. Same problems. It wasn’t the nose.
In any event, I did not want to draw or sculpt figures with Jewish noses. My Jewish nose was a testament to all my Jewish problems of fitting in, being accepted, getting along with others, finding respect, getting any kind of positive attention. I did not want any of these things reflected in the figures I drew or sculpted.
High school was like that. I suffered what we call micro-aggressions, again and again, from most of my teachers. My guidance counselor. The principal of the school. Other students. Their families. Businesses in town. School was not a safe space. Nor was the town I lived in. Neither was my family.
I never took another art class again. Even in college, I would try to visualize taking some studio art classes, but was always too intimidated, too fretful, too fearful, too angry to register for them.
Inward. I could never find a direction where I felt safe. With meaning. With purpose.
I thought Archaeology would be a good profession. I pictured myself working alone. Spending hours carefully brushing away dirt and sand, hoping to uncover that special object. Out somewhere in a location not close to any other. Inward meant alone. Control. Not in the public eye or sphere. An easy specifiable task with a beginning, middle and rewarding end which no one could refute.
My parents supported Archaeology, but I never really knew why. I guess it sounded important to them. It had to have been, because their plan was doctor or lawyer, perhaps pharmacist. And there was no resistance to Archaeology. But secretly, I wanted Architecture. But I feared it. It seemed so public and outward. It smacked of Art, and I couldn’t bring myself, I had no internal energy, to confront every thing that I imagined I would have to confront if I ever brought my very being close to Art. I couldn’t do it. A choice I’ve always regretted.
I made it through college. Took an Archaeology class, and hated it, and said Goodbye to Archaeology. A good choice, one I have never regretted.
Out into the real world and my own apartment. I was in my early 20’s. I wanted to decorate my apartment. This was the right time, a safer time, less threatening, I thought, to see if I had any artistic talent at all. I wanted to try doing some paintings. Would they have that special appeal, and sufficient appeal, that I would take the risk of hanging them up. Exposing my apartment to something I created. Where other people might see what I created. And react to them. Then react to me. Relate the artworks to me. Relate me to the artworks.
I didn’t think, I just did. I purchased some acrylic paints, some brushes, an easel, some sketch paper and a set of colored pencils and a soft drawing pencil. I set the easel up in front of my couch, to where I could still see the TV.
The inspiration for my very first painting was a deteriorating black power poster that had been stapled to a telephone pole. I sketched what I saw directly onto the canvas with a soft pencil. I painted within the lines. Some areas white, others black. An exact replica. But lacking. There was no anger in the painting. Or a sense of defeat, because I felt their cause was defeated. I was angry. My cause was defeated. Intellectually I was set on making the connection, but it wasn’t coming across.
I propped the painting up against the wall, next to the TV. I pondered. I fretted. I started letting some self-doubt rise within my core. This wasn’t working for me. Failure. I was a Jew and I couldn’t paint. Yes, I could draw. I could illustrate. I could copy. But not enough. Not enough to want to hang this on the wall. To let others see it. They’d reject the painting. They’d reject me. Because I was a Jew, talentless, ugly, awful, unacceptable. It was no good. I was no good.
There it sat. Propped up. For months. I had to see it every time I sat down on my couch. My uncomfortable couch.
I brought the painting back up to my easel. I brushed in, with thickly applied, yet narrow, thin strokes, up and down the sides of the areas which were black. In dark red. Mustard. Black. More texture. More dimension. More randomness. More power. I had added something suggestive of blood and vomit and sweat. My painting was saying something to the world. There was no longer a sense that movement, that effort to sway society toward something else, was defeated. It was a work in progress, and with a sensibility of blood, and vomit and sweat, and with dimension, texture and, yes, direction and purpose, there was a chance. A chance that things could change. For what that poster stood for. For what I wanted for myself.
Inward. But a different inward. Nothing I could articulate about or draw boundaries around it. But a different inward, nonetheless.
I painted the tension between country and city folks because I had to find my way both within the country and within the city. I painted my Aunt Gert, a frenetic, conniving individual, sitting serenely on a city park bench. I painted an abstract rendering of chaos behind two skew lines representing measurement. I painted a furious Greek god against the ravages of AIDS. A pregnant woman within a environment marred by human revenge. A woman’s gloved hand grasping binoculars, staring out in the distance at some romantic encounter, thinking about the fun they would have.
I had lots of paintings with which to decorate the walls of my apartment. Expressive. Appealing. Meaningful. Of which I was happy to share publicly.
And many years later, however, through a confluence of seemingly fateful events, I began making jewelry. Not yet designing, but making. Making jewelry had a special fascination for me, moreso than painting. More real, authentic, touchable, something residing on the body, connected to my inner soul. More expressive and meaningful — what I wanted those drawn and sculpted figures I had created in that high school class to have been. I found myself on a pathway towards finding my Rogue Elephant, inwards or outwards, not sure, and beading him.
CONQUERING THE CREATIVE MARKETPLACE: Between the Fickleness of Business and the Pursuit of Design
How dreams are made between the fickleness of business and the pursuit of jewelry design
This guidebook is a must-have for anyone serious about making money selling jewelry. I focus on straightforward, workable strategies for integrating business practices with the creative design process. These strategies make balancing your creative self with your productive self easier and more fluid.
Based both on the creation and development of my own jewelry design business, as well as teaching countless students over the past 35+ years about business and craft, I address what should be some of your key concerns and uncertainties. I help you plan your road map.
Whether you are a hobbyist or a self-supporting business, success as a jewelry designer involves many things to think about, know and do. I share with you the kinds of things it takes to start your own jewelry business, run it, anticipate risks and rewards, and lead it to a level of success you feel is right for you, including
· Marketing, Promoting, Branding: competitor analysis, developing message, establishing emotional connections to your products, social media marketing
· Selling: linking product to buyer among many venues, such as store, department store, online, trunk show, home show, trade show, sales reps and showrooms, catalogs, TV shopping, galleries, advertising, cold calling, making the pitch
· Resiliency: building business, professional and psychological resiliency
· Professional Responsibilities: preparing artist statement, portfolio, look book, resume, biographical sketch, profile, FAQ, self-care
SO YOU WANT TO BE A JEWELRY DESIGNER Merging Your Voice With Form
So You Want To Be A Jewelry Designer reinterprets how to apply techniques and modify art theories from the Jewelry Designer’s perspective. To go beyond craft, the jewelry designer needs to become literate in this discipline called Jewelry Design. Literacy means understanding how to answer the question: Why do some pieces of jewelry draw your attention, and others do not? How to develop the authentic, creative self, someone who is fluent, flexible and original. How to gain the necessary design skills and be able to apply them, whether the situation is familiar or not.
The Jewelry Journey Podcast “Building Jewelry That Works: Why Jewelry Design Is Like Architecture” Podcast, Part 1 Podcast, Part 2
PEARL KNOTTING…Warren’s Way Easy. Simple. No tools. Anyone Can Do!
I developed a nontraditional technique which does not use tools because I found tools get in the way of tying good and well-positioned knots. I decided to bring two cords through the bead to minimize any negative effects resulting from the pearl rotating around the cord. I only have you glue one knot in the piece. I use a simple overhand knot which is easily centered. I developed a rule for choosing the thickness of your bead cord. I lay out different steps for starting and ending a piece, based on how you want to attach the piece to your clasp assembly.
SO YOU WANT TO DO CRAFT SHOWS:16 Lessons I Learned Doing Craft Shows
In this book, I discuss 16 lessons I learned, Including How To (1) Find, Evaluate and Select Craft Shows Right for You, (2) Determine a Set of Realistic Goals, (3) Compute a Simple Break-Even Analysis, (4) Develop Your Applications and Apply in the Smartest Ways, (5) Understand How Much Inventory to Bring, (6) Set Up and Present Both Yourself and Your Wares, (7) Best Promote and Operate Your Craft Show Business before, during and after the show.
Guiding Questions? 1. What is an Artist Statement? 2. How do I write one?
Your Artist Statement
Simply, your Artist Statement is a description of you, your work and your design philosophy. It is usually 1–2 pages, with the first 3 sentences able to stand on their own and substitute for the longer version. Note: some applications will set a 200–250 word limit.
Your design philosophy is all about how you think through the designing process. You make choices about materials, techniques, styles, silhouettes, colors, patterns, construction. You anticipate the kinds of customers who will wear and purchase your pieces. What are all these choices? Explain what you think about when making these kinds of choices. How does making these kinds of choices lead to pieces which are appealing, wearable, collectible, situationally appropriate, whatever?
When writing your Artist Statement, you do not want to follow anyone’s template. This won’t serve you well. In reality, too many Artist Statements sound the same.
Make the Statement deeply personal. You want the Statement to feel like you are speaking to a client, but maintaining a professional tone of voice. Visually, you want the look to be comparable in relation to your brand identity.
You share your Artist Statement with venues in which you want to sell your jewelry, such as a boutique or gallery. You share it with sales reps and agencies. You share it with your customers and collectors. You share it with the press. You share it in print. You share it online. It can be written from the first person (that is you) or the third person (referring to you).
Your Artist Statement tells your audience who you are, what is significant about your work, your methods and techniques.
As with most things in business, you will probably want to have more than one version of your Artist Statement — one for galleries, one for stores, one for the press, and one for submissions to juried contests, competitions, shows and other venues.
Topics which might be included and get you thinking:
1. How you got started
2. Your inspiration(s)
3. Your design approach and process and philosophy
4. The challenges you face as a designer
5. Artistic influences
6. How people understand you and your work
7. What about you and your jewelry makes you stand out from the crowd
8. The materials you use
9. The techniques and technologies you use
10.What makes your jewelry a collection?
Start by thinking about these topics, and make a long list of keywords that you free-associate with these topics.
If you have difficulty thinking of keywords, write down 5 questions you would like an interviewer or reporter to ask you about yourself as a designer and about your work.
KEYWORDS (generate at least 25–30)
Next, organize these key words into 2–3 sentences.
2–3 Opening Sentences
Next, elaborate on each thought, perhaps over 1–2 written pages.
Last, edit. Remove cliches, any jargon, repetitions, and tangents which do not fit or flow.
Strengthen weakly sounding adjectives and adverbs. Your words should be descriptive, visual, active, colorful, powerful.
Can anything be re-written or expanded up to help your audience even better understand you and your work?
Keep things focused, consistent and coherent.
You want to avoid using words like unique or best or other superlatives.
If your work is very varied, do not try to encompass everything with one particular Artist Statement.
Expect to have to generate multiple drafts before you settle on a finished Statement.
Periodically, review your Artist Statement and revise it to reflect what is currently happening in your artistic life.
CONQUERING THE CREATIVE MARKETPLACE: Between the Fickleness of Business and the Pursuit of Design
This guidebook is a must-have for anyone serious about making money selling jewelry. I share with you the kinds of things it takes to start your own jewelry business, run it, anticipate risks and rewards, and lead it to a level of success you feel is right for you, including Getting Started, Financial Management, Product Development,Marketing, Selling, Resiliency, Professional Responsibilities.
SO YOU WANT TO BE A JEWELRY DESIGNER Merging Your Voice With Form
So You Want To Be A Jewelry Designer reinterprets how to apply techniques and modify art theories from the Jewelry Designer’s perspective. To go beyond craft, the jewelry designer needs to become literate in this discipline called Jewelry Design. Literacy means understanding how to answer the question: Why do some pieces of jewelry draw your attention, and others do not? How to develop the authentic, creative self, someone who is fluent, flexible and original. How to gain the necessary design skills and be able to apply them, whether the situation is familiar or not.
The Jewelry Journey Podcast “Building Jewelry That Works: Why Jewelry Design Is Like Architecture” Podcast, Part 1 Podcast, Part 2
PEARL KNOTTING…Warren’s Way Easy. Simple. No tools. Anyone Can Do!
I developed a nontraditional technique which does not use tools because I found tools get in the way of tying good and well-positioned knots. I decided to bring two cords through the bead to minimize any negative effects resulting from the pearl rotating around the cord. I only have you glue one knot in the piece. I use a simple overhand knot which is easily centered. I developed a rule for choosing the thickness of your bead cord. I lay out different steps for starting and ending a piece, based on how you want to attach the piece to your clasp assembly.
In this book, I discuss 16 lessons I learned, Including How To (1) Find, Evaluate and Select Craft Shows Right for You, (2) Determine a Set of Realistic Goals, (3) Compute a Simple Break-Even Analysis, (4) Develop Your Applications and Apply in the Smartest Ways, (5) Understand How Much Inventory to Bring, (6) Set Up and Present Both Yourself and Your Wares, (7) Best Promote and Operate Your Craft Show Business before, during and after the show.
Designers need to get the approval of and payment from their clients. That means the client has to recognize and share the choices the designer made when creating the piece of jewelry. It all comes down to two aspects of marketing: persuasion and influence. Marketing is about creating persuasive arguments which can influence a person’s beliefs, attitudes, motivations, intentions and behaviors. Influence comes with knowing what the best outcome that the marketer should seek. Persuasion includes the tools you use to get there. Persuasion can take many forms. The marketer’s success depends on a handful of persuasive factors. Marketing strategies follow one or more of eight universal principles of persuasion. Information within any successful persuasive argument is best presented in a certain order.
Influence and Persuasion
Marketing is about creating persuasive arguments which can influence a person’s beliefs, attitudes, motivations, intentions and behaviors. The marketer wants to be able to persuade the client to focus their attention on the jewelry product line, to approach it, touch it, try it on, buy it, exhibit it, share it with others, then, moreover, to further persuade these others (thus making the marketing message contagious) to want to buy it. Influence comes with knowing what the best outcome that the marketer should seek. Persuasion includes the tools you use to get there.
When we are trying to persuade someone, we might be trying to get them to change their mind about something. We might want them to change the weight, ranking or priority they give one thing over another. We might want them to see the interrelationship among two or more otherwise unrelated things. We might want them to re-evaluate the cost and reward calculus they use when deciding to make a purchase.
When trust is present, influence increases and persuasion ends in more positive outcomes.
Persuasion can take many forms. It can be…
· Coercive, done aggressively through direct commands, threats, fear mongering, shaming.
· Informational, spread as biased in some way towards a particular position or idea.
· Leveraging a belief by appeals to logic and reasoning.
· Leveraging a belief by appeals to feelings and emotions.
· Establishing a high level of credibility or character.
A marketer or jewelry designer is not born as persuasive. It is something to be learned, practiced, applied and applied again. The strength of the marketer’s influence centers on a handful of persuasive factors, such as:
1. Commonalities: People like people like themselves.
2. Logic and Rationality: When you see data, it tells a recognizable story.
3. The Target Audience’s Needs, Wants, Values and Desires: It is important to pay attention and hone in on these.
4. Attractiveness: Attractive people are more persuasive.
5. Confidence / Charisma: Confident /Charismatic people are more persuasive.
6. Preparation: Learning, Practicing and Preparing are how you place yourself in a powerful, persuasive position.
Persuasion and Marketing
Persuasion in marketing involves the ability not just to influence people’s actions, but their attitude as well.
Persuasion is a matter of establishing mutual trust or shared understandings. You develop that sense of trust in your client. That means, they believe that you will deliver on any and all your promises, and that your product will solve their problems, needs and/or desires. The marketer presents some type of evidence which the client must interpret as relevant and valid for themselves, whatever that might mean.
Marketing campaigns are various strategies attempting to influence, direct or change client behaviors by eliciting reactions. Marketing campaigns rely on imagery and word associations tied to emotional responses.
To be persuasive, the marketing message must have value and relevance for your target client. She or he might see a reward or a minimization of costs and agree to change their behavior. She or he might be trying to shield themselves from anything which refutes their sense of self and self-esteem. She or he might derive pleasure when they can align their self-concept with that of the emotional message associated with the product. She or he might find that they can meet their needs for understanding and control by finding out more information about your product.
In response to any marketing campaign, the client can do one of three things:
1. Accept
2. Non-commit or remain indifferent
3. Reject
And it is important to think of persuasion as a continual process. You might be able to persuade someone to purchase your product once, but will they purchase your product again?
The Designer As Marketer Should Have A Detailed Familiarity With Everything Involved With Consumer Behavior
What causes clients to purchase certain products and brands, and reject others? It is important to begin to document client shopping behaviors, motivations and their psychological and sociological underpinnings.
The marketer will want to get a handle on the target audience in terms of
· Psychological Factors: How assumptions, perceptions, understandings, values and desires affect responses to the marketing message.
· Personal Factors: How demographic characteristics, such as age, culture, profession, gender play roles in forming responses to the marketing message.
· Social Factors: How socio-cultural groups, such as income, geographic residence, education level, affect shopping behaviors and responses to the marketing message.
How Can Marketing Affect Client Shopping Behaviors? The Eight Universal Principles of Persuasion
Persuasion works when the client feels that, by purchasing your product, you and your product have made a positive contribution to their life. There are different ways or principles marketers follow for establishing that sense of positivity.
There are eight universal principles of persuasion the marketer can resort to in order to influence client shopping behaviors. These are,
1.Reciprocity
2.Commitment
3.Consensus
4.Authority
5.Affinity
6.Scarcity
7.Visibility of Consequences
8.Information Exposure
Reciprocity
If you do this for me, I’ll do this for you.
People tend to feel the need to return the favor. You offer or remove incentives and play with client’s natural tendency to be grateful and want to do something for you in return. You might offer them discounts or a free sample. You might put them in a frequent shopper rewards program. You might do a special customization. You might offer them a gift. You might offer something special to first time buyers or to clients who register for your email list.
Commitment
I am a loyal customer.
Once someone is engaged with something, they are more likely to stick to it and commit. They become loyal to the designer, the designer’s business and the designer’s brand. The marketer would do those things which enhance customer loyalty. You might have a special showing or trunk show. You might include them on your email list. You might make them aware a way ahead of time of some deals or opportunities.
Consensus
If it’s OK with them, it’s OK with me.
Sometimes this is referred to as the herd response. If the client sees others doing it, they are more likely to do it as well. The marketer here would demonstrate the popularity of their products with other clients and client groups.
Authority
If such-and-such expert tells me it’s OK, I’ll think it’s OK.
Clients are more likely to listen to an expert they trust, than anyone else. The marketer would have the marketing message put forth by trusted experts who could be seen as authority figures. These authority figures are seen as having already established proof of their knowledges and beliefs. Authority might be actual or implied. Thus, their advice is recognized as trustworthy. You might seek endorsements from well-known figures. You might create an ad where the expert is delivering the message. You might rely on influencers online to spread your marketing message.
Affinity
She bought it, and she’s a lot like me, so I’ll buy it as well.
The client is more willing to follow through on the marketing message and goal if she or he knows someone who is similar to themselves who bought the product. Similarly might be by gender or age or economic class. Similarly might be people who belong to the same church or shop at the same store or attend the same events. The marketer would emphasize shared interests. The marketer would present reasons why conformity is the best choice here.
Scarcity
I better get it right away, if I’m to get it at all.
People tend to want what they think they might not be able to have. When something is scarce, clients tend to assign it more value. Defining the context becomes very important for this principle of persuasion. It might be something that is exclusive. It might be in limited supply. It might have some sense of rarity. It might be subtle clues provided in how the products are displayed to make it seem like you are running out of stock (such as, a very large container with a few items left in the bottom). The product might not be available from any other competitor. The product might be temporarily on sale or only available for a limited amount of time. The marketer might emphasize that this product does what no other product can do. The marketer might emphasize that if the client doesn’t act quickly, the likelihood that they could ever purchase the product will be very low.
Visibility of Consequences
I know what will happen when I purchase and use this product.
The client is more likely to purchase a product if they can anticipate the consequences of their choice. Every purchase is a risk. Will it work? Will it hold up? Will it be appropriate? Will I get the reactions I want? Here the marketer would highlight evidence which makes the consequences obvious, and then more evidence which minimizes the likelihood that any risk and uncertainty might occur. The marketer might emphasize the positive results, and minimize any negative ones. They might point to past successes of this or similar products. They might present the pros and cons and comparative imaging of future outcomes. They might present the pros and cons by comparing antecedents. They might explain that the client will have emotion regrets of they don’t make the purchase.
Information Exposure
I was told it was important now to act.
Clients often have to make choices when they have more limited information upon which to rely. How and when the client is exposed to certain information, prompts, triggers and cues may affect their choice whether to buy a product or not. The client might be distracted. There might be time / timing / seasonal considerations where they pay more attention, say to holiday merchandise during Christmas season, than at other times of the year. Some information may have increased salience, depending on the context. For example, what the jeweler says when standing behind the jewelry counter may have more salience than what that same person says about the same product when randomly meeting that person on the street.
The marketer might present or withhold information based on timing considerations. The message might be different presented during the day from presented during the evening. It might be different in the Spring from the Fall. The marketer might try to connect positive emotional information the client already holds to the product the marketer is trying to sell. This could be a positive memory such as a song or image or experience. The marketer might stress how even with this limited information the client can still anticipate a level of success. The marketer might emphasize negative information about a competitor or competitor’s products. The marketer might use popular phrases and words that have a particular emotional or cognitive association with the target audience.
The Persuasive Argument
Whatever principle of persuasion the designer follows, the presentation of information in their persuasive argument follows a pattern. That is, informational content, when presented in a certain order, makes for a more persuasive argument. This order is presented in the table below.
A Few Cautions
When marketing your products, you have a professional responsibility not to cross the line between influence and manipulation. You might be successful in manipulation in the short term, but this will probably spell disaster for you mid- and long-term. People are willing to be influenced and persuaded, but resent getting manipulated. And if manipulated, they usually find out.
Don’t present yourself falsely in any way. Don’t claim to be an expert when you are not, for example.
Last, don’t over emphasis economic factors — price, discounts, and the like — in your marketing messages. Rely more on one or more of the universal principles of persuasion where you play towards emotions, perceptions and desires.
_________________
FOOTNOTES
Abelson, Herbert I. Persuasion: How Opinions and Attitudes are Changed. Spring Publishing, 1965.
Clements, Jon. The Power Of Influence and Persuasion in Business.
The other day, I looked up some quotes that Art Critics and Art Theorists have had to say about beaded jewelry and jewelry artists. What do you think?
(1)
“Anything done with beads is not art.”
Here the art critic equates “beads/beadwork” with the canvas of a painting, and not the painting itself. To the critic, beads are merely decoration. In this point of view, it is impossible to use beads in any way so that the finished project would be seen as art.
(2)
“Beading speaks for that branch of culture which is too homey, too functional, too archaic, for the name of ‘art’ to extend to it.”
To this reviewer, art is associated with clarity of choice and purpose, a sense of presence, and the evoking of an emotional response (or unleashing psychological content). To this reviewer, these kinds of things are not associated with beadwork and jewelry. In fact, to this reviewer, they can never be. Thus, beadwork and jewelry are not “art.”
(3)
“Beading as Art Brut — The work of children, asylum patients, and others untouched by artistic culture.”
My local paper in Nashville — The Tennessean — refuses to cover anything that is not fine art in their art pages. Many galleries and museums refuse to display bead art, often justifying this by saying there is no audience for bead art.
(4)
“Objects may only be valued as ‘art’ if they have a link to the academic setting.”
Many galleries and art critics only recognize the art of those artists with formal credentials. The reputation of the schooling of the artist is directly related to the judged “artistic” value of their work. However, there really are very few academic programs in beading/jewelry making. These are mostly involved with technical training, rather than theory and investigation. There are no professional journals where ideas and theories are proposed, discussed, tested and proven. In this model, beaders/jewelry makers stand little chance of getting judged as true artists.
(5)
“An object is ‘art’ if someone is willing to pay for it as ‘art’.”
In this sense, making a distinction between craft and art, or trying to blur the distinction between craft and art, becomes irrelevant. Within this definition, a lot of what gets sold as beadwork and jewelry, which many people would not value as ‘art’, will get included within the concept. When a piece of jewelry can get labeled as ‘art’, and retain this label, it becomes more valuable. It can sell for more. More people will indicate that it is good, rather than not good. It (and the artist) have more power.
(6)
“There’s nothing conceptual about jewelry. It’s mere hedonism.”
Jewelry is seen as visual spectacle. There are no self-reflective qualities to jewelry. There is no artist’ hand involved in its creation.
It seems that the more beadwork mimics painting or sculputre, the more it gets acceptable as ‘art’. A beaded tapestry or a beaded art doll is much more readily accepted as art, than jewelry.
(7)
“The object is ‘art’ if the object shows the artist’s process of conceptualization in its final form.”
Somehow, we must be able to recognize how the artist conceived of the piece, and how the artist implemented his/her conceptions. How did the artist tewst the limits of the materials — in this case, beads? How did the artist exploit the possibilities through the use of beads? How did the artist compose and design the piece?
Within this framework, all the parts of the jewelry — the center piece, the fringe, the strap, the bail, the surface embellishment — are critical to the appreciation of the jewelry as an object of art. Each of these elements of the piece of jewelry require the artist to exploit the possibilities of the material — the beads. Only with this fuller understanding of the piece in its entirety than Classical Art Theory would allow, can the artist, through the jewelry, create something where the whole is more than the sum of its parts. And this, then, is jewelry as art. In Classical Art Theory, the strap, fringe, bail would have to be seen to be subservient to the centerpiece.
Should I Still Call Myself An Artist… …If The Critics Say I’m Not?
Classical Art Theory is often at odds with my self-image as a jewelry artist and designer. It often denies the very essence of my artistic being, relegating what I do to some secondary status. Who is more right, I often ask myself.
Classical Art Theory holds that if, when talking about a piece, you talk or focus to much on ‘technique’, your piece is not Art. It’s Craft.
Craft is seen as having nothing to do with aesthetics. It is merely a creative engagement with materials.
With paint, the technique to apply it, is seen as virtually irrelevant. What matters with painting is what it says, not how it was made.
If the sense of ‘technique’ supersedes an object of art’s ‘statement’, then the art is really craft, thus a failure… and an embarrassment. Craft is an affront to art.
Art is exploring the expressive qualities of the medium, stoking the imagination of its audience. In fact, crafters supposedly do not play to an audience; art does.
Art critics would want us to talk about beadwork or jewelry making without speaking about technique. With a minimal reference to functionality. With a focus on the central part of the piece, not its strap or fringe or other noncentral embellishment. Apart from our audience as they are wearing our pieces.
The prominence of these are critics and their ideas and beliefs are some of the key reasons people are more willing to pay $5,000 for a painting, but not for most beadwork. They are why these critics see something special about the artist, but nothing special after the craftsperson. There is the pernicious assumption that the jewelry maker does not have to exercise judgment, does not have to worry about presentation, does not need to bring a high level of care and dexterity to the project, uses technique but not really skill, and does not need to take many risks.
Of course, I don’t buy into any of these Classical Art Critics and what they have to say. I know I am an artist. I know my pieces should be judged as a whole, and judged as the pieces are worn.
It is the process of linking the technique to the materials that is “art.” A successful process of jewelry making and design requires an understanding of the intrinsic values of the materials. It requires an understanding of how to manipulate the materials to elicit a positive response from others. It is expressive, intuitive and evokes emotions. The critical focus is not on the techniques. The critical focus in on the linking of technique and material to create something that others emotionally interact with.
WHY YOU NEED AN ORIENTATION TO BEADS & JEWELRY FINDINGS
Most people who make jewelry learn the craft in a haphazard way. Taking a course here or there. Watching some video tutorials online. Making a few pieces with some friends.
I have found over the years that, because of this, most jewelry designers are unfamiliar with all the various possible choices of stringing materials, clasps, jewelry findings, beads and the like. And they are unfamiliar with the implications of making one choice over another. They do not have a clear conception of how one part relates to another part or relates to how to execute a particular technique.
Because of this, most jewelry designers do not seem to fully understand quality issues associated with the materials they use. They have a weak understanding of what materials should best be used, and best not be used, and with what projects. They do not know what happens to all these different materials over time as the jewelry is worn. They do not know the required design tricks and strategies for making pieces more durable and more comfortable.
That’s why I developed this very comprehensive ORIENTATION TO BEADS & JEWELRY FINDINGS.
This course reviews the various materials jewelry designers use. I point out the pros and cons for selecting and using these. I go over how these impede or enhance function, movement, and the mechanics of construction.
Some topics covered:
HISTORY, GLASS BEADS, LAMPWORK BEADS, CRYSTAL BEADS, SEED AND DELICA BEADS, METAL BEAD, CLASPS, FINDINGS, STRINGING MATERIALS, TOOLS, ADHESIVES, TYPES OF BEADING AND JEWELRY MAKING, 3 APPROACHES FOR TEACHING BEADING AND JEWELRY MAKING, SUPPORT SYSTEMS AND OTHER ARCHITECTURAL CONSIDERATIONS,
This Series of 18 modules, most around 20 minutes, and totaling a full 5 1/2 hours of introductory materials about all kinds of beads, metals, clasps and stringing materials for the beader and jewelry maker.
And one more thing. For those who take this Orientation, I also have a 75-page article for you to download about getting started in jewelry making. You have a purpose as a jewelry designer: To merge your voice with form. This covers things you will need to know to find that voice.
how to channel your excitement
what types of jobs are available for those with jewelry making skills
Choosing and Using Other Jewelry Findings:
Preparers
You have to approach the Jewelry Findings with a large measure of respect. “Jewelry Findings” are all the pieces that you use, including clasps, other than stringing materials and beads. They are called “jewelry findings”, because up until about 15 years ago, many of these pieces didn’t exist. People went to sewing notion stores, antique stores, flea markets, hardware stores, cannibalized old jewelry, wherever, and found things and made them work. Because many of these pieces are new, there is not a consensus on what some of these things should be called, so you have a lot of similarly looking pieces that go by different names. I’m sure over time, the name-game will shake out, and there will be more consistency.
Respect these jewelry findings. They are the pieces that get pulled and strained, torn at and squeezed, maligned and misused. These are the pieces that will make or break your piece of jewelry. Understand and respect them.
Many designers fail to make the full range of these pieces available to them. They either don’t know about them, or are afraid of them or think they might use them incorrectly. They too often limit their own design possibilities by relying on the same limited set of findings for everything they make. But the world of possibilities that these jewelry findings open up for us is endless.
Below is a list of other major jewelry findings used in bead stringing. I’ve tried to group them into three categories to make it a little easier to relate to.
PREPARERS:
Things Which Prepare the Ends of Cords and Stringing Materials:
These kinds of jewelry findings are mostly used with thicker cords, like leather and waxed cotton, but also with cable wires. These enable you to create a “loop end” on each side of the cord or cable.
From the two loop ends you have created on each end of your cord, you then continue to create the rest of your clasp assembly. If the loop is big enough (to give you jointedness), or looks substantial enough (like it won’t break from movement), you can attach the clasp directly to the loop. If not, you will want to attach your clasp/ring to jump or split rings, and these, in turn, to your loop ends.
You usually try to match the size of the interior opening on the jewelry finding to the thickness of your cord or cable. For some of these pieces, this match is more important than others.
You always put some glue on your cord or cable before you stick them into the piece. You use glue because all these cords are oily, and some will sweat, as well. They will slip out of the findings — even with tight crimping or clamping — because they are slippery. That’s why you use glue.
I recommend using a glue like E6000 or Beacon 527. Don’t use super glue. Super glue (or the jeweler’s version called G-S Hypo Cement) dries like glass, so the bond will shatter like glass, because all jewelry moves. Also, after it shatters, the bond looks like a broken coke bottle. E6000 and Beacon 527 dry like rubber, so they act as a shock absorber, when the jewelry moves.
CRIMP ENDS
These come very fancy or plain. They come with a small opening to use with cable wires, and wider and wider openings to use with leather or waxed cotton, or even braided leather.
These pieces have a loop at the end of a tube. The tube has 3 bands. The first and third are decorative. The center band is meant to be crushed and crimped. You put some glue on the cord or cable — any glue except super glue — stick it into the tube, and take a pliers and crush the center band as flat as you can get it.
When you crush the middle band, visually, it looks like it is part of a pattern of beads. It doesn’t look like an ugly crushed piece of metal.
Some crimp ends come with a hook, so that you attach a loop on one end and the hook on the other, to create a hook and eye clasp.
These and clamps (see below) work best for preparing the ends of cable wires and thicker cords. Crimp ends tend to be on the pricier side; clamps are very inexpensive. Both hold well, relying on both the glue and the crimp.
CHAIN/CORD ENDS
These pieces have a loop at the end of a split tube. For chain, these are soldered on. For cords or cable, you put some glue on (again never super glue), stick it into the split tube, and take a pliers and crush snug, NOT flat. What’s holding these on is the glue. If you crush flat, you lose the bond. Should tightly match cord thickness to interior diameter.
We need to crush snug because we want the glue to adhere to all the interior surfaces. If there are any gaps where the glue has not adhered, the bond will break.
These are terrible pieces, because it is difficult to achieve that perfect bonding with the glue.
END CAPS
These pieces come in just a few sizes, but many designs. Those pictured are very industrial looking, but they come very decorative, as well. Some pieces have a hole at the end instead of a loop and are labeled “end caps,” but technically, these should be called either a cone or a bead cap. Usually, the interior opening size of the end cap will be listed, such as ID=6mm or ID=8mm or ID=12mm. You coordinate this with the width of whatever you are trying to slip into the end cap. But because of the shape of the end cap, there still may be fit issues.
These pieces have a loop at the end of a hard metal tube. The loop is either an eyelet or a fixed loop. You put some glue (not super glue) on cord or cable and stick in. The glue is all that holds. Should tightly match cord thickness to interior diameter.
Because it is important, for the bond to hold, to get the glue to adhere to all the interior surfaces, and you cannot crush the ends snug, you need to put a lot of excess glue on the cord when you stick it in. And you need to be prepared to wipe away the excess glue that bleeds back out.
You never attach your clasp directly to these pieces. You need an additional intervening ring — jump ring or split ring or soldered ring — between the end cap and your clasp component.
CLAMPS Ribbon or Bar Clamps:
These clamps are folded metal with a loop in the center edge, come in different lengths, and have teeth. These are for ribbons or fabric. You don’t use glue, because the glue will bleed into the ribbon or fabric.
You fold over the end of the ribbon or fabric, making the end pretty, and stick into the clamp, and use a pliers to crush firm. If your material is wider than the clamp you have, you would make several folds in the end, like you would when gift-wrapping a package.
Foldover or Wing Clamps:
These come in a few different sizes, some with square loops, some with round loops. Some have plain backs; some have patterned backs.
These typically are a loop on top of flat metal with two wings that fold over. You put some glue (not super glue) on the cord or cable, sit in the saddle between the two wings, and use a large pliers, and crush the two wings over each other and over the cord. Crush as flat as you can get it. This is not done in one movement because the wings are stiff and strong. You usually take your pliers and move then to one side, then the other, then back, until you get the two wing position over each other, and you can crush them flat.
One mistake people make with this piece is that they crush snug, not flat. Where the wings overlap each other, this leaves an air passage. Again, we want our glue to adhere to all the interior surfaces. If you crush snug, this air passage will weaken the bond, and your cord will pull out. You have to crush as flat as you can get it, to force the glue up into that air passage.
You can use one clamp for multiple strands, if you wish. You can seat multiple strands of cable wire or leather or whatever into the saddle of one clamp.
These and the crimp ends work the best for preparing the ends of cable wires and thicker cords. Crimp ends are pricier; clamps are cheap. Crimp ends have a design impact; clamps are very utilitarian.
COIL ENDS
Coil ends have an open ended loop at the top of a tightly wound coil. I don’t like the way these look after they are crushed onto the cord, and they don’t hold up well. One advantage is that the coil functions as a spring, and absorbs a lot of the excess force place on the piece, that comes from movement.
With coil ends, you put some glue, (but not super glue), on the cord, shove it into the coil. You take a chain-nose pliers and crush the first two rings of the coil onto the cord. If you crush too hard, you’ll slice the cord. If you don’t crush hard enough, the cord will pull out.
The way the loop was designed to work, was that you take a pliers, move the open ring to the side, slip on your clasp or ring, and, using the pliers, move the open ring to a closed position again. DON’T DO IT THIS WAY. When you move the loop back and forth, it breaks off easily. These loops are rather brittle. SO, the way you would use this, is that you would take a jump ring or split ring, and attach this to the loop and your clasp piece. As long as you don’t move this loop wire, it stays strong.
Coil ends come in two sizes in terms of the width of the interior diameter. If your cord is thicker than the smaller size, see if you can make it work with this smaller size, anyway. The larger size is more awkward to use. Say you had leather cord. You can take a single-edge razor blade and cut the end at an angle, put some glue on the cord, and shove it into the smaller piece.
BEAD CAPS
This is a decorative cup-like or bowl-like piece, with a hole in the center. This piece is originally used as a decorative element, to cover one or both sides of a bead, as you string your beads on. However, you can adapt this piece to be an end. You might have multi-strands, where you tie them all off together, and use the bead cap to hide the mess. You might have a bead crocheted rope, and again, use the bead cap to give your piece a decorative end. You glue the bead cap on. Then you take an independent wire or thread, attaching it to your piece about 2–3” from the end, and running it through your piece, through the cap, then finishing off the rest of your clasp assembly.
What’s nice here are that there are hundreds of styles, whereas the more typical jewelry findings look very utilitarian.
BELL CAPS
A bell cap is a bead cap with a loop on it. This is a decorative cup-like or bowl-like piece, with a loop sticking above the center. This piece is originally used to adapt something, like gluing it to the top of a crystal pendant or bead, to be a drop. But it can be adapted to use as a fancy end-cap. Use glue here. Attach the clasp assembly to an additional jump ring or split ring. Again, there are many, many decorative styles in bell caps, so you won’t have to rely on the typical and very plain specialized jewelry findings.
The arms on the bell cap are somewhat independent, and can be pushed into the shape of whatever piece they are attached to. So, for example, you can take a rough stone, position the bell cap at the top, push on the arms to shape them to the stone, then put glue on each arm and attach the bell cap to the piece.
BEAD TIPS (aka, KNOT-COVERS)
These pieces are used to hide knots. One style has a cup with a tongue attached. Another style ends with a loop, not a tongue. The most widely used style — Clam Shell Bead Tip (or double-cup) — has two half cups that close over the knot, and a tongue extending from one end. While some people use these pieces with cable wire, they are primarily designed for use with needle and thread.
These take some practice in learning how to use them. On the first side of your piece, you string on the bead tip, say the clam shell. You tie a bunch of knots in the tail, so your knot is bigger than the hole in the bead tip, and won’t slip out. Cut off the tail. Put a drop of glue on the knot. Here you would use something like superglue. Superglue will make the knot stiff, so it won’t pull through the hole. E6000 will make the knot rubbery, and it will be able to contort and work its way through the hole. Trim the tail. Press the two halves of the clamp together over the knot, so it looks like a bead. Take the tongue, fold it over and through the ring on your clasp, and back to itself, so it forms a loop.
On the other side of your piece, here’s the tricky part. You need to keep your tension on the thread, so the thread doesn’t show when you’re finished. You need to tie a bunch of knots, and complete the rest of the process. This is a 3-hand operation, but you only have 2 hands.
Here you slide the bead tip onto your thread. Use one hand to hold everything tight. Take an awl or a round nose pliers — something where the width graduates into a point, and put the tip where you want your finished knot to end up. Tie an overhand knot over the awl or pliers up high on the wider part of the jaws. Tighten the loop of this knot. Tighten the tension on your thread. Move the loop down the awl or pliers a bit, moving towards the narrow pointed end. Tighten this loop. Check your overall thread tension. Move the loop down a little bit more. Tighten this loop. Check your overall thread tension. When you loop gets to the tip of your awl or pliers, you need to pull your knot tightly, and push the awl or pliers out of the way, AND, you want to maintain the thread tension in your piece. Tie a bunch more knots. Put glue on the knot. Trim the tail. Close the clamp. Loop the tongue into the other part of your clasp. This takes about 5 tries before your body gets that muscle memory to do the task easily and correctly.
When I started in jewelry making, almost every piece used bead tips. I’m not a big fan of this type of piece today. The tongue when bent over to hook and secure the clasp is not jointed enough. It doesn’t leave a big enough loop, so there is tension and these tongues break off. Today, you can tie your piece to the clasp using knots, then slip a crimp cover over the knot, so it looks finished as if there were a bead there. This is both more secure and easier to do.
Some alternatives to tying a globular knot: (1) with needle and thread work, you can tie off an end to an 11/0 seed bead, and have your clam-shell enclose the seed bead, and (2) with cable wire, you can crimp on a crimp bead on the end of your wire, and have your clam-shell enclose the crushed crimp bead.
CONES
Cones come in many shapes and designs, but basically look like a megaphone. These are used to finish off the ends of jewelry, often to hide a lot of messy knots or unfinished ends inside the cone.
One style of cone is called a 3-to-1 cone (also, 2-to-1 up to 11-to-1). This is a flattened cone, with one hole on one side, and 3 holes on the other. This is supposed to help you finish off a 3-strand piece in a decorative way. You pull each of 3 strands through the 3 holes on one side, and out together through the one hole on the other side. For two of the strands, you tie a large knot or double-knot, cut off the excess tail, and let the knot fall back into the box of the cone. I’ve only known one person in my life who could accomplish this, and maintain sufficient string tension so that none of the cable wire showed on the other side of the cone and as part of the bracelet. For the 3rd string, you would continue creating your clasp assembly. This is a good piece in theory, but not practice. Most people end up tying the three strands into this big, globular knot, and then trying to finish off the clasp assembly, only to have the clasp assembly take up 25–30% of their finished bracelet.
Regular cones are used like lampshades to hide some ugliness. With the typical cone style — that megaphone looking piece, the way you are supposed to use this piece is as follows: You take a soldered ring, something small enough so that it will fit far enough back into the cone, that the cone will hide any of the finishing knots or ends. If we start with a 3-strand necklace, you would tie off each strand to one side of the soldered ring. Then you would take a separate, independent cable wire, hard wire or thread, whatever you are stringing with, and tie it off in a knot to the other side of the soldered ring, pull the whole works into the cone, with the stringing material coming out the narrow end. Then you would finish off your clasp assembly.
The soldered ring, in this case, acts as a “support system”, creating jointedness. Otherwise, without this ring or support system, the cone could not support the resulting stress and strain. Since all the pieces are metal — cable wire, cone, clasp, crimp — , and these would be too stiff and would not move easily, and, as you now know very well, when you bend metal back and forth, it breaks.
EYEGLASS HOLDER ENDS
A major category of jewelry are eyeglass leashes. You make an eyeglass leash by attaching an eyeglass holder end to the eyeglasses, making a string of beads, attaching the string of beads to a split ring, and attaching the split ring to the eyeglass holder end. You never attach the beadwork directly to the holder ends. Eyeglass leashes take a huge beating, as they are worn, and you need to create as much jointedness as possible, so you don’t ruin someone’s eyeglasses, have the lenses shift position within the frames, or have the leash break. In fact, we want to use a split ring — about 10mm or 12mm in diameter — that is a little larger visually than you might feel comfortable with.
Eyeglass leash holder ends are made from round rubber thong (usually black or clear), flat vinyl (usually black or clear), or elastic cord (comes in many colors). The round rubber thong is the most durable. Elastic cord is not durable at all. There are various style options. Most come with what is called a “coil center”. When the eyeglass leashes are worn, the rubber, vinyl or elastic cord sweats, both from the humidity found in the air, as well as the wearer’s own body sweat. Coil centers tend to slip, so these don’t work well with narrow arms on eyeglasses. Other eyeglass leashes come with a bead center, usually a 6mm glass roller bead. The beads don’t slip.
The ones with bead centers are a little more expensive than the ones with coil centers. One company bought the ones with the coil centers, slipped these off what is basically a rubber band, and slipped on a 6mm glass roller bead. They took a $0.45 cent piece and sold them for $4.00 a piece. People thought they were magic because the beads didn’t slip, so were willing to pay the premium. You can do the same thing. There are about 300 colors of roller beads, so you can personalize your line.
WATCH BAND COMPONENTS
These pieces are used to adapt watch faces so you can make beaded watch bands off them. They consist of a tube designed to slip over the spring bar on each end of a watch face, and some kind of loop or series of holes that come off the tube. Beaded watch bands have become so popular, that now you can purchase watch faces designed specifically to attach these to them.
CRIMP BEADS, CRIMP COVERS, and HORSESHOE WIRE PROTECTORS
Crimp beads come in many styles, sizes and finishes. These are used to secure cable wires to clasps. The crimping process involves crushing the crimp onto the cable wire, first separating the tail wire from the main wire, then creating a lock, and finally re-shaping it so it looks like a bead again.
Crimp Covers
These are U-shaped beads that slip over the crushed crimp. They are used like a lampshade to hide something that is ugly.
You attach the crimp cover in two steps. First, using the tips of your crimping pliers, you push the two sides of the U together, so you have a pretty bead. These are made of a soft metal, so you don’t want to push too hard, or you will crush them. After you get the two sides to meet, you’ll find that the lip on either side doesn’t meet up perfectly.
So, Second, at this point, you return the crimp cover to your crimping pliers, this time resting it between the top notches (thus, furthest from your hand) in each jaw. This will help preserve the roundness of the crimp cover as you manipulate it. Gently push the jaws to force the lips to meet more perfectly. You can slide crimp covers over your crushed crimps. You can also use these to slide over any knots, to hide the knots.
Horseshoe wire protectors
These serve several purposes. (1) It forces you to leave the correct size loop in the cable wire, so that you have the appropriate support system or jointedness. Without the loop, you would be pushing the crimp all the way to the clasp. This is a No-No. You never push the crimp all the way to the clasp — this creates stiffness with metal parts, and general movement would cause these to break.
(2) The horseshoe also makes the loop more finished looking — better than a bare-wire loop. Most people hate a bare, exposed loop. The horseshoe fools the eye/brain here, making it think that the loop is finished and more organically a part of the whole composition.
(3) The horseshoe prevents the cable wire from folding into a V over a period of time and wear. If the wire were to change from an arched loop to a V-loop, the wire then would more easily bend back and forth and break.
There are many choices to make when selecting crimp beads:
Crimp Beads
– tube vs. round
no difference in “holdability”, but most people prefer the tubes
– THE SILVER COLOR ISSUE: sterling silver vs. silver plated vs. silver plated crimp with sterling silver crimp cover vs. argentium silver crimps
Silver-plated crimps are usually plated over brass. Brass has a very high degree of integrity as a jewelry making metal. The plating wears off relatively quickly, and your crimps will look black — basically tarnished brass. More recently, these plated crimps have been plated over aluminum, which can break from the force of the crimping pliers.
Sterling softens at body temperature. If your crimp is resting on the wrist or the neck, there is some risk of it softening and weakening. This risk is minimal, however. If you’ve crimped correctly, you shouldn’t lose sleep over this. I prefer to use the sterling silver crimps; they are often made better than the other crimps.
You can also use a silver-plated crimp to crimp, and slide a sterling silver crimp cover over it.
Argentium has the same silver content as sterling but does not soften as easily at body temperature. These are a lot more expensive than sterling.
– crushing the crimp and re-rounding it vs. crushing, then using crimp cover
Some people don’ t like the look of the re-rounded crimp, or feel uncomfortable trying to re-round them. The crimp covers add about $0.50 — $1.00 more to each piece.
– plain tube vs. twisted tube
The twisted tubes (sometimes called Tornado or Cyclone crimps) are a little more expensive than the plain ones. When you crush the twisted tubes, they look decorative enough that you don’t have to re-round them. You definitely need to re-round the plain ones.
– Regular or long tube vs. short or half tube
Short tubes or half tubes are primarily used in pieces like illusion necklaces, where you have a cluster of beads, and the cord shows, another cluster of beads, the cord shows, etc. Half tubes are used on either side of the clusters to keep the beads in place. When you crush the half tube, the volume of space it takes up is not noticeable. When you crush the regular sized tube, its volume of space is too noticeable and detracts from the general look of the piece. One mistake people make with the short or half tubes, is that, when they use them to finish off the ends of jewelry, their mind tells them to use 2 or 3 of them so that they will “hold better.” A crimp is a crimp, and if you crimped correctly, there is no difference in holdability between the short and longer tubes. Each crushed crimp you add becomes like a little razor blade. All jewelry moves, so you’re increasing the chances, by using more than one crimp on each end, that one of these crimps will cut through the cable wire. One crimp on either end is enough.
– variations on quality/grade of crimp beads
Basically, you get what you pay for!
Here’s how crimp beads are made: You start with a sheet of metal. You roll the metal into a tube. You buff along the seam where the two sides meet, so that it looks like it’s been soldered together. However, there’s really a seam there.
So often, people come into our shop and tell sad tales of failed crimps and broken bracelets and necklaces. They blame themselves. They blame the pliers. But they never blame the crimp beads. In most cases, the crimp is at fault.
Cheap crimps, usually bought in small packages, usually at craft stores, are not made well. When you crush these, they tend to split along the seam. Sometimes you can see the split. Othertimes, you can’t quite see that the two sides of the tube have started to separate. Your cable wires pull out. Or your crimp edges have cut into the cable wire.
An A-grade crimp, usually costing about 3 times what the cheap crimps cost, can hold up to your initial crushing, as well as another 8 or so clamping down on it during the re-rounding process.
There are heavy-duty or A+ grade crimps. These run about 6–8 times what the cheap crimps do. You don’t have to worry about any splitting, no matter how much you work the crimp bead with your pliers.
– using 1 crimp on each end vs. using more than 1 crimp on each end
Using 1 crimp on each end of your piece is sufficient. Using more than 1 crimp on each end is too risky. Sometimes you mind, or your best friend, thinks that is 1 is good, 2 or more would be better. No! When you crush your crimp onto the wire, it becomes like a little razor blade. All jewelry moves, so your crimp is constantly trying to saw through the cable. Using more than one crimp on each end increases the chances that one will saw through. All you are doing is adding razor blades.
– size of crimp
Manufacturers are inconsistent in how they label the sizes of crimp beads. In general:
2mm is the average size For .014, .015, .018, .019 cable wires
1.5mm is small For .010 and .012 cable wires
2.5mm is slightly more than averg For .019 and .024 cable wires
3.0mm is large For .024 cable wires, or thicker cords, or bringing
more than 1 strand thru at a time
4.0mm and larger For thicker cords, or bringing 2+ strands thru
Choosing and Using Other Jewelry Findings: Controllers and Adapters
You have to approach the Jewelry Findings with a large measure of respect. “Jewelry Findings” are all the pieces that you use, including clasps, other than stringing materials and beads. They are called “jewelry findings”, because up until about 15 years ago, many of these pieces didn’t exist. People went to sewing notion stores, antique stores, flea markets, hardware stores, cannibalized old jewelry, wherever, and found things and made them work. Because many of these pieces are new, there is not a consensus on what some of these things should be called, so you have a lot of similarly looking pieces that go by different names. I’m sure over time, the name-game will shake out, and there will be more consistency.
Respect these jewelry findings. They are the pieces that get pulled and strained, torn at and squeezed, maligned and misused. These are the pieces that will make or break your piece of jewelry. Understand and respect them.
Many designers fail to make the full range of these pieces available to them. They either don’t know about them, or are afraid of them or think they might use them incorrectly. They too often limit their own design possibilities by relying on the same limited set of findings for everything they make. But the world of possibilities that these jewelry findings open up for us is endless.
CONTROLLERS: Things Which Control the Positioning of Pieces or Sections within Your Piece:
SEPARATOR or SPACER BARS
These are multi-hole pieces that are used to keep multi-strand pieces neat and organized. In a bracelet you might use 3–5, spaced evenly along the length of the piece. In a necklace, you might use 5–7, spaced evenly along the length of the piece.. Some of these pieces are very narrow and meant to be “hidden”. Others have a decorative edge that will be seen as part of the overall design. Separators with a broad surface are referred to as Separator Boxes.
END BARS (can also be used for making earring dangles)
These pieces are basically a bar, with one centered loop off one side, and multiple loops off the other. For a 3-loop end bar (which has 4 loops — 1 centered on one side, and 3 on the other) you would finish off a 3-strand piece on the one side, and then use the single loop on the other side to begin your clasp assembly. The bar can be plain, or very decorative. The bar can be straight, curved, or zig-zagged.
On an earring, with the bar positioned horizontally, you can dangle these one from the other, and create a neat cascading effect with dangles.
These come plain, as well as very decorative.
CONNECTORS and LINKABLES
There is a sub-family of jewelry findings originally called “Connectors”, and more recently referred to as “Linkables”. [The word “connectors” didn’t seem to resonate with customers, so they are trying “linkables”, which also doesn’t particularly resonate, because people are unfamiliar with most of these types of parts. That’s unfortunate, because connectors and linkables open up myriad design possibilities.]
Connectors or linkables are pieces that either have a lot of holes in them, or have multiple loops that come off them. They enable the designer to create segments or sections of beads, which are then connected to each other. They enable the designer to re-direct the flow or pathway of the piece, or to start new pathways/directions off the original piece. They allow you to create support systems within your pieces which are very attractive, appealing, and create a higher level of interest on the part of both viewers and wearers.
The most basic connectors or linkables are rings of various sorts.
Jump rings have a gap or split in them. Split rings are like little key rings, in which the wire of the ring goes around twice. Soldered rings or stamped solid rings have no gaps whatsoever.
In making a choice among these, you would first try to use a soldered or stamped solid ring. If this won’t work, because you have to make some kind of jump, your second choice is a split ring. If this won’t work, either functionally or sometimes from a visual-appeal standpoint they are not appealing, you would use a jump ring.
To open and close a jump ring, you move the wire ends, on either side of the gap, sideways just a bit, so that you have an opening wide enough to slip over whatever you need to slip them over on. You never pull the wires out and in, just back and forth. After you have connected your pieces to your ring, you close the ring by moving the two ends side to side until the two ends meet. If you have difficulty doing this with your fingers, or the aid of a chain nose pliers, you can purchase a jump ring pliers. With the jump ring pliers, you close the jump ring as best as you can with your fingers. Then you put the jump ring between the jaws of these pliers, and squeeze to close perfectly.
Bead Attach Rings
These are two rings soldered together, one small and one larger. These are primarily used in beaded charm bracelets. If you strung your charms on with your beads, they would get locked between the beads, and not flow freely. Instead, you string on your beads, and string on (through the smaller hole) a bead attach ring, everywhere you want to place a charm. Then you attach the charms, usually using a jump ring or split ring, to the larger hole.
Rosary and Y-Necklace Components, and other multi-hole or multi-loop pieces (see above) let you segment your pieces, or take the strings in different directions.
Beads
There are some beads that are considered a part of the Connector or Linkable family.
Double beads are either tubes that are soldered together so that the directions of the tubes are different, or you have a tube with one or more rings soldered along its length.
Say you have two tubes soldered together, and one is curved to the left and the other to the right. You take two strings, one through one, and the other through the other tube, add some beads to both, add another 2-tube-double-bead, to twist the strings in the opposite direction, add more beads to each string, another double bead, and so forth. You end up with a bracelet or necklace that looks somewhat like a DNA-strand (double helix).
Say you have a twist tube with two loops soldered to it, one near the top, and the other near the bottom. You can take two of these, and make a long necklace, with one tube+loops positioned on the left side, and a second one positioned on the right side. The wire of this necklace is strung through the tubes. Next, you take another stringing wire from the top loop on the left side and the top loop of the other tube+loops bead on the right side, and make a strand of beads across the chest. Do this again, attaching the lower loops from left to right. You end up with a necklace that also has two strands going across the chest.
Twister beads are round beads that are soldered together, so that the holes go in different directions. Usually these come as two soldered beads or three soldered beads. You place these in 2-strand or 3-strand necklace or bracelet, at each point you want the strands to cross over each other.
The traditional way to make a twist necklace or bracelet is to take two end bars, and attach the strands in the following way:
Twister beads come in handy because problems arise when these multiple strand pieces are done the traditional way and are worn. First, if you flip one of the end bars over to its other side, you lose the twist as you envision it. Second, when people wear these pieces, they often don’t twist at the points you envisioned, either.
By using two twister beads — in this case, a twister bead comprised of 2 beads soldered together — in the example, the piece will always twist in the way the artist envisions.
Tubes with loops.
These are basically a tube with a loop soldered off the middle. You string these on everyone wherever you to add a drop or pendant to your piece.
ADAPTERS: Things Which Help Adapt Something So It May Be Used Within Your Piece:
BAILS
These are basically pieces that enable you to put a loop somewhere along your strung piece of jewelry. You string these pieces on everywhere you want to add a drop or a pendant. Regular bails look similar to tubes or beads with a soldered loop off the end.
Some loops are set horizontally, and some vertically, and this positioning of the loop may affect how useful it is for your piece. PAY ATTENTION to the positioning of the bail’s loop relative to the positioning of the hole on your pendant piece.
Other types of bails: Pinch bail — basically a fancy V-shaped piece. The legs have pointed pinchers at their ends. You push these pinchers into a horizontally drilled drop. Austrian crystal drops, for example, are horizontally drilled. And you end up with a loop to string through.
Pinch bails come in many sizes, and a few different configurations, today. You need to match the pinch bail and its design to the pendant drop you want to combine it with. When you open and close the pinch bail too many times, it breaks. You are basically taking metal and bending it back and forth. When you try to fit the bail onto the drops, often you break the tops of the drops, particularly if your drops are some type of crystal material. A hazard of using these. So, when planning your projects (and also when pricing these), always assume you will need some extra bails and some extra pendant drops.
While not my favorite thing to do, some people put a drop of super glue where each point or beg of the bail enters the drilled hole.
Snap on bail — basically a fancy lanyard clasp. This is used to make your pendant removable. You can snap on the bail over the stringing wire, and then take it off the stringing wire.
Wire bails — basically a triangular shaped jump ring, where the gap is off to the side, rather than at the bottom. The drop or pendant won’t have a gap to pull through, because the gap is on the side. What I like about these is that people often bring things into the shop to have us convert into some kind of pendant drop, and if I can’t find a regular piece to work, I usually can always make a wire bail work.
Donut bail
The donut bail is used to convert a glass or gemstone donut into a drop. You slip one side of the bail through the donut hole, then push the two loops on the end of the bail together. Then you string through the two loops.
Beaver Tail or Beaver Tail Bail
Beaver tails are flat surfaces with a loop or bail loop attached to one end. You glue the flat surface to your piece, say a piece of fused glass, letting the loop or bail loop to stick out over the top of the piece. If a plain loop, you would add a jump ring or similar piece, to finish off the piece.
Leaf or Foldover Bail
This is a long piece of metal with flat, decorative ends on each side, usually a leaf stamping. You carefully fold this over, creating a loop in the middle. Then you glue either flat surface to the surface of your pendant drop, like a piece of fused glass.
To glue the leaf, foldover, beaver tail or beaver tail bail to a piece, first try either E6000 or Beacon 527. If these don’t work, try a 5-minute epoxy that comes in a dual-syringe. If your piece is smooth glass, you might use some sandpaper or a file to rough up the surface a bit before gluing. If you have still having difficulty with a glass piece, try using glass cement.
SCREW EYES
These pieces are a screw-threaded post, with a loop soldered to the top. You put some glue (any glue except super glue) on the post, push it into a bead — they do not screw into anything — , attach a jump ring to the loop and string the bead on to your piece as a drop.
EXTENDER CHAINS
This is a short length of chain, usually with a spring ring clasp on one side, and a bead-drop on the other. You can buy these pre-made, or make your own. These are used to lengthen necklaces. The spring ring clasps onto the existing ring of the necklace; the hook-clasp can clasp into any link on the chain. The bead drop is primarily decorative.
SAFETY CHAINS
These 2 ½” to 3” lengths of chain, have two tiny jump rings, one on each end. These are used to attach to bracelets, to prevent you from losing your bracelet, should the clasp come undone. You can buy these pre-made, or make your own.
HEAD PINS
Head pins are pieces of wire with a flattened or decorative end or head. You put beads on the head pin, and the head stops them from falling off. You make a loop on the other end, and string these on a necklace, or dangle them from an ear-wire or other loop. You need ½” of exposed wire to make a loop. You can make a single loop, a double loop or a triple loop. Each provides a different level of security, a different visual appearance, and a different impact on the resulting silhouette.
Head pins come in different thicknesses (gauges). Regular thickness: 20 gauge Extra Thin: 22 gauge or 21 gauge Ultra Thin: 24 gauge or 26 gauge
Too many people try to use the longest head-pins they can get. They end up with bent dangles and drops on funny looking necklaces, bracelets and earrings. If you want something “long”, consider making a series of links using eye pins, instead.
When you make your loops on the head pin, make them large enough so that they have sufficient jointedness and support, and will easily slip over the stringing material or finding. I can’t tell you how many times I’ve seen women with earring dangles stuck in a 90 degree angle, because the loops were too small.
EYE PINS
Eye pins are pieces of wire with a loop on one end. These are used to make bead-chains, such as in a rosary. You put one or more beads on the eye pin, then make a loop on the other end. You need ½” of exposed wire to make a loop. These come in different thicknesses (gauges). Regular thickness: 20 gauge Extra Thin: 22 gauge or 21 gauge Ultra Thin: 24 gauge or 26 gauge
You can buy head pins and eye pins pre-made. Or you can easily make your own, using simple wire working techniques.
The women were so excited about the jewelry. Trying it on. Adjusting it to see if they could wear it a different way. Changing up the silhouettes. Pretending they were wearing different outfits to visualize what the pieces would look like. It was a very versatile line of jewelry, and all the women noticed that very quickly. They could wear necklaces as bracelets. Combine bracelets into necklaces. Take one bracelet, add it to a necklace, and create a longer piece. They could purchase different pendant drops, all as add-ons as they wished or none at all. And the drops easily converted into earrings. Imagine that! And the awe and glee and elation and animation — yes, these women were more than happy to have found this jewelry designer and her custom pieces.
I was there that day. In the store. At this one-day trunk show. I saw it all. These women were purchasing almost every last piece. It was the right aesthetic. Contemporary but conservative as well. An individualized look but not outlandish. Easy to wear. Easy to adapt. Easy to visualize what it would look like with different outfits and in different situations.
The jewelry designer was very attentive. She demonstrated the flexibility of each piece in the line. She, at first, asked the women individually a lot about themselves and how they liked to wear jewelry. Then she subtly shifted the conversation a bit so they were talking about themselves and how they would want to wear her jewelry.
At one point, I slowly looked around this upscale clothing, accessories and jewelry store. There were seven store associates standing around. Standing around. A glazed look on their faces. The enthusiasm and energy before them somehow foreign. After the trunk show, when the designer was no longer there, they would be the ones to represent her and her jewelry.
They stood there with blank faces. As if watching a movie they found uninteresting. None of them stepped in. None of them stepped up. Even though the jewelry designer was mobbed with seven or eight women at any one time. They obviously were unable to empathize with the crowd. They had no clue how to sell the pieces because these were pieces of jewelry they didn’t wear themselves. They were somewhat clueless about how to suggest how these store guests could put things together in a stylish, wearable way.
At the end of the day, the jewelry designer was very happy with her sales. But it hit her. Her jewelry would remain at this store for the next several months. But she would not. She would be leaving that day. And she was worried. She thought that over the 10 hours, her purpose was not only to sell to customers, but her purpose was also to model for the sales staff the smart ways for working with these customers and selling her product.
Had the store associates been reliable deputized partners with the jewelry designer that day, all would have made many more customers happy, and made a lot of money and commissions for store, sales staff and designer. Going forward, the designer now had doubts.
Jewelry Designers Often Have To Rely On Others,
The Designers’ Success Relies On Their Whims
Most jewelry designers do not own their own shops. They rely on other people to sell their stuff. They might put their jewelry in a clothing, accessories or jewelry store on consignment. They might be represented by a gallery or sales representative, with their jewelry spread out in many stores. They might package their jewelry into trunk shows or pick boxes where they send out their jewelry to various stores. These other venues can pick and choose and sell what they want, then return the rest.
The success of sales becomes the whim of who sells it. Their understanding of the designs. Whether they like the pieces or not. Their motivations to keep things clean, neat and displayed well. If they can see themselves or their friends or spouses wearing these. Their sense of style, knowing what things might work well together with what fashions. How well they communicate with their customers. Perhaps even IF they communicate with their customers. If they follow-up with their customers.
Designers Must Take The Lead In Preparing Others To Sell Their Jewelry
The designer must play a leadership role here. The designer as leader must effectively influence, persuade, train and convince whoever will be selling their jewelry how to sell it. As best as possible, the designer must build shared understandings about the product with those who will sell it.
Passive assumptions won’t work here. The designer cannot assume that store owners and their sales staff, because they supposedly want to show a profit, will be good at their jobs. More likely, they are not — particularly when it comes to selling someone else’s stuff. The consequences of poor salesmanship are virtually invisible until many months, even years, later. That’s too late to wait.
To add to the difficulties, the opportunities in terms of time, resources, and follow-up are very limited. The designer may get just one shot to build shared understandings and accomplish several goals. Ideally this should happen in person. Often, it is not. Often it is reduced to shared emails, some printed materials, and some phone calls.
Six Key Shared Understandings
There are six key understandings which the designer must influence others to share. These include,
1. The Key Product Details
2. The Primary Product Benefits
3. The Smart Ways To Use The Products To Build Customer Relationships
4. What Rewards The Sales Staff Should Expect For Themselves, Based On Their Performance
5. At All Times, How To Maintain The Optimum Inventory and Product Mix
6. How To Routinize Timely Feedback
1. The Key Product Details
Think of every line of jewelry as its own culture with a group or tribal identity. Which three to six words or simple phrases encapsulate what that identify is all about? What were the key, primary design choices made which give this line of jewelry its character and resonance? How would anyone know that any piece of jewelry was a part of that group or tribe?
These key words or details might relate to materials and techniques. They might reference fashion, style and taste. They might be things about the designer or about jewelry design in general. There will be lots and lots of details which can be conveyed, but the list of details will need to be severely culled.
People have what is called finite rationality. They can only handle and remember between 4 and 10 pieces of information at a time, with 7 pieces of information usually the upper limit for most people.
Don’t confuse the sales staff. Don’t let them confuse the customers. Limit that descriptive words you use when explaining your jewelry, your design choices, and your design goals. Keep these descriptors simple, un-jargoned, devoid of business babble and clichés.
Keep repeating these 3 to 6 things. Repeat them in ways you want the sales staff to learn them, understand them, and be able to repeat these 3 to 6 things to their customers when you are not around.
2. The Primary Product Benefits
It is not the features of your jewelry that result in sales; it is the benefits people perceive the jewelry will provide for them. People do not focus on what the product is. They focus on what the product means to them.
People buy things to solve problems. These problems might relate to needs and wants. They might relate to achieving status and position. They might resolve emotional desires.
What problems for the potential customer does your jewelry solve? Think carefully about this. Make lists.
Then reflect awhile on how you think your jewelry solves these problems for your customers better than any of your competitors. What are your competitive advantages?
Convey to store owners and sales staff the results of your thinking and synthesis. You do not only want to list for them what customer problems your jewelry solves for them. You do not want your explanation divorced from the actual selling situation. You are not presenting an academic assessment; you want to present a marketing assessment. You want to convey how your jewelry resolves customer problems better than anyone else. This is a little more difficult to do and get the words out, and requires some practice.
And, again, remember that people have finite rationality. Don’t talk about everything. Focus on the couple of primary competitive advantages your line of jewelry has.
As best as possible, make your benefits concrete and specific. Think of which benefits would most readily stick in people’s minds.
3. The Smart Ways To Use The Products To Build Customer Relationships
Any sale is an interaction based on communication. The sale is not the only result. The building of a relationship also results. Too often sales staff performance is rated based on number of sales, and too rarely rated on building relationships. But it is in the building of relationships where we get those repeat sales and bigger sales and broader sales and better word of mouth and more new customers and, you get the idea.
Ideally, if you get the chance, like in the trunk show described above, you can model these relationship building behaviors in front of the sales staff. You can demonstrate how you elicit customer needs, wants and problems to be solved, and how you gain their awareness and trust in how your jewelry will meet these in an advantageous way. If there are other types of products in the store, you can demonstrate how to co-market, such as your jewelry with the store’s clothing.
Absent the in-person approach, you can provide ideas in periodic emails. You might do some simple one-sided-page images and short descriptive content. You might create a fun video that you can share.
You can also work with store staff in developing customer lists detailing the who, how to contact them, the what they bought, the dates, the follow-up sales, customer preferences, any descriptive information about the customer to help future sales.
To help guarantee that sales staff keep these lists and fill them out completely, you can ask to see them periodically to review. You can encourage sales staff to communicate with customers pre-, during, and –post sales. Based on your review, you can suggest specific items in the line that each customer might like to see, and possibly buy. Even though you are not physically present, you can still show how building relationships can generate sales and profits.
4. What Rewards The Sales Staff Should Expect For Themselves,
Based On Their Performance
It is helpful if you not only generate commissions and sales for the store, but also some kind of reward for the sales staff each time they sell one of your pieces. Show you recognize their efforts and appreciate them. If sales staff get paid no matter what they do, they may not give your line of jewelry the attention and promotion it deserves.
Besides some reward, perhaps a thank you note, or giving either a monetary extra commission or a piece of your jewelry, you most likely also want to reward the sales staff’ customer follow-ups, without actual sales, such as sending thank you notes or calling them when you send new pieces to the store.
5. At All Times, How To Maintain The Optimum Inventory and Product Mix
Do not assume that the store will maintain the optimum inventory and product mix of your jewelry at all times. There will always be other companies, other designers and other product opportunities competing for any store’s attention. So you will need to step in and capture that attention on a regular basis.
Create an easily update-able plan for the store that details the ideal mix of product — types of jewelry, price points, color, finishes and textures.
Reduce this to a simple product inventory sheet to give the store.
Contact the store periodically to update the inventory, compare to your plan, and make inventory suggestions accordingly.
6. How To Routinize Timely Feedback
You need to get feedback routinely, say at least every 3 to 6 months. You need regular feedback on your jewelry, on the sales process, on other things you can do to help sales staff become better at selling your jewelry.
If your jewelry is not turning at least twice a year, the particular store is probably not right for you. It might be the inattentiveness of the sales staff. It might be a lack of fit with the store’s customer base. But, if you are not getting a minimum of 2 turns a year, this location is not working either for you or the store.
You might formalize requests for quarterly results. You might call the store or any of its sales staff periodically to get information feedback. You might send a questionnaire to customers who have previously purchased your jewelry.
It helps the feedback process along when you provide rewards. This might be in the form of refreshments, such us sending an evaluation form with a box of cookies. This might take the form of adding some free pieces of jewelry to be sold, or one-time discount on purchases.
______________________________
FOOTNOTES
James, Geoffrey. 6 Ways to Persuade Customers to Buy. Inc.com, 2020.
Jewelry creates a series of dilemmas for the jewelry maker — not always anticipated by what most jewelry makers are taught in a typical art class.
That’s the rub!
Painters can create any color and color effect they want with paints.
Jewelry makers do not have access, nor can they easily create, a full color palette and all the desired coloration effects with the beads and other components used to make jewelry.
Jewelry is not like a painting or sculpture that sits in one place, with controlled lighting, and a more passive interaction with anyone looking at it.
Jewelry moves with the person through different settings, lighting, times of day. Jewelry sits on different body shapes. Jewelry must function in many different contexts. Jewelry serves many different purposes.
People use and understand colors using their senses. These perceptions among wearer, viewer and designer include:
(1) The Sensation Of Color Balance
(2) The Sensation Of Color Proportions
(3) The Sensation Of Simultaneous Color Contrasts
Better designers are able to manage these sensations. They do so, in major part, by relying on a series of color sensation management tools.
We review these in great detail in this course.
In this course, you will learn some critical skills for jewelry designers that you will want to know…
How to pick colors for jewelry, and how this differs from picking colors as a painter
How to adapt basic color concepts in art when making jewelry
How to recognize the differences between universal responses to color from the more typical subjective ones, and what better designers do about this
How to manage the sensation of color within your pieces to achieve your designer goals
You will learn to make smart choices about color when designing and making jewelry.
She came to me overwhelmed. She had bags and bags of jewelry, some in perfect condition, some not so much, some broken. Her aunt had died, and left her a lot of jewelry. That was years ago. Her mother had died more recently, and left her a lot of jewelry, and a lot of half-finished pieces and components and parts. Her mother had dabbled in jewelry making. And regrettably, three more family members, including a grandmother she was very close to, had recently succumbed to the corona virus. And each had left her more bags of jewelry.
She tried sorting these herself, but frustration got the best of her. She knew there were pieces she would wear herself. Other pieces she wanted to keep for sentimental reasons. Parts of pieces she thought she could do something with, re-purposing them. And lots and lots of fine and costume jewelry she wanted to sell.
She felt she needed some more help in sorting and evaluating what she had. She needed to know, What she should do, How she should do it, and Where she should go to do it.
Our consultation covered these considerations:
1) Etiquette
2) Organize and Sort
3) Clean, Identify Areas of Wear, Refurbish
4) Establish Value
5) Keep and Wear, or Keep and Store
6) Re-Purpose
7) Recycle
8) Sell
9) Donate
10) Throw Away
1) Etiquette
Her name was Danali. She was named after her grandmother and a great aunt. Danali felt very guilty and a few other awkward feelings as she thought about giving away or selling all this jewelry. She repeatedly asked herself, “Should I keep all of it?”
Did she have to keep it all? It was important to have this conversation up front. I told her she did not necessarily have to keep everything. The various people who gave her their jewelry would want her to be happy. She needed to do the things which made her happy, whether this meant keeping things, reworking things or selling things.
Was it her decision what to do with the jewelry, or should she involve other members of her family? Her brother asked her for some of it so that he could give it to his wife and daughter. Her step-father wanted to give several pieces to his second wife. I advised her to consider herself first. Some families have a tradition of passing down jewelry. What was her family’s tradition? Was giving some of it to her brother something she wanted to do? Since she wasn’t related to her step-father’s second wife, I told her that I found his desire to be a little unusual, maybe even creepy. Bottom line: the jewelry was passed down to her to make her happy. That had to be the guiding principle here.
She wanted to remake or sell some of the jewelry. Would she be violating someone’s legacy here? Again, I pointed out that she should do what makes her happy. That’s the legacy. Her deceased relatives wanted her to be happy and get pleasure from the jewelry which they had worn or created. Getting pleasure meant both financially and/or aesthetically. They left their jewelry to her because they trusted the decisions she would make. But that did not mean that every piece had to be preserved exactly or stored in some warehouse or safety deposit box or not be sold or shared with others.
Danali needed to talk about giving herself permission to make those particular choices which would make her happy. She needed to acknowledge to herself what she wanted to wear, what she wanted to repurpose, what she wanted to give away, and what she wanted to sell. This was important.
2) Organize and Sort
The next thing she and I worked on was to organize and sort all the pieces. There were a lot of pieces, and this took many hours spread out over several weeks, typically a 2-hour session at a time.
We went one bag or one box at a time. Within each bag or box, we went piece by piece by piece at a time.
For each piece, we created a simple written record: a) Description of piece to best of her and my ability b) What she preferred to do with the piece:
– keep and wear,
– keep and store,
– repurpose,
– cannabalize the parts,
– recycle,
– share with someone else,
– donate,
– sell,
– throw away
These became the sort categories for her jewelry.
c) What I thought the full retail price would be for the piece, if sold in a store. [More about establishing value later.]
In our descriptions, we examined each closely and paid particular attention to these factors:
1. The condition, both top-side and back-side, and whether both top and bottom sides of the piece were finished and detailed, or just one side
2. The type and quality of materials used, such as differentiating fine from costume jewelry, gemstone from glass from plastic, type of metal and if there was an accompanying stamp (like .925 or 14KT or GF), and the like
3. The craftsmanship, especially for hand-made pieces
4. For pieces with better quality gems, then their cuts, their visual qualities, and whether the gems alone were more useful and valuable than the piece as a whole
5. The quality and condition of the clasp and other connector features
6. Looked for evidence of the designer or brand, such as a signature or stamp
7. If there was any paperwork associated with the piece, from designer sketches to valuations to certificates of authenticity to insurance policies to sales receipts
8. For some pieces, we listed a style or decade or era it might be associated with, and wrote down the evidence we used to draw these conclusions
The GOOGLE LENS app will let you take picture of anything, and then search its image database. This was helpful in locating similar pieces, and seeing how they were described and valued. Sometimes we took a picture of the clasp or a particular cut of the stone to see what similar things and information we could find through Google.
With each piece, I had Danali ask herself these questions:
· Did you like it?
· Like it enough to want to keep it?
· Did she have space for it?
· Were other things very similar and duplicative?
· Would a photo of the item be a sufficient keepsake rather than the item itself?
· Could she create or recreate or repurpose something of pleasure and value from any of the parts?
3) Clean, Identify Areas of Wear, Refurbish
A lot of inherited jewelry needs some cleaning, and perhaps some refurbishing and repair. It is important to consider whether you think any particular piece will benefit from this extra effort. This is true whether you want to keep the piece or sell it.
Some jewelry will benefit from a soap and rinse with warm water and mild dish detergent. Other jewelry might need some polishing up, especially if it is made from sterling silver. Of note, plated materials will not polish up and be a shiny color again. Sterling silver will.
Typically, some stones are missing and need to be replaced. A clasp might be missing or might not work well any more. The stringing material may have deteriorated. Some parts of the piece may have chipped or broken off. It may be missing a part, such as the clutch for an earring post. Old rings may need new shanks. Chains may need to be soldered.
Costume jewelry will be particularly difficult to restore. The parts are usually made of materials that cannot be re-soldered. The materials used — beads, stones, findings — may no longer be available, or available in the particular colors available when the jewelry was first made. If the piece was plated, this plating has probably worn away. Re-plating may be difficult or too expensive, given the material value of the piece.
4) Establish Value
It is important to establish value for each piece. It is equally important to use a measure of value that can be standardized for all pieces, and that is understandable.
The value of any one piece of jewelry is not one particular number. It depends on the context. The value could be the price someone would pay for it in a store. It might be the price someone who sells jewelry is willing to pay for it, so that a profit could be made. It might be the value of the materials themselves, irrespective of the design. It might be the value people are willing to pay for pieces made by a particular designer. It might be a value at auction. It might have value only for the person who owns it.
There are several standards for establishing value. Four prominent ones include the following:
1) REPLACEMENT PRICE
2) ESTATE VALUE AT RETAIL
3) ESTATE VALUE AT WHOLESALE
4) INTRINSIC VALUE
Replacement Value. If you bought the same piece new today, what would its price be? This gives you the highest valuation. It is not the value of the piece itself. This value is the least accurate standard. However, it is a number that people can easily relate to. I like to start with the replacement value, because it is so meaningful to the client. And I give the client what are called multipliers — that is, a number to multiply the replacement value by in order to estimate what value they might really be able to get for their pieces, given where they are trying to sell them.
Estate Retail Value. This is the price a piece of jewelry would be sold at to an individual who is looking to purchase the used jewelry for themselves. This value links directly to the jewelry item. These individuals expect to save money compared with buying a similar item new.
There are many sources of estate jewelry. These include people who sell used, older or vintage jewelry through Craigslist, Ebay, various auction houses, garage sales, flea markets, or other online sites. There will be quite a variety here in pricing and pricing strategies. For price comparison purposes, I like to use prices I find on Ebay. I tell my clients to use a multiplier between .40 (representing a 60% reduction in value) and .70 (representing a 30% reduction in value), with .60 or 60% as a reasonable average estimate. So, they would multiply the Replacement Value by .40 to get at the Estate Retail Value.
If the Replacement Value was $100.00, then a reasonable estimate of the Estate Retail Value would be $100.00 times .60, or $60.00. This would be $40.00 less than the Replacement Value. Stated another way: if a similar new piece was selling for $100.00, then someone would expect to pay $60.00 for the used jewelry when purchasing that jewelry for personal use.
Estate Wholesale Value. This is the price a business which sells used jewelry is willing to pay. Businesses have to take into account many more costs — overhead, rent, maintenance, staffing — than individuals buying used jewelry. So these businesses will only be willing to purchase used jewelry at a considerably lower price than the Estate Retail Value. The jewelry these businesses need to purchase have to be resalable at a cost customers are willing to spend, and which also covers their operational costs plus a profit.
Businesses like antique stores, estate jewelers, pawn shops, even some boutiques, may purchase inherited jewelry for resale. You can anticipate that they will want to at least double, and probably triple, their cost to set their own price for their customers.
The Estate Wholesale Value is probably the best value for resalable jewelry which has been inherited. This assumes that most of the inherited jewelry will be sold to a business where that business intends to resell it.
The multipliers I suggest here are between .30 (70% reduction) and .50 (50% reduction), with .35 (65% reduction) as a reasonable estimate.
If the Replacement Value was $100.00, then a reasonable estimate of the Estate Wholesale Value would be $100.00 times .35, or $35.00. This would be $65.00 less than the Replacement Value.
Intrinsic Value. The value here is set by the value of the raw materials, usually less a small processing fee. This value yields the lowest price. This price may be lower than the actual price you might be able to sell your item, so think carefully. Typically the Intrinsic Value is the value of the raw metals and the gems. Style, condition, brand, market demand, among other factors, are not taken into account.
Refineries, Cash-for-Gold businesses, some fine jewelry stores will pay intrinsic value for inherited pieces. Be certain up front, with pieces made up of both precious metals and stones, whether the purchasing business will pay for both, or just one or the other. You may have to remove any stones before taking your pieces into these businesses.
There will be different payment rates for different metals, all based on weight. An average scrap rate for gold or sterling silver will be around 85% of the current market value less a processing fee, say $50.00. They will take the total weight of the metal, calculate the current value, multiply this by .85, and subtract a processing fee. This becomes the Intrinsic Value.
The intrinsic value for any gemstone is based on the wholesale price of the gem less any cost for re-cutting, re-polishing or otherwise refurbishing the stone.
Intrinsic metal prices are well publicized online. Intrinsic stone prices are not, and there will be a wide variation on this, so it is wise to shop around.
Other Value Considerations
There are other factors which may come into play:
– Whether the piece is currently in style or not
– Whether something makes it rare or coveted, such as by a particular designer or brand (look for stamped mark or engraved signature), or is an unusual design or uses particular stones
– Metal and gemstone prices fluctuate quite a bit, and you may be hitting the market at a low (or at a high) point
– The condition of the piece
And just because the piece is costume, not fine jewelry, is not a reason for dismissal. Many costume jewelry pieces are coveted and highly valued today.
OnLine Services
There are many online services which will value your pieces for you. Their fees and reputations will vary widely. Check their online reviews.
There are several national associations for appraisers. These require their members to adhere to a high standard of conduct. You should make sure your appraiser either is a member, or, if not, you know that person to be highly knowledgeable and reputable. This is because anyone can present themselves as an appraiser. There are no federal and state licensures.
An appraisal will
· Clearly state the value and the type of value
· Describe the item in detail
· List the procedures used to determine the value
· Specify the appraiser’s qualifications
· Have the appraiser’s signature
You will also find scrap metal calculators online which will be useful.
5)Keep and Store, or Keep and Wear?
Keep and store. For some pieces, you may want to keep them, even though you do not plan to wear them. They may have some sentimental value. They may have a personal story to tell. You might see yourself wearing them at some time, just not now, and are not ready to part with them.
I suggest keeping at least one piece from each loved one from whom you inherited the jewelry. Pick a piece they may have worn a lot, or worn on a special occasion, or represented their personal style.
You can also display pieces you love, but are not interested in wearing, say in a shadow box you hang on the wall.
Keep and wear. There are most likely many pieces you can see yourself wearing. It’s great to mix old and new pieces together with any outfit. Everything is a matter of styling and your personal taste.
6)Re-Purpose
A brooch becomes a pendant. A pendant becomes an earring. A necklace is remade into two bracelets. A very long necklace or a multiple strand necklace made into two or more necklaces. A shoe-clip becomes a clasp. There are many ways to re-purpose jewelry from one type to another.
You might also repurpose a pin into a curtain pull. Some earring drops into push pins or refrigerator magnets. Use in a mosaic. Embellish a cross stitch canvas. Create a bookmark. Decorate some sandals or sneakers. Use as drawer pulls. Decorate your cell phone. Add some pizazz to a purse or strap.
Lots of ideas. You can also do a search engine search, like on Google or Bing, using the keyword phrase “old jewelry into new” or “grandma’s old jewelry”.
7) Recycle
Sell your scrap. There are places, like refineries, cash-for-gold stores, jewelry stores, and the like, which will buy scrap for its intrinsic value. For metal scrap, they will weigh your pieces and you will get paid, depending on the weight, metal value, less a fee. For stones, places will evaluate their wholesale values, less costs for reconditioning or refurbishing, and less a fee.
Cannabalize the parts. You can break up the pieces of jewelry and reuse the components, beads, clasps and other parts in other jewelry making projects. The parts may have more value as parts than as part of the piece as a whole.
8)Sell
There are many places, both where you live, as well as online, where you can sell your pieces.
Locally, you might contact antique stores, boutiques, jewelry stores, salons or pawn shops. Most likely they will take your items on consignment (that is, you will be paid when the pieces sell). You might try a local flea market or marketplace. You might hold a garage sale.
Online, you might check out Ebay, Craigslist, Rubylane, Etsy, The Real Real (focuses on high-end jewelry), Worthy.com (diamond rings), Tophatter and other jewelry-specific auction sites. Take high resolution photos, at least 500 x 500 pixels in size. Provide good and thorough descriptions. You need to establish, through how you present your items, a high level of trust and credibility.
Ebay especially is a useful source for researching the prices your items might sell at. If you have several items which might only sell for a few dollars each, you can group them together into a “lot,” and sell them as a “lot”.
Be sure to list…
· Description, including anything of particular interest, using words your potential customers will connect with
· Condition, any flaws, any functionality issues
· Color
· Brand
· Size and dimensions
· Estimated value and the basis for that valuation
· List price, as well as minimum acceptable price
· Photos, at least 3 (front, back and side), and use a white background
These online sites will take a 10–15% of your sales price as a fee. There may be some other small fees involved. You should anticipate these fees, when setting your prices.
9)Donate
Let’s say you have a lot of jewelry you like, but doubt you would ever wear it. You don’t want to deal with selling the pieces. So you might think about donating them.
First, think about any friends or relatives who might appreciate these pieces. You could even hold a party and let people pick out the things they like for themselves.
Second, think about donating pieces to charity or nonprofit thrift shops like Good Will or Salvation Army. Other sites, I Have Wings Breast Cancer Foundation; Dress For Success; Support Our Troops; Suited For Change; New Eyes.
Make sure you get a donation receipt.
10)Throw Away
Of course, your last option is to throw the jewelry away.
You do this only after you have exhausted all other options.
John Jacob thought he could set up anywhere and anytime. So he missed the April 30th deadline for the Red Hills Fair. And he sent in an incomplete application without the required pictures to Napa Sweets Festival. And he didn’t take seriously the fact that Naples Symphony Days was a juried competition. And he couldn’t understand how adding one more jewelry vendor to the Rocky Mountain Showroom would make much of a difference.
He had calculated that he needed to do 4 shows a year to make a living. But for several years now, although he had applied to at least 12 shows each year, he rarely was approved for more than 2.
Sample Application Form
THE APPLICATION
1. PREPARE A GENERIC APPLICATION
2. UNDERSTAND THE JURIED SELECTION PROCESS
3. SUBMIT APPLICATIONS AND FOLLOW-UP ON THEM
4. SCHEDULE YOURSELF FOR THE YEAR
Prepare a Generic Application
1. PREPARE A GENERIC APPLICATION
Some organizations have a formal, printed application form to fill out. More and more, however, organizations are using online application services.
I suggest creating a generic application form, from which you can cut and paste into these printed or online application forms.
They may ask you for these types of information:
1. Company information, address, phone, email, contact phone, onsite-contact phone, website, license plate #, re-sale or tax number and state which issued it
2. Type of merchandise to be sold
3. Hand-made?
4. High and low price range of merchandise
5. Describe your craft (techniques, materials, designs)
6. Artist Statement (about 150–250 words)
7. Booth size requirements (will you need more than one 10’x10’ booth space?)
8. Requirements for additional services, such as electricity, table and chair rental, tent
9. 5 photos of your crafts (be sure your photos are sharp and attractive, as if they were publishing in a book. No dark photos. .jpg or .tif)
With photos, you might need slides, or you might need .jpg images that are 72–96 dpi, or you might need hi-resolution .jpg images which are 300 or 600 dpi. Use 16-bit color. Be prepared with each of these.
10. 3 photos of your booth set-up (They want visually appealing, customer enticing, user friendly booth set-ups, again, no dark photos.)
11. List of special preferences, such as “corner booth, if available”.
12. Credit card number, expiration date, security code number, billing address (They will probably want this number to keep on file.
2. UNDERSTAND THE JURIED SELECTION PROCESS
At this point, you have selected shows which you feel are a good fit with your business.
Now, determine if you are eligible for them. Do they put any limitations on who can and cannot apply? Do they require that your creative work be juried?
Most craft shows make simple acceptance decisions based on — submitting an application form, and — paying the fee
Some may restrict the number of jewelry vendors they accept, because they want a balance of types of merchandise, and often, too many jewelry vendors apply.
Other shows want to maintain some level of merchandise quality standards. They subject the applicant to a more intensive jury-review process.
The jury process is probably what you would expect. Usually a few people review all the application and score them against a set of criteria. They choose the ones which score the highest.
Some typical criteria they use: — products considered best for the show — aesthetics and visual appeal — functionality — creativity — originality — technique — marketability — quality of work — booth design
They want to end up with vendors whose wares will sell, where there won’t be much duplication, and whose presence and set-up is exciting for the people who attend the show.
Your short write-up and submitted photographs need to make your case.
WHAT DOES IT MEAN WHEN A JUROR SAYS “NO!”?
Most rejections are based on the limited number of openings, particularly for jewelry vendors.
Another major reason for rejections is the poor quality of photos submitted. Look at your photos. Share them with some friends. Judge them according to the previously discussed judging criteria. How well do they make your case? Are they clear, focused, bright?
3. SUBMIT APPLICATIONS AND FOLLOW-UP ON THEM
You have created your list of possible shows, based on your sense of fit, the goals you have set for yourself, and your budget, given the costs involved. You have determined whether you are eligible for them.
Decide about how many shows you want to do a year. Select 5–10 more shows in addition to the number you ant to do.
Another rule of thumb is to select 3 events to apply to for each weekend you want to work. If you want to work 4 weekends, then apply to 12 events.
Get their application forms, and review the rules and application deadlines.
READ ALL THE RULES !!!
Determine how long their review processes are, and figure out when you should know whether you have been accepted.
Call or email each one, and verify that all the information you have — dates, fees, application requirements, deadlines — are true. Things change. Things get printed wrong.
4. SCHEDULE YOURSELF FOR THE YEAR
Organization is critical here.
Get a good 3-year calendar. Map out every date. Every Application deadline. Every application acceptance notification. Every deadline for notifying them, confirming your acceptance, and submitting any up-front fees. Every show date, including set-up and break-down dates and times.
Remember, for many craft shows, you will be applying 6–12 months ahead of time.
It takes a lot of coordinated effort to keep everything on track. You might set up a spread-sheet or data-base. I use a calendar app that links with my email program. I set up automatic reminders, so they pop up when I need to take action.
After you send in your fees, follow-up in 2 weeks to be sure they received your application and payment.
5. BEFORE SAYING YES!…
Re-review your — fit with the show — break-even analysis — calendar schedule — the money needed up front
And, … — whether there are any cancellation penalties or rules — what kinds of local and state licenses, certificates and permits you will need — if the show promoters assist you in obtaining temporary ones for the duration of the show