WHY YOU NEED AN ORIENTATION TO BEADS & JEWELRY FINDINGS
Most people who make jewelry learn the craft in a haphazard way. Taking a course here or there. Watching some video tutorials online. Making a few pieces with some friends.
I have found over the years that, because of this, most jewelry designers are unfamiliar with all the various possible choices of stringing materials, clasps, jewelry findings, beads and the like. And they are unfamiliar with the implications of making one choice over another. They do not have a clear conception of how one part relates to another part or relates to how to execute a particular technique.
Because of this, most jewelry designers do not seem to fully understand quality issues associated with the materials they use. They have a weak understanding of what materials should best be used, and best not be used, and with what projects. They do not know what happens to all these different materials over time as the jewelry is worn. They do not know the required design tricks and strategies for making pieces more durable and more comfortable.
That’s why I developed this very comprehensive ORIENTATION TO BEADS & JEWELRY FINDINGS.
This course reviews the various materials jewelry designers use. I point out the pros and cons for selecting and using these. I go over how these impede or enhance function, movement, and the mechanics of construction.
Some topics covered:
HISTORY, GLASS BEADS, LAMPWORK BEADS, CRYSTAL BEADS, SEED AND DELICA BEADS, METAL BEAD, CLASPS, FINDINGS, STRINGING MATERIALS, TOOLS, ADHESIVES, TYPES OF BEADING AND JEWELRY MAKING, 3 APPROACHES FOR TEACHING BEADING AND JEWELRY MAKING, SUPPORT SYSTEMS AND OTHER ARCHITECTURAL CONSIDERATIONS,
This Series of 18 modules, most around 20 minutes, and totaling a full 5 1/2 hours of introductory materials about all kinds of beads, metals, clasps and stringing materials for the beader and jewelry maker.
And one more thing. For those who take this Orientation, I also have a 75-page article for you to download about getting started in jewelry making. You have a purpose as a jewelry designer: To merge your voice with form. This covers things you will need to know to find that voice.
how to channel your excitement
what types of jobs are available for those with jewelry making skills
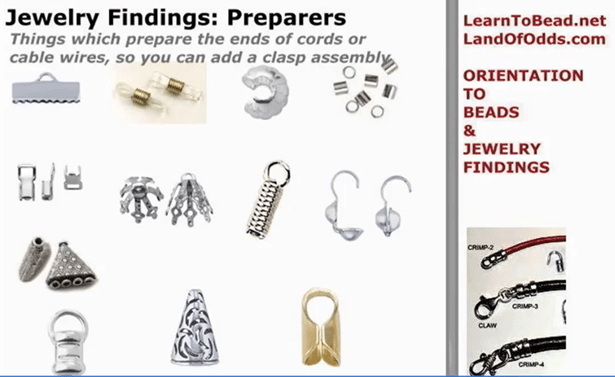
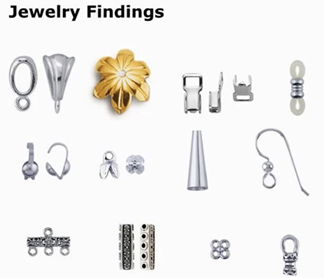
Choosing and Using Other Jewelry Findings:
Preparers
You have to approach the Jewelry Findings with a large measure of respect. “Jewelry Findings” are all the pieces that you use, including clasps, other than stringing materials and beads. They are called “jewelry findings”, because up until about 15 years ago, many of these pieces didn’t exist. People went to sewing notion stores, antique stores, flea markets, hardware stores, cannibalized old jewelry, wherever, and found things and made them work. Because many of these pieces are new, there is not a consensus on what some of these things should be called, so you have a lot of similarly looking pieces that go by different names. I’m sure over time, the name-game will shake out, and there will be more consistency.
Respect these jewelry findings. They are the pieces that get pulled and strained, torn at and squeezed, maligned and misused. These are the pieces that will make or break your piece of jewelry. Understand and respect them.
Many designers fail to make the full range of these pieces available to them. They either don’t know about them, or are afraid of them or think they might use them incorrectly. They too often limit their own design possibilities by relying on the same limited set of findings for everything they make. But the world of possibilities that these jewelry findings open up for us is endless.
Below is a list of other major jewelry findings used in bead stringing. I’ve tried to group them into three categories to make it a little easier to relate to.
PREPARERS:
Things Which Prepare the Ends of Cords and Stringing Materials:
These kinds of jewelry findings are mostly used with thicker cords, like leather and waxed cotton, but also with cable wires. These enable you to create a “loop end” on each side of the cord or cable.
From the two loop ends you have created on each end of your cord, you then continue to create the rest of your clasp assembly. If the loop is big enough (to give you jointedness), or looks substantial enough (like it won’t break from movement), you can attach the clasp directly to the loop. If not, you will want to attach your clasp/ring to jump or split rings, and these, in turn, to your loop ends.
You usually try to match the size of the interior opening on the jewelry finding to the thickness of your cord or cable. For some of these pieces, this match is more important than others.
You always put some glue on your cord or cable before you stick them into the piece. You use glue because all these cords are oily, and some will sweat, as well. They will slip out of the findings — even with tight crimping or clamping — because they are slippery. That’s why you use glue.
I recommend using a glue like E6000 or Beacon 527. Don’t use super glue. Super glue (or the jeweler’s version called G-S Hypo Cement) dries like glass, so the bond will shatter like glass, because all jewelry moves. Also, after it shatters, the bond looks like a broken coke bottle. E6000 and Beacon 527 dry like rubber, so they act as a shock absorber, when the jewelry moves.
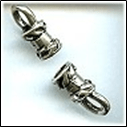
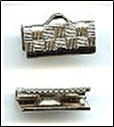
CRIMP ENDS
These come very fancy or plain. They come with a small opening to use with cable wires, and wider and wider openings to use with leather or waxed cotton, or even braided leather.
These pieces have a loop at the end of a tube. The tube has 3 bands. The first and third are decorative. The center band is meant to be crushed and crimped. You put some glue on the cord or cable — any glue except super glue — stick it into the tube, and take a pliers and crush the center band as flat as you can get it.
When you crush the middle band, visually, it looks like it is part of a pattern of beads. It doesn’t look like an ugly crushed piece of metal.
Some crimp ends come with a hook, so that you attach a loop on one end and the hook on the other, to create a hook and eye clasp.
These and clamps (see below) work best for preparing the ends of cable wires and thicker cords. Crimp ends tend to be on the pricier side; clamps are very inexpensive. Both hold well, relying on both the glue and the crimp.
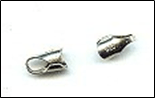
CHAIN/CORD ENDS
These pieces have a loop at the end of a split tube. For chain, these are soldered on. For cords or cable, you put some glue on (again never super glue), stick it into the split tube, and take a pliers and crush snug, NOT flat. What’s holding these on is the glue. If you crush flat, you lose the bond. Should tightly match cord thickness to interior diameter.
We need to crush snug because we want the glue to adhere to all the interior surfaces. If there are any gaps where the glue has not adhered, the bond will break.
These are terrible pieces, because it is difficult to achieve that perfect bonding with the glue.
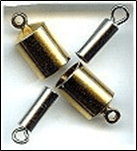
END CAPS
These pieces come in just a few sizes, but many designs. Those pictured are very industrial looking, but they come very decorative, as well. Some pieces have a hole at the end instead of a loop and are labeled “end caps,” but technically, these should be called either a cone or a bead cap. Usually, the interior opening size of the end cap will be listed, such as ID=6mm or ID=8mm or ID=12mm. You coordinate this with the width of whatever you are trying to slip into the end cap. But because of the shape of the end cap, there still may be fit issues.
These pieces have a loop at the end of a hard metal tube. The loop is either an eyelet or a fixed loop. You put some glue (not super glue) on cord or cable and stick in. The glue is all that holds. Should tightly match cord thickness to interior diameter.
Because it is important, for the bond to hold, to get the glue to adhere to all the interior surfaces, and you cannot crush the ends snug, you need to put a lot of excess glue on the cord when you stick it in. And you need to be prepared to wipe away the excess glue that bleeds back out.
You never attach your clasp directly to these pieces. You need an additional intervening ring — jump ring or split ring or soldered ring — between the end cap and your clasp component.
CLAMPS Ribbon or Bar Clamps:
These clamps are folded metal with a loop in the center edge, come in different lengths, and have teeth. These are for ribbons or fabric. You don’t use glue, because the glue will bleed into the ribbon or fabric.
You fold over the end of the ribbon or fabric, making the end pretty, and stick into the clamp, and use a pliers to crush firm. If your material is wider than the clamp you have, you would make several folds in the end, like you would when gift-wrapping a package.
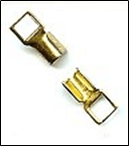
Foldover or Wing Clamps:
These come in a few different sizes, some with square loops, some with round loops. Some have plain backs; some have patterned backs.
These typically are a loop on top of flat metal with two wings that fold over. You put some glue (not super glue) on the cord or cable, sit in the saddle between the two wings, and use a large pliers, and crush the two wings over each other and over the cord. Crush as flat as you can get it. This is not done in one movement because the wings are stiff and strong. You usually take your pliers and move then to one side, then the other, then back, until you get the two wing position over each other, and you can crush them flat.
One mistake people make with this piece is that they crush snug, not flat. Where the wings overlap each other, this leaves an air passage. Again, we want our glue to adhere to all the interior surfaces. If you crush snug, this air passage will weaken the bond, and your cord will pull out. You have to crush as flat as you can get it, to force the glue up into that air passage.
You can use one clamp for multiple strands, if you wish. You can seat multiple strands of cable wire or leather or whatever into the saddle of one clamp.
These and the crimp ends work the best for preparing the ends of cable wires and thicker cords. Crimp ends are pricier; clamps are cheap. Crimp ends have a design impact; clamps are very utilitarian.
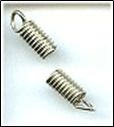
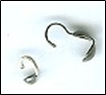
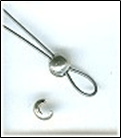
COIL ENDS
Coil ends have an open ended loop at the top of a tightly wound coil. I don’t like the way these look after they are crushed onto the cord, and they don’t hold up well. One advantage is that the coil functions as a spring, and absorbs a lot of the excess force place on the piece, that comes from movement.
With coil ends, you put some glue, (but not super glue), on the cord, shove it into the coil. You take a chain-nose pliers and crush the first two rings of the coil onto the cord. If you crush too hard, you’ll slice the cord. If you don’t crush hard enough, the cord will pull out.
The way the loop was designed to work, was that you take a pliers, move the open ring to the side, slip on your clasp or ring, and, using the pliers, move the open ring to a closed position again. DON’T DO IT THIS WAY. When you move the loop back and forth, it breaks off easily. These loops are rather brittle. SO, the way you would use this, is that you would take a jump ring or split ring, and attach this to the loop and your clasp piece. As long as you don’t move this loop wire, it stays strong.
Coil ends come in two sizes in terms of the width of the interior diameter. If your cord is thicker than the smaller size, see if you can make it work with this smaller size, anyway. The larger size is more awkward to use. Say you had leather cord. You can take a single-edge razor blade and cut the end at an angle, put some glue on the cord, and shove it into the smaller piece.
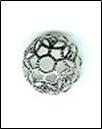
BEAD CAPS
This is a decorative cup-like or bowl-like piece, with a hole in the center. This piece is originally used as a decorative element, to cover one or both sides of a bead, as you string your beads on. However, you can adapt this piece to be an end. You might have multi-strands, where you tie them all off together, and use the bead cap to hide the mess. You might have a bead crocheted rope, and again, use the bead cap to give your piece a decorative end. You glue the bead cap on. Then you take an independent wire or thread, attaching it to your piece about 2–3” from the end, and running it through your piece, through the cap, then finishing off the rest of your clasp assembly.
What’s nice here are that there are hundreds of styles, whereas the more typical jewelry findings look very utilitarian.
BELL CAPS
A bell cap is a bead cap with a loop on it. This is a decorative cup-like or bowl-like piece, with a loop sticking above the center. This piece is originally used to adapt something, like gluing it to the top of a crystal pendant or bead, to be a drop. But it can be adapted to use as a fancy end-cap. Use glue here. Attach the clasp assembly to an additional jump ring or split ring. Again, there are many, many decorative styles in bell caps, so you won’t have to rely on the typical and very plain specialized jewelry findings.
The arms on the bell cap are somewhat independent, and can be pushed into the shape of whatever piece they are attached to. So, for example, you can take a rough stone, position the bell cap at the top, push on the arms to shape them to the stone, then put glue on each arm and attach the bell cap to the piece.
BEAD TIPS (aka, KNOT-COVERS)
These pieces are used to hide knots. One style has a cup with a tongue attached. Another style ends with a loop, not a tongue. The most widely used style — Clam Shell Bead Tip (or double-cup) — has two half cups that close over the knot, and a tongue extending from one end. While some people use these pieces with cable wire, they are primarily designed for use with needle and thread.
These take some practice in learning how to use them. On the first side of your piece, you string on the bead tip, say the clam shell. You tie a bunch of knots in the tail, so your knot is bigger than the hole in the bead tip, and won’t slip out. Cut off the tail. Put a drop of glue on the knot. Here you would use something like superglue. Superglue will make the knot stiff, so it won’t pull through the hole. E6000 will make the knot rubbery, and it will be able to contort and work its way through the hole. Trim the tail. Press the two halves of the clamp together over the knot, so it looks like a bead. Take the tongue, fold it over and through the ring on your clasp, and back to itself, so it forms a loop.
On the other side of your piece, here’s the tricky part. You need to keep your tension on the thread, so the thread doesn’t show when you’re finished. You need to tie a bunch of knots, and complete the rest of the process. This is a 3-hand operation, but you only have 2 hands.
Here you slide the bead tip onto your thread. Use one hand to hold everything tight. Take an awl or a round nose pliers — something where the width graduates into a point, and put the tip where you want your finished knot to end up. Tie an overhand knot over the awl or pliers up high on the wider part of the jaws. Tighten the loop of this knot. Tighten the tension on your thread. Move the loop down the awl or pliers a bit, moving towards the narrow pointed end. Tighten this loop. Check your overall thread tension. Move the loop down a little bit more. Tighten this loop. Check your overall thread tension. When you loop gets to the tip of your awl or pliers, you need to pull your knot tightly, and push the awl or pliers out of the way, AND, you want to maintain the thread tension in your piece. Tie a bunch more knots. Put glue on the knot. Trim the tail. Close the clamp. Loop the tongue into the other part of your clasp. This takes about 5 tries before your body gets that muscle memory to do the task easily and correctly.
When I started in jewelry making, almost every piece used bead tips. I’m not a big fan of this type of piece today. The tongue when bent over to hook and secure the clasp is not jointed enough. It doesn’t leave a big enough loop, so there is tension and these tongues break off. Today, you can tie your piece to the clasp using knots, then slip a crimp cover over the knot, so it looks finished as if there were a bead there. This is both more secure and easier to do.
Some alternatives to tying a globular knot: (1) with needle and thread work, you can tie off an end to an 11/0 seed bead, and have your clam-shell enclose the seed bead, and (2) with cable wire, you can crimp on a crimp bead on the end of your wire, and have your clam-shell enclose the crushed crimp bead.
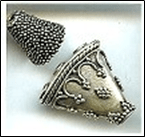
CONES
Cones come in many shapes and designs, but basically look like a megaphone. These are used to finish off the ends of jewelry, often to hide a lot of messy knots or unfinished ends inside the cone.
One style of cone is called a 3-to-1 cone (also, 2-to-1 up to 11-to-1). This is a flattened cone, with one hole on one side, and 3 holes on the other. This is supposed to help you finish off a 3-strand piece in a decorative way. You pull each of 3 strands through the 3 holes on one side, and out together through the one hole on the other side. For two of the strands, you tie a large knot or double-knot, cut off the excess tail, and let the knot fall back into the box of the cone. I’ve only known one person in my life who could accomplish this, and maintain sufficient string tension so that none of the cable wire showed on the other side of the cone and as part of the bracelet. For the 3rd string, you would continue creating your clasp assembly. This is a good piece in theory, but not practice. Most people end up tying the three strands into this big, globular knot, and then trying to finish off the clasp assembly, only to have the clasp assembly take up 25–30% of their finished bracelet.
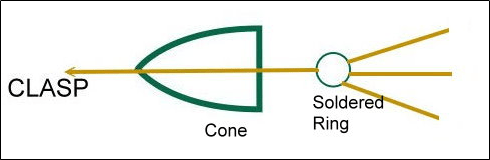
Regular cones are used like lampshades to hide some ugliness. With the typical cone style — that megaphone looking piece, the way you are supposed to use this piece is as follows: You take a soldered ring, something small enough so that it will fit far enough back into the cone, that the cone will hide any of the finishing knots or ends. If we start with a 3-strand necklace, you would tie off each strand to one side of the soldered ring. Then you would take a separate, independent cable wire, hard wire or thread, whatever you are stringing with, and tie it off in a knot to the other side of the soldered ring, pull the whole works into the cone, with the stringing material coming out the narrow end. Then you would finish off your clasp assembly.
The soldered ring, in this case, acts as a “support system”, creating jointedness. Otherwise, without this ring or support system, the cone could not support the resulting stress and strain. Since all the pieces are metal — cable wire, cone, clasp, crimp — , and these would be too stiff and would not move easily, and, as you now know very well, when you bend metal back and forth, it breaks.
EYEGLASS HOLDER ENDS
A major category of jewelry are eyeglass leashes. You make an eyeglass leash by attaching an eyeglass holder end to the eyeglasses, making a string of beads, attaching the string of beads to a split ring, and attaching the split ring to the eyeglass holder end. You never attach the beadwork directly to the holder ends. Eyeglass leashes take a huge beating, as they are worn, and you need to create as much jointedness as possible, so you don’t ruin someone’s eyeglasses, have the lenses shift position within the frames, or have the leash break. In fact, we want to use a split ring — about 10mm or 12mm in diameter — that is a little larger visually than you might feel comfortable with.
Eyeglass leash holder ends are made from round rubber thong (usually black or clear), flat vinyl (usually black or clear), or elastic cord (comes in many colors). The round rubber thong is the most durable. Elastic cord is not durable at all. There are various style options. Most come with what is called a “coil center”. When the eyeglass leashes are worn, the rubber, vinyl or elastic cord sweats, both from the humidity found in the air, as well as the wearer’s own body sweat. Coil centers tend to slip, so these don’t work well with narrow arms on eyeglasses. Other eyeglass leashes come with a bead center, usually a 6mm glass roller bead. The beads don’t slip.
The ones with bead centers are a little more expensive than the ones with coil centers. One company bought the ones with the coil centers, slipped these off what is basically a rubber band, and slipped on a 6mm glass roller bead. They took a $0.45 cent piece and sold them for $4.00 a piece. People thought they were magic because the beads didn’t slip, so were willing to pay the premium. You can do the same thing. There are about 300 colors of roller beads, so you can personalize your line.
WATCH BAND COMPONENTS
These pieces are used to adapt watch faces so you can make beaded watch bands off them. They consist of a tube designed to slip over the spring bar on each end of a watch face, and some kind of loop or series of holes that come off the tube. Beaded watch bands have become so popular, that now you can purchase watch faces designed specifically to attach these to them.
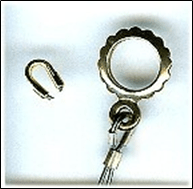
CRIMP BEADS, CRIMP COVERS, and HORSESHOE WIRE PROTECTORS
Crimp beads come in many styles, sizes and finishes. These are used to secure cable wires to clasps. The crimping process involves crushing the crimp onto the cable wire, first separating the tail wire from the main wire, then creating a lock, and finally re-shaping it so it looks like a bead again.
Crimp Covers
These are U-shaped beads that slip over the crushed crimp. They are used like a lampshade to hide something that is ugly.
You attach the crimp cover in two steps. First, using the tips of your crimping pliers, you push the two sides of the U together, so you have a pretty bead. These are made of a soft metal, so you don’t want to push too hard, or you will crush them. After you get the two sides to meet, you’ll find that the lip on either side doesn’t meet up perfectly.
So, Second, at this point, you return the crimp cover to your crimping pliers, this time resting it between the top notches (thus, furthest from your hand) in each jaw. This will help preserve the roundness of the crimp cover as you manipulate it. Gently push the jaws to force the lips to meet more perfectly. You can slide crimp covers over your crushed crimps. You can also use these to slide over any knots, to hide the knots.
Horseshoe wire protectors
These serve several purposes. (1) It forces you to leave the correct size loop in the cable wire, so that you have the appropriate support system or jointedness. Without the loop, you would be pushing the crimp all the way to the clasp. This is a No-No. You never push the crimp all the way to the clasp — this creates stiffness with metal parts, and general movement would cause these to break.
(2) The horseshoe also makes the loop more finished looking — better than a bare-wire loop. Most people hate a bare, exposed loop. The horseshoe fools the eye/brain here, making it think that the loop is finished and more organically a part of the whole composition.
(3) The horseshoe prevents the cable wire from folding into a V over a period of time and wear. If the wire were to change from an arched loop to a V-loop, the wire then would more easily bend back and forth and break.
There are many choices to make when selecting crimp beads:
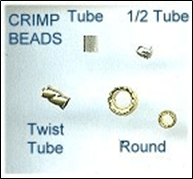
Crimp Beads
– tube vs. round
no difference in “holdability”, but most people prefer the tubes
– THE SILVER COLOR ISSUE: sterling silver vs. silver plated vs. silver plated crimp with sterling silver crimp cover vs. argentium silver crimps
Silver-plated crimps are usually plated over brass. Brass has a very high degree of integrity as a jewelry making metal. The plating wears off relatively quickly, and your crimps will look black — basically tarnished brass. More recently, these plated crimps have been plated over aluminum, which can break from the force of the crimping pliers.
Sterling softens at body temperature. If your crimp is resting on the wrist or the neck, there is some risk of it softening and weakening. This risk is minimal, however. If you’ve crimped correctly, you shouldn’t lose sleep over this. I prefer to use the sterling silver crimps; they are often made better than the other crimps.
You can also use a silver-plated crimp to crimp, and slide a sterling silver crimp cover over it.
Argentium has the same silver content as sterling but does not soften as easily at body temperature. These are a lot more expensive than sterling.
– crushing the crimp and re-rounding it vs. crushing, then using crimp cover
Some people don’ t like the look of the re-rounded crimp, or feel uncomfortable trying to re-round them. The crimp covers add about $0.50 — $1.00 more to each piece.
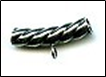
– plain tube vs. twisted tube
The twisted tubes (sometimes called Tornado or Cyclone crimps) are a little more expensive than the plain ones. When you crush the twisted tubes, they look decorative enough that you don’t have to re-round them. You definitely need to re-round the plain ones.
– Regular or long tube vs. short or half tube
Short tubes or half tubes are primarily used in pieces like illusion necklaces, where you have a cluster of beads, and the cord shows, another cluster of beads, the cord shows, etc. Half tubes are used on either side of the clusters to keep the beads in place. When you crush the half tube, the volume of space it takes up is not noticeable. When you crush the regular sized tube, its volume of space is too noticeable and detracts from the general look of the piece. One mistake people make with the short or half tubes, is that, when they use them to finish off the ends of jewelry, their mind tells them to use 2 or 3 of them so that they will “hold better.” A crimp is a crimp, and if you crimped correctly, there is no difference in holdability between the short and longer tubes. Each crushed crimp you add becomes like a little razor blade. All jewelry moves, so you’re increasing the chances, by using more than one crimp on each end, that one of these crimps will cut through the cable wire. One crimp on either end is enough.
– variations on quality/grade of crimp beads
Basically, you get what you pay for!
Here’s how crimp beads are made: You start with a sheet of metal. You roll the metal into a tube. You buff along the seam where the two sides meet, so that it looks like it’s been soldered together. However, there’s really a seam there.
So often, people come into our shop and tell sad tales of failed crimps and broken bracelets and necklaces. They blame themselves. They blame the pliers. But they never blame the crimp beads. In most cases, the crimp is at fault.
Cheap crimps, usually bought in small packages, usually at craft stores, are not made well. When you crush these, they tend to split along the seam. Sometimes you can see the split. Othertimes, you can’t quite see that the two sides of the tube have started to separate. Your cable wires pull out. Or your crimp edges have cut into the cable wire.
An A-grade crimp, usually costing about 3 times what the cheap crimps cost, can hold up to your initial crushing, as well as another 8 or so clamping down on it during the re-rounding process.
There are heavy-duty or A+ grade crimps. These run about 6–8 times what the cheap crimps do. You don’t have to worry about any splitting, no matter how much you work the crimp bead with your pliers.
– using 1 crimp on each end vs. using more than 1 crimp on each end
Using 1 crimp on each end of your piece is sufficient. Using more than 1 crimp on each end is too risky. Sometimes you mind, or your best friend, thinks that is 1 is good, 2 or more would be better. No! When you crush your crimp onto the wire, it becomes like a little razor blade. All jewelry moves, so your crimp is constantly trying to saw through the cable. Using more than one crimp on each end increases the chances that one will saw through. All you are doing is adding razor blades.
– size of crimp
Manufacturers are inconsistent in how they label the sizes of crimp beads. In general:
2mm is the average size For .014, .015, .018, .019 cable wires
1.5mm is small For .010 and .012 cable wires
2.5mm is slightly more than averg For .019 and .024 cable wires
3.0mm is large For .024 cable wires, or thicker cords, or bringing
more than 1 strand thru at a time
4.0mm and larger For thicker cords, or bringing 2+ strands thru
Choosing and Using Other Jewelry Findings: Controllers and Adapters
You have to approach the Jewelry Findings with a large measure of respect. “Jewelry Findings” are all the pieces that you use, including clasps, other than stringing materials and beads. They are called “jewelry findings”, because up until about 15 years ago, many of these pieces didn’t exist. People went to sewing notion stores, antique stores, flea markets, hardware stores, cannibalized old jewelry, wherever, and found things and made them work. Because many of these pieces are new, there is not a consensus on what some of these things should be called, so you have a lot of similarly looking pieces that go by different names. I’m sure over time, the name-game will shake out, and there will be more consistency.
Respect these jewelry findings. They are the pieces that get pulled and strained, torn at and squeezed, maligned and misused. These are the pieces that will make or break your piece of jewelry. Understand and respect them.
Many designers fail to make the full range of these pieces available to them. They either don’t know about them, or are afraid of them or think they might use them incorrectly. They too often limit their own design possibilities by relying on the same limited set of findings for everything they make. But the world of possibilities that these jewelry findings open up for us is endless.
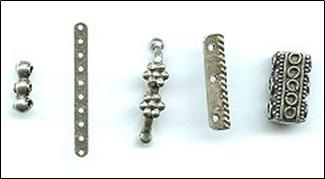
CONTROLLERS: Things Which Control the Positioning of Pieces or Sections within Your Piece:
SEPARATOR or SPACER BARS
These are multi-hole pieces that are used to keep multi-strand pieces neat and organized. In a bracelet you might use 3–5, spaced evenly along the length of the piece. In a necklace, you might use 5–7, spaced evenly along the length of the piece.. Some of these pieces are very narrow and meant to be “hidden”. Others have a decorative edge that will be seen as part of the overall design. Separators with a broad surface are referred to as Separator Boxes.
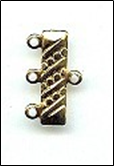
END BARS (can also be used for making earring dangles)
These pieces are basically a bar, with one centered loop off one side, and multiple loops off the other. For a 3-loop end bar (which has 4 loops — 1 centered on one side, and 3 on the other) you would finish off a 3-strand piece on the one side, and then use the single loop on the other side to begin your clasp assembly. The bar can be plain, or very decorative. The bar can be straight, curved, or zig-zagged.
On an earring, with the bar positioned horizontally, you can dangle these one from the other, and create a neat cascading effect with dangles.
These come plain, as well as very decorative.
CONNECTORS and LINKABLES
There is a sub-family of jewelry findings originally called “Connectors”, and more recently referred to as “Linkables”. [The word “connectors” didn’t seem to resonate with customers, so they are trying “linkables”, which also doesn’t particularly resonate, because people are unfamiliar with most of these types of parts. That’s unfortunate, because connectors and linkables open up myriad design possibilities.]
Connectors or linkables are pieces that either have a lot of holes in them, or have multiple loops that come off them. They enable the designer to create segments or sections of beads, which are then connected to each other. They enable the designer to re-direct the flow or pathway of the piece, or to start new pathways/directions off the original piece. They allow you to create support systems within your pieces which are very attractive, appealing, and create a higher level of interest on the part of both viewers and wearers.
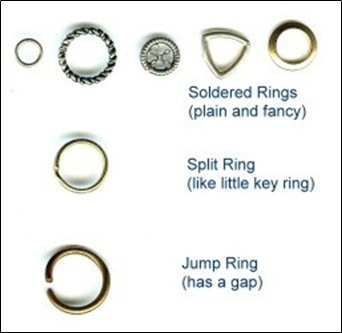
The most basic connectors or linkables are rings of various sorts.
Jump rings have a gap or split in them. Split rings are like little key rings, in which the wire of the ring goes around twice. Soldered rings or stamped solid rings have no gaps whatsoever.
In making a choice among these, you would first try to use a soldered or stamped solid ring. If this won’t work, because you have to make some kind of jump, your second choice is a split ring. If this won’t work, either functionally or sometimes from a visual-appeal standpoint they are not appealing, you would use a jump ring.
To open and close a jump ring, you move the wire ends, on either side of the gap, sideways just a bit, so that you have an opening wide enough to slip over whatever you need to slip them over on. You never pull the wires out and in, just back and forth. After you have connected your pieces to your ring, you close the ring by moving the two ends side to side until the two ends meet. If you have difficulty doing this with your fingers, or the aid of a chain nose pliers, you can purchase a jump ring pliers. With the jump ring pliers, you close the jump ring as best as you can with your fingers. Then you put the jump ring between the jaws of these pliers, and squeeze to close perfectly.
Bead Attach Rings
These are two rings soldered together, one small and one larger. These are primarily used in beaded charm bracelets. If you strung your charms on with your beads, they would get locked between the beads, and not flow freely. Instead, you string on your beads, and string on (through the smaller hole) a bead attach ring, everywhere you want to place a charm. Then you attach the charms, usually using a jump ring or split ring, to the larger hole.
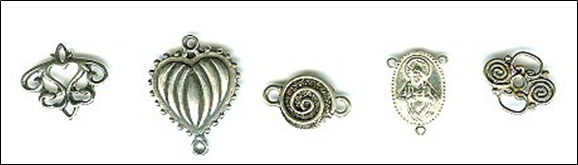
Rosary and Y-Necklace Components, and other multi-hole or multi-loop pieces (see above) let you segment your pieces, or take the strings in different directions.
Beads
There are some beads that are considered a part of the Connector or Linkable family.
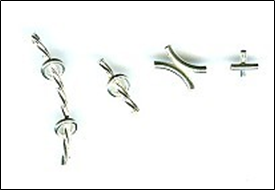
Double beads are either tubes that are soldered together so that the directions of the tubes are different, or you have a tube with one or more rings soldered along its length.
Say you have two tubes soldered together, and one is curved to the left and the other to the right. You take two strings, one through one, and the other through the other tube, add some beads to both, add another 2-tube-double-bead, to twist the strings in the opposite direction, add more beads to each string, another double bead, and so forth. You end up with a bracelet or necklace that looks somewhat like a DNA-strand (double helix).
Say you have a twist tube with two loops soldered to it, one near the top, and the other near the bottom. You can take two of these, and make a long necklace, with one tube+loops positioned on the left side, and a second one positioned on the right side. The wire of this necklace is strung through the tubes. Next, you take another stringing wire from the top loop on the left side and the top loop of the other tube+loops bead on the right side, and make a strand of beads across the chest. Do this again, attaching the lower loops from left to right. You end up with a necklace that also has two strands going across the chest.
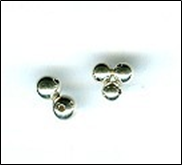
Twister beads are round beads that are soldered together, so that the holes go in different directions. Usually these come as two soldered beads or three soldered beads. You place these in 2-strand or 3-strand necklace or bracelet, at each point you want the strands to cross over each other.
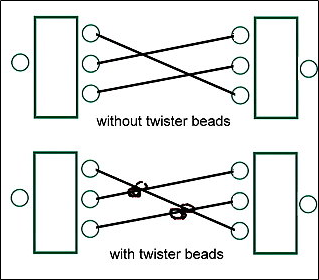
The traditional way to make a twist necklace or bracelet is to take two end bars, and attach the strands in the following way:
Twister beads come in handy because problems arise when these multiple strand pieces are done the traditional way and are worn. First, if you flip one of the end bars over to its other side, you lose the twist as you envision it. Second, when people wear these pieces, they often don’t twist at the points you envisioned, either.
By using two twister beads — in this case, a twister bead comprised of 2 beads soldered together — in the example, the piece will always twist in the way the artist envisions.
Tubes with loops.
These are basically a tube with a loop soldered off the middle. You string these on everyone wherever you to add a drop or pendant to your piece.
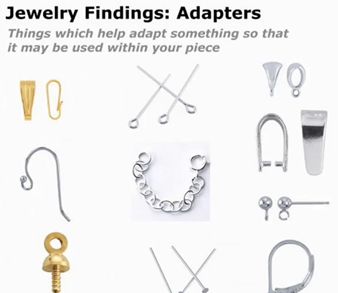
ADAPTERS: Things Which Help Adapt Something So It May Be Used Within Your Piece:
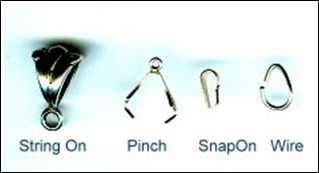
BAILS
These are basically pieces that enable you to put a loop somewhere along your strung piece of jewelry. You string these pieces on everywhere you want to add a drop or a pendant. Regular bails look similar to tubes or beads with a soldered loop off the end.
Some loops are set horizontally, and some vertically, and this positioning of the loop may affect how useful it is for your piece. PAY ATTENTION to the positioning of the bail’s loop relative to the positioning of the hole on your pendant piece.
Other types of bails: Pinch bail — basically a fancy V-shaped piece. The legs have pointed pinchers at their ends. You push these pinchers into a horizontally drilled drop. Austrian crystal drops, for example, are horizontally drilled. And you end up with a loop to string through.
Pinch bails come in many sizes, and a few different configurations, today. You need to match the pinch bail and its design to the pendant drop you want to combine it with. When you open and close the pinch bail too many times, it breaks. You are basically taking metal and bending it back and forth. When you try to fit the bail onto the drops, often you break the tops of the drops, particularly if your drops are some type of crystal material. A hazard of using these. So, when planning your projects (and also when pricing these), always assume you will need some extra bails and some extra pendant drops.
While not my favorite thing to do, some people put a drop of super glue where each point or beg of the bail enters the drilled hole.
Snap on bail — basically a fancy lanyard clasp. This is used to make your pendant removable. You can snap on the bail over the stringing wire, and then take it off the stringing wire.
Wire bails — basically a triangular shaped jump ring, where the gap is off to the side, rather than at the bottom. The drop or pendant won’t have a gap to pull through, because the gap is on the side. What I like about these is that people often bring things into the shop to have us convert into some kind of pendant drop, and if I can’t find a regular piece to work, I usually can always make a wire bail work.
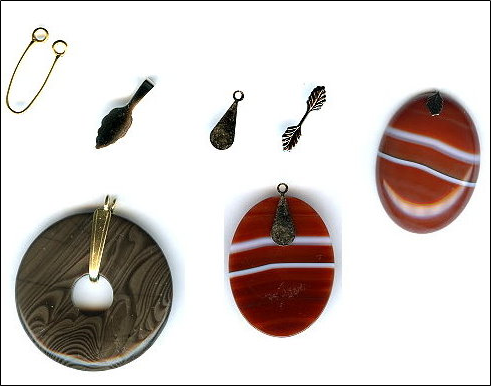
Donut bail
The donut bail is used to convert a glass or gemstone donut into a drop. You slip one side of the bail through the donut hole, then push the two loops on the end of the bail together. Then you string through the two loops.
Beaver Tail or Beaver Tail Bail
Beaver tails are flat surfaces with a loop or bail loop attached to one end. You glue the flat surface to your piece, say a piece of fused glass, letting the loop or bail loop to stick out over the top of the piece. If a plain loop, you would add a jump ring or similar piece, to finish off the piece.
Leaf or Foldover Bail
This is a long piece of metal with flat, decorative ends on each side, usually a leaf stamping. You carefully fold this over, creating a loop in the middle. Then you glue either flat surface to the surface of your pendant drop, like a piece of fused glass.
To glue the leaf, foldover, beaver tail or beaver tail bail to a piece, first try either E6000 or Beacon 527. If these don’t work, try a 5-minute epoxy that comes in a dual-syringe. If your piece is smooth glass, you might use some sandpaper or a file to rough up the surface a bit before gluing. If you have still having difficulty with a glass piece, try using glass cement.
SCREW EYES
These pieces are a screw-threaded post, with a loop soldered to the top. You put some glue (any glue except super glue) on the post, push it into a bead — they do not screw into anything — , attach a jump ring to the loop and string the bead on to your piece as a drop.
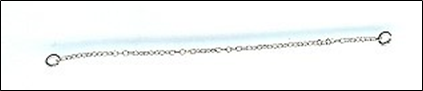
EXTENDER CHAINS
This is a short length of chain, usually with a spring ring clasp on one side, and a bead-drop on the other. You can buy these pre-made, or make your own. These are used to lengthen necklaces. The spring ring clasps onto the existing ring of the necklace; the hook-clasp can clasp into any link on the chain. The bead drop is primarily decorative.
SAFETY CHAINS
These 2 ½” to 3” lengths of chain, have two tiny jump rings, one on each end. These are used to attach to bracelets, to prevent you from losing your bracelet, should the clasp come undone. You can buy these pre-made, or make your own.
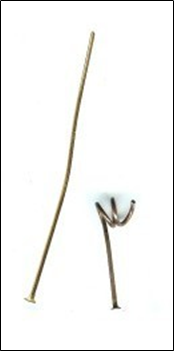
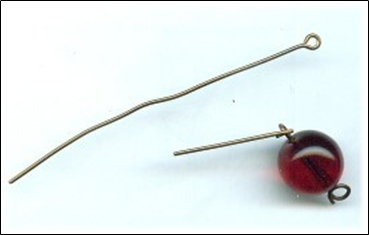
HEAD PINS
Head pins are pieces of wire with a flattened or decorative end or head. You put beads on the head pin, and the head stops them from falling off. You make a loop on the other end, and string these on a necklace, or dangle them from an ear-wire or other loop. You need ½” of exposed wire to make a loop. You can make a single loop, a double loop or a triple loop. Each provides a different level of security, a different visual appearance, and a different impact on the resulting silhouette.
Head pins come in different thicknesses (gauges). Regular thickness: 20 gauge Extra Thin: 22 gauge or 21 gauge Ultra Thin: 24 gauge or 26 gauge
Too many people try to use the longest head-pins they can get. They end up with bent dangles and drops on funny looking necklaces, bracelets and earrings. If you want something “long”, consider making a series of links using eye pins, instead.
When you make your loops on the head pin, make them large enough so that they have sufficient jointedness and support, and will easily slip over the stringing material or finding. I can’t tell you how many times I’ve seen women with earring dangles stuck in a 90 degree angle, because the loops were too small.
EYE PINS
Eye pins are pieces of wire with a loop on one end. These are used to make bead-chains, such as in a rosary. You put one or more beads on the eye pin, then make a loop on the other end. You need ½” of exposed wire to make a loop. These come in different thicknesses (gauges). Regular thickness: 20 gauge Extra Thin: 22 gauge or 21 gauge Ultra Thin: 24 gauge or 26 gauge
You can buy head pins and eye pins pre-made. Or you can easily make your own, using simple wire working techniques.
The women were so excited about the jewelry. Trying it on. Adjusting it to see if they could wear it a different way. Changing up the silhouettes. Pretending they were wearing different outfits to visualize what the pieces would look like. It was a very versatile line of jewelry, and all the women noticed that very quickly. They could wear necklaces as bracelets. Combine bracelets into necklaces. Take one bracelet, add it to a necklace, and create a longer piece. They could purchase different pendant drops, all as add-ons as they wished or none at all. And the drops easily converted into earrings. Imagine that! And the awe and glee and elation and animation — yes, these women were more than happy to have found this jewelry designer and her custom pieces.
I was there that day. In the store. At this one-day trunk show. I saw it all. These women were purchasing almost every last piece. It was the right aesthetic. Contemporary but conservative as well. An individualized look but not outlandish. Easy to wear. Easy to adapt. Easy to visualize what it would look like with different outfits and in different situations.
The jewelry designer was very attentive. She demonstrated the flexibility of each piece in the line. She, at first, asked the women individually a lot about themselves and how they liked to wear jewelry. Then she subtly shifted the conversation a bit so they were talking about themselves and how they would want to wear her jewelry.
At one point, I slowly looked around this upscale clothing, accessories and jewelry store. There were seven store associates standing around. Standing around. A glazed look on their faces. The enthusiasm and energy before them somehow foreign. After the trunk show, when the designer was no longer there, they would be the ones to represent her and her jewelry.
They stood there with blank faces. As if watching a movie they found uninteresting. None of them stepped in. None of them stepped up. Even though the jewelry designer was mobbed with seven or eight women at any one time. They obviously were unable to empathize with the crowd. They had no clue how to sell the pieces because these were pieces of jewelry they didn’t wear themselves. They were somewhat clueless about how to suggest how these store guests could put things together in a stylish, wearable way.
At the end of the day, the jewelry designer was very happy with her sales. But it hit her. Her jewelry would remain at this store for the next several months. But she would not. She would be leaving that day. And she was worried. She thought that over the 10 hours, her purpose was not only to sell to customers, but her purpose was also to model for the sales staff the smart ways for working with these customers and selling her product.
Had the store associates been reliable deputized partners with the jewelry designer that day, all would have made many more customers happy, and made a lot of money and commissions for store, sales staff and designer. Going forward, the designer now had doubts.
Jewelry Designers Often Have To Rely On Others,
The Designers’ Success Relies On Their Whims
Most jewelry designers do not own their own shops. They rely on other people to sell their stuff. They might put their jewelry in a clothing, accessories or jewelry store on consignment. They might be represented by a gallery or sales representative, with their jewelry spread out in many stores. They might package their jewelry into trunk shows or pick boxes where they send out their jewelry to various stores. These other venues can pick and choose and sell what they want, then return the rest.
The success of sales becomes the whim of who sells it. Their understanding of the designs. Whether they like the pieces or not. Their motivations to keep things clean, neat and displayed well. If they can see themselves or their friends or spouses wearing these. Their sense of style, knowing what things might work well together with what fashions. How well they communicate with their customers. Perhaps even IF they communicate with their customers. If they follow-up with their customers.
Designers Must Take The Lead In Preparing Others To Sell Their Jewelry
The designer must play a leadership role here. The designer as leader must effectively influence, persuade, train and convince whoever will be selling their jewelry how to sell it. As best as possible, the designer must build shared understandings about the product with those who will sell it.
Passive assumptions won’t work here. The designer cannot assume that store owners and their sales staff, because they supposedly want to show a profit, will be good at their jobs. More likely, they are not — particularly when it comes to selling someone else’s stuff. The consequences of poor salesmanship are virtually invisible until many months, even years, later. That’s too late to wait.
To add to the difficulties, the opportunities in terms of time, resources, and follow-up are very limited. The designer may get just one shot to build shared understandings and accomplish several goals. Ideally this should happen in person. Often, it is not. Often it is reduced to shared emails, some printed materials, and some phone calls.
Six Key Shared Understandings
There are six key understandings which the designer must influence others to share. These include,
1. The Key Product Details
2. The Primary Product Benefits
3. The Smart Ways To Use The Products To Build Customer Relationships
4. What Rewards The Sales Staff Should Expect For Themselves, Based On Their Performance
5. At All Times, How To Maintain The Optimum Inventory and Product Mix
6. How To Routinize Timely Feedback
1. The Key Product Details
Think of every line of jewelry as its own culture with a group or tribal identity. Which three to six words or simple phrases encapsulate what that identify is all about? What were the key, primary design choices made which give this line of jewelry its character and resonance? How would anyone know that any piece of jewelry was a part of that group or tribe?
These key words or details might relate to materials and techniques. They might reference fashion, style and taste. They might be things about the designer or about jewelry design in general. There will be lots and lots of details which can be conveyed, but the list of details will need to be severely culled.
People have what is called finite rationality. They can only handle and remember between 4 and 10 pieces of information at a time, with 7 pieces of information usually the upper limit for most people.
Don’t confuse the sales staff. Don’t let them confuse the customers. Limit that descriptive words you use when explaining your jewelry, your design choices, and your design goals. Keep these descriptors simple, un-jargoned, devoid of business babble and clichés.
Keep repeating these 3 to 6 things. Repeat them in ways you want the sales staff to learn them, understand them, and be able to repeat these 3 to 6 things to their customers when you are not around.
2. The Primary Product Benefits
It is not the features of your jewelry that result in sales; it is the benefits people perceive the jewelry will provide for them. People do not focus on what the product is. They focus on what the product means to them.
People buy things to solve problems. These problems might relate to needs and wants. They might relate to achieving status and position. They might resolve emotional desires.
What problems for the potential customer does your jewelry solve? Think carefully about this. Make lists.
Then reflect awhile on how you think your jewelry solves these problems for your customers better than any of your competitors. What are your competitive advantages?
Convey to store owners and sales staff the results of your thinking and synthesis. You do not only want to list for them what customer problems your jewelry solves for them. You do not want your explanation divorced from the actual selling situation. You are not presenting an academic assessment; you want to present a marketing assessment. You want to convey how your jewelry resolves customer problems better than anyone else. This is a little more difficult to do and get the words out, and requires some practice.
And, again, remember that people have finite rationality. Don’t talk about everything. Focus on the couple of primary competitive advantages your line of jewelry has.
As best as possible, make your benefits concrete and specific. Think of which benefits would most readily stick in people’s minds.
3. The Smart Ways To Use The Products To Build Customer Relationships
Any sale is an interaction based on communication. The sale is not the only result. The building of a relationship also results. Too often sales staff performance is rated based on number of sales, and too rarely rated on building relationships. But it is in the building of relationships where we get those repeat sales and bigger sales and broader sales and better word of mouth and more new customers and, you get the idea.
Ideally, if you get the chance, like in the trunk show described above, you can model these relationship building behaviors in front of the sales staff. You can demonstrate how you elicit customer needs, wants and problems to be solved, and how you gain their awareness and trust in how your jewelry will meet these in an advantageous way. If there are other types of products in the store, you can demonstrate how to co-market, such as your jewelry with the store’s clothing.
Absent the in-person approach, you can provide ideas in periodic emails. You might do some simple one-sided-page images and short descriptive content. You might create a fun video that you can share.
You can also work with store staff in developing customer lists detailing the who, how to contact them, the what they bought, the dates, the follow-up sales, customer preferences, any descriptive information about the customer to help future sales.
To help guarantee that sales staff keep these lists and fill them out completely, you can ask to see them periodically to review. You can encourage sales staff to communicate with customers pre-, during, and –post sales. Based on your review, you can suggest specific items in the line that each customer might like to see, and possibly buy. Even though you are not physically present, you can still show how building relationships can generate sales and profits.
4. What Rewards The Sales Staff Should Expect For Themselves,
Based On Their Performance
It is helpful if you not only generate commissions and sales for the store, but also some kind of reward for the sales staff each time they sell one of your pieces. Show you recognize their efforts and appreciate them. If sales staff get paid no matter what they do, they may not give your line of jewelry the attention and promotion it deserves.
Besides some reward, perhaps a thank you note, or giving either a monetary extra commission or a piece of your jewelry, you most likely also want to reward the sales staff’ customer follow-ups, without actual sales, such as sending thank you notes or calling them when you send new pieces to the store.
5. At All Times, How To Maintain The Optimum Inventory and Product Mix
Do not assume that the store will maintain the optimum inventory and product mix of your jewelry at all times. There will always be other companies, other designers and other product opportunities competing for any store’s attention. So you will need to step in and capture that attention on a regular basis.
Create an easily update-able plan for the store that details the ideal mix of product — types of jewelry, price points, color, finishes and textures.
Reduce this to a simple product inventory sheet to give the store.
Contact the store periodically to update the inventory, compare to your plan, and make inventory suggestions accordingly.
6. How To Routinize Timely Feedback
You need to get feedback routinely, say at least every 3 to 6 months. You need regular feedback on your jewelry, on the sales process, on other things you can do to help sales staff become better at selling your jewelry.
If your jewelry is not turning at least twice a year, the particular store is probably not right for you. It might be the inattentiveness of the sales staff. It might be a lack of fit with the store’s customer base. But, if you are not getting a minimum of 2 turns a year, this location is not working either for you or the store.
You might formalize requests for quarterly results. You might call the store or any of its sales staff periodically to get information feedback. You might send a questionnaire to customers who have previously purchased your jewelry.
It helps the feedback process along when you provide rewards. This might be in the form of refreshments, such us sending an evaluation form with a box of cookies. This might take the form of adding some free pieces of jewelry to be sold, or one-time discount on purchases.
______________________________
FOOTNOTES
James, Geoffrey. 6 Ways to Persuade Customers to Buy. Inc.com, 2020.