I’ve always wanted a fuller online space for representing the various things I’ve been involved with. A space to bring all my writings about jewelry making, jewelry design and conquering the creative marketplace. A central place to guide people to opportunities — art and craft shows, beads, findings and other supplies, highlighting new ideas and new designers in jewelry.
My ultimate goal is to contribute a set of ideas, practical steps, and fix-it strategies to stuff into your designer toolbox, which all lead towards becoming a professional in jewelry design. Not a craft. Not only an artist. But a designer with the skills and insights for making tradeoffs between beauty and function, pure art and commercialization, and the intuitive excitement which comes from applying your creativity and the negotiation of shared understandings and desires as you introduce your pieces publicly.
I have set up this space for our community of jewelry designers — Warren Feld Jewelry’s PATREON HUB — to learn, to interact, and to provide and/or get feedback on what they are working on. Please join here.
Be part of a community of jewelry designers who recognize that we have a different way of thinking and doing than other types of crafters or artists.
WHY SUBSCRIBE?
Engage with a community. Benefit from its collective power — insights, reactions, feedback, foresight, and directing you to opportunities.
Never miss an update. You won’t have to worry about missing anything. Every new article of interest, and announcements about kits, workshops and webinars, chat groups, feedback sessions, and special promotions, goes directly to your inbox.
I bring articles, tutorials, and chat-group discussion sessions to you about…
What it means to be fluent and literate in design?
What the implications are for defining jewelry as an “object” versus as an “intent”?
Why some jewelry draws your attention, and others do not?
· Articles. Stay up-to-date. Access each new article up to 3 months. · Advanced Notice. Kits, webinars, workshops, tutorials, promotions, discounts · Free Mini-Lesson Download. One free downloadable Mini-Lesson of your choice
· First view of all articles and kits · Access to all the articles in the archive · 25% Discount on beads, supplies and kits on LandOfOdds.com website · Priority in posting comments · All member chats · + All free-tier member benefits
GETTING STARTED: DEVELOPING YOUR PASSION Passions Aren’t Found, They Are Developed!
Design is about knowledge, skill and understanding. Knowledge requires time and preciseness. Skill requires care and attention. Understanding requires empathy and insight.
You are not born with the knowledge, skill and understandings necessary for jewelry design. These must be learned and developed over time. Anyone and everyone can learn these. Everyone has a creative capacity within them. There are many different ways to express things creatively. But one has to learn to express their thoughts and feelings creatively, step by step, developmentally over a period of time. It is through this process of investment in self that the designer’s passions emerge and expand.
It is important not to give up too easily, if designing and making jewelry seems too difficult at first. Difficulty does not equate to a lack of passion. It does not equate to a lack of ability. It does not equate to a lack of creativity. Many things will be difficult, particularly at first.
Nor does any waxing and waning of motivation imply that jewelry design is not for you. It’s natural that jewelry design does not provide an endless, infinite, always-there motivation. This does not mean you have lost your passion for it.
Passions must be cultivated. As do technical abilities and creative thinking. These all must be developed.
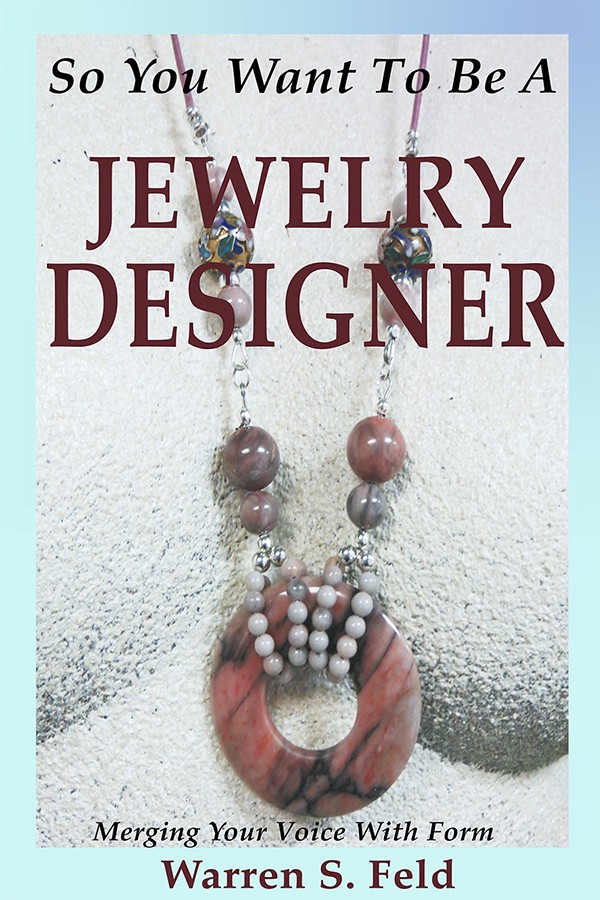
SO YOU WANT TO BE A JEWELRY DESIGNER Merging Your Voice With Form
So You Want To Be A Jewelry Designer reinterprets how to apply techniques and modify art theories from the Jewelry Designer’s perspective. To go beyond craft, the jewelry designer needs to become literate in this discipline called Jewelry Design. Literacy means understanding how to answer the question: Why do some pieces of jewelry draw your attention, and others do not? How to develop the authentic, creative self, someone who is fluent, flexible and original. How to gain the necessary design skills and be able to apply them, whether the situation is familiar or not.
Some Updates and Things Happening. (Please share this newsletter)
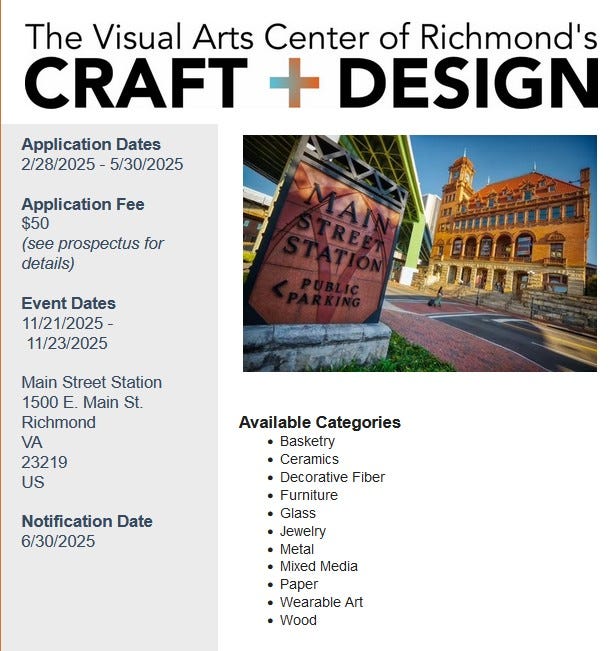
In this Issue: 1. Some highlights from the recent ORNAMENT magazine 2. Mastering the art of talking about your jewelry in public 3. Some advice about self promotion 4. Smithsonian Craft2Wear Show, September 26–28, 2025, APPLY NOW 5. What does it mean to foster a Growth Mindset? 6. Are the days of men’s jewelry worn solely as symbol of power and wealth gone for good? 7. Call for entries: Richmond CRAFT+DESIGN 8. Clever phrases/aphorisms/memes for artists of all kinds Some articles you may have missed
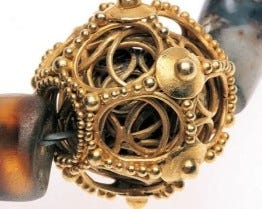
I received my most recent issue of one of my favorite magazines — ORNAMENT. Here are some highlights.
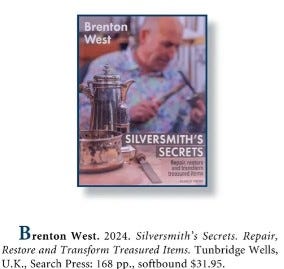
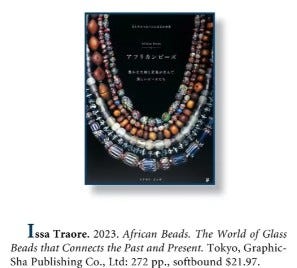
New books:
Articles:
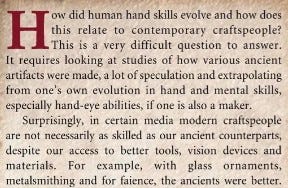
Ancient Craft Skills and the Contemporary Craftsperson
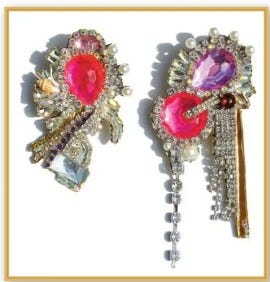
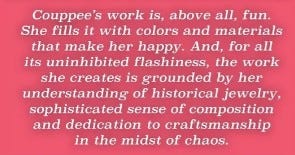
Nikki Couppee Showcase
There are many other jewelry designers highlighted, as is New York City Jewelry Week.
2. Mastering the art of talking about your jewelry in public
Speaking about your work publicly can be both exciting and nerve-wracking. Here are some key tips to confidently and effectively share your work:
a. Know Your Story (Inspirations, getting started, techniques and materials)
b. Develop a Clear 30 second Elevator Pitch (engage in 30 seconds; focus on what makes your jewelry unique)
c. Speak with Passion and Confidence (enthusiasm is contagious; take your time and speak clearly, even if you are nervous)
d. Adapt to your Audience (what do you think your audience wants to hear? focus on process and inspiration; highlight your brand and craftsmanship; be conversational and authentic; tell stories and anecdotes and don’t lecture)
e. Prepare a Narrative (focus on crafting a story that encapsulates your artistic journey, the challenges, triumphs, pivotal moments, struggles, doubts you’ve overcome, mishaps, recurring themes in your work, how your themes relate to your personal story; a compelling narrative evokes emotion)
f. Show and Tell (be prepared to show and tell, whether you have your jewelry with you at the moment, or you share images or your portfolio on your cellphone)
g. Engage, Don’t Just Talk (be interactive; encourage questions; ask what people think, invite them to share their opinions or what they think; get their reactions to a piece of jewelry before you begin to talk about it; style preferences; be conversational; show genuine interest in their responses and respond with some detail to what they say; be patient with responses and allow your audience time to formulate and articulate their thoughts; resist the urge to fill silences too quickly; you can always start the conversation by talking about a question you get asked a lot)
h. Practice, Practice, Practice (outline your remarks or write it out like a script for a play; rehearse in front of a mirror or with a friend; record yourself and refine your delivery; I use a desktop/mobile app called LOOM, which has a free subscription option)
i. Be Ready For Questions (why use these, do this, not do this?; what do you like?; how long does this take?)
j. Provide Takeaways (at the end of your talk, summarize the key ‘learnings’; provide a brochure or postcard or business card that your audience can take with them, as a physical reminder of your work; provide an avenue for them to explore your work further or contact you for potential opportunities, purchases, collaborations)
k. End With A Call To Action (extend the conversation beyond the event; always end with a call to action: visit website; sign up for newsletter; take them on a tour)
l. Follow-Up (you want to build lasting relationships (invite audience to stay connected and give you their email addresses, other contact information; send a personalized thank you note or email shortly after event; repeat highlights of your talk, links to your work, information about where to find you next)
m. Reflect and Adapt (review the event/encounter; what resonated best/least; what feedback did the audience present; adjust previous steps accordingly)
n. Network and Connect (expand your professional circle and foster meaningful relationships with other jewelry designers as well as your client base; engage in one-on-one conversations with clients who seemed interested in your work; exchange contact information with fellow designers and any boutiques, galleries or other businesses that seemed interested in your work; discover new opportunities to keep you and your work visible)
3. I was reading this article about self promotion, and wanted to share this with you. Good stuff.
The Power of Being Yourself Self-promotion often feels like an uncomfortable task for artists, but my first rule is simple: be yourself. There is no one way to self-promote, and the key is to find an approach that aligns with your personality. Authenticity is what draws people in — it’s not about forcing a persona but rather amplifying what makes you unique.
Let’s address social media, the most obvious self-promotional tool. Over the past half-decade, its impact has declined as big businesses have taken over. That doesn’t mean it’s useless — it just means you must use it wisely. Instead of treating social media as an advertising outlet, think of it as a storytelling tool. Show your process, your inspirations, and the personal side of your work. People connect with authenticity, not just finished products.
[His stated philosophy: Art is not something we create, it is who we are.]
4. Smithsonian Craft2Wear Show, September 26–28, 2025, APPLY NOW
The 2025 Smithsonian Craft2Wear Show is an exhibition and sale of wearable contemporary American craft (clothing, accessories and jewelry) held in Washington, DC at the beautiful Smithsonian Arts and Industries Building (AIB) on the National Mall.
Electronic applications are due by Tuesday, April 15, 2025. A non-refundable fee of $30 must accompany each application.
Failure is uncomfortable. Disconcerting. Too often, we do everything we can to keep ourselves out of situations where we might fail. We focus on what could go wrong, instead of what could go right. We think we don’t have the abilities to do the task. We get paralyzed. We do nothing. Or we keep repeating ourselves, producing the same-ole, same-ole, whether there is a continued market for these items, or not. Or we begin to visualize any risk as insurmountable, way bigger than it really is.
But allowing any fear of failure to become some kind of insurmountable wall works against us. If we are trying to make a go of it by selling our jewelry, we can’t build these kinds of walls. Successful business people and successful businesses need to foster a culture which promotes a growth mindset. Simply, a growth mindset is a culture where you have permission and encouragement and confidence to take risks.
Risks are OK because they bring rewards. Rewards allow the business to maintain itself, sustain itself, grow and expand.
Failures are OK, as well, as long as they become learning experiences.
Doubt and self-doubt are OK only if they are used to trigger reflection and new ideas to overcome them.
Not having the skills requisite for the moment is OK because we are all capable of continual learning.
Temporary setbacks are OK because you have had them before and overcame them.
Carol Dweck wrote the seminal book on growth mindsets called Mindset: The New Psychology of Success (2006), with a series of related books to follow. People have either a growth-mindset or a fixed-mindset.
Those with a growth-mindset believe their abilities are developed through continual learning and hard work. They are more willing to experiment and try new things, and see failures as opportunities rather than setbacks.
Those with a fixed-mindset believe that abilities are innate — you’re born with talents or not. They seek out opportunities where specific talents, rather than effort, leads to success. They prefer to repeat tasks and apply skills they are already familiar with.
Developing a growth mindset means such things as…
1. Understanding the power of “Not Yet”.
2. Setting learning and continual learning goals
3. Being deliberate and constantly challenging yourself
4. Asking for honest feedback and criticism
5. Always reflecting on and being very metacognitive about your thoughts and actions, successes and failures
6. Recognizing if you are stuck in a fixed-mindset, and acknowledging your weaknesses
7. Focusing on the process, and less-so on the result
8. Getting comfortable with self-affirmation, rather than needing the affirmation and approval of others
6. Are the days of men’s jewelry worn solely as symbol of power and wealth gone for good?
A look at men’s jewellery at GemGenève
The rebirth of jewellery for men since the 2010s is actually due to another factor altogether: men have changed the way they relate to jewels and jewellery in general, argues GemGenève co-founder Ronny Totah. Today, men account for up to 30% of jewellery purchases from certain collections by brands and independent craftsmen and women.
8. Clever phrases/aphorisms/memes for artists of all kinds
I am a member of the Columbia Arts Council. For an event, we are going to pass out stickers. I generated a sampling of sayings that could go on the stickers, and I’m sharing them with you. Thought you’d get a chuckle out of these.
General Creativity & Art
Create like nobody’s watching.
Messy hands, brilliant mind.
Art: cheaper than therapy.
Make art, not excuses.
Doubt kills more art than failure ever will.
Every artist was first an amateur.
Creativity is intelligence having fun.
I speak fluent paint splatter.
Art is my love language.
Reality is overrated — paint me another one.
The world is my canvas, and I’m out of control.
Perfectly imperfect — just like my art.
Stay weird, stay creative.
Warning: Contains excessive imagination.
Creativity takes courage — and a lot of snacks.
Makers & Hands-On Artists
Handmade with sarcasm and love.
Makers gonna make.
I make things. What’s your superpower?
Handcrafted with reckless precision.
This is what ‘made with love’ looks like.
I turn coffee into art.
Saw dust is my glitter.
I make because I must.
Perfection is boring. Make something weird.
Measure twice, cut once, cry anyway.
My blood type is glue and glitter.
I can’t. I have a project.
Made by hand, heart, and a little bit of chaos.
Mistakes are just creative detours.
Cut. Sew. Cry. Repeat.
Painting & Drawing
Watercolor outside the lines.
Oil paint runs in my veins.
Sketch today, masterpiece tomorrow.
More paint, less perfection.
I draw, therefore I am.
Happy little accidents happen daily.
Smudges are just love marks from my art.
Inking my way through life.
My brush dances to its own tune.
If you see me clean, I’m out of paint.
Jewelry Making & Beading
Bead it like you mean it.
I like big beads and I cannot lie.
Stringing together happiness, one bead at a time.
Jewelry is art you can wear.
Beading: because therapy is expensive.
If lost, check the bead store.
Some collect memories; I collect beads.
Beading is my cardio.
Life is too short for boring jewelry.
More beads, less stress.
Creative Process & Inspiration
Inspiration hits at inconvenient times.
Chaos is just creativity’s warm-up.
Creativity is a work in progress.
Start before you’re ready.
Don’t wait for inspiration — just start.
Creativity thrives in the mess.
Done is better than perfect.
There’s no such thing as too many ideas.
Creativity: where the fun begins and logic ends.
You can’t rush art — but you can procrastinate it.
Art & Business
Starving artist? No, thriving artist.
Yes, it’s handmade. No, it’s not cheaper.
Support artists — buy art, not mass production.
Art is work. Pay accordingly.
Artists don’t work for exposure.
Yes, I make art. No, I won’t do it for free.
DIY: Because hiring professionals costs money.
Just because I enjoy it doesn’t mean I’ll do it for free.
I create. You buy. Everyone’s happy.
Respect the artist. Respect the craft.
Music & Performing Arts
Life’s better with a soundtrack.
Dancers don’t sweat, they sparkle.
Sing like you mean it.
Break a leg — but not my instruments.
Music is what feelings sound like.
The stage is my happy place.
Dance first, think later.
Creativity has no volume control.
When in doubt, just improvise.
Make music, not noise.
Writing & Literature
Write your own story.
Plot twist: I need more coffee.
My brain is 90% plot ideas and 10% snacks.
Poetic soul, chaotic mind.
Editing is just rewriting with regret.
Too many tabs open — some are story ideas.
I write. What’s your superpower?
Procrastinating? No, I’m world-building.
My characters made me do it.
Caution: Writer at work — approach with snacks.
Quirky & Funny
Oops, I arted.
Eat. Sleep. Create. Repeat.
More glue, less stress.
Why fit in when you can stand out?
I make, therefore I am.
Art teachers gave up on me; now they buy my work.
Creativity: The only mess that’s worth it.
Not all who wander are lost… some are just looking for inspiration.
This shirt contains 100% recycled creative energy.
The best ideas come at 2 AM and disappear by 7 AM.
UPCOMING WORKSHOPS by Warren Feld
Sat, 4/12, 2–3, LET’S MAKE EARRINGS, Maury County Library, 211 W 8th St, Columbia, TN Register: Call (931) 375–6502
WARREN FELD JEWELRY (www.warrenfeldjewelry.com) Custom Design, Workshops, Video Tutorials, Webinars, Coaching, Kits, Group Activities, Repairs ~~~~~~~~~~~~~~~~~~~~~~~ Join our community of jewelry designers on my Patreon hub Be part of a community of jewelry designers who recognize that we have a different way of thinking and doing than other types of crafters or artists. One free downloadable Mini-Lesson of your choice for all new members! ~~~~~~~~~~~~~~~~~~~~~~~
A jewelry designer is not born with an inherent essence of being a designer. Rather, they become a designer, and exist as a designer, through the act of designing. The essence with which each jewelry designer conveys when existing as a jewelry designer is some blend of artistic expression, craftsmanship, emotional resonance, and functional ability, and, in some cases, business acumen.
The question we get asked over and over again, and we ask ourselves over and over again, is: Who Are You? / Who Am I?
The obvious answer is You are who you are. Or, You are what you do. You exist.
But, how do you become?
You weren’t born into jewelry design. Jewelry designing may or may not have been on your horizon as you grew up, began some kind of work, and lived your life. At some point, you became a jewelry designer.
Was there a point in time where you felt in your gut that you not only were making jewelry, but you had become a jewelry designer?
Perhaps not. In this case, you might have felt that anyone might make jewelry at any point in time. You made it, you sold it, you gave it away. If we merely exist to make jewelry, then we are a technician. An automaton. Interchangeable with a machine. Easily replaceable and duplicated. The results of our work are repeatable. Universal. Mass appeal. Same ole, same ole. We haven’t become a jewelry designer. We merely implement designs.
Yet, perhaps there is a point in time where we, not only be and do, but become. After all, in this case, not just anyone can design jewelry. A machine can be given instructions on how to design jewelry. But it cannot be inspired. It cannot, on its own, inspire others. It cannot build in meaning and content and power and edginess. It cannot evoke emotions. It cannot, on its own, find that point of conversation between designer and client where both believe the jewelry is finished and successful. It cannot, on its own, understand desire and its driving forces for both designer and client. Nor, where their desires overlap and where they conflict. All these cannots suggest that one more likely becomes a jewelry designer. At some point.
So, how do you become? How do you become a jewelry designer?
And once you become, how do you know you are one?
And, finally, what does it mean to exist as one?
Existence
The idea of existence can sound so pejorative in some ways. A sense of nothingness, an as “is”. Something mechanical that may or may not be self-perpetuating. A tree holding up the sky for no particular reason, but that it does.
I can prefix the idea of existence with one of essence. This sounds a little sexier. The jewelry designer cannot exist as a jewelry designer without some sense of exuding some essence. It is not a smell or perfume. It is not some particular set of tools or techniques. It is more than an idea or fantasy or wish fulfillment.
The essence with which each jewelry designer conveys when existing as a jewelry designer is some blend of artistic expression, craftsmanship, emotional resonance, and functional ability, and, in some cases, business acumen. It is not beauty or functionality, but beauty and functionality. It is not object or intent, but object and intent. It is not mechanically constructed or symbolically constructed, but mechanically constructed and symbolically constructed. It is not the assumptions, expectations, perceptions, values and desires of the designer or the client, but both of designer and client in a shared dialogue about understandings.
The existence of the jewelry designer is one of telling stories. Stories evoke meanings. Meanings lead to emotional and resonant responses. Emotional and resonant responses often lead to public expression. Public expression might lead to contagion or rejection.
To exist as a jewelry designer means encapsulating all these things. Together. At once. But piecemeal, too. Integrated, but contradictory, too. Coherent, yet incoherent concurrently, too. Existence as a jewelry designer takes on multi-faceted meanings. Existence is shaped by creativity, influenced by materials and techniques, affected by someone’s relationship to beauty, oftentimes jarred by architectural issues of functionality, stresses and strains, softened by the impact their pieces have on the client and the situations the client, wearing their works, finds themselves in.
Jewelry design is a process, and the cycle repeats with each new piece. But the essence is the same. The existence has, indeed requires, the same essential parameters.
You Know It When You Know It
I do some coaching from time to time with students who want to exist as jewelry designers, but not sure if they do, if they do yet, and how to know when it happens. It could result from difficulty with a technique. Or the application of art and design principles of composition, construction and manipulation. Or how to make some success in business.
A lot of the coaching boils down to the same thing: the essence of existence.
I have set up a space for our community of jewelry designers — Warren Feld Jewelry’s PATREON HUB — to learn, to interact, and to provide and/or get feedback on what they are working on. Please join here.
Be part of a community of jewelry designers who recognize that we have a different way of thinking and doing than other types of crafters or artists. Access more articles and other resources not included in my medium.com site.
Not sure how I got this way. I can remember when I was 10 or 11 years old, my friend Gary and I, and sometimes Ira, who was sometimes a friend, sometimes someone we bullied, used to set fires, and then try to put them out. We would set fire to this field behind the Ford dealership on Rt. 22. We would set fire to homes and businesses under construction. We would set fires, let them burn awhile and then try to put them out by stamping them with our feet, putting blankets over them, pouring water on them.
We set fires until we were caught. By the police. Punished severely by our parents who could not figure out why we were setting fires. The word because was insufficient for them. We did it because we could. The fields and buildings were there waiting to be used. We used them the way we knew how. That gave us some fun. A feeling of power. And that was that.
That was that for Gary and Ira. Actually, not for me. I became mesmerized. The colors. The contrasts. The saturation and vibrancy. The interplay. The movement and rapid color changes. The certainty when it was all over.
My gaze locked in, never wavering, staring as the light tans and beiges of the tall field grasses, very still, began undulating with reds and oranges, some blues, some maroons, the fiery colors taking over, first a small area, then more and more, until the colors were more powerful than the heat generated by the fire. Once the fire was put out, I literally felt the strong juxtaposition between charcoal and beige, at once listless and lifeless, yet exuding a powerful finality.
Color is such a powerful influencer. I never set fires again, but, at the same time, I had no one to share my very personal, very emotional, very primal color experiences with until I was in my late 20’s. In school, I was always tracked with the more intelligent kids. This meant rewards for math and science, and some put downs for art and music. My parents did not want to hear about anything else besides lawyer and doctor.
Soon after Gary and Ira and I were caught, I moved away.
But I doubt color was in their forethoughts as we set fires to things.
The Jewelry Designer Colors Differently Than The Artist
You cannot paint with beads and other jewelry components.
I am going to repeat this: You cannot paint with beads and other jewelry components.
When you take color class after color class rooted in art, they are teaching you how to paint. You can’t do this with jewelry and beads.
I give this warning to all my students. I repeat it frequently in the articles I write. I follow it carefully when designing my own pieces. I have been challenged frequently by people who make jewelry and consider themselves artists. But to create successful jewelry takes you beyond art, its ideas, constructs and precepts. Jewelry has some roots in art, which is true. But it also has roots in craft. It is very comparable to architecture. Its product — the outcome — plays a different role and must conform to different social and physical tensions than paintings and sculptures. I repeat: You cannot paint with beads.
As frustrating as this can be, you cannot ignore the fact that Color is the single most important Design Element. Colors, their selection, use and arrangement, are believed to have universal powers to get people to see things as harmonious and appealing. Color attracts attention. A great use of color within an object, not only makes that object more coherent, it can make it more contagious, as well. Using colors that do not work well together, or using too many colors or not enough colors, or using colors which look good on paper but distort in reality can put people off.
Jewelry Designers can learn the artistic basics of Color concepts and theories. They can reference this visual language of color to influence how they go about making choices, including those about picking and using colors. However, jewelry artists who are fluent in design will be very aware of the limitations this artistic, painterly language imposes on them. They will have to learn how to decode, adjust and leverage their thinking to anticipate how the bead and other related and integrated materials assert their needs for color, and how to strategically compose, construct and manipulate them.
Jewelry, unlike painting or sculpture, has certain characteristics and requirements which rely on the management and control of color, its sensation and its variability with a slightly different emphasis than learned in a traditional art class. Jewelry is a 3-dimensional object, composed of a range of materials. Jewelry situates, moves and adjusts in relation to the human body and what that body is doing at the moment.
To get the attention their jewelry deserves, jewelry artists must become fluent with color selection and application from their own disciplinary perspective. We must understand color in jewelry as the jewelry is worn, and worn in a particular context or situation. Ever-changing directions and intensities of light and shadow, reflection, absorption and refraction. The observation that color may be present, even projected (the color shadow), outside the boundaries of the bead or jewelry component itself.
Beads [here I use ‘beads’ as a stand-in for all the component parts and stringing and canvas materials used in a piece of jewelry] are curved or faceted or otherwise shaped, and the shape and texture and material and dimensionality and even the hole through it affect the color, its variation and its placement and movement on the bead’s surface. They affect how light reflects and refracts, so depending on the angle at which you are standing, and how you are looking at the bead, you get some unexpected, unanticipated, sometimes unwanted colors in your piece of jewelry.
Additionally, you need to anticipate how the bead, when worn, can alter its color, depending on the source and positioning of light, the type and pace of movement of the wearer, and how the eye interacts with the bead at any point of time or positioning. There are many more color tensions that come from the interrelationships between positive and negative spaces. There are many gaps of light between each pair of beads, and you can’t paint these in. The colors don’t blend, don’t merge, don’t spill over, don’t integrate. You can’t create the millions of subtle color variations that you can with paint.
I’m not suggesting that beaders and jewelry makers be afraid of colors. Rather, they should embrace them. They should learn insights into understanding colors. They should be inspired by colors. They should express their artistic and creative selves through color. They should use color palettes to their fullest. They should recognize how their various audiences see and claim and interact with color.
It is most important that jewelry designers understand color, its use and application from their own disciplinary standpoint. In some sense, however, the approaches of most bead artists and jewelry designers too often remain somewhat painterly — too rooted in the Art Model.
The Art Model ignores things about functionality and context. The Art Model does not anticipate all the additional management and control issues which arise with jewelry creation and how /where / when it is worn. The Art Model diminishes how the individuality of the designer, and the subjective responses of the wearer and viewer affect each other. In many respects, these are synergetic, mutually dependent and reciprocal. The Art Model understands the success of jewelry only as if the jewelry were sitting on an easel, not as it is worn. When jewelry is treated as an inanimate object, apart from when it is worn, then traditional art color theories would suffice and apply.
As a result, when the use of color is solely dictated by art theory, then color theories get oversimplified for the jewelry artist. “Value” is barely differentiated from “Intensity”. Color selection focuses too much on harmony and variety, and too little on resonance and edginess. Color training too often steers jewelry designers towards a step-by-step, paint-by-number sort of approach to color selection and application. Color theory seeks to explain the universal, and paintings, given that they are immobile, hung on a wall, give time and space for the viewer to experience these universals.
Jewelry, on the other hand, requires an understanding of how color can be adapted to more subjective experiences. It does not stay in the same place. It is not desired in the same way across individuals who view it and wear it. As such, the co-dependent relationship between Color and other Jewelry Design Elements is downplayed and glossed over. This is a major disservice.
Designers need to think of colors as building blocks, and the process of using colors, as one of Creative Construction. Creative Construction requires focusing on how color (and multiple co-existing colors) is (are) sensed, and sensed by various audiences which include the artist him- or herself, and the wearer and the viewer, and the exhibitor, collector, and the seller, if need be. Creative Construction also requires anticipating how color is sensed within those context(s) and situation(s) the jewelry will be worn. Creative Construction includes an ability to anticipate how the various audiences of the designer use color to assume, perceive, understand, express, value and desire jewelry within any context.
All jewelry designers, including myself, are challenged with tasks like controlling the presentation of color(s) along a jewelry object’s silhouette. Or in blending colors among fixed physical objects awkwardly aligning or misaligning within some positive and negative spaces. Or having two or more colors co-exist within the same space or form which may or may not harmonize, given the reality that beads and other jewelry objects do not come in every possible and desirable color, nor consistently express any particular color over their entire surface.
I have found the use of simultaneity effects especially useful here. The one I use the most is that of grays. Gray takes on the colors around it. If I line up an orange bead, then a gray bead, then a blue bead, the middle gray bead will create the perception of a blended orange to blue form. Any bead with an underlying gray or black tone, strategically placed, will accomplish some color blending otherwise problematic.
I often play with other simultaneity effects. Some colors in combination emphasize warmth, and others cold. A sense of temperature (for example a red square embedded within a white square vs. that same red square embedded within a black square) can sometimes be used to divert the mind’s attention from whether the colors correctly harmonize.
In a similar way, some colors in combination (example a yellow square within a black square vs. within a white square) can create the illusion of either projecting or receding, and this too can be used to divert the mind’s attention from whether the colors correctly harmonize.
In my pieces, you will often find colors which, if not used strategically in combination and placement, would not seem to go together. They don’t fit a color scheme. They do not perfectly conform to a mathematical algorithm. They might even clash. More often, however, they just seem off in some way. But by smartly using simultaneity effects, they feel whole, consistent, coherent, right in some way. But also intriguing as the viewer’s mind tries to make sense of them. The colors resonate and are edgy in some way, yet feel harmonious, and the viewers can never figure out why. I intentionally create an object which lacks inherent meaning in order to trap the viewer into trying to find inherent meaning. Fun stuff. And something which often draws the viewer’s attention to my pieces, and keeps their attention there.
I like to play with color proportions. There are ideal proportions of the presence of any two or more colors. Red should appear in equal proportions to green. There should be one orange for any two blues. In art, we would strive to achieve the perfect proportions. In jewelry design, however, I would want to play with imperfections in proportions to give an edginess to my piece. This edginess, if not gone too far, enhances how the jewelry resonates emotionally for the wearer or buyer. We want our jewelry to have a little bit of edginess, or else it may feel harmonious yet boring and banal.
I believe the jewelry designer needs to be able to apply the careful of consideration of color with the goal of evoking resonance in the viewer. Something beyond harmony. Something represented by the difference of the viewer saying I like it, from the viewer saying I want to wear it, or I want to buy it. The designer is here to perhaps emphasize a little bit of the absurdity in life, some playfulness, some inquisitiveness which result from tensions between order and chaos, meaning and meaninglessness.
The designer is there, in part, to challenge the viewer’s subjective interpretations. This is especially true as the jewelry is worn and the wearer moves from different situations, contexts, and lighting. The use of color in jewelry designer often fails when the designer merely tries to duplicate a perfect color scheme, given perfect lighting and no movement. Jewelry is not a painting or sculpture to be displayed in fixed position. It’s much more. Using color from the designer’s viewpoint, rather than of the artist, is a very useful tool.
All these and similar color tricks I use as a jewelry designer contribute to how my jewelry expresses and reflects my authenticity. They add the cachet to my pieces as contemporary. Uninhibited by social norms encapsulated in art theory rules for the use of color. Creating more of a sense of freedom in my pieces, a sense which affects the feelings of freedom the wearer has. Transcendence. A re-imagining. Revelation, connection, awakening.
That’s what my Rogue Elephant needs, wants, demands. In this chaotic and indifferent universe, that rogue-ness could not have it any other way.
_______________________________
I hope you found this article useful. Please consider sharing. Thank you for clicking the CLAP HANDS icon at the bottom of this article.
Sometimes I get so sick and tired of this question. I get perplexed. What does it really mean? What are people really telling me when they say I should follow my passion?
What job or career or avocation should I pursue? Do I have an intense interest in anything? Does anything drive me? Motivate me? Capture my undivided attention? What do I wish I would have done? Or should have done? Or could have done? Is something to do with design the answer? Passion! That word is spoken so often.
Follow your passion! Follow your passion! Follow your passion!
You get told this over and over again so many times that you begin to question whether anyone has ever really been successful, or even been substantially motivated, to follow their passions. Especially those people who tell you to do so — surely, they have not actually found their passion. It seems so hard to find. A good goal, but let’s get real. Insurmountable. There are lots of things I like and get very enthusiastic about, but I can’t say I’m passionate about them. And you can’t forget you have to earn a living, whether you are passionate about what you do or not.
You hear and read about finding your passion, so much so, that you feel if you haven’t found yours, something must be wrong with you. And, certainly you think no one else has, either. The pressure, the pressure. Why is it so important to my family and friends and my inner still voice that I be passionate about something?
Their admonitions take different tones, from command, to pleading, to expressing concern and sorrow, to lowering their expectations for you. You see / feel/ know what they are really trying to say to you — sympathy, empathy, pity — by those variations on the memes they throw at you.
You don’t have to make a decision about a career until you find your passion!
Don’t worry, you’ll find something to be passionate about!
Not everyone finds their passion.
You begin to feel like a failure in life for not finding your passion. Or that so-and-so you went to school with found theirs… and you didn’t.
The only way to stave all these folks off is to get a job that makes a lot of money. Pursuing money apparently is seen as a legitimate substitute for following your passion.
And that’s what I did.
For almost 40 years.
I pursued money.
Until I found my passion.
In my late 30’s.
My passion for design.
Specifically, jewelry design.
What Is Passion?
Passion, I have discovered over many years in the design world, is something key to a more fulfilling and successful career.
Passion makes sense for design.
Passion is an emotion.
Passion provides the fuel firing you to action.
Almost in spite of yourself.
Passion is often equated with determination, motivation, and conviction — all moving you in a particular direction. But these three concepts do not adequately capture what passion is all about. Passion challenges you. It is intriguing. It provides the principle around which you organize your life.
Passion is something more than a strong interest. Passion is a bit more energetic, directional. And when you want to change direction, emotionally, passion makes this very difficult. Passion is simultaneously a response somewhat divorced from any reason, but in the service of reason, as well. Once you have it, passion can be very sticky and hard to shake off.
Passion puts you to work. It helps you overcome those times when you get frustrated. Or bored. Or anxious.
Passion reveals what you are willing to sacrifice other pleasures for.
Passion is what helps you overcome those times when you get frustrated when something isn’t working out exactly as you want, or when you are anxious about your ability to do something, or you get bored with what you are trying to do at the moment.
But passion is somewhat amorphous. Intangible. Not something solid enough or clear enough to grab and grip and get ahold of.
Is it Necessary To Have A Passion For Design?
In high school, I decided that my passion would be archaeology. I read books and articles about Middle East history and settlement patterns. I loved the idea of traveling. I loved history. I selected a college that had an excellent and extensive archaeology program.
That first fall semester, I took two archaeology classes. In one of these classes, week after week for 18 weeks, I sat through the examinations and resultant reports looking at the remains of a small grouping of houses in Iran. I saw the partial remains of some walls. An area the remains of which suggested it was a kitchen. And lots of dust and dirt and not much else.
The archaeological reports were each done by teams from different countries. From the scant evidence, the Russian report found the settlement to be communal and socialist. They based their conclusions on the positioning of the walls, the proximity of the kitchen area to the walls, and the remains mostly consisting of chicken bones. The German report found the settlement to be more democratic but still communal. Their evidence was based on the positioning of the walls, the proximity of the kitchen area to the walls, and the remains mostly consisting of chicken bones. And the American report found the settlement to be an early example of democracy and capitalism. Their evidence — can you guess? — was based on the positioning of the walls, the proximity of the kitchen area to the walls, and the remains mostly consisting of chicken bones.
I made a discovery in myself and about myself that first semester of college. Archaeology was not my passion. I changed majors. But still no passion.
I still yearned to be passionate about something, however. A goal. A Task. An activity. A career. Anything. My search took almost another 20 years.
Not having a passion did not affect my ability to work and do my job. But I felt some distance from it. Some disconnection. Something missing and less satisfying.
While it took me a long time to find my passion, for others it happens very quickly. You never know. In either case, passion is not something that falls down from the sky and hits you on the head. It is something that has to be pursued, developed and cultivated over time.
Pursuing your passion has many advantages. When you are passionate about something, you can more easily accomplish things which are difficult and hard. Your work and job and life feel more fulfilling. You feel you are impacting the world around you.
A passion for design enables you to become the best designer you can be. It builds within you a more stick-to-it-iveness, while you develop yourself as a designer over many years, and as you learn the intricacies of your trade and profession. Having a passion for design is a necessity if you are to come to an understanding of yourself as a professional practicing a discipline.
Passion gives us purpose. It attaches a feeling to our thoughts, intensifying our emotions. It is transformative. Empowering. Passion allows us to realize a vision within any context we find ourselves.
A passion for design allows us to navigate those tensions between the pursuit of beauty and the pursuit of functionality. It allows us to incorporate the opinions and desires of our clients into our own design work, without sacrificing our identities and integrities as designers. In a sense, it allows our design choices to reaffirm our ideas and concepts, tempering them with the needs, desires, and understandings of our client and the client’s various audiences. It allows us, through our design decisions, to manage the vagaries in any situation and, ultimately, to get the professional recognition we seek.
Where Did My Passion Come From?
It was always just a whispered aside. Something quiet. A glance in one direction, then back so no one would notice. A comment. And the only comment ever said out loud. But hushed. Always and only in that hushed voice. A voice conveying alarm. Embarrassment. Bravery. Humiliation. Horror. Survival. History. Culture.
“She has a number tattooed on her arm. Did you see it?”
And I had. It was difficult to hide. Everyone spoke with so many gestures and drama, whatever the subject, and the sleeves pulled up on their arms.
And not another word was said about it. It — the situation. The larger situation. I never knew their specific experiences. Nor their views. Nor their feelings. Nor their understandings.
They never shared their terror. Or spoke about their anxiety. Or explained what they thought had happened, or how they had managed to survive.
I could not see anything in their faces. Or their eyes. There was nothing different about their skin. Their height. Their weight. The way they walked. Or talked.
There were those in the room who escaped to America during or immediately after the war. There were those in the room who had escaped similar horrors, but many decades earlier, fleeing Poland and Russia and the Middle East. There were their children. And there were their children’s children, I being one of them.
And while I was only 4 or 5 or 6 years old, I remember the collective feeling — even 60 years later — of the hushed voice and the tattooed numbers. I was never privy to any person’s history. I never heard about anyone’s experience. It was inappropriate to talk about it. But that one memory conveyed it all. The full story. It sparked my curiosity. I had to make sense of things. I wrote the full story in my mind. And attached all the full emotions.
My curiosity grew and drove me to make sense of a lot of things as I grew up. Eventually, I found myself curious about jewelry, and began making jewelry. As many of my creations were less than satisfying and successful, I found myself more curious about design. And more emotionally attached to finding answers. My passion grew from there.
Passion Starts With Curiosity
It is the little things that come up every so often that imbues a curiosity in you. That makes you want to make sense of the world. Find understanding. Make sense of things where you do not know all the details. Or where things are headed. But you fill in the blanks anyway. And keep asking questions. To clarify. To intensify. To soften. To connect with other stories your curiosity has led you to.
Passion starts with curiosity. But not just curiosity. Passion is sparked by curiosity, but goes further. It creates this emotional energy within you to make meaning out of ambiguity. For passion to continually grow and develop, such derived meaning must be understood within a particular context, and all the people, actually or virtually present, who concurrently interact with that context, and your place in it.
Passion involves insights. Passion is about finding connections. Connections to insights and meanings. Connections to things which are pleasing to you. Connections to things which are contradictory. Connections to things which are unfamiliar or ambiguous. Connections to others around you. And finding them again. And reconnecting with them again. And again and again.
Passion requires reflection. It demands an awareness of why you make certain choices rather than others. Why particular designs draw your attention, and others do not. Why you are attracted to certain people (or activities), and others not.
Passion affects how you look at things and people. It is dynamic. It is communicative. It affects all your interactions.
Passion is not innate. You are not born with it. It is not set at birth waiting to be discovered. It is something to find and cultivate.
The elemental roots of my passion were present at a very early age. I was very curious. I tried to impose a sensibility on things. While I wanted people around me to like me, that wasn’t really a part of my motivation. I wanted people to understand me as a thinking human being. And I was always that way.
In some respects, this situation when I was around 5 years old has been an example of the root of my passion. My jewelry designs resonate with that hushed, quiet voice. That voice conveys my intent through the subtle choices I make about color and proportion and arrangement and materials and techniques. I usually start each design activity by anticipating how others will come to understand what I hope to achieve. How they might recognize the intent in my designs. How my intent might coordinate with their desires.
My jewelry design pushes limits. It seeks to find the strengths in materials and techniques and leverage them, while minimizing any weaknesses. Passion sustains the energy it takes to push limits.
My jewelry designs tell stories. They tell my stories. They tell my stories so that other people might be a little curious as well and connect with them. And understand my passion for design.
Are Passion and Creativity the Same Thing?
As designers, we bring our creative assets to every situation. But we must not confuse these with the passion within us. Passion and creativity are not the same thing. We do not need passion to be creative. Nor do we need passion to be motivated to create something.
Passion is the love of design. Creating is making an object or structuring a project.
Passion is the love of jewelry. Creating is making a necklace.
Passion is the love of color. Creating is using a color scheme within a project.
Passion is the love of fashion. Creating is making a dress.
After college, I had some great jobs. Lots of creativity. Not much passion.
I was a college administrator for a year. I was hired to organize the student orientation program. As new students arrived at the university in the fall, I created social activities, like dances and mixers and discussions. I arranged for greet and meets in each of the dorms. I worked with each club to generate their first meetings and some of the marketing materials. I set up religious orientations and services for Jewish, Christian and Islamic students. I set up orientations for women’s affinity groups, black groups, latino groups, and many others. I wrote, photographed and published an orientation handbook and a new faces book. I even planned the food services menus for the first week. I did a lot. I loved it. It was very creative.
But not my passion.
I also had an opportunity to become the Assistant Editor of the American Anthropologist for a year. The regular Assistant wanted to go on a sabbatical. The Editor knew me and asked if I wanted to do her job for a year. I edited and saw to the publication of 2 ½ issues. I worked with anthropologists all over the world in helping them translate their work into publishable articles. I loved this job too. I did a lot. It was very creative.
But not my passion.
I decided to pursue a degree in City and Regional Planning. I was getting an inkling that I liked things associated with the word “design.” I liked the idea of designing cities and neighborhoods and community developments. I was intrigued with transportation systems and building systems and urban development.
I was about to enter graduate training in City Planning, which meant moving from where I lived, but a family crisis came up. Physical planning — buildings, cities, roads, neighborhoods — had captured my interest. But I resigned myself, in order to accommodate family needs, to attend a graduate program close to home which emphasized social and health planning, instead.
I got a job as a city health planner, and worked for a private revitalization agency. I assisted in getting government approval for a rehabilitation center. I developed a local maternal-child health system. I guided a group of health care professionals in developing a health care plan for New Brunswick, New Jersey. I organized a health fair. I loved this job. I did a lot. It was very creative.
But not my passion.
As I have come to believe over many careers and many years, the better designer needs both passion and creativity. They reinforce each other. They accentuate. When both are appropriately harnessed, the joys and stresses of passion fuel creativity, innovation and design. Passion inspires. It is insightful. It motivates. Creativity translates that emotional imaging and feeling into a design. Creativity is opportunistic. It transforms things. It generates ideas. It translates inspirations into aspirations into finished projects.
The design process usually takes place over an extended period of time. There can be several humps and bumps. Passion gets us through this. It is that energizing, emotional, motivating resource for creative work. Passion is that strong desire and pressing need to get something done. Passion helps us, almost forces us, in fact, to build our professional identities around that activity we call design.
Passion reveals an insatiability for self discovery and self development. But this sense of self is always contingent upon the acceptance of others. Sounds a lot like the design process and working with clients. You don’t need to be passionate to do design and do it well. You need passion to do design better and more coherently. You need passion to have more impact on yourself and others.
How Is Your Passion For Design Developed?
I continued working in the health care field, teaching graduate school, doing consulting, government health policy planning, and, my last professional job, directing a nonprofit membership organization of primary health care centers.
Working in health care had become such a hollow experience for me, that I jumped off the corporate ladder when I was 36 years old. With a partner, we opened up a retail operation, in Nashville, Tennessee, where we sold finished jewelry, most of it custom made, as well as selling all the parts for other people interested in making jewelry themselves.
Originally, my partner was the creative one, and the design aspects of the business were organized around her work. I was the business person. I made some jewelry to sell, but my motivation was purely monetary. No passion yet.
During the first few years, it was painfully obvious that my jewelry construction techniques were poor, at best. The jewelry I made broke too easily. This bothered me. I was determined to figure out how to do it better.
This was pre-internet. There were no established jewelry making magazines at that time. In Nashville, there was a very small jewelry / beading craft community. No experience, no support. So I did a lot of trial-and-error. Lots of experimentation.
In these early years in our retail jewelry business, two critical things happened which started steering me in the direction of pursuing my jewelry design passion.
First, our store was located in a tourist area near the downtown convention center. Many people attending conventions lived in areas, especially California, where there were major jewelry making and beading communities. They shopped in our store, and from watching their shopping behaviors, seeing what they liked and did not like, and talking with them, I learned many insights about where to direct my energies.
Second, I began taking in jewelry repairs. It became almost like an apprenticeship. I got to see what design choices other jewelry makers made, and I looked for patterns. I got to see where things broke, and I looked for patterns. I spoke with the customers to get a sense of what happened when the jewelry broke, and I looked for patterns. I put into effect my developing insights about jewelry construction and materials selection when doing repairs, and I looked for patterns.
No passion yet, but I took one more big step. And passion was beginning to show itself on the horizon.
I was developing all this knowledge and experience about design theory and applications. Suddenly, I wanted to share this. I wanted to teach. But I wanted to have some high level of coherency underlying my curriculum. My budding passion for design saw design as a profession, not a hobby. I did not want to teach a step-by-step, paint-by-number class. I wanted to teach a way of thinking through design. I wanted my students to develop a literacy and fluency in design.
I inadvertently cultivated my passion for design over time. I did not really follow one. It was a journey. My passion for the idea of design did not necessarily match a particular job. I coordinated it with the job I had been doing. And over time, my job and my passion became more and more intertwined and coherent. For me, it was a long process. I honed my abilities. I leveraged them to create value — personal satisfaction and some monetary remuneration. My passion became my lifestyle. My lifestyle resonated with me.
Passion involves deep introspection. It requires you to be metacognitive — always aware of the things underlying your choices. It requires talking with people and testing out how different ideas or activities resonate with you. What do you care about? What changes in the world do you want to make? What is driving you? What if this or that? Are you willing to give up something else for this? Would people respect me if…?
During this journey, you will systematically test your assumptions about what you think your personal sense of purpose should be. For the most part, there may not be a single answer or one that will last forever. But you reach progressive levels of clarity which give you a sense of direction and fulfillment.
As a designer, it is more important to focus on personal connections represented in your passion, rather than on creating some material thing. You can steer your job to spend more time exploring the tasks you are passionate about and the people you like to share your passion with. Look for inspirations. Reflect on what you care about. It is a good idea to know yourself as a designer and why you are enthusiastic about it. Self-discipline and management go hand-in-hand with passion so that you maintain perspective and continue to create designs. You won’t necessarily love everything you do, but your passion will keep you motivated to do it.
It’s a cycle of self-discovery. But don’t sit around waiting for the cycle to show up and start rotating. Keep trying new things. Exploring. Taking charge of your life. Revisiting things which interested you when you were younger. Thinking about things you never tire of doing. Thinking about things you do well. Recognizing things you like learning about.
What Are The Characteristics of a Passionate Designer?
A prominent country music star and her six-person entourage entered my store. They had heard about our jewelry design work, and were eager to see what we could make for the singer.
She had some specifics in mind. A necklace. It had to be all black. She wanted crosses all around it. Each cross had to be different. Each cross had to be black.
We accepted the challenge.
We began laying out some different ideas and options on the work table. The singer said No! to each idea. The entourage chimed in like a Greek chorus. (Admittedly a little weird and unnerving.) We weren’t really getting anywhere, so we set another meeting date. We would put together more options, and get their opinions. Agreed.
The color of black was easily accomplished. We could string black beads or use black chain or black cord. It would be a challenge to find or design a lot of black crosses, but not impossible.
We put in a lot of hours gathering materials and developing some more prototype options.
The second meeting was no more fruitful than the first. The artist and her entourage could offer no additional insights about what they wanted. Our mock-ups were unacceptable.
We ended the meeting.
We were not, however, going to throw in the towel. Our passion would not let us.
In fact, we were intrigued by the puzzling puzzle put before us. Our passion energized us to continue the chase and find the solution.
We decided we needed more information about why this country music artist wanted this necklace, what outfit and styling she would wear it with, and why an assortment of differing black crosses was important to her.
We put on our anthropology, psychology and sociology hats and played Sherlock Holmes. We approached members of her entourage individually. Her entourage was made up of her stylists. We were able to fill in a lot of the blanks by talking with them. She was going to wear this piece on the road, performing in several concert venues. We got into some discussions about her religion, more specifically, how she practiced it. The best way to describe this was a pagan-influenced Christianity. We had enough information to go by. This was particularly important in picking out crosses, and arranging them around the necklace.
They loved our prototype, and we only had to do a little tweaking.
Three Types Of Passions For Design
It took awhile, and it was always confusing, but I came to realize that not everyone’s passion is the same.
Some designers are passionate about making things. This designer’s passion is focused on an activity. They believe it is possible to make something out of nothing. Designers do, see, touch, compose, arrange, construct, manipulate. This passion is very hands-on and mechanical. Its drive is orderly, methodical, systematic, and directional.
Other designers are passionate about beauty and appeal. They believe it is possible to do whatever it takes to create or develop something of beauty. Designers select, feel, sense, compose, arrange, construct, manipulate. This passion is very emotional and feeling. Its drive follows the senses, the intuitive, the inspiration with an eye always on the ultimate outcome — beauty and appeal.
Still other designers are passionate about making things make sense — coherency. This designer’s passion is focused on resolving tensions, typically between the need for beauty concurrently with the need for functionality. They believe it is possible to resolve these tensions. Designers think, analyze, reflect, organize, present, resolve, solve. This passion is very intellectual. Its drive is meaning, content, sense-making, conflict resolution and balance. This is the type of passion that drives me.
How Does Being Passionate Make You A Better Designer?
I discovered that not every professional designer is passionate about what they do. Nor do they have to be in order to do a good job and make money.
It is not necessary to pursue your Rogue Elephant in order to do a good job. Part of me hopes that such pursuit is a necessity toward this end, but, alas, it has become clear to me that it is not. And pursuing your Rogue Elephant does not solve any problems at work — the stresses, the difficult interpersonal relationships, the need to find people to pay you for what you do.
Instead, Rogue Elephants guide you to better resolve problems. They make the work extra special. The work becomes less a job, and more a process of continual growth and self-actualization. Pursuing your Rogue Elephant helps you more easily clarify the ambiguous and unfamiliar. More readily overcome obstacles. Assist you in finding that sweet spot between fulfilling your needs and intents, and meeting those of others who work with you, pay you for what you do, critique, evaluate and recommend you.
Having a passion for something, that is, pursuing your Rogue Elephant, does not equate to having a professional career. Careers don’t necessarily happen because you have a passion for them. But it is great to have your career and passion co-align. This imbues you with the freedom to create your own meaning and purpose as reflected in the jewelry you design. Deeper thinking. Liberating. Breaking out of the confines of everyday living. Fully engaged. Your authentic self. Confronting the questions about your existence. You are more ready and able to pursue your design without compromise. Expressing your emotions and experiences through design.
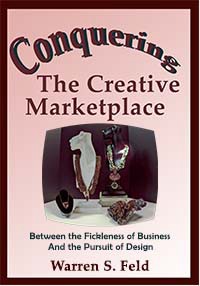
CONQUERING THE CREATIVE MARKETPLACE: Between the Fickleness of Business and the Pursuit of Design
How dreams are made between the fickleness of business and the pursuit of jewelry design
This guidebook is a must-have for anyone serious about making money selling jewelry. I focus on straightforward, workable strategies for integrating business practices with the creative design process. These strategies make balancing your creative self with your productive self easier and more fluid.
Based both on the creation and development of my own jewelry design business, as well as teaching countless students over the past 35+ years about business and craft, I address what should be some of your key concerns and uncertainties. I help you plan your road map.
Whether you are a hobbyist or a self-supporting business, success as a jewelry designer involves many things to think about, know and do. I share with you the kinds of things it takes to start your own jewelry business, run it, anticipate risks and rewards, and lead it to a level of success you feel is right for you, including
· Marketing, Promoting, Branding: competitor analysis, developing message, establishing emotional connections to your products, social media marketing
· Selling: linking product to buyer among many venues, such as store, department store, online, trunk show, home show, trade show, sales reps and showrooms, catalogs, TV shopping, galleries, advertising, cold calling, making the pitch
· Resiliency: building business, professional and psychological resiliency
· Professional Responsibilities: preparing artist statement, portfolio, look book, resume, biographical sketch, profile, FAQ, self-care
SO YOU WANT TO BE A JEWELRY DESIGNER Merging Your Voice With Form
So You Want To Be A Jewelry Designer reinterprets how to apply techniques and modify art theories from the Jewelry Designer’s perspective. To go beyond craft, the jewelry designer needs to become literate in this discipline called Jewelry Design. Literacy means understanding how to answer the question: Why do some pieces of jewelry draw your attention, and others do not? How to develop the authentic, creative self, someone who is fluent, flexible and original. How to gain the necessary design skills and be able to apply them, whether the situation is familiar or not.
The Jewelry Journey Podcast “Building Jewelry That Works: Why Jewelry Design Is Like Architecture” Podcast, Part 1 Podcast, Part 2
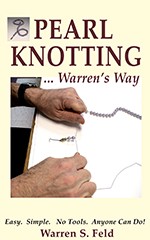
PEARL KNOTTING…Warren’s Way Easy. Simple. No tools. Anyone Can Do!
I developed a nontraditional technique which does not use tools because I found tools get in the way of tying good and well-positioned knots. I decided to bring two cords through the bead to minimize any negative effects resulting from the pearl rotating around the cord. I only have you glue one knot in the piece. I use a simple overhand knot which is easily centered. I developed a rule for choosing the thickness of your bead cord. I lay out different steps for starting and ending a piece, based on how you want to attach the piece to your clasp assembly.
SO YOU WANT TO DO CRAFT SHOWS:16 Lessons I Learned Doing Craft Shows
In this book, I discuss 16 lessons I learned, Including How To (1) Find, Evaluate and Select Craft Shows Right for You, (2) Determine a Set of Realistic Goals, (3) Compute a Simple Break-Even Analysis, (4) Develop Your Applications and Apply in the Smartest Ways, (5) Understand How Much Inventory to Bring, (6) Set Up and Present Both Yourself and Your Wares, (7) Best Promote and Operate Your Craft Show Business before, during and after the show.
Translating thoughts, feelings, emotions into color, form, structure. Can never get enough of this. But where does all this creativity come from?
I remember in college — way back when — I took a physiological psychiatry class with a professor name Ina Samuels. Dr. Samuels was one of my mentors. She discussed what was new-thinking then, how the brain is this self-actualizing entity. Thoughts reside less in certain defined areas of the brain, and are more a collection of organized chemical-electrical pathways traversing the brain, all around and within it. Memories are more defined pathways that get traversed a lot.
The brain has the ability to invent, and re-invent itself. It is self-stimulative. The brain pleasures itself with creative thoughts over and over and over again each day. Sexy. Sensual. The act of creating is almost masturbatory. The brain discovers, organizes, reinforces and remembers.
Of course, I did not wax so eloquently on my final exam in Dr. Samuel’s class. She gave me a C, and I was embarrassed to have performed so poorly. I got carried away with creatively building upon my understanding of neural pathways, synapses, and thinking — too much so, that my thoughts were way off course. I carried the discussion to mechanics of three way connections and power boosters and revolving tracks — all ideas never before expressed in texts or classes or on final exams.
Yes, I let my creativity carry the day. While it didn’t earn me a good grade at the time, it sure was fun. To be wrapped up in my insights, imaginations, and good ole fashioned, solid in an organizing way, brain sex.
But when you think jewelry and speak jewelry and work jewelry, this is what you have become. This is your purpose.
Becoming a Jewelry Designer is exciting. With each piece, you are challenged with this profound question: Why does some jewelry draw people’s attention, and others do not? When designers turn to how-to books or art theory texts, however, these do not uncover the necessary answers. They do not show you how to make trade-offs between beauty and function. Nor how to introduce your pieces publicly. You get insufficient practical guidance about knowing when your piece is finished and successful. In short, you do not learn about design. You do not learn the essentials about how to go beyond basic mechanics, anticipate the wearer’s understandings and desires, or gain management control over the process.
So You Want To Be A Jewelry Designer reinterprets how to apply techniques and modify art theories from the Jewelry Designer’s perspective. This very detailed book, by jewelry designer Warren S. Feld, reveals how to become literate and fluent in jewelry design.
Section 1-JEWELRY BEYOND CRAFT, p. 19 1. Jewelry Beyond Craft, p. 21
Section 2-GETTING STARTED, p. 27 2a. Becoming the Bead Artist and Jewelry Designer, p. 29 2b. 5 Questions Every Jewelry Designer Should Have An Answer For, p. 39 2c. Channeling Excitement, p. 51 2d. Developing Your Passion, p. 65 2e. Cultivating Practice, p. 79
Section 3-WHAT IS JEWELRY, p. 97 3. What Is Jewelry, Really?, p. 99
Section 4-MATERIALS, TECHNIQUES AND TECHNOLOGIES, p. 113 4a. Materials — Knowing What To Know, p. 115 4b. Techniques and Technologies — Knowing What To Do, p. 143 4c. Mixed Media, Mixed Techniques, p. 175
Section 5-RULES OF COMPOSITION, CONSTRUCTION, AND MANIPULATION, p. 179 5a. Composition — Playing With Blocks Called Design Elements, p. 181 5b. The Jewelry Designer’s Approach To Color, p. 197 5c. Point Line Plane Shape Form Theme, p. 231 5d. Jewelry Design Principles: Composing, Constructing, Manipulating, p. 253 5e. How To Design An Ugly Necklace — The Ultimate Challenge, p. 289 5f. Architectural Basics, p. 309
5g. Architectural Basics — Anatomy of a Necklace, p. 335 5h. Architectural Basics — Sizing, p. 343
Section 6-DESIGN MANAGEMENT, p. 349 6a. The Proficient Designer: The Path To Resonance, p. 351 6b. Jewelry Design: A Managed Process, p. 377 6c. Designing With Components, p. 387
Section 7-INTRODUCING YOUR DESIGNS PUBLICLY, p. 407 7a. Shared Understandings and Desires, p. 409 7b. Backward-Design Is Forwards Thinking, p. 437
Section 8-DEVELOPING THOSE INTUITIVE SKILLS WITHIN, p. 445 8a. Creativity Isn’t Found, It’s Developed, p. 447 8b. Inspiration and Aspiration, p. 459 8c. Your Passion For Design, p. 467
Section 9-JEWELRY IN CONTEXT, p. 483 9a. Contemporary Jewelry Is Not A Look — It’s A Way Of Thinking, p. 485 9b. Contemporizing Traditional Jewelry, p. 499 9c Fashion Style Taste Art Design, p. 513 9d. Designing With The Brain In Mind: Perception, Cognition, Sexuality, p. 523 9e. Self-Care, p. 535
Section 10-TEACHING DISCIPLINARY LITERACY, p. 543 10. Teaching Disciplinary Literacy In Jewelry Design, p. 545
Final Words of Advice, p. 579 Thank You, p. 581 About Warren Feld, p. 583 Other Articles and Tutorials, p. 587
In this very detailed book, with thoroughly-explained instructions and pictures, you are taught a non-traditional Pearl Knotting technique which is very easy for anyone to learn and do. Does not use special tools. Goes slowly step-by-step. Presents a simple way to tie knots and position the knots to securely abut the bead. Anticipates both appeal and functionality. Shows clearly how to attach your clasp and finish off your cords. And achieves that timeless, architectural perfection we want in our pearl knotted pieces.
Most traditional techniques are very frustrating. These can get overly complicated and awkward. They rely on tools for making and positioning the knots. When attempting to follow traditional techniques, people often find they cannot tie the knots, make good knots, get the knots close enough to the beads, nor centered between them. How to attach the piece to the clasp gets simplified or glossed over.
Fortunately, Pearl Knotting doesn’t need to be this hard.
Pearl Knotting…Warren’s Way teaches you how to:
· Hand-knot without tools
· Select stringing materials
· Begin and finish pieces by (1) attaching directly to the clasp, (2) using French wire bullion, (3), using clam shell bead tips, or, (4) making a continuous piece without a clasp
· Add cord
· Buy pearls, care for them, string and restring them, store them
By the end of this book, you will have mastered hand-knotting pearls.
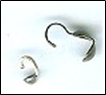
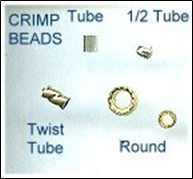
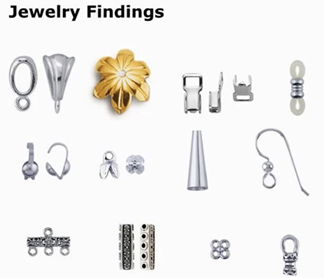
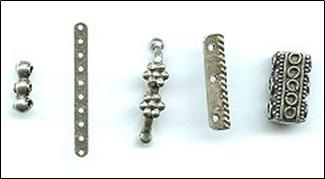
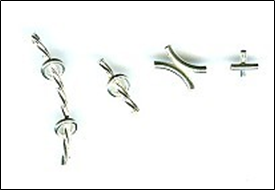
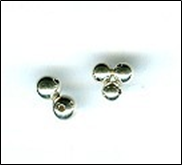
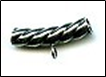
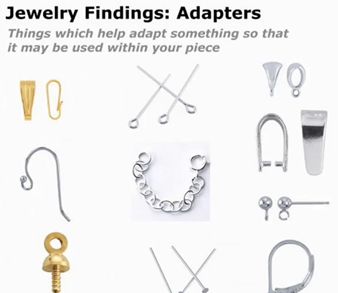
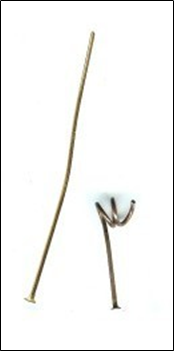
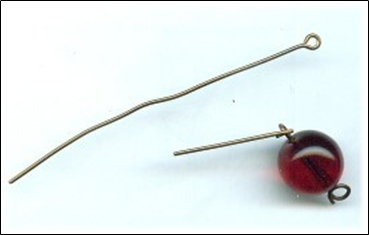
Choosing and Using Other Jewelry Findings:
Preparers
You have to approach the Jewelry Findings with a large measure of respect. “Jewelry Findings” are all the pieces that you use, including clasps, other than stringing materials and beads. They are called “jewelry findings”, because up until about 15 years ago, many of these pieces didn’t exist. People went to sewing notion stores, antique stores, flea markets, hardware stores, cannibalized old jewelry, wherever, and found things and made them work. Because many of these pieces are new, there is not a consensus on what some of these things should be called, so you have a lot of similarly looking pieces that go by different names. I’m sure over time, the name-game will shake out, and there will be more consistency.
Respect these jewelry findings. They are the pieces that get pulled and strained, torn at and squeezed, maligned and misused. These are the pieces that will make or break your piece of jewelry. Understand and respect them.
Many designers fail to make the full range of these pieces available to them. They either don’t know about them, or are afraid of them or think they might use them incorrectly. They too often limit their own design possibilities by relying on the same limited set of findings for everything they make. But the world of possibilities that these jewelry findings open up for us is endless.
Below is a list of other major jewelry findings used in bead stringing. I’ve tried to group them into three categories to make it a little easier to relate to.
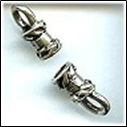
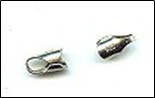
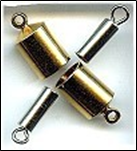
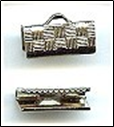
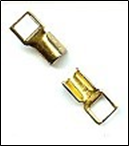
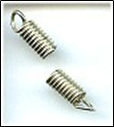
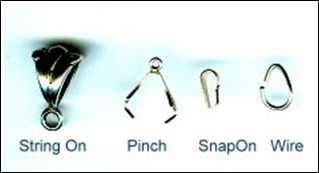
PREPARERS:
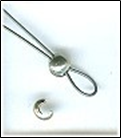
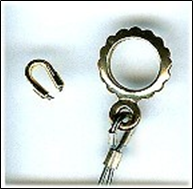
Things Which Prepare the Ends of Cords and Stringing Materials:
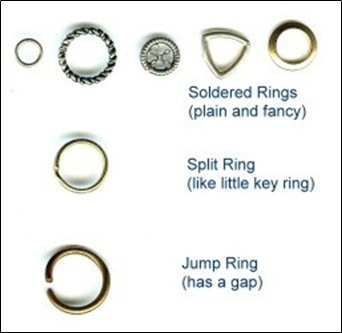
These kinds of jewelry findings are mostly used with thicker cords, like leather and waxed cotton, but also with cable wires. These enable you to create a “loop end” on each side of the cord or cable.
From the two loop ends you have created on each end of your cord, you then continue to create the rest of your clasp assembly. If the loop is big enough (to give you jointedness), or looks substantial enough (like it won’t break from movement), you can attach the clasp directly to the loop. If not, you will want to attach your clasp/ring to jump or split rings, and these, in turn, to your loop ends.
You usually try to match the size of the interior opening on the jewelry finding to the thickness of your cord or cable. For some of these pieces, this match is more important than others.
You always put some glue on your cord or cable before you stick them into the piece. You use glue because all these cords are oily, and some will sweat, as well. They will slip out of the findings — even with tight crimping or clamping — because they are slippery. That’s why you use glue.
I recommend using a glue like E6000 or Beacon 527. Don’t use super glue. Super glue (or the jeweler’s version called G-S Hypo Cement) dries like glass, so the bond will shatter like glass, because all jewelry moves. Also, after it shatters, the bond looks like a broken coke bottle. E6000 and Beacon 527 dry like rubber, so they act as a shock absorber, when the jewelry moves.
CRIMP ENDS
These come very fancy or plain. They come with a small opening to use with cable wires, and wider and wider openings to use with leather or waxed cotton, or even braided leather.
These pieces have a loop at the end of a tube. The tube has 3 bands. The first and third are decorative. The center band is meant to be crushed and crimped. You put some glue on the cord or cable — any glue except super glue — stick it into the tube, and take a pliers and crush the center band as flat as you can get it.
When you crush the middle band, visually, it looks like it is part of a pattern of beads. It doesn’t look like an ugly crushed piece of metal.
Some crimp ends come with a hook, so that you attach a loop on one end and the hook on the other, to create a hook and eye clasp.
These and clamps (see below) work best for preparing the ends of cable wires and thicker cords. Crimp ends tend to be on the pricier side; clamps are very inexpensive. Both hold well, relying on both the glue and the crimp.
CHAIN/CORD ENDS
These pieces have a loop at the end of a split tube. For chain, these are soldered on. For cords or cable, you put some glue on (again never super glue), stick it into the split tube, and take a pliers and crush snug, NOT flat. What’s holding these on is the glue. If you crush flat, you lose the bond. Should tightly match cord thickness to interior diameter.
We need to crush snug because we want the glue to adhere to all the interior surfaces. If there are any gaps where the glue has not adhered, the bond will break.
These are terrible pieces, because it is difficult to achieve that perfect bonding with the glue.
END CAPS
These pieces come in just a few sizes, but many designs. Those pictured are very industrial looking, but they come very decorative, as well. Some pieces have a hole at the end instead of a loop and are labeled “end caps,” but technically, these should be called either a cone or a bead cap. Usually, the interior opening size of the end cap will be listed, such as ID=6mm or ID=8mm or ID=12mm. You coordinate this with the width of whatever you are trying to slip into the end cap. But because of the shape of the end cap, there still may be fit issues.
These pieces have a loop at the end of a hard metal tube. The loop is either an eyelet or a fixed loop. You put some glue (not super glue) on cord or cable and stick in. The glue is all that holds. Should tightly match cord thickness to interior diameter.
Because it is important, for the bond to hold, to get the glue to adhere to all the interior surfaces, and you cannot crush the ends snug, you need to put a lot of excess glue on the cord when you stick it in. And you need to be prepared to wipe away the excess glue that bleeds back out.
You never attach your clasp directly to these pieces. You need an additional intervening ring — jump ring or split ring or soldered ring — between the end cap and your clasp component.
CLAMPS Ribbon or Bar Clamps:
These clamps are folded metal with a loop in the center edge, come in different lengths, and have teeth. These are for ribbons or fabric. You don’t use glue, because the glue will bleed into the ribbon or fabric.
You fold over the end of the ribbon or fabric, making the end pretty, and stick into the clamp, and use a pliers to crush firm. If your material is wider than the clamp you have, you would make several folds in the end, like you would when gift-wrapping a package.
Foldover or Wing Clamps:
These come in a few different sizes, some with square loops, some with round loops. Some have plain backs; some have patterned backs.
These typically are a loop on top of flat metal with two wings that fold over. You put some glue (not super glue) on the cord or cable, sit in the saddle between the two wings, and use a large pliers, and crush the two wings over each other and over the cord. Crush as flat as you can get it. This is not done in one movement because the wings are stiff and strong. You usually take your pliers and move then to one side, then the other, then back, until you get the two wing position over each other, and you can crush them flat.
One mistake people make with this piece is that they crush snug, not flat. Where the wings overlap each other, this leaves an air passage. Again, we want our glue to adhere to all the interior surfaces. If you crush snug, this air passage will weaken the bond, and your cord will pull out. You have to crush as flat as you can get it, to force the glue up into that air passage.
You can use one clamp for multiple strands, if you wish. You can seat multiple strands of cable wire or leather or whatever into the saddle of one clamp.
These and the crimp ends work the best for preparing the ends of cable wires and thicker cords. Crimp ends are pricier; clamps are cheap. Crimp ends have a design impact; clamps are very utilitarian.
COIL ENDS
Coil ends have an open ended loop at the top of a tightly wound coil. I don’t like the way these look after they are crushed onto the cord, and they don’t hold up well. One advantage is that the coil functions as a spring, and absorbs a lot of the excess force place on the piece, that comes from movement.
With coil ends, you put some glue, (but not super glue), on the cord, shove it into the coil. You take a chain-nose pliers and crush the first two rings of the coil onto the cord. If you crush too hard, you’ll slice the cord. If you don’t crush hard enough, the cord will pull out.
The way the loop was designed to work, was that you take a pliers, move the open ring to the side, slip on your clasp or ring, and, using the pliers, move the open ring to a closed position again. DON’T DO IT THIS WAY. When you move the loop back and forth, it breaks off easily. These loops are rather brittle. SO, the way you would use this, is that you would take a jump ring or split ring, and attach this to the loop and your clasp piece. As long as you don’t move this loop wire, it stays strong.
Coil ends come in two sizes in terms of the width of the interior diameter. If your cord is thicker than the smaller size, see if you can make it work with this smaller size, anyway. The larger size is more awkward to use. Say you had leather cord. You can take a single-edge razor blade and cut the end at an angle, put some glue on the cord, and shove it into the smaller piece.
BEAD CAPS
This is a decorative cup-like or bowl-like piece, with a hole in the center. This piece is originally used as a decorative element, to cover one or both sides of a bead, as you string your beads on. However, you can adapt this piece to be an end. You might have multi-strands, where you tie them all off together, and use the bead cap to hide the mess. You might have a bead crocheted rope, and again, use the bead cap to give your piece a decorative end. You glue the bead cap on. Then you take an independent wire or thread, attaching it to your piece about 2–3” from the end, and running it through your piece, through the cap, then finishing off the rest of your clasp assembly.
What’s nice here are that there are hundreds of styles, whereas the more typical jewelry findings look very utilitarian.
BELL CAPS
A bell cap is a bead cap with a loop on it. This is a decorative cup-like or bowl-like piece, with a loop sticking above the center. This piece is originally used to adapt something, like gluing it to the top of a crystal pendant or bead, to be a drop. But it can be adapted to use as a fancy end-cap. Use glue here. Attach the clasp assembly to an additional jump ring or split ring. Again, there are many, many decorative styles in bell caps, so you won’t have to rely on the typical and very plain specialized jewelry findings.
The arms on the bell cap are somewhat independent, and can be pushed into the shape of whatever piece they are attached to. So, for example, you can take a rough stone, position the bell cap at the top, push on the arms to shape them to the stone, then put glue on each arm and attach the bell cap to the piece.
BEAD TIPS (aka, KNOT-COVERS)
These pieces are used to hide knots. One style has a cup with a tongue attached. Another style ends with a loop, not a tongue. The most widely used style — Clam Shell Bead Tip (or double-cup) — has two half cups that close over the knot, and a tongue extending from one end. While some people use these pieces with cable wire, they are primarily designed for use with needle and thread.
These take some practice in learning how to use them. On the first side of your piece, you string on the bead tip, say the clam shell. You tie a bunch of knots in the tail, so your knot is bigger than the hole in the bead tip, and won’t slip out. Cut off the tail. Put a drop of glue on the knot. Here you would use something like superglue. Superglue will make the knot stiff, so it won’t pull through the hole. E6000 will make the knot rubbery, and it will be able to contort and work its way through the hole. Trim the tail. Press the two halves of the clamp together over the knot, so it looks like a bead. Take the tongue, fold it over and through the ring on your clasp, and back to itself, so it forms a loop.
On the other side of your piece, here’s the tricky part. You need to keep your tension on the thread, so the thread doesn’t show when you’re finished. You need to tie a bunch of knots, and complete the rest of the process. This is a 3-hand operation, but you only have 2 hands.
Here you slide the bead tip onto your thread. Use one hand to hold everything tight. Take an awl or a round nose pliers — something where the width graduates into a point, and put the tip where you want your finished knot to end up. Tie an overhand knot over the awl or pliers up high on the wider part of the jaws. Tighten the loop of this knot. Tighten the tension on your thread. Move the loop down the awl or pliers a bit, moving towards the narrow pointed end. Tighten this loop. Check your overall thread tension. Move the loop down a little bit more. Tighten this loop. Check your overall thread tension. When you loop gets to the tip of your awl or pliers, you need to pull your knot tightly, and push the awl or pliers out of the way, AND, you want to maintain the thread tension in your piece. Tie a bunch more knots. Put glue on the knot. Trim the tail. Close the clamp. Loop the tongue into the other part of your clasp. This takes about 5 tries before your body gets that muscle memory to do the task easily and correctly.
When I started in jewelry making, almost every piece used bead tips. I’m not a big fan of this type of piece today. The tongue when bent over to hook and secure the clasp is not jointed enough. It doesn’t leave a big enough loop, so there is tension and these tongues break off. Today, you can tie your piece to the clasp using knots, then slip a crimp cover over the knot, so it looks finished as if there were a bead there. This is both more secure and easier to do.
Some alternatives to tying a globular knot: (1) with needle and thread work, you can tie off an end to an 11/0 seed bead, and have your clam-shell enclose the seed bead, and (2) with cable wire, you can crimp on a crimp bead on the end of your wire, and have your clam-shell enclose the crushed crimp bead.
CONES
Cones come in many shapes and designs, but basically look like a megaphone. These are used to finish off the ends of jewelry, often to hide a lot of messy knots or unfinished ends inside the cone.
One style of cone is called a 3-to-1 cone (also, 2-to-1 up to 11-to-1). This is a flattened cone, with one hole on one side, and 3 holes on the other. This is supposed to help you finish off a 3-strand piece in a decorative way. You pull each of 3 strands through the 3 holes on one side, and out together through the one hole on the other side. For two of the strands, you tie a large knot or double-knot, cut off the excess tail, and let the knot fall back into the box of the cone. I’ve only known one person in my life who could accomplish this, and maintain sufficient string tension so that none of the cable wire showed on the other side of the cone and as part of the bracelet. For the 3rd string, you would continue creating your clasp assembly. This is a good piece in theory, but not practice. Most people end up tying the three strands into this big, globular knot, and then trying to finish off the clasp assembly, only to have the clasp assembly take up 25–30% of their finished bracelet.
Regular cones are used like lampshades to hide some ugliness. With the typical cone style — that megaphone looking piece, the way you are supposed to use this piece is as follows: You take a soldered ring, something small enough so that it will fit far enough back into the cone, that the cone will hide any of the finishing knots or ends. If we start with a 3-strand necklace, you would tie off each strand to one side of the soldered ring. Then you would take a separate, independent cable wire, hard wire or thread, whatever you are stringing with, and tie it off in a knot to the other side of the soldered ring, pull the whole works into the cone, with the stringing material coming out the narrow end. Then you would finish off your clasp assembly.
The soldered ring, in this case, acts as a “support system”, creating jointedness. Otherwise, without this ring or support system, the cone could not support the resulting stress and strain. Since all the pieces are metal — cable wire, cone, clasp, crimp — , and these would be too stiff and would not move easily, and, as you now know very well, when you bend metal back and forth, it breaks.
EYEGLASS HOLDER ENDS
A major category of jewelry are eyeglass leashes. You make an eyeglass leash by attaching an eyeglass holder end to the eyeglasses, making a string of beads, attaching the string of beads to a split ring, and attaching the split ring to the eyeglass holder end. You never attach the beadwork directly to the holder ends. Eyeglass leashes take a huge beating, as they are worn, and you need to create as much jointedness as possible, so you don’t ruin someone’s eyeglasses, have the lenses shift position within the frames, or have the leash break. In fact, we want to use a split ring — about 10mm or 12mm in diameter — that is a little larger visually than you might feel comfortable with.
Eyeglass leash holder ends are made from round rubber thong (usually black or clear), flat vinyl (usually black or clear), or elastic cord (comes in many colors). The round rubber thong is the most durable. Elastic cord is not durable at all. There are various style options. Most come with what is called a “coil center”. When the eyeglass leashes are worn, the rubber, vinyl or elastic cord sweats, both from the humidity found in the air, as well as the wearer’s own body sweat. Coil centers tend to slip, so these don’t work well with narrow arms on eyeglasses. Other eyeglass leashes come with a bead center, usually a 6mm glass roller bead. The beads don’t slip.
The ones with bead centers are a little more expensive than the ones with coil centers. One company bought the ones with the coil centers, slipped these off what is basically a rubber band, and slipped on a 6mm glass roller bead. They took a $0.45 cent piece and sold them for $4.00 a piece. People thought they were magic because the beads didn’t slip, so were willing to pay the premium. You can do the same thing. There are about 300 colors of roller beads, so you can personalize your line.
WATCH BAND COMPONENTS
These pieces are used to adapt watch faces so you can make beaded watch bands off them. They consist of a tube designed to slip over the spring bar on each end of a watch face, and some kind of loop or series of holes that come off the tube. Beaded watch bands have become so popular, that now you can purchase watch faces designed specifically to attach these to them.
CRIMP BEADS, CRIMP COVERS, and HORSESHOE WIRE PROTECTORS
Crimp beads come in many styles, sizes and finishes. These are used to secure cable wires to clasps. The crimping process involves crushing the crimp onto the cable wire, first separating the tail wire from the main wire, then creating a lock, and finally re-shaping it so it looks like a bead again.
Crimp Covers
These are U-shaped beads that slip over the crushed crimp. They are used like a lampshade to hide something that is ugly.
You attach the crimp cover in two steps. First, using the tips of your crimping pliers, you push the two sides of the U together, so you have a pretty bead. These are made of a soft metal, so you don’t want to push too hard, or you will crush them. After you get the two sides to meet, you’ll find that the lip on either side doesn’t meet up perfectly.
So, Second, at this point, you return the crimp cover to your crimping pliers, this time resting it between the top notches (thus, furthest from your hand) in each jaw. This will help preserve the roundness of the crimp cover as you manipulate it. Gently push the jaws to force the lips to meet more perfectly. You can slide crimp covers over your crushed crimps. You can also use these to slide over any knots, to hide the knots.
Horseshoe wire protectors
These serve several purposes. (1) It forces you to leave the correct size loop in the cable wire, so that you have the appropriate support system or jointedness. Without the loop, you would be pushing the crimp all the way to the clasp. This is a No-No. You never push the crimp all the way to the clasp — this creates stiffness with metal parts, and general movement would cause these to break.
(2) The horseshoe also makes the loop more finished looking — better than a bare-wire loop. Most people hate a bare, exposed loop. The horseshoe fools the eye/brain here, making it think that the loop is finished and more organically a part of the whole composition.
(3) The horseshoe prevents the cable wire from folding into a V over a period of time and wear. If the wire were to change from an arched loop to a V-loop, the wire then would more easily bend back and forth and break.
There are many choices to make when selecting crimp beads:
Crimp Beads
– tube vs. round
no difference in “holdability”, but most people prefer the tubes
– THE SILVER COLOR ISSUE: sterling silver vs. silver plated vs. silver plated crimp with sterling silver crimp cover vs. argentium silver crimps
Silver-plated crimps are usually plated over brass. Brass has a very high degree of integrity as a jewelry making metal. The plating wears off relatively quickly, and your crimps will look black — basically tarnished brass. More recently, these plated crimps have been plated over aluminum, which can break from the force of the crimping pliers.
Sterling softens at body temperature. If your crimp is resting on the wrist or the neck, there is some risk of it softening and weakening. This risk is minimal, however. If you’ve crimped correctly, you shouldn’t lose sleep over this. I prefer to use the sterling silver crimps; they are often made better than the other crimps.
You can also use a silver-plated crimp to crimp, and slide a sterling silver crimp cover over it.
Argentium has the same silver content as sterling but does not soften as easily at body temperature. These are a lot more expensive than sterling.
– crushing the crimp and re-rounding it vs. crushing, then using crimp cover
Some people don’ t like the look of the re-rounded crimp, or feel uncomfortable trying to re-round them. The crimp covers add about $0.50 — $1.00 more to each piece.
– plain tube vs. twisted tube
The twisted tubes (sometimes called Tornado or Cyclone crimps) are a little more expensive than the plain ones. When you crush the twisted tubes, they look decorative enough that you don’t have to re-round them. You definitely need to re-round the plain ones.
– Regular or long tube vs. short or half tube
Short tubes or half tubes are primarily used in pieces like illusion necklaces, where you have a cluster of beads, and the cord shows, another cluster of beads, the cord shows, etc. Half tubes are used on either side of the clusters to keep the beads in place. When you crush the half tube, the volume of space it takes up is not noticeable. When you crush the regular sized tube, its volume of space is too noticeable and detracts from the general look of the piece. One mistake people make with the short or half tubes, is that, when they use them to finish off the ends of jewelry, their mind tells them to use 2 or 3 of them so that they will “hold better.” A crimp is a crimp, and if you crimped correctly, there is no difference in holdability between the short and longer tubes. Each crushed crimp you add becomes like a little razor blade. All jewelry moves, so you’re increasing the chances, by using more than one crimp on each end, that one of these crimps will cut through the cable wire. One crimp on either end is enough.
– variations on quality/grade of crimp beads
Basically, you get what you pay for!
Here’s how crimp beads are made: You start with a sheet of metal. You roll the metal into a tube. You buff along the seam where the two sides meet, so that it looks like it’s been soldered together. However, there’s really a seam there.
So often, people come into our shop and tell sad tales of failed crimps and broken bracelets and necklaces. They blame themselves. They blame the pliers. But they never blame the crimp beads. In most cases, the crimp is at fault.
Cheap crimps, usually bought in small packages, usually at craft stores, are not made well. When you crush these, they tend to split along the seam. Sometimes you can see the split. Othertimes, you can’t quite see that the two sides of the tube have started to separate. Your cable wires pull out. Or your crimp edges have cut into the cable wire.
An A-grade crimp, usually costing about 3 times what the cheap crimps cost, can hold up to your initial crushing, as well as another 8 or so clamping down on it during the re-rounding process.
There are heavy-duty or A+ grade crimps. These run about 6–8 times what the cheap crimps do. You don’t have to worry about any splitting, no matter how much you work the crimp bead with your pliers.
– using 1 crimp on each end vs. using more than 1 crimp on each end
Using 1 crimp on each end of your piece is sufficient. Using more than 1 crimp on each end is too risky. Sometimes you mind, or your best friend, thinks that is 1 is good, 2 or more would be better. No! When you crush your crimp onto the wire, it becomes like a little razor blade. All jewelry moves, so your crimp is constantly trying to saw through the cable. Using more than one crimp on each end increases the chances that one will saw through. All you are doing is adding razor blades.
– size of crimp
Manufacturers are inconsistent in how they label the sizes of crimp beads. In general:
2mm is the average size For .014, .015, .018, .019 cable wires
1.5mm is small For .010 and .012 cable wires
2.5mm is slightly more than averg For .019 and .024 cable wires
3.0mm is large For .024 cable wires, or thicker cords, or bringing
more than 1 strand thru at a time
4.0mm and larger For thicker cords, or bringing 2+ strands thru
Choosing and Using Other Jewelry Findings: Controllers and Adapters
You have to approach the Jewelry Findings with a large measure of respect. “Jewelry Findings” are all the pieces that you use, including clasps, other than stringing materials and beads. They are called “jewelry findings”, because up until about 15 years ago, many of these pieces didn’t exist. People went to sewing notion stores, antique stores, flea markets, hardware stores, cannibalized old jewelry, wherever, and found things and made them work. Because many of these pieces are new, there is not a consensus on what some of these things should be called, so you have a lot of similarly looking pieces that go by different names. I’m sure over time, the name-game will shake out, and there will be more consistency.
Respect these jewelry findings. They are the pieces that get pulled and strained, torn at and squeezed, maligned and misused. These are the pieces that will make or break your piece of jewelry. Understand and respect them.
Many designers fail to make the full range of these pieces available to them. They either don’t know about them, or are afraid of them or think they might use them incorrectly. They too often limit their own design possibilities by relying on the same limited set of findings for everything they make. But the world of possibilities that these jewelry findings open up for us is endless.
CONTROLLERS: Things Which Control the Positioning of Pieces or Sections within Your Piece:
SEPARATOR or SPACER BARS
These are multi-hole pieces that are used to keep multi-strand pieces neat and organized. In a bracelet you might use 3–5, spaced evenly along the length of the piece. In a necklace, you might use 5–7, spaced evenly along the length of the piece.. Some of these pieces are very narrow and meant to be “hidden”. Others have a decorative edge that will be seen as part of the overall design. Separators with a broad surface are referred to as Separator Boxes.
END BARS (can also be used for making earring dangles)
These pieces are basically a bar, with one centered loop off one side, and multiple loops off the other. For a 3-loop end bar (which has 4 loops — 1 centered on one side, and 3 on the other) you would finish off a 3-strand piece on the one side, and then use the single loop on the other side to begin your clasp assembly. The bar can be plain, or very decorative. The bar can be straight, curved, or zig-zagged.
On an earring, with the bar positioned horizontally, you can dangle these one from the other, and create a neat cascading effect with dangles.
These come plain, as well as very decorative.
CONNECTORS and LINKABLES
There is a sub-family of jewelry findings originally called “Connectors”, and more recently referred to as “Linkables”. [The word “connectors” didn’t seem to resonate with customers, so they are trying “linkables”, which also doesn’t particularly resonate, because people are unfamiliar with most of these types of parts. That’s unfortunate, because connectors and linkables open up myriad design possibilities.]
Connectors or linkables are pieces that either have a lot of holes in them, or have multiple loops that come off them. They enable the designer to create segments or sections of beads, which are then connected to each other. They enable the designer to re-direct the flow or pathway of the piece, or to start new pathways/directions off the original piece. They allow you to create support systems within your pieces which are very attractive, appealing, and create a higher level of interest on the part of both viewers and wearers.
The most basic connectors or linkables are rings of various sorts.
Jump rings have a gap or split in them. Split rings are like little key rings, in which the wire of the ring goes around twice. Soldered rings or stamped solid rings have no gaps whatsoever.
In making a choice among these, you would first try to use a soldered or stamped solid ring. If this won’t work, because you have to make some kind of jump, your second choice is a split ring. If this won’t work, either functionally or sometimes from a visual-appeal standpoint they are not appealing, you would use a jump ring.
To open and close a jump ring, you move the wire ends, on either side of the gap, sideways just a bit, so that you have an opening wide enough to slip over whatever you need to slip them over on. You never pull the wires out and in, just back and forth. After you have connected your pieces to your ring, you close the ring by moving the two ends side to side until the two ends meet. If you have difficulty doing this with your fingers, or the aid of a chain nose pliers, you can purchase a jump ring pliers. With the jump ring pliers, you close the jump ring as best as you can with your fingers. Then you put the jump ring between the jaws of these pliers, and squeeze to close perfectly.
Bead Attach Rings
These are two rings soldered together, one small and one larger. These are primarily used in beaded charm bracelets. If you strung your charms on with your beads, they would get locked between the beads, and not flow freely. Instead, you string on your beads, and string on (through the smaller hole) a bead attach ring, everywhere you want to place a charm. Then you attach the charms, usually using a jump ring or split ring, to the larger hole.
Rosary and Y-Necklace Components, and other multi-hole or multi-loop pieces (see above) let you segment your pieces, or take the strings in different directions.
Beads
There are some beads that are considered a part of the Connector or Linkable family.
Double beads are either tubes that are soldered together so that the directions of the tubes are different, or you have a tube with one or more rings soldered along its length.
Say you have two tubes soldered together, and one is curved to the left and the other to the right. You take two strings, one through one, and the other through the other tube, add some beads to both, add another 2-tube-double-bead, to twist the strings in the opposite direction, add more beads to each string, another double bead, and so forth. You end up with a bracelet or necklace that looks somewhat like a DNA-strand (double helix).
Say you have a twist tube with two loops soldered to it, one near the top, and the other near the bottom. You can take two of these, and make a long necklace, with one tube+loops positioned on the left side, and a second one positioned on the right side. The wire of this necklace is strung through the tubes. Next, you take another stringing wire from the top loop on the left side and the top loop of the other tube+loops bead on the right side, and make a strand of beads across the chest. Do this again, attaching the lower loops from left to right. You end up with a necklace that also has two strands going across the chest.
Twister beads are round beads that are soldered together, so that the holes go in different directions. Usually these come as two soldered beads or three soldered beads. You place these in 2-strand or 3-strand necklace or bracelet, at each point you want the strands to cross over each other.
The traditional way to make a twist necklace or bracelet is to take two end bars, and attach the strands in the following way:
Twister beads come in handy because problems arise when these multiple strand pieces are done the traditional way and are worn. First, if you flip one of the end bars over to its other side, you lose the twist as you envision it. Second, when people wear these pieces, they often don’t twist at the points you envisioned, either.
By using two twister beads — in this case, a twister bead comprised of 2 beads soldered together — in the example, the piece will always twist in the way the artist envisions.
Tubes with loops.
These are basically a tube with a loop soldered off the middle. You string these on everyone wherever you to add a drop or pendant to your piece.
ADAPTERS: Things Which Help Adapt Something So It May Be Used Within Your Piece:
BAILS
These are basically pieces that enable you to put a loop somewhere along your strung piece of jewelry. You string these pieces on everywhere you want to add a drop or a pendant. Regular bails look similar to tubes or beads with a soldered loop off the end.
Some loops are set horizontally, and some vertically, and this positioning of the loop may affect how useful it is for your piece. PAY ATTENTION to the positioning of the bail’s loop relative to the positioning of the hole on your pendant piece.
Other types of bails: Pinch bail — basically a fancy V-shaped piece. The legs have pointed pinchers at their ends. You push these pinchers into a horizontally drilled drop. Austrian crystal drops, for example, are horizontally drilled. And you end up with a loop to string through.
Pinch bails come in many sizes, and a few different configurations, today. You need to match the pinch bail and its design to the pendant drop you want to combine it with. When you open and close the pinch bail too many times, it breaks. You are basically taking metal and bending it back and forth. When you try to fit the bail onto the drops, often you break the tops of the drops, particularly if your drops are some type of crystal material. A hazard of using these. So, when planning your projects (and also when pricing these), always assume you will need some extra bails and some extra pendant drops.
While not my favorite thing to do, some people put a drop of super glue where each point or beg of the bail enters the drilled hole.
Snap on bail — basically a fancy lanyard clasp. This is used to make your pendant removable. You can snap on the bail over the stringing wire, and then take it off the stringing wire.
Wire bails — basically a triangular shaped jump ring, where the gap is off to the side, rather than at the bottom. The drop or pendant won’t have a gap to pull through, because the gap is on the side. What I like about these is that people often bring things into the shop to have us convert into some kind of pendant drop, and if I can’t find a regular piece to work, I usually can always make a wire bail work.
Donut bail
The donut bail is used to convert a glass or gemstone donut into a drop. You slip one side of the bail through the donut hole, then push the two loops on the end of the bail together. Then you string through the two loops.
Beaver Tail or Beaver Tail Bail
Beaver tails are flat surfaces with a loop or bail loop attached to one end. You glue the flat surface to your piece, say a piece of fused glass, letting the loop or bail loop to stick out over the top of the piece. If a plain loop, you would add a jump ring or similar piece, to finish off the piece.
Leaf or Foldover Bail
This is a long piece of metal with flat, decorative ends on each side, usually a leaf stamping. You carefully fold this over, creating a loop in the middle. Then you glue either flat surface to the surface of your pendant drop, like a piece of fused glass.
To glue the leaf, foldover, beaver tail or beaver tail bail to a piece, first try either E6000 or Beacon 527. If these don’t work, try a 5-minute epoxy that comes in a dual-syringe. If your piece is smooth glass, you might use some sandpaper or a file to rough up the surface a bit before gluing. If you have still having difficulty with a glass piece, try using glass cement.
SCREW EYES
These pieces are a screw-threaded post, with a loop soldered to the top. You put some glue (any glue except super glue) on the post, push it into a bead — they do not screw into anything — , attach a jump ring to the loop and string the bead on to your piece as a drop.
EXTENDER CHAINS
This is a short length of chain, usually with a spring ring clasp on one side, and a bead-drop on the other. You can buy these pre-made, or make your own. These are used to lengthen necklaces. The spring ring clasps onto the existing ring of the necklace; the hook-clasp can clasp into any link on the chain. The bead drop is primarily decorative.
SAFETY CHAINS
These 2 ½” to 3” lengths of chain, have two tiny jump rings, one on each end. These are used to attach to bracelets, to prevent you from losing your bracelet, should the clasp come undone. You can buy these pre-made, or make your own.
HEAD PINS
Head pins are pieces of wire with a flattened or decorative end or head. You put beads on the head pin, and the head stops them from falling off. You make a loop on the other end, and string these on a necklace, or dangle them from an ear-wire or other loop. You need ½” of exposed wire to make a loop. You can make a single loop, a double loop or a triple loop. Each provides a different level of security, a different visual appearance, and a different impact on the resulting silhouette.
Head pins come in different thicknesses (gauges). Regular thickness: 20 gauge Extra Thin: 22 gauge or 21 gauge Ultra Thin: 24 gauge or 26 gauge
Too many people try to use the longest head-pins they can get. They end up with bent dangles and drops on funny looking necklaces, bracelets and earrings. If you want something “long”, consider making a series of links using eye pins, instead.
When you make your loops on the head pin, make them large enough so that they have sufficient jointedness and support, and will easily slip over the stringing material or finding. I can’t tell you how many times I’ve seen women with earring dangles stuck in a 90 degree angle, because the loops were too small.
EYE PINS
Eye pins are pieces of wire with a loop on one end. These are used to make bead-chains, such as in a rosary. You put one or more beads on the eye pin, then make a loop on the other end. You need ½” of exposed wire to make a loop. These come in different thicknesses (gauges). Regular thickness: 20 gauge Extra Thin: 22 gauge or 21 gauge Ultra Thin: 24 gauge or 26 gauge
You can buy head pins and eye pins pre-made. Or you can easily make your own, using simple wire working techniques.
She came to me overwhelmed. She had bags and bags of jewelry, some in perfect condition, some not so much, some broken. Her aunt had died, and left her a lot of jewelry. That was years ago. Her mother had died more recently, and left her a lot of jewelry, and a lot of half-finished pieces and components and parts. Her mother had dabbled in jewelry making. And regrettably, three more family members, including a grandmother she was very close to, had recently succumbed to the corona virus. And each had left her more bags of jewelry.
She tried sorting these herself, but frustration got the best of her. She knew there were pieces she would wear herself. Other pieces she wanted to keep for sentimental reasons. Parts of pieces she thought she could do something with, re-purposing them. And lots and lots of fine and costume jewelry she wanted to sell.
She felt she needed some more help in sorting and evaluating what she had. She needed to know, What she should do, How she should do it, and Where she should go to do it.
Our consultation covered these considerations:
1) Etiquette
2) Organize and Sort
3) Clean, Identify Areas of Wear, Refurbish
4) Establish Value
5) Keep and Wear, or Keep and Store
6) Re-Purpose
7) Recycle
8) Sell
9) Donate
10) Throw Away
1) Etiquette
Her name was Danali. She was named after her grandmother and a great aunt. Danali felt very guilty and a few other awkward feelings as she thought about giving away or selling all this jewelry. She repeatedly asked herself, “Should I keep all of it?”
Did she have to keep it all? It was important to have this conversation up front. I told her she did not necessarily have to keep everything. The various people who gave her their jewelry would want her to be happy. She needed to do the things which made her happy, whether this meant keeping things, reworking things or selling things.
Was it her decision what to do with the jewelry, or should she involve other members of her family? Her brother asked her for some of it so that he could give it to his wife and daughter. Her step-father wanted to give several pieces to his second wife. I advised her to consider herself first. Some families have a tradition of passing down jewelry. What was her family’s tradition? Was giving some of it to her brother something she wanted to do? Since she wasn’t related to her step-father’s second wife, I told her that I found his desire to be a little unusual, maybe even creepy. Bottom line: the jewelry was passed down to her to make her happy. That had to be the guiding principle here.
She wanted to remake or sell some of the jewelry. Would she be violating someone’s legacy here? Again, I pointed out that she should do what makes her happy. That’s the legacy. Her deceased relatives wanted her to be happy and get pleasure from the jewelry which they had worn or created. Getting pleasure meant both financially and/or aesthetically. They left their jewelry to her because they trusted the decisions she would make. But that did not mean that every piece had to be preserved exactly or stored in some warehouse or safety deposit box or not be sold or shared with others.
Danali needed to talk about giving herself permission to make those particular choices which would make her happy. She needed to acknowledge to herself what she wanted to wear, what she wanted to repurpose, what she wanted to give away, and what she wanted to sell. This was important.
2) Organize and Sort
The next thing she and I worked on was to organize and sort all the pieces. There were a lot of pieces, and this took many hours spread out over several weeks, typically a 2-hour session at a time.
We went one bag or one box at a time. Within each bag or box, we went piece by piece by piece at a time.
For each piece, we created a simple written record: a) Description of piece to best of her and my ability b) What she preferred to do with the piece:
– keep and wear,
– keep and store,
– repurpose,
– cannabalize the parts,
– recycle,
– share with someone else,
– donate,
– sell,
– throw away
These became the sort categories for her jewelry.
c) What I thought the full retail price would be for the piece, if sold in a store. [More about establishing value later.]
In our descriptions, we examined each closely and paid particular attention to these factors:
1. The condition, both top-side and back-side, and whether both top and bottom sides of the piece were finished and detailed, or just one side
2. The type and quality of materials used, such as differentiating fine from costume jewelry, gemstone from glass from plastic, type of metal and if there was an accompanying stamp (like .925 or 14KT or GF), and the like
3. The craftsmanship, especially for hand-made pieces
4. For pieces with better quality gems, then their cuts, their visual qualities, and whether the gems alone were more useful and valuable than the piece as a whole
5. The quality and condition of the clasp and other connector features
6. Looked for evidence of the designer or brand, such as a signature or stamp
7. If there was any paperwork associated with the piece, from designer sketches to valuations to certificates of authenticity to insurance policies to sales receipts
8. For some pieces, we listed a style or decade or era it might be associated with, and wrote down the evidence we used to draw these conclusions
The GOOGLE LENS app will let you take picture of anything, and then search its image database. This was helpful in locating similar pieces, and seeing how they were described and valued. Sometimes we took a picture of the clasp or a particular cut of the stone to see what similar things and information we could find through Google.
With each piece, I had Danali ask herself these questions:
· Did you like it?
· Like it enough to want to keep it?
· Did she have space for it?
· Were other things very similar and duplicative?
· Would a photo of the item be a sufficient keepsake rather than the item itself?
· Could she create or recreate or repurpose something of pleasure and value from any of the parts?
3) Clean, Identify Areas of Wear, Refurbish
A lot of inherited jewelry needs some cleaning, and perhaps some refurbishing and repair. It is important to consider whether you think any particular piece will benefit from this extra effort. This is true whether you want to keep the piece or sell it.
Some jewelry will benefit from a soap and rinse with warm water and mild dish detergent. Other jewelry might need some polishing up, especially if it is made from sterling silver. Of note, plated materials will not polish up and be a shiny color again. Sterling silver will.
Typically, some stones are missing and need to be replaced. A clasp might be missing or might not work well any more. The stringing material may have deteriorated. Some parts of the piece may have chipped or broken off. It may be missing a part, such as the clutch for an earring post. Old rings may need new shanks. Chains may need to be soldered.
Costume jewelry will be particularly difficult to restore. The parts are usually made of materials that cannot be re-soldered. The materials used — beads, stones, findings — may no longer be available, or available in the particular colors available when the jewelry was first made. If the piece was plated, this plating has probably worn away. Re-plating may be difficult or too expensive, given the material value of the piece.
4) Establish Value
It is important to establish value for each piece. It is equally important to use a measure of value that can be standardized for all pieces, and that is understandable.
The value of any one piece of jewelry is not one particular number. It depends on the context. The value could be the price someone would pay for it in a store. It might be the price someone who sells jewelry is willing to pay for it, so that a profit could be made. It might be the value of the materials themselves, irrespective of the design. It might be the value people are willing to pay for pieces made by a particular designer. It might be a value at auction. It might have value only for the person who owns it.
There are several standards for establishing value. Four prominent ones include the following:
1) REPLACEMENT PRICE
2) ESTATE VALUE AT RETAIL
3) ESTATE VALUE AT WHOLESALE
4) INTRINSIC VALUE
Replacement Value. If you bought the same piece new today, what would its price be? This gives you the highest valuation. It is not the value of the piece itself. This value is the least accurate standard. However, it is a number that people can easily relate to. I like to start with the replacement value, because it is so meaningful to the client. And I give the client what are called multipliers — that is, a number to multiply the replacement value by in order to estimate what value they might really be able to get for their pieces, given where they are trying to sell them.
Estate Retail Value. This is the price a piece of jewelry would be sold at to an individual who is looking to purchase the used jewelry for themselves. This value links directly to the jewelry item. These individuals expect to save money compared with buying a similar item new.
There are many sources of estate jewelry. These include people who sell used, older or vintage jewelry through Craigslist, Ebay, various auction houses, garage sales, flea markets, or other online sites. There will be quite a variety here in pricing and pricing strategies. For price comparison purposes, I like to use prices I find on Ebay. I tell my clients to use a multiplier between .40 (representing a 60% reduction in value) and .70 (representing a 30% reduction in value), with .60 or 60% as a reasonable average estimate. So, they would multiply the Replacement Value by .40 to get at the Estate Retail Value.
If the Replacement Value was $100.00, then a reasonable estimate of the Estate Retail Value would be $100.00 times .60, or $60.00. This would be $40.00 less than the Replacement Value. Stated another way: if a similar new piece was selling for $100.00, then someone would expect to pay $60.00 for the used jewelry when purchasing that jewelry for personal use.
Estate Wholesale Value. This is the price a business which sells used jewelry is willing to pay. Businesses have to take into account many more costs — overhead, rent, maintenance, staffing — than individuals buying used jewelry. So these businesses will only be willing to purchase used jewelry at a considerably lower price than the Estate Retail Value. The jewelry these businesses need to purchase have to be resalable at a cost customers are willing to spend, and which also covers their operational costs plus a profit.
Businesses like antique stores, estate jewelers, pawn shops, even some boutiques, may purchase inherited jewelry for resale. You can anticipate that they will want to at least double, and probably triple, their cost to set their own price for their customers.
The Estate Wholesale Value is probably the best value for resalable jewelry which has been inherited. This assumes that most of the inherited jewelry will be sold to a business where that business intends to resell it.
The multipliers I suggest here are between .30 (70% reduction) and .50 (50% reduction), with .35 (65% reduction) as a reasonable estimate.
If the Replacement Value was $100.00, then a reasonable estimate of the Estate Wholesale Value would be $100.00 times .35, or $35.00. This would be $65.00 less than the Replacement Value.
Intrinsic Value. The value here is set by the value of the raw materials, usually less a small processing fee. This value yields the lowest price. This price may be lower than the actual price you might be able to sell your item, so think carefully. Typically the Intrinsic Value is the value of the raw metals and the gems. Style, condition, brand, market demand, among other factors, are not taken into account.
Refineries, Cash-for-Gold businesses, some fine jewelry stores will pay intrinsic value for inherited pieces. Be certain up front, with pieces made up of both precious metals and stones, whether the purchasing business will pay for both, or just one or the other. You may have to remove any stones before taking your pieces into these businesses.
There will be different payment rates for different metals, all based on weight. An average scrap rate for gold or sterling silver will be around 85% of the current market value less a processing fee, say $50.00. They will take the total weight of the metal, calculate the current value, multiply this by .85, and subtract a processing fee. This becomes the Intrinsic Value.
The intrinsic value for any gemstone is based on the wholesale price of the gem less any cost for re-cutting, re-polishing or otherwise refurbishing the stone.
Intrinsic metal prices are well publicized online. Intrinsic stone prices are not, and there will be a wide variation on this, so it is wise to shop around.
Other Value Considerations
There are other factors which may come into play:
– Whether the piece is currently in style or not
– Whether something makes it rare or coveted, such as by a particular designer or brand (look for stamped mark or engraved signature), or is an unusual design or uses particular stones
– Metal and gemstone prices fluctuate quite a bit, and you may be hitting the market at a low (or at a high) point
– The condition of the piece
And just because the piece is costume, not fine jewelry, is not a reason for dismissal. Many costume jewelry pieces are coveted and highly valued today.
OnLine Services
There are many online services which will value your pieces for you. Their fees and reputations will vary widely. Check their online reviews.
There are several national associations for appraisers. These require their members to adhere to a high standard of conduct. You should make sure your appraiser either is a member, or, if not, you know that person to be highly knowledgeable and reputable. This is because anyone can present themselves as an appraiser. There are no federal and state licensures.
An appraisal will
· Clearly state the value and the type of value
· Describe the item in detail
· List the procedures used to determine the value
· Specify the appraiser’s qualifications
· Have the appraiser’s signature
You will also find scrap metal calculators online which will be useful.
5)Keep and Store, or Keep and Wear?
Keep and store. For some pieces, you may want to keep them, even though you do not plan to wear them. They may have some sentimental value. They may have a personal story to tell. You might see yourself wearing them at some time, just not now, and are not ready to part with them.
I suggest keeping at least one piece from each loved one from whom you inherited the jewelry. Pick a piece they may have worn a lot, or worn on a special occasion, or represented their personal style.
You can also display pieces you love, but are not interested in wearing, say in a shadow box you hang on the wall.
Keep and wear. There are most likely many pieces you can see yourself wearing. It’s great to mix old and new pieces together with any outfit. Everything is a matter of styling and your personal taste.
6)Re-Purpose
A brooch becomes a pendant. A pendant becomes an earring. A necklace is remade into two bracelets. A very long necklace or a multiple strand necklace made into two or more necklaces. A shoe-clip becomes a clasp. There are many ways to re-purpose jewelry from one type to another.
You might also repurpose a pin into a curtain pull. Some earring drops into push pins or refrigerator magnets. Use in a mosaic. Embellish a cross stitch canvas. Create a bookmark. Decorate some sandals or sneakers. Use as drawer pulls. Decorate your cell phone. Add some pizazz to a purse or strap.
Lots of ideas. You can also do a search engine search, like on Google or Bing, using the keyword phrase “old jewelry into new” or “grandma’s old jewelry”.
7) Recycle
Sell your scrap. There are places, like refineries, cash-for-gold stores, jewelry stores, and the like, which will buy scrap for its intrinsic value. For metal scrap, they will weigh your pieces and you will get paid, depending on the weight, metal value, less a fee. For stones, places will evaluate their wholesale values, less costs for reconditioning or refurbishing, and less a fee.
Cannabalize the parts. You can break up the pieces of jewelry and reuse the components, beads, clasps and other parts in other jewelry making projects. The parts may have more value as parts than as part of the piece as a whole.
8)Sell
There are many places, both where you live, as well as online, where you can sell your pieces.
Locally, you might contact antique stores, boutiques, jewelry stores, salons or pawn shops. Most likely they will take your items on consignment (that is, you will be paid when the pieces sell). You might try a local flea market or marketplace. You might hold a garage sale.
Online, you might check out Ebay, Craigslist, Rubylane, Etsy, The Real Real (focuses on high-end jewelry), Worthy.com (diamond rings), Tophatter and other jewelry-specific auction sites. Take high resolution photos, at least 500 x 500 pixels in size. Provide good and thorough descriptions. You need to establish, through how you present your items, a high level of trust and credibility.
Ebay especially is a useful source for researching the prices your items might sell at. If you have several items which might only sell for a few dollars each, you can group them together into a “lot,” and sell them as a “lot”.
Be sure to list…
· Description, including anything of particular interest, using words your potential customers will connect with
· Condition, any flaws, any functionality issues
· Color
· Brand
· Size and dimensions
· Estimated value and the basis for that valuation
· List price, as well as minimum acceptable price
· Photos, at least 3 (front, back and side), and use a white background
These online sites will take a 10–15% of your sales price as a fee. There may be some other small fees involved. You should anticipate these fees, when setting your prices.
9)Donate
Let’s say you have a lot of jewelry you like, but doubt you would ever wear it. You don’t want to deal with selling the pieces. So you might think about donating them.
First, think about any friends or relatives who might appreciate these pieces. You could even hold a party and let people pick out the things they like for themselves.
Second, think about donating pieces to charity or nonprofit thrift shops like Good Will or Salvation Army. Other sites, I Have Wings Breast Cancer Foundation; Dress For Success; Support Our Troops; Suited For Change; New Eyes.
Make sure you get a donation receipt.
10)Throw Away
Of course, your last option is to throw the jewelry away.
You do this only after you have exhausted all other options.
Abstract It’s not easy to do Ugly! Your mind and eye won’t let you go there. We are prewired with an anxiety response to help us avoid things that might harm us. So, it turns out, it is easier to design a beautiful piece of jewelry than an ugly one. Designing an ugly necklace, then, presents the designer with the ultimate challenge. To achieve a truly hideous result means making the hard design choices, putting ourselves in situations and forcing us to make the kinds of choices we’re unfamiliar with, and taking us inside ourselves to places that we are somewhat scared about, and where we do not want to go. The International Ugly Necklace Contest, first announced in 2002, and held 10 times since then, was one of the programs we launched as a way to reaffirm our beliefs in a design-oriented, theory-based, professional craft education curriculum. This article discusses the idea of “Ugly”, and provides some clues to designers about achieving it.
At the end of the article, you are given the chance to review and judge three of the submissions to The Ugly Necklace Contest — How Ugly Are They? You decide.
HOW TO DESIGN AN UGLY NECKLAC: The Ultimate Designer’s Challenge
Can you put together a well-designed and functional, yet UGLY, necklace? What kinds of things might you do if you were trying to design a necklace that is ugly, hideous, unsatisfying and what have you?
It’s Not Easy To Do Ugly!
Your mind and eye won’t let you go there. As research into color and design has shown, your eye and brain compensate for imbalances in color or in the positioning of pieces and objects — they try to correct and harmonize them.
You are pre-wired with an innate fear and anxiety response to subconsciously avoid anything that is disorienting, disturbing or distracting. You are genetically predisposed to avoid things that might hurt you or kill you, like snakes and spiders.
Moreover, necklaces are arranged in a circle. The circle shape itself errs on the side of beauty, and anything arranged, ordered or organized, such as the component parts of a necklace, will err on the side of beauty.
Because of all this, beauty is the norm. It is easier to design a beautiful necklace than an ugly one! How about that! Any jewelry designer who attempts to achieve “Ugly,” has to have enough control and discipline to override, perhaps overcome, intuitive, internally integrated principles of good design.
To achieve a truly hideous result means making the hard design choices, putting ourselves in situations and forcing us to make the kinds of choices we’re unfamiliar with, and taking us inside ourselves to places that we are somewhat scared about, and where we do not want to go.
– Can I push myself to use more yellow than the purple warrants, and mix in some orange?
— Can I make the piece off-sided or disorienting, or not have a clear beginning, middle or end?
— Can I disrupt my pattern in a way that, rather than “jazz,” results in “discord?”
— Can I work with colors and materials and patterns and textures and placements and proportions I don’t like?
— Can I design something I do not personally like, and perhaps am unwilling, to wear around my neck?
— Can I create a piece of jewelry that represents some awful feeling, emotion or experience I’m uncomfortable with?
— Can I make something I know that others won’t like, and may ridicule me for it?
Because answering questions like these is not something people like to do, jewelry designers who attempt to achieve “Ugly,” have to have a lot of control and discipline to override, perhaps overcome, intuitive, internally integrated principles of artistic beauty.
The best jewelry designers, therefore, will be those artists who can prove that they can design a truly Ugly Necklace. These are designers who can break the boundaries of form, material and technique.
What Is Ugly?
Some The Ugly Necklace Contest Submissions
We often like to say that beauty (and by inference, ugly) is in the eye of the beholder. But once we utter that phrase, we deny the possibilities of design — and the perspective from the eye of the designer. We refuse to accept universal understandings of beauty and appeal. We take away much of our power to reflect and evaluate and judge. We leave too much to the situation, and too little to our abilities as jewelry designers to translate inspiration into aspiration into finished designs which emotionally affect those around us.
As designers, we like to think we are capable of designing something beautiful. As teachers, we like to believe we are capable of training someone to be a better designer — one who can more readily choose colors, patterns, textures, forms and arrangements — in universally pleasing ways. As a discipline, we like to think of good design as resulting from sets of learned information, insights and behaviors.
Some The Ugly Necklace Contest Submissions
Different people interpret “Ugly” in different ways. Some might focus on the ugliness of each individual component. Some might use materials they feel convey a sense of ugly, such as llama droppings, or felted matted dog hair, or rusty nails, or cigarette butts, or a banana peel. Some might focus on mood and consciousness, and how certain configurations of pieces and colors evoke these moods or states of consciousness. Others might focus on combining colors which don’t combine well. Still others might focus on how the wearer’s own body would contribute to a sense of ugliness, when wearing the piece, such as the addition of a “Breast Pocket” which would lay just below the woman’s breast, or peacock feathers that covered the wearer’s mouth, or the irritating sounds of rusty cow bells, or the icky feeling of a rotting banana peel on the skin. Still others might view Ugly as a sense of psychological consciousness, such as being homeless, or an uncomfortable transition from adolescence to adulthood. For some Ugly might mean politically ugly, like Saddam Hussein of Iraq, or the trans-fats associated with fast foods.
It is not enough just to string a bunch of ugly beads on a wire. Ugly pieces do not necessarily result in an ugly necklace. Actually, if you look at many ugly pieces or components, once they are arranged and organized, they no longer seem as ugly anymore. Organization and arrangement contribute their own qualities and sense of beauty which transcend the ugly parts.
Adding to the fun (?difficulty?), designers want their ugly necklaces to also be functional and wearable. This goes to the heart of what jewelry is all about. Otherwise, they would merely be creating sculptures. The parts and techniques used to design an ugly necklace must also anticipate functional requirements. Otherwise, the piece of jewelry becomes a failure not only as a piece of jewelry, but of art, as well.
About The International Ugly Necklace Contest
The Ugly Necklace Contest, first announced in 2002, and held 10 times since then, was one of the programs Land of Odds-Be Dazzled Beads launched as a way to reaffirm our beliefs in a design-oriented, theory-based, professional craft education curriculum. The Contest was conceived as a fun way to break students out of the traditional craft mold, and get them to think, ponder, and translate their feelings and perceptions of what is UGLY into an organized and functional necklace design.
We made the contest international. We launched it on-line. Our goal was to politely influence the entire beading community to think in different terms and to try to work outside the box. We also wanted very actively to stimulate discussion about whether there are universal and practical design theories which underlie beadwork, and which can be taught.
Can you really design UGLY, or is UGLY merely in the eye of the beholder?
Four conceptual precepts underlying the creation of the Contest itself included:
1. The Necklace should be Ugly, yet still function as a piece of jewelry. 2. Better designers will demonstrate a degree of control over achieving these ends. 3. Better designers will show a sense of how both the larger context within which the jewelry is worn, as well as the overall effects of the wearer wearing the piece, will increase the piece’s Ugliness. 4. Better designers will have an intuitive design sense; best designers will show some strategic control over the design process.
Our judges evaluated each Ugly Necklace submission according to 10 jewelry design criteria (See Below), and scored each criteria. Each criterion was weighted equally. The 10 necklaces with the highest average scores were selected as our 10 semi-finalists.
Ten Semi-Finalists were picked. They were asked to submit the actual necklaces to us, to be put on display at Be Dazzled Beads. We took images of each one — a full frontal image showing someone wearing the piece, a close-up, and a close-up of the clasp assembly. We posted these images, along with the poems, on-line (now on display here) so that visitors to the site could vote for the winner and runner up. The winner got a $992.93 shopping spree on the Land of Odds web-site; the runner-up got a $399.07 shopping spree on the web-site.
NOW, You be the JUDGE!
Below, I present three very different Ugly Necklace submissions. Each artist submitting their necklace must include the following in their packet:
1) At least 4 images (front, back, someone wearing it, detail of clasp assembly) 2) A poem where they get to put into rhyme the kinds of things they were thinking when they made their various design decisions 3) A list of materials and techniques.
Some of this material is provided below to assist you when scoring each piece.
And you might want to take some aspirin first. It’s difficult to get your mind to evaluate things opposite to how you normally would do it.
The Judges Criteria
Each necklace is scored on 10 jewelry design criteria.
1. Overall Hideousness (first impressions; piece has noteworthy elements which slant your impressions toward Ugliness)
2. Clever Use of Materials (something about the materials chosen contribute to a sense of Ugliness)
3. The Clasp Assembly (any creativity applied here?)
4. Color Principles (the more violations, the better)
5. Balance or Arrangement (the more violations, the better)
6. Rhythm and Focus (the more violations, the better)
7. Orienting (the more disorienting, the better)
8. Parsimony (adding or subtracting 1 more element would make the piece more appealing, satisfying, even beautiful rather than more ugly; artist achieved maximum ugly effect efficiently and economically)
9. Wearability (piece must be wearable; extra points if the wearing of the piece makes the piece even uglier)
10. The Poem (expresses artist’s intent; artist shows power to translate intent into Ugly)
The Criteria In More Detail
1. Overall Hideousness (first impressions; piece has noteworthy elements which slant your impressions toward Ugliness)
The idea of “Noteworthiness” is key here. Noteworthiness means the extent the artist took something ordinary and made it extraordinary.
The best examples were the unexpected use of familiar materials. For example, felted dog hair shaped into beads; llama droppings, colored and drilled to be used as beads; a toothbrush used as part of a clasp assembly; a banana peel used as a pendant drop.
In some cases, the artist tried to make the necklace into a political statement, such as the Saddam Hussein necklace with bullets and pink shoes; or the glutenous fast food necklace with the gummi hot dog and gummi bun as the clasp.
In many cases, found objects, insignificant on their own, were organized to call attention to special meanings, such as the grenade box found among shells at the beach; or the remaining parts of a cat along with the chicken bone that led to her demise; or plastic jewels that seemed electrifying to the designer as a young girl, and so not as an adult.
Other things the judges look at include the clasp assembly, the artist’s anticipation of the effects of wearing the piece, the overall goals of the artist with the piece, and their first reaction to the piece.
2. Clever Use of Materials (something about the materials chosen contribute to a sense of Ugliness)
In too many cases, the jewelry artist chose ugly pieces and assumed that a necklace made of ugly pieces would itself be ugly as well. But as you can see from the images on this web-site, this strategy does not work well.
The artist has to have a deeper understanding of why the materials are ugly. The artist also needs to stay focused and strategic enough in the design process, so that she or he maintains this sense of ugly as the necklace gets organized.
For example, one necklace used felted matted dog hair, and made beads out of this. This was a start at a clever use of materials. But once strung into a circle, the necklace looked like something someone might actually wear.
A necklace of cigarette butts, again once organized into a circle, doesn’t look quite as ugly. In addition, the necklace over-used cigarette butts — too many — which started to make the necklace a bit boring. While “boring” might take us in the direction of “ugly”, in this case, it diminished the power of the cigarette butts to make a statement about “ugly”.
This criteria looks at the total picture. Not just the ugliness of each individual piece. But also the degree to which the assembly of pieces maintains this sense of ugliness. The concern here is “design-cleverness in the USE of materials”.
3. The Clasp Assembly (any creativity applied here?)
A better clasp assembly is one that seems to be an integral part of the necklace, not just an after-thought or add-on. It should anticipate how it contributes to the ugliness of the piece, how it re-affirms the artist’s concept and goals, and how it adds to the wearability of the piece.
Successful Clasp Assemblies:
A gummy hot dog closes into a candy gummy bun
There is an elaborate strap, zipper, and suspender toggles system as the clasp assembly. With different configurations of parts, the necklace may be worn as a choker, a back pack, a wrap, a fanny pack, a clutch, or a traditional over-the-shoulder and around the neck necklace.
A troll doll is the clasp. One end of necklace string is tied into a loop and wraps around the left hand of the troll doll. The other end of the necklace string is tied into a loop and wraps around the right hand of the troll doll. The two hands of the troll doll push apart to open up, and push closed to secure the necklace.
4. Color Principles (the more violations, the better)
The degree the piece violates good principles of color. This might include using colors in incorrect proportions; or which violate color schemes; or violate rules of dominance/submission; or disturbing arrangements — vertical vs. horizontal, shading and tinting, sharp vs. blurred boundaries, placements and balance, projecting forward vs. receding; or violating socio-cultural rules and expectations.
This is self-explanatory. For example, the appropriate proportions of yellow to purple should be 1:4, meaning in any grouping of 5 beads, 4 should be purple and 1 yellow. When you deviate from this, your piece gets uglier.
COLOR THEORY discusses the use of the color wheel to select colors that work together within a “scheme”. There are many schemes, including Analogous, Complementary, and Split Complementary. An ugly necklace would select colors that violate this scheme. This might mean selecting colors that do not fit together within a scheme. It might mean using the wrong proportions of color within the scheme. It might also mean violating expectations about which colors should and should not predominate within the scheme.
5. Balance or Arrangement (the more violations, the better)
This is self-explanatory. Does the placement seem satisfying, such as a graduated necklace that starts with smaller sizes, works up to larger sizes in the center, then works back down to smaller sizes at the clasp? Or, not?
When looking at the piece, can you see alternative arrangements that might make the piece look even uglier?
Another aspect of bad balance and arrangement has to do with “dimensionality”. This is the degree, whether the piece is flat or 3-dimensional, that this is satisfying, or not. For example, a flat loomed piece with an extra large button clasp on the top of it, would probably be less satisfying than one with a smaller clasp on the end of the piece. Dimensionality can also be created through mixing beads or objects with different finishes, like mixing glossy and matte. An ugly mix somehow would feel dissatisfying.
6. Rhythm and Focus (the more violations, the better)
One of the goals of the jewelry artist is to motivate the viewer to take in, experience and appreciate the whole necklace. One of the major techniques is to create a rhythm with the patterning of the beads, and to create a focal point. This influences the viewer’s brain/eye to want to see each part of the necklace from beginning to end, and then come to rest.
An ugly necklace, would either have no rhythm or a boring rhythm or a nauseating rhythm. An ugly necklace would either have no focal point, or have a focal point that is in a very disorienting or disturbing place on the necklace, or be very disorienting or disturbing in and of itself.
7. Orienting (the more disorienting, the better)
Jewelry plays a critical psychological role for the viewer in a room or in a space. It orients them. It is one of the important things in any person’s visual environment that lets the person know what is up and what is down, and what is right and what is left.
The natural state in life is to be dis-oriented. It takes walls and ceilings, trees and horizons, things with clear right angles, clear perpendicularity, obvious horizontal and vertical planes, to enable us to orient ourselves within any space. Otherwise people would fall down, lose a sense of how to turn or position themselves, or feel paralyzed.
The wearing of jewelry plays a critical function here, in that it visually establishes for the viewer appropriate horizontal and vertical lines and planes. If you see someone with their earring dangle at a 90 degree angle, or their necklace turned around so that the clasp is showing when it shouldn’t — you know how uncomfortable this makes you feel, even wanting to cringe. And you know you want and need them to straighten things out. This jewelry is dis-orienting you, at a time when you subconsciously rely on it to be orienting.
If this wasn’t important, things like the odd-angled dangle wouldn’t bother you….But we know that it does.
8. Parsimony (adding or subtracting 1 more element would make the piece more appealing, satisfying, even beautiful rather than more ugly; artist achieved maximum ugly effect efficiently and economically)
Once the artist has made their point, they don’t need to keep making it. For example, one entry used plastic trolls to create a sense of Ugly. There were over 20 on the necklace, but in their particular design, 6 or 8 were probably sufficient to make the point. The additional trolls served no other purpose in this piece. Just throwing in a lot of ugly pieces doesn’t necessarily result in something that is uglier. The additional trolls could have been used to make additional design points, but they were not. Instead they added a sense of repetition and disinterest.
A necklace of felted dog hair beads was a very clever idea. It was over 36″. No other design points were made, so an 18″ necklace of felted dog hair beads would have been as good as 36″. In a similar way, a very long necklace of cigarette butts would have been equally as good, or better if shorter, since no other design points were made.
9. Wearability (piece must be wearable; extra points if the wearing of the piece makes the piece even uglier)
From a design perspective, Jewelry is Art As It Is Worn.
In other words, you can only appreciate the artistic qualities and sensibilities of any piece of jewelry only when you see it worn — as it moves with the body, as it conforms to the body, as it enhances the wearer’s sense of self, and the viewer’s sense of the situation and context.
In our contest, we set the rule that the piece has to be Wearable. This rule tends to make it more difficult to achieve “Ugly”, but we’ve had some clever submissions that succeed here.
Some examples from our entries: — Peacock feathers that would fill the wearer’s mouth — An over-the-shoulder necklace that struggles to stay on the shoulders — A breast pocket strategically placed on the tip of the breast — Bloody teeth or a rotting banana peel meant to be worn against the skin
To the judges, wearability means that there should be clear evidence that the designer anticipated where the parts came from, and where they are going to, when the piece is worn.
10. The Poem (expresses artist’s intent; artist shows power to translate intent into Ugly)
The poem must relate to the piece. It should clearly explain the artist’s goals and concept. It should detail the artist’s strategies for making the design choices she or he did.
The judges ask themselves, given what the artist wrote in the poem, to what degree have they successfully created an ugly piece of jewelry?
Your Turn
Use the scoring sheets below to evaluate UGLY NECKLACE #1 and UGLY NECKLACE #2 and UGLY NECKLACE #3.
Or even try your own hand at designing an Ugly Necklace. Can you do it?
How Does The Designer Construct Shared Understandings?
A key part of the designer’s role is to interact with the various clients in such a way that construction of the relevant knowledge — assumptions, perceptions, expectations and values and desires — results in shared understandings. Not as difficult as all these big academic-type words sound.
The design process should be partly seen as creating a learning environment. The collective goal of this environment is to elicit shared understandings and feed back this information into all the choices involved with the design.
Design requires that works and words connect. As soon as we look at a design — even initially when that design is merely a fuzzy concept — we impose words on it. The words come from many sources. The designer. The critic. The teacher. The client. The buyer. The exhibitor. The seller. The collector. The user. The student. The public. The intents of imposing these words are myriad. Design triggers words. The designer needs to manage them.
Dialog has to happen between the designer and self, the designer and client(s), and the designer and all the audiences of the client(s) — either real or imagined. Dialog involves
– Brainstorming
– Exploring points of view
– Challenging perceptions
– Delineating options
– Evaluating the risks and rewards associated with each option
– Anticipating consequences
– Expanding ideas and perspectives
– Sharing experiences and feelings of connection to the project
The specific skills the designer applies include active listening, emotional reasoning, questioning, observing, probing, wondering, thinking out loud, synthesizing, connecting, creating, recognizing, interpreting, pushing and pulling.
The designer needs to know answers to these types of questions. When asking questions, if at all possible, the designer wants to frame them in such a way that they force choices. Examples of forced choices include things like,
– either / or
– this or that
– prioritizing
– grouping
– categorizing
– if this, then what
– organizing and arranging
– timing
– specifying criteria for evaluation
So, the designer might want to ask things like:
· What to do and What not to do
· Why this is important and necessary, moreso than what other things
· Why the client needs the designer to do this but not that
· To what degree the piece or project will impact the client under a list of different circumstances
· How and why the client values the designer’s work as well as the finished design above something else, like some other designer’s work, or not having the design at all
· What criteria the client will use to know that the finished design will have the intended value
· What alternative ways might the finished design be valued
· If any task or process or design element can be different or better?
A dialectic occurs to the extent that all parties actively listen to one another and think out loud. The design process needs to be welcoming. It should feel emotionally and cognitively comfortable. People should be free to express thoughts and free to disconnect from them when they change their minds. In a progressive and successful dialog, the participants will begin to shift their assumptions, expectations, perceptions, and values and desires, as necessary for the design project to proceed.
As the design process unfolds, then, all decisions, actions, words, focus and the like derive from these shared understandings. These shared understandings encapsulate ideas about possibility, purpose, and project criteria. They lay out what the designer and client(s) want to do, where they want to go, and how they will do it to the satisfaction of all.
The finished design serves as a permanent record of meanings — those shared understandings — — negotiated and conveyed by the designer and all the collaborators along the way. As a permanent record, it implicitly documents action, purpose, value and desire. It represents a narrative measure of how risks have been traded off with rewards.
The finished design only serves as this permanent record to the extent that the design has been introduced publicly in a such a way that its shared understandings are revealed.
The permanency of this record may be ephemeral and only last for a short time. Although the design itself is fixed, interpretations of the shared understandings underlying it may still change with the different contexts and situations or timeframes users of the design find themselves. The designer’s job, even after completing the piece or project, may never be completely done.
Importantly, all this communicative interaction is how design significantly differs from art or craft. Design is a lived experience.
The designer should be able to
· Distinguish the ideal from the real.
· Be aware of the interplay of the designer’s reactions and those reactions of the various client audiences.
· Discern intent and value, and the degree they are sufficient and enduring, as these evolve over the course of the design process.
· Specify tasks to be done which are truly supportive to the process of design management.
· Create a design process which, in effect, is a learning environment, conducive for the identification, negotiation, development and decision making which revolves around shared understandings.
· Improve their accuracy in becoming aware of client assumptions, expectations, perceptions, and values and desires.
· Distinguish options regarding form, content, materials and approach, assign measures of risk and reward to each option, and prioritize them in line with developing shared understandings.
Effective Risk Communication
One way to define the designer’s role is to view it as risk communication. Effective risk communication involves understanding people and issues. This means an ability to elicit assumptions, expectations, perceptions and values and desires. This means an ability to clarify options. An ability to either soften or intensify. An ability to organize and guide. An ability to prioritize, group, categorize, select among options. An ability to coordinate and resolve. An ability to maintain consistency over what could be a long period of time. An ability to share expertise and insights. An ability to restate things in measurable terms — exact numbers (10 hours of work) or relative concepts (slightly longer than the last project).
The client’s opinions are influenced by trust in the credibility of available risk information. This could relate to little things like identifying why one color might be a better choice than another. This could relate to bigger things like identifying what location sales should occur which might be better than another. Or like what to perform better in-house, than not.
There are many such risks which must be assessed, measured, conveyed and agreed upon in the design process, including, among others, …
· Making tradeoffs between beauty and function
· Resolving conflicts between designer values and desires with those of the client
· Over-doing or under-doing the project
· Choosing the wrong materials and techniques
· Mismatching materials with techniques
· Determining a stopping point for the project
· Incorrectly anticipating the context within which the design is to function
· Managing the design process over a period of time, without losing motivation, commitment or focus
How is this trust established? First off, the designer’s competence and expertise should be on display. Next, the designer should be able to demonstrate empathy, honesty and commitment. The designer should be able to delineate options for each task or goal. The designer should be able to understand and accept the developing assessments of risk in the choices to be made. The designer should be able to explain why something would not be a concern. Finally, the designer should be organized and prepared, a good communicator, and show a willingness to coordinate or collaborate, if need be.
Designers, then, communicate the levels of risk involved with any choice. All choices have consequences. Making one choice usually negates the opportunity for making alternative choices. Subsumed within any choice are sensations about workability, implementability, worth, some measure of risk relative to some reward. The choices could be about selecting materials or techniques. They could be about which design elements to use, and which ones not. They could be about which tasks to perform and when. They could be about criteria for determining whether a project should be judged finished and successful.
There are some keys to successful, adept messaging about risk. These include,
· Having a clear purpose and educating others about the purpose (both designer’s and client’s), how these relate to assumptions, expectations, perceptions and values, how to gain consensus
· Reducing all possible options to three or perhaps four major ones
· Supporting the pros and cons for each option with two to four facts
· Being up-front about uncertainty and possible consequences
· Detailing and explaining your preferences
· Explaining important conclusions about possible impacts with supporting reasons and details
· Tailoring the language to the client; working with the client to translate possible risks into language and measurements more familiar to that client
· Identifying things not yet known, such as having to learn techniques, or finding materials, or developing new forms or arrangements, or specifying a time frame for when you might be finished with the project
· Linking the project to past experiences or other things which the client might feel connected
· Asking the client to pre-test things and provide feedback and evaluation
· Keeping in regular touch with the client
· Being prepared for skepticism, controversy, misunderstanding, miscommunication or misdirection
· Being flexible, open to new ideas, and ready to suggest alternative solutions and ready to negotiate
· Not overlapping design projects; keeping things separate and compartmentalized
· If the overall project is especially large, breaking it up into a series of smaller projects; the project should be small enough so that risk and reward can be easily assessed and measured, and choices can be concise
· Having clear criteria for evaluating the project (and its continued value to and desirability for the client) at each increment of the way; allowing the criteria to grow, change and evolve, as necessary, without fostering disagreement
Designer Thinking: Literate, Fluent and Flexible in the Discipline of Design
When designers think like designers, they demonstrate a degree of leadership skills which goes a little beyond those of basic management. The fluent designer has the courage to have a vision and the wherewithal to stick with it until it is a finished product design. That designer has the courage to help others share understandings about the vision and how it will fit with their desires, as well. And that designer brings along that Designer Toolbox of strategies for adapting to unfamiliar or new situations.
Designers literate in design create learning environments within which communication and dialog flourish. These environments must allow for the free-flowing exchange of ideas, the expression of feelings and thoughts and values, and the emergence of shared understandings.
The fluent designer attaches concepts to design elements. Meaning to compositional arrangements. Transforms assumptions, expectations, perceptions and values and desires. Comfortably adapts to new or unfamiliar situations. Anticipates the future, and strategically brings this knowledge to bear when defining current tasks and setting priorities. Is very aware of their own thought processes and is not afraid to share them, modify them or completely change them. Or, conversely, to respond to or re-shape those of others.
Designers literate in design are metacognitive. They are aware of their thinking and how their thoughts play out and impact any situation. They are aware of how their own thinking and their client’s thinking is reflected back in the things they have designed. If the designer does not provide a sense of the underlying intellect in their designs, others cannot appreciate or anticipate what the designer was trying to accomplish.
Fluent designers are sensitive to what knowledges and skills they currently possess, which ones they do not, what ones they need to learn to complete the project at hand, and how to go about learning these.
They are critical in that they recognize the tradeoffs between risks and rewards of any choice — large or small — that they make vis-à-vis any project. They are able to articulate their critiques and raise questions about the project or process.
Relinquishing Your Design To Others: A Rite Of Passage
One of the most emotionally difficult things designers do is saying Good-bye! to their designs as they hand them over to their client or otherwise expose their work publicly. The designer has contributed so much thinking and has spent so much time to the project that it is like ripping away an integral part of your being.
This is the moment where you want to maintain the conversation and engage with your audience, but look at this from a different perspective. Your relationship with your design is evolving and you need to evolve with it. Its innate intimacy is shifting away from you and getting taken over by someone else.
But you still have needs here. You want that client to ask you to design something else for them. You want the client to share your design with others, expanding your audience, your potential clients, your validation and legitimacy as a designer. And you want to prepare yourself emotionally to take on the next project.
Relinquishing control over your design is a rite of passage. At the heart of this rite of passage are shared understandings and how they must shift in content and perspective. Rites of passage are ceremonies of sorts. Marking the passage from one status to another. There are three stages:
(1) Separation
You pass your design to others. You become an orphan. You have made a sacrifice and want something emotionally powerful and equal to happen to you in return. Things feel incomplete or missing. There is a void wanting to be fulfilled. You realize you are no longer sure about and confident in the shared understandings under which you had been operating .
(2) Transition (a betwixt and between)
There is a separation, a journey, a sacrifice. The designer is somewhat removed from the object or project, but not fully. The shared understandings constructed around the original project become fuzzy. Something to be questioned. Wondering if to hold on to them or let go. If they remain relevant. Pondering what to do next. Playing out in your head different variations in or changes to these shared understandings. Attempting to assess the implications and consequences for any change.
These original shared understandings must undergo some type of symbolic ritual death if the designer is to move on. Leverage the experience. Start again. As simple as putting all the project papers in a box to be filed away. Or having a launch party. Or deleting files and images on a computer.
(3) Reincorporation
The designer redefines him- or her-self vis-à-vis the designed object or project. The designer acquires new knowledge and new shared understandings. There is some reaffirmation. Triumph. This usually involves a new resolve, confidence and strategy for starting new projects, attracting new clients, and seeking wider acceptance of that designer’s skills and fluency in design.
The designer has passed through the rite of passage. The jewelry or other designed object or project has been relinquished. The designer is ready to start again.
But as a designer, you will always be managing shared understandings. These most likely will have shifted or changed after the design is gone. And new ones will have to be constructed as you take on new assignments.
About the Shared Understanding Series…
For any design, it is a long journey from idea to implementation. This journey involves different people at different times along the way. People will not use a design if their agendas and understandings do not converge in some way. They will not buy a design or contract with the designer unless there are some shared understandings about what should happen and when, what will happen, and what the risks and rewards of the finished project will be. Shared understandings are about recognizing intent and risk. Design is both an outcome as well as an instrument for new shared understandings, new relationships, new behaviors, new reflections. As such, any design represents a commitment to a conversation — between designer and self and designer and client. The conversation allows for the management of shifting assumptions, expectations, perspectives and values. Better designs show the designer’s conscious awareness of all the things affecting shared understandings.
Bittner, Eva Alice Christiane, and Leimeister, Jan Marco. Why Shared Understanding Matters — Engineering a Collaboration Process for Shared Understanding to Improve Collaboration Effectiveness in Heterogeneous Teams. Year: 2013, Volume: 1, Pages: 106–114, DOI Bookmark:10.1109/HICSS.2013.608.
Canel, Melissa. The Role of Perceptions in Conflict. April 9, 2016. As referenced:
The designer needs / wants / demands some level of acceptance by the client for the design. It is important to anticipate and assess how the client will form an opinion and make this kind of judgment.
For the client, some things will be accepted as true and right without proof. We call these things assumptions.
Other things for the client must be interpreted as to what they mean — a mental map or impression. We call these things perceptions.
The client will also have certain beliefs about what will happen or should have happened. We call these things expectations.
Last, the client will have certain preferences about what will or should happen which motivate the client to make certain judgments and take certain actions. We call these things values or desires.
Clients Have Opinions and Judge
We all know this. When we first meet the client, they have opinions about us and judge us. As we are working on the project, they have opinions about us and judge us. When we hand over the project to them, they have opinions about us and judge us. This is OK. This is natural and to be expected.
· Do they like it or not?
· Is it exciting to them or boring?
· Ugly or pretty?
· Useful or not?
· Worth it to them or not?
As a designer who wants people to wear or use your designs, sell your designs, exhibit your designs, buy your designs, share your designs with others, then you need to understand how your clients form their opinions and make their judgments. You need to understand the implications, consequences, impacts, effects and affects this all brings to your designs and your design process. You need to begin to formulate how you will incorporate these understandings into your design process. And you need to figure out how you will influence their understandings so that they will recognize your skill and worth as a designer. All this is essential to the design process. It should be stating the obvious that things go awry whenever the interests of people are incompatible.
One cautionary note: Your clients will probably have a certain naivete. They may know little to nothing about design, construction, selection of materials and techniques, compositions and arrangements of design elements — everything you know a lot about.
Will they appreciate the difference between hand-made and machine made? Will they be accepting your choices about what to include and what not to include? Will they recognize good design and be able to differentiate it from bad? Will they demand of you a higher level of fluency in design and motivate you to meet high expectations?
The better designer will look for ways to bring the client into the core of the design process. The designer will signal to the client that design requires some communication and conversation. The designer will take time to educate the client. The designer will guide the client through the process of eliciting assumptions, expectations, perceptions and values and desires. The designer will identify the emerging shared understandings and incorporate these into decisions about selecting materials and techniques, arrangements of objects within a design, and specifying tasks to be performed.
Assumptions
Our ideas and intents are supported by our assumptions about the world around us. Some assumptions are learned through our history and experiences. Some are taught to us. We take assumptions as givens and usually are unaware of them as we apply them. Except when our assumptions lead us on a path we do not want to travel.
Assumptions save us time and effort. As truisms, they allow us not to have to test and validate every little thing that comes our way. But they also can negatively affect our relationships, business or otherwise. We make assumptions about other people’s behavior, other people’s intentions, and our own behavior and intentions, and our assumptions can be off the mark. We may be laying a flawed foundation for our understanding of the relationship.
We need to identify and check our assumptions. We need to give our client the opportunity to identify and check their own assumptions. All this has to occur while developing a common, shared understanding of the design task at hand.
So, you can ask the client directly,
What do you want this piece or project to do for you? What do you see me doing? How familiar are you with the design tasks involved?
Assumptions are one of several things underlying client judgments. Let’s talk about Perceptions.
Perceptions
Perceptions are ways of regarding, understanding or interpreting something. Perceptions are subjective, and each person has their own subtle differences, even when responding to the same design or event. In fact, different people may have very different perceptions about the same design or event. Their assumptions, expectations and values may further color their perceptions.
Each person filters their perceptions with each move, each conversation, and each situation. Such filters may contingently alter perceptions. They may result in selectively perceiving some things, but not others. In design work, our clients might selectively focus on brighter lights, louder sounds, stronger odors, sharper textures. Selective perception can add some more muddiness to the interaction and finding and developing the shared understandings necessary for success.
Adequately sharing understandings within a situation and among the people in it depends on the amount of information available to each person and how correctly they interpret it. Perception is one of the critical psychological abilities we have in order to survive in any environment.
The designer needs to be open to understanding how the client perceives the design tasks and proposed outcomes, and to adjust their own perceptions when the management of the relationship calls for this. There is no formula here. Each situation requires its own management strategy. Each designer is left with their own inventiveness, sensitivity, and introspective skills to deal with perceptions. But it comes down to asking the right questions and actively listening.
How does the client begin to understand your product or service? Can the client describe what they think you will be doing and what the piece or product might look like when finished? Can the client tell you how the finished piece or product will meet their needs and feelings? Can the client tell you about different options? How will they interpret what you want them to know? What impressions do you want to leave with them? Do they perceive a connection between you as a designer and your design work as proposed? What levels of agreement and disagreement exist between your perceptions and theirs? Can you get at any reasons which might explain their perceptions, and any agreement or difference? Can you clear up any misperceptions?
Expectations
Expectations attach to perceptions. These are predispositions to perceive things in a certain way. They explain why people are more likely to prefer one interpretation or explanation over another.
Clients will have expectations about what the designer is like as a person. What the designer does. How the designer interacts with other people. How the designer sets a value and prices their work. What kind of ongoing information we will get. What the finished product or project might look like. How useful that product or project might be.
When expectations are not met, there is a sense of frustration. Even paralysis. There might be feelings of disrespect or disregard. Why didn’t the designer do what was expected? Why am I unhappy with the finished product or project?
As with assumptions and perceptions, the designer needs to define a management role for him- or herself relative to client expectations.
Was the designer aware of the client’s expectations? Was the client asked about their expectations? Was the designer skilled enough and insightful enough to meet those expectations? Was it in the client’s interest to steadfastly hold tight to their expectations, or to modify them?
Values and Desires
Values and desires are motivational. They signal a predisposition to act. They are a measure of the tradeoffs between the risks involved and the expected rewards. A social or economic calculation. A cognitive evaluation further affecting behavior. As such, they are a form of understanding.
Values and desires have a great impact on the assumptions people bring with them to the situation, and which ones they do not want to challenge. Values and desires have a great impact on the expectations people have, and which ones they want to prioritize. Values and desires have a great impact on the perceptions people have of the world, and which perceptions they want to act on.
Values and desires have two key components — the contributions of the designer and the motivations of the client. First, there is the value the designer places on the work, given the resources involved, the time spent, the skill applied, and meanings represented in the piece and importance to the designer. Second, there is the value the client places on the work, given their assumptions, perceptions, expectations, previous experience, and the socio-cultural-psychological context they find themselves in.
People project their feelings and thoughts and sensitivities onto the designed object, whether it be jewelry, an interior design, or a digitized representation online. These projections, however, can have many roots. Self-esteem. Self-expression. Social advantage. Tool of negotiation. Power.
Values and desires sometimes are expressed in monetary terms. Such and such a thing is priced at some dollar amount or assigned some worth also in monetary terms.
They more often are expressed with words. We hear words like beautiful, satisfying, appealing. And other words like ugly, boring, scary. Or phrases like worth it, I want it, I want to buy it, I want to collect it. Or more phrases like the designer’s pieces are in demand and rare, or the designer spent so much time creating the design, or the object contains several rare jewels.
Sometimes the meanings associated with these words are relative, comparative or proportional. That is, they reveal more about values and desires. We hear phrases like more satisfying, not as ugly as…, rarer than…, not as large as…, takes longer to make, about half as bright, and so forth.
Values and desires, then, involve direction (positive or negative) and intensity (a lot, somewhat, or a little). Both designer and client, more often than not, have to filter their assumptions, perceptions and expectations a bit and sensitively trade-off various assumptions, perceptions and expectations each brings to the design situation. They do this by establishing value and desire. They establish value and desire by communicating about risks relative to rewards.
Communicating about risks and rewards takes the form of (a) identifying various design or design process options, (b) talking about their pros, cons and consequences, ( c) attaching a sense of measurability (absolute or relative) to each option, and (d) selecting preferences for what should happen next.
About the Shared Understanding Series…
For any design, it is a long journey from idea to implementation. This journey involves different people at different times along the way. People will not use a design if their agendas and understandings do not converge in some way. They will not buy a design or contract with the designer unless there are some shared understandings about what should happen and when, what will happen, and what the risks and rewards of the finished project will be. Shared understandings are about recognizing intent and risk. Design is both an outcome as well as an instrument for new shared understandings, new relationships, new behaviors, new reflections. As such, any design represents a commitment to a conversation — between designer and self and designer and client. The conversation allows for the management of shifting assumptions, expectations, perspectives and values. Better designs show the designer’s conscious awareness of all the things affecting shared understandings.
Bittner, Eva Alice Christiane, and Leimeister, Jan Marco. Why Shared Understanding Matters — Engineering a Collaboration Process for Shared Understanding to Improve Collaboration Effectiveness in Heterogeneous Teams. Year: 2013, Volume: 1, Pages: 106–114, DOI Bookmark:10.1109/HICSS.2013.608.
Canel, Melissa. The Role of Perceptions in Conflict. April 9, 2016. As referenced:
What Kinds Of Things Does The Designer Need To Know?
The designer needs to be able to assess and manage shared understandings all through-out the design process. The designer needs to …
(1) Be clear about the role designers should play, and how to relate to the client
Design is an occupation in the throws of becoming a profession. “Design” and the designer role are claimed by three very different perspectives — what are called paradigms — about what the designer role should be about. These ways of looking at things come down to whether designers see their roles as craft, art or design. This can make it a little confusing about how the designer should go about assessing and managing shared understandings, and how the designer should relate to the client. To do so successfully, the designer may have to change their preferred paradigm, that is, how they think through what they should do.
(2) Be aware of the primacy of subjective experiences
How people interact with designs is very subjective. The designer can predict some universal understandings about color, object and placement. But the designer also needs to be prepared to ferret out those subjective assumptions, perspectives and values of the client (and the client’s various audiences).
(3) Be familiar with how designs have shared understandings, and why the development of these shared understandings is a social process
Conception, creation and implementation do not occur in a vacuum. They emerge as part of a social process. The recognition of a design — what it is, how useful it is, how enduring it is — is not wholly determined by that design’s objective characteristics. It is jointly determined.
Designers Operate Within One Of Three Professional Paradigms
There are three different paradigms or approaches within which designers operate — Craft, Art or Design. Each paradigm is very coherent and rule- and expectation-bound. Each is a standard perspective and set of ideas.
Each approach seeks to provide the answers to the question: Who Am I As A Designer? Each approach steers the designer to play out their role differently. Each approach leads the designer to make different assumptions about the process, what skills and abilities need to come to bear, how to approach and interact with the client, and how to evaluate the success of the outcome. Each approach provides guidance about the outcome the designer should strive for.
Designing is about making choices. Each approach gives you different advice about the norms for acceptable conduct. It is important to be aware of all this, and if you are to develop the necessary skills and insights for assessing and managing shared understandings, you may have to change the paradigm-perspective you have been operating under.
THE CRAFT APPROACH
By far, the most typically-encountered approach is called the Craft Approach. The design process here is very mechanical. Tasks are reduced to step-by-step instructions, almost like paint-by-number. Things are very systematic. There is a clear beginning where you start your project, an organized middle, and a clear end when you finish it. Tasks are specified and carried out generically, that is, applied similarly over many design projects. The primary focus is on getting the job done with some attention to beauty and appeal.
The Craft Approach assumes:
1. That the designer is either born with creative talents or not. Creativity is not something that you can learn. 2. The only thing that matters in design is to complete the task. 3. Designing is something anyone can do. It requires little to no specialized knowledge that must be garnered through a professional degree program. 4. In unfamiliar or new situations, there are no issues of adaptability. There is sort of a Have-Design-Will-Travel mentality. 5. Disciplinary literacy and fluency result from repetition and practice. The designer learns to be able to produce the same object over and over again.
Some consequences:
a. Since the singular goal is to get the job done, little thought or concern is placed on anticipating consequences and responding to them as they arise.
b. Appeal and beauty are primarily based on simply completing the project — no matter how it looks or feels or holds up with wear or use. It is assumed the project will be functional.
c. The designer is taught to start with a set of instructions, flow-chart or a pattern, and follow these mechanically. The instructions are assumed to be written correctly, need no further clarification, and should not be altered.
d. The better designer is one who has done more and more projects.
e. Easy to define an acceptable outcome — completing the project instructions from start to finish. It is assumed that there are few compositional issues, and that the project will be appreciated universally simply because it has been completed.
THE ART TRADITION
A second approach designers gravitate towards is the Art Tradition. The Art Tradition believes that the designer needs to learn a set of rules that can be used to apply to any situation where you are making designs. It is less important that you follow a set of steps. It’s more important to know how to apply art theories — things like color, perspective, dimension, pattern, texture, balance, harmony, composition and the like — to your project at each stage of the process, whatever that process is, and wherever that process takes you.
These art theories detail what defines successful (and unsuccessful) manipulation of design elements — universally and objectively — within any piece of art or design. There is some acknowledgement that subjectivity influences perceptions, but this is minimized. The focus, is instead, on universally accepted ideas about harmony in design. Design is seen as either a subset of painting or of sculpture. It is not seen as having its own discipline and medium, with its own special rules, theories, techniques and approaches, apart from those in art. Design is judged apart from the setting in which it is put into use.
What is nice about the Art Tradition, is that the goal is Beauty and there are issues of choice to be solved. The designer is not encumbered by having to follow specific steps or patterns. Nor is the designer encumbered by the structural and functional properties of all the pieces she or he uses — only their beauty. The designer does not have to compromise Beauty for Functionality.
The Art Tradition assumes:
1. While different people have different creative abilities, everyone has some creative ability, and can be influenced in how to apply these creative talents. 2. What matters in design is how you approach the process. It is irrelevant whether the designer is deliberative or spontaneous. It does matter whether the designer has applied the rules intuitively and correctly at each increment of the way. The end result will be a very beautiful piece of jewelry. 3. Design as art is really a form of sculpture or painting, and should be judged by the rules of sculpture or painting. The focus is on how you think through the process and make it intuitive. 4. The designer can achieve universally-accepted combinations and arrangements of design elements incorporated into any specific design piece or project. 5. Disciplinary literacy and fluency result from rehearsing theories and applying them over and over again until they become intuitive for any design choices you make.
Some consequences:
a. Little thought is given to issues of wearability or usability or durability.
b. The beauty of the design is as if it had been painted or sculpted. This is paramount.
c. The designer is taught that design is a matter of making choices, there are smarter choices to be made, and there are consequences when making any one choice. There is recognition that the designer may need to adapt to new or unfamiliar situations.
d. Design requires professional training and development over time.
e. Success results from universal understandings about how design elements should be combined and arranged so that they are harmonious, preferably with a bit of variety.
f. The full attention is on managing composition. Little attention or concern is placed on managing construction.
THE ART AND DESIGN PERSPECTIVE
A third approach to design is called theArt and Design Perspective. This paradigm recognizes the importance of the Art Tradition, especially in understanding the design process as the culmination of a series of choices, each sensitive to the context within which they are made, and each with elements of risks, rewards and consequences. This approach adds, however, to the types of choices the designer is seen as making beyond those involving beauty and appeal. These include such things as functionality, usability, durability.
· Design creates its own challenges which the Art Tradition either ignores or cannot meet.
· Designs function in real (or virtual) 3-dimensional spaces, particularly sensitive to position, light/shadow, volume and scale.
· Design must stand on its own as an object of art, while simultaneously interacting with the people around it while they are using or utilizing it. Design alters people’s relationships to it in the moment, across situations and settings, and over time.
· Design has to succeed where the responses to it are primarily subjective, even quirky. It serves many purposes for many wearers and viewers and users and responders. Some are aesthetic. Some functional. Some social, cultural and/or psychological.
In the Art and Design Perspective, designers learn their roles developmentally. That means, certain steps and rules should be learned before others, and that continual learning keeps building upon itself. While many designers initially learn their profession in a more shot-gun, less-than-organized way, it is necessary for them to, at some point, return to some basics and begin that developmental, hierarchical process. Only in this way will they truly begin to comprehend how everything interrelates and is inter-dependent.
There are many things to know and learn that present themselves in the design process — some art, architecture, engineering, behavioral science, social science, psychology, physics, mechanics, planning, marketing, administering, many techniques, many different materials, perhaps some computer coding and technology management, and the list goes on. The only way to become to become fluent in design is to gain an intuitive understanding how all these things are integrated, inter-related, and inter-dependent. That means developmentally learning how to become a design professional.
Designers work backward. That is, they first assess the shared understandings of all their clients involved, and how they anticipate the design project will be understood as finished and successful. Then the designers begin to clarify what tasks they need to perform to get there. How deliberate they are in specifying and following through on the ordering of the tasks to be performed will vary, depending on their personality, experience and comfort level. They may not do everything a full scientific management approach might suggest if there is no cost-benefit in the use of this time and the materials; that is, if their assessment of shared understandings informs them that particular tasks are unnecessary to do.
The Art and Design Tradition assumes:
1. Everyone has creative abilities, but for most people, these need to be carefully groomed and attended to developmentally. Expressing creativity is not a matter of turning a switch on and off. It’s a process that can be influenced by ideas and situations. The challenge is to teach people to become more intuitive in expressing their creative abilities and ideas. 2. What matters in design is that your project be judged as a work of art. In this case, the definition of “art” is specific to the design, in anticipation of how it will be used or utilized. Design can only be understood as “art” as it is put into use. 3. The end-user — the wearer or viewer, the buyer, the seller, the exhibitor, the collector, the student, the interactor, the inhabiter — responds to design mostly in a very subjective way. 4. Disciplinary literacy and fluency result from continual learning, rehearsing, and applying sets of integrated skills in different situations.
Some consequences:
a. This approach focuses on design issues. Beauty and appeal, along with functionality, wearability, durability, context, movement are all key considerations in selecting parts and interrelating these parts in a design. Very concerned with how you select parts and materials.
b. The beauty of the piece involves its construction, its lay-out, its consistency with rules of art theory, and how it holds up (physically and aesthetically) as it is worn in different situations. The focus is on how you organize your construction, piece by piece.
c. The jewelry designer is taught that design is a matter of making choices, there are smarter choices to be made, and there are consequences when making any one choice. Choices involve making strategic tradeoffs among appeal, functionality, and contextual relevance. There is recognition that the designer may need to adapt to new or unfamiliar situations.
d. Design requires continue professional training, development and re-training and re-development over time.
e. The full attention is on managing composition, manipulation and construction, and making hard choices where strategies conflict.
f. An acceptable outcome is one where the design maintains a sense of itself as art, as the piece is worn, inhabited or otherwise utilized. The piece or project should feel finished, usable and resonant to its intended client audience. The piece or project should reflect the designer’s hand while at the same time reveal its intimacy with the client.
The Universal and the Subjective
In design, we play with, organize and arrange design elements and objects, some of which are universally understood, like color schemes, and others in which clients respond to in very subjective ways.
For things universally shared and understood, we do not have to take the time to delineate and convey all the relevant information. Some of the relevant information is already understood. Designers do not have to spend a lot of time trying to anticipate and assess these universal and shared understandings.
These universals typically are predetermined. Sometimes by biology where our brains are prewired to either approach or flee. Universals are things which we approach. Other things we might have to interpret and figure out, perhaps deciding to flee. Othertimes, by culture or society, where we learn automatically to recognize various symbols, objects and meanings, and play out certain roles. And, yet, still othertimes by psychology, where we make certain assumptions, interpretations and value judgments where we accept things as fact without needing further proof.
Most things we will encounter, however, are not universals. They are subjective. Our work, our interactions with clients, our marketing our products and services all revolve around interpretation. Interpretation is subjective and judgmental.
What designers do need to figure out, when working with any client, is how that person’s assumptions, perceptions, expectations and values will impact the design process and the resulting piece or project so designed.
About the Shared Understanding Series…
For any design, it is a long journey from idea to implementation. This journey involves different people at different times along the way. People will not use a design if their agendas and understandings do not converge in some way. They will not buy a design or contract with the designer unless there are some shared understandings about what should happen and when, what will happen, and what the risks and rewards of the finished project will be. Shared understandings are about recognizing intent and risk. Design is both an outcome as well as an instrument for new shared understandings, new relationships, new behaviors, new reflections. As such, any design represents a commitment to a conversation — between designer and self and designer and client. The conversation allows for the management of shifting assumptions, expectations, perspectives and values. Better designs show the designer’s conscious awareness of all the things affecting shared understandings.
Bittner, Eva Alice Christiane, and Leimeister, Jan Marco. Why Shared Understanding Matters — Engineering a Collaboration Process for Shared Understanding to Improve Collaboration Effectiveness in Heterogeneous Teams. Year: 2013, Volume: 1, Pages: 106–114, DOI Bookmark:10.1109/HICSS.2013.608.
Canel, Melissa. The Role of Perceptions in Conflict. April 9, 2016. As referenced: