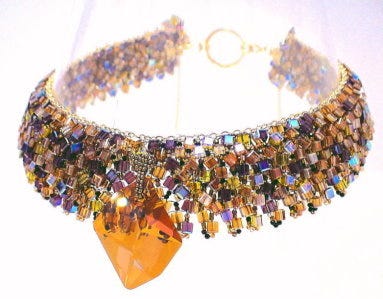
I was 4th place finalist, Swarovski jewelry competition
I highly recommend entering many art and jewelry design competitions each and every year. This is a good way to
· Raise your visibility
· Practice your self-promotion skills
· Get feedback on your work
· Gain more legitimacy and credibility
· Promote your value
· Keep aware of current trends and expectations in jewelry design
· Further inspire your clients
Competitions can supercharge your jewelry design growth and career.
The First Competition I Entered
In 2004, I submitted an entry (see image above) to the Swarovski Be Naturally Inspired jewelry design competition. I downloaded a copy of the rules and set to work. The project had to be at least 75% Swarovski Austrian crystal beads, stones, or other components. You had to submit an image of your final piece, an image of your inspiration, an artist bio, and an artist statement about your piece and how you translated your inspiration into the finished piece.
This image of the Grand Canyon at sunrise was my inspiration:
Grand Canyon Sunrise
I set out to work. Created the general design, selected the technique I wanted to use, and with determination and a lot of trial and error, created the finished piece. In the process, I discovered that different Austrian crystal colors, when used together, tended to blur boundaries and lose some of that distinct color sense that I wanted. I had to solve that problem, which I did, by using black 1.8mm delica beads between each crystal bead. This helped create sharper boundaries.
Up until that point, I had not written any kind of bio or artist statement. I was uneasy about how to describe the finished piece, such as what to call attention to. I had to do several drafts of each. Was a great exercise.
Submitted the piece. Heard back that I was a finalist. Then I had to send them the original piece. I had trouble letting go and saying goodbye. I found one package to use, then rejected it. Then another package, and rejected that. The fifth packaging idea was finally satisfying. Then I held onto the ready-to-ship package for almost a week before taking it over to the UPS shop. I had to insure it. The value was priceless to me. But I had to pick a number. And I prayed that the package would not get lost or damaging.
Swarovski emailed me that it had arrived safely.
I was invited to the awards ceremony they held in their offices in New York City.
And said goodbye again to my piece which was headed for their museum in Innsbruck Austria.
You Are Always A Winner
Whether you win or lose, you are, in fact, experiencing a rich source of inspiration and learning. There never really is a setback.
At the very least, you most likely will be included in a publicly presented list of submitters. You have already increased your visibility.
If your submission is accepted, you have something to list on your resume or list of achievements. You can use this as talking points when selling to a client, store or gallery. You can add this information to wherever you showcase the submitted work. You can embellish your descriptions with information from the materials you submitted for contest entry.
You can generate press releases, social media posts, special email announcements. You can send out updates as your submission progresses through the competition process, such as should you become a semifinalist.
As you do these kinds of things to increase your visibility, this builds credibility and brand awareness. Many store and gallery owners watch these contests closely, often making note of the better pieces and their designers, often following the designers over their career.
Whether The Feedback Is Positive or Negative — It Always Gives You A Better Understanding of Yourself As a Designer
Feedback provides clues to why your jewelry has VALUE to them. What do they want to know about it? How does the design help them solve a problem? What key attributes of VALUE should you promote to your clients?
Participating in competitions gives you a great opportunity to practice speaking about yourself and your jewelry, and seeing how others react.
Competitions provide many clues about what is relevant in the moment. They force you to figure out how to relate you and your design sense to a set of competition rules and expectations.
All this public visibility will actually inspire some people to spread the message about you. Generating word-of-mouth is often the most successful type of marketing.
Competitions Are Juried
Periodically do online searches for jewelry and art competitions. If the active link is a newsletter or mailing list of some sort, give them your email address. Some art competitions will allow submissions of jewelry; others will not.
I could see through the panes in the door this tall man heading towards me. I waited anxiously, obviously her father, to greet me and let me in to wait for his daughter and our date. Excited. Nervous. Eager to see her and lead her to our transportation, some dinner, a movie, perhaps something else. I had prepared for this moment. Though one can never fully prepare. And I heard him turn the knob and begin to open the door.
He opened the door violently. Violently. As if it were very heavy. Or difficult to open, you know, when you add that extra pull or push. His face was stern. Angry. Full of frustration. He was winding up. Something I wasn’t prepared for, and hoped would never happen.
“Get out of here!” “Stay away from my daughter!”
And the door slammed in my face.
This had happened too many times before with other planned-for dates that never materialized. In junior high. In high school.
Arlene, that was her name, had accepted my invitation for a date, I thought, because she wanted to go out with me. I liked her. I thought she liked me. We shared high school classes. We talked often. I felt an attraction. But Arlene, like Anne, and Sue, and Mary, and Ginny before her, had one objective. To get back at her parents by bringing a Jewish boy into their lives.
That Jewish boy. Walking up the front walkway. Up the 3 stairs. Ringing the doorbell. Unsuspecting — the parents that is, not caring whether the boy suspected or not.
Slap. Bang. Slam.
The outcome was always the same.
I crawled back to my car. My mother the driver prepared to take us wherever we wanted to go. She sat there speechless. Quiet. Blinders on. “Let’s go back home,” I said quietly with rejection.
My parents never reacted. They never confronted. Never stood up for me in a very public way. “We live in a Christian society, and have to accept that fact.” That was the rule they lived by. That was the rule they wanted me to live by.
The rule was cruel. I rued it. I resented my parents for it. Yes, they loved me, but never enough to protect me.
Arlene, over the next three years, never spoke to me at school again.
We would all bury this encounter deep within our memories. Hoping it would be forgotten.
Outward Or Inward
Someone once told me, that at the point we are ready to enter the world of life and things, we have to make a choice. A choice between heading outward or inward. We might head for a job in the corporate world. Or do something very singular and private. We might surround ourselves with networks of friends. Or find ourself to be our best, perhaps only friend. We might organize group activities likes sports or shopping or travel with many friends, eager to make new friends and acquaintances, and feeling very comfortable at it. Or we might explore the world on our own, hike the Appalachian Trail, set up a small business, exercise at home, a bit uncomfortable, even fearful, should we have to interact with any human encountered.
In the summer after my 18th birthday, I turned very inward. Inward was an escape. An escape from a world that told me over and over again that, as a Jew, I was ugly. Less than. Dangerous. To be kept at a distance. Not worthy of reward. Not worthy of attention. Uncomfortable to be around. I was tired of trying to fit in. Exhausted competing and defending myself. Wary of getting hurt. Punished for something to which I did not know how to relate.
Left alone, leaving myself alone, I thought about becoming an artist, or at least to explore that side of me. In my freshman year in high school, I took an art class. I needed to see whether what I felt inside of me could actually be channeled into some creative expression. I was sure I had talent, but I never tested this. I knew my parents would disapprove. Because they disapproved.
I remember when one adult — Risa — whom I met through a community program in the next town befriended me. She saw a lot of talent in me. She asked to meet with my parents. She had many connections in the creative community in New York City. She asked their permission to take me to New York and introduce me. My parents said, “No.” That ended that.
Over the next several months, my parents would ask me over and over again, to reaffirm that I believed their decision was right. I succumbed. They told me I couldn’t make a living at art, and I shouldn’t try. I was insecure. I felt unsupported in every other aspect of life, and this would be another one. Art was not to be given a chance. I would not give it a chance. Not then.
Inward. More inward. Ever inward. There had to be something in me that I would discover by turning inward. I was a kid. A young adult. This was too tall a task at the time. To go inward. All that was there were a bunch of emotions. Not well managed. Fear. Anger. Doubt. Disappointment. Rejection. Uselessness. But, as I saw it, turning inward, I had no other choice.
That art class in high school, well, that didn’t help. My art teacher was obsessed with noses — Jewish noses, to be exact. Every figure I drew and every figure I sculpted was never acceptable to him. While I was creating these works of art, he kept asking me why my figures did not have Jewish noses. On the finished works of art, he down-graded me because my figures did not have Jewish noses.
I had a Jewish nose, at least at the time before I thought rhinoplasty would solve all my problems. By the way, it did not. I remember the doctor probing to make sure that the nose job was for cosmetic reasons, not deeply concerning psychological ones. I never let on. Nose job done. I was still Jewish. Same problems. It wasn’t the nose.
In any event, I did not want to draw or sculpt figures with Jewish noses. My Jewish nose was a testament to all my Jewish problems of fitting in, being accepted, getting along with others, finding respect, getting any kind of positive attention. I did not want any of these things reflected in the figures I drew or sculpted.
High school was like that. I suffered what we call micro-aggressions, again and again, from most of my teachers. My guidance counselor. The principal of the school. Other students. Their families. Businesses in town. School was not a safe space. Nor was the town I lived in. Neither was my family.
I never took another art class again. Even in college, I would try to visualize taking some studio art classes, but was always too intimidated, too fretful, too fearful, too angry to register for them.
Inward. I could never find a direction where I felt safe. With meaning. With purpose.
I thought Archaeology would be a good profession. I pictured myself working alone. Spending hours carefully brushing away dirt and sand, hoping to uncover that special object. Out somewhere in a location not close to any other. Inward meant alone. Control. Not in the public eye or sphere. An easy specifiable task with a beginning, middle and rewarding end which no one could refute.
My parents supported Archaeology, but I never really knew why. I guess it sounded important to them. It had to have been, because their plan was doctor or lawyer, perhaps pharmacist. And there was no resistance to Archaeology. But secretly, I wanted Architecture. But I feared it. It seemed so public and outward. It smacked of Art, and I couldn’t bring myself, I had no internal energy, to confront every thing that I imagined I would have to confront if I ever brought my very being close to Art. I couldn’t do it. A choice I’ve always regretted.
I made it through college. Took an Archaeology class, and hated it, and said Goodbye to Archaeology. A good choice, one I have never regretted.
Out into the real world and my own apartment. I was in my early 20’s. I wanted to decorate my apartment. This was the right time, a safer time, less threatening, I thought, to see if I had any artistic talent at all. I wanted to try doing some paintings. Would they have that special appeal, and sufficient appeal, that I would take the risk of hanging them up. Exposing my apartment to something I created. Where other people might see what I created. And react to them. Then react to me. Relate the artworks to me. Relate me to the artworks.
I didn’t think, I just did. I purchased some acrylic paints, some brushes, an easel, some sketch paper and a set of colored pencils and a soft drawing pencil. I set the easel up in front of my couch, to where I could still see the TV.
The inspiration for my very first painting was a deteriorating black power poster that had been stapled to a telephone pole. I sketched what I saw directly onto the canvas with a soft pencil. I painted within the lines. Some areas white, others black. An exact replica. But lacking. There was no anger in the painting. Or a sense of defeat, because I felt their cause was defeated. I was angry. My cause was defeated. Intellectually I was set on making the connection, but it wasn’t coming across.
I propped the painting up against the wall, next to the TV. I pondered. I fretted. I started letting some self-doubt rise within my core. This wasn’t working for me. Failure. I was a Jew and I couldn’t paint. Yes, I could draw. I could illustrate. I could copy. But not enough. Not enough to want to hang this on the wall. To let others see it. They’d reject the painting. They’d reject me. Because I was a Jew, talentless, ugly, awful, unacceptable. It was no good. I was no good.
There it sat. Propped up. For months. I had to see it every time I sat down on my couch. My uncomfortable couch.
I brought the painting back up to my easel. I brushed in, with thickly applied, yet narrow, thin strokes, up and down the sides of the areas which were black. In dark red. Mustard. Black. More texture. More dimension. More randomness. More power. I had added something suggestive of blood and vomit and sweat. My painting was saying something to the world. There was no longer a sense that movement, that effort to sway society toward something else, was defeated. It was a work in progress, and with a sensibility of blood, and vomit and sweat, and with dimension, texture and, yes, direction and purpose, there was a chance. A chance that things could change. For what that poster stood for. For what I wanted for myself.
Inward. But a different inward. Nothing I could articulate about or draw boundaries around it. But a different inward, nonetheless.
I painted the tension between country and city folks because I had to find my way both within the country and within the city. I painted my Aunt Gert, a frenetic, conniving individual, sitting serenely on a city park bench. I painted an abstract rendering of chaos behind two skew lines representing measurement. I painted a furious Greek god against the ravages of AIDS. A pregnant woman within a environment marred by human revenge. A woman’s gloved hand grasping binoculars, staring out in the distance at some romantic encounter, thinking about the fun they would have.
I had lots of paintings with which to decorate the walls of my apartment. Expressive. Appealing. Meaningful. Of which I was happy to share publicly.
And many years later, however, through a confluence of seemingly fateful events, I began making jewelry. Not yet designing, but making. Making jewelry had a special fascination for me, moreso than painting. More real, authentic, touchable, something residing on the body, connected to my inner soul. More expressive and meaningful — what I wanted those drawn and sculpted figures I had created in that high school class to have been. I found myself on a pathway towards finding my Rogue Elephant, inwards or outwards, not sure, and beading him.
CONQUERING THE CREATIVE MARKETPLACE: Between the Fickleness of Business and the Pursuit of Design
How dreams are made between the fickleness of business and the pursuit of jewelry design
This guidebook is a must-have for anyone serious about making money selling jewelry. I focus on straightforward, workable strategies for integrating business practices with the creative design process. These strategies make balancing your creative self with your productive self easier and more fluid.
Based both on the creation and development of my own jewelry design business, as well as teaching countless students over the past 35+ years about business and craft, I address what should be some of your key concerns and uncertainties. I help you plan your road map.
Whether you are a hobbyist or a self-supporting business, success as a jewelry designer involves many things to think about, know and do. I share with you the kinds of things it takes to start your own jewelry business, run it, anticipate risks and rewards, and lead it to a level of success you feel is right for you, including
· Marketing, Promoting, Branding: competitor analysis, developing message, establishing emotional connections to your products, social media marketing
· Selling: linking product to buyer among many venues, such as store, department store, online, trunk show, home show, trade show, sales reps and showrooms, catalogs, TV shopping, galleries, advertising, cold calling, making the pitch
· Resiliency: building business, professional and psychological resiliency
· Professional Responsibilities: preparing artist statement, portfolio, look book, resume, biographical sketch, profile, FAQ, self-care
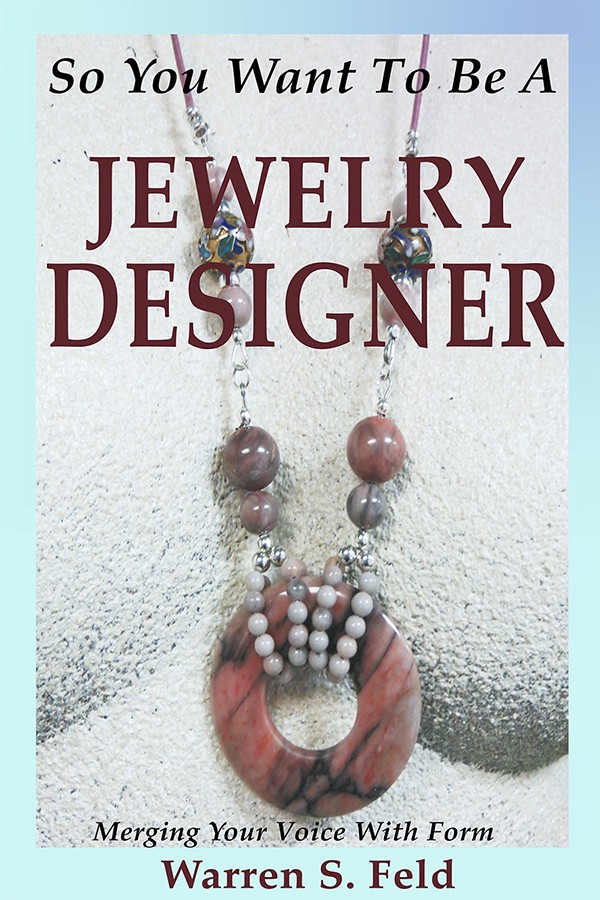
SO YOU WANT TO BE A JEWELRY DESIGNER Merging Your Voice With Form
So You Want To Be A Jewelry Designer reinterprets how to apply techniques and modify art theories from the Jewelry Designer’s perspective. To go beyond craft, the jewelry designer needs to become literate in this discipline called Jewelry Design. Literacy means understanding how to answer the question: Why do some pieces of jewelry draw your attention, and others do not? How to develop the authentic, creative self, someone who is fluent, flexible and original. How to gain the necessary design skills and be able to apply them, whether the situation is familiar or not.
The Jewelry Journey Podcast “Building Jewelry That Works: Why Jewelry Design Is Like Architecture” Podcast, Part 1 Podcast, Part 2
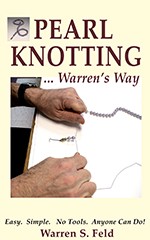
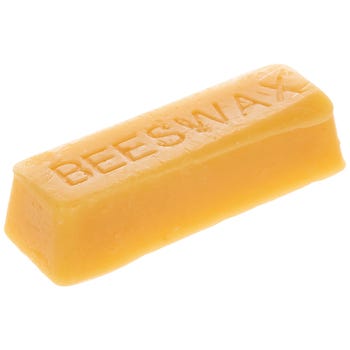
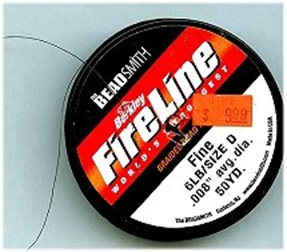
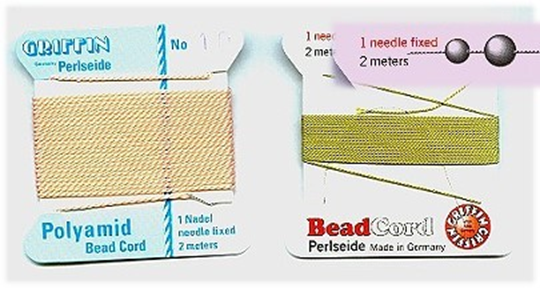
PEARL KNOTTING…Warren’s Way Easy. Simple. No tools. Anyone Can Do!
I developed a nontraditional technique which does not use tools because I found tools get in the way of tying good and well-positioned knots. I decided to bring two cords through the bead to minimize any negative effects resulting from the pearl rotating around the cord. I only have you glue one knot in the piece. I use a simple overhand knot which is easily centered. I developed a rule for choosing the thickness of your bead cord. I lay out different steps for starting and ending a piece, based on how you want to attach the piece to your clasp assembly.
SO YOU WANT TO DO CRAFT SHOWS:16 Lessons I Learned Doing Craft Shows
In this book, I discuss 16 lessons I learned, Including How To (1) Find, Evaluate and Select Craft Shows Right for You, (2) Determine a Set of Realistic Goals, (3) Compute a Simple Break-Even Analysis, (4) Develop Your Applications and Apply in the Smartest Ways, (5) Understand How Much Inventory to Bring, (6) Set Up and Present Both Yourself and Your Wares, (7) Best Promote and Operate Your Craft Show Business before, during and after the show.
Your Portfolio will most likely be the first impression a gallery, store, or collection gets of your work. You want to make it a positive and lasting one.
As with the Artist Statement, you do not want to follow anyone’s template when designing your Portfolio. This won’t serve you well. In reality, too many Portfolios look the same.
You will most likely want several versions, say 3 or 4, of your Portfolio in anticipate of different audiences and different ways you might use this. Specifically, you might want versions differentiated by one or more of these characteristics:
· Document without dates for jewelry pieces
· Document with dates for jewelry pieces
· Organized by theme
· Organized by audience
· Only those pieces representative of the brand you are trying to sell to a particular venue
· All your pieces
· Digital, including an online copy, an online copy with some graphical animations, an ebook, or a video online
NOTE: Your digital versions should be responsive. That means they are created in such a way that no matter what browser or what device (computer, tablet, phone, TV) they are viewed on, they will look good.
NOTE: I suggest sharing your digital copy with a URL link to where it would be posted online, say on your website. I suggest not sending a digital copy on a CD, disc or flash drive. I think the potential viewer might get annoyed having to set up their computer to ready it to read the digital copy off these formats.
· Print, including something you print yourself off an office printer, or something available from a bookseller as a print-on-demand.
· Presentation folder: basically a binder with plastic sheet holders, into which you can place sheets of printed images of your work and related text.
· PowerPoint slide show. Can easily be shared on a Tablet or Computer or Notebook Computer.
· With or without prices
Your Portfolio will include images, short text descriptions of each piece, its materials, techniques, and inspirations. You might include your Artist Statement, Testimonials, resume, copy of a significant press article about you. Of course, you would have all you contact information present.
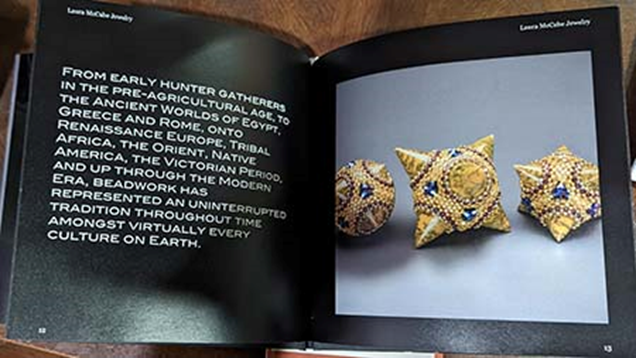
A Look Book is a more focused portfolio. It includes a limited number of your best pieces and pieces representative of your brand. The images are the stars. There is limited text, most often in the form of captioning or a short relevant quote. The Look Book should feel cohesive and feel like it targets a very specific audience.
Look Book by Laura McCabe, coverLook Book by Laura McCabe, inside pages
In Print: These days it is easy and very inexpensive to develop a print-on-demand book for your Portfolio. You have many size options. It can be printed in high quality color. You can have a hard cover and/or a soft cover. You can go with a high quality paper if you want. A printed Portfolio is something that you can give away or sell. This format ups your legitimacy and credibility significantly. You only have to print one copy at a time. It is not difficult to keep the book updated.
· Front cover art, back cover art, and side binding art
· Back cover text
· Bar code
· ISBN number
· Library of Congress number
· Your content with images
Designing Your Portfolio
STEP 1:Decide who this is for.
Research and delineate who their audiences are and to which they have to be responsive. For example, a gallery and its collector patrons. Or a store and its core customer base.
Given who it is for, what format and content would they prefer? How do you want them to respond after they view your Portfolio; what action (of course in your interest) do you want them to take?
STEP 2:Select your content.
Ask yourself:
· How consistent and coherent is my content? Have I described each project from inspiration to aspiration to designed outcome to production and distribution? If it is important to present yourself as a brand, how well does your selected content support your brand image?
· Does my content clearly show and demonstrate how I think and problem solve when designing jewelry? Have I identified the design challenges for each project, and how I solved them? Some design challenges might be time constraints, selecting materials, selecting techniques, availability of technologies and tools, consistency with fashion and style expectations.
· Does my text support my images, and vice versa?
· You do not want to settle for a laundry list of projects. You want a set of projects and their related content with which you can create a story.
STEP 3:Organize your content.
Does your organization reaffirm your communication and presentation skills? Have you made clear your style, process and design philosophy? Do the substance, look and feel support an image of you as a professional jewelry designer? Does your organization tell a story, with a beginning, middle, and end, and some takeaways or learnings? Does it have a good narrative flow?
You might organize by theme or color or technique or silhouette. You might organize by price point. You might organize by the context in or types of outfits with which the jewelry might be worn.
NOTE: Cognitively, it is much easier for the reader to digest 3 or 4 pieces of information at a time. So, you might group projects into collections of 3 or 4 pieces. For each piece, you might present 3 or 4 critical pieces of information. And so forth.
STEP 4:Design the cover.
This can be all image, all text, or a mix of image and text. How well does the cover coordinate with your jewelry and brand image?
STEP 5: Evaluation.
Does anything seem too vague or incomplete? Are the words you use strong, active, sufficiently descriptive and powerful? Does the narrative flow make sense, or can it be improved?
Ask yourself and some of your designer friends whether your Portfolio, given your audience and how you want them to act in response, prove that you are the right fit.
Given your audience, what questions can you anticipate that you think they might ask you? Example, what was difficult? What might you do differently if doing the piece again? Why would someone want to buy this piece? What kinds of related designs have you considered?
Some Advice
· Layout doesn’t matter nearly as much as the content and how you present your work
· Include some photos which demonstrate the scale of your work and the wearability of your work
· For a gallery, retail venue, or agency, show the retail prices you believe your work should sell for. Don’t include dates. A buyer might wonder, given an earlier date, why the piece hadn’t sold. For other audiences, you can decide whether or not to include either prices and/or dates. You might want to show your evolution and history as a jewelry designer.
· Keep images separated from text. Don’t interrupt a series of images about a particular piece with text. The viewer will have a visual journey that is a very different experience than a reading journey.
· Keep only 1–2 images per page.
· Make it easy for the viewer to know what you are showing them: detail name of piece, materials, size, technique, price.
· You might include several SOLD pieces, clearly marked as sold.
· Back up all your digital files!
· Unless asked to, I would suggest not sending images on 35mm slides.
· A vertical (portrait), rather than a horizontal (landscape), format will work best. If one of your pieces looks best presented horizontally, take that horizontal image and embed it on a vertical formatted page.
· Include a TITLE PAGE after your COVER. Acts as a visual transition to the images of your pieces. The Title Page should have the artist’s name and some kind of tag line or catchy informative heading.
· 8 ½ x 11” is always a good size, but you do not have to limit yourself to these dimensions.
· A white background will work well, but you do not have to limit yourself to white. Be sure your font colors will easily be seen when printed on a color other than white.
· Where using text, always have a HEADING LINE, which usually is a larger font, than the text you use in paragraphs.
· Start each piece on its own page. Usually, consistency in page/text/image formats from piece to piece will be more pleasing to the reader.
· Ideally, showing 20–30 pieces is a good goal. Depending on how you intend to use the Portfolio and who your audience is, you might present more pieces, but not less than 20.
· Create a BACK PAGE or BACK COVER. This might include a photo of yourself, some biographical information, and contact information.
CONQUERING THE CREATIVE MARKETPLACE: Between the Fickleness of Business and the Pursuit of Design
This guidebook is a must-have for anyone serious about making money selling jewelry. I share with you the kinds of things it takes to start your own jewelry business, run it, anticipate risks and rewards, and lead it to a level of success you feel is right for you, including Getting Started, Financial Management, Product Development,Marketing, Selling, Resiliency, Professional Responsibilities.
SO YOU WANT TO BE A JEWELRY DESIGNER Merging Your Voice With Form
So You Want To Be A Jewelry Designer reinterprets how to apply techniques and modify art theories from the Jewelry Designer’s perspective. To go beyond craft, the jewelry designer needs to become literate in this discipline called Jewelry Design. Literacy means understanding how to answer the question: Why do some pieces of jewelry draw your attention, and others do not? How to develop the authentic, creative self, someone who is fluent, flexible and original. How to gain the necessary design skills and be able to apply them, whether the situation is familiar or not.
The Jewelry Journey Podcast “Building Jewelry That Works: Why Jewelry Design Is Like Architecture” Podcast, Part 1 Podcast, Part 2
PEARL KNOTTING…Warren’s Way Easy. Simple. No tools. Anyone Can Do!
I developed a nontraditional technique which does not use tools because I found tools get in the way of tying good and well-positioned knots. I decided to bring two cords through the bead to minimize any negative effects resulting from the pearl rotating around the cord. I only have you glue one knot in the piece. I use a simple overhand knot which is easily centered. I developed a rule for choosing the thickness of your bead cord. I lay out different steps for starting and ending a piece, based on how you want to attach the piece to your clasp assembly.
In this book, I discuss 16 lessons I learned, Including How To (1) Find, Evaluate and Select Craft Shows Right for You, (2) Determine a Set of Realistic Goals, (3) Compute a Simple Break-Even Analysis, (4) Develop Your Applications and Apply in the Smartest Ways, (5) Understand How Much Inventory to Bring, (6) Set Up and Present Both Yourself and Your Wares, (7) Best Promote and Operate Your Craft Show Business before, during and after the show.
For most jewelry designers, the primary focus on their work is on creating pieces which are beautiful and desirable. The focus is on effectiveness. But as a business, you have to repeatedly ask yourself, But At What Cost? That is, you need to think about efficiencies in the design and production processes, if you are to make a sufficient profit and survive and thrive as a business.
Design Debt: Something Serious Which Needs To Be Managed
In more jargoned, but eye-opening, language, things the jewelry designer can do to increase efficiency will also reduce what is called Design Debt.
Design Debt refers to all the inefficiencies in your design and production processes which add more time and effort to what you are trying to accomplish, as you are designing or producing any piece of jewelry. Design Debt continues to accumulate and increase as a project matures over time. Even after the designer has relinquished the project to the client, Design Debt will continue to accumulate if the designer fails to deal with it head on.
Design Debt includes things like…
Taking too much time to meet your goals
Having to do too much research or experimentation when figuring out how to proceed
Spending too much time thinking how to make a particular piece of jewelry unique or special for a certain client
Failure to adequately streamline the steps in the production process
Failure to match each step in production with the skill and pay level of the person doing it
Design Debt also includes all the good design concepts or solutions you skipped in order to complete your project on time. Design Debt includes all the additional time and effort you will have to make, should you have a backlog of projects which keep accumulating and accumulating as you are trying to finish the particular project you are now working on.
Some designers might approach the ever-accumulating Design Debt by cutting corners or relinquishing the project to the client prematurely. The designer might settle for a lower fee or less profitability. The designer might find that negative word-of-mouth is building too quickly with unsatisfied clients or demanding business stakeholders.
There are many sources of Design Debt, some very tangible, others less so. Examples of these sources of Design Debt include…
The designer relies on an overabundance of non-reusable materials, or too much variation in inventory, or, inconsistent styles and conventions, all difficult to maintain
The designer might start a project with assumptions, rather than research
The designer might not have sufficient time or budget to implement each choice and step with care
The designer might not have a full understanding of how each design element, form and component should best be arranged and interact within a particular composition
The designer might be working with a partner or assistant, with incomplete information passing hands, as each works on the project
The designer might not have a chance to test a design before its implementation or sale
The designer might not get the opportunity to find out what happens with a particular piece after it has left the studio and the client wears it
The designer might not have in place any formal or informal time and procedure for reflection and evaluation, in order to understand how various choices led to good or bad designs, or whether there is an improvement or degradation in the designer’s brand due to good or bad performance
The designer might rely on published patterns without the wherewithal to adapt or customize them, or otherwise approach unfamiliar situations
Ultimately, Design Debt is measured in how satisfied our clients are with the products we design, (also understood as revenues and profits) and how that satisfaction affects what is referred to as contagion — the spread of word of mouth and its positive or negative impacts on our brand and reputation (again, also understood as revenues and profits). Over time, Design Debt accumulates and becomes a great burden on any designer and design business.
Anything which unifies the design process and reduces variability in the numbers and types of choices we make as designers will help us tackle Design Debt.
CONQUERING THE CREATIVE MARKETPLACE: Between the Fickleness of Business and the Pursuit of Design
This guidebook is a must-have for anyone serious about making money selling jewelry. I share with you the kinds of things it takes to start your own jewelry business, run it, anticipate risks and rewards, and lead it to a level of success you feel is right for you, including Getting Started, Financial Management, Product Development,Marketing, Selling, Resiliency, Professional Responsibilities.
SO YOU WANT TO BE A JEWELRY DESIGNER Merging Your Voice With Form
So You Want To Be A Jewelry Designer reinterprets how to apply techniques and modify art theories from the Jewelry Designer’s perspective. To go beyond craft, the jewelry designer needs to become literate in this discipline called Jewelry Design. Literacy means understanding how to answer the question: Why do some pieces of jewelry draw your attention, and others do not? How to develop the authentic, creative self, someone who is fluent, flexible and original. How to gain the necessary design skills and be able to apply them, whether the situation is familiar or not.
The Jewelry Journey Podcast “Building Jewelry That Works: Why Jewelry Design Is Like Architecture” Podcast, Part 1 Podcast, Part 2
PEARL KNOTTING…Warren’s Way Easy. Simple. No tools. Anyone Can Do!
I developed a nontraditional technique which does not use tools because I found tools get in the way of tying good and well-positioned knots. I decided to bring two cords through the bead to minimize any negative effects resulting from the pearl rotating around the cord. I only have you glue one knot in the piece. I use a simple overhand knot which is easily centered. I developed a rule for choosing the thickness of your bead cord. I lay out different steps for starting and ending a piece, based on how you want to attach the piece to your clasp assembly.
In this book, I discuss 16 lessons I learned, Including How To (1) Find, Evaluate and Select Craft Shows Right for You, (2) Determine a Set of Realistic Goals, (3) Compute a Simple Break-Even Analysis, (4) Develop Your Applications and Apply in the Smartest Ways, (5) Understand How Much Inventory to Bring, (6) Set Up and Present Both Yourself and Your Wares, (7) Best Promote and Operate Your Craft Show Business before, during and after the show.
At what point did I first begin to call myself a Jewelry Artist?
Coming out as a jewelry artist is similar, though not exactly the same, as someone coming out as gay. It is fraught with fear and dread. It means very visibly presenting yourself with a new public identity. It means preparing your ego to receive some negative comments, critiques, reviews, perhaps doubt or disbelief, and in some rarer instances, rejection or denial. It means asking others to accept and support you in your new role as Jewelry Designer.
There is a betwixt and between aspect to this coming out process — a rite of passage. And the unknown time and feelings and situations, between the before and afterwards, is often a span of uncertainty too great for many an artist to transcend. Many who want to be jewelry designers, are somewhat afraid to present themselves as such. These closet artists tell their family and friends such things as, “I dabble in this and that, including jewelry-making.” Or, “I consider myself a bank teller slash jewelry artist (and you can substitute whatever profession you are in for the words bank teller).” Or, “I’m making some things for fun or gifts, but not selling things.”
There is some hesitation. “I am a jewelry designer.” Can’t quite get the words out.
“I am a jewelry designer.” But I wasn’t trained and educated to be one. It was not my original passion, though I am passionate about it now.
“I am a jewelry designer.” Keep wanting to say “but” or add some qualification, so other people don’t say, with mocking and astonishment, “You’re a what?!@#$” “Can you make a living at that?”
“I am a jewelry designer,” you whisper to yourself over and over, but don’t tell anyone else.
When you step out of the closet, however, you show others you want respect. As a jewelry designer. You demand from others an understanding. As a jewelry designer. You present yourself as someone with self-esteem and confidence. As a jewelry designer.
After multiple levels of transition, I realize that the only thing that would diminish me as a jewelry artist is if I turned my back on it.
Before the pandemic, I was trying to arrange some Enrichment Travel tours. One was to Rome. This was part of the itinerary. If any group wants me to lead a Jewelry Discovery Tour to Rome or elsewhere, I would be happy to talk with you about this. — Warren@warrenfeldjewelry.com
Some favorite sites and studios in Instanbul:1. Topkapi Museum, Treasury Section Guided Tour
Once the palace of the Sultans of the Ottoman Empire, Topkapi is a vast treasury of Islamic culture, jewelry, costumes, science and weaponry. This tour is of the Treasury section (7 Halls of Exhibits) of the Topkapi Palace Museum (3rd courtyard) where you will find masterpieces of Turkish art of jewelry from different centuries and exquisite creations from the Far East, India and Europe.(2 hours guided tour of Treasury Section; 1–2 hours free time for guests to wander other parts of museum on their own.) Open every day except Tues, 9am-4:45pm (til 6:45 in april- october) 2015: most of Treasury Section is under restoration and is closed; check back for when work is finished)
WALKING TOUR OF ARTISAN JEWELRY GALLERIES IN NISANTASI / TESVIKIYE AREA Nisantasi / Tesvikiye is one of the best shopping districts of Istanbul. It contains designer label stores, very nice restaurants and cafes, a beautiful mall, and a few outstanding hotels. It is home to several galleries showcasing the best of Turkish jewelry artists and artisan jewelry. The store hours in this district are typically 11–7pm Tuesday through Saturday. Need to verify Monday and Sunday hours.
Urart (abdi ipekci Cad. 18/1)
One of Turkey’s most established jewelry companies, Urart makes re-creations, and also chic interpretations, of ancient Anatolian designs and motifs, Hittite symbols of noblesse and glory, the arabesques of Islamic art speaking to the infinity, Seljuk tiles echoing the dreams of the Silk Road or fluid objects of modern life… Design commits to matter, not only the striking form but also the wisdom that abides at the heart of a culture.
İn her first years, Zeynep Erol was mainly inspired by nature and created forms with her own modern interpretation. İn later years however, her designs have become more geometrical. Zeynep Erol’s Jewelry reflects her spiritual inner world, affections, relations, feelings, desires and change in the philosophy of life. The main materials used by Zeynep Erol in creating her pieces are; green, white and red gold (18k) together with silver (950). The selection of the remaining materials and the precious stones are chosen differently for each particular theme she wants to get across. A wide range of materials such as coconut shells, pearls, brilliants, sapphire, ruby, emeralds, quartz, glass, rose cut and uncut diamonds, sandalwood and feathers are used by her as necessary.
Based in Istanbul, jeweller and sculptor Aida Bergsen creates jewellery with different themes that reflect traces of her hometown and its multi-layered cultural fibre. She Draws inspiration mainly from mythological heroes, organic forms and the human anatomy. Each of her wearable sculptures are meticulously crafted in wax then transformed into timeless jewels using traditional techniques.”I try to re-inerprate traditional crafts and skills in jewellery making in order to create a more contemporary approach. I like to have a play on the contrast between light and shadow as I believe it is key in capturing form at a deeper level.”Aida
Bergsen was awarded with the “étoile de mode” at BIJHORCA in Paris and she was named the first runner- up for the very prestigious Couture Show Las Vegas in 2011 and 2014.
ECNP Gallery is a contemporary jewelry gallery showing the designs and collections of Ela Cindoruk and Nazan Pak. Partners since 1989, Ela and Nazan’s designs and creative process have reflected their philosophy of ‘less is more’. The duo have participated in numerous fairs in Turkey and abroad; their works can be found in many museum shops and galleries. Ela has received the 2012 Red Rot Design Award. Same year, the creative duo was awarded 2012 Jewelry Designer of the Year Award of Elle Style Awards. On September 2014, the designers opened their new showroom and studio, on the 21st year work anniversary. The showroom also has a gallery under its roof, Ela and Nazan’s a long time dream, a reflection of their commitment to design and aesthetic and their ambition to this gallery hosts design exhibits and aims at becoming a meeting point for the design/art world.
SODA, founded in 2010, focuses on contemporary trends in art, particularly of jewelry artists. They are interested in showcasing the use of new materials and design concepts. Some permanent artist representations as well as rotating exhbitis.
7. Alef(Tesvikiye Mh, Haci Emin Efendi Sokak, No:4)
This goldsmith adapts classical goldsmith principles to contemporary techniques and designs. Alef’s founder, jewelry designer Yeşim Yüksek,
BoyBeyi is a family-run business that has been around for more than 100 years, their collection features many traditional rose-cut diamonds, as well as modern and colorful pieces, all inspired by the Turkish culture.
WALKING TOUR OF JEWELRY GALLERIES, JEWELRY AND BEAD SHOPS IN AND NEAR THE GRAND BAZAAR
This walking tour takes you in and around the Grand Bazaar, discovering jewelry galleries displaying works by local artists, as well as a myriad of stores in the Grand Bazaar which sell jewelry, beads and beading supplies.
Tiara(yavuz Sinan mah., rakip gumus pala cad. No; 69)
Antique jewelry, award-winning designs, modern designs that reflect trends in the world, some might find at Tiara Jewelry … Byzantine, Roman and Ottoman cultures, inspired by the collections, since the ancient civilizations in history has produced reflections of jewelry. Traditional hand-made items by craftsmen in the production of valuable, native jewelry lovers to win the admiration of the foreign guests
Widely considered to be one of Istanbul’s top jewellers, with several locations throughout the city. The cuffs are studded with precious stones, the necklaces are vintage-inspired, and the gold rings are topped with enormous yellow diamonds. The Bazaar outpost is Kafkas’ first store, and you’ll often find the owners presiding behind the glittering displays.
Sevan Bıçakçı has started his journey as a jeweler when he was only 12 years old as an intern in Hovsep Çatak’s workshop. His first personal collection that he created in 2002 was inspired by the historical Grand Bazaar — Sultanahmet area where he spends a considerable part of his daily life. Since then his unique designs that require intensive craftsmanship have been attracting the attention of collectors as well as some distinguished stores.
4. Walk up Nuruosmaniye Caddessi Past the heart of jewelry and bead stores in the Grand Bazaar
There are piles and piles of antique rings, bracelets, necklaces, and earrings from Central Asia, as well as walls covered in strands of colorful beads made out of precious and semiprecious stones.
OPTIONAL: 3 block side trip to http://www.haciburhan.com) aka Emin Bead Company, Sterling Silver Handcrafted Turkish Beads. Sell different silver jewelry, beads and accessories for silver jewelry. Wholesale. Eminsinan Mah. Yeniceriler Cad. Evkaf Sok. No: 15 (Formerly 9) Cemberlitas, Fatih (verify store hours)
5. Angel Old Jewellery (kiliccilar sok., cuhaci han No: 36)
When you’re visiting this tiny, poorly lit (the blindingly bright interior doesn’t do their products any justice) store, you will be transformed into a museum where you can purchase anything you want from a collection of princess-worthy jewelry. From tiaras to necklaces, brooches to bracelets, these elegant pieces are bedecked with intricate, precious stones like diamonds. This store has both antique pieces, as well as new jewelry that looks vintage due to a special ageing method they use.
In the Grand Bazaar’s Cevahir Bedestani, Bagus sells the proprietor’s own reasonably priced collection of handmade jewelry made with silver and semiprecious stones as well as intriguing pieces imported from countries including India, Nepal, Thailand, and Indonesia.
Before the pandemic, I was trying to arrange some Enrichment Travel tours. One was to Rome. This was part of the itinerary. If any group wants me to lead a Jewelry Discovery Tour to Rome or elsewhere, I would be happy to talk with you about this.
ROME 1. JEWELRY GALLERIES WALKING TOUR, ROME. There are several stores/galleries specializing in artisan jewelry, with both some very famous local jewelry designers, as well as some less known between the Piazza di Spagna (Spanish Steps) and Piazza del Orologi. This is a 1.25 mile (2.1km) leisurely jewelry shopping tour along ancient walking streets in the heart of historic Rome, where we discover the works of local jewelry artisans. (5 hour walking tour with dinner break; begin at 3pm (any day except Monday) when these shops are most likely to be open. Typical hours: open 10-1:30pm and 3:30-7:30pm).
Damiani, via condotti 84 (All Damiani collection jewels are exclusive and unique creations, combining the allure of Italian jewelry with the unmistakable, always modern and fashionable Damiani taste.)
4. Melis Massimo Maria, via dell’Orso 57 (ancient techniques reproduced in gold)
5. Studio Giorelleria R. Quattrocolo, via della Scrofa 54 (both antique jewelry and jewelry produced in their own workshop studio, including their line of micro-mosaics)
6. Alternatives, via della Chiesa Nuova 10 (Specializes in contemporary. Avant guard jewelry and is dedicated to the promotion of both newcomers and internationally established artists from all over the world)
7. Del Fina Delettrez, via Governo Vecchio 67 (Delfina Delettrez Fendi is a designer and jeweller based in Rome. Original use of figurative surrealism and natural iconography including hands, eyes, bees, and lips.)
~~~~~~~~~~~~~~~~~~~~~~~~~~
ROME 2. SHOPPING TRIP TO ARTISAN MARKET IN ROME. Visit to Mercato Monti, 30+ artisans selling fashions, jewelry and accessories, first 3 Sundays and last Saturday of the month, 8am-8pm, inside exhibit hall of Palatino Hotel, via Leonina 46. (4 hours)
But when you think jewelry and speak jewelry and work jewelry, this is what you have become. This is your purpose.
Becoming a Jewelry Designer is exciting. With each piece, you are challenged with this profound question: Why does some jewelry draw people’s attention, and others do not? When designers turn to how-to books or art theory texts, however, these do not uncover the necessary answers. They do not show you how to make trade-offs between beauty and function. Nor how to introduce your pieces publicly. You get insufficient practical guidance about knowing when your piece is finished and successful. In short, you do not learn about design. You do not learn the essentials about how to go beyond basic mechanics, anticipate the wearer’s understandings and desires, or gain management control over the process.
So You Want To Be A Jewelry Designer reinterprets how to apply techniques and modify art theories from the Jewelry Designer’s perspective. This very detailed book, by jewelry designer Warren S. Feld, reveals how to become literate and fluent in jewelry design.
Section 1-JEWELRY BEYOND CRAFT, p. 19 1. Jewelry Beyond Craft, p. 21
Section 2-GETTING STARTED, p. 27 2a. Becoming the Bead Artist and Jewelry Designer, p. 29 2b. 5 Questions Every Jewelry Designer Should Have An Answer For, p. 39 2c. Channeling Excitement, p. 51 2d. Developing Your Passion, p. 65 2e. Cultivating Practice, p. 79
Section 3-WHAT IS JEWELRY, p. 97 3. What Is Jewelry, Really?, p. 99
Section 4-MATERIALS, TECHNIQUES AND TECHNOLOGIES, p. 113 4a. Materials — Knowing What To Know, p. 115 4b. Techniques and Technologies — Knowing What To Do, p. 143 4c. Mixed Media, Mixed Techniques, p. 175
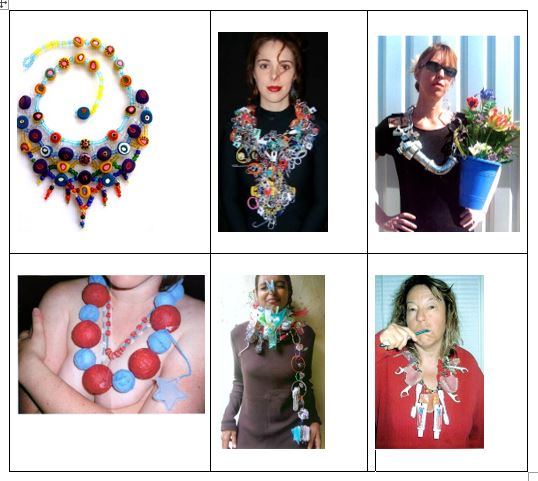
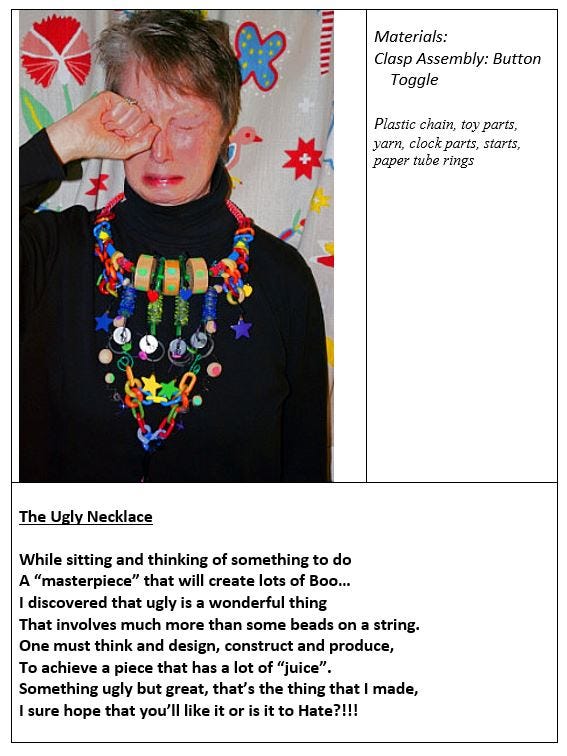
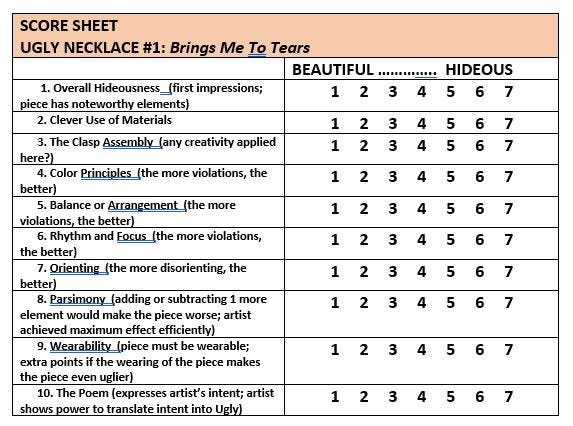
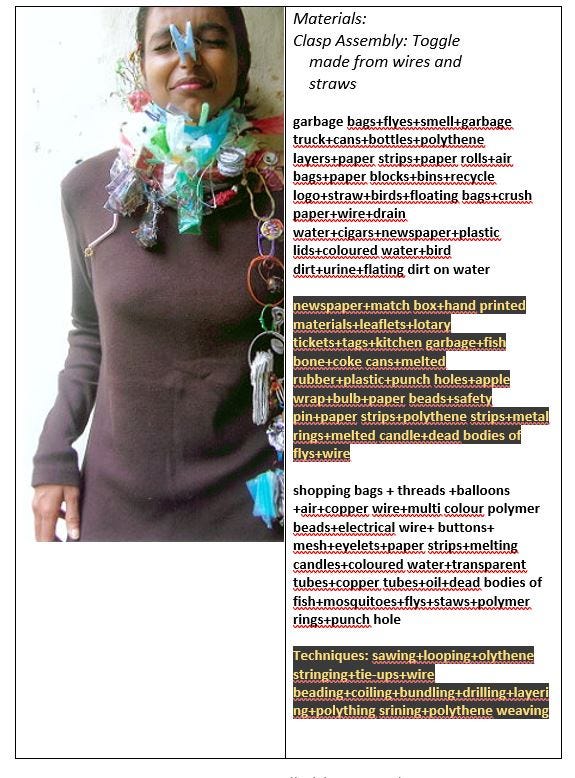
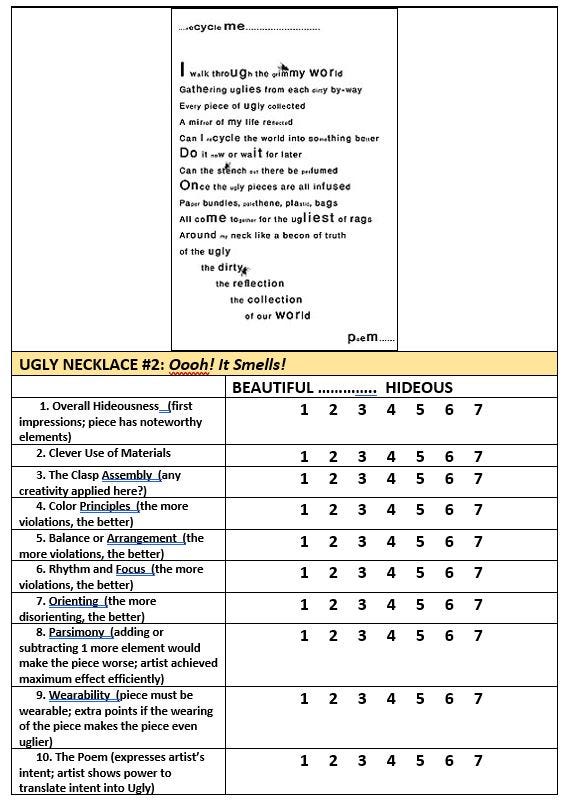
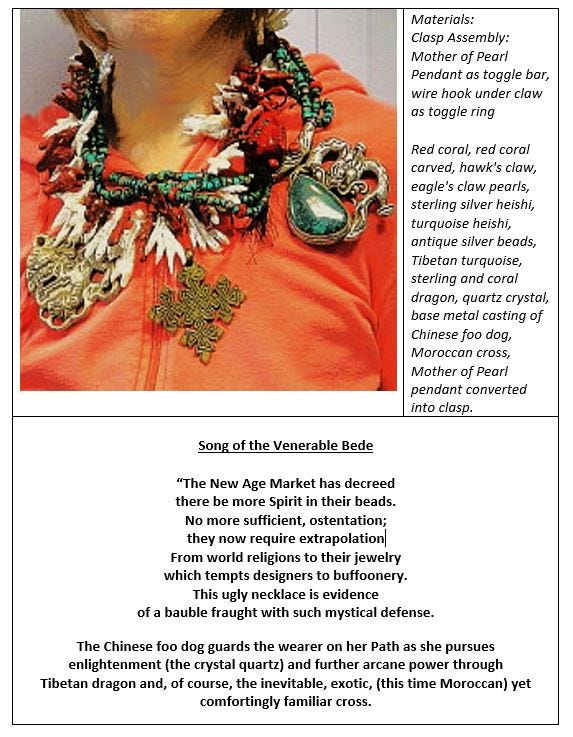
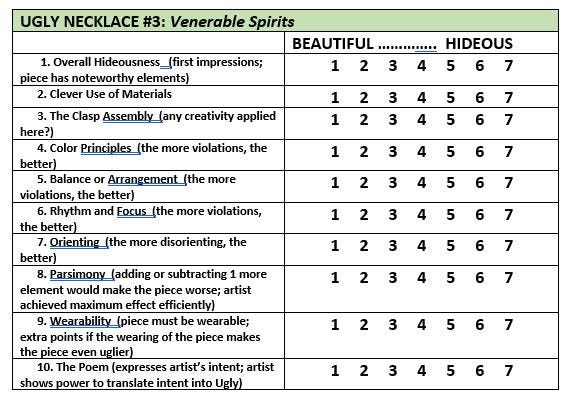
Section 5-RULES OF COMPOSITION, CONSTRUCTION, AND MANIPULATION, p. 179 5a. Composition — Playing With Blocks Called Design Elements, p. 181 5b. The Jewelry Designer’s Approach To Color, p. 197 5c. Point Line Plane Shape Form Theme, p. 231 5d. Jewelry Design Principles: Composing, Constructing, Manipulating, p. 253 5e. How To Design An Ugly Necklace — The Ultimate Challenge, p. 289 5f. Architectural Basics, p. 309
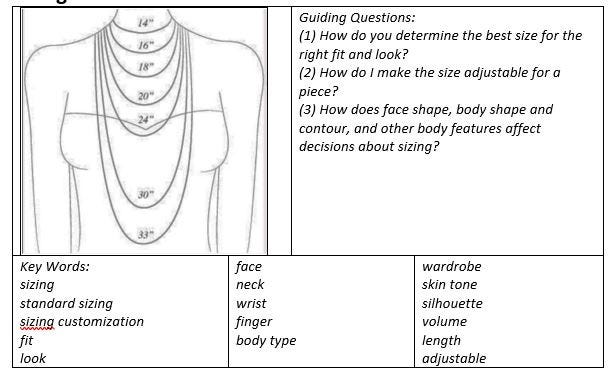
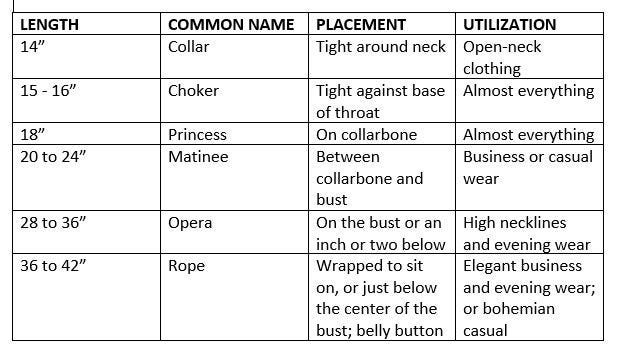
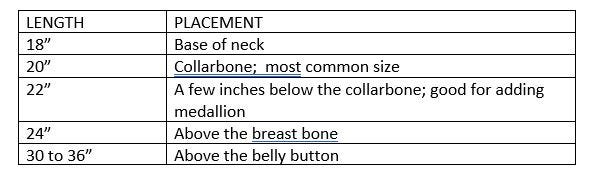
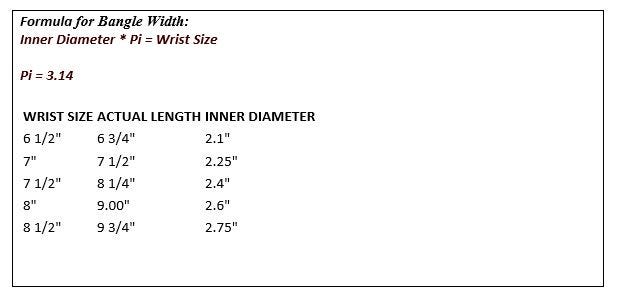
5g. Architectural Basics — Anatomy of a Necklace, p. 335 5h. Architectural Basics — Sizing, p. 343
Section 6-DESIGN MANAGEMENT, p. 349 6a. The Proficient Designer: The Path To Resonance, p. 351 6b. Jewelry Design: A Managed Process, p. 377 6c. Designing With Components, p. 387
Section 7-INTRODUCING YOUR DESIGNS PUBLICLY, p. 407 7a. Shared Understandings and Desires, p. 409 7b. Backward-Design Is Forwards Thinking, p. 437
Section 8-DEVELOPING THOSE INTUITIVE SKILLS WITHIN, p. 445 8a. Creativity Isn’t Found, It’s Developed, p. 447 8b. Inspiration and Aspiration, p. 459 8c. Your Passion For Design, p. 467
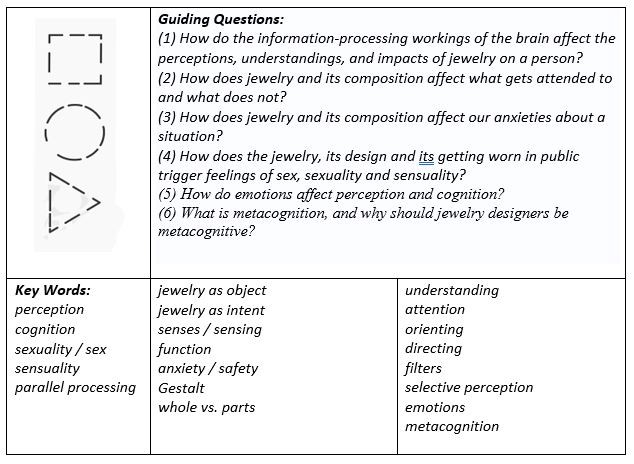
Section 9-JEWELRY IN CONTEXT, p. 483 9a. Contemporary Jewelry Is Not A Look — It’s A Way Of Thinking, p. 485 9b. Contemporizing Traditional Jewelry, p. 499 9c Fashion Style Taste Art Design, p. 513 9d. Designing With The Brain In Mind: Perception, Cognition, Sexuality, p. 523 9e. Self-Care, p. 535
Section 10-TEACHING DISCIPLINARY LITERACY, p. 543 10. Teaching Disciplinary Literacy In Jewelry Design, p. 545
Final Words of Advice, p. 579 Thank You, p. 581 About Warren Feld, p. 583 Other Articles and Tutorials, p. 587
In this very detailed book, with thoroughly-explained instructions and pictures, you are taught a non-traditional Pearl Knotting technique which is very easy for anyone to learn and do. Does not use special tools. Goes slowly step-by-step. Presents a simple way to tie knots and position the knots to securely abut the bead. Anticipates both appeal and functionality. Shows clearly how to attach your clasp and finish off your cords. And achieves that timeless, architectural perfection we want in our pearl knotted pieces.
Most traditional techniques are very frustrating. These can get overly complicated and awkward. They rely on tools for making and positioning the knots. When attempting to follow traditional techniques, people often find they cannot tie the knots, make good knots, get the knots close enough to the beads, nor centered between them. How to attach the piece to the clasp gets simplified or glossed over.
Fortunately, Pearl Knotting doesn’t need to be this hard.
Pearl Knotting…Warren’s Way teaches you how to:
· Hand-knot without tools
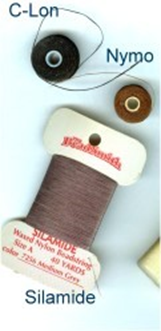
· Select stringing materials
· Begin and finish pieces by (1) attaching directly to the clasp, (2) using French wire bullion, (3), using clam shell bead tips, or, (4) making a continuous piece without a clasp
· Add cord
· Buy pearls, care for them, string and restring them, store them
By the end of this book, you will have mastered hand-knotting pearls.
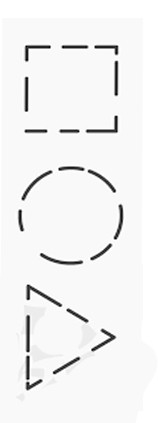
Jewelry plays a lot of psychological functions for both the wearer and the viewer, so it is important to understand some things about perception and cognition and how the brain processes information. The jewelry designer plays with various design elements, let’s call these parts. The designer arranges these parts into a composition, let’s refer to this as the whole. The brain takes in information about, that is, attends to each part, and information about the whole, and assigns a meaning to these. The designer must anticipate all this, especially understanding Gestalt behavior. So the designer is not only dealing with aesthetic and functional considerations in their designs, but also the psycho-social-emotional triggers and filters these may represent. Some of these emotions may evoke a sense of sex, sexuality and sensuality. Last, jewelry designers must be very aware — metacognitive — of how they think through design, and be able to turn their experiences into thinking routines.
DESIGNING WITH THE BRAIN IN MIND
Jewelry plays a lot of psychological functions for the wearer, the viewer, and the buyer, so it is important to understand some things about perception and cognition and how the brain processes information. Jewelry is used to meet the individual’s needs for self-esteem and self-actualization. A sense of oneness and uniqueness. Or conversely, a sense of being a part of a larger group or community. A sense of survival and protection. A re-affirmation of values and perspectives. A connection to a higher power or spirituality. A sense of fantasy. An orientation to what is up and what is down and what is left and what is right.
The jewelry designer plays with various design elements, let’s call these parts. The designer arranges these parts into a composition, let’s refer to this as the whole. The brain takes in information about, that is, attends to each part, one by one, and then gathers information about the whole, and assigns a meaning to all these. Because of how the brain works, there may be several meanings that rise up to the surface, so the brain has to filter and prioritize these somehow. The resulting assigned meaning(s) results in some type of behavior. At its simplest level, the behavior is either one of placing attention or one of suggesting movement. The behavior, whatever it is, reaffirms for the observer that their goals are getting met or that there is some consistency and coherency with personal values and desires.
The designer must anticipate all this. So the designer is not only dealing with aesthetic and functional considerations in their designs, but also the psycho-social-emotional triggers and filters these may incur. Some of these emotions may evoke a sense of sex, sexuality and sensuality. Jewelry has sensual qualities. It has gender associations. It may symbolically represent what is safe and what is not to view or to touch.
PERCEPTION
Perceptions are ways of regarding, understanding or interpreting something. We perceive using our senses. We touch, we see, we feel, we hear, we smell, we sense positioning. Perceptions are subjective, and each person has their own subtle differences, even when responding to the same design or event. In fact, different people may have very different perceptions about the same design or event. Their assumptions, expectations and values may further color their perceptions.
Each person filters their perceptions with each move, each conversation, and each situation. Such filters may contingently alter perceptions. Perceptions are not fixed. They are very sensitive to the context and the situation. Any type of filter may result in selectively perceiving some things, but not others. In design work, our clients might selectively focus on brighter lights, louder sounds, stronger odors, sharper textures, silhouettes, proportions, placements and distributions, balance, harmony and variety. Selective perception can add some more muddiness to the interaction especially as designer and client try to find and develop the shared understandings necessary for success.
Adequately sharing understandings within a situation and among the people in it depends on the amount of information available to each person and how correctly they interpret it. Perception is one of the critical psychological abilities we have in order to survive in any environment.
The designer needs to be open to understanding how the client perceives the design tasks and proposed outcomes, and to adjust their own perceptions when the management of the relationship calls for this. There is no formula here. Each situation requires its own management strategy. Each designer is left with their own inventiveness, sensitivity, and introspective skills to deal with perceptions. But it comes down to asking the right questions and actively listening.
How does the client begin to understand your product or service? Can the client describe what they think you will be doing and what the piece or product might look like when finished? Can the client tell you how the finished piece or product will meet their needs and feelings? Can the client tell you about different options? How will they interpret what you want them to know? What impressions do you want to leave with them? Do they perceive a connection between you as a designer and your design work as proposed? What levels of agreement and disagreement exist between your perceptions and theirs? Can you get at any reasons which might explain their perceptions, and any agreement or difference? Can you clear up any misperceptions?
The jewelry designer needs to distinguish between how the jewelry is perceived when it is not worn from when it is worn. When not worn, jewelry is an object admired and perceived more in art or sculptural terms. When worn, jewelry is an intent where perceptions about the jewelry as object are intertwined, complicated, distorted, amplified, subjugated — you get the idea — with the needs and desires of the individual as that person presents the self and the jewelry as worn in context. Either set of perceptions may support one another, or they may be contradictory.
COGNITION
Cognition involves how the brain processes our perceptions, particularly when these perceptions are incomplete or contradictory or otherwise messy or unresolvable. Cognition focuses on how the brain takes in existing knowledge and creates new knowledge. Cognition is both conscious or unconscious, concrete or abstract, intuitive or conceptual. Cognition may influence or determine someone’s emotions. Metacognition is your own awareness of your strategies and methods of thinking and problem-solving.
The brain takes in a lot of information all at once. The brain looks for clues. It compares clues to information stored in memory. Typically different parts of the brain will simultaneously process (e.g., parallel processing) either different clues or the same clues in different ways. Some information will have greater relevance or resonance than others. Some information will be rejected. Some information will be recategorized or reinterpreted.
You can think of all these mental processes going on in the brain as a huge, self-organizing undertaking, but happening within minute fractions of a second. What happens is very context- or situation-specific. The goal is the creation of some kind of understanding. This understanding will have some logic to it. It will be compatible with and reaffirm the individual’s memories, assumptions, expectations, values and desires. This understanding will typically result in some kind of behavioral response. The response will most often be related to attention or movement. The understanding and the behavioral response will likely get stored in memory.
Attention
The cognitive process starts with attention. Attention has to do with how we focus on some perceptual information, and not on others. A key function of attention is how to identify irrelevant data and filter it out, enabling other more significant data to be distributed to other parts of the brain for further processing.
Picture a piece of jewelry. This jewelry will present many stimuli — color, placement, proportion, balance, volume, positioning, its relation to the human body, the context within which it is worn, perhaps how comfortable it feels, symmetry, and the list can go on and on. Which perceptual clues are most important to the person who needs to decide whether to wear or buy it? Attention is the first cognitive step in determining how to answer this, though the observer does not always consciously grasp the specifics of what is going on.
There are two types of attention: (1) Orienting, and (2) Directing.
Orienting Attention works more reflexively. For example, we are prewired in our brainstem with a fear or anxiety response. This helps us reflexively avoid snakes and spiders. This anxiety response has major implications for how people initially respond to jewelry as it is worn.
Say a stranger is in a room and wearing a necklace. You approach the entrance to this room. You see the stranger who is wearing the jewelry. Your brain has to instantaneously evaluate the situation and determine if it is safe for you to approach and continue to enter the room, or whether you need to be fearful and turn around and flee. Jewelry can play a key role here.
The jewelry signals the primary information the brain needs to make this judgment. Perceptions are filtered to the very basic and very elemental. First the viewer wants to be able to make a complete circle around the jewelry. Anything which impedes this — an ugly clasp assembly, poor rhythm, colors that don’t work together, uncomfortable negative spaces — makes the brain edgy. If the brain gest edgy, the jewelry will start to get interpreted as boring, monotonous, unsatisfying, ugly, and we can go all the way to will cause death.
After the viewer makes that complete circle, a second perception kicks in and becomes key to whether the brain will signal it’s either OK to approach or, instead, you better flee. This second perception is a search for a natural place for the eye/brain to come to rest. In jewelry we achieve this by such things as placing a pendant in the center or graduating the sizes of the beads or doing something with colors.
In slightly more technical terms, the jewelry draws the observer to a focal point at which they can sense an equilibrium in all directions. The viewer feels physically oriented. The jewelry composition presents a coordinated form which connects spaces and masses within something that feels / looks / seems like a unique harmony. The observer is made to feel, as she or he is attenuating to how mass relates to space within the composition, that not only is each element of the jewelry related to the ones preceding or following it, but that each element is contributing to the concept of the whole — the jewelry form is greater than the sum of its parts. There is continuity. There is coherence. Space and mass are interdependent. The distinction among parts is removed. The brain likes this. It searches for it. It makes it restful.
The full experience of the jewelry only gains its full meaning within its total expression. The significance of the total jewelry composition unfolds as the observer moves about its separate parts. This expression, in turn, as it relates to the attention processes of cognition, gets reduced to the confluence of the two clues of (a) making a complete circle, and (b) finding a place to come to rest. If the two clues are satisfying, the jewelry is viewed as finished and successful, and the immediate environment is seen as safe.
The jewelry designer controls the limits and the possibilities for attention. If jewelry design were merely a matter of organizing a certain number of parts, the process would be very mechanical and not at all creative. All jewelry design would be equally good (or more likely, bad). The purpose of good jewelry design is to express particular meanings and experiences for the wearer, viewer or buyer to attend to. Jewelry design is only successful to the extent these are fully communicated to the observer, and are fully sensitive to how perception and cognition play out in our brains. That is, how the jewelry, through its design, enhances or impedes perception and cognition.
Directing Attention, the other type of attention, signals to the observer the possibilities for or constraints on movement. It is more deliberate rather than reflexive. It can divide one’s attention so that the person can pay attention to more than one thing at the same time. Using our example, there could be several strangers in the room, each wearing a different style and design of necklaces. As our observer walks into the room, attention can be shifted from one person / jewelry to another, or focused on one person / jewelry alone.
Directing Attention determines the potential for movement, so that the observer can anticipate the possibilities, or conceive the limits. With whatever piece of jewelry is worn, how freely or easily can the person shift positions, stand, run, dance, lay down? Will any type of movement change the appeal of the jewelry as worn? Is there anything about the design of the jewelry which anticipates different kinds of movements and positioning? Will the appeal of the jewelry remain should the wearer move to a different type of lighted situation or into a shadow? How much ease should be built into the construction of the piece?
The aesthetics of mass and space, such as the interplay of points, lines, planes and shapes, are rooted in a person’s psychology in order to arouse predictable patterns of experience. There seems to be a constant human need to perceive and attend to spatial relationships which distinguish harmony from cacophony. This psychological response to form most likely is connected to a person’s mechanisms for balance, movement and stature.
On the simplest level, observers use jewelry to assist them in knowing what is up and what is down, and what is left and what is right. Jewelry is used similarly in this directing sense as the floors, walls and ceilings are used towards this end in a room, or the horizon, landscape and trees are used outside. Without any clues about positioning, a human being would fall down and not be able to get up.
Picture, for example, how you might feel when the person standing next to you has one earring stuck in a 90 degree angle, or is only wearing one earring, or has a necklace mispositioned and slightly turned around the neck. You most likely feel a bit uncomfortable, perhaps uncomfortable enough to let the person know the jewelry needs to be adjusted in position, or that they seem to be missing an earring. Or perhaps not so comfortable to raise the issue publicly.
GESTALT: The Whole Vs. The Parts
One mechanism of cognition is called a Gestalt. At its root, Gestalt means that the whole composition is more meaningful than the meanings of its individual parts. There is a chicken and egg type of debate within the field about whether the person attends to the parts first with a stronger emergent whole, or whether the person needs to understand the whole first and use this understanding to interpret the parts. But for jewelry designers, we do not have to get into the debate here. Jewelry designers need to recognize that the resulting whole composition should always be more resonant, more finished-feeling and more successful than any of the individual design elements incorporated into the piece.
At its core, people are motivated to recognize entire patterns or configurations. If there are any gaps or flaws or mis-directions, the brain, cognitively, has a tendency to fill in the gaps or ignore the flaws or mis-directions. Where perceptual information does not exist or is somehow incomplete, the brain will fill in the blanks, so to speak, using perceptions about proximity, similarity, figure-ground, continuity, closure, and connection. This all involves work on the part of the brain. The brain may generate resistance towards this end, unless somehow coerced or tricked by aspects of the design choices themselves.
Jewelry will have a lot of gaps of light throughout. The individual beads and components do not blend into each other. They are distinct points of information. Instead, from the brain’s point of view, there are the equivalent of cliffs between each one. The brain, in effect, is asked to jump each cliff. It may be resistant to do so. The brain wants harmony. The brain wants to connect the dots into a smooth line. Or, if the composition were separate lines, the brain wants to connect the lines into a smooth, coherent plane. Or, if there were several distinct lines and planes, the brain wants to integrate these into a recognizable shape or form. But again, all this is not automatic. The brain will resist to do any more work than necessary. The designer will need to make smart, influencing, persuading choices in the design. The Gestalt mechanism is a set of these kinds of choices.
The brain needs to be sufficiently motivated to make the effort to harmonize the pattern or configuration. Gestalt is one of the cognitive, motivating, innate forces the brain uses. In music, when the brain hears part of a melody, it not only hears the notes, but also something else, let’s, for simplicity, call this a tune. This something else allows the brain to anticipate how the melody will continue. If the melody at this point changes key, the brain anticipates how the melody will play out in the new key as a similar tune but with different notes before it is played. How the brain interacts with a piece of jewelry has parallels.
One obvious example is the use of color simultaneity effects. Here the color of the next bead is affected by the color of the previous bead. Place a grey bead next to an orange bead, and the grey bead will take on some orange tones. Both beads get perceived as blended or bridged, even though, in reality, they are not. The observer generalizes the relationship between the two stimuli rather than the absolute properties of each. Take three beads, one emerald, one olivine and one grey. You would not normally find these two greens within the same composition. Place the grey bead between the two greens and, because of simultaneity effects, the two greens will harmonize as the grey forces a blending or bridging.
Jewelry designers need to learn the basic principles or laws of Gestalt. This allows them to predict the interpretation of sensation and explain the way someone will see their compositions. It allows them to anticipate how their jewelry will arouse predictable patterns of emotions and responses in others.
These laws can be used as guides for improving the design outcomes. They can be used to influence what design elements should be included. In what forms / volumes / placements / other attributes these design elements should take. How design elements should be arranged. How construction and function should best relate to aesthetics. How the jewelry should be worn. How the jewelry might coordinate with other clothes and accessories or contexts.
These principles are based on the following:
Principle of Proximity: In an assortment of elements, some which are closer together are perceived as forming groups. Emphasizes which aspects of elements are associated.
Principle of Similarity: Elements within an assortment are grouped together if similar. This similarity could be by color or shape or other quality. If the assortment is comprised of many elements, some similar and some dissimilar, the brain will sort this out so that the similar ones, no matter where placed within the assortment, will be perceived and grouped together.
Principle of Closure: People tend to perceive objects as complete, even when incomplete, rather than focusing on any gaps or negative spaces. When parts of the whole are missing, people tend to fill in the missing parts. The brain is preset to attempt to increase the regularity of sensation or the equilibrium within an experience or event.
Principle of Symmetry:The mind perceives objects as being symmetrical and forming around a center or focal point. Similar symmetrical elements will be grouped as one. The brain will attempt to make something which is asymmetric be perceived as symmetric as best as it can. The brain equates symmetry to coherency.
Principle of Common Fate: Elements are perceived as lines which move along the smoothest path. We perceive objects as having trends of motion. In jewelry design, think about something like rhythm. The beads are not moving in reality, but we perceive a direction and a quality of movement.
Principle of Continuity: Elements of objects tend to be grouped together, and therefore integrated into perceptual wholes, if they are aligned with an object. If two objects are next to each other or overlap, the brain tends to see each object distinctly as two separate wholes, if the elements within each object are aligned and continuous. Picture a 2-strand necklace. The brain will be primed to see these as 2 separate strands or wholes, rather than one whole necklace. Objects with abrupt and sharp directional changes will less likely be perceived as a whole.
Principle of Past Experience: Under some circumstances, visual stimuli are categorized according to past experience. Especially when faced with unknown or unfamiliar objects, the brain will resort to using past experience as a means for interpretation and whether to group elements within the objects as a whole.
DESIGNS CREATE EMOTIONS
There is a growing body of knowledge of the mechanics of sensory processes in cognition. A good design creates positive emotions for the viewer, wearer and/or buyer. Jewelry designers need a deeper understanding of types of emotions and their psychological underpinnings. People develop emotions with jewelry on three levels: (1) visceral (intrinsic), (2) behavioral (behavior), and reflective (reflection).
(1) Visceral (wants to feel): attractiveness, first impressions, feelings
(2) Behavioral (wants to do): usability, function, performance, effectiveness
(3) Reflective (wants to be): meaning, impact, shared experience, psycho-socio-cultural fit
METACOGNITION
Metacognition is an awareness of your own thought and problem-solving processes. It involves a search for patterns and the meanings behind them. It involves a lot of reflection. It involves a sensitivity to the choices made when confronting any unfamiliar or unknown situation. It concerns an awareness of why some choices worked better than others, or not at all.
For jewelry designers, it is important to take metacognition one step further. It is important to turn your experiences into thinking routines. These routines are fix-it strategies you bring with you when overcoming difficult or unfamiliar situations.
SEX, SEXUALITY, AND SENSUALITY
As a jewelry designer, you have to be very aware of the roles jewelry plays in sex, sexuality and sensuality. The act of sex. Everything leading up to it. Eroticism. Sex, however, differs from sensuality. Sensuality is how the jewelry brings out the sensual — the gratification of the appetite for visuals, sounds, tastes, smells and touch. Sensuality always makes jewelry desirable. But perhaps no two people experience the sensuality of a piece of jewelry in the same way.
These sex-sexuality-sensuality roles include,
(1)The Peacock Role
(2)The Gender Role
(3)The Safe Sex Role
One sexual role of jewelry is the Peacock Role. People wear personal adornment to attract the viewer’s attention. This means that the jewelry not only needs to be flashy enough, but also must contain culturally meaningful elements that the viewer will recognize and be sufficiently meaningful as to motivate the viewer to focus his or her attention on the jewelry and who is wearing it.
These culturally meaningful elements might include the use of color(s), talismans, shapes, forms. They clue the viewer to what is good, appealing, appropriate, and to what is not. But the jewelry must also provide clues to the individuality of the wearer — her (or his) personal style, social or cultural preferences, personal senses of the situation in which they find themselves.
Another of these sexuality roles — The Gender Role — is to define gender and gender-rooted culture. Certain jewelry, jewelry styles, and ways of wearing jewelry are associated with females, and others with males. Some are used to signal androgyny, others polyamory or gender fluidity. You can easily label which jewelry looks more masculine, and which more feminine. Some jewelry is associated with heterosexuality, and others with homosexuality. I remember when men, in a big way, started wearing one earring stud, it was critical to remember whether to wear the stud in the left ear lobe (hetero) or the right one (gay). For engaged and married women, it is important to recognize which style of ring is more appropriate, and which hand and finger to wear these on.
One of the most important sexuality roles, however — The Safe Sex Role — concerns the placement of jewelry on the body. Such placement is suggestive of where it is safe, and where it is unsafe, to look at or to touch the person wearing it. The length of the necklace, relative to the neck, the breast, or below the breast. How long the earring extends below the lobe of the ear. Whether the person wears bracelets. The size of the belt buckle. If a person has body piercings, where these are — the navel, the eyebrow, the nose, the lip.
Jewelry calls attention to areas of the body the wearer feels are safe to view or touch. It’s like taking a sharpie marker and drawing a boundary line across the body. Jewelry gives the viewer permission to look at these areas, say above the line, and not others below the line. Jewelry may give the viewer permission to touch these areas, as well. The wearer may want to call attention to the face, the neck, the hands, the ankle, but also to the breasts, the naval, the genital area.
We know that certain areas of the body are more sexually arousing than others. We know that different people are more or less comfortable with these areas on the body. But how does the wearer communicate that? How does the wearer communicate her (or his) personal views of what is sexually acceptable without having to physically and verbally interact with someone in order for that person to find out?
Jewelry. How jewelry is worn is one of the most critical and strategic ways for achieving this Safe-Sex goal. The linear form of the jewelry imposes a boundary line on the body. Do not cross it. And make no mistake, this boundary line separates the permissible from the impermissible, the non-erotic from the erotic, the safe from the unsafe. In a similar way the centerpiece focuses attention as if it were an arrow pointing the way. Jewelry is not just a style preference thing. It’s a safe-sex preference thing, as well.
When news of the AIDS epidemic first burst on-stage in the 1980s, you witnessed a very dramatic change in jewelry and how it was worn. Right before the AIDS epidemic, large long earrings were style. Remember shoulder dusters. But as awareness of AIDS spread, most women stopped wearing earrings for awhile. Then gradually, they began wearing studs. Then very small hoops. It wasn’t until around 2004 that some women wore the new chandelier earrings, and you saw longer earrings on actresses as they paraded down the red carpets of one award show after another.
Prior to AIDS, the necklace style was for longer necklaces — 24” to 36” long. The necklaces were full — multi-strand, lots of charms and dangles. Again, as awareness of AIDS spread, the necklace profile changed rapidly to no necklace at all, or to thin, short chains and chokers. You would typically find ONE charm, not many, on a necklace. Attention was pulled away from the genital area, the navel and the breasts, all the way back up to the face.
Prior to AIDS, necklaces and earrings were the best-sellers in my store. After AIDS, it became bracelets. Holding hands. Not necking. Not fondling. Not sexual intercourse. Holding hands was now the acceptable norm. This was safe.
Body piercings came into major vogue during the 1980s. And look what typically got pierced. Noses, belly buttons, eyebrows, lips. This of this as a big Body Chart for safe sex.
As society became more understanding of AIDS and how it spread, the jewelry became larger. It extended to more areas of the body. People wore more of it. But in 2009, it was still restrained, when compared to what people wore before the 1980s.
In the sexual hunt between the sexes, jewelry plays an important boundary-defining role. Let’s not forget about this. Jewelry, in some sense, is an embodiment of desire. Jewelry communicates to others how the wearer comes to define what desire might mean for the self. It communicates through placement, content, embellishment and elaboration.
Jewelry does not have to be visibly erotic, or include visual representations of sexual symbols, in order to play a role in sexuality and desire — a role that helps the hunter and the hunted define some acceptable rules for interacting without verbal communication.
___________________________________
FOOTNOTES
Canel, Melissa. The Role of Perceptions in Conflict. April 9, 2016. As referenced:
WHY YOU NEED AN ORIENTATION TO BEADS & JEWELRY FINDINGS
Most people who make jewelry learn the craft in a haphazard way. Taking a course here or there. Watching some video tutorials online. Making a few pieces with some friends.
I have found over the years that, because of this, most jewelry designers are unfamiliar with all the various possible choices of stringing materials, clasps, jewelry findings, beads and the like. And they are unfamiliar with the implications of making one choice over another. They do not have a clear conception of how one part relates to another part or relates to how to execute a particular technique.
Because of this, most jewelry designers do not seem to fully understand quality issues associated with the materials they use. They have a weak understanding of what materials should best be used, and best not be used, and with what projects. They do not know what happens to all these different materials over time as the jewelry is worn. They do not know the required design tricks and strategies for making pieces more durable and more comfortable.
That’s why I developed this very comprehensive ORIENTATION TO BEADS & JEWELRY FINDINGS.
This course reviews the various materials jewelry designers use. I point out the pros and cons for selecting and using these. I go over how these impede or enhance function, movement, and the mechanics of construction.
Some topics covered:
HISTORY, GLASS BEADS, LAMPWORK BEADS, CRYSTAL BEADS, SEED AND DELICA BEADS, METAL BEAD, CLASPS, FINDINGS, STRINGING MATERIALS, TOOLS, ADHESIVES, TYPES OF BEADING AND JEWELRY MAKING, 3 APPROACHES FOR TEACHING BEADING AND JEWELRY MAKING, SUPPORT SYSTEMS AND OTHER ARCHITECTURAL CONSIDERATIONS,
This Series of 18 modules, most around 20 minutes, and totaling a full 5 1/2 hours of introductory materials about all kinds of beads, metals, clasps and stringing materials for the beader and jewelry maker.
And one more thing. For those who take this Orientation, I also have a 75-page article for you to download about getting started in jewelry making. You have a purpose as a jewelry designer: To merge your voice with form. This covers things you will need to know to find that voice.
how to channel your excitement
what types of jobs are available for those with jewelry making skills
The women were so excited about the jewelry. Trying it on. Adjusting it to see if they could wear it a different way. Changing up the silhouettes. Pretending they were wearing different outfits to visualize what the pieces would look like. It was a very versatile line of jewelry, and all the women noticed that very quickly. They could wear necklaces as bracelets. Combine bracelets into necklaces. Take one bracelet, add it to a necklace, and create a longer piece. They could purchase different pendant drops, all as add-ons as they wished or none at all. And the drops easily converted into earrings. Imagine that! And the awe and glee and elation and animation — yes, these women were more than happy to have found this jewelry designer and her custom pieces.
I was there that day. In the store. At this one-day trunk show. I saw it all. These women were purchasing almost every last piece. It was the right aesthetic. Contemporary but conservative as well. An individualized look but not outlandish. Easy to wear. Easy to adapt. Easy to visualize what it would look like with different outfits and in different situations.
The jewelry designer was very attentive. She demonstrated the flexibility of each piece in the line. She, at first, asked the women individually a lot about themselves and how they liked to wear jewelry. Then she subtly shifted the conversation a bit so they were talking about themselves and how they would want to wear her jewelry.
At one point, I slowly looked around this upscale clothing, accessories and jewelry store. There were seven store associates standing around. Standing around. A glazed look on their faces. The enthusiasm and energy before them somehow foreign. After the trunk show, when the designer was no longer there, they would be the ones to represent her and her jewelry.
They stood there with blank faces. As if watching a movie they found uninteresting. None of them stepped in. None of them stepped up. Even though the jewelry designer was mobbed with seven or eight women at any one time. They obviously were unable to empathize with the crowd. They had no clue how to sell the pieces because these were pieces of jewelry they didn’t wear themselves. They were somewhat clueless about how to suggest how these store guests could put things together in a stylish, wearable way.
At the end of the day, the jewelry designer was very happy with her sales. But it hit her. Her jewelry would remain at this store for the next several months. But she would not. She would be leaving that day. And she was worried. She thought that over the 10 hours, her purpose was not only to sell to customers, but her purpose was also to model for the sales staff the smart ways for working with these customers and selling her product.
Had the store associates been reliable deputized partners with the jewelry designer that day, all would have made many more customers happy, and made a lot of money and commissions for store, sales staff and designer. Going forward, the designer now had doubts.
Jewelry Designers Often Have To Rely On Others,
The Designers’ Success Relies On Their Whims
Most jewelry designers do not own their own shops. They rely on other people to sell their stuff. They might put their jewelry in a clothing, accessories or jewelry store on consignment. They might be represented by a gallery or sales representative, with their jewelry spread out in many stores. They might package their jewelry into trunk shows or pick boxes where they send out their jewelry to various stores. These other venues can pick and choose and sell what they want, then return the rest.
The success of sales becomes the whim of who sells it. Their understanding of the designs. Whether they like the pieces or not. Their motivations to keep things clean, neat and displayed well. If they can see themselves or their friends or spouses wearing these. Their sense of style, knowing what things might work well together with what fashions. How well they communicate with their customers. Perhaps even IF they communicate with their customers. If they follow-up with their customers.
Designers Must Take The Lead In Preparing Others To Sell Their Jewelry
The designer must play a leadership role here. The designer as leader must effectively influence, persuade, train and convince whoever will be selling their jewelry how to sell it. As best as possible, the designer must build shared understandings about the product with those who will sell it.
Passive assumptions won’t work here. The designer cannot assume that store owners and their sales staff, because they supposedly want to show a profit, will be good at their jobs. More likely, they are not — particularly when it comes to selling someone else’s stuff. The consequences of poor salesmanship are virtually invisible until many months, even years, later. That’s too late to wait.
To add to the difficulties, the opportunities in terms of time, resources, and follow-up are very limited. The designer may get just one shot to build shared understandings and accomplish several goals. Ideally this should happen in person. Often, it is not. Often it is reduced to shared emails, some printed materials, and some phone calls.
Six Key Shared Understandings
There are six key understandings which the designer must influence others to share. These include,
1. The Key Product Details
2. The Primary Product Benefits
3. The Smart Ways To Use The Products To Build Customer Relationships
4. What Rewards The Sales Staff Should Expect For Themselves, Based On Their Performance
5. At All Times, How To Maintain The Optimum Inventory and Product Mix
6. How To Routinize Timely Feedback
1. The Key Product Details
Think of every line of jewelry as its own culture with a group or tribal identity. Which three to six words or simple phrases encapsulate what that identify is all about? What were the key, primary design choices made which give this line of jewelry its character and resonance? How would anyone know that any piece of jewelry was a part of that group or tribe?
These key words or details might relate to materials and techniques. They might reference fashion, style and taste. They might be things about the designer or about jewelry design in general. There will be lots and lots of details which can be conveyed, but the list of details will need to be severely culled.
People have what is called finite rationality. They can only handle and remember between 4 and 10 pieces of information at a time, with 7 pieces of information usually the upper limit for most people.
Don’t confuse the sales staff. Don’t let them confuse the customers. Limit that descriptive words you use when explaining your jewelry, your design choices, and your design goals. Keep these descriptors simple, un-jargoned, devoid of business babble and clichés.
Keep repeating these 3 to 6 things. Repeat them in ways you want the sales staff to learn them, understand them, and be able to repeat these 3 to 6 things to their customers when you are not around.
2. The Primary Product Benefits
It is not the features of your jewelry that result in sales; it is the benefits people perceive the jewelry will provide for them. People do not focus on what the product is. They focus on what the product means to them.
People buy things to solve problems. These problems might relate to needs and wants. They might relate to achieving status and position. They might resolve emotional desires.
What problems for the potential customer does your jewelry solve? Think carefully about this. Make lists.
Then reflect awhile on how you think your jewelry solves these problems for your customers better than any of your competitors. What are your competitive advantages?
Convey to store owners and sales staff the results of your thinking and synthesis. You do not only want to list for them what customer problems your jewelry solves for them. You do not want your explanation divorced from the actual selling situation. You are not presenting an academic assessment; you want to present a marketing assessment. You want to convey how your jewelry resolves customer problems better than anyone else. This is a little more difficult to do and get the words out, and requires some practice.
And, again, remember that people have finite rationality. Don’t talk about everything. Focus on the couple of primary competitive advantages your line of jewelry has.
As best as possible, make your benefits concrete and specific. Think of which benefits would most readily stick in people’s minds.
3. The Smart Ways To Use The Products To Build Customer Relationships
Any sale is an interaction based on communication. The sale is not the only result. The building of a relationship also results. Too often sales staff performance is rated based on number of sales, and too rarely rated on building relationships. But it is in the building of relationships where we get those repeat sales and bigger sales and broader sales and better word of mouth and more new customers and, you get the idea.
Ideally, if you get the chance, like in the trunk show described above, you can model these relationship building behaviors in front of the sales staff. You can demonstrate how you elicit customer needs, wants and problems to be solved, and how you gain their awareness and trust in how your jewelry will meet these in an advantageous way. If there are other types of products in the store, you can demonstrate how to co-market, such as your jewelry with the store’s clothing.
Absent the in-person approach, you can provide ideas in periodic emails. You might do some simple one-sided-page images and short descriptive content. You might create a fun video that you can share.
You can also work with store staff in developing customer lists detailing the who, how to contact them, the what they bought, the dates, the follow-up sales, customer preferences, any descriptive information about the customer to help future sales.
To help guarantee that sales staff keep these lists and fill them out completely, you can ask to see them periodically to review. You can encourage sales staff to communicate with customers pre-, during, and –post sales. Based on your review, you can suggest specific items in the line that each customer might like to see, and possibly buy. Even though you are not physically present, you can still show how building relationships can generate sales and profits.
4. What Rewards The Sales Staff Should Expect For Themselves,
Based On Their Performance
It is helpful if you not only generate commissions and sales for the store, but also some kind of reward for the sales staff each time they sell one of your pieces. Show you recognize their efforts and appreciate them. If sales staff get paid no matter what they do, they may not give your line of jewelry the attention and promotion it deserves.
Besides some reward, perhaps a thank you note, or giving either a monetary extra commission or a piece of your jewelry, you most likely also want to reward the sales staff’ customer follow-ups, without actual sales, such as sending thank you notes or calling them when you send new pieces to the store.
5. At All Times, How To Maintain The Optimum Inventory and Product Mix
Do not assume that the store will maintain the optimum inventory and product mix of your jewelry at all times. There will always be other companies, other designers and other product opportunities competing for any store’s attention. So you will need to step in and capture that attention on a regular basis.
Create an easily update-able plan for the store that details the ideal mix of product — types of jewelry, price points, color, finishes and textures.
Reduce this to a simple product inventory sheet to give the store.
Contact the store periodically to update the inventory, compare to your plan, and make inventory suggestions accordingly.
6. How To Routinize Timely Feedback
You need to get feedback routinely, say at least every 3 to 6 months. You need regular feedback on your jewelry, on the sales process, on other things you can do to help sales staff become better at selling your jewelry.
If your jewelry is not turning at least twice a year, the particular store is probably not right for you. It might be the inattentiveness of the sales staff. It might be a lack of fit with the store’s customer base. But, if you are not getting a minimum of 2 turns a year, this location is not working either for you or the store.
You might formalize requests for quarterly results. You might call the store or any of its sales staff periodically to get information feedback. You might send a questionnaire to customers who have previously purchased your jewelry.
It helps the feedback process along when you provide rewards. This might be in the form of refreshments, such us sending an evaluation form with a box of cookies. This might take the form of adding some free pieces of jewelry to be sold, or one-time discount on purchases.
______________________________
FOOTNOTES
James, Geoffrey. 6 Ways to Persuade Customers to Buy. Inc.com, 2020.
Jewelry creates a series of dilemmas for the jewelry maker — not always anticipated by what most jewelry makers are taught in a typical art class.
That’s the rub!
Painters can create any color and color effect they want with paints.
Jewelry makers do not have access, nor can they easily create, a full color palette and all the desired coloration effects with the beads and other components used to make jewelry.
Jewelry is not like a painting or sculpture that sits in one place, with controlled lighting, and a more passive interaction with anyone looking at it.
Jewelry moves with the person through different settings, lighting, times of day. Jewelry sits on different body shapes. Jewelry must function in many different contexts. Jewelry serves many different purposes.
People use and understand colors using their senses. These perceptions among wearer, viewer and designer include:
(1) The Sensation Of Color Balance
(2) The Sensation Of Color Proportions
(3) The Sensation Of Simultaneous Color Contrasts
Better designers are able to manage these sensations. They do so, in major part, by relying on a series of color sensation management tools.
We review these in great detail in this course.
In this course, you will learn some critical skills for jewelry designers that you will want to know…
How to pick colors for jewelry, and how this differs from picking colors as a painter
How to adapt basic color concepts in art when making jewelry
How to recognize the differences between universal responses to color from the more typical subjective ones, and what better designers do about this
How to manage the sensation of color within your pieces to achieve your designer goals
You will learn to make smart choices about color when designing and making jewelry.
I’m not proud to admit it, but I used to string things on fishing line and dental floss. It was there. I knew about it. I understood it. It was simple. Uncomplicated. Didn’t need directions. Didn’t need a 20-minute explanation about when these were used, and when they were not, or what they were used for, and what they were not.
Then I discovered Tiger Tail cable wire. This seemed magical, somehow. It was something more than fishing line or dental floss. It seemed strong. It was metal. It was masculine. You could swing from trees on it. You could tie up old planks together to secure them. You could string things on easily without a needle. You didn’t need glue. You didn’t need bead tips or knot covers. It tied easily to clasps. And although, it turned out, the Tiger Tail broke rather easily, I’d pretend like it never broke for me.
Luckily, today, beaders have been blessed with an abundance of stringing materials to choose from. Each has it’s pros and cons. Each much better than the choices I had a few decades ago.
When beaders and jewelry makers select stringing materials, they need to ask a lot of questions of the people who sell these products, as well as the people who use them. You’ll get a lot of contradictory advice. But you need a lot of information to help make your choices. For me, I prefer stringing materials that don’t break easily, allow pieces to drape nicely, move freely and correctly with the body, and are relatively easy to use. But don’t we all.
From a design perspective, you typically get your best results with needle and thread. Needle and thread projects always take the shape of your body. So they feel the best, move the best, and drape the best. However, needle and thread are very involved and time-consuming to do. Especially if you’re selling your stuff, it’s difficult to use needle and thread and expect to recoup your labor costs. As long as you know what the ideal is, however, it becomes a little easier to step back from the ideal, and compensate for any weaknesses through various design techniques and devices.
Threads, Needles, and More Threads
I discovered Nymo beading thread, Size #12 English beading needles, and Tiger Tail cable wire. This wasn’t a match made in heaven. I didn’t take to it like a duck takes to water. It wasn’t a piece of cake.
Have you ever seen a beading needle? They’re so thin. They have even thinner eye holes. First you learn that cotton sewing thread is round and sewing needles have round holes. Next you learn that nylon beading thread is flat like a ribbon, and beading needles have rectangular, narrow holes.
The shape of the eye-hole of a beading needle is like a funnel –one side of the hole is bigger than the other. If you are having trouble fitting that thread through the hole, turn the needle around. Try again.
I started with size #12 needles. I find #10 needles to be more useful for bead stringing and both #10 and #12 most useful for bead weaving. Proportionally, the eye holes in the #10 are much bigger than those in the smaller, thinner needles.
Major Beading Threads
NYMO thread is the granddaddy of them all. It comes in many colors and thicknesses. It doesn’t look like it, but it is one of the strongest things you can string things on. With NYMO, the black is stronger than the white. The white is stronger than the colors.
C-LON thread (also called SuperLon) is a relatively new thread. It’s similar to Nymo, but a little stronger. It comes in a lot of colors, but only a couple of thicknesses. In our store, if you came in for a Nymo product, and there was an equivalent C-Lon product, we would suggest you switch to C-Lon. With C-Lon, the colors and the white are as strong as the black. All are as strong as Nymo black.
ONE-G thread is made by TOHO. This is a premium nylon beading thread, and much more expensive than Nymo or C-Lon. I’m very fond of the strength of the thread, and the feel, give and take of the thread while I’m beading. It has a stretching quality to it that makes it less tiring to use on long projects. It’s my beading thread of choice.
SILAMIDE is a prewaxed thread. Lots of beaders love this. I’m not a big fan of this because it breaks very easily. Some people suggest that you double the thread to deal with the breakage issue, but I find it awkward to use a doubled thread. Even though Silamide is prewaxed, if you purchased it from us, we would tell you to wax it. There’s no waxy buildup on it, and this, we feel, is the major advantage of waxing.
When you use beading thread as your stringing or weaving material, you want to pass through each bead about 3 times. Most weaving techniques do this automatically as part of the step-pattern of the technique.
I advise all my students to wax their thread before they use it. The wax has these advantages:
Protects the thread from chemicals in the environment, including pollutants in the air, chemicals in a person’s sweat, and chemicals in cosmetics and hair sprays. Natural beeswax will protect the thread for 150 years. Synthetic beeswax provides protection for centuries more.
The hole of a bead looks like a broken coke bottle. The wax will fill in some of the jagged rim, lowering the risk of the hole cutting your thread.
Helps you maintain a tighter thread tension while you weave or string.
There are products called thread conditions. One brand, now defunct, was called Thread Heaven. When you keep pulling the thread through your beads over and over again, static electricity builds up. This results in the thread getting tangle up and knotted while you work. The conditioner prevents this from happening. Waxing will not.
You cannot use both products. You have to pick one. I suggest always picking the wax.
The Hybrid “Cable Thread”
Every year there are many new stringing materials. Many start as advances in fishing lines. One recent advance is what I call the hybrid “cable thread”. These are made from threads that are braided together (instead of braided wires as in a cable wire, see below) and encased in nylon,
Three brands — Power Pro, WildFire, and FireLine are very prominent. I especially like the FireLine.
You use these with needles, but do not have to wax them, though I suggest you do. You don’t have to go through your beads three times, like with the threads. Once is sufficient, though I sometimes go through 2 or 3 times to firm up the way the beads lay on the stringing material, and so the beads don’t wobble.
You don’t necessarily have to wax the FireLine, but a lot of people like to do this. The major advantage of waxing is that the wax protects the integrity of the nylon encasing. Cable threads are strong only to the point the nylon encasing is able to maintain the twist in the braided threads. As soon as the encasing is violated, the thread immediately untwists and breaks. You might pierce the thread with the needle as you are working your piece; the wax will melt into the hole and plug it. A pollutant in the air, or a chemical in someone’s sweat, or cosmetics or hairspray will make the nylon encasing deteriorate. Perfume oils will dissolve it. The wax provides a protective shield to minimize this happening.
If you wax it, this will increase your thread tension considerably. In most projects a tight tension is very desirable. With some very tight bead weaving stitches, like Peyote, cable threads may result in too tight a tension. Usually, I use regular beading thread with the Peyote stitch. With weaving stitches with loose tension, like Right Angle Weave or Ndebele, the cable thread’s tightness is an advantage, giving you more control over managing the thread tension as you work your piece.
Beading thread is flat and shaped like a ribbon. Beading needles have rectangular holes. FireLine, however, is shaped round. To make it easier to thread FireLine into a beading needle, you can flatten the end of the FireLine. I pull the end between two of my fingernails. You can also use a chain nose pliers to flatten the end. Then pop it into your needle. Don’t pull this through your teeth. It will cut into your teeth.
Pieces done with the cable threads lay stiffer and feel stiffer than the threads, like Nymo or C-Lon, but they drape and feel much better than the cable wires.
Many stringers and bead weavers have switched to cable threads.
Bead Cords
For some types of jewelry projects, you don’t want to cover and hide all the stringing material with beads. You might be putting knots between beads, or you might be doing macramé, braiding or kumihimo with beads, or you might be doing something like a Tin Cup necklace, where you have a cluster of beads, then some cord showing, then another cluster of beads, then more cord showing, and you get the idea.
In this case, if we used threads, the raw and waxed threads would be kind of ugly. Most cable wires, if showing, would be ugly. So instead, we use what is called Bead Cord.
Bead Cords are threads which have been braided together to make the stringing material look pretty. However, we don’t wax the bead cord to deal with issues like fraying or stretching. This would ugly it up.
Thus, when we use Bead Cord, we are trading off durability for appearance. If we were going to cover all the bead cord with beads, then this would not be the best choice of stringing material. You would want to use either a thread or cable wire, in this case.
There are many brands and qualities of bead cord.
Most people prefer Griffin Bead Cord, which comes on cards, and has a needle fixed to one end of the 2-meter long cord. There are many colors and thicknesses. It is available in Nylon and in Silk. I’d give this cord a grade of a “B”. What people like about this cord is that it comes with a needle attached on one end. This makes it easier to use when you are knotting between beads. It allows you to start with a thicker cord.
I recommend using silk bead cord if your project is all pearls or mostly pearls. I suggest using nylon bead cord if your project is very few pearls or no pearls. Unfortunately, every other type of stringing material, except the silk, will ruin the pearls. These other materials cut into the nacre around the pearl, starting at the hole, leading to cracking and chipping around the bead, thus ruining them. Only silk won’t cut into the pearls. Unfortunately, silk naturally deteriorates in 3–5 years, so anything you do on silk will have to be re-done every 3–5 years.
Nylon doesn’t deteriorate, so that’s why we suggest it for everything else. Now some people tell me things were always done on silk. I tell them nylon wasn’t always. But I can reverse hats. Say you’re selling your pieces. There’s more marketing cache if you say “it was strung on silk”, than if you said “it was strung on nylon.” You can make it your customer’s problem to re-string in 3–5 years.
Basically, at the same level of quality, the pros and cons of nylon and silk are the same. At the same quality level, they fray the same, stretch the same and get dirty the same. It’s just that the silk deteriorates and the nylon does not.
Bead cords are also used in knotting, macramé, braiding, bead crochet and kumihomo.
C-lon or S-lon (same thing, two different brand names) is the A-grade nylon. It comes in 4 thicknesses. It’s excellent.
Flexible Cable Wires
When I first started beading and making jewelry, I was not a big fan of thread. I was never one to sew. Needle and thread seemed so complicated. It took so long. The threads seemed to break. They frayed. They stretched. They got tangled up and they got knotted up. It was hard to see and keep in my field of vision a very thin thread on a very thin needle going through some very small beads. I poked myself with the needle. It made me cranky.
I turned to Tiger Tail cable wire. Cable wires are flexible wires that are braided together and encased in nylon. The wire is stiff enough to be its own needle. Stringing beads on a cable wire seemed so perfect. You only had to go through your beads once. The wire was stiff enough to be its own self-needle. Zip, zip. Fast, fast. For years, I made everything on cable wires. Always satisfied, never a complaint.
Today, there are many brands, qualities and distinctions of cable wires. There are easily over 24 choices. Each brand organizes its worst to best wires differently. None of the brands provides sufficient information on their labels to make a fully informed choice. It’s very confusing. It’s virtually impossible to compare across brands. You need to know the materials the braided wires are made of, the thicknesses of the finished wires, and the number of wires braided together within the cable, the material the nylon sheathing is made of, and the thickness of this sheathing.
The true measure of wire strength is called “tensile strength.” This is the amount of force it takes to keep the wire from untwisting within the nylon sheathing. Tensile strength depends on what the wire is made of, what the nylon sheathing is made of, and how thick and nonporous this nylon sheathing is. This information is not found on any of the labels.
On the labels of these products, the manufacturers list the number of strands braided together within the cable. This gives you some information, but not enough information to make a choice. You don’t know what the wire is made of, or it might say “stainless steel”, but there are hundreds of grades of stainless steel. They do not list what the nylon sheathing is made of, or how thick and nonporous it is. Some companies differentiate their lowest from highest qualities based on the number of strands. For example, one company’s low end is 7-strand and its high-end is 49-strand. However, other companies do not differentiate by number of strands. Another company’s 7-strand high end product is stronger and softer than its middle-range 49-strand product. It’s middle range 49-strand product is stronger and softer than that first company’s high-end 49-strand product.
A long time ago, manufacturers put “pound strength” on their labels. It’s on some labels, but not all. The actual pound strength numbers change more often than feels comfortable.
There are no government standards about measuring “pound strength.” Because of this, whenever you see “pound strength” on a label, whatever the product, you need to take this with a large degree of skepticism. First, there are two definitions of how to measure pound strength — (1) how heavy the fish is that the line will support, and (2) how much force the line will support when reeling in a fish of a given weight. But because there are no standards, it is up to the factory to put whatever they want. Most of these wires are made in total or in part in one factory in Taiwan. The person at the factory responsible for labeling pound strength many years ago never got it right, and never got it the same. One batch would show 20#, then the next time it might show 2#, then 5#, back to 20#, down to 10#. Since he could never get this right, the manufacturers asked him to leave this information off the label.
There are many brands of flexible, nylon coated cable wires. These cable wires can be grouped into three levels of quality:
— Craft (Tiger Tail) — Designer (Flex Wire) — Professional or Artist
I start people at the Designer (flex wire) quality cable wires. Most craft stores only carry the Craft quality. This is rather useless. Most bead stores carry the Craft and Designer levels, and sometimes the Professional or Artist level as well. The “best” level is extremely expensive, so I feel the beader or jewelry-maker needs to justify the extra expense when moving up to this quality. I’ve rarely seen a situation where the Professional quality was needed.
Tiger Tail was the original cable wire, and today it is the low-end product. It’s the Craft level wire, and all brands carry it. Often you don’t see the word Tiger Tail on the label. You can tell it’s Tiger Tail because it’s very cheap — substantially cheaper than anything else — usually under $5.99 for a 30ft spool. Tiger Tail wire breaks very easily in and of itself. The wire tends to kink. The way you should attach Tiger Tail to the clasp is to tie the wire into a knot or a double-knot. This gives you a very secure connection to the clasp.
Tiger Tail Cable Wire
Flex-wire is the Designer Level. Flex-wire (again available in several forms in each of the brand lines) is noticeably more expensive than the Tiger Tail — usually starting at $10.99 — $18.99 and up for a 30ft spool. It does not break easily in and of itself. It does not kink. However, it is very difficult to tie into a knot. So you have to use a crimp bead in order to hold the wire in place and secure the clasp. [I only recommend 2 brands — Soft Flex and Flexrite. These are very supple; the nylon sheathing has a high degree of integrity; they are very strong]
Flex wire cable wire
The way you use a crimp bead is that you take the wire and go through the crimp, through the clasp, then back through the crimp. You crush the crimp with a pliers (preferably a crimping pliers) to hold it into place. The major reason to use a crimp bead is to make your piece look more finished, than if you had tied a knot. However, it does make your piece less secure.
When you crush your crimp bead onto the wire, this flattened crimp becomes like a little razor blade. All jewelry moves. So your crimp is constantly trying to saw through your wire. On Tiger Tail, crimps easily cut through the wire, so that is why we suggest tying a knot. If you don’t like the look of the knot, you can either use beads on either end with large enough holes to swallow the knot. Or you can use a piece called a crimp cover and slip this over the knot, squeeze it shut, and it looks like you have a bead there.
With Flex-wire, this wire is so strong that we feel very comfortable recommending that you use a crimp bead on each end. However, and this is a big However, we DO NOT suggest that you use more than one crimp on each end. Sometimes your friends, or your mind, will tell you that if 1 crimp was good, then using 2 or 3 crimps on each end will be more secure. It’s not. All you are doing is adding razor blades. You’re increasing the chances that one of these crimps will cut through the wire.
If you’ve crimped correctly, one crimp on either end is sufficient. It doesn’t matter what the shape or the size of the crimp bead is. It doesn’t matter how heavy the beads are.
Cable wires come in different thicknesses.
For necklaces, you want to choose the thinnest wire that is the most durable. This is because the major design goal here is to have your necklace drape as best and as comfortably as possible. We suggest something around .014” or .015”. If someone sits at their desk and fidgets with the necklace a lot, then this thinner thickness will break. In this case, since durability is becoming an issue, the .018″ or .019″ will work fine.
For bracelets, you want to use the thickest wire that is most comfortable. Bracelets take a huge beating on a daily basis. We suggest something around .018” or .019”.
For eyeglass leashes, we suggest .024” or .019”. These take the most beating. You don’t want the leash or the eyeglasses themselves to break.
Cable wires are fast and easy. They are not as involved as using needle and thread. However, with the cable wires, the finished projects tend to be stiff. They don’t lay well. They don’t move well at all. If you make a bracelet with needle and thread, the bracelet, when worn, conforms to your wrist. If you move your wrist to the right, your bracelet also moves in the same direction to the right. If you made that same bracelet on cable wire, the wire takes the shape of a circle. Your wrist is actually oval. If you moved your wrist to the right, the bracelet done on cable wire would actually move in the opposite direction — to the left.
Lots of deep physics here. But the results are obvious, and often embarrassing. This most often happens with necklaces that turn around when worn, bringing the clasp front and off-centered, sometimes making the wearer look somewhat clownish.
Most brands of cable wire I find too stiff. They have major problems of draping and moving with the body. They lay on the body funny. Two brands I find particularly good, and these are the only brands I use, are Soft Flex and Flexrite.
Hard Wire
People use hard wire to make things like ear wires and clasps, earring dangles, chains, rosaries, coils and components, and wire-wrapped settings for stones.
But hard wire is not a stringing wire. You can’t simply put beads on it and attach the ends. The hard wire would bend and distort, but not return to its original shape, like a cable wire would.
There are many kinds of hard wire.
At the low end is called Craft Wire. Craft Wire is plated wire over steel or a brass alloy of steel. Craft Wire is bad for finished jewelry projects. It’s OK for practice. It’s OK for stationary objects like a beaded ornament. All jewelry moves. The plating doesn’t bond at all to steel. So when you bend the steel back and forth, the plating tends to wear off quickly. Also when you bend steel back and forth, it doesn’t take long before it breaks.
Craft wire, no matter the brand, tends to be packaged like the white spool pictured below.
Above Craft Wire is Plated Copper Wire. If you need to work with a plated wire, then Plated Copper Wire is a great product. There are many brands. The packaging varies but it never looks like that of the craft wire above. The plating and enameling bonds well to copper, so it takes a very long time to wear off. Also, when you bend copper back and forth, it takes a very long time to break. It comes in lots of colors and lots of metallics.
Higher in quality than plated wire is called “Raw” wire. In our store, we sell raw brass, raw copper, raw nickel. We sell sterling silver wire, fine silver wire, gold-filled wire and a new metal called argentium silver. Argentium is tarnish-resistant sterling silver.
The sizes of wire are measured by “gauge”. What Gauge means is that somewhere on earth there is a standard sized pipe. Gauge refers to how many wires will fit into the pipe. So, if you can fit 20 wires into the pipe, the wire is 20 gauge. If you can only fit 6 wires into the pipe, that wire is 6 gauge.
When buying wire, another choice to make is how HARD or stiff the wire should be at the start of your project. Wire is usually sold as “Hard”, “Half-Hard”, or “Dead-Soft.
With “Hard” hard wire, you can’t bend the wire. This is useful when making a hat pin or stick pin. You cut the length of wire you want. You take a metal file and file one end into a point. The wire is stiff, so it will easily puncture a hat or a fabric, without bending. However, if you wanted to make a loop on one end of the hard wire, say to make an earring dangle, you could not; it won’t bend.
With “Half-Hard” and “Dead-Soft” wire, you can manipulate the wire. You can twist it, bend it, curve it, wrap it, hammer it. Each time you manipulate the wire, you harden it. If you keep manipulating and manipulating the wire, it eventually hardens to the point where it is “Hard”, that is, unbendable. If you kept going still, the wire would become brittle and break.
Your goal as a wire artist is to find that level of hardness/softness where, after you manipulate the wire the way you want, you’ll end up with wire that keeps its shape, stays in place, or if it is holding a stone in, that the stone won’t pop out.
If I want to make an earring dangle by putting some beads on a wire, and bending one end into a loop so that I can hang it, if I started with “Half-Hard” wire, I would grab the end of my wire with a round nose pliers, twist my wrist to form the loop-shape, and let go of the wire with the pliers. I can trust that the loop-shape will keep its shape.
If I had started with “Dead-Soft” wire, however, and repeated this same procedure, the loop would open up and lose its shape. The wire is too soft. To start at “Dead-Soft”, I probably would have to grab the wire at both ends with vises or pliers, twist the wire until it started to harden, make a loop with a round nose pliers, and perhaps hammer on this loop a bit — all before I could trust that the loop-shape will keep its shape.
Most wire artists and how to books tell you to start at dead soft. Many of my students and customers who follow these directions have their bracelets pull apart, their shapes distort, their stones pop out of their settings. This is because they have not manipulated the dead soft wire enough to get it stiff enough. I suggest, either starting with half hard wire, or to twist the dead soft wire somewhat to stiffen it before you begin to shape it.
Plated Craft and Copper-Core wire typically comes as “dead soft”. It is up to the manufacturer to determine what that means. So, you will find that one company’s dead soft might be stiffer or softer than another’s. Typically, if I start at dead soft, I twist the wire or hammer it to harden it a little bit, before I start my projects.
Some Other Popular Stringing Products
Elastic String: People hate clasps. So they love this material. You put the beads on, tie a surgeon’s or square knot, put a drop of glue on the inside, then the outside of the knot, cut the tails, and that’s it. Comes in different colors, different thicknesses, different textures. Does deteriorate a little over time, and it does lose its memory. There are many brands. Some labels say they don’t deteriorate or lose their memory, but from experience, they all do.
The elastic string which is round lasts a long time. The elastic string which is flat like floss shreds rather quickly.
When using elastic string, you first take some super glue and coat the beginning 3/4″ to 1” of the string. Let it dry. Take a single edge razor blade and cut the end at an angle, so you have a point, and the end becomes a self needle. Put your beads on. Then tie a surgeon’s knot or square knot. As you tie your knot, put a drop of glue on the inside of the knot, pull tight, and put another drop of glue on the outside of the knot. Any glue EXCEPT super glue.
We suggest E6000 or Beacon 527, but, with this product, you can use school glue, rubber cement or elmers glue. Super glue dries like glass, so the bond becomes like a piece of glass. When you pull the string, the bond shatters like glass. Moreover, the broken bond looks like a piece of broken glass. The other glues dry more like rubber, so when you pull on the string, the bond acts like a shock absorber.
Elastic string can deteriorate in about 1–2 years, depending on its exposure to the air and sunlight.
Illusion Cord (monofilament): Basically a thin fishing line. Used to make illusion necklaces. Small crimp beads are used to hold clusters of beads in place. Not particularly durable. Any monofilament will dry out and crack from exposure to ultraviolet light and heat.
Hemp: Used with various macramé, micro-macrame, knotting and braiding techniques.
Irish Waxed Linen: Similar to hemp, but a higher quality. Used for more fashion-oriented jewelry that incorporates macramé, knotting and braiding techniques. In jewelry, the waxiness of this product draws dust and dirt to it. You might want to use, instead, an unwaxed bead cord for jewelry.
Leather: Always popular. Greek leather is the highest quality. Don’t shower in this. It makes the leather dry out and crack.
Waxed Cotton: A more durable leather substitute. It doesn’t have that great earthy smell of leather, however. Simply a waxed or glazed cotton wrapped around a nylon monofilament. You can shower in this.
Pearl Cotton #8: Used in making bead-knitted bags. 11/0 seed beads will slip over the Pearl Cotton #8.
Rubber Thong: Another leather substitute and more durable. Very soft to the skin.
Satin Cord (Rat Tail): A shiny, colorful cord that’s used to hang pendants from. Pretty. Frays relatively quickly. Not durable at all.
Organza Ribbon: The type of ribbon that you would string beads on. Use a Big-Eye needle to get your beads onto the ribbon.
Memory Wire: A stainless steel coil, like a slinky. Cut off some rings, put beads on, then, bend the ends. Caution: Memory wire will ruin all your jewelry tools. If you are using Memory Wire, then use industrial strength tools — things you would find in a wood-working shop.
To look great in a piece of jewelry — whether a necklace, or chain, or pendant, or bracelet, or ring and the like — people should look to the face, the neck, the wrist, the finger, the body type to get the right fit and look. There are often two main reasons why people do not wear their jewelry. First, it doesn’t work with their wardrobe or skin tone. But second, it doesn’t flatter them because of the silhouette, volume and length. Learning both about standard sizing and sizing customization measurement rules are critical for any jewelry designer.
SIZING
To look great in a piece of jewelry — whether a necklace, or chain, or pendant, or bracelet, or ring and the like — look to the face, the neck, the wrist, the finger, the body type to get the right fit and look.
There are often two main reasons why people do not wear their jewelry. First, it doesn’t work with their wardrobe or skin tone. But second, it doesn’t flatter them because of the silhouette, volume and length.
When designing a piece of jewelry, it sometimes is helpful to make the size of the piece adjustable. This is usually accomplished with the design of the clasp assembly, such as adding a chain extension, or having 2 or 3 button loops.
Necklaces[1]
There are many standard length options for necklaces for women. If you have a narrower or wider neck than average, you may have to adjust these standards. If you have a longer or shorter neck, you might prefer a particular length over another.
When choosing a size, start with your neck. Narrow, thin necks might prefer shorter lengths. Thicker, fatter necks might prefer the medium size lengths.
Next, consider your upper torso. If the necklace length will place the necklace over your breast, be sure it flatters your appearance.
Third, consider your height. Short women are usually overwhelmed by longer lengths. Taller women sometimes look funny with short lengths.
Last, consider the shape of your face. Faces are usually described as oval, round, square and heart-shaped. Oval faces can wear any length. Round faces do better with longer lengths, and silhouettes that take the shape of a “V”. Heart-shaped faces do better with shorter lengths, and silhouettes that are curved. Squarer, more rectangular faces do better with shorter lengths and rounded silhouettes.
For men,
Bracelets [1]
Usually, with bracelets, size is less an issue than with necklaces.
Measure the wrist at the wrist bone, using a piece of string or tape measure. If you use a string, it’s best to use a bracelet sizing cone to determine the actual wrist measurement. If you like your bracelets to be somewhat loose, add ¾” or 1” to the measurement. With larger beads or adornments, the linear length against a ruler will have to be larger than the actual size of your wrist, since these larger components will pull the bracelet further out from your wrist as you wear the piece.
For women, most wear between a 6” and 7” length.
For men, most wear between a 7” and 8” length.
But obviously, there will be some deviation from the typical, because not everyone is a standard size.
Also, some people like to wear their bracelets tight to their wrist, while others like to wear them somewhat or very loose on their wrists.
For bangles, it becomes important to anticipate the width of the widest part of the hand for which the bangle has to slide over.
This bangle formula works in general, but, again, everyone’s hand-width and wrist size will vary.
Rings [1]
Rings sizes are standardized and unisex, running in numbers (whole sizes and half sizes).
For women, standard size is 7, with the range from 5 to 9.
For men, standard size is 10, with the range from 8 to 12. Wider rings on men tend to run smaller in size when worn.
But again, as with necklaces and bracelets, people’s finger sizes will often vary from the standards.
Also, fingers swell and contract in size, depending on the weather, heat and humidity, or how active a lifestyle some has, or with age. Some people prefer to order a ring size a half size larger to accommodate these kinds of things.
________________________________________
FOOTNOTES
1 REEDS JEWELERS, Jewelry Wise, “Choosing the Right Necklace Length For You”, as reference
Abstract It’s not easy to do Ugly! Your mind and eye won’t let you go there. We are prewired with an anxiety response to help us avoid things that might harm us. So, it turns out, it is easier to design a beautiful piece of jewelry than an ugly one. Designing an ugly necklace, then, presents the designer with the ultimate challenge. To achieve a truly hideous result means making the hard design choices, putting ourselves in situations and forcing us to make the kinds of choices we’re unfamiliar with, and taking us inside ourselves to places that we are somewhat scared about, and where we do not want to go. The International Ugly Necklace Contest, first announced in 2002, and held 10 times since then, was one of the programs we launched as a way to reaffirm our beliefs in a design-oriented, theory-based, professional craft education curriculum. This article discusses the idea of “Ugly”, and provides some clues to designers about achieving it.
At the end of the article, you are given the chance to review and judge three of the submissions to The Ugly Necklace Contest — How Ugly Are They? You decide.
HOW TO DESIGN AN UGLY NECKLAC: The Ultimate Designer’s Challenge
Can you put together a well-designed and functional, yet UGLY, necklace? What kinds of things might you do if you were trying to design a necklace that is ugly, hideous, unsatisfying and what have you?
It’s Not Easy To Do Ugly!
Your mind and eye won’t let you go there. As research into color and design has shown, your eye and brain compensate for imbalances in color or in the positioning of pieces and objects — they try to correct and harmonize them.
You are pre-wired with an innate fear and anxiety response to subconsciously avoid anything that is disorienting, disturbing or distracting. You are genetically predisposed to avoid things that might hurt you or kill you, like snakes and spiders.
Moreover, necklaces are arranged in a circle. The circle shape itself errs on the side of beauty, and anything arranged, ordered or organized, such as the component parts of a necklace, will err on the side of beauty.
Because of all this, beauty is the norm. It is easier to design a beautiful necklace than an ugly one! How about that! Any jewelry designer who attempts to achieve “Ugly,” has to have enough control and discipline to override, perhaps overcome, intuitive, internally integrated principles of good design.
To achieve a truly hideous result means making the hard design choices, putting ourselves in situations and forcing us to make the kinds of choices we’re unfamiliar with, and taking us inside ourselves to places that we are somewhat scared about, and where we do not want to go.
– Can I push myself to use more yellow than the purple warrants, and mix in some orange?
— Can I make the piece off-sided or disorienting, or not have a clear beginning, middle or end?
— Can I disrupt my pattern in a way that, rather than “jazz,” results in “discord?”
— Can I work with colors and materials and patterns and textures and placements and proportions I don’t like?
— Can I design something I do not personally like, and perhaps am unwilling, to wear around my neck?
— Can I create a piece of jewelry that represents some awful feeling, emotion or experience I’m uncomfortable with?
— Can I make something I know that others won’t like, and may ridicule me for it?
Because answering questions like these is not something people like to do, jewelry designers who attempt to achieve “Ugly,” have to have a lot of control and discipline to override, perhaps overcome, intuitive, internally integrated principles of artistic beauty.
The best jewelry designers, therefore, will be those artists who can prove that they can design a truly Ugly Necklace. These are designers who can break the boundaries of form, material and technique.
What Is Ugly?
Some The Ugly Necklace Contest Submissions
We often like to say that beauty (and by inference, ugly) is in the eye of the beholder. But once we utter that phrase, we deny the possibilities of design — and the perspective from the eye of the designer. We refuse to accept universal understandings of beauty and appeal. We take away much of our power to reflect and evaluate and judge. We leave too much to the situation, and too little to our abilities as jewelry designers to translate inspiration into aspiration into finished designs which emotionally affect those around us.
As designers, we like to think we are capable of designing something beautiful. As teachers, we like to believe we are capable of training someone to be a better designer — one who can more readily choose colors, patterns, textures, forms and arrangements — in universally pleasing ways. As a discipline, we like to think of good design as resulting from sets of learned information, insights and behaviors.
Some The Ugly Necklace Contest Submissions
Different people interpret “Ugly” in different ways. Some might focus on the ugliness of each individual component. Some might use materials they feel convey a sense of ugly, such as llama droppings, or felted matted dog hair, or rusty nails, or cigarette butts, or a banana peel. Some might focus on mood and consciousness, and how certain configurations of pieces and colors evoke these moods or states of consciousness. Others might focus on combining colors which don’t combine well. Still others might focus on how the wearer’s own body would contribute to a sense of ugliness, when wearing the piece, such as the addition of a “Breast Pocket” which would lay just below the woman’s breast, or peacock feathers that covered the wearer’s mouth, or the irritating sounds of rusty cow bells, or the icky feeling of a rotting banana peel on the skin. Still others might view Ugly as a sense of psychological consciousness, such as being homeless, or an uncomfortable transition from adolescence to adulthood. For some Ugly might mean politically ugly, like Saddam Hussein of Iraq, or the trans-fats associated with fast foods.
It is not enough just to string a bunch of ugly beads on a wire. Ugly pieces do not necessarily result in an ugly necklace. Actually, if you look at many ugly pieces or components, once they are arranged and organized, they no longer seem as ugly anymore. Organization and arrangement contribute their own qualities and sense of beauty which transcend the ugly parts.
Adding to the fun (?difficulty?), designers want their ugly necklaces to also be functional and wearable. This goes to the heart of what jewelry is all about. Otherwise, they would merely be creating sculptures. The parts and techniques used to design an ugly necklace must also anticipate functional requirements. Otherwise, the piece of jewelry becomes a failure not only as a piece of jewelry, but of art, as well.
About The International Ugly Necklace Contest
The Ugly Necklace Contest, first announced in 2002, and held 10 times since then, was one of the programs Land of Odds-Be Dazzled Beads launched as a way to reaffirm our beliefs in a design-oriented, theory-based, professional craft education curriculum. The Contest was conceived as a fun way to break students out of the traditional craft mold, and get them to think, ponder, and translate their feelings and perceptions of what is UGLY into an organized and functional necklace design.
We made the contest international. We launched it on-line. Our goal was to politely influence the entire beading community to think in different terms and to try to work outside the box. We also wanted very actively to stimulate discussion about whether there are universal and practical design theories which underlie beadwork, and which can be taught.
Can you really design UGLY, or is UGLY merely in the eye of the beholder?
Four conceptual precepts underlying the creation of the Contest itself included:
1. The Necklace should be Ugly, yet still function as a piece of jewelry. 2. Better designers will demonstrate a degree of control over achieving these ends. 3. Better designers will show a sense of how both the larger context within which the jewelry is worn, as well as the overall effects of the wearer wearing the piece, will increase the piece’s Ugliness. 4. Better designers will have an intuitive design sense; best designers will show some strategic control over the design process.
Our judges evaluated each Ugly Necklace submission according to 10 jewelry design criteria (See Below), and scored each criteria. Each criterion was weighted equally. The 10 necklaces with the highest average scores were selected as our 10 semi-finalists.
Ten Semi-Finalists were picked. They were asked to submit the actual necklaces to us, to be put on display at Be Dazzled Beads. We took images of each one — a full frontal image showing someone wearing the piece, a close-up, and a close-up of the clasp assembly. We posted these images, along with the poems, on-line (now on display here) so that visitors to the site could vote for the winner and runner up. The winner got a $992.93 shopping spree on the Land of Odds web-site; the runner-up got a $399.07 shopping spree on the web-site.
NOW, You be the JUDGE!
Below, I present three very different Ugly Necklace submissions. Each artist submitting their necklace must include the following in their packet:
1) At least 4 images (front, back, someone wearing it, detail of clasp assembly) 2) A poem where they get to put into rhyme the kinds of things they were thinking when they made their various design decisions 3) A list of materials and techniques.
Some of this material is provided below to assist you when scoring each piece.
And you might want to take some aspirin first. It’s difficult to get your mind to evaluate things opposite to how you normally would do it.
The Judges Criteria
Each necklace is scored on 10 jewelry design criteria.
1. Overall Hideousness (first impressions; piece has noteworthy elements which slant your impressions toward Ugliness)
2. Clever Use of Materials (something about the materials chosen contribute to a sense of Ugliness)
3. The Clasp Assembly (any creativity applied here?)
4. Color Principles (the more violations, the better)
5. Balance or Arrangement (the more violations, the better)
6. Rhythm and Focus (the more violations, the better)
7. Orienting (the more disorienting, the better)
8. Parsimony (adding or subtracting 1 more element would make the piece more appealing, satisfying, even beautiful rather than more ugly; artist achieved maximum ugly effect efficiently and economically)
9. Wearability (piece must be wearable; extra points if the wearing of the piece makes the piece even uglier)
10. The Poem (expresses artist’s intent; artist shows power to translate intent into Ugly)
The Criteria In More Detail
1. Overall Hideousness (first impressions; piece has noteworthy elements which slant your impressions toward Ugliness)
The idea of “Noteworthiness” is key here. Noteworthiness means the extent the artist took something ordinary and made it extraordinary.
The best examples were the unexpected use of familiar materials. For example, felted dog hair shaped into beads; llama droppings, colored and drilled to be used as beads; a toothbrush used as part of a clasp assembly; a banana peel used as a pendant drop.
In some cases, the artist tried to make the necklace into a political statement, such as the Saddam Hussein necklace with bullets and pink shoes; or the glutenous fast food necklace with the gummi hot dog and gummi bun as the clasp.
In many cases, found objects, insignificant on their own, were organized to call attention to special meanings, such as the grenade box found among shells at the beach; or the remaining parts of a cat along with the chicken bone that led to her demise; or plastic jewels that seemed electrifying to the designer as a young girl, and so not as an adult.
Other things the judges look at include the clasp assembly, the artist’s anticipation of the effects of wearing the piece, the overall goals of the artist with the piece, and their first reaction to the piece.
2. Clever Use of Materials (something about the materials chosen contribute to a sense of Ugliness)
In too many cases, the jewelry artist chose ugly pieces and assumed that a necklace made of ugly pieces would itself be ugly as well. But as you can see from the images on this web-site, this strategy does not work well.
The artist has to have a deeper understanding of why the materials are ugly. The artist also needs to stay focused and strategic enough in the design process, so that she or he maintains this sense of ugly as the necklace gets organized.
For example, one necklace used felted matted dog hair, and made beads out of this. This was a start at a clever use of materials. But once strung into a circle, the necklace looked like something someone might actually wear.
A necklace of cigarette butts, again once organized into a circle, doesn’t look quite as ugly. In addition, the necklace over-used cigarette butts — too many — which started to make the necklace a bit boring. While “boring” might take us in the direction of “ugly”, in this case, it diminished the power of the cigarette butts to make a statement about “ugly”.
This criteria looks at the total picture. Not just the ugliness of each individual piece. But also the degree to which the assembly of pieces maintains this sense of ugliness. The concern here is “design-cleverness in the USE of materials”.
3. The Clasp Assembly (any creativity applied here?)
A better clasp assembly is one that seems to be an integral part of the necklace, not just an after-thought or add-on. It should anticipate how it contributes to the ugliness of the piece, how it re-affirms the artist’s concept and goals, and how it adds to the wearability of the piece.
Successful Clasp Assemblies:
A gummy hot dog closes into a candy gummy bun
There is an elaborate strap, zipper, and suspender toggles system as the clasp assembly. With different configurations of parts, the necklace may be worn as a choker, a back pack, a wrap, a fanny pack, a clutch, or a traditional over-the-shoulder and around the neck necklace.
A troll doll is the clasp. One end of necklace string is tied into a loop and wraps around the left hand of the troll doll. The other end of the necklace string is tied into a loop and wraps around the right hand of the troll doll. The two hands of the troll doll push apart to open up, and push closed to secure the necklace.
4. Color Principles (the more violations, the better)
The degree the piece violates good principles of color. This might include using colors in incorrect proportions; or which violate color schemes; or violate rules of dominance/submission; or disturbing arrangements — vertical vs. horizontal, shading and tinting, sharp vs. blurred boundaries, placements and balance, projecting forward vs. receding; or violating socio-cultural rules and expectations.
This is self-explanatory. For example, the appropriate proportions of yellow to purple should be 1:4, meaning in any grouping of 5 beads, 4 should be purple and 1 yellow. When you deviate from this, your piece gets uglier.
COLOR THEORY discusses the use of the color wheel to select colors that work together within a “scheme”. There are many schemes, including Analogous, Complementary, and Split Complementary. An ugly necklace would select colors that violate this scheme. This might mean selecting colors that do not fit together within a scheme. It might mean using the wrong proportions of color within the scheme. It might also mean violating expectations about which colors should and should not predominate within the scheme.
5. Balance or Arrangement (the more violations, the better)
This is self-explanatory. Does the placement seem satisfying, such as a graduated necklace that starts with smaller sizes, works up to larger sizes in the center, then works back down to smaller sizes at the clasp? Or, not?
When looking at the piece, can you see alternative arrangements that might make the piece look even uglier?
Another aspect of bad balance and arrangement has to do with “dimensionality”. This is the degree, whether the piece is flat or 3-dimensional, that this is satisfying, or not. For example, a flat loomed piece with an extra large button clasp on the top of it, would probably be less satisfying than one with a smaller clasp on the end of the piece. Dimensionality can also be created through mixing beads or objects with different finishes, like mixing glossy and matte. An ugly mix somehow would feel dissatisfying.
6. Rhythm and Focus (the more violations, the better)
One of the goals of the jewelry artist is to motivate the viewer to take in, experience and appreciate the whole necklace. One of the major techniques is to create a rhythm with the patterning of the beads, and to create a focal point. This influences the viewer’s brain/eye to want to see each part of the necklace from beginning to end, and then come to rest.
An ugly necklace, would either have no rhythm or a boring rhythm or a nauseating rhythm. An ugly necklace would either have no focal point, or have a focal point that is in a very disorienting or disturbing place on the necklace, or be very disorienting or disturbing in and of itself.
7. Orienting (the more disorienting, the better)
Jewelry plays a critical psychological role for the viewer in a room or in a space. It orients them. It is one of the important things in any person’s visual environment that lets the person know what is up and what is down, and what is right and what is left.
The natural state in life is to be dis-oriented. It takes walls and ceilings, trees and horizons, things with clear right angles, clear perpendicularity, obvious horizontal and vertical planes, to enable us to orient ourselves within any space. Otherwise people would fall down, lose a sense of how to turn or position themselves, or feel paralyzed.
The wearing of jewelry plays a critical function here, in that it visually establishes for the viewer appropriate horizontal and vertical lines and planes. If you see someone with their earring dangle at a 90 degree angle, or their necklace turned around so that the clasp is showing when it shouldn’t — you know how uncomfortable this makes you feel, even wanting to cringe. And you know you want and need them to straighten things out. This jewelry is dis-orienting you, at a time when you subconsciously rely on it to be orienting.
If this wasn’t important, things like the odd-angled dangle wouldn’t bother you….But we know that it does.
8. Parsimony (adding or subtracting 1 more element would make the piece more appealing, satisfying, even beautiful rather than more ugly; artist achieved maximum ugly effect efficiently and economically)
Once the artist has made their point, they don’t need to keep making it. For example, one entry used plastic trolls to create a sense of Ugly. There were over 20 on the necklace, but in their particular design, 6 or 8 were probably sufficient to make the point. The additional trolls served no other purpose in this piece. Just throwing in a lot of ugly pieces doesn’t necessarily result in something that is uglier. The additional trolls could have been used to make additional design points, but they were not. Instead they added a sense of repetition and disinterest.
A necklace of felted dog hair beads was a very clever idea. It was over 36″. No other design points were made, so an 18″ necklace of felted dog hair beads would have been as good as 36″. In a similar way, a very long necklace of cigarette butts would have been equally as good, or better if shorter, since no other design points were made.
9. Wearability (piece must be wearable; extra points if the wearing of the piece makes the piece even uglier)
From a design perspective, Jewelry is Art As It Is Worn.
In other words, you can only appreciate the artistic qualities and sensibilities of any piece of jewelry only when you see it worn — as it moves with the body, as it conforms to the body, as it enhances the wearer’s sense of self, and the viewer’s sense of the situation and context.
In our contest, we set the rule that the piece has to be Wearable. This rule tends to make it more difficult to achieve “Ugly”, but we’ve had some clever submissions that succeed here.
Some examples from our entries: — Peacock feathers that would fill the wearer’s mouth — An over-the-shoulder necklace that struggles to stay on the shoulders — A breast pocket strategically placed on the tip of the breast — Bloody teeth or a rotting banana peel meant to be worn against the skin
To the judges, wearability means that there should be clear evidence that the designer anticipated where the parts came from, and where they are going to, when the piece is worn.
10. The Poem (expresses artist’s intent; artist shows power to translate intent into Ugly)
The poem must relate to the piece. It should clearly explain the artist’s goals and concept. It should detail the artist’s strategies for making the design choices she or he did.
The judges ask themselves, given what the artist wrote in the poem, to what degree have they successfully created an ugly piece of jewelry?
Your Turn
Use the scoring sheets below to evaluate UGLY NECKLACE #1 and UGLY NECKLACE #2 and UGLY NECKLACE #3.
Or even try your own hand at designing an Ugly Necklace. Can you do it?