Kathleen was one of our bead-weaving instructors at the shop. Her primary sources of inspiration came from nature. I wrote this marketing intro for her jewelry making business she did on the side:
Intuitive. Inspired by Nature and the world around me. Translating feelings and senses and vague images into beautiful jewelry, wonderful beadwork, exciting wearable pieces of art. Beyond following step by step. We’re on the edge and we’re high strung about it.
Kathleen wrote:
Nature inspires all great art, including bead weaving.
Flowers, leaves, vines, and butterflies, (to name a few), are fairly common examples of attempts by bead weavers to transform nature into beadwork. Some are spectacular, like Diane Fitzgerald’s “Ginkgo Leaves.”
Along with other design elements, the color of your beads and the size of your beads and the materials of your beads play major roles in how successful your piece turns out. I have told my students that a solid foundation in the stitches, like we teach at our Stitch of the Month at The Center For Beadwork and Jewelry Arts / Be Dazzled Beads, will allow them the freedom to choose the best stitch for the project. This is particularly true when designing your own piece.
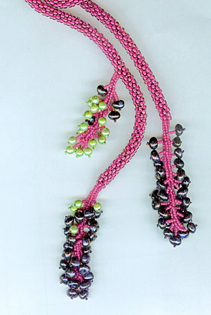
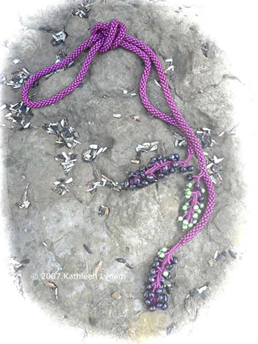
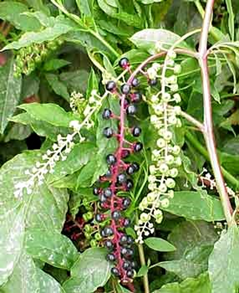
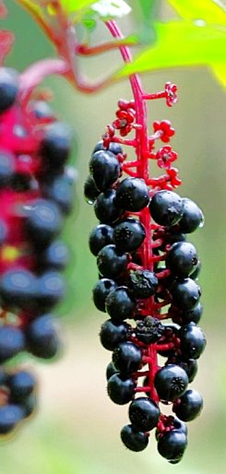
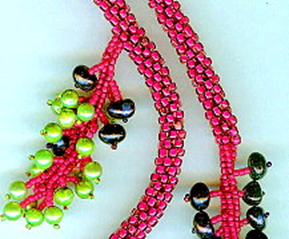
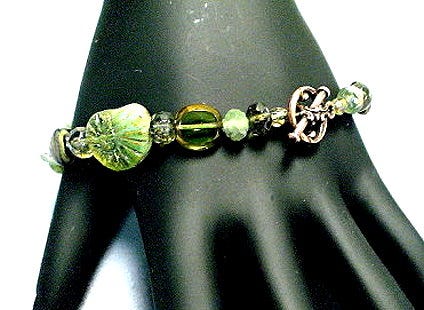
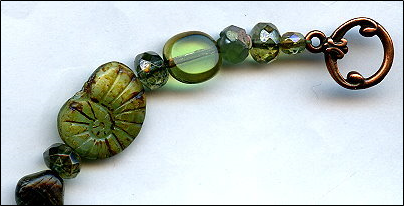
The following is an example of how I was inspired by nature and the resulting Poke Berry Lariat piece.
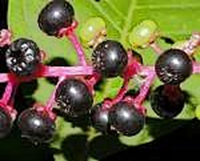
During a walk one day, I saw some poke weeds. I had so much fun playing with these when I was a child — I love making ink out of the berries! So I went over for a closer look.
Beading is always on my mind, as I examined the stem and berries. It could be done! At least, I could try and re-create this glorious work of nature using beads. I broke off the stem (a bright magenta) and the berries (both purple and green). I took the stem and berries to the bead shop to match up the colors.
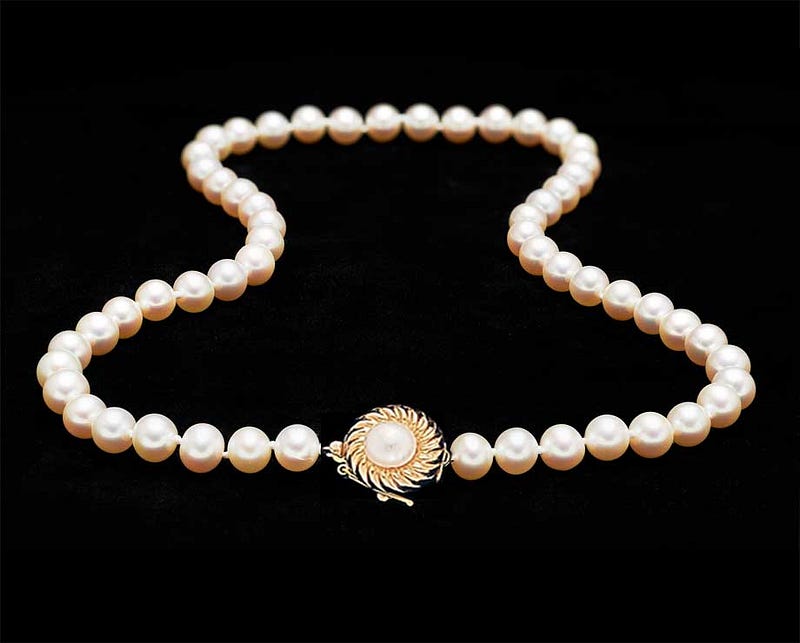
The berriesThe stem of the poke plant
The shape of the berries resembled some freshwater pearls. Again I used the actual berries (purple and bright green) to match up the colors with the pearls.
I already had certain stitches in mind. I decided to make this a lariat necklace. Bead crochet was my obvious stitch of choice for the vine-like rope. I decided to use size 8/0 seed beads for the crochet rope to provide strength and a balance to the berry clusters that I would add on to the rope.
For the berry clusters, Ndebele would have strength, provide movement and mimic the way the real clusters are attached to the vine. Using the same magenta color as the crocheted rope, I switched to size 11/0 Japanese seed beads.
The tubular Ndebele stitch was easy to begin right off the crochet rope — both from the ends and a berry cluster about 4 inches from one end. From this Ndebele base, the last stitch, fringe, was used to attach the pearls.
To represent the ripening of the berries, I used a combination of green and purple pearls on 2 of the berry clusters. I decided not to add any leaves. My “Poke Berry” necklace was ready to be worn.
A BEAD is anything that has a hole in it. And you can do a lot of things with things that have holes.
You can put these things on string.
You can sew these things onto fabric.
You can weave these things together with threads.
You can knot or braid or knit or crochet these things together.
You can combine and wrap and en-cage these things with metal wires and metal sheets.
You can work these things into projects with clay, polymer clay and metal clay.
You can embellish whatever you can think of — dolls, tapestries, clothes, shoes, scrapbooks, pillows, containers, and vases.
You can incorporate these things into basket weaving, wood work, and kumihimo.
You can use these as money or for trade.
You can use these things in scientific experiments.
You can fuse these things together.
You can incorporate these things into projects involving stained glass, mosaics, or multi-media art.
You can use these to make yourself look prettier through adornment.
You can decorate your house and your household things with these things.
You can texture surfaces with these things, using glues, cements or resins.
You can use them as game pieces.
You can use these as ornamental or decorative objects.
You can sort them and organize them and stack them and arrange them and assemble them once or twice or over and over again.
Beads can become an armature to support the structure of something else.
You can use these symbolically by colors, shapes or sizes to signify emotions, spiritual connections, and life’s rights of passage.
You can construct models with these, such as architectural or biological or chemical.
Beads can be used to communicate emotions, beliefs, status and power, and social acceptability.
You can establish fashions and styles with these, or use these to measure the level of someone’s taste.
You can buy these pre-made, or make your own.
You can do a lot of things with beads. Most people begin by Stringing beads, and graduate to things like Weaving beads, Embellishing with beads on Fiber, Knotting and Braiding with beads, and Wire Working with beads. A few people learn to hand-make Lampwork glass beads, or learn to sculpt with Polymer Clay or Precious Metal Clay, or learn to solder using Silver-Smithing techniques.
And you can feel self-satisfied and secure in the knowledge that, should everything else in the world around you go to pot, we will all be back to bartering with beads.
Everyone has a Getting-Started story. Some people were always crafty, and beading was a natural extension to what they were doing. Others were driven by the allure of beads and jewelry. They saw fabulous earrings and necklaces and bracelets in magazines, department stores and boutiques at prices out of reach, and they said to themselves: I can do this — and for less. Some didn’t want to pay to have jewelry repaired by a jeweler. And still others were drawn by the beads themselves — beautiful objects to be adorned. And played with. And fondled.
Vanessa told me how she got started. She had bought a strand of beads. She possessed them. They possessed her. She kept them with her at all times. In her pocket. In her purse. Between her hands. Inside a zip-lock bag. Then outside the zip-lock bag. And back into the zip-lock bag. After weeks of taking them out, putting them away, and then taking them out again, she sat herself down at her kitchen table. She lay the strand of beads on the table, ever-so-gently. She reached for the sharpened scissors. And cut the strand.
The beads rolled all over the table. Vanessa’s eyes got wide. She told me she couldn’t stop looking at them and touching them and playing with them. The look on her face was sinful, almost pornographic.
Vanessa returned to the local bead store. And bought some more beads.
Terry had been crafty her whole life, ever since she was a little girl. She didn’t remember when she first started making jewelry. But she did remember when she was lucky enough to get paid for it. She made more jewelry. She sold more jewelry. And made more. And sold more.
Hessie loved to watch the jewelry home shopping network. She imagined herself modeling the jewelry on TV, and telling her audience how wonderful the beads and the colors and the stones and the designers all were. She began watching the craft shows on cable, and studying the instructors and every little thing they said and did. She started bead stringing jewelry and learning some wirework.
If you had walked into Renee’s bedroom, you would have seen boxes and boxes of jewelry — all in need of repair. She kept meaning to fix each piece, but the cost and inconvenience were too high. Finally, she convinced herself, “I can do this myself.”
Darita was a fiber artist. She had become frustrated, a bit, because she wanted more life in her projects. By a happy accident — a shattered car window and shards of glass sticking into several fiber projects on the front seat of her car — she discovered she could add beads. These beads added light and interplays on light. Darita was very happy with the results.
I always find myself asking our customers and students how they got started. Here’s how some of them finished the sentence, “When I started beading…”
“… I needed jewelry for my prom.”
“… My neighbor made me do it.”
“… A friend wanted a pair of earrings.”
“… I visited my first bead shop.”
“… I needed someone to repair a necklace, and couldn’t find anyone to do it.”
“… I needed to make some extra money.”
“… I was thinking about what to do after I retired.”
“… I ordered a kit on-line.”
“… I dreamed about beads and designed in my sleep.”
“… My dad brought me a beaded Indian doll, and I had to learn how to make something so similar.”
“… I was recuperating in the hospital from some surgery, and the volunteer brought me some beadwork to keep me busy.”
“… I begged a friend of mine to make me a bracelet like hers, but she never did. So I made one for myself.”
“… I decorated a scrapbook with some beads, and suddenly found myself switching craft careers.”
“… I needed an escape, something relaxing, something meditative.”
“… I was a baby in diapers learning to walk by following my mother holding some big beads dangling from a string.”
When I started beading in the late 1980’s, there were no major bead magazines — like Bead & Button or Beadwork. There were very few stringing material options, and in fact, many people used dental floss or sewing thread or fishing line. There were few choices of clasps and other findings — especially for stringing on thicker cords like leather or waxed cotton. I had to go to hardware stores and sewing notion stores and antique stores and flea markets to find things, and make them work. I cannibalized a lot of old jewelry for their parts.
I was in Nashville, Tennessee, at the time. There wasn’t much of a beading culture here. It was difficult to find advice and direction. This was pre-Internet. I mostly strung beads, and got hooked early on. Probably because I sold so much of what I made. Selling your stuff gets you addicted very fast.
Very fast.
But initially, that’s all beading and jewelry meant to me. Money.
Not too long ago, I tried to link one of our web-pages — the announcement about our Beaded Tapestry Contest — to a crochet-themed web-ring. I received an email from this web-ring manager that she had received my request, and had visited our web-site. She discovered that we were linked to several Art-themed web-rings, as well. This, she pointed out, was unacceptable. She indicated that her web-ring was “G” rated, and that Art web-rings allowed pornography.
There was no more elaboration. I was wondering what she meant by pornography. It was difficult to imagine that any real XXX sites were linked in these ART web-rings. These websites allowed various artists in many different media to showcase their works. It was much more likely that some of the art-related sites had images that showed portions of the female or male body, perhaps in erotic poses, perhaps not.
I didn’t consider these kinds of things pornographic. She gave me the option either to delete myself from these Art-web-rings, or unsubscribe from hers. So I asked her to unsubscribe me from her web-ring. I guess she was a bit taken aback from my response. She emailed me a few more times to clarify my decision. I had picked Art over her. Supposedly porn over craft.
Geesh!
I replied “let’s just unsubscribe me.” Nothing more. I kept it short, simple, unemotional. I didn’t ask for any more clarification on her views. I didn’t share any of my views. If that’s how she defined “G” rated, fine. I didn’t define it the same way.
And of course, she got a little retaliatory, as I found out after the weekend, that I had been removed from four more crochet-oriented web-rings, without any explanation.
I’m sorry, people, you can’t separate JEWELRY from SEX and SEXUALITY. Playing with beads and designing jewelry is not ColorForms. It’s not dressing up paper dolls. There’s nothing one dimensional about it. There’s nothing asexual about it. You can’t separate jewelry from sex and sexuality.
It can’t be done.
It can’t.
Sex.
Get used to it.
As a jewelry designer, you have to be very aware of the roles jewelry plays in sex and sexuality. These include,
(1) The Peacock Role (2) The Gender Role (3) Safe Sex Role
One sexual role of jewelry is the “Peacock Role”. People wear personal adornment to attract the viewer’s attention. This means that the jewelry not only needs to be flashy enough, but also must contain culturally meaningful elements that the viewer will recognize and be sufficiently meaningful as to motivate the viewer to focus his attention on the jewelry and who is wearing it.
These culturally meaningful elements might include the use of color(s), talismans, shapes, forms. They clue the viewer to what is good, appealing, appropriate, and to what is not. But the jewelry must also provide clues to the individuality of the wearer — her (or his) personal style, social or cultural preferences, personal senses of the situation in which they find themselves in.
Another of these sexuality roles — The Gender Role — is to define gender and gender-rooted culture. Certain jewelry, jewelry styles, and ways of wearing jewelry are associated with females, and others with males. You can easily label which jewelry looks more masculine, and which more feminine. Some jewelry is associated with heterosexuality, and others with homosexuality. I remember when men, in a big way, started wearing one earring stud, it was critical to remember whether to wear the stud in the left ear lobe (hetero) or the right one (gay). For engaged and married women, it’s important to recognize which style of ring is more appropriate, and which hand and finger to wear these on.
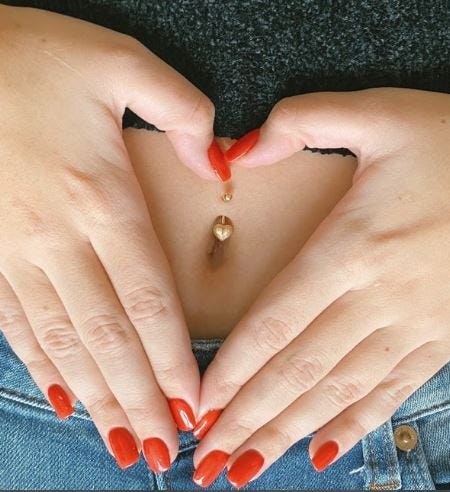
One of the most important sexuality roles, however, — The Safe Sex Role — concerns the placement of jewelry on the body. Such placement is suggestive of where it is safe, and where it is unsafe to look at or touch the person wearing it. The length of the necklace, relative to the neck, the breast, and below the breast. How long the earring extends below the lobe of the ear. Whether the person wears bracelets. The size of the belt buckle. If a person has body piercings, where these are — the navel, the eyebrow, the nose, the lip.
Jewelry calls attention to areas of the body the wearer feels are safe. It’s like taking a sharpie marker and drawing a boundary line across the body. Jewelry gives the viewer permission to look at these areas, say above the line, and not others. Jewelry may give the viewer permission to touch these areas, as well. The wearer may want to call attention to the face, the neck, the hands, the ankle, but also to the breasts, the naval, the genital area.
We know that certain areas of the body are more sexually arousing than others. We know that different people are more or less comfortable with these areas on the body, or with someone sexually arousing these areas on the body. But how does the wearer communicate that? How does the wearer communicate her (or his) personal views of what is sexually acceptable without having to physically and verbally interact with someone in order for that person to find out?
Jewelry. How jewelry is worn is one of the most critical and strategic ways for achieving this Safe-Sex goal. The line of the jewelry imposes a boundary line on the body. Do not cross it. And make no mistake, this boundary line separates the permissible from the impermissible, the non-erotic from the erotic, the safe from the unsafe. Jewelry is not just a style preference thing. It’s a safe-sex preference thing, as well.
When news of the AIDS epidemic first burst on-stage, you saw a very dramatic change in jewelry and how it was worn. We’re going back to the 1970’s. Right before the AIDS epidemic, large long earrings were in style. Remember shoulder dusters. But as awareness of AIDS spread, most women stopped wearing earrings for awhile. Then gradually, they began wearing studs. Then very small hoops. It wasn’t until around 2004, that some women wore the “new” chandelier earrings, and you saw longer earrings on actresses as they paraded down the red carpets of one award show after another.
Prior to AIDS, the necklace style was for longer necklaces — 24” to 36” long. The necklaces were full — multi-strand, lots of charms and dangles. Again, as awareness of AIDS spread, the necklace profile changed rapidly to no necklace at all, or to thin, short chains and chokers. You would typically find ONE charm, not many, on a necklace. Attention was pulled away from the genital area, the navel and the breasts, all the way back up to the face.
Prior to AIDS, necklaces and earrings were the best-sellers in the shop. After AIDS, it became bracelets. Holding hands. Not necking. Not fondling. Not sexual intercourse. Holding hands was now the acceptable norm. This was safe.
Body piercings came into major vogue during the 1970s. And look at what typically got pierced. Noses, belly buttons, eyebrows, lips. Think of this as a big Body Chart for safe sex.
As society became more understanding of AIDS and how it is spread, the jewelry became larger. It extended to more areas of the body. People wore more of it. But in 2009, it was stilled restrained, when compared to what people wore before the 1970s.
In the sexual hunt between the sexes, jewelry plays an important boundary-defining role. Let’s not forget about this. Jewelry, in some sense, is an embodiment of desire. Jewelry communicates to others how the wearer comes to define what desire might mean for the self. It communicates through placement, content and elaboration.
Jewelry does not have to be visibly erotic, or include visual representations of sexual symbols, in order to play a role in sexuality and desire — a role that helps the hunter and the hunted define some acceptable rules for interacting without verbal communication.
(Begin Top Left) Bead Stringing, Bead Weaving, Wire Working, Metalsmithing
Abstract: Jewelry Making Techniques bring materials together within a composition. Techniques construct the interrelationship among parts so that they preserve a shape, yet still allow the piece of jewelry to move with the person as the jewelry is worn. And Techniques manipulate the essence of the whole of the piece so as to convey the artist’s intent and match it to the desires of wearer, viewer, buyer, seller, exhibitor, collector, student and teacher. Technique is more than mechanics. It is a philosophy. Thoughts transformed into choices. Part of this philosophy is understanding the role of technique to interrelate Space and Mass. Space and Mass are the raw materials of jewelry forms. Technique reduces the contrast between them in a controlled way and with significance for designer and client. Techniques have special relationships to light, texture and ornamentation. Technology enables us to expand our technical prowess with new materials, processes, styles and forms
TECHNIQUES AND TECHNOLOGIES: Knowing What To Do Technique is Knowledge, Value, Creation
Jewelry Making Techniques are more than mechanics.
Techniques are ways to implement ideas. To transform thoughts and feelings into choices.
Techniques are knowledge, value and creation.
Jewelry Making Techniques bring materials together within a composition. Techniques construct the interrelationship among parts so that they preserve a shape, yet still allow the piece of jewelry to move with the person as the jewelry is worn. And Techniques manipulate the essence of the whole of the piece so as to convey the artist’s intent and match it to the desires of wearer, viewer, buyer, seller, exhibitor, collector, student and teacher.
There are many different kinds of jewelry making techniques, as well as strategies and variations for implementing them. In fact, the jewelry designer has no proscriptions, no prescriptions, no expectations, no limits on how she or he decides to compose, construct and manipulate materials and structures and supports. It can be a technique that is learned. It can be one approximated. It can be totally new, emergent and spontaneous. It can be socially acceptable or not. The designer can pull, tug, press, cut, carve, sculpt, emboss, embellish, embroider, sew, knit, weave, coil, bend, fold, twist, heat, cool, assemble, combine, dissolve, destruct, cast, wrap, solder, glue, wind, blow, or hammer.
In reality, it is impossible to discuss meaningfully the technique apart from the ideas, abilities and experiences of each jewelry designer, particularly in reference to knowing when a piece should be considered finished and successful. There will be some variations in how any designer applies a technique. This is called skill. One might pull harder or hammer harder than another. One might allow some more ease or looseness than another. One might use easy solder where another might choose hard solder. One might prefer a thinner thickness or gauge of stringing material, and another a thicker one. One might leverage the structural properties of one material, while another might choose other materials with different properties towards the same end. One might apply the technique, following Step XYZ before Step ABC, and another, apply the technique in reverse, altering the steps to be XYA and ABZ.
But our primary focus here is on technique apart from skill. This lets us see why some designers are masterful at technique, while others are not.
While there are a lot of different methods and applications designers can choose from, all too often, however, when selecting techniques, jewelry designers fail themselves (and their clients). They disappoint. They do not understand how to select techniques. They do not fully understand the basic mechanics. They do not fully understand the expressive powers of techniques.
Because of this, they are unaware of the responsibilities, as artist and designer, which come with them. In turn, they make inadequate choices. They might choose the simple, the handy, the already learned. They might choose what they see other designers using. They might choose what they see in magazines and books and videos which get spelled out in Step1-Step2-Step3 fashion.
But often they are naïve in their choices. They lack an understanding of technique and its philosophy. They do not understand that there are lot of things more to any technique beyond its simple mechanics. Techniques are not step-by-step. They are a collection of knowledge, skill, understanding, choices, decisions, tradeoffs, intents with implication and consequence. Techniques anticipate shared understandings between artist and audience about finish and success.
Moreover, jewelry designers often do not recognize that each and every technique can and should be varied, experimented and played with. They do not understand that techniques do not work or accommodate every situation. That is, jewelry designing is not a “Have-Technique-Will-Travel” type of professional endeavor. Techniques need to be selected and adapted to the problems or contexts at hand.
They do not understand that there is more to techniques than securing an arrangement of elements. They do not understand that techniques must find some balance or tradeoffs between maintaining shape(s) and managing support(s), that is movement, drape and flow.
They do not understand how their choice of technique, and the decisions they make about how to apply it, influence the response of others to jewelry materials and forms they create. Technique, compounded by skill, can be very determinative of outcome.
SPACE AND MASS AND A PHILOSOPHY OF TECHNIQUE
Space and Mass are the raw materials of jewelry form. Space is void. Mass is something. Some jewelry depends more on the expression of Space; others more on the expression of Mass. Whatever the designer’s goals and intents, Technique permits a reduction of the contrast between space and mass. Towards this end, Technique communicates the significance of a mass within a space by controlling it. Publicly demonstrating this control communicates intent, meaning and expressiveness.
The jewelry artist begins by confronting a void. There is space, but there is nothing in it. Space.
Into this space or void, the artist introduces mass. This may begin with a point or a line or a plane or a specific shape or color or texture or pattern. More mass is added. Mass.
The designer sets boundaries, places and distributes things, brings things together, determines the scale, signifies directions and dimensions. The designer begins to co-relate the mass to the space around, within, or through it. Mass on Space.
The designer regulates the relationship and relative importance of the surface of the mass to the entirety of the mass itself. Sometimes the mass (or its surface) is expected to be static. Sometimes it is expected to move. Occasionally ornamentation is added. In the context of jewelry, some of this mass should be able to hold a shape; other of this mass should be able to move, drape and flow when worn. Mass on Mass.
Technique makes something out of nothingness. It is designed. It is constructed. The act of implementing a technique — that is, revealing a pattern of choice behaviors — is communicative. It has intent. Mass, Space, Intent.
Eventually, the designer applies Technique to this mass, and in so doing, creates composition. Things are assembled. They are pulled together. The mass suddenly has order. It has organization. It is communicative. It interacts with the desires others place on it. It evokes an emotional response. It references a context or situation in which it is to be worn. Mass, Space, Intent, Content.
Thus, things placed within the space are pulled together, juxtaposed, connected, inter-related in some way. We call this composition. Composition might mean how the jewelry designer
– Treats the surface
– Emphasizes dimension
– Joins units
– Impresses into things, onto things or through things
– Pulls or Stretches or Twists things
– Covers, embellishes, frames or exposes things
– Asserts or changes the scale
– Determines sizes, shapes and volumes
– Arranges, Places, Distributes things
– Relates positive to negative space
– Creates a rhythm, form or theme
– Expects things to move or be static
– Anticipates who might wear it, how it might be worn, and where it might be worn
A piece of jewelry becomes a wholly finite environment within what otherwise would have been nothingness. But filling this space with form is not enough. It is not the end of the designer’s role and responsibility.
With order, organization and communication come significance, meaning, implication, connectedness and consequence for everyone around it. Expression occurs. An explanation or story emerges.
The designer must give this mass-in-space a quality other than emptiness. It must have content, meaning, purpose. The designer must allow this mass-in-space to be enjoyed. Again, expressed. Much of this comes down to materials and techniques.
That means the designer must impose upon this space some personal Philosophy of Technique — hopefully employing artistic and design knowledge, skill and understanding. This philosophy is how this designer thinks-like-a-designer. It becomes a key part of the designer’s fluency, adaptability, and originality as a professional. It is how the designer touches things and brings things together. This is a philosophy of selection, implementation and management of mass-in-space which
– Balances, equalizes, meditates
– Restricts
– Releases
– Senses and newly senses
– Becomes a standpoint, a flashpoint, or a jumping off point
– Sees new possibilities, forecasts, anticipates or expects
– Creates and re-creates feelings
– Plays with tolerances, stresses and strains
– Makes things parsimonious where enough is enough
– Results in things which are finished, successful and resonant
The mass has form and arrangement within space. It begins to convey sensation and feelings and content and meaning. But the designer still has not completed the job. Jewelry cannot be fully experienced in anticipation. It must be worn. It must be inhabited. It must communicate, interact, connect. Any philosophy of technique must account for all of this. Mass, Space, Intent, Content, Dialectic.
The elemental parts and their pleasing arrangement into a whole must allow it to be enjoyed by others. Be influenced by it. Persuaded. A desire to touch it. See it. Wear it. Buy it. Display it. Show it to others. Others, on some level, must accept the designer’s Philosophy of Technique, that is, the designer’s definition with intent for manipulating mass within space, in order to
– Recognize how to look at it and react to it
– Understand how to wear it
– Be inspired as the artist was inspired
– Feel the balance, harmony, variety, cacophony, continuity, interdependence among spaces and masses
– Anticipate the effects of movement, drape and flow
– Get a sense of psycho-socio-cultural release
– Get a sense of psycho-socio-cultural restriction
– Know when the piece is finished and successful
– Judge the piece in terms of value and worth
– Assess the risk within some context of wearing or purchasing it
– Assess the risk within some context of sharing it with others
Designers over time gain fluency in their philosophies of several techniques. Such fluency is recognized and comes to the fore when Techniques serve the desires, understandings and values of both designer and client. Techniques and the philosophies (ways of thinking) which underly them must fully communicate the particular intent, concepts and experiences expressed by the jewelry designer. They must anticipate, as well, the particular shared understandings others have about whether the piece will be judged finished and successful.
Designer and client have a special relationship which comes to light within the composed, constructed and manipulated piece of jewelry as it is introduced and expressed publicly.
Through Technique. Through Skill. And a Philosophy.
TECHNIQUES INVOLVE RELATIONSHIPS
Techniques, and the relative skill in applying them, are used to resolve the relational tensions underlying the craftmanship, artistry and design of any piece of jewelry. How these relationships are implemented and managed affect how the finished jewelry will be perceived sensorially, sensually, and symbolically. These will affect how the wearer/viewer recognizes the artist’s intent. These will affect how the wearer/viewer sees their desires reflected within the piece, thus the value and worth of the piece to them.
In design terms, this is called Expression. Expression in design is the communication of quality and meaning. The designer expresses quality and meaning through the selection, implementation and application of technique. We sometimes refer to this as skill. A technique will have a function. It will have a set of mechanics and processes. It will have purpose. There will be variations in how the mechanics and processes will be put into effect. Sometimes it will require a stiffening up; othertimes a loosening up. A pressing or pulling harder or softer. A curving or straightening. A transformation from 2 dimensions to 3 dimensions. Repositioning. Altering texture.
The technique, its function and application will further get interpreted and transformed, that is, expressed, into wearable art. Similar to how sounds are made into music. And how words are made into literature. There is an underlying vocabulary and grammar to jewelry design, from decoding to comprehension to fluency.
Some aspects of expression are universal, but perhaps most are very subjective, reflective of the interpretations and intents (philosophies) of the artist, the wearer/viewer, and the general culture. Because of this, each and every expression of design through technique will have to resolve some underlying tensions. Of special concern are these tensions and relationships:
Aesthetic (beauty) vs. Architectural (function)
Should Parts Be Considered Center Stage or Supplemental
Special Relationship to Light and Shadow
Special Relationship to Texture
Special Relationship to Color and Ornamentation
Aesthetic vs.Architectural
Jewelry Design all too often is viewed apart from the human body, as if we were creating sculptures, rather than wearable art. Yet its successful creation and implementation is not independent of the body, but moreso dependent upon it. It must feel good, move with the body, minimize the stresses and strains on the components and materials. And look good at the same time.
This sets up a tension in the relationship between the Aesthetic and the Architectural. The problems of jewelry design extend beyond the organizing of space and mass(es) within it. The designer must plan for and create a harmonious and expressive relationship between object and body and between object and person as the object is worn. This often means compromising. Trading off some of the aesthetics for more functionality.
Before you choose and implement any technique…
STOP ASK YOURSELF: What about this technique and the steps involved in implementing this technique will help my piece maintain its shape (structure)?
Before you choose and implement any technique…
STOP ASK YOURSELF: What about this technique and the steps involved in implementing this technique will help my piece move, drape and low (support)?
2. Should Parts Be Considered Center Stage or Supplemental
The question becomes how the various parts or segments of the jewelry should relate to one another. We might have strap, a yoke, a centerpiece or focal point, a bail, and a clasp assembly. The tension here becomes whether the jewelry as a whole should be judged critically as an expression of art and design, or only the centerpiece or focal point should be so judged.
With the latter, the non-center/focus parts of the jewelry are seen merely as supplemental. This is similar to how a frame functions for painting or a pedestal for a sculpture.
With the former, each segment or component part cannot exist or be expressive apart from any other. The piece must be judged as a whole. The whole must be more resonant or evocative than the sum of its parts.
Here we begin to question what exactly technique is. Is it only that set of mechanics and processes applied to only a section of the whole piece of jewelry? Or is it how the designer makes choices about construction and manipulation from getting from one end of the piece of jewelry to the other?
3. Special Relationship To Light And Shadow
Light and shadow are both critical design elements to be manipulated as a part of the jewelry designer’s active decision making process. Yet, light and shadow affect the experience of any piece of jewelry in ways which are outside that designer’s scope and control, as well.
Light and shadow are necessary for the expression of the artist’s intent and inspiration in jewelry. Because light and shadow move, change character, and come and go with their source, light and shadow have the power to give that mass of component parts a living quality. This effect is compounded (or foiled) as the wearer moves, changes position, travels from room to room or inside to outside.
The designer cannot control all this, but should be able to predict a lot of this behavior, and make appropriate design choices accordingly.
The designer can channel light through the selection of materials and their reflective, absorptive and refractive properties. The designer can play with color, pattern and texture. The designer can be strategic about the placement of positive and negative spaces. The designer can arrange or embellish surfaces in anticipation of all this. The designer can diffuse light or transform or distort colors. The designer can add movement or dimensionality to enliven their forms. The designer can even use light or shadow to hide things which might negatively affect the overall aesthetic.
The points, lines, planes and shapes incorporated into any piece of jewelry become receptacles of light and shadow which can change in character or form as time progresses, people move and contexts change. An important part in the success of jewelry designs is played by the quality and intensity of light (and shadow) within context.
4. Special RelationshipTo Texture
Jewelry is experienced both tactilely and visually.
Sometimes these complement each other; othertimes, they compete or conflict. Texture plays a major role here. On the one hand, it expresses something about the quality of the materials used. On the other, it gives a particular quality to light and shadow, and their interplay with the piece as worn.
Designers often select materials partly based on their tactile textures. They might also alter these textures to expand on the variety of expressive qualities that might be offered. The stone might be used as is. It might be smoothed and polished. It might be roughed up, carved or chiseled. The material might end up expressing something about the natural state or about refinement and sophistication.
Visually, the designer makes many choices about how to employ the materials. They may emphasize verticality over horizontality. Projecting over recession. Slow or fast rhythm. Opacity may be altered. The designer produces differing visual expressions based on patterns and how lighting of the surface conveys the sensory experience of these patterns.
A single texture, whether the goal is tactile or visual, is rarely employed alone in jewelry design. The actual variety of materials and treatments produces a complex of textures that must be composed and harmonized and resonant into the jewelry’s expressive and consistent whole.
5. Special Relationship To Color and Ornament
Color is a characteristic of all jewelry making materials. It is a constant feature of any piece of jewelry. Materials might be selected for their color and visual appeal. Techniques might be selected for their ability to enhance or play with color and its visual appeal.
Yet, on the other hand, other jewelry making materials and techniques might be selected primarily for their structural properties — that is, their ability to be used to create, maintain, and retain shape or silhouette. They might be used as mere armature or to create that armature. The colors of these materials or the effects resulting from how techniques manipulated them may not be suited to the expressive goals of the designer. Because of the nature of jewelry making techniques and components, there also may be an unintended or unwanted absence of color, such as gaps of light between beads.
Thus, because of these kinds of things, materials with more suitable expressive colors, either as is or as manipulated, are added to the surface as embellishment and ornamentation. Sometimes these materials are dyes or coatings or fired-on chemicals. Sometimes these materials are more substantive materials like glass, gemstone, wood or shell.
These ornamental materials may cover parts of the surface or hide the entire surface of the piece. They may disguise it. They may be used to alter how color is perceived and experienced. They may completely change the experience. But without technique, and a philosophy of technique, these ornamental options may make it impossible to achieve the sensory, visual or structural powers the ornamentation is meant to provide.
The tension arises when the designer makes choices whether the ornamentation is to be used to enhance the expressiveness of the piece as originally designed (applied ornamentation), or, whether the ornamentation is to be used to create a completely different meaning, decorative motif, or symbolic expression, regardless of appropriateness to that original design (mimetic ornamentation).
Applied ornamentation enhances the designer’s power and control to assert intent and inspiration within the jewelry. Often applied ornamentation makes some reference to the underlying structures behind it. But the designer needs to be careful that this doesn’t turn into merely applied decoration. As ornament, whatever is done is integral to the piece. As decoration, it is not.
Mimetic ornamentation is often used to make a piece more familiar, more accepting, more reassuring to various audiences. It might be used to disguise something. It might have symbolic value. Here, too, the designer needs to be careful that this doesn’t turn into merely applied decoration.
A third consideration is whether the ornamentation is critical to the jewelry’s functioning or materials (inherent ornamentation). It is important that it be organic to the piece. That is, it should derive directly from and be a function of the nature of the jewelry and the materials used. It may allow size adjustment. Its placement may reinforce to overcome vulnerabilities. It may redistribute stresses and strains. It may aid in movement. It may assist in maintaining a shape. It may rationalize color, texture and/or pattern within and throughout the piece.
SURVEY OF JEWELRY MAKING TECHNIQUES
There are many, many different types of techniques used in jewelry making. Each encompasses basic mechanics. Each is implemented within a procedure or process. Each is a form of expression.
These techniques or forms of expression differ from each other in terms of the choices the designer makes about how mass should get related to space for creating composition. They differ in how structure (shape) is created and preserved, and in how support (movement, drape and flow) is built in, achieved and maintained. They differ in how pattern and texture is created or added. These techniques differ, apart from the materials used, in how people interact with them, aesthetically, functionally, sensorially and sensually.
These techniques are not mutually exclusive, and are often combined. It is up to the designer to select the technique or techniques to be used, maximizing the strengths and minimizing the weaknesses of each. Usually, the designer, when combining techniques, will want one technique to predominate. The designer does not want the underlying philosophies of two or more techniques to conflict, compete, or not coordinate.
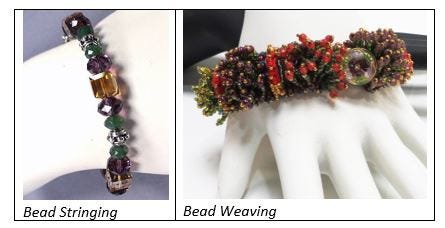
Stringing, Bead Weaving
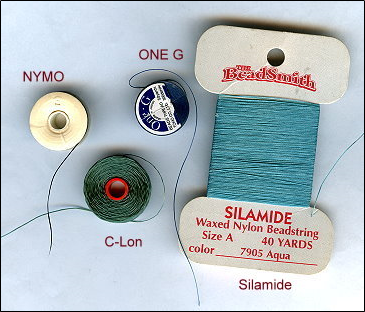
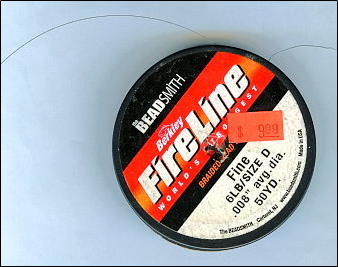
Beads and other components are assembled together into a composition and silhouette. The stringing materials range from the very narrow, like beading thread, cable thread and cable wire, to thicker, like bead cord, leather, waxed cotton, ribbon, satin cord, and braided leather. The stringing materials are often hidden, and typically play a supplemental role to the beads and other components within any composition.
Philosophy of Technique: Objects are placed and assembled together within a space in relationship to the direction and linearity of some type of stringing material or canvas. There is great attention to the use of points and lines, usually within a singular plane. Shapes are basic, often only in reference to a silhouette. Minimal attention is paid to dimensionality.
A piece is made stable by the rigidity of the stringing material or canvas. The stringing material or canvas is able to withstand tension and compression.
Often, designers place too much reliance on the clasp assembly to provide support (movement, drape and flow), instead of embedding support elements (rings, loops, unglued-knots, hinges, springs, coils, rivets, rotators) throughout the piece. In a similar way, often designers place too much reliance on the placement of objects on the canvas (that is, stringing material) for maintaining structure (shape), instead of other elements that could be used to maintain shape, while mitigating against stress and strain.
Each stringing and bead weaving technique and its procedures and processes for implementation rely on part of the implementation to maintain a shape, and on part of the implementation to allow for movement, drape and flow. The particular technique used to assemble the beads (and related components) sets the tone in pattern, shape, form and texture. Some stringing and bead weaving techniques are great at maintaining shapes. Other techniques are good at allowing for movement. The better techniques are good at accommodating both structure and support.
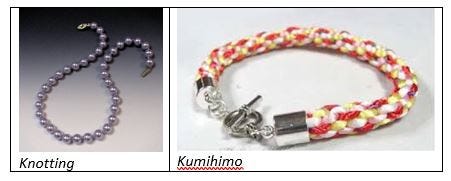
Knotting, Braiding, Knitting, Crocheting
The stringing materials take center stage, either in combination with other elements, or alone. The composition may or may not include beads and other components. Occasionally glue is used, but its use should be minimized.
Philosophy of Technique: Within a space, the artist places and intertwines various types of stringing materials. The artist varies tightness and looseness, placement and distribution of sizes, volumes and mass to achieve the dual goals of structure and support.
A piece is made stable by the rigidity of the intertwining (knotting, chaining, braiding) of the stringing material or canvas. The intertwined stringing material or canvas is able to withstand tension and compression.
Each strategy for knotting or braiding attempts to simultaneously achieve structure and support. The technique might vary the placement of fixed points with the use of chaining to create lines, forms and planes within the composition. Considerable attention is paid to the positioning of positive and negative spaces.
There is a lot of attention to the use of line. These techniques allow for incorporation of various strategies for achieving a sense of dimensionality. The shapes may be allowed to stretch or contract, allowing easy response to issues resulting from stress or strain. Texture is a major emphasis.
Embroidery, Embellishment, Fringing
Elements are attached to the surface of the canvas. This surface is often referred to as the foundation or base. These elements may be glued or sewn or woven on. The canvas typically plays a diminished or supplemental role, though this is not a requirement.
Philosophy of Technique: The space available has been defined by a particular canvas. This might be a string. This might be a flat surface. Elements are placed on and secured to this surface; the mechanics here relate to structural goals. The pliability, manipulability, and/or maneuverability of the canvas relate to support goals.
A piece is made stable by the rigidity of the stringing material or canvas. The stringing material or canvas is able to withstand tension and compression.
The embellishment may be used to create a particular image, or pattern, or texture. Often it is used to add a sense of dimensionality and/or movement to a piece. It invites people to want to touch the composition because it adds a very sensual quality to a piece beyond the characteristics of the materials or colors used.
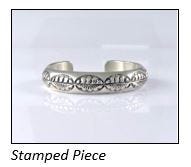
Stamping, Engraving, Etching
Elements are embedded on or worked into the surface of the canvas. The canvas may be comprised of any material.
Philosophy of Technique: The space available has been defined by a particular canvas. This is typically a flat surface of some kind, but not limited to any one material. Structural, as well as support, goals depend on the physical, functional and chemical properties of the canvas. Sometimes these properties are altered through the application of the techniques. Texture and pattern are major focuses.
A piece is made stable by the rigidity and material strength of the canvas coupled with that canvas’s ability to maintain its integrity after it has been physically or chemically altered. The resulting canvas is able to with stand tension and compression.
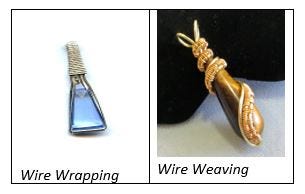
Wire Working, Wire Wrapping, Wire Weaving
Hard Wire is manipulated into forms which hold their shape, serve as structural supports, or create pleasing patterns and textures.
Philosophy of Technique: The designer places wires into a space. The wires may be bent to form lines, planes, shapes and forms. The wires may be interwoven, bundled together, coiled, or otherwise anchored or tied together to create a canvas and form the basic foundation of a piece of jewelry.
During the process of applying a wire technique and creating a piece of jewelry, the physical properties of the wire must be changed. The designer takes wire, applies a technique to it, and continues to apply the technique until the wire is stiff enough to hold a shape. Each time you manipulate wire, it gets harder and harder and harder. If you manipulate it too much, it will become brittle and break. The wire can be pulled, coiled, bent, twisted, or hammered.
A piece is made stable by the stiffness or hardness of the canvas and its material strength, where it is stiff enough to hold a shape, but not so stiff as to become brittle and break. The resulting canvas is able towithstand tension and compression.
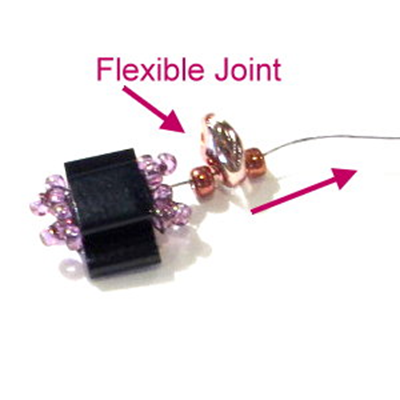
Considerable attention must be paid to strategies of support, that is, how things get joined and jointed. That is, whatever the piece of jewelry, it must be able to move freely, and withstand all sources of stress or strain.
For example, hard wire would not be used as a stringing material. If you put beads on the hard wire to create a bracelet or necklace, the wire would distort in shape when the piece is worn, but not return to its original shape. In this case, you would have to create several segments or components using the wire, and then make some kind of chain to create that jointedness and support. Picture a rosary which is a bead chain made of wire.
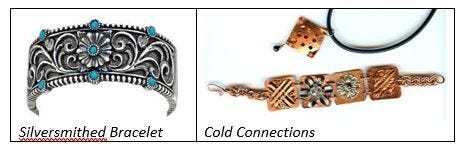
Metalsmithing, Fabrication, Cold Connections
Here metal is shaped and formed into a broad, layered canvas or a series of canvases we call components. Layers of sheet, wire and granules, or a series of components may be combined in some way, either to create a more complex composition, increase a sense of dimensionality or movement, or allow for jointedness, connectivity and support. The designer might use heat and solder — fabrication. Or the designer might use rivets, hinges, loops, rings, rotators — cold connections. The layers or the series of components may be textured or not.
Philosophy of Technique: Into a space, the designer places pieces of metal. These pieces of metal may sit side-by-side, on top of each other, overlap, sit perpendicular or at an angle. The components are attached together, using heat and solder, glue, or cold connections. Each layered canvas or component is a composition unto itself.
Canvases and components are rigid shapes and are constructed to withstand stress and strain. When constructing a piece of jewelry, typically the designer interconnects various components in a way which allows movement, drape and flow.
Interconnected components may be thematic or tell a story.
A piece is made stable by the rigidity and material strength of the canvas after it has been successfully altered through shaping, heat, soldered connection, glue or cold connection. The resulting canvas is able to withstand tension and compression, up until the point it bends or dents. Usually, if that happens, the piece can be unbent or undented. Considerable attention must be paid to strategies of support, that is, how things get joined and jointed.
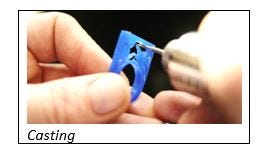
Casting, Modeling, Molding, Carving, Shaping
Here a material is reconfigured and altered into some kind of shape or form. The material may be rigid, like wood or stone. It may be malleable like clay or casting material. The material, once altered, may or may not be subject to additional actions to change its physical, functional or chemical properties, such as the application of heat or cold or a chemical bath.
Philosophy of Technique: The material is positioned within a space. As it is manipulated, it most likely will alter its relationship to that space. It will be able to play many roles from point to line to plane, and from shape to form to theme. The designer must be critically aware of how the technique will alter this relationship between space and mass, and light and shadow, and how these in turn, will affect form and composition.
A piece is made stable by the rigidity of the canvas after it has been shaped. Cast pieces have difficulty responding to strong forces. The resulting canvas is able to withstand tension and compression only to that point before it crumbles and breaks.
Structure and support considerations can either be built into the resulting component, or components may be treated in similar ways as in metalsmithing.
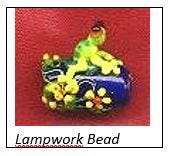
Lampworking, Wound Glass, Encasing
Rods and stringers of glass are heated by a torch and wound around a steel rod called a mandrel. Sometimes shards of glass, sometimes with abstract patterns, sometimes representative of realistic images, are laid on the hot glass, and covered (encased) by a transparent glass wound over them. The result is a bead or pendant or a small sculpture.
Philosophy of Technique: The material slowly enters and occupies a defined space. The artist plays with different types of glass, glass colors and transparencies, rods of glass, pieces of glass, ground up glass, and metallic foils. Things are placed and layered and spiraled. Surfaces can be altered by tools. Once begun, the artist must take the technique to completion. Thus, the artist’s ideas, focus, and intent are very concentrated and intense. Glass as a material requires the manipulation of the interpenetration of mass with space.
A piece is made stable by the properties of the glass. The resulting canvas is able to withstand tension and compression to the extent the properties of the glass will allow.
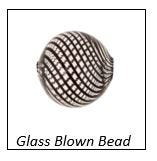
Glass Blowing
Air is forced through a steel straw. At the end of this straw is a blob of molten glass. The air forces it to hollow out. As this happens, the artist rolls it, hammers it, textures it, domes it, otherwise shapes it until it is a finished piece. The artist may roll the glass over other pieces of glass, to melt them into the piece. As the glass cools, the result might be a bead or a pendant or a small sculpture.
Philosophy of Technique: The material expands within a space. This space may be very narrow and defined, or very expansive, perhaps ill-defined. The resulting object has surface and interior and exterior spaces. The qualities of the surface create a play between mass and space, and their interpenetration.
A piece is made stable by the properties of the glass. The resulting canvas is able to withstand tension and compression to the extent the properties of the glass walls will allow.
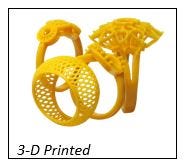
Computer Aided Design (CAD), 3-D Printing
Here the artist uses computers to aid in the creation, modification, analysis, or optimization of a design. The output is typically in the form of electronic files or technical drawings for 3-D printing, machining or other manufacturing operation. 3-D printing takes a CAD model and builds it, material layer by layer in an additive manufacturing fashion. Frequently, the 3-D printed object is a casting mold, rather than the finished piece.
Philosophy of Technique: CAD can place points, lines and curves within a 2-dimensional space, or curves, surfaces and solids within a 3-dimensional space. CAD can simulate motion and its impact on any object. It can take into account other parameters and constraints. The final technical output must convey more than information about shape. It must convey information about the extents to which various materials may be used in the design, their dimensions and tolerances. It must convey information about the pros and cons of processes the artist might use in the design.
One pay-off for the artist is that the computer can detail many more ways, and many more unexpected ways, to relate mass to space than typically thought of without it.
HOW TO LEARN TECHNIQUE
A good design, poorly executed, is not worth all that much.
So, how do we learn techniques is ways which help us develop ourselves as designers and be fluent in how we select, implement and apply them?
We need to be very aware of what influences us in our
o Selection of Technique
o Implementation of Technique
o Application of Technique
Selection: Anticipating What Will Happen If And When
We begin to develop our fluency in technique at the point of selection. To select a technique is to anticipate what will happen to the piece of jewelry after it is designed, constructed and worn. This involves all our senses from thought to touch to sight.
When we touch a piece constructed using a particular technique, how will it feel? Will it curve or bend? Will it curve or bend in the direction we need it to? Will it drape nicely on the body? Move easily with the body? Feel comfortable when worn? Will it hold its shape?
When we see a piece constructed using a particular technique, what will be the resulting pattern and texture? What will be the interplay of light and shadow? Will it look good from all sides when sitting on an easel? Will it look good from all sides when someone is wearing it? When that person is moving? Will all color issues be resolved?
We play a What-If game. What-If we used a variation on the technique? What-If we used another technique? What-If we combined techniques or sequenced them or staggered them? What-if we settled for a little less beauty to achieve better movement, drape and flow?
We might do some research. Has the technique been used by another artist or in another project you were attracted to? Was it used successfully? Did it work well in terms of structure and support? Did it contribute to (or at least not detract from) the visual appearance of the piece?
We might do some pre-testing. Will the technique hold up to our expectations? Will it still work with some variation? Will it work under differing circumstances?
We are honest with ourselves about our biases. Will we pick something only because we have done it before? Or we are very familiar with it? Or it is the easiest or path of least resistance?
Implementation: Basic Mechanics and Processes
We want to learn the basic mechanics of each technique in a way which highlights their philosophies — that is, how we think them through. We think about managing:
– Structure and Support
– How To Hold The Piece To Work It
– How To Distribute Stresses and Points of Vulnerability
– How To Create A Clasp Assembly
– How To Finish Off The Piece
Structure and Support. To begin, we know that each and every technique has as part of its mechanics and processes some aspects which help us create and maintain structures (shape). And each and everytechnique has some aspects which help us create and maintain support (movement, drape and flow). We want to be able to break down any technique so that we can recognize what results in what.
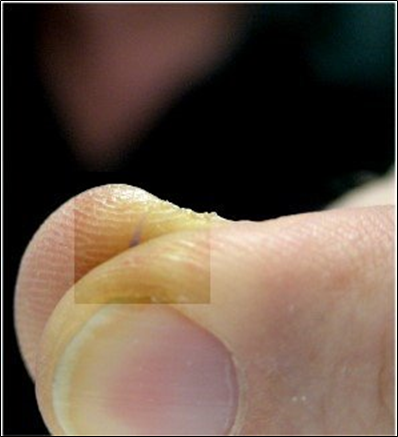
Holding The Piece To Work It. Next, the basic mechanics also includes strategies for how to hold the piece while you work it.
Picture yourself as an artist. An artist has an easel and something to use as a clamp to hold things in place.
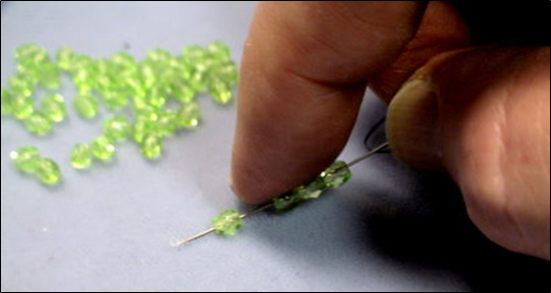
A bead weaver would use their forefinger on one hand as an easel, pressing the developing bead work project against it, and then take their thumb on that same hand, and clamp down over the work to keep it in place.
A silversmith might use a steel bench block as an easel, and a vice as a clamp.
Someone doing braiding or knotting might use a clipboard as an easel and a bulldog clip as a clamp.
Your challenge is to hold the piece in such a way that you maximize your ability to implement a technique all the while maximizing the strengths of that technique and minimizing its weaknesses. This is called leveraging. You use whatever it is that is equivalent to the artist’s easel and clamp in such a way that you can successfully leverage the technique for your purposes.
Holding your piece correctly also sends signals to your hands telling you when each individual step is completed, and when you are finished.
Distribute Stresses and Points of Vulnerability.
In any piece of jewelry, it can be expected that the stress-bearing and strain-bearing strengths and weaknesses of each component will be unevenly distributed throughout the pieces. That is, there will be some areas or points in the piece of jewelry which will be vulnerable to stresses and strains. This may cause the piece to break or lose its shape or otherwise disrupt its integrity.
The jewelry designer needs to be able to easily look at a piece or its sketch or design plan and identify all the points of vulnerability. After identifying these, the designer will need to figure out ways to compensate for these weaknesses in design.
Usually points of vulnerability occur in these places or situations:
Where the clasp assembly is attached to the piece
At the beginning and the end of the piece
Along the edges
Corners and inside corners
Where components have very sharp holes or edges
When using materials which degrade, deteriorate, bleed, rub off, distort, are too soft
Where there is not an exact fit between two pieces or elements
Where there is insufficient support or jointedness
These points of vulnerability may need reinforcement. More support or structural elements may need to be added. Things may need to be re-located or positioned within the design. They may need to be eliminated from the design.
Most often, places of vulnerability occur where the structures or supports in place take on the shapes of either H, L, T, or U. Think of these shapes as hazards. These shapes tend to split when confronted with external or internal forces. They tend to split because each leg is often confronted with different levels or directions of force. The legs are not braced. These hazardous shapes cry out for additional reinforcements or support or structural systems.
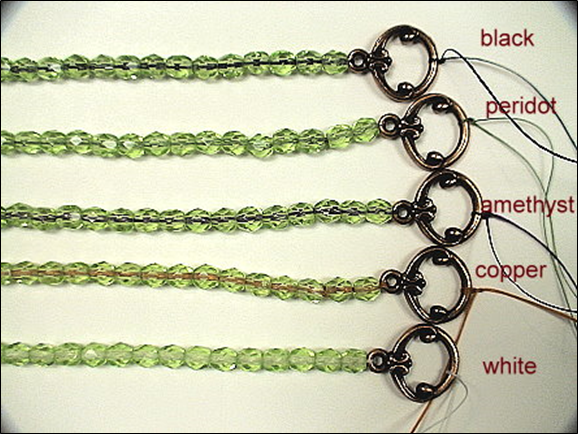
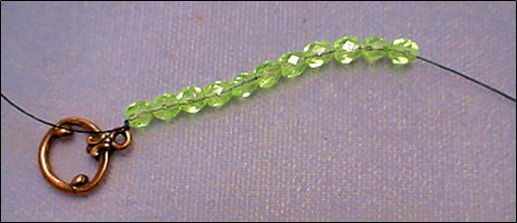
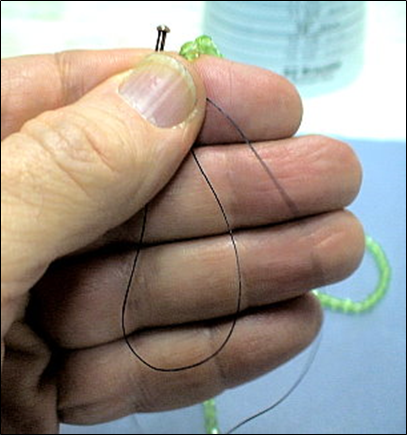
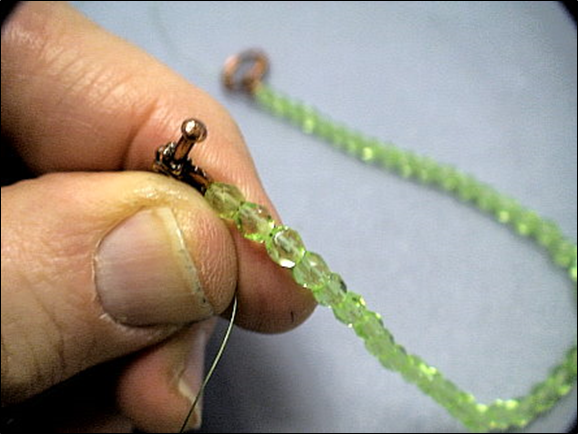
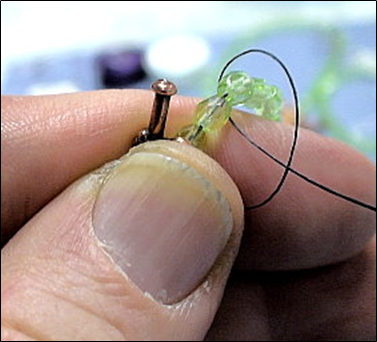
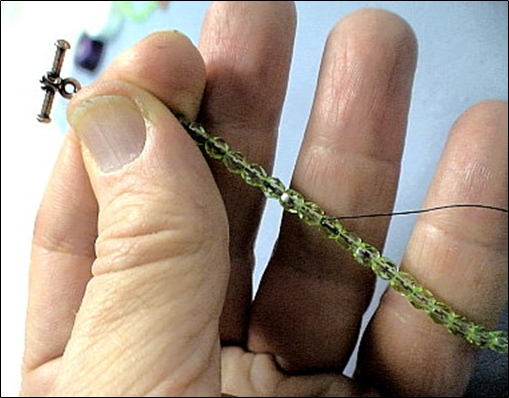
The Clasp Assembly. The “CLASP ASSEMBLY” usually consists of several parts. It includes everything it takes to attach the clasp to your beadwork. Besides the Clasp itself, there are probably jump rings and connectors, crimp beads, clamps, cones, end caps or other jewelry findings.
Visually, the Clasp Assembly is part of the vernacular of the piece. Ideally, it should seem organically related to the piece or at least a logical inclusion.
Structurally, the Clasp Assembly should hold the piece together as the piece is worn. It may have some impact on maintaining the shape of the silhouette.
Most importantly, the Clasp Assembly should be put together as a support system. It is the most important support system in any piece of jewelry. Support systems used in a necklace or bracelet are similar tothe joints in your body. They aid in movement. They prevent any one piece from being adversely affected by the forces this movement brings to the piece. They keep the piece from being stiff. They make the piece look and feel better, when worn.
The Clasp Assembly of any piece of jewelry should be designed first before the rest of the piece is designed, or designed currently with the rest of the piece. Too often, jewelry designers select the clasp after they have finished the rest of the piece. They do not seem to understand how the clasp assembly is an integral part of the implementation of any technique. In this case, not only does the clasp assembly look like it was the last choice, but it usually falls short of meeting its visual, structural and support roles.
Finishing Off The Piece. We always need to step back and reflect whether the piece as designed and implemented will be judged as finished and successful by each of the myriad audiences we hope to please. Will their judgments confirm or reject our philosophy of the particular technique(s) we used?
It is the challenge for the designer not to make the piece under-done or over-done. Each and every material and component part should be integral to the piece as a whole.
Application: Achieving Expressiveness
Expressiveness refers to the power of the piece of jewelry to fit with both the designer’s as well as all other’s expectations about desire, connectedness, power, value and worth. This is one and the same thing as measuring the extent to which both materials and techniques can be seen to have been leveraged, to maximize their strengths and minimize their weaknesses.
A technique has been applied in the most expressive way at that point where the design elements and the materials selected have been composed, manipulated and constructed in the most optimum way. We can judge the degree of expressiveness by honing in on two concepts: Parsimony and Resonance.
Parsimony (maximum applied impact):Parsimony is when you know enough is enough. When the finished and successful piece is parsimonious, the relationship of all the Design Elements and their expressed attributes will be so strong, that to add or remove any one thing would diminish, not just the design, but rather the significance of the design.
Parsimony is sometimes referred to in art and design as Economy, but the idea of economy is reserved for the visual effects. For jewelry designers, we want that economy or parsimony to apply to functional and situational effects, as well. The designer needs to be able to decide when enough is enough.
Parsimony… – forces explanation; its forced-choice nature is most revealing about the artist’s understandings and intentions
– relies on evidence moreso than assumptions to get at criticality
– focuses examination of the few elements that make a difference
Resonance (coherency of applied impact):Resonance is some level of felt energy that is a little more than an emotional response. The difference between saying that piece of jewelry is “beautiful” vs. saying that piece of jewelry “makes me want to wear it”. Or that “I want to touch it”. Or “My friends need to see this.”
Resonance is something more than emotion. It is some kind of additional energy we see, feel and otherwise experience. Emotion is very reactive. Resonance is intuitive, involving, identifying. Resonance is an empathetic response where artist and audience realize a shared (or contradictory) understanding without losing sight of whose views and feelings belong to whom.
Resonance results from how the artist applies technique to control light, shadow, and their characteristics of warmth and cold, receding and approaching, bright and dull, light and dark. Resonance results from how the artist leverages the strengths of materials and techniques and minimizes their weaknesses. Resonance results from social, cultural and situational cues. Resonance results from how the artist takes us to the edge of universal, objective understandings, and pushes us every so slightly, but not too, too far, beyond that edge.
Jewelry which resonates…– is communicative and authentic
– shows the artist’s hand as intention, not instinct
– evokes both an emotional as well as energetic response from wearer and viewer
– shows both degrees of control, as well as moments of the unexpected
– makes something noteworthy from something ordinary
– finds the whole greater than the sum of the parts
– lets the materials and techniques speak
– anticipates shared understandings of many different audiences about design elements and principles, and some obvious inclusion, exclusion or intentional violation of them
– results from a design process that appears to have been more systemic (e.g., ingrained within an integrated process) than systematic (e.g., a step-by-step approach)
– both appeals and functions at the boundary where jewelry meets person
TECHNOLOGY AND JEWELRY DESIGN
The potential of technology merged with craft is infinite.
Technology includes things like,
– New methods, processes and materials
– New ways to implement ideas
– Ability to generate new styles
– Opportunity to create meaningful forms
– Unseen contributions to aesthetic structure and composition
– Less costly and/or more production-friendly methods for creating pieces, especially for projects which might not otherwise get implemented
New materials and composites are created and enter the marketplace every year.
New ways of extracting, shaping, finishing, stabilizing materials come on line each year.
Computer Aided Design (CAD) and 3-D printing provide the tools to jewelry designers to create things beyond their imaginations.
Electroforming enables the creation of lightweight pieces from various metals.
Lasers are used to weld, cut and decorate.
Laser-Sintering melts powdered metal, layer by layer, into a finished piece.
Jewelry makers and beaders frequently come up with new techniques, mechanics and processes for creating jewelry. Technology provides creatives with original ways of expression.
“Smart” elements are getting introduced into some designs, transforming your jewelry into a smart device. These might measure health and fitness; might change color and appearance to suit different environments or clothing; might warm or cool the body.
TO WHAT EXTENT SHOULD JEWELRY DESIGNERS RESPOND TO TECHNOLOGY?
Technology is a very powerful tool. Combined with craftmanship, it can create a new language of shape, object, and sensation. We have to be careful, however, that we use technology to support jewelry which is hand-made, and not supplant it.
The use of technology allows the designer to create new forms and materials that otherwise would not exist. Technology often translates into convenience and more rapid production. In today’s globalized world, this might offer a competitive edge. Technology also enables more customization, and faster customization. Again, in a globalized world, this would offer a competitive advantage. Technology encourages us to look forward, rather than back, for our inspirations and insights.
Again, it is important to emphasize that we do not want all this technological efficiency to diminish the act of “creativity”. We don’t want to standardize everything and reduce everything into a set of how-to instructions. We want to expand our creative abilities. We want to increase the power of the designer to produce pieces reflective of the artist’s hand. We want our jewelry to be as expressive as possible of the needs, wants and desires of our various clientele.
The impact of jewelry on our professional practice. Whether we use new technologies in our professional practice, or not, we cannot escape them. We must be up-to-date and aware of technological impacts on what we do and how we do it.
The impact of technology on work and jobs was the focus of an opinion piece in the New York Times by David H. Autor and David Dorn.
As jewelry designers, we are living through and with all the positives and negatives that arise through this technological change.
How has technology affected what we do as designers?
How has it affected what we do to survive and thrive as designers?
Have we mechanized and computerized the jewelry design business into obsolescence?
How have you had to organize your jewelry designer lives differently? given the rise of
-The internet, -Ebay, Etsy and Amazon.com -Blogs, Facebook, Twitter, Pinterest, Instagram -New technologies and materials like precious metal clay, polymer clay, crystal clay, 3-D printing
What has happened to your local bead stores? Jewelry stores? Boutiques?
What has happened to bead and jewelry making magazines?
If you teach classes for pay, or sell kits and instructions, how do you compete against the literally millions of online tutorials, classes, instructions and kits offered for free? How does this affect what you teach or design to sell as kits?
If you sell jewelry, how do you compete against the 60,000,000 other people who sell jewelry online? How does this affect your marketing, your pricing, your designs?
If you make part of your living doing the arts and crafts show circuit, will there still be a need for this in the future?
_________________________________________
FOOTNOTES
Autor, David H. and Dorn, David. “How Technology Wrecks the Middle Class”, New York Times, August 24, 2013.
(Begin Top Left) Bead Stringing, Bead Weaving, Wire Working, Metalsmithing
Abstract: Jewelry Making Techniques bring materials together within a composition. Techniques construct the interrelationship among parts so that they preserve a shape, yet still allow the piece of jewelry to move with the person as the jewelry is worn. And Techniques manipulate the essence of the whole of the piece so as to convey the artist’s intent and match it to the desires of wearer, viewer, buyer, seller, exhibitor, collector, student and teacher. Technique is more than mechanics. It is a philosophy. Thoughts transformed into choices. Part of this philosophy is understanding the role of technique to interrelate Space and Mass. Space and Mass are the raw materials of jewelry forms. Technique reduces the contrast between them in a controlled way and with significance for designer and client. Techniques have special relationships to light, texture and ornamentation. Technology enables us to expand our technical prowess with new materials, processes, styles and forms
TECHNIQUES AND TECHNOLOGIES: Knowing What To Do
Technique is Knowledge, Value, Creation
Jewelry Making Techniques are more than mechanics.
Techniques are ways to implement ideas. To transform thoughts and feelings into choices.
Techniques are knowledge, value and creation.
Jewelry Making Techniques bring materials together within a composition. Techniques construct the interrelationship among parts so that they preserve a shape, yet still allow the piece of jewelry to move with the person as the jewelry is worn. And Techniques manipulate the essence of the whole of the piece so as to convey the artist’s intent and match it to the desires of wearer, viewer, buyer, seller, exhibitor, collector, student and teacher.
There are many different kinds of jewelry making techniques, as well as strategies and variations for implementing them. In fact, the jewelry designer has no proscriptions, no prescriptions, no expectations, no limits on how she or he decides to compose, construct and manipulate materials and structures and supports. It can be a technique that is learned. It can be one approximated. It can be totally new, emergent and spontaneous. It can be socially acceptable or not. The designer can pull, tug, press, cut, carve, sculpt, emboss, embellish, embroider, sew, knit, weave, coil, bend, fold, twist, heat, cool, assemble, combine, dissolve, destruct, cast, wrap, solder, glue, wind, blow, or hammer.
In reality, it is impossible to discuss meaningfully the technique apart from the ideas, abilities and experiences of each jewelry designer, particularly in reference to knowing when a piece should be considered finished and successful. There will be some variations in how any designer applies a technique. This is called skill. One might pull harder or hammer harder than another. One might allow some more ease or looseness than another. One might use easy solder where another might choose hard solder. One might prefer a thinner thickness or gauge of stringing material, and another a thicker one. One might leverage the structural properties of one material, while another might choose other materials with different properties towards the same end. One might apply the technique, following Step XYZ before Step ABC, and another, apply the technique in reverse, altering the steps to be XYA and ABZ.
But our primary focus here is on technique apart from skill. This lets us see why some designers are masterful at technique, while others are not.
While there are a lot of different methods and applications designers can choose from, all too often, however, when selecting techniques, jewelry designers fail themselves (and their clients). They disappoint. They do not understand how to select techniques. They do not fully understand the basic mechanics. They do not fully understand the expressive powers of techniques.
Because of this, they are unaware of the responsibilities, as artist and designer, which come with them. In turn, they make inadequate choices. They might choose the simple, the handy, the already learned. They might choose what they see other designers using. They might choose what they see in magazines and books and videos which get spelled out in Step1-Step2-Step3 fashion.
But often they are naïve in their choices. They lack an understanding of technique and its philosophy. They do not understand that there are lot of things more to any technique beyond its simple mechanics. Techniques are not step-by-step. They are a collection of knowledge, skill, understanding, choices, decisions, tradeoffs, intents with implication and consequence. Techniques anticipate shared understandings between artist and audience about finish and success.
Moreover, jewelry designers often do not recognize that each and every technique can and should be varied, experimented and played with. They do not understand that techniques do not work or accommodate every situation. That is, jewelry designing is not a “Have-Technique-Will-Travel” type of professional endeavor. Techniques need to be selected and adapted to the problems or contexts at hand.
They do not understand that there is more to techniques than securing an arrangement of elements. They do not understand that techniques must find some balance or tradeoffs between maintaining shape(s) and managing support(s), that is movement, drape and flow.
They do not understand how their choice of technique, and the decisions they make about how to apply it, influence the response of others to jewelry materials and forms they create. Technique, compounded by skill, can be very determinative of outcome.
SPACE AND MASS AND A PHILOSOPHY OF TECHNIQUE
Space and Mass are the raw materials of jewelry form. Space is void. Mass is something. Some jewelry depends more on the expression of Space; others more on the expression of Mass. Whatever the designer’s goals and intents, Technique permits a reduction of the contrast between space and mass. Towards this end, Technique communicates the significance of a mass within a space by controlling it. Publicly demonstrating this control communicates intent, meaning and expressiveness.
The jewelry artist begins by confronting a void. There is space, but there is nothing in it. Space.
Into this space or void, the artist introduces mass. This may begin with a point or a line or a plane or a specific shape or color or texture or pattern. More mass is added. Mass.
The designer sets boundaries, places and distributes things, brings things together, determines the scale, signifies directions and dimensions. The designer begins to co-relate the mass to the space around, within, or through it. Mass on Space.
The designer regulates the relationship and relative importance of the surface of the mass to the entirety of the mass itself. Sometimes the mass (or its surface) is expected to be static. Sometimes it is expected to move. Occasionally ornamentation is added. In the context of jewelry, some of this mass should be able to hold a shape; other of this mass should be able to move, drape and flow when worn. Mass on Mass.
Technique makes something out of nothingness. It is designed. It is constructed. The act of implementing a technique – that is, revealing a pattern of choice behaviors — is communicative. It has intent. Mass, Space, Intent.
Eventually, the designer applies Technique to this mass, and in so doing, creates composition. Things are assembled. They are pulled together. The mass suddenly has order. It has organization. It is communicative. It interacts with the desires others place on it. It evokes an emotional response. It references a context or situation in which it is to be worn. Mass, Space, Intent, Content.
Thus, things placed within the space are pulled together, juxtaposed, connected, inter-related in some way. We call this composition. Composition might mean how the jewelry designer
– Treats the surface
– Emphasizes dimension
– Joins units
– Impresses into things, onto things or through things
– Pulls or Stretches or Twists things
– Covers, embellishes, frames or exposes things
– Asserts or changes the scale
– Determines sizes, shapes and volumes
– Arranges, Places, Distributes things
– Relates positive to negative space
– Creates a rhythm, form or theme
– Expects things to move or be static
– Anticipates who might wear it, how it might be worn, and where it might be worn
A piece of jewelry becomes a wholly finite environment within what otherwise would have been nothingness. But filling this space with form is not enough. It is not the end of the designer’s role and responsibility.
With order, organization and communication come significance, meaning, implication, connectedness and consequence for everyone around it. Expression occurs. An explanation or story emerges.
The designer must give this mass-in-space a quality other than emptiness. It must have content, meaning, purpose. The designer must allow this mass-in-space to be enjoyed. Again, expressed. Much of this comes down to materials and techniques.
That means the designer must impose upon this space some personal Philosophy of Technique—hopefully employing artistic and design knowledge, skill and understanding. This philosophy is how this designer thinks-like-a-designer. It becomes a key part of the designer’s fluency, adaptability, and originality as a professional. It is how the designer touches things and brings things together. This is a philosophy of selection, implementation and management of mass-in-space which
– Balances, equalizes, meditates
– Restricts
– Releases
– Senses and newly senses
– Becomes a standpoint, a flashpoint, or a jumping off point
– Sees new possibilities, forecasts, anticipates or expects
– Creates and re-creates feelings
– Plays with tolerances, stresses and strains
– Makes things parsimonious where enough is enough
– Results in things which are finished, successful and resonant
The mass has form and arrangement within space. It begins to convey sensation and feelings and content and meaning. But the designer still has not completed the job. Jewelry cannot be fully experienced in anticipation. It must be worn. It must be inhabited. It must communicate, interact, connect. Any philosophy of technique must account for all of this. Mass, Space, Intent, Content, Dialectic.
The elemental parts and their pleasing arrangement into a whole must allow it to be enjoyed by others. Be influenced by it. Persuaded. A desire to touch it. See it. Wear it. Buy it. Display it. Show it to others. Others, on some level, must accept the designer’s Philosophy of Technique, that is, the designer’s definition with intent for manipulating mass within space, in order to
– Recognize how to look at it and react to it
– Understand how to wear it
– Be inspired as the artist was inspired
– Feel the balance, harmony, variety, cacophony, continuity, interdependence among spaces and masses
– Anticipate the effects of movement, drape and flow
– Get a sense of psycho-socio-cultural release
– Get a sense of psycho-socio-cultural restriction
– Know when the piece is finished and successful
– Judge the piece in terms of value and worth
– Assess the risk within some context of wearing or purchasing it
– Assess the risk within some context of sharing it with others
Designers over time gain fluency in their philosophies of several techniques. Such fluency is recognized and comes to the fore when Techniques serve the desires, understandings and values of both designer and client. Techniques and the philosophies (ways of thinking) which underly them must fully communicate the particular intent, concepts and experiences expressed by the jewelry designer. They must anticipate, as well, the particular shared understandings others have about whether the piece will be judged finished and successful.
Designer and client have a special relationship which comes to light within the composed, constructed and manipulated piece of jewelry as it is introduced and expressed publicly.
Through Technique. Through Skill. And a Philosophy.
TECHNIQUES INVOLVE RELATIONSHIPS
Techniques, and the relative skill in applying them, are used to resolve the relational tensions underlying the craftmanship, artistry and design of any piece of jewelry. How these relationships are implemented and managed affect how the finished jewelry will be perceived sensorially, sensually, and symbolically. These will affect how the wearer/viewer recognizes the artist’s intent. These will affect how the wearer/viewer sees their desires reflected within the piece, thus the value and worth of the piece to them.
In design terms, this is called Expression. Expression in design is the communication of quality and meaning. The designer expresses quality and meaning through the selection, implementation and application of technique. We sometimes refer to this as skill. A technique will have a function. It will have a set of mechanics and processes. It will have purpose. There will be variations in how the mechanics and processes will be put into effect. Sometimes it will require a stiffening up; othertimes a loosening up. A pressing or pulling harder or softer. A curving or straightening. A transformation from 2 dimensions to 3 dimensions. Repositioning. Altering texture.
The technique, its function and application will further get interpreted and transformed, that is, expressed, into wearable art. Similar to how sounds are made into music. And how words are made into literature. There is an underlying vocabulary and grammar to jewelry design, from decoding to comprehension to fluency.
Some aspects of expression are universal, but perhaps most are very subjective, reflective of the interpretations and intents (philosophies) of the artist, the wearer/viewer, and the general culture. Because of this, each and every expression of design through technique will have to resolve some underlying tensions. Of special concern are these tensions and relationships:
Aesthetic (beauty) vs. Architectural (function)
Should Parts Be Considered Center Stage or Supplemental
Special Relationship to Light and Shadow
Special Relationship to Texture
Special Relationship to Color and Ornamentation
Aesthetic vs.Architectural
Jewelry Design all too often is viewed apart from the human body, as if we were creating sculptures, rather than wearable art. Yet its successful creation and implementation is not independent of the body, but moreso dependent upon it. It must feel good, move with the body, minimize the stresses and strains on the components and materials. And look good at the same time.
This sets up a tension in the relationship between the Aesthetic and the Architectural. The problems of jewelry design extend beyond the organizing of space and mass(es) within it. The designer must plan for and create a harmonious and expressive relationship between object and body and between object and person as the object is worn. This often means compromising. Trading off some of the aesthetics for more functionality.
Before you choose and implement any technique…
STOP
ASK YOURSELF: What about this technique and the steps involved in implementing this technique will help my piece maintain its shape (structure)?
Before you choose and implement any technique…
STOP
ASK YOURSELF: What about this technique and the steps involved in implementing this technique will help my piece move, drape and low (support)?
Should Parts Be Considered Center Stage or Supplemental
The question becomes how the various parts or segments of the jewelry should relate to one another. We might have strap, a yoke, a centerpiece or focal point, a bail, and a clasp assembly. The tension here becomes whether the jewelry as a whole should be judged critically as an expression of art and design, or only the centerpiece or focal point should be so judged.
With the latter, the non-center/focus parts of the jewelry are seen merely as supplemental. This is similar to how a frame functions for painting or a pedestal for a sculpture.
With the former, each segment or component part cannot exist or be expressive apart from any other. The piece must be judged as a whole. The whole must be more resonant or evocative than the sum of its parts.
Here we begin to question what exactly technique is. Is it only that set of mechanics and processes applied to only a section of the whole piece of jewelry? Or is it how the designer makes choices about construction and manipulation from getting from one end of the piece of jewelry to the other?
Special RelationshipTo Light And Shadow
Light and shadow are both critical design elements to be manipulated as a part of the jewelry designer’s active decision making process. Yet, light and shadow affect the experience of any piece of jewelry in ways which are outside that designer’s scope and control, as well.
Light and shadow are necessary for the expression of the artist’s intent and inspiration in jewelry. Because light and shadow move, change character, and come and go with their source, light and shadow have the power to give that mass of component parts a living quality. This effect is compounded (or foiled) as the wearer moves, changes position, travels from room to room or inside to outside.
The designer cannot control all this, but should be able to predict a lot of this behavior, and make appropriate design choices accordingly.
The designer can channel light through the selection of materials and their reflective, absorptive and refractive properties. The designer can play with color, pattern and texture. The designer can be strategic about the placement of positive and negative spaces. The designer can arrange or embellish surfaces in anticipation of all this. The designer can diffuse light or transform or distort colors. The designer can add movement or dimensionality to enliven their forms. The designer can even use light or shadow to hide things which might negatively affect the overall aesthetic.
The points, lines, planes and shapes incorporated into any piece of jewelry become receptacles of light and shadow which can change in character or form as time progresses, people move and contexts change. An important part in the success of jewelry designs is played by the quality and intensity of light (and shadow) within context.
Special RelationshipTo Texture
Jewelry is experienced both tactilely and visually.
Sometimes these complement each other; othertimes, they compete or conflict. Texture plays a major role here. On the one hand, it expresses something about the quality of the materials used. On the other, it gives a particular quality to light and shadow, and their interplay with the piece as worn.
Designers often select materials partly based on their tactile textures. They might also alter these textures to expand on the variety of expressive qualities that might be offered. The stone might be used as is. It might be smoothed and polished. It might be roughed up, carved or chiseled. The material might end up expressing something about the natural state or about refinement and sophistication.
Visually, the designer makes many choices about how to employ the materials. They may emphasize verticality over horizontality. Projecting over recession. Slow or fast rhythm. Opacity may be altered. The designer produces differing visual expressions based on patterns and how lighting of the surface conveys the sensory experience of these patterns.
A single texture, whether the goal is tactile or visual, is rarely employed alone in jewelry design. The actual variety of materials and treatments produces a complex of textures that must be composed and harmonized and resonant into the jewelry’s expressive and consistent whole.
Special Relationship To Color and Ornament
Color is a characteristic of all jewelry making materials. It is a constant feature of any piece of jewelry. Materials might be selected for their color and visual appeal. Techniques might be selected for their ability to enhance or play with color and its visual appeal.
Yet, on the other hand, other jewelry making materials and techniques might be selected primarily for their structural properties – that is, their ability to be used to create, maintain, and retain shape or silhouette. They might be used as mere armature or to create that armature. The colors of these materials or the effects resulting from how techniques manipulated them may not be suited to the expressive goals of the designer. Because of the nature of jewelry making techniques and components, there also may be an unintended or unwanted absence of color, such as gaps of light between beads.
Thus, because of these kinds of things, materials with more suitable expressive colors, either as is or as manipulated, are added to the surface as embellishment and ornamentation. Sometimes these materials are dyes or coatings or fired-on chemicals. Sometimes these materials are more substantive materials like glass, gemstone, wood or shell.
These ornamental materials may cover parts of the surface or hide the entire surface of the piece. They may disguise it. They may be used to alter how color is perceived and experienced. They may completely change the experience. But without technique, and a philosophy of technique, these ornamental options may make it impossible to achieve the sensory, visual or structural powers the ornamentation is meant to provide.
The tension arises when the designer makes choices whether the ornamentation is to be used to enhance the expressiveness of the piece as originally designed (applied ornamentation), or, whether the ornamentation is to be used to create a completely different meaning, decorative motif, or symbolic expression, regardless of appropriateness to that original design (mimetic ornamentation).
Applied ornamentation enhances the designer’s power and control to assert intent and inspiration within the jewelry. Often applied ornamentation makes some reference to the underlying structures behind it. But the designer needs to be careful that this doesn’t turn into merely applied decoration. As ornament, whatever is done is integral to the piece. As decoration, it is not.
Mimetic ornamentation is often used to make a piece more familiar, more accepting, more reassuring to various audiences. It might be used to disguise something. It might have symbolic value. Here, too, the designer needs to be careful that this doesn’t turn into merely applied decoration.
A third consideration is whether the ornamentation is critical to the jewelry’s functioning or materials (inherent ornamentation). It is important that it be organic to the piece. That is, it should derive directly from and be a function of the nature of the jewelry and the materials used. It may allow size adjustment. Its placement may reinforce to overcome vulnerabilities. It may redistribute stresses and strains. It may aid in movement. It may assist in maintaining a shape. It may rationalize color, texture and/or pattern within and throughout the piece.
SURVEY OF JEWELRY MAKING TECHNIQUES
There are many, many different types of techniques used in jewelry making. Each encompasses basic mechanics. Each is implemented within a procedure or process. Each is a form of expression.
These techniques or forms of expression differ from each other in terms of the choices the designer makes about how mass should get related to space for creating composition. They differ in how structure (shape) is created and preserved, and in how support (movement, drape and flow) is built in, achieved and maintained. They differ in how pattern and texture is created or added. These techniques differ, apart from the materials used, in how people interact with them, aesthetically, functionally, sensorially and sensually.
These techniques are not mutually exclusive, and are often combined. It is up to the designer to select the technique or techniques to be used, maximizing the strengths and minimizing the weaknesses of each. Usually, the designer, when combining techniques, will want one technique to predominate. The designer does not want the underlying philosophies of two or more techniques to conflict, compete, or not coordinate.
Stringing, Bead Weaving
Beads and other components are assembled together into a composition and silhouette. The stringing materials range from the very narrow, like beading thread, cable thread and cable wire, to thicker, like bead cord, leather, waxed cotton, ribbon, satin cord, and braided leather. The stringing materials are often hidden, and typically play a supplemental role to the beads and other components within any composition.
Philosophy of Technique: Objects are placed and assembled together within a space in relationship to the direction and linearity of some type of stringing material or canvas. There is great attention to the use of points and lines, usually within a singular plane. Shapes are basic, often only in reference to a silhouette. Minimal attention is paid to dimensionality.
A piece is made stable by the rigidity of the stringing material or canvas. The stringing material or canvas is able to withstand tension and compression.
Often, designers place too much reliance on the clasp assembly to provide support (movement, drape and flow), instead of embedding support elements (rings, loops, unglued-knots, hinges, springs, coils, rivets, rotators) throughout the piece. In a similar way, often designers place too much reliance on the placement of objects on the canvas (that is, stringing material) for maintaining structure (shape), instead of other elements that could be used to maintain shape, while mitigating against stress and strain.
Each stringing and bead weaving technique and its procedures and processes for implementation rely on part of the implementation to maintain a shape, and on part of the implementation to allow for movement, drape and flow. The particular technique used to assemble the beads (and related components) sets the tone in pattern, shape, form and texture. Some stringing and bead weaving techniques are great at maintaining shapes. Other techniques are good at allowing for movement. The better techniques are good at accommodating both structure and support.
Knotting, Braiding, Knitting, Crocheting
The stringing materials take center stage, either in combination with other elements, or alone. The composition may or may not include beads and other components. Occasionally glue is used, but its use should be minimized.
Philosophy of Technique: Within a space, the artist places and intertwines various types of stringing materials. The artist varies tightness and looseness, placement and distribution of sizes, volumes and mass to achieve the dual goals of structure and support.
A piece is made stable by the rigidity of the intertwining (knotting, chaining, braiding) of the stringing material or canvas. The intertwined stringing material or canvas is able to withstand tension and compression.
Each strategy for knotting or braiding attempts to simultaneously achieve structure and support. The technique might vary the placement of fixed points with the use of chaining to create lines, forms and planes within the composition. Considerable attention is paid to the positioning of positive and negative spaces.
There is a lot of attention to the use of line. These techniques allow for incorporation of various strategies for achieving a sense of dimensionality. The shapes may be allowed to stretch or contract, allowing easy response to issues resulting from stress or strain. Texture is a major emphasis.
Embroidery, Embellishment, Fringing
Elements are attached to the surface of the canvas. This surface is often referred to as the foundation or base. These elements may be glued or sewn or woven on. The canvas typically plays a diminished or supplemental role, though this is not a requirement.
Philosophy of Technique: The space available has been defined by a particular canvas. This might be a string. This might be a flat surface. Elements are placed on and secured to this surface; the mechanics here relate to structural goals. The pliability, manipulability, and/or maneuverability of the canvas relate to support goals.
A piece is made stable by the rigidity of the stringing material or canvas. The stringing material or canvas is able to withstand tension and compression.
The embellishment may be used to create a particular image, or pattern, or texture. Often it is used to add a sense of dimensionality and/or movement to a piece. It invites people to want to touch the composition because it adds a very sensual quality to a piece beyond the characteristics of the materials or colors used.
Stamping, Engraving, Etching
Elements are embedded on or worked into the surface of the canvas. The canvas may be comprised of any material.
Philosophy of Technique: The space available has been defined by a particular canvas. This is typically a flat surface of some kind, but not limited to any one material. Structural, as well as support, goals depend on the physical, functional and chemical properties of the canvas. Sometimes these properties are altered through the application of the techniques. Texture and pattern are major focuses.
A piece is made stable by the rigidity and material strength of the canvas coupled with that canvas’s ability to maintain its integrity after it has been physically or chemically altered. The resulting canvas is able to with stand tension and compression.
Wire Working, Wire Wrapping, Wire Weaving
Hard Wire is manipulated into forms which hold their shape, serve as structural supports, or create pleasing patterns and textures.
Philosophy of Technique: The designer places wires into a space. The wires may be bent to form lines, planes, shapes and forms. The wires may be interwoven, bundled together, coiled, or otherwise anchored or tied together to create a canvas and form the basic foundation of a piece of jewelry.
During the process of applying a wire technique and creating a piece of jewelry, the physical properties of the wire must be changed. The designer takes wire, applies a technique to it, and continues to apply the technique until the wire is stiff enough to hold a shape. Each time you manipulate wire, it gets harder and harder and harder. If you manipulate it too much, it will become brittle and break. The wire can be pulled, coiled, bent, twisted, or hammered.
A piece is made stable by the stiffness or hardness of the canvas and its material strength, where it is stiff enough to hold a shape, but not so stiff as to become brittle and break. The resulting canvas is able towithstand tension and compression.
Considerable attention must be paid to strategies of support, that is, how things get joined and jointed. That is, whatever the piece of jewelry, it must be able to move freely, and withstand all sources of stress or strain.
For example, hard wire would not be used as a stringing material. If you put beads on the hard wire to create a bracelet or necklace, the wire would distort in shape when the piece is worn, but not return to its original shape. In this case, you would have to create several segments or components using the wire, and then make some kind of chain to create that jointedness and support. Picture a rosary which is a bead chain made of wire.
Metalsmithing, Fabrication, Cold Connections
Here metal is shaped and formed into a broad, layered canvas or a series of canvases we call components. Layers of sheet, wire and granules, or a series of components may be combined in some way, either to create a more complex composition, increase a sense of dimensionality or movement, or allow for jointedness, connectivity and support. The designer might use heat and solder – fabrication. Or the designer might use rivets, hinges, loops, rings, rotators – cold connections. The layers or the series of components may be textured or not.
Philosophy of Technique: Into a space, the designer places pieces of metal. These pieces of metal may sit side-by-side, on top of each other, overlap, sit perpendicular or at an angle. The components are attached together, using heat and solder, glue, or cold connections. Each layered canvas or component is a composition unto itself.
Canvases and components are rigid shapes and are constructed to withstand stress and strain. When constructing a piece of jewelry, typically the designer interconnects various components in a way which allows movement, drape and flow.
Interconnected components may be thematic or tell a story.
A piece is made stable by the rigidity and material strength of the canvas after it has been successfully altered through shaping, heat, soldered connection, glue or cold connection. The resulting canvas is able to withstand tension and compression, up until the point it bends or dents. Usually, if that happens, the piece can be unbent or undented. Considerable attention must be paid to strategies of support, that is, how things get joined and jointed.
Casting, Modeling, Molding, Carving, Shaping
Here a material is reconfigured and altered into some kind of shape or form. The material may be rigid, like wood or stone. It may be malleable like clay or casting material. The material, once altered, may or may not be subject to additional actions to change its physical, functional or chemical properties, such as the application of heat or cold or a chemical bath.
Philosophy of Technique: The material is positioned within a space. As it is manipulated, it most likely will alter its relationship to that space. It will be able to play many roles from point to line to plane, and from shape to form to theme. The designer must be critically aware of how the technique will alter this relationship between space and mass, and light and shadow, and how these in turn, will affect form and composition.
A piece is made stable by the rigidity of the canvas after it has been shaped. Cast pieces have difficulty responding to strong forces. The resulting canvas is able to withstand tension and compression only to that point before it crumbles and breaks.
Structure and support considerations can either be built into the resulting component, or components may be treated in similar ways as in metalsmithing.
Lampworking, Wound Glass, Encasing
Rods and stringers of glass are heated by a torch and wound around a steel rod called a mandrel. Sometimes shards of glass, sometimes with abstract patterns, sometimes representative of realistic images, are laid on the hot glass, and covered (encased) by a transparent glass wound over them. The result is a bead or pendant or a small sculpture.
Philosophy of Technique: The material slowly enters and occupies a defined space. The artist plays with different types of glass, glass colors and transparencies, rods of glass, pieces of glass, ground up glass, and metallic foils. Things are placed and layered and spiraled. Surfaces can be altered by tools. Once begun, the artist must take the technique to completion. Thus, the artist’s ideas, focus, and intent are very concentrated and intense. Glass as a material requires the manipulation of the interpenetration of mass with space.
A piece is made stable by the properties of the glass. The resulting canvas is able to withstand tension and compression to the extent the properties of the glass will allow.
Glass Blowing
Air is forced through a steel straw. At the end of this straw is a blob of molten glass. The air forces it to hollow out. As this happens, the artist rolls it, hammers it, textures it, domes it, otherwise shapes it until it is a finished piece. The artist may roll the glass over other pieces of glass, to melt them into the piece. As the glass cools, the result might be a bead or a pendant or a small sculpture.
Philosophy of Technique: The material expands within a space. This space may be very narrow and defined, or very expansive, perhaps ill-defined. The resulting object has surface and interior and exterior spaces. The qualities of the surface create a play between mass and space, and their interpenetration.
A piece is made stable by the properties of the glass. The resulting canvas is able to withstand tension and compression to the extent the properties of the glass walls will allow.
Computer Aided Design (CAD), 3-D Printing
Here the artist uses computers to aid in the creation, modification, analysis, or optimization of a design. The output is typically in the form of electronic files or technical drawings for 3-D printing, machining or other manufacturing operation. 3-D printing takes a CAD model and builds it, material layer by layer in an additive manufacturing fashion. Frequently, the 3-D printed object is a casting mold, rather than the finished piece.
Philosophy of Technique: CAD can place points, lines and curves within a 2-dimensional space, or curves, surfaces and solids within a 3-dimensional space. CAD can simulate motion and its impact on any object. It can take into account other parameters and constraints. The final technical output must convey more than information about shape. It must convey information about the extents to which various materials may be used in the design, their dimensions and tolerances. It must convey information about the pros and cons of processes the artist might use in the design.
One pay-off for the artist is that the computer can detail many more ways, and many more unexpected ways, to relate mass to space than typically thought of without it.
HOW TO LEARN TECHNIQUE
A good design, poorly executed, is not worth all that much.
So, how do we learn techniques is ways which help us develop ourselves as designers and be fluent in how we select, implement and apply them?
We need to be very aware of what influences us in our
o Selection of Technique
o Implementation of Technique
o Application of Technique
Selection: Anticipating What Will Happen If And When
We begin to develop our fluency in technique at the point of selection. To select a technique is to anticipate what will happen to the piece of jewelry after it is designed, constructed and worn. This involves all our senses from thought to touch to sight.
When we touch a piece constructed using a particular technique, how will it feel? Will it curve or bend? Will it curve or bend in the direction we need it to? Will it drape nicely on the body? Move easily with the body? Feel comfortable when worn? Will it hold its shape?
When we see a piece constructed using a particular technique, what will be the resulting pattern and texture? What will be the interplay of light and shadow? Will it look good from all sides when sitting on an easel? Will it look good from all sides when someone is wearing it? When that person is moving? Will all color issues be resolved?
We play a What-If game. What-If we used a variation on the technique? What-If we used another technique? What-If we combined techniques or sequenced them or staggered them? What-if we settled for a little less beauty to achieve better movement, drape and flow?
We might do some research. Has the technique been used by another artist or in another project you were attracted to? Was it used successfully? Did it work well in terms of structure and support? Did it contribute to (or at least not detract from) the visual appearance of the piece?
We might do some pre-testing. Will the technique hold up to our expectations? Will it still work with some variation? Will it work under differing circumstances?
We are honest with ourselves about our biases. Will we pick something only because we have done it before? Or we are very familiar with it? Or it is the easiest or path of least resistance?
Implementation: Basic Mechanics and Processes
We want to learn the basic mechanics of each technique in a way which highlights their philosophies – that is, how we think them through. We think about managing:
– Structure and Support
– How To Hold The Piece To Work It
– How To Distribute Stresses and Points of Vulnerability
– How To Create A Clasp Assembly
– How To Finish Off The Piece
Structure and Support. To begin, we know that each and every technique has as part of its mechanics and processes some aspects which help us create and maintain structures (shape). And each and everytechnique has some aspects which help us create and maintain support (movement, drape and flow). We want to be able to break down any technique so that we can recognize what results in what.
Holding The Piece To Work It. Next, the basic mechanics also includes strategies for how to hold the piece while you work it.
Picture yourself as an artist. An artist has an easel and something to use as a clamp to hold things in place.
A bead weaver would use their forefinger on one hand as an easel, pressing the developing bead work project against it, and then take their thumb on that same hand, and clamp down over the work to keep it in place.
A silversmith might use a steel bench block as an easel, and a vice as a clamp.
Someone doing braiding or knotting might use a clipboard as an easel and a bulldog clip as a clamp.
Your challenge is to hold the piece in such a way that you maximize your ability to implement a technique all the while maximizing the strengths of that technique and minimizing its weaknesses. This is called leveraging. You use whatever it is that is equivalent to the artist’s easel and clamp in such a way that you can successfully leverage the technique for your purposes.
Holding your piece correctly also sends signals to your hands telling you when each individual step is completed, and when you are finished.
Distribute Stresses and Points of Vulnerability.
In any piece of jewelry, it can be expected that the stress-bearing and strain-bearing strengths and weaknesses of each component will be unevenly distributed throughout the pieces. That is, there will be some areas or points in the piece of jewelry which will be vulnerable to stresses and strains. This may cause the piece to break or lose its shape or otherwise disrupt its integrity.
The jewelry designer needs to be able to easily look at a piece or its sketch or design plan and identify all the points of vulnerability. After identifying these, the designer will need to figure out ways to compensate for these weaknesses in design.
Usually points of vulnerability occur in these places or situations:
Where the clasp assembly is attached to the piece
At the beginning and the end of the piece
Along the edges
Corners and inside corners
Where components have very sharp holes or edges
When using materials which degrade, deteriorate, bleed, rub off, distort, are too soft
Where there is not an exact fit between two pieces or elements
Where there is insufficient support or jointedness
These points of vulnerability may need reinforcement. More support or structural elements may need to be added. Things may need to be re-located or positioned within the design. They may need to be eliminated from the design.
Most often, places of vulnerability occur where the structures or supports in place take on the shapes of either H, L, T, or U. Think of these shapes as hazards. These shapes tend to split when confronted with external or internal forces. They tend to split because each leg is often confronted with different levels or directions of force. The legs are not braced. These hazardous shapes cry out for additional reinforcements or support or structural systems.
The Clasp Assembly.The “CLASP ASSEMBLY” usually consists of several parts. It includes everything it takes to attach the clasp to your beadwork. Besides the Clasp itself, there are probably jump rings and connectors, crimp beads, clamps, cones, end caps or other jewelry findings.
Visually, the Clasp Assembly is part of the vernacular of the piece. Ideally, it should seem organically related to the piece or at least a logical inclusion.
Structurally, the Clasp Assembly should hold the piece together as the piece is worn. It may have some impact on maintaining the shape of the silhouette.
Most importantly, the Clasp Assembly should be put together as a support system. It is the most important support system in any piece of jewelry. Support systems used in a necklace or bracelet are similar tothe joints in your body. They aid in movement. They prevent any one piece from being adversely affected by the forces this movement brings to the piece. They keep the piece from being stiff. They make the piece look and feel better, when worn.
The Clasp Assembly of any piece of jewelry should be designed first before the rest of the piece is designed, or designed currently with the rest of the piece. Too often, jewelry designers select the clasp after they have finished the rest of the piece. They do not seem to understand how the clasp assembly is an integral part of the implementation of any technique. In this case, not only does the clasp assembly look like it was the last choice, but it usually falls short of meeting its visual, structural and support roles.
Finishing Off The Piece. We always need to step back and reflect whether the piece as designed and implemented will be judged as finished and successful by each of the myriad audiences we hope to please. Will their judgments confirm or reject our philosophy of the particular technique(s) we used?
It is the challenge for the designer not to make the piece under-done or over-done. Each and every material and component part should be integral to the piece as a whole.
Application: Achieving Expressiveness
Expressiveness refers to the power of the piece of jewelry to fit with both the designer’s as well as all other’s expectations about desire, connectedness, power, value and worth. This is one and the same thing as measuring the extent to which both materials and techniques can be seen to have been leveraged, to maximize their strengths and minimize their weaknesses.
A technique has been applied in the most expressive way at that point where the design elements and the materials selected have been composed, manipulated and constructed in the most optimum way. We can judge the degree of expressiveness by honing in on two concepts: Parsimony and Resonance.
Parsimony (maximum applied impact):Parsimony is when you know enough is enough. When the finished and successful piece is parsimonious, the relationship of all the Design Elements and their expressed attributes will be so strong, that to add or remove any one thing would diminish, not just the design, but rather the significance of the design.
Parsimony is sometimes referred to in art and design as Economy, but the idea of economy is reserved for the visual effects. For jewelry designers, we want that economy or parsimony to apply to functional and situational effects, as well. The designer needs to be able to decide when enough is enough.
Parsimony… – forces explanation; its forced-choice nature is most revealing about the artist’s understandings and intentions
– relies on evidence moreso than assumptions to get at criticality
– focuses examination of the few elements that make a difference
Resonance (coherency of applied impact):Resonance is some level of felt energy that is a little more than an emotional response. The difference between saying that piece of jewelry is “beautiful” vs. saying that piece of jewelry “makes me want to wear it”. Or that “I want to touch it”. Or “My friends need to see this.”
Resonance is something more than emotion. It is some kind of additional energy we see, feel and otherwise experience. Emotion is very reactive. Resonance is intuitive, involving, identifying. Resonance is an empathetic response where artist and audience realize a shared (or contradictory) understanding without losing sight of whose views and feelings belong to whom.
Resonance results from how the artist applies technique to control light, shadow, and their characteristics of warmth and cold, receding and approaching, bright and dull, light and dark. Resonance results from how the artist leverages the strengths of materials and techniques and minimizes their weaknesses. Resonance results from social, cultural and situational cues. Resonance results from how the artist takes us to the edge of universal, objective understandings, and pushes us every so slightly, but not too, too far, beyond that edge.
Jewelry which resonates…
– is communicative and authentic
– shows the artist’s hand as intention, not instinct
– evokes both an emotional as well as energetic response from wearer and viewer
– shows both degrees of control, as well as moments of the unexpected
– makes something noteworthy from something ordinary
– finds the whole greater than the sum of the parts
– lets the materials and techniques speak
– anticipates shared understandings of many different audiences about design elements and principles, and some obvious inclusion, exclusion or intentional violation of them
– results from a design process that appears to have been more systemic (e.g., ingrained within an integrated process) than systematic (e.g., a step-by-step approach)
– both appeals and functions at the boundary where jewelry meets person
TECHNOLOGY AND JEWELRY DESIGN
The potential of technology merged with craft is infinite.
Technology includes things like,
– New methods, processes and materials
– New ways to implement ideas
– Ability to generate new styles
– Opportunity to create meaningful forms
– Unseen contributions to aesthetic structure and composition
– Less costly and/or more production-friendly methods for creating pieces, especially for projects which might not otherwise get implemented
New materials and composites are created and enter the marketplace every year.
New ways of extracting, shaping, finishing, stabilizing materials come on line each year.
Computer Aided Design (CAD) and 3-D printing provide the tools to jewelry designers to create things beyond their imaginations.
Electroforming enables the creation of lightweight pieces from various metals.
Lasers are used to weld, cut and decorate.
Laser-Sintering melts powdered metal, layer by layer, into a finished piece.
Jewelry makers and beaders frequently come up with new techniques, mechanics and processes for creating jewelry. Technology provides creatives with original ways of expression.
“Smart” elements are getting introduced into some designs, transforming your jewelry into a smart device. These might measure health and fitness; might change color and appearance to suit different environments or clothing; might warm or cool the body.
TO WHAT EXTENT SHOULD JEWELRY DESIGNERS
RESPOND TO TECHNOLOGY?
Technology is a very powerful tool. Combined with craftmanship, it can create a new language of shape, object, and sensation. We have to be careful, however, that we use technology to support jewelry which is hand-made, and not supplant it.
The use of technology allows the designer to create new forms and materials that otherwise would not exist. Technology often translates into convenience and more rapid production. In today’s globalized world, this might offer a competitive edge. Technology also enables more customization, and faster customization. Again, in a globalized world, this would offer a competitive advantage. Technology encourages us to look forward, rather than back, for our inspirations and insights.
Again, it is important to emphasize that we do not want all this technological efficiency to diminish the act of “creativity”. We don’t want to standardize everything and reduce everything into a set of how-to instructions. We want to expand our creative abilities. We want to increase the power of the designer to produce pieces reflective of the artist’s hand. We want our jewelry to be as expressive as possible of the needs, wants and desires of our various clientele.
The impact of jewelry on our professional practice. Whether we use new technologies in our professional practice, or not, we cannot escape them. We must be up-to-date and aware of technological impacts on what we do and how we do it.
The impact of technology on work and jobs was the focus of an opinion piece in the New York Times by David H. Autor and David Dorn.
As jewelry designers, we are living through and with all the positives and negatives that arise through this technological change.
How has technology affected what we do as designers?
How has it affected what we do to survive and thrive as designers?
Have we mechanized and computerized the jewelry design business into obsolescence?
How have you had to organize your jewelry designer lives differently?
given the rise of
-The internet,
-Ebay, Etsy and Amazon.com
-Blogs, Facebook, Twitter, Pinterest, Instagram
-New technologies and materials like precious metal clay, polymer clay, crystal clay, 3-D printing
What has happened to your local bead stores? Jewelry stores? Boutiques?
What has happened to bead and jewelry making magazines?
If you teach classes for pay, or sell kits and instructions, how do you compete against the literally millions of online tutorials, classes, instructions and kits offered for free? How does this affect what you teach or design to sell as kits?
If you sell jewelry, how do you compete against the 60,000,000 other people who sell jewelry online? How does this affect your marketing, your pricing, your designs?
If you make part of your living doing the arts and crafts show circuit, will there still be a need for this in the future?
_________________________________________
FOOTNOTES
Autor, David H. and Dorn, David. “How Technology Wrecks the Middle Class”, New York Times, August 24, 2013.
It’s a strongly held belief of mine that Beaders and Jewelry Designers should be taught and learn and practice as if they were Architects.
Beaders and Jewelry Designers and Architects impose shape, light, shadow, aesthetics and function onto an otherwise empty space. The scale might be different, and the purposes might vary, but they all do the same thing, requiring the same kinds of thinking and insights.
The knowledge base and insights required are many. Beaders and Jewelry Designers need to understand the consequences which result from their selection of materials. They need to know what works and doesn’t work when specific techniques and processes of construction are implemented.
They also need to recognize, given any design goal, how these kinds of choices enhance or impede movement, drape, flow, and durability. As well, they need to be aware how these choices affect the creation and retention of shapes and forms. The need to understand the roles of stresses and strains on the continued success of jewelry over time. Last they need to be capable in making choices about aesthetics and function, fully comfortable with the tradeoffs one must make before one completes the finished piece.
I like my students to be fully aware how they physically build a piece of jewelry. Structurally so it holds a shape. Mechanically so it moves, drapes and flows as intended. Functionally so that it withstands the tests of stress, strain, time and place. Aesthetically so that the surface and surface treatments resonate.
So, this is a start — a Statement of Opinion.
I want to spend some time and effort teasing out this Opinion into more concrete terms. If we were establishing a professional program of Beading and Jewelry Design, and wanted to get beyond Craft, and beyond the confines and limitations of traditional Art theory, how would we began to generate that language and vocabulary of Design which our students would be taught? I think the discipline of Architecture offers a lot of clues and insights.
Let’s begin the discussion and see where it goes.
And a first question would involve generating more awareness where a knowledge of how choices about structure and materials can affect “shape” or “movement”.
QUESTION 1: WHAT CAN YOU ACHIEVE WITH SOME TECHNIQUES OR MATERIALS THAT YOU CAN’T ACHIEVE WITH OTHERS?
For example, I prefer to use Fireline with right angle weave stitch, and a more traditional beading thread with peyote stitch. The Fireline gives me more control over maintaining a tighter and more even thread tension with RAW, but I find it often makes my peyote pieces too stiff.
I find that the type of joint created with brick stitch allows me to make a much greater and often more satisfying range of shapes than if I tried to make the same shapes with peyote stitch — the architectural joints created with peyote don’t allow the same multi-directional movement as those with brick.
Coated and galvanized beads often do not work well in bracelets. The coatings chip off too easily.
It is more difficult to achieve a satisfying outcome, when mixing different kinds of materials rather than using a single type of material in the same piece.
Beth Katz S. I completely agree with your thoughts about the architecture correlation. I have a friend who is a landscape architect. The name of his company escapes me (so what else is new?), but it ends with “chitecture.” When I told him that many of my pieces are structural in nature and that I am often inspired by various types of architecture, he suggested I use the name “beaditecture,” but I thought I was a mouthful. No do, however, like the idea.
Lynn D. The structural practicalities of any beading piece are very important, particularly if the piece is sculptural and/or wearable. I often see beadwork that is stunningly beautiful but that wouldn’t survive if worn regularly… or that would be hideously uncomfortable for the wearer. Even the small practical things like whether a bead is top- or side-drilled can be very important when you’re connecting things together and want them to hang the right way round!
Susan Lifton S. I definitely agree that architects and beaders/jewelry designers share similar skills — I’ve been an architect for over 20 years and only began beading 4 years ago. I picked up beading very quickly as I already had skills in math, design, color, spacial relationships, geometry, structure and problem solving.
Continuing the discussion…
QUESTION 2: IF THE BEADER/JEWELRY MAKER SAW THEIR PROJECTS AS AN ARCHITECT WOULD, WHAT KINDS OF WORDS AND PHRASES WOULD THEY USE TO DESCRIBE THE PROJECT, OR HOW THEY WERE APPLYING THE TECHNIQUE OR WHAT THEY WERE TRYING TO ACCOMPLISH?
For example, when I teach a stitch, like circular peyote or tubular Ndebele, where we start the stitch by making a circle of beads, I now refer to this circle as a 1-stack column. I want my students to recognize this circle as a necessary supporting structure. So I use the word “column”.
In some projects, where I have my students attach two components with say, a bead between them, I now refer to this connecting bead as a “supporting joint”. I want my students to recognize that this connector has important structural purposes. It has to both hold the two components together and allow them to maintain a shape and silhouette, as well as allow them to move, or self-adjust to the varying forces of movement when the piece is worn, somewhat independently or co-dependently.
In the piece under construction and pictured, the joint is made up of a 2-hole superduo. To be effective, the distance between the holes of the superduo have to align perfectly with the corner holes of two tila beads. In this piece, I would have preferred to use 2-hole Czechmate Tile beads instead of Tilas, because they make the piece look richer and more attractive, but the hole alignment doesn’t work. Because of this mis-alignment, with the Czechmate Tiles, too much stress is placed at the joint, working against my structural goals and necessities.
In teaching dimensional beadwork, I now differentiate between the parts of the piece which serve to provide structure or shape — usually two “arms” crossing somewhat perpendicularly — , and the other parts of the piece which merely fill in the “space” between these supports.
ARCHITECTURAL LANGUAGE
Architects have an established way of visual thinking and methodical communication. They have meaningful ways for relating design intent to visual representation and context.
Architects talk about such things as construction and construction materials, they refer to columns, arches, walls, floors, structures, load weights, slabs, foundations, spatial relationships, building blocks, shapes, posts and beams, frameworks, platforms, scale.
Architects might reinterpret any piece of jewelry in terms of its structural anatomy.
They might see a piece of jewelry having a footprint.
They would be concerned with the effects of movement, drape and flexibility, thinking about things like static, strength, stiffness, comfort, bending, stretching, shifting, light and shadow, lateral structural systems, beams and columns.
They would confront the consequences and implications of force, stress, and strain.
Architects would think about how best to manage the visual presentation, seeing it as somehow a skin or surface supported internally or externally by various structures which help it hold its shape and enhance its visual presentation.
Daisy V. Yes , we are Architects , always building something with ALL the differents shapes available . THATS THE MAGIC OF WORKIN WITH BEADS !! Let our imagination run wild !!
Continuing the discussion…
QUESTION 3: CAN YOU THINK OF WAYS IN WHICH THE SMART MANAGEMENT OF THREAD TENSION EITHER (1) INCREASED YOUR ABILITY TO MAINTAIN A PARTICULAR SHAPE OR POSITIONING OF AN ELEMENT OR A CURVATURE WITHIN YOUR PIECE, OR, (2) ENHANCED THE MOVEMENT, DRAPE AND FLOW OF YOUR PIECE?
Your thread (or, similarly for any other stringing material like cord, cable wire, hard wire or elastic string) is your canvas. We often don’t think about this. However, we should. As the canvas, your thread serves several functions. Foremost, it serves to keep your piece’s shape.
The more thread you stitch into the holes of your beads, the more power your canvas has to maintain this shape in the face of forces resulting from movement.
The way you stitch this thread through various pathways in and around your beads enhances or impedes the ability of your piece, or parts of your piece, to move, drape and flow.
How you prepare your canvas before you use it affects its durability and integrity. You might stretch it. You might wax it. You might color it with a marker. You might twist it when making twisted fringe so it holds its twist.
The canvas and how it is used may determine a piece’s silhouette. It may force upon your piece a sense of boundaries and frames, verticals and horizontals, straight lines and curves.
Whether you want any parts of the canvas to show, or whether you want to hide all the canvas within the holes of your beads.
Architecturally, we would want to have the best understanding of how the canvas works, at each and every point of our piece. How it works at the clasp. How it works at the point of focus. How it works along less embellished areas. How it works along more embellished areas.
And we would want to know how the management of our canvas — that is, the management of thread tension — affects each different type of stitch. And what opportunities and limitations each different type of creates for managing our canvas.
We frequently talk about (and compare ourselves to others) in terms of whether our personal tension is towards the tighter or the looser, but, otherwise, we often don’t see that managing tension has more implications for the success of our pieces. We need to be able to switch back and forth between tighter and looser, to accomplish our architectural goals for our pieces.
Right Angle Weave Stitch Sample
So, for example, I discovered that right angle weave requires both tight and looser thread tension throughout. For right angle weave to function architecturally — it functions like a spring mattress — the beads within the RAW unit need to be very tightly bound together so that the beads within the unit function as one. The tension needs to be looser within the connecting beads between RAW units, so that each unit can move somewhat independently and self-adjust to the forces of movement. This architectural understanding influences how I design my thread pathways in projects where I incorporate right angle weave.
Peyote Stitch Sample
Nancy Cain had a very informative article about mastering thread tension for tubular peyote stitch in the June/July 2015 Beadwork. She wrote, “Learning and understanding the foundation aspect of peyote stitch and the role of thread tension is the key to starting a structural shape….The first five rounds are the most important for setting tension for the entire piece.”
[ I’ve also found that if you don’t get the first 3 rows very tight, you can lose control over the tension in the rest of your piece. For me, these organization of these rows forms a “column” and must conform to the structural requirements, as such. ]
Nancy covers a lot of relevant ground in her article which is very worth reading.
THE EVOLVING POSITION STATEMENT: Architectural Basis of Jewelry Design
It’s a strongly held belief of mine that Beaders and Jewelry Designers should be taught as if they were Architects. Beaders and Jewelry Designers and Architects impose shape, light, shadow, aesthetics and function onto an otherwise empty space. The scale might be different, and the purposes might vary, but they all do the same thing, requiring the same kinds of thinking and insights.
The knowledge base and insights required are many. Beaders and Jewelry Designers need to understand the consequences which result from their selection of materials. They need to know what works and doesn’t work when specific techniques and processes of construction are implemented. They also need to recognize, given any design goal, how these kinds of choices enhance or impede movement, drape, flow, and durability. As well, they need to be aware how these choices affect the creation and retention of shapes and forms. Last they need to be capable in making choices about aesthetics and function, fully comfortable with the tradeoffs one must make before one completes the finished piece.
I like my students to be fully aware how they physically build a piece of jewelry. Structurally so it holds a shape. Mechanically so it moves, drapes and flows as intended. Functionally so that it withstands the tests of time and place. Aesthetically so that the surface and surface treatments resonate.
7. DON’T SETTLE ON THE FIRST NAME YOU COME UP WITH
8. PICKING YOUR BUSINESS NAME (final drafty)
9. PROTECTING YOUR BUSINESS NAME
10. CREATING A TAG LINE
11. WRITE UP SHORT DESCRIPTIONS ABOUT YOUR BUSINESS
12. NAME YOUR JEWELRY
13. WRITING A STORY AND ELEVATOR PITCH ABOUT YOUR BUSINESS
14. GO FORTH AND PROSPER
Right off the bat….
List your initial, first-things-coming-to-mind business name or range of business name ideas here:
NAMING YOUR BUSINESS: WHAT’S INVOLVED
It’s Really Difficult To Pick A Business Name
Would you ever buy a Swarovski necklace or a bead crocheted rope lariat from a company called “Flan”?
The “FLAN CORPORATION” sells handcrafted, bead strung and bead woven jewelry.
The name “FLAN” doesn’t suggest anything associated with “jewelry” or the “emotions jewelry should evoke”. The name “FLAN” doesn’t connect in any way with people who might be looking to buy some jewelry. The name “FLAN” doesn’t lend itself very well to the kinds of imagery you might use in a logo, or on a business card or on a website. The name doesn’t really make you want to find out more information about the company.
As the people at the FLAN CORPORATION discovered every early on in their new, budding jewelry business, as new customers failed to knock down their doors…
IT’S REALLY DIFFICULT TO PICK A BUSINESS NAME
Your name choice can make your business the talk of the town, or doom it to obscurity.
Picking a business name can be harder than naming your child.
It can be harder than naming your dog.
I’ve tried many times to come up with business names with varying degrees of success.
And the first business name you pick might seem great and work great at the beginning, but will it evolve with your business as well? Maybe yes, maybe not.
People often make snap judgments about your business based on your business name.
Your business name can often make or break your success.
What’s important is not only how good your business name sounds, and how appealing it is today, but also how adaptable it is over time, as you grow or change your business.
TYPES OF BUSINESS NAMES There are all types of business names.
Some are ABSTRACT — a blank slate upon which to create an image, suggestive of what your business is about.
Some are INFORMATIVE — so that customers immediately know what your business is, where it is, who owns it.
One problem that businesses which select an Informative name run into is that the name can become a straight-jacket. If your name is a niche business name, and you change or outgrow your business, your name might not grow with it. You don’t want to outgrow your business name. What if Amazon had been named Bookstore.com — books were the primary item they were selling when they first started? They would be limited to selling books.
One name that outgrew itself is Burlington Coat Factory. When they were naming their store, they didn’t think far enough into the future. When they expanded their product offerings, they had to change their tagline to, “We’re more than just coats.” (They also always have to have a legal disclaimer in their ads that says, “Not affiliated with Burlington Industries.” Ouch.)
Some are COINED — names that come from made-up words, usually to try to evoke an emotional feeling or to make your business more memorable.
If you invent a new “word” for your name, be careful that it doesn’t sound unnatural. Mashing two words together or mixing up a bunch of letters to form a new word rarely appears or sounds smooth. And be cautious using trendy suffixes to make up a new word. Sprayology, Teaosophy and Perfumania are all train wrecks.
Watch out that you don’t run into a trap where you try to be Mysterious with your Coined business name.
A sure-fire way to annoy people is to choose a name that’s completely random and seemingly meaningless. One I wonder about a lot is Vungle. I have no idea what this company does, and I don’t want to know. Likewise, can you guess what companies Qdoba, Magoosh, Iggli, Kiip, Zippil, or Zumper do?
Blindly following naming trends will lead to nothing but trouble down the road. But don’t just take my word for it. Ask the founders of Xobni, Svbtle, anddel.icio.us.
Some Coined Names involve NEW FORMS — new ways of spelling traditional words, like YRNGS for Earrings, to make your business more memorable and have qualities of innovation or with-it-ness.
The problem with having a name like Naymz, Takkle, Flickr, or Speesees is that you will forever have to spell it when you say it, because it isn’t spelled how people hear it. (Think about how often you have to spell your own first and last name. Why would you want to have to do this with your brand name, too?)
Plus, Siri and other voice recognition software do not understand names that are not spelled naturally. And if you and your employees have to spell your name out loud for people, you are wasting everyone’s time and apologizing for it, over and over again.
SELF-MARKETING ANALYSIS
Be Brutally Honest About What Your Business Is (And Will Be) All About.
You first need to know: What Do You Want To Communicate?
Over the years, I have had to come up with many business names for different types of businesses, some more, some less successful.
Take the business name, “Land of Odds”.
The name was always received well by customers, and was memorable.
Originally (starting in 1980), I used the name for a hobby business where I restored antique lamps and sold some antiques.
Years later, with my partner Jayden, we opened up a retail store (in 1989) that sold all kinds of handmade jewelry and unusual collectibles and beads. The name still had a good fit.
Eventually, Land of Odds evolved from a bricks and mortar operation to an internet e-commerce store. Here visibility and recognition depended on how well the website got indexed by search engines. We were not selling LAND. We were not selling ODDS. Our name, which had served us so well over many, many years, became a bit of a handicap.
We also opened (in 1999) a retail store we called “Be Dazzled”. At first, Be Dazzled sold finished jewelry, collectibles, some clothing, greeting cards, and beads. But at its location, mostly the beads sold, and nothing else. So we narrowed the operation to beads.
The name was always popular and attractive, but there are many bead stores across the country that called themselves some version of “Bead Dazzled”, and there were many hair salons across the country that called themselves some version of “Be Dazzled”. People frequently confused us with other businesses.
Again, as more and more business, directly or indirectly, moved online, I wished we had formally named our business “Be Dazzled Beads”, so it would be more easily indexed.
And for awhile, one business opened up a few miles from us in Nashville, and named their business, “BeadDazzled”. Nothing we could do about that.
On-line, however, I called our website’s domain name www.bedazzledbeads.com . Had to get that word “beads” in there so that search engines would index us correctly, and customers specifically interested in beads would find us.
Several years ago, I began making high end, handcrafted jewelry. Coming up with a name for this business was difficult, as well. I settled on Warren Feld Jewelry — www.warrenfeldjewelry.com.
Several things went into consideration here. I wanted to create a strong brand identity associated with my name. I wanted to make it difficult for other people to copy my business name. Since I anticipated that most of my business would be conducted on-line, I wanted a key word that search engines would see and associate with my business.
However, I settled for a name configuration that is so common among jewelry designers — Your Name Jewelry — that it was not a name that would stand out as much, set me off from the pack as much, or be as memorable as much — not like Land of Odds has been. [Same issue with Your Name Designs.]
Also, if I ever entertained thoughts of selling this business, having my name in the business name would probably be a negative.
Self-Marketing Analysis means that you take some time and write down what you think your business is today, and what it will evolve into tomorrow.
This includes:
BUSINESS ATTRIBUTES: What Is Your Business Today (Real or Anticipated)?
What do I want a name to accomplish for my company? What do you want your name to accomplish for you? A name can help separate you from competitors and reinforce your company’s image, says Steve Manning, founder of Sausalito, Calif.-based Igor, a naming agency. He suggests clearly defining your brand positioning before choosing a name, as Apple did to differentiate itself from corporate sounding names like IBM and NEC. “They were looking for a name that supported a brand positioning strategy that was to be perceived as simple, warm, human, approachable and different,” Manning says.
Exercise: DISCUSS Name Options, In light of each evaluative question posed below…
Will the name be too limiting? Don’t box yourself in, says Phoenix-based Martin Zwilling, CEO and founder of Startup Professionals Inc., an advisor to early-stage startups. Avoid picking names that could limit your business from enlarging its product line or expanding to new locations, he says, citing the example of Angelsoft.com, a company formed in 2004 to help connect startup companies with angel investors. A couple of years ago, the company realized it needed to appeal equally to venture capital and other types of investors. So, it did a costly rebranding to Gust.com, which is less specific and evokes a nice “wind in the sails” image.
Does the name make sense for my business? For most companies, it’s best to adopt a name that provides some information about their products and services. That doesn’t mean it can’t also have a catchy ring. Lawn and Order, for example, is a good name for a landscaping business because it gets people’s attention and also clearly relates to the company’s services, Zwilling says. While unusual words like Yahoo and Fogdog sometimes work, quirky names are always a crapshoot.
Is the name easy to remember? The shorter the name, the better, Zwilling says, suggesting that business owners limit it to two syllables and avoid using hyphens or other special characters. He also recommends skipping acronyms, which mean nothing to most people, and picking a name whose first letter is closer to A than Z because certain algorithms and directory listings work alphabetically. “When choosing an identity for a company or a product, simple and straightforward are back in style and cost less to brand,” he says.
Is the name easy for people to spell? That may seem to be a given, but some companies purposely select names that consumers can’t easily spell. It’s a risky strategy to try to make a company stand out, and some naming consultants recommend against it. “If your name looks like a typo, scratch it off the list,” says Alexandra Watkins, founder and chief innovation officer of Eat My Words, a naming service based in San Francisco. She also believes that it’s important that your name be spelled exactly as it sounds. Otherwise, you will forever have to spell it out for people when saying the name or your company’s email or website address aloud. “Think of how often you have to spell your own first or last name for people,” she says. “Why would you want a brand name with the same problem?”
How will potential customers first encounter your name? Some naming experts believe there are exceptions to the easy-to-spell rule, especially if most people will see your name for the first time in a print or online ad. For example, consider Zulily, the online company offering daily deals for moms, babies and kids. “If you just heard that name, you might not guess how to spell it, but the company’s aggressive online ad campaign has meant that most people first see it spelled out,” says Chris Johnson, a naming consultant in Seattle and author of The Name Inspector blog, who came up with the name Zulily. “The payoff is that the unusual sound and spelling of the name have helped them create a very distinctive brand.”
Does the name sound good and is it easy to pronounce? Manning says the sound of the name is important in conveying a feeling of energy and excitement. You also must be sure potential customers can easily pronounce your company’s name. “It is a hard fact that people are able to spell, pronounce and remember names that they are familiar with,” he says, pointing to Apple, Stingray, Oracle and Virgin as strong names. But he doesn’t like such company names as Chordiant, Livent and Naviant. “These names are impossible to spell or remember without a huge advertising budget, and the look, rhythm and sound of them cast a cold, impersonal persona,” he says.
Is your name meaningful only to yourself? A name with hidden or personal meanings evokes nothing about your brand, and you won’t be there to explain it when most people encounter it. “Refrain from Swahili, words spelled backwards, and naming things after your dog,” Watkins says. She gives the example of Lynette Hoy, who was using her first and last name for her PR firm in Bainbridge Island, Wash. The name didn’t work because it failed to evoke Hoy’s fiery personality and passion, Watkins says. So, the company was rebranded Firetalker PR, and Hoy took the title of Fire Chief. She called her office The Firehouse, and began offering PR packages such as Inferno, Controlled Burn and The Matchbox. “Her entire brand is built around that name and lends itself to endless ways to extend the name,” Watkins says. “Her prior name didn’t lend itself to any theme or wordplay.”
Is the name visually appealing? You also want to consider how the name looks in a logo, ad or a billboard, Manning says. He points to Gogo, the inflight Internet service provider, as a good name for design purposes. “It’s the balance of the letters, all rounded and friendly, versus a word with hard, angular letters like Ks and Ts and Rs,” Manning says. Other visually appealing names include Volvo because it has no low-hanging letters and Xerox for the symmetry of beginning and ending with the same letter.
How will your name look? — On the web, as part of a logo, in an email address, on social media, on packaging.
What connotations does it evoke? — Is your name too corporate or not corporate enough? Does it reflect your business philosophy and culture? Does it appeal to your market?
Is it unique? — Pick a name that hasn’t been claimed by others, online or offline. A quick web search and domain name search (more on this below) will alert you to any existing use. When naming a business, you need to think about your potential customers. What’s their appetite for embracing the new? Or should you place emphasis on tradition and history?
DELINEATING ALL THE NAMING POSSIBILITIES
Initially, at least, Don’t Limit Yourself.
How did you come up with your current business name, or list of business name possibilities?
If you were starting from scratch, and trying to name your jewelry-making business, what things could you do?
What factors are important?
What do you want your name to communicate?
Do you like how certain words sound or look printed on a page?
DISCUSSION Q: How does your business name, or name possibilities relate to what you wrote about your jewelry above?
Start by deciding what you want your name to communicate. It should reinforce the key elements of your business. Your work in developing a niche and a mission statement will help you pinpoint the elements you want to emphasize in your name.
The more your name communicates to consumers about your business, the less effort you must exert to explain it. According to naming experts, entrepreneurs should give priority to real words or combinations of words over fabricated words. People prefer words they can relate to and understand. That’s why professional namers universally condemn strings of numbers or initials as a bad choice.
BRAINSTORM PROCESS: You first brainstorm with yourself only.
First, write down every name, word, partial word which comes to your mind?
Second, What inspired you, or inspires you? Why did you get into this business?
Third, look at your jewelry and think about every word that might be used to describe it.
What are your styles of jewelry? Sophisticated, every day, novelty? Gemstone, crystal, glass? Only one of a kind, or more mass-produced? In what settings will you sell your jewelry?
Fourth, think about your work process — how you organize your jewelry making supplies, how you apply your craft, how you finish off your projects. What are all the words which come to mind here?
Fifth, think about your potential customers, markets and niche markets. Who are they? How will your jewelry benefit them? What are all the words which come to mind here?
Sixth, find out what types of business names are jewelry designers currently using?
USE YOUR RESOURCES…
If you do a Google search on “jewelry designers” or “directories jewelry”, you can come up with lists of names other people use. Most use the artist’s name and either the word “design” or the word “jewelry”. Susan Fein Designs. Susan Fein Jewelry. Susan Fein Jewelry Designs. Susan Fein Designed Jewelry.
The Google search will also show you other types of business names jewelry designers use. You might also page through jewelry popular and trade magazines.
Play With Words And Word Combinations
Write down all the words and phrases that appeal to you.
BRAINSTORMING (with other people)
Now, involve other people in this “coming-up-with-names” process.
Similar to what you did “inside” your head. Now see how other people think, react and understand what you are trying to do.
At this point, you come up with every word, phrase and idea that has any possibility.
Share your lists of words and names with others.
See what additional words and names they can come up with.
Brainstorm with EVERYONE. As many family, friends and strangers (who may be potential customers) you can. Don’t be shy about this.
Brainstorm. When making the decision about words and names, brainstorm a lot. Brainstorm with yourself. Your friends and family. Potential customers. In this initial part of the naming process, don’t reject anything. You want to pull out as many ideas as possible. You never know what combination of words and phrases might click.
How would they describe your work and your design abilities?
Why do they think you wanted to get into this business?
What do they think inspires you?
What qualities do they think people will associate with your jewelry?
What target markets do they think you should go after?
How do they see your products benefiting others?
When choosing a business name, keep the following tips in mind:
· Choose a name that appeals not only to you but also to the kind of customers you are trying to attract.
· Choose a comforting or familiar name that conjures up pleasant memories so customers respond to your business on an emotional level.
· Don’t pick a name that is long or confusing.
· Stay away from cute puns that only you understand.
· Don’t use the word “Inc.” after your name unless your company is actually incorporated.
Here are five of my most lucrative brainstorming tools and techniques:
Open the thesaurus treasure chest.
Begin your online brainstorming on a thesaurus website, where you can find a jackpot of synonyms and related words. My go-to one is Thesaurus.com. When a consultant I know had to come up with fresh name ideas for a hip frozen yogurt franchise in Utah that was targeted at teenagers, he hit the jackpot when he typed in the word “cold” and found these three fun names:
Bitter: With one of the two yogurt flavors being tart, it was self-deprecating and fun Goosebumps: Perfect for their target audience of hormonal teenagers Frigid: Playful and fun. He actually used this later as the name of an ice cream store
2. Comb through glossaries of terms.
Every sport, hobby and industry has its own lingo of fun words and phrases. You can find pages and pages of them online by searching for “glossaries,” “lingo,” “vernacular,” “jargon,” “dictionaries,” “thesaurus,” “terms,” “words” or “slang,” which are essentially the same thing but will turn up different results in searches. While brainstorming frozen yogurt store names, my consultant friend looked at snowboarder glossaries and stumbled upon the word “Chatter,” which was perfect for this business, as it evokes teens socializing with each other.
3. Go “Googlestorming.”
There are endless ways to utilize Google for brainstorming, or as I call it, “Googlestorming.” For the frozen yogurt store, my friend searched for “coldest places on earth.” He found a small town “deep Siberian wilderness.” The word Siberian jumped out at him. “Siberia,” sounds hip, is relatable, and has an underlying humor to it. Great name for an ice cream or frozen yogurt shop.
4. Tune into iTunes.
Song titles make super sticky names, because just like the songs themselves, they get stuck in our head.
5. Search stock photos and Google images.
A picture says a thousand words. Photos can inspire awesome names, which is why I always do image searches to fuel my creativity. Stock photo websites such as Bigstock and Getty Images are fantastic places to get ideas and search for concepts related what you’re naming.
There are many word and image resources online to help stimulate your creativity. Try the ones above and poke around to find others. You’ll have the freedom to come up with ideas without anyone shooting them down. And you won’t have to buy anyone dinner.
6. Online Business Name Generators
FILTERING
PUT WORDS TOGETHER INTO PHRASES
See how combinations of words might work for you…
Then, filter
Start Putting Words Together Into Phrases. From this list of potential key words and tags, start putting words together in various combinations. Say them out loud. Plug in some of these words into the GOOGLE or Yahoo browser bar, and see what other suggested key words they are associated with.
For some of your favorite words, you might look these up in different languages — French or Spanish or German or Italian or Chinese or whatever.
Check these words in a Thesaurus to find related words. For each 2 or 3 or more word combinations, do a Google or Yahoo search on them, and see what comes up. Are these the kinds of businesses you want your own to pop up with in an internet search? See any other words other businesses use that relate? Does it appear that no other business is using the same name you want to use?
Filter
Begin to group the words and names into categories, such as GREAT, GOOD, FAIR and BAD.
If you are marketing to a multi-lingual audience, will the words you use be recognized in more than one language, and will they be seen as positive and have no negative connotations?
Some better business names function on more than one level of understanding — a play on words. That is, a word or part of a word can convey more than one meaning, and each meaning can be appreciated. A business called “JewelryWorks” or “DesignWorks” suggests that the jewelry is handcrafted, as well as successful — it works! — for the wearer.
Names that begin with hard sounds — K, — usually work better.
Find words or pairings with a rhythm or semantic flow, which helps to avoid leaving someone with a hard stop. This tends to create alliteration, such as Freaky Friday or Sunny Shores.
People are most likely to remember how something makes them feel. This means that beautiful-sounding names have a better chance of encoding into long-term memory. Interesting fact: “Cellar Door” has been rated as the most phonetically beautiful pairing of words.
Names with letters that have high point values in Scrabble — J, K, Q, V, W, X, Y and Z — tend to be more memorable, likely because they are less commonly found in western languages. This less commonly found attribute makes a name more distinct for encoding into memory.
Letter form beauty. Brand names are more often seen in writing than any other form, so having a name translated into visual language, such as a logo, is an important next step. Take OXO and xpedx for example.
Context is important. A name should feel like a fit for the category it is going to occupy. Do this by being relatable through contextual meaning. For example, naming a small pillow company Microsoft today would be odd, but 100 years ago it may have worked.
The more physical and tangible a word is, the easier it will be to remember. The reason? It gives someone an image in their mind and helps to store it as a memory. Take “mossy rock” vs. “soft place” as an example. One is an object and the other is a concept. Guess which one someone would remember tomorrow?
Not every name is going to encompass all of these factors, but considering them gives a better sense of how memorable a name may be when it reaches the eyes and ears of a brand’s audiences.
Avoid tongue twisters. “Six Thistles Jewelry”, looks pretty on paper, offers many graphic illustration options, but is very difficult to say aloud.
Don’t Settle On The First Name You Come Up With
The best approach is to generate 3–5 business names, and start pre-testing them.
Again, search Google, domain name registries and trademark offices.
Again, bring your friends and families into a brainstorming session. Show your friends and family members all 3–5 names, and ask them to pick their favorites, and tell you why.
REALITY TEST
Subject your 3–5 choices to some rigorous and extensive reality-testing…
THE PRINTED WORDS. Type out the names, using different type-font faces. You can easily do this in your word processing or web-page editing software. How does it visually appear on the page, and do you like it or not? Besides the overall look, be sure that anyone reading your typed out name (or domain name or email address) won’t confuse lower case “L” with the number “1” or a capital “I”, or Zeroes and “O’s” or Fives and “S’s” or underscores with hyphens or blanks when the name or email address is shown as a highlighted, underlined link.
THE DIGITAL ENVIRONMENT. Type in your business name and domain name into a web browser and search engine. How does it look in the location bar at the top of the browser. In the search list, how does it appear, where does it come up, and what other businesses come up with it?
Type your email address into the TO section of an email.
Make sure you haven’t picked a name where, when you write it down, some letters slur together, making it illegible for others to read.
On the screen, it’s difficult to read “ill” , for example. Again, Besides the overall look, be sure that anyone reading your typed out name (or domain name or email address) won’t confuse lower case “L” with the number “1” or a capital “I”, or Zeroes and “O’s” or Fives and “S’s” or underscores with hyphens or blanks when the name or email address is shown as a highlighted, underlined link.
Some online applications may reject anything with a non-letter symbol, like a hyphen or slash or exclamation point.
Online applications will not typically recognize letters in different colors.
How long will it take or how difficult will it be for someone to type out your email address?
Does your business name lend itself to a logo.
A long time ago, I had done some consulting with a friend — Marje Feinson. We called ourselves Feinson-Feld Planning Associates. “Feinson-Feld” was easy to say, sounded professional and established, and we liked it.
We had a terrible logo, however. We took the “F” of both of our last names, and had one F upright and one F facing down, to form a right-leaning box, and people would frequently ask which one of us was the upside down F. (Of course, it was me!)
Hold your jewelry next to your name. Match? Mismatch?
Say your business name out loud. How easy is it to say and pronounce and be understood? Have other people say your business name out loud.
Your name pronunciation is not güd. Your name should be approachable and intuitive to pronounce in your brand’s country of origin. Don’t rely on punctuation marks or letters in different colors to aid in pronunciation. Your name will not appear in color in the press or in search-engine results and people go batty trying to find accent marks and umlauts on their keyboard.
DISCUSSION: Relate business name/names to questions below…
Can people spell your business name?
Can people remember your business name?
When people hear your business name, will they know what your business is about?
Does the name seem as workable for a physical bricks and mortar business, as it does for an online business?
Think about how you intend to market your business — brochures, directories, ads, email campaigns, signage — does your name feel good and fit with these marketing strategies?
If your primary means of marketing is a listing in the Yellow Pages or some other directory, then the first letter of the name might be important. Should your business start with the letter “A”? Should your business name avoid the “a”, “an” and/or “the”?
Do certain words in your name make different people react in different ways? I remember a gemstone shop named Art By God. On the one hand, gemstones are literally Art by “God”. Lots of people can appreciate that. On the other hand, whenever you use “God” in a name, it may seem that you’re diminishing something some see as sacred. I don’t think I’d feel comfortable naming one of my businesses, “Land of Gods”. And I remember the TV commercial where a woman names her new shoe store “Clothing Optional”, and attracts a hoard of nudists.
If you have an identifiable major competitor, does your business name sufficiently distinguish you from them?
Using “DESIGN” or “JEWELRY” as part of the business name…..This has pros and cons. On the positive side, it’s important to get your name associated with the jewelry you make, and the certain style, look and/or quality of your jewelry. This is called branding. You always need to keep re-emphasizing your name. In terms of both positive and negative, this gives the search engines something to work with when indexing. The name is user friendly in that it is easy to interpret and understand.
On the negative side, it seems that almost everyone you are competing with uses the same naming construct. If a potential customer is paging through the yellow pages, or scrolling down a list of designers in a search engine, you can get lost in the crowd.
Sample potential customers.
What will the future bring?
Where do you see yourself in 3 years, 5 years, 10 years, 20 years? What will you be selling, to whom, at what price? Will it be the same merchandise you began with, or very different merchandise?
Will the name limit you in any way over time? Have you chosen something like Tennessee Jewls, and may want to sell outside Tennessee, or have non-Tennessee products to sell? Do you think you might want to expand beyond jewelry?
PICK YOUR BUSINESS NAME (consider thisa working title for now)
Now you are ready to choose the ONE…
KEEP IT SIMPLE
Double meanings often work best, such as in DesignWorks or DesignedExpressions.
DON’T SETTLE ON THE FIRST NAME YOU COME UP WITH
That first name you come up with probably won’t be the chosen name…
PICK. Pick your business name. (final draft)
Now, how do you make your final decision?
Recall all your initial criteria. Which name best fits your objectives? Which name most accurately describes the company you have in mind?
Some entrepreneurs arrive at a final decision by going with their gut or by doing consumer research or testing with focus groups to see how the names are perceived. You can doodle an idea of what each name will look like on a sign or on business stationery. Read each name aloud, paying attention to the way it sounds if you foresee radio advertising or telemarketing in your future. Use any or all of these criteria.
PROTECT YOUR BUSINESS NAME
Registration, Trademark, Service Mark, Copyright…
Register Your New Business Name
Registering a business name is a confusing area for new business owners. What does it mean and what are you required to do?
Registering your business name involves a process known as registering a “Doing Business As (DBA)” name or trade name. This process shouldn’t be confused with incorporation and it doesn’t provide trademark protection.
Registering your “Doing Business As” name is simply the process of letting your state government know that you are doing business as a name other than your personal name or the legal name of your partnership or corporation. If you are operating under your own name, although you can skip the process, it is still a strategically sound idea to register your name. In some states, you may have to register your name at the City and County level, as well as with the State.
A trademark protects words, names, symbols, and logos that distinguish goods and services. Your name is one of your most valuable business assets, so it’s worth protecting. You can file for a trademark for less than $300. Learn how to trademark your business name.
When it comes to starting a business, there’s often some confusion about the process of business name registration. How are trade names and trademarks different? Does a trade name afford any legal branding protection? Can your trade name be the same as your trademark?
Simply put, a trade name is the official name under which a company does business. It is also known as a “doing business as” name, assumed name, or fictitious name. A trade name does not afford any brand name protection or provide you with unlimited rights for the use of that name. However, registering a trade name is an important step for some — but not all — businesses (more on this below).
A trademark is used to protect your brand name and can also be associated with your trade name. A trademark can also protect symbols, logos and slogans. Your name is one of your most valuable business assets, so it’s worth protecting.
An important reason to distinguish between trade names and trademarks is that if a business starts to use its trade name to identify products and services, it could be perceived that the trade name is now functioning as a trademark, which could potentially infringe on existing trademarks.
NOTE: You cannot trademark adjectives.
Registering a Trade Name
Naming your business is an important branding exercise. If you choose to name your business as anything other than your own personal name (i.e. a “trade name”), then you’ll need to register it with the appropriate authority as a “doing business as” (DBA) name.
Consider this scenario: John Smith sets up a painting business and chooses to name it “John Smith Painting.” Because “John Smith Paining” is considered a DBA name (or trade name), John will need to register it as a fictitious business name with a government agency.
You need a DBA in the following scenarios:
Sole Proprietors or Partnerships — If you wish to start a business under any name other than your real one, you’ll need to register a DBA name so you can do business under the DBA name.
Existing Corporations or LLCs — If your business is already incorporated and you want to do business under a different name, you will need to register a DBA.
Note that many sole proprietors maintain a DBA or trade name to give their business a professional image, yet still use their own name on tax forms and invoices.
Depending on where your business is located, you’ll need to register your DBA name through either your county clerk’s office or your state government. Note: Not all states require fictitious business names or DBA registration. SBA’s Business Name Registration page has more information about the process, plus links to the registration authorities in each state.
Registering Your Trademark
Choosing to register a trademark is up to you, but your business name and identity is one of its most valuable assets, so it’s worth protecting.
Registering a trademark guarantees exclusive use, establishes legally that your mark is not already being used, and provides government protection from any liability or infringement issues that may arise. Being cautious in the beginning can certainly save you trouble in the long run. You may choose to personally apply for trademark registration or hire an intellectual property lawyer to register for you.
Trademarks can be registered on both federal and state levels. Federal trademarks can be registered through the United States Patent and Trademark Office. Applications can be submitted online, by using the Trademark Electronic Application System (TEAS), or by requesting a hard copy application and mailing in a paper form. Although both methods are acceptable, filing online is a faster and more cost-effective process (less than $300).
It usually is more expensive to get a US Trademark. This can be confusing, and I would suggest consulting with a trademark attorney.
It is usually less expensive to get a Trademark in the state you do business with. The process is usually very simple, and usually you would not need the services of a trademark attorney.
Tip: Before you register, you’ll need to follow these steps:
Determine whether your product is eligible for a trademark
Conduct a trademark search using TESS (Trademark Electronic Search System)
Because it can be tricky with US Trademarks to identify potential infringement or clashes, and the penalties for doing so are high, it’s worth talking to a good intellectual property lawyer to ensure you cover all bases.
As with trade names, registering a trademark at the state level varies from state to state. Check out the USPTO’s State Trademark Information page for links to your state’s trademark office.
As you begin to narrow down a name, check with the US Trademark office to be sure no one else has used these names. Go to www.uspto.gov , and search the business names. Your state trademarks office may also have a searchable list.
Protect your business name by registering the name (and logo, if you have one) as a trademark or service mark. Also copyright your brochures and advertising copy, and any sets of instructions, if you create these.
As soon as you pick your business name, register it as a trade or service mark with your state trademark office. Each State you do business in, as well as the US as a whole, offer opportunities to protect your trade or service mark. It may or may not make sense to trademark in multiple states, or for the US as a whole.
In Tennessee, this process is especially inexpensive — around $40.00 per trade or service mark. You can prevent someone else from using your business name, or product name, by registering this name with the state(s), or US. You would put a TM next to the name you’ve trademarked, such as Be Dazzled BeadsTM .
Have I conducted a proper trademark search? A great name is worthless if someone else already has laid claim to it. Start with some free resources like Trademarkia.com or USPTO.gov to do a cursory search to see if the name is already in use. Then, hire a trademark attorney to do a more thorough screening, and if the name isn’t taken, to register it with the U.S. Patent and Trademark Office. “Get it right the first time,” Watkins says. “A third of our business comes from companies who are being threatened with trademark infringement.”
Or you can send a copy to yourself in a Registered letter, write on the outside of the envelop what is inside, and don’t open the envelop when you receive it back in the mail. This is a proof of date, should you need to challenge anyone.
REGISTER ONLINE DOMAIN NAME
Check to see if anyone has registered your business name online as a registered domain name. Go to www.networksolutions.com/ or www.GoDaddy.com and type in the name you want. If the name you want is taken, you can always vary the domain type, such as “.net” or “biz” instead of “.com”. You can vary a name by adding punctuation like a hyphen or period or deleting a space between words. You can vary a name by making it plural. You can vary the name by playing with the spelling of certain words — even making up your own creative spelling for some words.
Next, register a business domain name, so that you protect your business name from other people who might use it on-line. In translating your business name to an internet domain name, keep in mind that your email address will include that domain name. You want people to be able to easily and quickly type in your email address into an email. You do not want people to confuse the spelling or any added punctuation.
Pointers: The business name does not have to match your domain name. The .com extension would be best, even though there are many other choices. If possible, the domain name should be rich in key words. Avoid using punctuation as part of the business name.
To find out if your business name has been claimed online, do a simple web search to see if anyone is already using that name.
Next, check whether a domain name (or web address) is available. You can do this using the WHOIS database of domain names. If it is available, be sure to claim it right away. This guide explains how to register a domain name.
SET UP YOUR EMAIL ADDRESSES
Determine how you want emails to be directed to you. Never use “info@yourname.com” or “customerservice@yourname.com” or “webmaster@yourname.com” or “store@yourname.com” or “mail@yourname.com” or “contact@yourname.com” or “ask@yourname.com” and generic things like that. These too often are challenged by spam prevention systems as spam. You don’t want your customers’ email systems automatically deleting your emails.
Claim Your Social Media Identity
It’s a good idea to claim your social media name early in the naming process — even if you are not sure which sites you intend to use. A name for your Facebook page can be set up and changed, but you can only claim a vanity URL or custom URL once you’ve got 25 fans or “likes.” This custom URL name must be unique, or un-claimed.
Along with the URL for the business name, you’ll want to check and make sure there are places on Facebook, LinkedIn,Twitter, and Instagram (at the minimum) to claim early on.
You will want your business listed as a business in various search engines, like Google and Bing, and various directories, like Yelp.
Being active on public social media platforms such as Facebook, Instagram, LinkedIn, and Twitter in addition to your own business blog, is almost an essential part of any business marketing toolkit. These tools can have enormous benefits, but they also have their dangers.
For example, some businesses jump on social networking sites only to discover that someone has already registered their company or product names on Facebook and Twitter and is misrepresenting their brand as a consequence. Likewise someone might be out there reproducing your copyrighted web copy, blogs, photographs and videos (all that good multi-media stuff that social networks love to propagate) — without your knowledge.
CREATE A TAG LINE
Use a catchy phrase to summarize your business and get people’s attention…
Create A Tag Line
On written documents, brochures, stationery, envelopes and on online documents with titles, headings and the like, you have an opportunity to present more “words”, that is “meanings”, about your business. This gives you a second opportunity to convey things about your business that perhaps your specific business name falls short on, or needs more emphasis.
After you’ve come up with a business name, return to your lists of key words, and not-so-key words, and think of a tag line. Think of it as a “subtitle”.
Your Tag Line is a marketing opportunity, and should be worded in a catchy way.
Great tag line for taxidermy business: “the only game in town”
A great tagline captures the essence of the value you provide to your customer in one or two concise sentences.
For my shop, Be Dazzled, “Don’t be Frazzled, Be Dazzled”
For my shop, Land of Odds, “Your Partner In Design”
Creating a tagline is a powerful exercise, as it forces you to think about exactly what it is you do for your customers that is unique. I call this a business’s Unique Advantage Point (UAP). It’s the perfect place to start when developing a tagline for your business.
First write a 9 words or less tag line. You need to be able to tell someone, in 1-sentence, preferably seven to nine words, who you are as a jewelry designer. What’s your style? What’s your approach? What’s your uniqueness? What’s your competitive advantage?
No qualifiers. No further supporting detail and elaboration. 1-Sentence.
It might be helpful to fill in this blank: “You want to buy/sell my jewelry because….(blank)….”
Or, “My jewelry is different and more relevant and better than everyone else’s because… (blank) …. “
A tagline doesn’t need to be overly clever or cute to be effective. A good tagline is primarily functional. It should explain the unique value that your business offers as clearly as possible.
Sure, many classic taglines are pretty smart. “Let your fingers do the walking” is a clever play on words for a telephone directory company. But it also clearly evokes the value that the Yellow Pages offers: easy access to reliable information.
Don’t Worry About Being Too Cute
Make It Memorable
Inject a Little Personality
Settle on a final draft.
Some examples of tag lines / slogans:
De Beers. A diamond is forever. Citizen. Beyond precision. Crystal gets closer to the body than ever before. Diamonds by the Yard. Every kiss begins with Kay. Live the moment. Perpetual spirit. Quality is Remembered Long After the Price is Forgotten. The crown jewellers for 150 years. The Jeweller of Kings. The right time for life. The added value of the first impression. Where Maryland gets engaged. For those who want more. Honesty, my addiction. Getting rid of headaches since 1888. Ring on your finger, necklace on your neck, and men on their knees. Diamonds. Divas. Desire. Love’s embrace. Want honesty? She only has two things on her list. Unleashing the beauty of the stone. Unstoppable. Our reputation shines as brightly as our diamonds. Beautiful, masterful design never goes out of fashion. Walk down our aisles first. Hearts on fire. The ultimate in luxury and style.
NEXT WRITTEN EXERCISE: Write Up Short Descriptions of Your Business
At this point, you have done a lot of work generating terms, key words, phrases all very relevant to your business. Take a little more time to generate some descriptions of your business which you can cut and paste into forms, such as the application forms for getting listed in various online directories.
Then, come up with a 250 word description of your business.
Then, come up with a 100 word description of your business.
Last, come up with a 25 word description of your business.
All these will be useful, when creating written documents, as well as web-pages, and, just as important, will be useful for filling out forms to register your business name with various search engines and directories online.
NAME YOUR JEWELRY
Naming your jewelry will increase your sales…
I was filling out an entry form the other day for a jewelry contest sponsored by Beading Daily, a part of Interweave Press. I was submitting my Duchess Aiko Necklace under the Czech Glass category. On the entry form, they asked you to name your piece, and I’m glad I had.
This piece was very classical looking, very European sic Roman sic Greek sic British aristocracy and French bureaucracy. Stuffy, Uppity, and Refined. Hence the “Duchess”.
I have frequently used a variation on a Japanese jewelry design technique and motif called a bundle of straw. The bundle of straw allows some interlacing, some interpenetration of forward, center and receding spaces, and some simple movements. I used a variation of this technique with a narrow tube bead that slipped through the larger holes of two positioned rondelle separator bars, and underneath two 14mm faceted and frosted carnelian discs. This had the effect of pushing the upper disc forward, increasing the dimensionality of the piece, as well. Hence, the “Aiko”.
I kept thinking how important it was to name all your pieces, and how I had named them — The E. Taylor (a take-off on a multimillion dollar piece worn by Elizabeth Taylor), the Barcelona Necklace (a translation of contemporary Spanish jewelry fashions and techniques), the Etruscan Vestment (a contemporary interpretation of an Etruscan collar), and Blue Waterfall (for a piece in silvers and a multitude of blues that felt very much like a moving waterfall).
The point here is, Name Your Jewelry. I find it useful in increasing attention and sales to name my jewelry. I name each piece of jewelry, and organize similar pieces of jewelry into collections and series, to which I assign names, as well.
This helps people relate to the various pieces I make. They get connected to my pieces because the “titles” give them meanings to relate to. Naming allows me to segment all the jewelry I make into smaller subsets. This enables me to explain techniques and materials pertinent to particular pieces, so I don’t end up, in my sales pitches, making broad generalizations about what I sell. And I find people often like to own more than one piece within any series or collection. People are natural “collectors.” The familiarity these names generate seems to encourage people to want to own a second or third piece of mine.
Pointers: Keep your names short. Relate the names to your design work, but not necessarily too literally. Have fun with your names.
WRITE A STORY ABOUT YOUR BUSINESS Sell yourself as an artist by telling your story…
Write A Short Story About Your Business and Your Biography as an Artist
Sell yourself, the jewelry artist, as well as your jewelry creations.
Buyers of your jewelry and other craft creations will want to know a lot about your craft or jewelry background. They will want to know about the piece, how you thought about it, what kinds of techniques you used to make it, where the materials come from, what makes the piece special or original. The more they know about you, the more connected they feel towards you. And the more comfortable they will feel about doing business with you.
They might want to know who taught you and how you learned your craft. They might want to know if you make your items full-time or part-time. They might be interested to learn where else you sell or have sold your pieces.
Write up a 3–4 paragraph story about yourself. It could be a true story, or it could be a fantasy you want associated with your products. This story, or parts of it, may end up in your brochures. It may end up on your packaging, such as earring cards, bags or gift boxes. It may end up on your web-site. It will be something you should be prepared to tell orally, as well.
Then re-write these paragraphs as 3 short, concise, distinct sentences. You won’t be able to tell everything about yourself. You won’t be able to go into your creative process.
Things that will work well in this 3-sentence structure are titles of articles you’ve written, awards won, specialized training programs, classes you teach, your website address, specialties you concentrate on, state where you are from.
ELEVATOR PITCH
Last, translate your short story and 3-sentence summary into a 30-second Elevator Pitch. Picture yourself on an elevator with a potential client, and you have 30 seconds to “make the sale”, so to speak.
While you are at it, ….
GO FORTH AND PROSPER
Once your decision is made, start building your enthusiasm for the new name immediately. Your name is your first step toward building a strong company identity, one that should last as long as you’re in business.
Part of the success of your business name is how you effectively use it in your marketing plans.
Right or wrong, the name you choose, or don’t choose, speaks volumes about your business savvy and understanding of the world you are about to enter.
Recently, one of my jewelry making friends, while attempting to attach a clasp to a bracelet she was making, exclaimed in frustration: “I MAKE ALL THE MISTAKES IN THE BOOK!”
My first thought was, What are these mistakes?
And that led me to ask this question of my readers:
QUESTION:
WHAT ARE SOME OF THE MISTAKES THAT YOU HAVE MADE THAT SHOULD BE IN THE BOOK?
From me: I am usually working on projects and waiting on customers or answering their questions at the same time. What I have done, more times than I can count is one of two things. I either pick up my work to continue the project, and head in the wrong direction. Or, I repeat the last step I did rather than continue with the next step.
Those are the most common mistakes I make too. Another one I make is one there’s no excuse for. I pick up 2 beads instead of one and don’t notice until I get back around to the mistake in the next row or round.
Skipping a bead, or leaving thread around the edge of a bead and only realising you have done so after you have woven in the ends, I had to redo a beaded bezel this afternoon after doing the first one. 😦
I sometimes think I will be able to back out my thread by stitching in reverse instead of taking off the needle and pulling the thread out. Bites me in the behind every time.
Kate McKinnon, author of “Contemporary Geometric Beadwork”, recommends breaking the offending double bead (delicas, or seed beads) by pushing a map pin through it and into a rubber eraser. Works great. Once I tried using a needle nose pliers to break the bead, but the glass sliced through the Fireline thread, so that move is too risky for me!
The only thing about doing that, Evelyn is that you end up with a little bit of loose visible thread where the extra bead was, if you don’t burst the thread. If it is on the inside, or will be covered by layers of embellishment then you may be able to get away with it, but may be obvious on a simpler piece.
It would for that technique because you can take it down into the columns of herringbone between the sections of peyote. The problem I had today was with a peyote bezel, I tried doing that but it wouldn’t lie flat and I had the extra bulk from the second thread, so I just redid the bezel — I’m just fussy about the finish.
What are all the mistakes in the book that you make? Share in the comments section.
People think that they can copyright their designs, and this single act will be sufficient to prevent people from copying their work. However, to prove that someone has violated the copyright, and to sue them in court, is difficult, time-consuming and expensive to do.
A copyright is a grant from the United States Government for a specific jewelry design. It can cover the actual piece and the drawings for the piece, but cannot cover a specific idea or concept. You can only copyright something that is tangible.
Your registration covers the specific design, and may be flexible to cover a color change. However, if there is any obvious change in the piece — different shapes, different patterns, different sense of dimensionality — , you would want to register each variation on a core design.
You can also copyright a “collection of jewelry”, but you can’t add new designs to the collection, without getting new copyrights. In the collection, the pieces would need to share design elements and sensibilities, and these would need to be obvious.
Copyrights last for the life of the designer plus 70 years. Use form VA (Visual Arts). It usually takes about a year for the paperwork to go through, but your piece is considered copyrighted from the date you submitted your application.
The US Copyright Office will often reject jewelry designs for lacking authorship because they consist of common or usual shapes and forms. When submitting your application, you should present a well-reasoned argument, based on basic principles of jewelry design composition, form and function, as to why your jewelry and patterns should be copyrighted.
To bring a lawsuit, you must formally register your copyright with the US Library of Congress.
Federal law specifies the amount of damages you can sue for. In 2006, if your copyright registration was filed at least 3 months before the infringement, damages could range from $750 to $30,000 per infringement up to $150,000 maximum without having to prove that you had lost any profit. If your registration was last minute, you can only sue for your lost profit, and/or your infringer’s profits.
When is a copy an infringement? The standard is that the piece must be substantially similar and that the infringer copied the piece. There is a general idea that if the piece is 10% different, it is not an infringement. However, this is not a legal principle or standard. It’s “infringement” whether the person copied your design directly, or copied it from a photo or other image that someone had taken of your piece.
If you want to pursue any legal action, consult a copyright lawyer. A lawsuit can easily set you back $2,000–4,000.
The Mess over Copyright
It’s true. Many people copy other people’s jewelry. A large number of these folks want to copy other people’s jewelry exactly, bead by bead, clasp by clasp, part by part. They come into the store with pages torn from fashion or bead magazines, and want to make the same thing. They try to take photographs or make sketches of finished art-jewelry in our Open Window Gallery. They try to duplicate what they see others wearing — particularly the news ladies on the various programs on TV.
Over the years, beader after beader, and jewelry-maker after jewelry-maker, stood before us, plain scared that, if anyone saw their pieces, their designs would be stolen. After all, they saw it happening daily all around them. For too many of these artists, this was an insurmountable mountain. One of our friends would bring her pieces for us to see, but if another customer walked up to the counter, our friend would cover her pieces with her hands — shielding them from the potential design-thief. Over the 15 years we knew her, our friend was determined to launch herself into the jewelry design business — a business based on not allowing anyone to see her merchandise, for fear they would steal her designs. I’m sure she’ll be at this business enterprise of hers for 15 more years, as well. And not getting any further ahead.
If you want to sell your stuff, you have to put it out there. People will try to duplicate your pieces. So what? Successful businesses are successful, not just because they have great jewelry to sell, but because they’ve marketed well, placed their products well, priced their products fairly, distributed their products in a timely manner, and kept a tight control over the financial management of their businesses. They work, market, and invest in themselves so that eventually they create a “brand” recognition for their jewelry.
Jayden once took a lampworking class where the instructor was teaching one of her signature beads. However, in her instructions, she left out three pieces of critical information, which prevented her students from duplicating her work. The water of the lampwork-aquarium did not glisten blue. The dimensional arrangement of fish and plants could not be achieved. The students were very upset, because their pieces were inferior, by comparison, to those of the teacher. The students blamed themselves. But this teacher had been very dishonest and deceitful with them. She hadn’t really taught them how to make the bead they came to this class to learn to make.
If you want to teach classes or publish your work in a magazine or book, you have to put your instructions out there, (as well as present them so that anyone following them can come up with a result that is similar to the original as pictured). People will follow your instructions. They may teach your instructions. They may try to publish your instructions as their own in another book. So what? Successful instructors are successful, not just because they have great patterns to sell, but because they’ve marketed them well, placed them to maximize their visibility, priced them fairly, and created a steadfast brand loyalty on the part of their students and readers, who begin to associate particular looks, styles, steps and designs with particular designers.
If you don’t want the public to “consume your intellectual property,” don’t teach and don’t publish. I always felt that if you teach or publish instructions for the consumable public, then it’s like making a contract with them that they can follow and use those instructions. It’s no longer exclusively yours. As a teacher, it should be a natural part of the lesson to show your students how they might vary the instructions and make the piece their own. And ethically, it would be appropriate for any student or jewelry designer to reference the source of their ideas, if not their own, or not primarily their own.
This issue percolates to the surface every couple of years. Most notably was the shot heard around the world, when the editor, Mindy Brookes, at Bead & Button magazine wrote an editorial (June 2006 issue) about “When, if ever, is it acceptable to sell or teach another person’s designs?
From the editorial:
That’s a question we hear frequently at Bead & Button, and it tells us that many of our readers care about the ethical and legal issues involved when it comes to the money-making aspects of beading. Unfortunately, we also have first hand experience with beading’s darker side — the dishonest few who cause heartache and financial harm by cashing, in on another person’s original work. And when unethical people profit from ideas that don’t belong to them, it hurts us all.
Maybe it was inevitable that as beading became more popular, people would look for shortcuts to exploit the growing number of lucrative opportunities, and maybe there is nothing one editor one editorial can do to change that. So, it’s gratifying to know that my concerns about the ethics of beading are shared by the editors of other beading magazines, including Cathy Jakicic of BeadStyle, Marlene Blessing of Beadwork, Pamela Hawkins of BeadUnique, and Leslie Rogalski of Step by Step Beads. They will also be covering this topic in upcoming issues of their publications.
To address the question presented at the start of this editorial, Bead & Button’s position on copying designs is as follows:
It is unethical to copy an artist’s work to sell without the artist’s permission.
It is unethical to copy any work that has appeared in a magazine, book, or website and represent it in any venue as an original design.
It is unethical to teach a beading project that has appeared in a magazine, book, or website without the artist’s permission.
It is unethical to teach a beading project learned in another teacher’s class without the teacher’s permission.
If you agree, please help disseminate this message by including a copy of these statements with your class materials, your kits, and the pieces you sell. You can download a copyright-free version at beadandbutton.com.
The reactions of our customers, teachers and students in the store were strong, worried, concerned, angry, frustrated, soul-searching, and very questioning of the Bead & Button manifesto. The primary concern was that most people liked to try out the patterns in the magazine. Was this unethical? Many teachers took cues from the magazines about fun projects to teach. Was this now unethical?
How much, in percent, of a project would have to have been copied, to suggest that this copying was unethical?
If determining the correct percentage, what did you count? Color? Bead? Style? Stringing material? Pattern?
How many original designs can people truly come up with? What if the originators were some tribal or provincial group hundreds of years ago? With 54,000,000 people who bead or design jewelry in the United States, how many original ideas can there actually be?
What if someone created an important variation on someone else’s design? Who’s project would the project be, and would that variation have to be suppressed?
Should there be a distinction between “copying” and “learning new techniques”?
How could anyone find out what was already copyrighted in jewelry? Copyrights are filed by title, not design elements. There is no searchable database. There are so many books and magazines and so many hundreds of years of beading.
I had read of a court battle in Washington State of a glass artist suing two of his apprentices, who went off and started their own business. The original artist claimed that he had sole rights to create certain curvatures in glass. Can you really copyright or patent a curvature in glass — how many curvatures can there be, before the glass breaks? The original artist claimed that the work of the two apprentices was too similar to his own. To complicate the situation, the original artist had been physically unable to make his own pieces. He designed them, oversaw the work of the apprentices, and signed the pieces. If the original artist were to win in court, would this force all other glass artists out of business, because they would no longer have the rights to make certain curvatures in glass?
By trying to clarify the issue, I think Bead & Button muddied the water more. They confused the moral value of copying someone else’s work, with the legal value of copyrighted material.
What I say:
1. Don’t be a jewelry designer, teacher or craft-writer, if you don’t want people to copy your work.
2. Don’t copy someone else’s work and sell it or teach it, without at least referencing or acknowledging your source material.
3. When teaching or designing based on someone else’s work, set a goal for yourself to try to “make it your own”, by personalizing or varying the piece.
Needle and thread were very intimidating, and frankly, scared me. I could barely sew a button back on a shirt. My hands seemed so big and bulky — how could I hold onto these extremely thin beading needles? And thread the eye of the needle? And control things? The few times I had hemmed some torn pants, my thread path was more modern art, than functional perfection.
Jayden loved needle and thread. She made everything with it. She kept trying to force me to learn, but I resisted. For years. Resisted for many years. At one point, she retired, and I had to take over teaching her Attaching Clasps class. In that class, she taught both crimping and needle and thread bead stringing. So I had to learn it.
Not as painful as I anticipated. And the resulting pieces felt and moved and looked so much better than cable wires, that I took to it very quickly, and made it my own, so to speak. Needle and thread became my preferred approach. But when I made things to sell, I often reverted back to the cable wires. When cable threads, like FireLine, came along, these became a good compromise, at least for some projects, though not all of them.
HOW TO USE NEEDLE AND THREAD To String a Bracelet, Including How to Wax Your Thread
There are many different types of stringing materials. The best outcomes, from the Art and Design Tradition, are achieved using needle and thread. Beading threads are nylon. Most are shaped like a thin ribbon, rather than round, like sewing thread. Most are bonded, rather than twisted, fibers, which adds a lot of what is called “abrasion resistance.” Twisted fibers have zero abrasion resistance.
With beading threads, your stringing will be the strongest, it will last a long time, it will feel supple and soft, and it will drape and wear the best. It will take the shape of the body, and move the best with the body. With needle and thread, you tie knots to secure your clasps. You do not use crimp beads.
Prominent beading threads including Nymo, C-Lon and One-G. One thread, Silamide, is twisted, rather than bonded, which means it has no abrasion resistance. Beads have very sharp holes — picture broken glass — and Silamide breaks easily. Although it is pre-waxed and little easier to manipulate through your beads, I don’t recommend it. I’m not big on anything that breaks easily.
Using needle and thread does add a lot of time to the creation of a piece. You have to use a needle, which can be awkward. You need to wax your thread, which takes more time. You need to go through your piece THREE times. If you are selling your pieces, very often you won’t be able to recoup your labor, when using needle and thread.
One alternative is to use a cable wire. This goes very quickly and is easy to do. The cable wire is stiff enough to be its own needle. You don’t wax. You only have to go through your piece ONE time. The better cable wires are very strong. There is a stiffness to them that makes the pieces not feel as good when worn, in comparison to thread. You also have to use a crimp bead to hold the cable wires in place, and this is a weaker and somewhat riskier design element than tying a knot in the Clasp Assembly. Cable wire brands that I particularly like and recommend include Soft Flex and Flexrite.
Pieces done on cable wire move in the opposite direction that your body moves. If I wear a needle/thread bracelet on my wrist, and move my wrist to the left, the bracelet will move with me. If I wear a cable wire bracelet on my wrist, and move my wrist to the left, the bracelet will actually move in the opposite direction to the right. The cable wire bracelet does not conform to and take the shape of your wrist, when worn. This becomes a major design problem not always dealt with easily.
Another alternative to beading thread is to use a hybrid cable thread, such as FireLine or PowerPro or Spiderwire. Cable threads are threads braided together and encased in nylon. Originally these were used as fishing line and adapted by craftspersons for stringing and weaving. You use needles with these cable threads, but you only have to go through your piece one time, instead of 3 times, as you do with thread. You can go through your piece more than once to make your piece stiffer, but you don’t have to. You do not have to wax these cable threads. You can wax them, however, if you want, to increase your thread tension, and add more security against the sharp bead-holes cutting the cable thread.
The cable thread pieces are stiffer than the regular beading threads, but drape better than the cable wires. You tie knots with the cable threads, like with regular beading threads, to secure your clasp. Since you still rely on a needle, using the cable threads goes more slowly than using the cable wires. The PowerPro is a little awkward to use. I really like the FireLine and Spiderwire.
Threads(nylon beading thread)
Unfortunately for me, and for many beginning jewelry artists, the choices were not only about choosing thread instead of cable thread or cable wire. There were many types and brands of beading threads, each with some pros and each with some cons.
The original nylon beading thread is Nymo. Nymo was first developed by the shoe industry to attach the bottom of your shoe to the top of your shoe. It is widely used in upholstery. In the 1980s and earlier, if you wanted to buy Nymo, you bought it on a gigantic wheel — a five lifetime’s supply for us. As beading got more popular, Nymo packaged their thread on smaller and smaller entities, starting with a cone (a little bigger than a fist), then a spool (a little bigger than a thumb), and then a small bobbin. More recently the spool has been replaced by a large bobbin.
It turns out that the company could not get the same product onto a small bobbin. So, the thread on the small bobbin is weaker than the thread on the large bobbin, spool and cone. However, usually only white and black colors are available on the entities larger than the small bobbin.
Nymo is very strong. I suggest, if you have never worked with Nymo, to cut off about a 3 foot length, and try to pull on it and break it between your hands. It will break, but you’ll feel how tough it is. And in bead stringing, we typically go through each bead at least 3 times, so you have 3 thicknesses of this thread inside your piece.
When they make Nymo thread, it is a beige color. To make black, they dye the thread. The black dye tightens the thread, and makes it stronger. To make white, they bleach the thread. The bleach weakens the thread, so white is weaker than black. To make a color thread, they first bleach the thread white and then add a color dye. These color dyes further weaken the thread. So colors are weaker than white, and thus weaker than black. The colors of the thread, however, are consistent from batch to batch.
Nymo comes in many sizes. From smallest to largest, these include: OO, O, A, B, D, F, and G. The most popular and often used size is D (.008″). For a few years, the manufacturer, which had been stamping the size on the bobbin’s side, decided not to stamp any size on the bobbin. I guess people complained, understandably so, and they returned to their original practice.
C-Lon is a newer thread. When they make C-Lon, whatever color it is, that is the color the thread starts as. So, all the colors AND the white AND the black are equally as strong. However, the color from batch to batch will vary, sometimes widely. Overall, we like C-Lon better, particularly for the white and the colors. Black C-Lon is equivalent in strength to the Black Nymo. For white and colors in C-lon, these are stronger than their Nymo compatriots. One drawback to C-Lon is that the ends of the thread fray easily, making it more difficult to get your thread into the eye-hole of the needle, than with Nymo. C-Lon only comes in two sizes — AA (smallest) and D (thickest).
ONE-G is a premium beading thread and is similar in strength to C-Lon. I think its best attribute is that it has a spring-i-ness to it, that makes it much less tiring to use, than Nymo or C-Lon. ONE-G only comes in size D and only in about 12 colors.
Silamide is a pre-waxed thread. The pre-waxing allows the thread to get less tangled up when you use it. However, Silamide breaks very easily, so I don’t recommend it. Why put in all that time into a project if there is a good chance your thread will break?
Beading thread is shaped flat like a ribbon. Sewing thread is shaped round. Sewing threads are not strong enough to use in beadwork.
When choosing a thread to use, sometimes you have to make some compromises and trade-offs.
From one beader:
After finishing the pendant, I thought the necklace needed something more — like individual seed bead daisies attached to a handful of the beads in the necklace. I was working on the necklace on a Sunday night and told my friend I’d have it for her at work on Monday. I had limited thread options at hand: white Nymo or brown embroidery thread. The Nymo would have been a better thread choice, but the white was not aesthetically pleasing against the dark beads. So, I went with the brown embroidery thread. How bad could it be? Ugh! It was so hard to handle and kept fraying. Once the piece came back from photography, I did end up redoing it with brown Nymo.
I find myself switching thread brands and colors from project to project. For bead stringing, I rarely use any other size than D. I most often use the color black, and when I want to use black, I usually grab my ONE-G or Nymo. When I use a color thread, I go for ONE-G, if they have a good color; otherwise, I use C-Lon. If my piece uses any kind of crystal bead, I use FireLine or Spiderwire. There is a cable-thread product called C-Thru-B, which goes in and out of production, but is an excellent product to use with crystal beads and other beads with especially sharp holes.
Color Effects of Thread
Thread color affects the viewer’s perception and evaluation of the piece. People see the thread at the knots. They subconsciously see the threads between each bead. If you are using transparent or translucent beads, the thread color will affect the color of these beads. You can do the same piece using different colored threads, and each of these pieces will look very different.
Same bead, different colors of thread
Black always works. Can’t see the knots, only shadows. This makes your piece seem older, richer, more traditional. It gives your piece a patina.
White makes your pieces brighter, sharper, more contemporary looking.
Colors: Most people select a color that is the same or similar to the predominant color in the piece. In this case, there is no color affect. However, you can pick contrasting or complimentary colors, such as using an amethyst colored thread to string peridot colored beads. You can also change the colors of your thread as you work thru your piece.
Needles
The eye of a beading needle is shaped like a rectangular funnel (the opening on one side of this funnel is larger than the opening on the other). Beading thread is shaped like a ribbon.
The eye of a sewing needle is round or a larger, rounder opening. Cotton sewing thread is round.
There are many styles of beading needles. The most used ones include:
English Beading Needles (Size #10 is good for bead stringing projects; Sizes #10 and #12 are used most often in bead weaving. There’s also a size #11.)
I like these because they have a little, but not too much, bend to them. They are stiff enough to push through your beads, but can bend a little to take some corners, or to get into the holes between two beads on a string.
Some people like to use Pony brand, rather than the English Beading Needles. Pony needles are made in India. They are a fraction of the cost of the English ones. However, they break very easily. I get too frustrated with my needles breaking too frequently, so I use the English.
Other people like to us Japanese beading needles. These have similar durability to the English ones, but are very stiff and lack that useful “bending” property that I prefer.
These needles come in many sizes. The #10 is the biggest, and the size of the eye hole relative to the needle is proportionately much bigger than that in the thinner sizes. You will also find Size #12, Size #13 and Size #15.
TULIP needles: These are the top of the line quality needles. They are made in such a way that they bend easily when you want to maneuver them through a bead, but straighten out after you have made your thread pass. A little pricey, but worth it, in my opinion. These come in several varieties and sizes.
Sharps Needles (shorts) Sharps needles are English but are shorter and considerably stiffer than regular English Beading Needles. These needles are primarily used in bead embroidery, where you have to push the needle through fabric, and a stiffer needle works better here. Some people like to use these for everything, but these are a bit too small for my hand. My hand cramps up when I use them.
These come in Size #10 and Size #12.
Loom Needles (long) Loom needles are longer than regular English beading needles. When you do loom work, you want to get as many beads on your needle as you can, when passing back and forth, to minimize the chances of snagging a warp thread with your needle.
These come in Size #12.
Big Eye Needles When your stringing material is ribbon or fabric or yarn or string, you would use a Big Eye Needle. This needle consists of two flexible needles, soldered at each end, and which open up to form a big eye. You wedge the end of your stringing material into one end, and this becomes your trailing end as you string your beads.
These come in a 2” length and a 5” length.
Twist Wire Needles Twist Wire Needles, sometimes called Collapsible Eye Needles, are used when you can’t get your stiff needle through, and you need to pass through a bead-hole one more time. You take your stiff needle off your thread, and re-thread on the Twist Wire Needle. This will usually go through a hole about three more times, before it begins to unravel. These needles come in many sizes, from Very Fine, Fine and Medium to Heavy and Extra Heavy.
Needle Threaders These work with sewing thread and needles, but not really with beading thread and needles. When you buy a kit of beading needles at a craft store, they usually come with needle threaders. These won’t work with beading needles. You can get the threader through the eye of the beading needle; however, when you try to pull it back through with the thread, it’s too thick and won’t come back out.
It’s always a good idea to have two or more beading needles on hand. They break. You don’t want to find yourself in the middle of your project and having to run to the store get another needle.
And you will occasionally poke yourself with the needle. Occupational hazard.
Hiding The Knot. When using thread, the knots are so small, that you don’t see them on the finished piece. This is especially true when using Black thread. With black thread, people see a shadow.
When using thicker cords and stringing materials, if you want to hide the knot, use a bead with a larger hole on either end, so that the hole swallows the knot. Or slide a crimp cover over the knot, so it seems like there is a bead there.
Getting Your Thread Onto Your Needle
Most people try to push the needle onto the thread. This works, but it takes a lot longer than what I am going to suggest. I like to hold the needle steady and pop the thread into the eye of the needle.
First, when using thread as your bead stringing material, you always begin with a wing-span (arm-to-arm’s) length, which is about 6 feet. Six feet of thread will make an 8”-bracelet.
Next, on one end of your length of thread, pinch it between your thumb and forefinger, with a little bit of the tail sticking up.
Pull the thread slowly down so that the top of the thread is at the same level as the top of your forefinger.
We are going to play with this thread. Pinch the thread to pop it up higher, and then pinch the thread to pop it back lower, just below the surface of your forefinger. Do this a couple times so that you can lock into your mind an image of where the thread will pop up..
Bring your needle down parallel with your forefinger. Hold the eye of your needle right above where your thread will pop up. Don’t move your needle. Pinch the thread to pop it right into the eye hole of your needle.
When threading your needle, often it is useful, if your thread is a dark color, to work over a light-colored surface, and if your thread is a light color, to work over a dark-colored surface.
NOTE: If you are using a cable thread like FireLine, this cable thread is round, not flat. To get it on the beading needle, you often have to flatten the end of the cable thread a bit. Run the end between your finger nails, or a tweezer, or a chain nose or flat nose pliers. Don’t pull it through your teeth; it can cut into your teeth.
Wax. Wax. Wax.
A really good artist will wax their thread. Even if the thread says it’s been pre-waxed, you want to re-wax this thread.
We wax our thread to make it strong, less likely to fray, to straighten and stretch it a bit before using, to waterproof and protect the thread from weird body chemistries, from cosmetics, perfumes and hair sprays and from pollutants in the area, as well as to glide through the beads better, and to fill in the jagged edges of the hole of a bead to make it less likely to cut the thread.
There are different types of threads and conditioners. The primary choices are among pure beeswax, synthetic beeswax (also called microcrystalline wax), and a product called Thread Heaven, which is a thread conditioner, not a wax.
Thread Conditions make the thread less likely to get tangled up and knotted, while you ware working it. Each time you pull the thread through the bead, static electricity builds up. The conditioner prevents this from happening. But it is not a wax. It doesn’t do anything the wax will do.
I suggest you always use beeswax, either pure or synthetic. I do not recommend thread heaven. Natural bees wax will protect the thread for 150 years. The synthetic wax is a little more expensive than the pure wax, but I prefer it. The synthetic does everything the pure one does, only better, and lasts an even much longer time.
Waxing the thread takes very little time, and it can add years to the life of your bead art.
When waxing, we pull our thread through the wax two times. Then we take our two fingers, pinching the thread, and slowing moving down the full length of our thread. Our body temperature melts the wax into the thread. Our fingers also knock off any excess wax on the thread. Always pull by the thread, not by your needle, when waxing.
To feel the effects of waxing, try this:
Take an arm’s length (about 6 feet) of nymo D or C-Lon D
Thread it onto a Size #10 English beading needle. Double it up, so that you now have your length of thread in half, with two equal lengths extending from either side of your needle’s eye hole. At the needle end, wrap the thread around your forefinger a couple times. When we pull the thread through the wax, we want to pull by the thread, and NOT by the needle.
Wax the thread twice, then take your two fingers and slowly go down the thread, allowing your body temperature to melt the wax into the thread. Now un-double your thread. Move your needle up to one end, leaving about an 8–10” tail. Take your two fingers, pinching the thread, and feel down the length of the thread to find the area that was wrapped around your finger, and did not get waxed. Your fingers will slip. Now wax two more times from that area on down. Pinch your thread at one end, moving your fingers down the length to melt the wax into the thread.
DOUBLING YOUR THREAD
Some people like to work with a doubled thread. I find this awkward and difficult to control. However, I leave this up to you.
ADDING THREAD
If you are making a piece, like a necklace, at some point, you will run out of thread. After all, 6’ of thread does about an 8” bracelet.
When the length of your thread looks like it will be too short to continue, then you need to tie off and anchor this thread. If you are at one end of your piece, you can tie the thread off to your clasp component. If you are somewhere in the middle of your piece, you would tie off your thread to the spine (that is, the thread already running through your piece. It is good to tie a double knot (two overhand knots).
You never cut your thread at the knot. So, after you have tied your knots, you will run your remaining thread through some beads. Then cut the thread as close to the bead-hole you can get. When you are adding new thread, you will go through a few beads before tying that knot.
MAKING A BRACELET USING NEEDLE AND THREAD
Basic Steps
We are going to string a simple strand of beads, using needle and thread. If you wanted to do some planning and design work, for a fancier arrangement, you would play with your beads on a Bead Board, and temporarily string them, using bead stoppers or hemostats on either end, to secure them in place, until you are satisfied with your layout and design.
We are going to do everything in 3’s. We are going to go through the beads three times. We are going to tie 3 knots each time we reach and/or return to an end.
Supplies: 1 strand 4mm round fire polish or druk beads Nymo, Size D thread in black 2 size #10 English Beading Needles Toggle Clasp Bees Wax
Scissors Work Surface OPTIONAL: Bracelet Sizing Cone OPTIONAL: Bead Board OPTIONAL: Bead Stoppers or Hemostats
LAY OUT YOUR BEADS ON A BEAD BOARD OR WORK SURFACE.
1. THREAD. Cut a length of thread measured from hand to hand of your outstretched hands. (about 6 feet)
2. NEEDLE. Thread onto a #10 English beading needle. Leave an 8–10” tail. You will need this length of tail in order to finish off your piece.
NOTE: Unlike with cable wire, where you deal with your tails immediately, you deal with the tails from needle/thread work at the very end of your project. So these tails will always be annoyingly in the way while you are making your piece.
3. WAX. Wax your thread
4. ATTACH FIRST CLASP PART. On the end opposite the one with the needle, string on the largest piece of your clasp set. Leave about 8–10” of a tail. Don’t short-change yourself on the tail length. You will need 8–10” to finish off your piece at the end.
Tie 3 over-hand knots. Thus, you take the tail, go over the spine, under the spine, and back up through this developing loop. Pull tight.
5. STRING YOUR BEADS. Using your needle, put enough beads on the thread until you have made the correct bracelet length, as you want it. Push these beads down so they are flush against the clasp.
The best way to get the beads on the needle, is to use one hand, hold your needle, and spear the hole of your target bead, lifting it up and letting it slide down a bit of your needle. Do this again and again, until you have 4 or more beads on the needle.
Then take your other hand, and push the beads all the way down to your clasp, tied off on the other end. If you can use only one and to pop your beads onto your needle, then you will increase your speed. But if you have to use two hands to get your beads on the needle, that’s OK.
Do NOT string the beads over the tail. The beads, with needle and thread, are strung over the spine only. We deal with the tails at the very end of the process. [This is unlike with cable wire, where we cover both the spine and the tail at this point.]
6. TEST LENGTH. Test the length of the bracelet on your wrist or against a sizing cone before tying off the second end. Make any necessary adjustments, such as adding or subtracting beads.
Remember, when you add the 2nd clasp part, you could be adding more length to your piece. With a toggle clasp, you will be adding about 1/2″ more to the length of your piece at this point.
7. ATTACH 2nd CLASP PART. You will be taking the second (and smaller) part of the clasp set and tying this off.
REMEMBER: After this point, you will not be able to make any changes in design, length or ease.
You need to maintain your tension on the beads while doing this. We are going to be using a fancier version of the simple overhand knot. This fancier version gives you more control over your thread tension. If you don’t want to do this, or forget how to do this, you can always tie simple overhand knots.
Let’s begin.
You are the artist. Your finger is your easel. Your thumb is your clamp. The thread is your canvas. The beads are your paints.
a. Put the length of beads over your forefinger, (from over there towards you) with the already tied-off part of the clasp at the top, and laying in front of your finger, closest to your body.
b. Push the clasp part off to the side, and clamp the beads, the clasp part, and the tension all in place with your thumb.
2. Make a U shape with your thread, and tuck under your thumb to hold in place. The U is actually part of your knot.
d. Take the end with the needle, and come from behind the string of beads (from outer space towards you), and under the beadwork, but stay over the U-thread and your working thread.
DO NOT take your needle through the U. The U is part of the knot, and you don’t want to tangle up your working thread with your knot.
Don’t pull your bracelet up into the air while working on it. Leave most of it resting on your work surface, pulling the end you are working on up towards you a bit.
e. Pull, pull, pull, pull, pull and watch the loop getting smaller. Before it gets too small, put your needle down, and work the rest with your hand. Move this ever-decreasing-in-size loop in place between your first bead and the clasp part. You’ll have to let go with your thumb until you have the loop positioned. Clamp down again with your thumb.
f. Pull tight, and pull out the U.
g. One more pull — give the thread a good tug — to tighten things up. With your fingers on one hand, pinch the clasp part and hold tight and steady. With the fingers on your other hand, grab your working thread and pull the clasp part tightly against the first beads. You don’t want any thread to be showing.
The first time you do this step is the most important. After this, your clasp is locked in place close to that first bead.
h. This is your first knot.
i. Repeat this fancy version of an overhead knot two more times
NOTE: Your knots are tied around the thread or your previous knot. You could also, instead, have gone back through the loop coming off your clasp component, but this is not necessary. With our instructions, less thread and knots will show at the clasp.
8. 2nd Pass With Needle/Thread. Take your needle, and thread all the way back to the other side of your bracelet (where the larger part of your clasp is).
You cannot do this in one step. You will have to pull your needle out every inch or two. When you pull your needle out, give your thread a tug. You don’t want it to bunch up inside the bead holes.
9. Three More Fancy Knots. Tie three of these special knots with the U.
When you get to your second side, there will be an 8–10” tail annoyingly in the way. Push this behind your hand, so it doesn’t get tangled up with your working thread, as you are trying to tie this fancy knot.
10. 3rd Pass With Needle/Thread. Take your needle, and thread all the way back to the other side.
11. Three More Fancy Knots. Tie three more of these special knots with the U.
12. Finishing Off The Tail. Take you needle and thread, and thread back about 2–3” of beads, and pull your thread through.
At this point, you have a lot of thread and knots near and in the hole of that first bead next to the clasp. You may have to push your needle through and out of that first bead first, and then go back through several other beads.
13. Can You Pop The Knot Back Into The Hole Of The First Bead? Pinch the beads right below the clasp end with your thumb and forefinger. Push these away from you, and, at the same time, pull the tail-thread towards you. You are trying to have the knots next to the clasp pop into the hole of the first bead. Usually you’ll hear and feel a pop. But not always. If you were able to maintain a very tight tension throughout, there may not be a pop.
14. Trim The Tail. Pull the thread away from you, and cut it as close to the bead hole as you can get.
15. Finish Off The Tail On The Other Side. Take your needle off the thread, and put the remaining tail of thread onto your needle.
Repeat steps 12 thru 14.
Give It The Once Over…
Once your bracelet is done, look it over carefully. Be sure your thread, where you trimmed your tails, isn’t showing. Be sure that it has sufficient ease.
Needle and thread work loosens up a bit with wear. If your tension is a little on the tighter side, then this will loosen up. If your tension is loose at this point, you may want to run another thread through your piece, anchoring it to both ends, to tighten things up.
How Do You Clarify What You Do In Your Practice As A Jewelry Designer? Building that relevance into your work
What do you (or will you) say to people who ask you what you do for a living? When you say, “Jewelry Designer”, you probably get a “That’s nice” or “Oh, you make jewelry,” and perhaps a far-away look. Most people can’t imagine exactly what you do. Their images and experiences with jewelry and what it can look like, the materials available to use, the techniques applied are somewhat limited. Not everyone knows you can craft jewelry by hand, not just by machine.
It can be difficult to define jewelry design. What you do as an artist and designer may involve several different kinds of tasks. Your process may be conventional or unconventional. And it’s not just the “What do you do” aspect of the question, but the concurrently implied “Can you make a living at this” aspect of the question, as well. It’s almost as if they are about to say, “What do you really do?”
The response you want to come up with is your personal understanding and recognition about your passion for design, and all the things that drive this passion. Your excitement in telling your story will become infectious, and, while they still might not comprehend everything you do or the how and why you do it, they will certainly see that you are a jewelry designer, one who is intent on achieving some level of success within the profession.
Your Practice, and how you define and live and succeed in it depends on gaining some clarity in terms of…,
(1) Having a definition of what success as a designer means to you
(2) Developing a production (and marketing) routine
(3) Creating a consistent and coherent body of work
(4) Being very organized
(5) If selling or exhibiting, taking a multi-venue approach
(6) Developing a Criticality where you are reflecting, evaluating, validating, legitimizing, being very metacognitive
(7) Self-Care and finding balance in your life
(1) Defining Success
Not every designer is going to define success in the same way. In fact, there will be dramatic differences. Some people may want to focus on applying their creative skills. They search for artistic excellence. Others may want to make money. They want monetary gain and, perhaps, financial stability. Still others may want to be a part of a social network of other creative types. They might want a support network, seek collaboration, or find recognition.
Some people want to do this full time, and others part time. Some want to earn enough money to pay for their habit; others want to make money to supplement their income; still others want to make enough money to be self-supporting.
Success is all about you. What do you want? How much effort and organization will it take to match your ambition and goals? How much time and money do you want to invest in your education and development? Are you aiming to be a crafter, an artist, or a designer?
Success depends on many factors. But key to all, and foremost, is that you brainstorm with yourself, be brutally honest, and list the goals you prefer and want to achieve. Prioritize these. More successful designers find some balance among creativity, business, and recognition. But your ambitions may be different, and just as legitimate in finding success.
Know that achieving any level or definition of success will take time and effort, often sacrifices. The jewelry designer should set expectations and work strategies accordingly.
(2) The Day-To-Day Routine
While everyone has their own process and their own flow, more successful designers establish some kind of work routine. They allocate a specific work space within which to create. They keep their inventory of parts and finished pieces very organized. And, key here, they set up a schedule for (a) researching ideas and inspirations, (b) working in a production mode, c) presenting or marketing their work to others, (d) reflecting on their practice.
Periodically, evaluate your process. Are there things you can do to improve your efficiency or effectiveness? Can you better manage your productivity? Do you work better at a certain time of day, or day of the week? Have you programmed in breaks? Is there a comfortable balance between work time and break time? Would it be helpful to take the last 15 minutes of your day to set up for tomorrow?
Plot out your weekly schedule on a calendar or spreadsheet. Set some objectives about how many pieces you want to finish per week or per month. If interruptions, say from friends or family, get too annoying, make them aware of your schedule and ask them to help you protect your creative time and space.
It is important to note here that there is a fundamental tension between productivity and creativity. The former tries to put you in a box. The latter tries to keep you from getting stuck in a box. This can be frustrating.
Yet artists and designers, overall, who are able to provide some structure to their creative time tend to be more successful in their practice. These artists and designers set a routine and schedule for both making jewelry time as well as thinking about designing time. They also structure in time for introducing their ideas publicly as well as reflecting on the efficiency and effectiveness of everything they do — tangible and otherwise.
(3) Creating A Consistent and Coherent Body Of Work
Jewelry designers are free to create whatever they want. And usually, novices would be wise to try out a lot of different techniques, and use a lot of different materials, and create a lot of different designs. Think of this as play and experimentation. It’s how you learn to be a designer.
But as you develop more as a designer, it makes more sense to set some limits and begin to define a personal style, coherency and brand identity.
Your style reflects what you are passionate about. It may focus on a particular technique, material or design. Or it may focus on integrating and combining several things. But with all the things you do, there is some coherence to it. It becomes more associated and identified with you and you become more recognized with it. The consistency ties you to your work.
This doesn’t limit variation and creativity in your work. It primarily means that wearers and buyers and collectors of your jewelry can sense the artist’s hand, that is you, reflected by the pieces you create.
Coherency has several dimensions to it. The designer achieves a level of coherency in how the majority of these dimensions, not necessarily all dimensions, are reflected in any one piece. Thus, the designer still has a lot of room for variation in their work and style.
These dimensions of coherency about which designers are selective include,
– The choice of materials
– The choice of techniques
– How pieces are presented, displayed, organized, situated with other pieces
– How pieces and collections are named
– Packaging
– Color palettes
– The use of forms and themes
– Personalization, differentiation and originality
– The use of negative vs. positive space
– The use of point, line, plane and shape
– Arrangements, placements, distributions of design elements within the piece
– Control over light, shadow, bright, dull
– The marriage and resulting tradeoffs between aesthetics and functionality
– Silhouettes
– Quality in materials, quality in craftsmanship, quality in finish, quality in presentation
(4) Organization
Good organization involves
(a) Inventory (how you organize, track and replenish it)
(b) Work space (how you create productive areas for creative work, business and creative reflection)
c) Bookkeeping and accounting (how you manage your finances)
(d) Business logistics, such as researching venues, getting to venues, tracking your pieces, shipping, marketing, web-presence and social media management (how you manage the other business aspects of what you do)
Good organization will help you avoid a lot of frustration and disarray. Learn to use spreadsheets and apps. These will save you a lot of time and minimize a lot of grief and worry. You’ll have more time to create, and need less time to keep things organized and up-to-date.
Think of and treat your inventory of materials, and all that it takes to achieve a satisfactory level of quality in your pieces, as investments, rather than costs. It gets more productive to reflect on What Is Your Return On Investment (ROI)?, rather than on What Does This Cost? This will go a long way in clarifying for you what is important, and what is less so, and how to prioritize things in the face of limits on time and other resources.
Your workspace might be a part of a room, it might be an entire room in your home, or even a complete studio space outside your home.
Divide your “work space” into three distinct areas: where you create, where you handle all the business things, and where you relax, think and reflect.
As you develop your work and related spaces, you should try to anticipate what it will take to scale each of these up, as you get more established as a jewelry designer. Are your spreadsheets and computer apps robust enough to grow with your developing career and business, as well?
(5) A Multi-Venue Approach Towards The Creative Marketplace
Successful jewelry designers are able to get the visibility and legitimacy they want and deserve. They know what to expect when exposing their work publicly within the creative marketplace.
They are good at communicating their ideas and their value, when approaching art and craft show vendors, stores and boutiques, galleries, and buyers and collectors, or applying for art grants or doing demonstrations. They are able to get articles written about them in blogs, newspapers, magazines and jewelry editorials. And, very importantly, they use a multi-venue approach (diversification) when introducing their jewelry into the marketplace. At a minimum, this multi-venue approach will include both an on-line strategy and a bricks-and-mortar strategy.
Legitimacy as an artist requires massive exposure, most often in diverse locations and venues. It is unusual for a single venue or location, whether you are looking for exhibitions or for sales, to be sufficient for a designer to become successful. You will need to have your jewelry pieces in many venues. There are many online directories and other resources to help you find the wide variety of venues useful to the further development of your jewelry design career.
What To Expect When Exposing Your Work Publicly
No jewelry designer works in a vacuum, and no piece of jewelry is complete until it has been shared with an audience.
No wearer or purchaser of jewelry is going to see the piece as merely an object of adornment. They will interact with the piece in a much more intimate way, and very much so influenced by the jewelry creator and all the choices made in design.
Part of the jewelry designer’s development as a professional involves an ability to anticipate and understand how various audiences express desire and how various audiences judge a piece of jewelry to be finished and successful. Jewelry is here to amaze and intrigue. It is here to entice someone to wear it, purchase it, show it around. It is here to share the inspiration and prowess of the designer with those who see, feel, touch and inhabit it.
The more successful designer takes the time to explore how an audience is engaged with the piece. The designer learns insights in how any piece of jewelry evokes emotions and resonates with others. The designer is very sensitive to the experience people have at the point of purchase or gifting. Finish and presentation are very important. Acquiring jewelry is special and unique a process. Jewelry is not something we must have to meet some innate need; rather, it is something we desire because it stirs something in us.
Approaching Stores and Galleries
Although some jewelry designers may feel uneasy mixing art with business, for most it is a necessity. You do not have to sacrifice wonder for reality. Most designers sell their pieces, so recognizing the things about coordinating art with business become very important.
Typically small stores and boutiques, websites and online sales platforms, and galleries will sell your jewelry, either outright, or on consignment. Their goal is to turn a profit, and they are at greater risk than the artist. It is the venue that displays, promotes, prices, trains employees to talk about your jewelry to customers, and keeps the pieces clean. Available selling-space is always limited. When your jewelry takes up space in these venues, it is an opportunity cost to the business — they lose the opportunity to carry someone else’s work which might be more appropriate to the setting, or might sell better.
There are different types of stores, websites and galleries. Each satisfies a different market niche for jewelry. Each has a different level of understanding about what jewelry really is, and all the choices the jewelry designer has made to design and create each piece.
When approaching stores or galleries to display and sell your pieces, it is critical that the artist understand how each specific venue functions, who their audiences are, and what the attendant risks to them are, should they decide to exhibit and/or sell your pieces.
The first step is to be your authentic, passionate self. Your jewelry will not speak for itself. So, in spite of any feelings of vulnerability you might have when approaching stores and galleries, you will need to talk about yourself and your jewelry. You do not want to feel “salesy” when speaking with business or gallery owners and representatives. You do not want to feel pushy. Or desperate. But you want them to get to Yes.
You speak to them on their terms. They want to know the real you. What excites you. The history behind the design choices you make. Your understanding of yourself as an artist, and your understanding of your virtual client, her desires, wants and motivations. How do you connect to your audience through your jewelry?
o Who are your best customers likely to be? o How would you describe them: demographics, shopping behaviors, wants and desires? o Why are they attracted to your work? o How and where do they find out about you and your work? o What is your Getting Started story? o How would you go about persuading someone to buy a piece of jewelry you made — what’s in it for them? How does it connect with them emotionally? How would it make their lives better?
Do some research ahead of time. The internet has a wealth of information you can pull up. Before you meet with them, get an understanding of the types of jewelry artists and their materials they carry in their venues. These venues are always on the lookout for new talent. They are most likely to say Yes to a jewelry designer whose style and materials fit in, but do not duplicate, what they already are showing.
Also research who their customer base is. They are most likely to say Yes to a jewelry designer whose audience either mirrors their existing customer base, or incrementally adds to and expands it at the margin. They most likely will not want to spend resources (and add risk) by going after a completely new and different customer base.
One more thing. You can either push your way in, or use pull to get in. For most of us, particularly when we are getting started, have only push at our disposal. We might cold call, or set up a formal interview, or initiate a conversation with someone at a gallery opening or art show.
But pull always works better. Here we leverage something or someone to get to the right place or person at the right time. An established designer or academic might set up an appointment for you with one of their contacts, for example.
Influencers
In today’s world, there is a manic competition for attention. Then, also, a frenetic effort to retain and manipulate that attention. Attention creates value. Often, it is difficult for the individual jewelry artist to get a leg up in this world without some significant help. Again, as mentioned above, if you can use pull, you’ll go farther, faster than if you have to rely on push.
Influencers are one of the backbones of internet culture and one way to use pull. Their business model centers on ways to shape everything we do in our lives from how we shop to how we learn to how we dress. Influencers are part micro-celebrity and part entrepreneur. They are opinion leaders and have been able to garner a large audience. They have proven themselves to be able to exploit how people distribute their time and attention.
Influencers typically work on a quid-pro-quo basis. In exchange for some products you give them, they promote them. Sometimes a fee may be involved. They take photos, they interact with audiences, they get your message out on different platforms, they sponsor content.
The Value of Collaboration
It can be so easy for any jewelry designer to get so wrapped up in creating things that they isolate themselves. But this is not the ideal situation.
At a minimum, it is very helpful, and very healthy, to have a support group. People you can talk to and talk things out with. People who can give you good feedback.
It is also very invigorating to collaborate on a project with someone else — A2A, that is, artist to artist. You can get an infusion of new ideas, sensibilities and strategies. You can get challenged. You become more self-aware of your own styles and preferences. You come up with new ideas about coordinating your own authentic, creative self with that of someone else.
Maintaining A Client Base
Much of any jewelry designer’s success comes down to maintaining a high level of visibility. Regularly keeping in touch with your client base is extremely important here.
Keep good documentation about who bought your pieces, when, why, for how much, and their address, email, phone numbers.
Maintain a web presence, either as a unique website, and/or a presence on social media platforms.
Create a mailing/emailing list, and use it frequently.
Have business cards handy at all times.
Do promotions to expand your mailing/emailing lists. Call to actions are very effective, such as offering a ‘discount coupon good for the next 7 days’. Or directing them to see your new pieces online by clicking a link.
Keep them up-to-date about where your pieces may be found, and what you are working on now.
(6) Criticality
Criticality is something you want to build into your Practice. It is not something to avoid or minimize.
Criticality is about making choices. It is about separating and confronting and going beyond your piece in order to build in that relevance jewelry needs as it gets exposed to the public.
Criticality helps you close the distance between the jewelry you create and the person it has been created for.
Criticality aids you in revealing the implications and consequences of all your choices. About materials. About techniques. About colors and patterns and textures and forms. Each form of jewelry requires endless and constant adjustments, and you should be very critically aware of what, why and how.
Criticality is necessary for you to continue to grow and develop as a professional jewelry designer.
Criticality is not a put-down of the artist. Rather it is a way of reflecting, evaluating and being very metacognitive of all the choices made in design and construction, and a lot of what-if envisioning and analysis of possible alternative choices. It is an exploratory thing. It adds understanding and comprehension.
Criticality assists in creating a dialog between artist and all the various audiences with whom the artist interacts. Towards that end, it is helpful to actively bring others into that criticality discussion, where we now have the prospects of many voices merging into a form. It can be difficult to be objective about your own work. And you may not be aware of how the quality of your work stacks up with others, and where it needs to be.
Legitimacy
Your legitimacy as a jewelry designer, your reputation, your visibility, your opportunities, to some degree, flow from this process of criticality. Legitimacy comes from both local and more general validation. Validation results from these processes of critical observation and analysis of your work and of how you conduct yourself within your practice.
Your various audiences that view your work critically, in turn, bring your work in contact with the external world. They look for a high level of coherence within the design and its execution. They describe it critically as to its qualifications for matching desire, establishing appeal, having personal or general value and meaning. For successful jewelry designers, this contagion continues, diffuses, and grows.
Legitimacy engenders a deeper level of confidence among artist, wearer and viewer. The relationships are stimulated, enriched, given more and more value. Jewelry is more than a simple object; it is a catalyst for interaction, for relationships, for engagement, for emotion. Legitimacy results in trust and validation.
With globalization and rapid technological changes, the jewelry designer is confronted with additional burdens, making the effort to achieve legitimacy ever more difficult. That is because these larger forces bring about more and more standardization of jewelry. They rapidly bring fashions and styles to the fore, only to scrap them, in the seemingly blink of an eye, for the next hot thing. They channel images of jewelry pieces around and around the world taking on a sameness, and lowering people’s expectations to what jewelry could be about.
If the products around the world are essentially the same, then the only thing the customer will care about is price. They won’t care who made it. They won’t care about quality.
Innovation begins to disappear. With its disappearance, the role of the jewelry designer diminishes. The jewelry designer becomes more a technician with no professional identity or concerns. The jewelry simply becomes the sum of its parts — the market value of the beads, metals and other components. There are few, if any, pathways to legitimacy.
That’s not what we want. And that makes it ever more important that jewelry designers see themselves as professionals, and develop their disciplinary literacy — fluency, flexibility and originality in design. Aspects of design which cannot be globalized. Or standardized. Or accomplished without the work, knowledge, skills, understandings and insights of a professional jewelry designer.
(7) Finding Balance — Self Care
Making jewelry and living a creative life can wear and tear on both your physical, as well as mental, health. It’s important that you have a plan of self-care and balance that you have thought about and structured ahead of time.
Take breaks. Play. Experiment. Take walks. Don’t isolate yourself. Develop a support system.
Exercise. Take good care of your hands, finger nails, wrists, arms, neck, back and eyes. If you need to read with glasses, then you need to make jewelry with glasses. There are lots of different tools specific to different situations — use them all. Elastic wrist bands, thumb-support gloves, elbow bands do great to preserve your fingers, wrists and elbows. There are lots of ergonomic tools and chairs and lighting. With a lot of metalsmithing and lampworking, you’ll need goggles, perhaps special lenses to filter out the glare of torch flames. Make these your friends.
There will be creative aspects to what you do, and administrative aspects to what you do. Find some balance between your right brain and your left brain.
Spend a lot of time feeding your creative well with ideas, inspirations, motivations and a deep appreciation for what artists do well.
Take some time to explore new materials, techniques and technologies.
There will be slow times and seasonal ups and downs. Plan ahead of time how you will occupy yourself during slow periods.
There will be times you will have designer’s block. You will be stuck, usually difficulty getting started, or if your piece is getting developed over a long period of time, some difficulty staying motivated. Develop strategies you can refer to on how to stay motivated, and on how to stop yourself from sabotaging your progress. It is important to know what you can and cannot control.
Train yourself with a mindset for rejection. Not everyone will like what you do. Not everyone will want to wear or buy the pieces you’ve invested your heart and soul in. That’s not your problem. It’s their problem. Don’t make it yours.
For the novice, all that excitement at the beginning, when thinking about making jewelry and making some pieces, sometimes collides with a wall of developing self-doubt. It’s not easy to quiet a doubt.
The jewelry artist organizes their life around an inspiration. There is some fuzziness here. That inspiration has some elements of ideas, but not necessarily crystal clear ones. That inspiration has some elements of emotions — it makes you feel something — but not necessarily something you can put into words or images or fully explain. You then need to translate this fuzzy inspiration into materials, into techniques, into color, into arrangements, into a coherent whole.
You start to make something, but realize you don’t know how to do it. But you want to do it, and do it now. However, to pick up the needed skills, you realize you can’t learn things all at once. You can’t do everything you want to do all at once. That initial excitement often hits a wall. Things take time to learn. There are a lot of trial and error moments, with a lot of errors. Pieces break. Combining colors and other design elements feels very awkward. Silhouettes are confusing. You might get the right shape for your piece, but it is difficult to get the right movement, drape and flow, without compromising that shape. Things take time to do.
To add to this stress and strain, you need to show your jewelry off. You might want someone to like it. To want it. To need it. To buy it. To wear it. To wear it more than once. To wear it often. To exhibit it. To collect it. And how will all these other people recognize your creative spark, and your abilities to translate that spark into a wonderful, beautiful, functional piece of jewelry, appropriate for the wearer and appropriate for the situation? Things need to be shared.
Frequently, because of all this, the artist experiences some sense of doubt and self-doubt. Some paralysis. Can’t get started. Can’t finish something. Wondering why they became a jewelry designer in the first place.
Doubt holds you back from seizing your opportunities.
It makes getting started or finishing things harder than they need to be.
It adds uncertainty.
It makes you question yourself.
It blocks your excitement, perhaps diminishing it.
While sometimes doubt and self-doubt can be useful in forcing you to think about and question your choices, it mostly holds you back.
Having doubt and self-doubt is common among all artistic types. What becomes important is how to manage and overcome it, hence, my idea of Channeling Your Excitement, so that doubts do not get in the way of your creative process and disciplinary development.
8 MAJOR WAYS JEWELRY ARTISTS FALL INTO SELF-DOUBT
There are 8 major ways in which jewelry artists get caught beginning to fall into that abyss we call self-doubt:
1)What If I’m Not Creative Enough or Original Enough or Cannot Learn or Master or Don’t Know a Particular Technique?
2)What If No One Likes What I Make?
3)What If No One Takes Me Seriously As An Artist And Designer?
4)I Overthink Things and Am A Bit of a Perfectionist.
5)How Can I Stay Inspired?
6)Won’t People Steal My Work?
7)Being Over Confident or Under Confident
8)Role Confusion
1. What If I’m Not Creative Enough or Original Enough or Cannot Learn or Master or Don’t Know a Particular Technique?
Everyone has some creativity baked into their being. It is a matter of developing your way of thinking and doing so that you can apply it. This takes time.
So does originality. At first, you’ll try different ways of personalizing projects. There are always things you can do to bring some aspects of originality to your pieces. This might be the choice of colors, or using a special clasp, or rearranging some elements in your composition. Again, as with creativity, the ability to be more and more original will evolve over time. It is helpful to think of originality, not necessarily as coming up with something completely new, but rather as differentiation — how you differentiate yourself from other jewelry designers.
For almost everyone, you don’t begin your design career at the height of your levels of creativity and originality. Yes, if you look around you, other people are more creative and original than you or have more skills than you. Don’t let these observations be a barrier to your own development as a jewelry designer. You get there through persistence and hard work. You handle your inner critic. You may not be there, yet — the key word here is yet. But you will be.
2. What If No One Likes What I Make?
We all have fears about how our creativity and originality are going to be evaluated and judged. We project our self-doubts to the doubts we think we see and feel from others. What if no one wants to wear my pieces, or buy my works?
We can’t let these outsider reactions dictate our lives and creative selves. A key part of successful jewelry design is learning how to introduce what we do publicly. At the least, it is the core nature of the things we create that they are to be worn on the body. Jewelry is a very public thing.
Turn negative comments into positive ideas, motivators, insights, explorations. Allow yourself some give and take, some needs to step back awhile, some needs to tweak. Jewelry design and jewelry making are iterative processes. They in no way are linear. Your outcomes and their success are more evolutionary, than guaranteed.
Distressing about what others may think of your work can be very damaging to your self-esteem. It can amplify your worries. Don’t go there.
Don’t become your worst critic.
3. What If No One Takes Me Seriously As An Artist And Designer?
Jewelry design is an occupation in search of a profession. You will find that a lot of people won’t recognize your passion and commitment. They may think anyone can design jewelry. They may think of jewelry making as a craft or some subset of art, not as something unique and important in and of itself. They may wonder how you can make a living at this.
The bottom line: if you don’t take yourself seriously as a jewelry designer, no one else will.
People will take you seriously as they see all the steps you are taking to master your craft and develop yourself as a professional.
4. I Over Think Things And Am A Bit Of A Perfectionist
Some designers let a sense that their work is not as good as imagined get in the way. They never finish anything. They let doubt eat away at them.
Perfectionism is the enemy of the good. It’s great to be meticulous, but emotionally, we get wrecked when anything goes astray, or any little thing is missing, or you don’t have that exact color or part you originally wanted.
Go ahead and plan. Planning is good. It’s insightful. It can be strategic. But also be sure to be adaptable and realistic. Each piece is a stepping stone to something that will come next.
The better jewelry designer develops a Designer’s Toolbox — a collection of fix-it strategies to deal with the unfamiliar or the problematic.
Overthinking can be very detrimental. You can’t keep changing your mind, trying out every option, thinking that somewhere, someplace there exists a better option. Make a choice and get on with it. You can tweak things later.
Yes, attention to detail is important. But so is the value of your time. You do not want to waste too much time on trivial details.
Be aware when you begin over-analyzing things. Stop, take a breath, make a decision, and move on.
5. How Can I Stay Inspired?
Designing a piece of jewelry takes time, sometimes a long time. That initial inspirational spark might feel like it’s a dying ember.
Don’t let that happen.
Translate that inspiration into images, colors, words, sample designs, and surround your work space with these.
Talk about your inspiration in detail with family and friends.
6. Won’t People Steal My Work?
Many jewelry designers fear that if they show their work publicly, people will steal their ideas. So they stop designing.
Yet jewelry design is a very communicative process which requires introducing your work publicly. If you are not doing this, then you are creating simple sculptures, not jewelry.
Yes, other people may copy your work. See this source of doubt as an excuse. It is a self-imposed, but unnecessary, barrier we might impose to prevent us from experiencing that excitement as a jewelry designer. Other people will never be able to copy your design prowess — how you translate inspiration into a finished piece. That is unique and special to you, and why the general public responds positively to you and your work.
7. Over Confidence can blind you to the things you need to be doing and learning, and Under Confidence can hinder your development as a designer.
Too often, we allow under confidence to deter us from the jewelry design and making tasks at hand. We always question our lack of ability and technical prowess for accomplishing the necessary tasks at hand. It is important, however, to believe in yourself. To believe that you can work things out when confronted with unfamiliar or problematic situations. It is important to develop your skills for thinking like a designer. Fluency. Flexibility. Originality. There is a vocabulary to learn. Techniques to learn. Strategies to learn. These develop over time with practice and experience. You need to believe in your abilities to develop as a designer over time.
With over confidence comes a naivete. You close off the wisdom to listen to what others have to say or offer. You stunt your development as an artist. You overlook important factors about materials and techniques to the detriment of your final designs and products. You close yourself off to doubt and self-doubt, which is unfortunate. Doubt and self-doubt are tools for asking questions and questioning things. These help you grow and develop as an artist and designer. These influence your ability to make good, professional choices in your career.
8. Role Confusion Jewelry artists play many roles and wear different hats. Each has its own set of opportunities, requirements, and pressures that the artist must cope with. It’s a balancing act extraordinaire.
First, people who make jewelry wear different hats: Artist and Designer, Manufacturer, Distributor, Retailer, and Exhibitor.
Second, people who make jewelry have different needs: Artistic Excellence, Recognition, Monetary Gain, or Financial Stability.
Third, the artist needs to please and satisfy themselves, as well as other various clients.
Fourth, the artist constructs pieces which need to function in different settings: Situational, Cultural, Sociological, Psychological.
Last, the artist must negotiate a betwixt and between situation — a rite of passage — as they relinquish control over the piece and its underlying inspirations to the wearer and the viewer, who have their own needs, desires and expectations.
This gets confusing. It affects how you pick materials and supplies. Which techniques you use. What marketing strategies you employ. How you value and price things. And the list goes on.
It is important to be aware (metacognitive) of what role(s) you play when, and why. Given the role, it is important to understand the types of choices you need to make, when constructing a piece of jewelry. It is critical to understand the tradeoffs you will invariably end up making, and their consequences for the aesthetic, emotional and functional success of your pieces.
Some Advice
While doubt and self-doubt can hinder our development as jewelry designers, some degree of these may be helpful, as well.
To develop yourself as a jewelry designer, and to continue to grow and expand in your profession, you must have a balanced amount of both doubt and self-doubt. Uncertainty leads to questioning. A search for knowledge. Some acceptance of trial and error and experimentation. A yearning for more reliable information and feedback.
Jewelry design uses a great deal of emotion as a Way of Knowing. Emotions cloud or distort how we perceive things. They may lead to more doubt and worry and lack of confidence. But they also enhance our excitement when translating inspirations into designs.
· Don’t let your inner doubts spin out of control. Be aware and suppress them.
· Be real with yourself and your abilities.
· Keep a journal. Detail what your doubts are and the things you are doing to overcome them.
· Create a developmental plan for yourself. Identify the knowledge, skills and understandings you want to develop and grow into.
· Remember what happened in the past the last time doubt got in your way. Remember what you did to overcome this doubt. Remember that probably nothing negative actually happened.
· Talk to people. These can be friends, relatives and colleagues. Don’t keep
doubts unto yourself.
· Don’t compare yourself to others. This is a trap. Self-reflect and self-evaluate you on your own terms.
· Worrying about what others think? The truth is that people don’t really care that much about what you do or not do.
· Don’t beat yourself up.
· Get re-inspired. This might mean surrounding yourself with images and photos of things. It might mean a walk in nature. It might me letting someone else’s excitement flow over to you.
Because the history of pearls has been very much a part of the history of nobility, there have been many customs and social expectations that have arisen around pearls. One of these has to do with styles and lengths.
Graduated: Beads are graduated in size, with the largest in the center, and decreasing in size on either side towards the clasp.
Uniform: All the pearls are within .5mm of each other in size.
Choker: One or more strands worn just above the collarbone, typically 15 1/2″ to 16 1/2″.
Princess: 18″ length
Matinee: 22–24″ length
Opera: 30–32″ length
Continuous Strand: A necklace without a clasp, typically over 26″ in length so that it can slip over someone’s head.
Bib: A necklace with many strands, each one longer than the one above it.
Rope: 45″ or longer, sometimes referred to as a lariat.
A necklace enhancer, sometimes referred to as a “necklace shortener”, is like a ring with a latch on one side and a hinge on the other, which lets you open and securely close it. These are most often used with ropes, where you circle the rope over your head 2 or 3 times, to wear like a multi-strand choker. The necklace enhancer clips over the knots in the encircling strands, to secure them together and in place. If you cannot find a necklace enhancer, you might be able to use an S-clasp to achieve the same end.
Odd vs. Even number of strands: This is a personal choice. Traditionally, it was believed that an even number of strands was inappropriate and bad luck. It would be very unusual to see any royalty wear an even number of strands.
Pearls will last a lifetime and beyond, if cared for properly.
Exposure to heat (such as the top of a TV set or near a stove or fire place), sunlight, and chemicals (such as those in hair spray, cosmetics and perfumes) can damage the nacre of pearls.
How do I safely clean pearls? Use a gentle detergent soap or mild shampoo without dyes and warm water. Be sure to clean around the hole of each pearl. Rinse thoroughly and let dry on a damp cloth overnight. Hot water can permanently damage your pearls. Do not let your pearls soak in the water. Let the pearls and string dry out for 24 hours before wearing.
Never wear your pearls when the string is still wet . Never hang the strand when wet.
Pearls are softer than other gemstones. Always wipe them with a soft cloth after wearing. Perfume oils, makeup, hair sprays and perfumes can spot and weaken their surfaces, as well as the cords they are strung on. Pearls should be put on after the application of cosmetics, perfume or hair spray. They should be the LAST THINGS PUT ON and the FIRST THINGS TAKEN OFF.
Pearls should be kept away from hard or sharp jewelry that could scratch them.
Pearls are best stored in a soft cloth pouch, or in a separately lined segment of a jewelry box, and out of the air and sunlight. Do not store in a plastic bag. The plastic emits a chemical which makes the pearl surface deteriorate.
Do not shower or swim in your pearl jewelry.
Ammonia and alcohol will ruin pearls. They both draw out the oils in the pearls which give them their luster. Keep pearls away from metal cleaners and tarnish removers.
The more you wear your pearls, the more beautiful they become. Pearls’ luster is maximized when worn often because the oils from the skin react with the surface of the pearl. However, you want your pearls to glow, not yourself; perspiration can be slightly acidic, and eat away at the pearl.
The air in many safes and security deposit boxes is very dry, and can cause pearls to crack or discolor.