Learn To Bead

At Land of Odds / Be Dazzled Beads – Beads, Jewelry Findings, and More

Archive for April, 2013

COLOR BLENDING: A MANAGEMENT APPROACH

Posted by learntobead on April 30, 2013

COLOR BLENDING:
A MANAGEMENT PROCESS

bw2fr1-8-fall-palette-bracelet2 - Copy - Copy

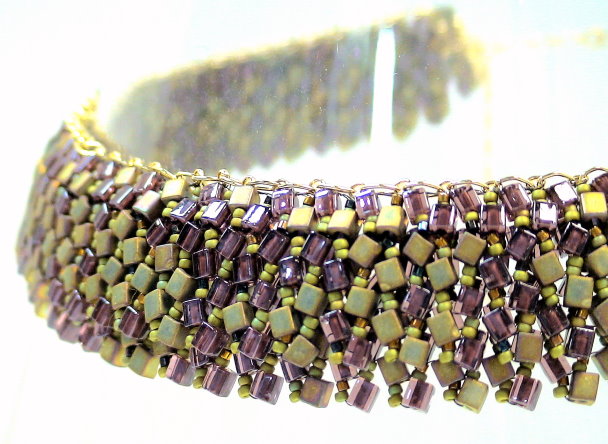
Color blending with beads is always challenging. It is not like paints, where you can merge and blend colors with ease. Beads are physical objects with set colors. You can’t mush them together, The transition from bead to bead in any piece, requires the eye/brain, when interacting and interpreting colors, to literally jump a cliff between the inevitable gaps of light between each bead. You want the viewer to have a satisfying, pleasurable journey as their eye/brain moves along that line of color-transitioning beads.

It is this transition from color to color that must be managed.

bw2fr1-spring-begin-garden-border - Copy (2)

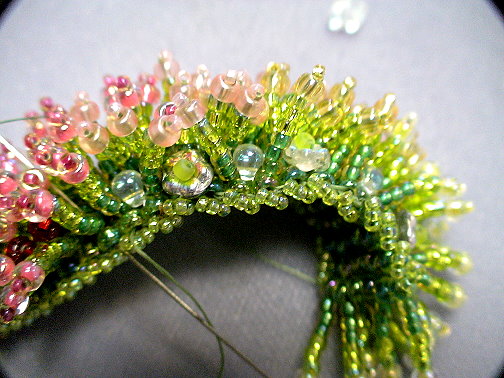
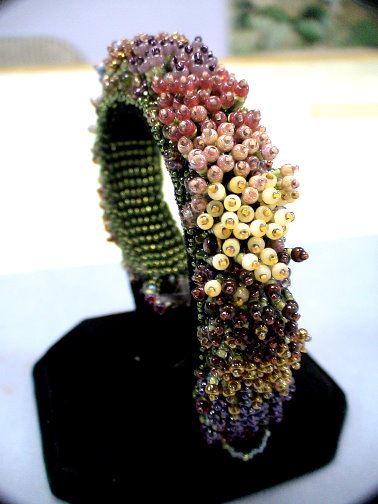
The Monet’s Garden Bracelet by Kathleen Lynam
One Example of a Color Blending Strategy

The Monet’s Garden Bracelet is a fun project that students love. It is for students who have some familiarity with bead weaving. Kathleen had been experimenting with various strategies for blending colors along the length of a bracelet. At about the same time, Beadwork issued a call for project proposals to be used in a book about what to do with your Bead Stash — all those small quantities of lots of different colors you have left over. This was the perfect type of project for color blending.

bw2fr1-spring-fringe-done-1

This bracelet teaches a mathematical approach for organizing several colors within a color blending scheme. Also presented is a simple math formula for personalizing your bracelet — that is, varying the width and length to suit your needs. The techniques here are Square Stitch and Fringing.

In her pieces, Kathleen loves to draw on nature’s inspiration. She gathers flowers and plants and bring them into the bead shop to match their colors as closely as she can. For her Monet’s Garden Bracelet, she developed instructions for both a Spring Palette, as well as a Fall Palette. However, the instructions would be as useful for a monochromatic palette, such as whites to grays to black, or a Southwest palette, such as turquoise to corals to reds. Use your imagination — and use up your bead stash, in the process!

Color Blending

Your goal is to move from one color to the next, in a satisfying way. You have many different kinds of choices to make, when managing a transition like this.

After you have chosen which colors you want to use, you need to decide what the color will look like as a “base” color, and what the color might look like as a “blend” color. With paints, this task is much, much easier, than with beads. It is not easy to blend beads, not least of which is because it is difficult to find the right colors needed to merge a color from base to blend and back to the base of the next color.
In this project, our strategy is to change the proportions of the base color as we move from one row to the next, until the proportions of the base to the blend in the first row are in reverse to the proportions to the blend to the base in the last transitional row. [And then, the blend becomes the new base, etc. along the bracelet.]

Besides varying the proportions, other options of blending that you have as a jewelry artist:

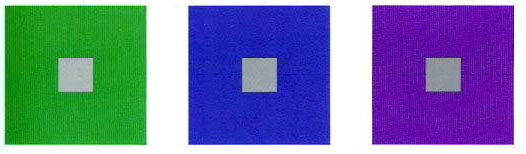
– Varying the brightness and dullness as you move from base to blend, such as finding colors with either more black, more gray, or more white in them

– Graduating the length of your fringes from row to row to create a sense of layering

– Varying the lightness and darkness as you move from base to blend, such as going from red to maroon or from red to pink

When choosing a set of colors, these do not have to match perfectly, but they do need to be coordinated. It is difficult if you vary the finishes of the beads too much. For example, transparent and transparent AB would not work well together in our scheme. Nor would transparent AB and luster finishes. Yet transparent AB, silver-lined and metallic colors do work well together, but only when you allow one of the finishes to be predominant.

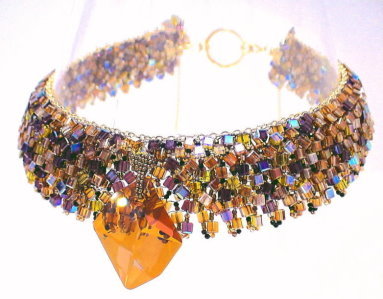
Kathleen:”This Monet’s Garden Bracelet project is about color blending, so I went all out in selecting 14 colors. I could have easily used fewer colors or more colors.
Using the color blending strategy presented for this project, with 14 colors, each color would require 4 rows. So, in a bracelet, the base of which consists of 58 rows, the maximum number of colors we could use would be 14 (that is, 58 divided by 4, with 2 extra rows). I decided that when I got to the end with my 14th color, I would blend it with the 1st color, and color an extra row at the beginning and at the end (thus, my two extra rows), both done in the 1st color. [An alternative for treating the end of the bracelet would be to transition back from color 14 to color 13, and finish off the rows.]

I use a formula discussed below in allocating the proportion of each color, row by row. I played with combinations of different finishes. I was not satisfied with plain transparent beads — not enough brightness or dimensionality. Using all one finish, such as an AB finish or luster finish, was interesting, but too monotonous. It didn’t look like “nature”. I settled on using primarily transparent luster-finish colors, with some transparent AB, transparent silver-lined and a couple of metallic and metallic iris finish colors. This mixing of finishes seemed better. These captured and reflected light in different ways, and drew the eye into the bead differently, thus adding considerable interest. Lastly, I used more matte finishes in my Fall palette, than in my Spring.

My transitions from color to color are relatively quick. Each transition from one color to the next takes up 2 rows. With 14 colors, thus 4 rows allocated for each, you would have 2 full color rows and 2 transitional color rows. However, I could have easily come up with a formula-strategy to make the transitions much slower. And I could have come up with a formula-strategy to transition 3 colors at a time, instead of 2.

For this project, I graduated my colors in a way that seeming pleasing to me. The main transition is from reds to purples to golds and topaz’s.

My flower stalks are two sizes. For the first and last stalks, four 11/0 seed beads long and then topped with an 8/0 and a 15/0 seed bead as the flower tips, about 3/8”. For the 2nd through 7th stalks, six 11/0 seed beads long and then topped with an 8/0 and a 15/0 seed bead as the flower tips, about 1/2″. Because I have used Japanese seed beads, the 2nd thru 7th stalks/tips are the same lengths. I tried a sample going longer (8 11/0 seed beads plus the 8/0 and 15/0 tip), but this wasn’t appealing to me. Also, I would not have gone much longer, because the stalks could more likely bend in half, instead of standing more firmly upright. It was important to use 3 color gradations in my flower stalk, rather than a single color. A sense of “movement” is one of the key beauties of this bracelet. As the bracelet is worn, and the fringe move, I want the viewer to have a sense of watching flowers blowing in the wind. To maximize this effect, I vary the colors from darkest near the base to lightest near the flower tip.

For the Fall Palette, I also vary the finishes from luster to color lined, to silver lined, to AB, so that they eye’s interaction with any glass bead will also vary. I want things to feel like that changing of nature during Fall.

I coordinated the colors of the 8/0 and 15/0 seed beads forming the flower and its tip. In many cases, I found colors that were very similar. In a couple of cases, to add a bit of variety and surprise, and I used colors with a little more contrast, yet in the same general color family. “

The pattern underlying Kathleen’s color blending formula:
Determine the color patterns for the non-transitional and the transitional rows of flower stalk tips (the fringe in her bracelet). This pattern is based on playing with the proportions of the two colors, as we transition between them.

In our instructions today, we use the following patterns:
Where,
S=Same or current color
N=Next new color

Non-Transitional Row:
S | S | S | S | S | S | S
First of two Transitional Rows:
S | N | S | N | S | N | S
Second of two Transitional Rows:
N | N | N | S | N | N | N

Color Blending:

It is difficult to blend colors, when using beads. Some people like to make a bead mix of all the beads and colors they want to blend. This “Random” approach to blending works sometimes, but in a random way. Similarly, “Alternating” colors or “Graduating Colors from light to dark, or bright to dull” along your piece, also do not work well.

Usually, to get a great color-blending design, you need to plan, pre-test, plan again, pre-test again, until you work out a more involved, complex patterning.

One way to choreograph things, is to play with color proportions. Go line by line, and begin with the ideal proportionate relationship between two colors. Gradually manipulate this down the line by anticipating the next ideal proportionate relationship between the next two colors that need to follow.

Posted in bead weaving | Tagged: , , , , | Leave a Comment »

A LESSON IN USING COLOR SIMULTANEITY EFFECTS:

Posted by learntobead on April 22, 2013

A LESSON IN USING COLOR SIMULTANEITY EFFECTS:
The Contemporized Etruscan Collar
By Warren Feld
http://www.warrenfeldjewelry.com


reposted from my Jewelry Design Discussion Group on FaceBook
https://www.facebook.com/groups/jewelrydesign/

bw3nb01-amethystsage-full4-hi-res-small-medium

Several years ago, I had been asked to do a week-long jewelry design workshop in Cortona, Italy. The topic I selected was on Contemporizing Traditional Etruscan Jewelry. One of the projects I developed for the workshop was this Contemporized Etruscan Collar. The challenge, here for me, was to create a sophisticated, wearable, and attractive piece that exemplified concepts about contemporizing traditional jewelry.

Contemporizing Traditional Jewelry has to do with how you take particular traditional forms and techniques, and both add your personal style to the pieces, as well as make them more relevant to today’s sense of fashion and style. The challenge for the designer is how to keep traditional ideas essential and alive for today’s audience.

Things clicked. I found a traditional Etruscan Collar that I immediately connected with.

The Contemporized Etruscan Collar

The contemporized piece basically consists of two staggered and overlapping bead-woven strips. The bead-woven technique used is the Ndebele Stitch (sometimes called Herringbone).

There are many design theory elements incorporated into this piece, including dimensionality, curvature, malleability, and movement. One of the more interesting theories I applied here has to do with color simultaneity effects.

Color Simultaneity Effects
bw3nb01-amethystsage-small-medium-full3-hi-res
Picking colors is about making strategic choices. Picking colors is very revealing about the jewelry artist’s understanding of how the bead asserts its needs for color. One set of color-theories employed to make these kinds of choices has to do with Simultaneity Effects. Colors in the presence of other colors get perceived differently, depending on the color combination.

For example, a White Square on a Black background looks bigger than a Black Square on a white background. White reaches out and overflows the boundary; black contracts.
colorsimulataneity1
Another example: Gray always picks up some of the color characteristics of other colors around it. Gray next to orange will appear to have an orange tone to it. Gray next to green will appear to have a green tone to it. A “Gray” bead is one, the color of which, has a strong gray or black tone to it. Besides the obvious “gray”, these other colors function as a “gray”: montana blue, alexandrite, colorado topaz, prairie green. Many color-lined and silver-lined beads can function as a “gray”, particularly when the glass color is other than clear. Many metallic or otherwise reflective surface beads can function as a “gray”.

A final example of simultaneity effects has to do with how people sense whether colors are warm or cool. In one composition, depending on the color mix, a particular color might be felt as “warm”. In a second composition, with a different color mix, that same color might be felt as “cool”. You can picture a yellow square surrounded by white feels lighter, brighter and a different temperature than its counterpart surrounded by black. A red square surrounded by black feels darker, duller, and a different temperature than its counterpart surrounded by white.

Existence of these simultaneity effects is a great piece of information for the designer. There will be gaps of color and light between beads. Many bead colors are imperfect, particularly in combination. Playing with simultaneity effects gives the designer tools to overcome some of the color limitations associated with the bead and the gaps of light between beads. These allow you to “blend” and build “bridges” and create “transitions.”

Look back at the images of the Ndebele-stitched piece. When you work with beads, there are always gaps between them. In the Ndebele-stitch, there are many and very pronounced gaps of light between beads. This can be very threatening to a viewer. People are pre-wired to avoid things which might harm them, such as snakes and spiders. This is our fear- or anxiety-response.

We can summarize most color theories as a set of principles the brain uses – both in perception and cognition – to find a state of color or colors which are harmonious. That is, people like to see and feel comfortable and safe with colors which harmonize and go together. When we start to lose that harmonious state of color, this makes the brain edgy. When the brain starts to get edgy, we start to interpret pieces as boring, monotonous, scary, dangerous, will cause death. We innately reject, as part of our pre-wired fear response, that which does not follow good principles of color.

Any viewer’s brain will immediately try to interpret what it sees and make sense of it. This includes jewelry. The viewer’s brain needs to know immediately whether to approach or flee. Each time the eye/brain comes to the end of the bead and is confronted with a gap of light separating it from the next bead, it’s similar to a person approaching a cliff, and getting asked to jump off of that cliff.
No one wants to jump off a cliff. And no one’s eye/brain wants to jump over a gap of light between two beads.

We have to fool ourselves, that is, our brain, in some way. Color theories offer us many possible ideas on how to do this. I find using simultaneity effects works especially well in jewelry compositions using beads. Certain colors, when juxtaposed, create their own meanings, and fool the brain into thinking it sees something in these gaps, or is somehow more motivated to fill in the gaps, and proceed from one bead to the next.

In this Etruscan Collar project, many of my color choices were based on an understanding of simultaneity effects.

Posted in beadwork, jewelry design | Leave a Comment »

WHAT SHOULD I CREATE

Posted by learntobead on April 15, 2013

WHAT SHOULD I CREATE?

reposted from my Jewelry Design Discussion Group on FaceBook
https://www.facebook.com/groups/jewelrydesign/
cgswarovskifull
Kierkegaard – and I apologize for getting a little show-off-y with my referents – once described “Creativity” as “a passionate sense of the potential.” And I love this definition. Passion is very important. Some kind of intuitive sense made operational by bringing all your capabilities and wonderings and technical know-how to the fore – creativity is the sum of a whole set of thinking and mechanical and imaginative activities.

You sit down, and you ask, what should I create? For most people, especially those getting started, they look for patterns and instructions in bead magazines or how-to books or websites online. They let someone else make all the creative choices for them. The singular creative choice here is picking what you want to make. And, when you’re starting, this is OK.

When you feel more comfortable with the materials and the techniques, you can begin to make additional choices. You can choose your own colors. You can make simple adaptations, such as changing out the bead, or changing the dimensions, or changing out a row.

Eventually, however, you will want to confront the Creativity issue head on. You want to decide that pursuing your innermost “jewelry designer”, no matter what pathway this takes you along, is the next thing, and right thing, to do. That means, at first, you want your jewelry and your beadwork to reflect your artistic hand. You want to develop a personal style. You want to come up with your own projects.

But applying yourself creatively is also work. It can be fun at times, but scary at other times. There is an element of risk. You might not like what you end up doing. Your friends might not like it. Nor your family. You might not finish it. Or you might do it wrong. It always will seem easier to go with someone else’s project, already proven to be liked and tested – because it’s been published, and passed around, and done over and over again by many different people. Sometimes it seems insurmountable, after finishing one project, to decide what to do next.

But it’s important to keep pushing on. Challenging yourself. Developing yourself. Turning yourself into a bead artist or jewelry artist. And pursuing opportunities to exercise your talents even more, as you enter the world of design.

So, what kinds of creative advice can you offer others about enhancing their creativity?

Here is some of my advice:

Success Stories. While you are fiddling with beads and wire and clasps and everything else, try to be as aware as you can of why your successes are successful. What are all the things you did to succeed? On what points does everyone agree the project succeeds?

Un-Block. Don’t set up any road blocks. Many people, rather than venture onto an unknown highway of creativity, put up walls to delay their path. If they just had the right beads. Or the right colors. Or sufficient time. Or had learned one more technique. Or had taken one more class. Or could find a better clasp. These are excuses. Excuses to avoid getting creative.

Adapt. Anticipate contingencies. It amazes me how many people come into the shop with a picture out of a magazine. We probably can find over half the components, but for the remaining components pictured which we don’t have in stock, we suggest substitutes. But, NO, the customer has to have it exactly like the picture, or not at all. Not every store has every bead and component. Many beads and components are not made all the time. Many colors vary from batch to batch. Many established companies have components especially made up for them – and not available to the general public. The supplies of many beads and components are very limited – not unlimited.

Play. Be a kid again. Let your imagination run wild. Try things. Try anything. If the world says your color combination is ugly, don’t listen to them. Do it anyway. Ignore all restrictions. Forget about social and art conventions.

Be Curious. Play “What If…” games. What if a different color? What if a different technique? What if a different width or length? What if a different style of clasp. Re-arrange things. Tweak. Take out a bead board, and lay out beads and findings on the board, and re-order everything — Ask yourself: More or less satisfying?

Embrace the New. Don’t do the same project over and over again, simply because you have proven to yourself that you can make it. While you might want to repeat a project, with some variations, to learn more things, too much doing of the same-ole, same-ole, can be very stifling.

Evaluate. Learn from failures. You have invested time, money and effort into making these pieces. And not everything works out, or works out well. Figure out why, and turn these failed pieces into lessons and insights.

And if you suddenly find your productivity interrupted by Bead-Block and Artist-Block and Jeweler’s-Block, put your project down. Take a break. Robert Alan Black gives great advice. He shouts at the blocked: Break A Crayon. He shouts again: Draw Outside The Lines. And I would add: Stick your hands into a bowl full of mud. These are all great advice.

Do something out of the ordinary. Something unexpected. Or socially taboo. Or something not just done. This will shock your system to think in different ways. To see things in a new light. To recognize contradictions.

And unblock you.

Posted in Stitch 'n Bitch | 4 Comments »