I don’t mean to drag a poor Elephant by its tail, kicking and screaming, into our bead world against its wishes. Nor do I perceive the elephant to be a threat, like you might see an Elephant in the boudoir, or the fine china store. And I don’t want you to shut your eyes and pretend not to notice that this Elephant is here, standing shoulder to shoulder with every beader and jewelry maker around.
The Elephant is not a joke. And the fact that it is “Rogue” makes it more important than ever to figure out why it’s here, among size #10 English beading needles, and Czech size 11/0 seed beads, and Austrian crystal beads. It seems so worldly, yet other-worldly, our Elephant. It’s not our muse. It’s not our Cassandra. It has no secret plan or strategy. It does not depend on its size to make its point. It does not hesitate to stomp and chomp and clomp because the beads before it are raku or glass or gemstone or crystal or metal or plastic. But a Rogue Elephant in the middle of our craft room forces upon us a completely different logic, so that we can make sense of it all.
Only the beader or jewelry artist who is willing to submerge her- or him-self completely in this wonderfully off-centered picture — Rogue Elephant, beads, stringing materials, clasps and all — will really get the fullness of this humor, this wisdom, and the splendor of beading and jewelry making as a form of art that is worn.
And that’s what happened with me. Though not all at once. Struggling excitedly, creative frustration, wondrous illusion — that’s how I would describe my over 30 years stringing beads, weaving beads, combining wire with beads, soldering silver with beads, entangling fibers with beads.
Somewhere along the way I felt that Rogue Elephant staring at me from a distance. I moved closer to him. And all the applications and all the techniques and all the materials and all the making-selling-making-selling-making-selling began to cohere into something very real. Very meaningful. Integrally resonant. I discovered my Rogue Elephant and beaded him.
How do you stop an elephant from passing through the eye of a needle?
Tie a knot in its tail.
The issues and inspirations that drive the artist
This is a fable for all jewelry artists who aspire to become one with Design. How to Bead a Rogue Elephant becomes an evolving tale and collection of personal perspectives and experiences on the issues and inspirations that drive me, and that drive other bead and jewelry-making artist in their designs.
“Design” is the operative word here. A Rogue Elephant does not present an obstacle, nor create any opportunities, for the artist, unless that artist understands, follows through and is committed to Jewelry as an Art Form, and realizes that jewelry is art only as it is worn.
Jewelry as art isn’t a happenstance. It is made up of a lot of different kinds of parts. These must be strategically and thoughtfully brought together. They are brought together as a kind of construction project. The results of this project must be beautiful and appealing. They must be functional and wearable. And this all comes about through design. Jewelry must be designed. And designed it is.
Rogue Elephants are big, and jewelry design is a big task. Rogue Elephants move in unpredictable, yet forceful ways. And jewelry must be designed with movement in mind. Rogue Elephants come with a surface scape, texture and environment, against which the jewelry must look good. And again, good jewelry emerges primarily from the design perspective and the control of the bead, and all the other incumbent parts by the jewelry artist.
Most beaders and jewelry makers don’t get to the point where they can fully answer Why some pieces of their jewelry get good attention, and others do not? They have fun making things. They match outfits. They give gifts. They sell a few pieces. They use pretty beads and other components. And sometimes they get compliments. Other times they do not.
Thus, they don’t necessarily know what to do with the pieces they are playing with. They don’t control these pieces, or the process of combining them. They follow patterns and instructions. And do these again. And again and again. Their artistic goals are to complete the steps and end up with something. They might stick to one or a few techniques they feel comfortable with. There is an unfamiliarity with the “bead” –What is it? Where did it come from? What makes it special as a medium of art and light and shadow? How does it relate to other beads or clasps or stringing materials or jewelry findings? What happens to the bead over time? When they look at the bead, what do they see?
But luckily, beading for many artists is an evolving obsession. This obsession leads them to contemplate the bead and its use. The bead and its use in art. The bead and its use in jewelry. The bead and its relationship to the artist’s studio. Beads are addictive. Their addictiveness leads the beader or jewelry maker to seek out that Rogue Elephant that haunts them along the distant horizon. They know they want to bead it. They’re not sure how. But they steer themselves along the pathway to find out. This pathway isn’t particularly straight, level or passable. But it’s a pathway nonetheless. And the ensuing possibilities for learning and growing as an artist and designer along the way reap many worthwhile and satisfying rewards. I call this CONTEMPLATION.
The first step in this pathway is to figure out how to get started with beads and jewelry making. You need supplies. You need work spaces and storage strategies and understanding how to get everything organized. You need to anticipate bead spills and many unfinished projects. You need to learn to plan your pieces. You need to get a handle on the beads (and all the other pieces), and how to use them. I call this PLAY.
Whatever the reason, most beaders and jewelry makers don’t get past PLAY. They are content following patterns and making lots of pieces, according to the step-by-step instructions in these patterns. They might fear testing themselves against broader rules of artistic expression. They might not want to expend the mental and physical energy it takes to get into design. They just want to have fun. And if they never notice that Rogue Elephant hugging the horizon, that’s fine with them.
At some point, some beaders and jewelry makers will want to start educating themselves to get a little below the surface. Rather than mechanically following a set of steps, or randomly assembling things bead by bead, you want to know more about what is really going on. How do I hold my piece to work it? How do I manage my thread tension? How do I select colors? What clasp might work best? If you find yourself at this point, PLAY is not enough. You need to start DABBLING.
But for those beaders and jewelry makers for whom the Rogue Elephant is very disturbing, no matter how far away he may be, there are these wonderfully exciting, sensually terrific, incredibly fulfilling things that you find as you try to bead your Rogue Elephant, ear, trunk, feet, bodice and all. You learn to play with and dabble with and control the interplay of light and shadow, texture and pattern, dimensionality and perspective, strategy and technique, form and function, structure and purpose. You begin sharing your designs with friends and strangers, perhaps even teaching classes about how to make your favorite project, or do your preferred technique. You might also create a small business for yourself and sell your pieces. Your sense of artistry, your business acumen, your developing design perspective — you need all this, if you are to have any chance of catching up with your Rogue Elephant, let alone beading him. As you begin to evolve beyond the simple craft perspective to one of artistry and then design, you enter the stage I call CREATE.
As your jewelry pieces become more the result of your design intuition and acuity, you begin to wonder how other artists capture, be-jewel, and release their own Rogue Elephants. How did they get started? What was their inspiration? What motivated them to delve into beading, stick with it, and take it to the next level? Do they make their pieces for show or for sale? You begin to recognize how some pieces of beadwork and jewelry are merely “craft”, and others are “art”. You get frustrated with beautiful pieces that are unwearable and fashionable pieces that lack durability and pieces that sell that are poorly constructed. You see many good ideas, some well-executed, but many not. I call this SAFARI.
Part of this SAFARI is historical. And the more recent socio-cultural-artistic history of beading in America is a fantastic tale of curiosity, grit, creative expression, ambition and technological advances in materials. Beading exploded across America in the late 1980s and 1990s and owes much to its many fore-mothers and a few fore-fathers that began their beadwork careers at this time, as well as those who founded the many beadwork magazines so prominent today. The other part of the SAFARI is learning life’s lessons, and incorporating these into beadwork and jewelry making approaches and designs.
As you begin to articulate what works and does not work in various pieces in terms of form, structure, art theory, relationships to the body, relationships to psychological and cultural and sociological constructs, you complete your evolution as a jewelry designer. You add a body of design theory and practice to your already honed skills in art, color, bead-stringing, bead-weaving and wire working. You find and bead your Rogue Elephant. I call this GALLERY HOPPING.
As you compare yourself as Designer to other jewelry designers all over the world, this is partly a personal adventure as you self-experience your intellectual growth as an artist. And it is partly an adventure of evaluating how well other artists have succeeded in this same quest, as well. One very revealing pathway is following how artists contemporize traditional designs. Still another follows the artist who revives vintage styles. Or the pathway that finds the artist elevating fringe, edging, strap, bail and surface embellishment to the same level of “art” as the centerpiece. And yet another pathway which looks at multimedia beadwork, and how artists seek to maintain the integrity of each medium within the same piece. You might explore that pathway which involves collaboration. I call this stage DESIGN MANAGEMENT.
Your adventure along this pathway towards design — your success at beading your Rogue Elephant — is very fulfilling. Whether you walk, run, skip or crawl or some mix of the above, it’s a pathway worth following. You’ve learned to transcend the physicality and limitations of your workplace, tools and supplies. You’ve learned to multi-task and organize and construct your project as if you were architecting or engineering a bridge. You have discovered how to dress and present yourself for success, including strategies for self-promotion. You’re a Designer. You have learned to present yourself and promote yourself as a Jewelry Artist. You’ve evolved as a Beader and Jewelry-Designer and are feeling a true SATISFACTION.
Beading requires a lot of mind-body coordination. That takes work. It is work.
Calisthenics are exercises you can do to improve and tone your mind-body coordination when bead weaving.
You have to be able to get from your fingers to the needle to the beads, back along the thread to the needle to the fingers, hands, arms, eyes, mind. And then again. And again. Over and over, one more time. You need to get into a rhythm. All these working parts need to be working. No time for cramping. No time to get tired. No time to lose concentration.
A rhythm. Needle, pick up bead, pull down along thread, check the tension, pick up a bead, pull down along thread, check the tension, pick up a bead….
I noticed that different instructors had various techniques and strategies for maintaining this rhythm. Yes, music was involved sometimes. Othertimes simple meditation or creative reading and discourse. Some people had some stretching exercises that they did. Others tested themselves before proceeding with their big project. Still others did small things to reconfirm their learning.
Throughout this Series, I introduce some of the beading calisthenics that I experienced along the way. If you want to gather materials up so that you can follow along with these calisthenics, here’s the list.
MATERIALS NEEDED FOR ALL THE CALISTHENIC EXERCISES (SUPPLY LIST):
notebook, pencil 1 tube each of Japanese 11/0 seed beads in gray, 3 different colors of orange, black, white, any other 4 colors 1 tube each of Japanese 8/0 seed beads in gray or silver, black, white, orange, any other 4 colors 1 tube each of Japanese 6/0 seed beads in gray or silver, black, white, orange, any other 4 colors 5 gray-scale colors of delicas or 11/0 seed beads Nymo D or C-Lon D thread in black Nymo D or C-Lon D thread in yellow two toggle clasps .018” or .019” flexible cable wire assorted 4mm, 6mm and 8mm beads in various coordinating colors, including grays and oranges in your mix, as well big bowl and a bowl-full of assorted beads Size 10 English beading needles Bees wax scissors beading dishes or trays any kind of graph paper work surface or pad colored pencils a few clasps, (toggles are easy to work with) some crimp beads crimping pliers
BEADING CALISTHENICS #1: 5-Finger Stretchies
This exercise is used to prevent your fingers from cramping. Often, when beading, you are holding your hand and fingers in a very tight, controlled, sometimes unnatural or uncomfortable position. You should stop periodically, and do 5-Finger Stretchies. This is a wonderful exercise which relaxes the muscles in your hands.
Take one hand and hold it arm out, palm forward. Your arm is parallel to the floor. Your palm, fingers up, is perpendicular to the floor. Tighten every muscle in every finger, and pull each finger inward and downwards towards the point they meet the palm, but don’t touch the palm. Picture making a claw with your pulled back fingers.
Squeeze the tension, release. Squeeze, release. Squeeze, release. Do this rapidly, perhaps 4 squeeze/releases a second. Do this for 10 seconds.
Now do this with the other hand. 10 seconds.
Do this a couple times with each hand.
Then return to your beading.
BEADING CALISTHENICS #2: Zen Needle Threading
Take a length of Nymo size D thread and a size #10 English beading needle. Thread the needle the way you are accustomed to doing this. Take the thread end, and thread it again. You may have to trim the tip of the thread.
Now try to thread your needle, this time keeping your eyes closed.
Visualize in your mind what you had just seen with your eyes.
Feel with your hands and body what you had just felt with your hands and body.
Unsuccessful? Then try again. Thread the needle twice with eyes open. Close your eyes. Try again. Visualize. Make your body and mind one with the needle and one with the thread.
BEADING CALISTHENICS #3: Head Turning / Turning Beads
Enough 4mm-8mm beads to make an 18” necklace Nymo D or C-Lon D thread .019” or .018” thick flexible cable wire, such as Soft Flex or Flexrite 2 toggle clasps
Using any sized and color beads, string an 18” necklace using Nymo D or C-Lon D thread and a toggle clasp.
Using the same number, size and color beads, string an 18” necklace using .018” or .019” flexible cable wire, crimp beads and a toggle clasp.
Put on the necklace strung on the thread. Bend over as if you were picking up something off the ground. Stand straight, then twist your body to the left. Note the positioning of the clasp. Note how the necklace feels on, and feels when you move. Take the necklace off.
Put on the necklace strung on the cable wire. Again, bend down as if you were picking up something off the ground. Stand straight, then twist your body to the left. Note the positioning of the clasp. Note how the necklace feels on, and feels when you move. Take the necklace off.
Typically, when you use needle and thread in stringing, the piece conforms to the body and moves in the same direction as the body.
Typically, when you use cable wire, the piece does not conform to the body, and will move in the opposite direction the body moves in.
BEADING CALISTHENICS #4: Two-Needle Race Up The Ladder
For each person:2 size #10 English beading needles Nymo D or C-Lon D thread Size 8/0 Japanese seed beads
Here, you need two or more people, or you can compete against yourself. This is a race.
We are going to use two needles and one length of thread to work up through the ladder stitch.
The ladder technique: Double your length of thread. Thread a needle on the end of each side. Pick up the same number of beads on the two needles. Pass the needles in opposite directions through the top beads on each needle. Pull the tension tight. For your first loop (or rung), you’ll need one extra bead on each needle, than for subsequent loops (rungs).
You might start with 4 beads on each needle for the first rung, then 3 beads on each needle for each additional run. Pick up 4 on each needle, crossover. Pull the tension tight. Pick up 3 on each needle, crossover. Pull the tension tight. Keep repeating with 3 beads on each needle.
The ladder looks like this:
Run the race to see who can be the first to make a ladder that is 12 inches long.
The goal here is to learn a little about managing thread tension.
Pick a favorite bead weaving stitch, such as Peyote, Brick or Ndbele (Herringbone). Plan out how to make a flat length of the weave, about ½” wide and 6” long. You can also do 6 separate pieces about ½” wide and 1” long.
For the first inch, keep a tight tension. For the 2nd inch, make the tension tighter. For the 3rd inch, make it even tighter. For the tightest tension, you might even want to reinforce your stitching, by going through each bead again and again with your thread.
For the fourth inch, try to get a tension a little looser than you typically use. Then the next inch, get even looser. For your final inch, make this the loosest of all.
Now pick a stitch like the Chevron Stitch or the Right Angle Weave Stitch. Work it for a length of 3–4”. These stitches start out very loose.
What different kinds of strategies can you employ to tighten the tension? — Reinforcement? Reinforcement after each small segment of stitches? Or Reinforcement after you’ve completed the whole piece? Changing the type of stringing material you are using? Stitching over a solid form, such as a dowel, pencil or straw or vase or ball? Adding additional beads at key joints? There are these and lots of possibilities. Try them out.
BEADING CALISTHENICS #6: Aren’t You Glad You Used Orange
Orange is a difficult color for most people to work with. So this challenge is a simple bead stringing one.
Create an appealing, satisfying necklace, using at least 30 or more 4–6mm beads in orange, and 30 or more 4–6mm beads in each of two other colors.
Stand back from your piece and examine it. If you added or subtracted any one color, could you make the necklace more satisfying?
What makes the particular combination that you ended up with the best combination?
BEADING CALISTHENICS #7: Composition in Gray and Gray
5 gray-scale colors of delicas or 11/0 seed beads gray colored Nymo or C-lon thread, size D yellow colored Nymo or C-lon thread, size D
You can use an existing peyote, brick stitch or loom pattern, or create your own. Try to use or create a pattern that is about 3 inches square. Assign your colors using your 5 gray-scale colors of delicas or 11/0 seed beads.
Evaluate your resulting bead-weaving:
To what extent have you been able to create obvious or desired boundaries between sections or forms within the piece?
To what extent have you been able to create a sense of dimensionality, or forward/receding qualities?
To what extent have you had control over the lines, forms, sections and other design elements, using only gray?
To what extent have you been able to achieve an energy/vitality within the piece, as if it had been multi-colored?
Additional Exercises:
1. Repeat the pattern, using your 5-gray-scale bead colors, and use a bright yellow Nymo or C-Lon Size D thread
2. Repeat the pattern, and substitute a rich colored blue or red bead for one of the grays, plus the other original 4 colors of gray, and the gray Nymo or C-Lon thread
BEADING CALISTHENICS #8: Speaking With Beads
During Apartheid in South Africa, there were those Zulu tribes that adopted Christianity and identified with the colonialists, and there were those tribes that did not. The tribes that did not created a very elaborate communication system using beads.
Besides what colors were next to each other, they used a lot of triangles in their patterns. It was important if the triangle faced up or down, and again what the colors were. With their beadwork, they could “say” something very general, like “I’m mad at the world,” or something very specific, like “I’d like to get together with you tomorrow night at eight, but not before I’ve met with your brother.”
The challenge here is to create your own symbolic communication system using beads and their patterning within a piece of jewelry.
First write a sentence or paragraph about something that you will want to reduce to symbols, and illustrate by constructing a necklace.
Second develop a cipher: This would be a list of each symbol and its meaning or referent. For example, “red” might stand for “women” and “blue” might stand for “men”. A diagonal line leaning left might be “safety”, and one leaning right might be “danger.” Someone using your cipher should be able to make sense of your beadwork and what statement you are trying to make with it.
Third, using graph paper and colored pencils, sketch out what your piece would look like, in order to express the statement you want to make. Have a friend use your cipher and see if they can “read” your piece of jewelry, as drawn on the graph paper.
BEADING CALISTHENICS #9: Bead Massage
Fill a large bowl with beads of any sort and size. Put your hands into the beads, and squeeze, let go, let the beads run over your hands, feel them in your hands, squeeze them in your hands.
Start to squeeze them in your hands and through your fingers starting with your pinkies, and working across your hand slowly until you get to your thumbs and forefingers, and squeeze them through these. Start again at your pinkies.
Put your palm flat onto the top surface of the bowl of beads. Push down. Then make a fist, and let the beads run through your fingers.
Repeat. Repeat again.
BEADING CALISTHENICS #10: Daisy Stitch Expansion
The challenge here is to see how many variations you can construct using the simple daisy chain stitch.
Simplest daisy chain: A stem and a flower with a center bead, then a stem and flower w/center, and so forth.
Start with a line of 5 beads.
Add 5 more beads to your thread. Make the 5th bead a different color. This is your “flower set”. The 5th bead is your center point.
Make a loop by going back through the first of these 5 beads in the set.
Add two more beads to the flower set, and bring the needle through 4th bead in that original set of 5.
So the daisy pattern goes: BEAD 1 to 2 to 3 to 4 to 5 (flower center point bead marked by X) back to 1 to 6 to 7 back to 4 and out.
Pull tight.
Add another line of 5 beads. Continue.
Try the daisy chain above without the stem, so that each flower set is interconnected by one bead — # 4 (which becomes #1 in the next flower). Make your 5th bead a different color.
Next, look at the modified daisy chain pattern below. Try another interconnected daisy pattern, where we would connect each subsequent flower by two beads, instead of one. Here we would make the first daisy’s 3 and 4 become the next daisy’s 1 and 6.
This would go: 1 to 2 to 3 to 4 to 5 (flower center) to 1 to 6 to 7 to 4 up through 3 and out. Then 3 becomes 1 in the next daisy link. The pattern continues in the second link as 1 to 2 to 3 to 4 to 5 (flower center) to 1 to 6 to 7 to 4 up through 3 and out. Then 3 becomes 1 again.
Try the same pattern, this time making the 2nd, 5th and 7th bead the same color, but different than the others.
Try again, making the 1st, 5th and 4th beads the same color, but different than the others.
I hope you found this article useful. Be sure to click the CLAP HANDS icon at the bottom of this article.
At several jewelry shows over the past 5 years, we have marveled at a continually evolving fashion trend towards reproduction vintage looks using new, more recently available materials.
It is important to understand, however, that, when purchasing fashion jewelry, there is more to consider than how a piece looks. You need to understand something about the materials used and the overall construction. Only in this way can you be sure that you are purchasing what we would call “collectible costume jewelry.”
The reproduction vintage looks are obvious — a reference to the stylish pieces of the 1930s, 40s, 50s and 60s, using modern materials and construction technologies. Great colors. Strong and soft colors. Lots of faceting and sparkle.
The use of new materials includes higher end acrylics, new metallic composites, specialized glass and Chinese crystal.
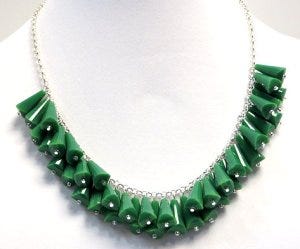
These green components, in the piece shown above, are made out of Chinese crystal, not plastic. To the naked eye, you might see a similar piece where the components are plastic, looking like but definitely not crystal. The eye can deceive itself. Simple test: click bead against a stiff surface or front teeth. If crystal or glass, you will hear a sharp click; if plastic, you will hear a dull click.
These new fashion pieces should be considered “collectable” costume jewelry. But, again, it is important to understand what you are buying. There are many lower quality copies — what we’d call “disposable jewelry” — you’ll find at discount stores and online. You want to be sure you are buying the quality we would call “collectible”. The price will reflect whether the jewelry is “collectible” or “disposable.”
So, You Want Your Fashion Jewelry To Be Made With…
* Glass, Crystal and/or Advanced Plastics
Typically, you will find a mix of materials within you piece. Materials you do not want would include enameled or colored ceramics or regular plastic or metalized plastic or plastic pearls.
* Advanced Plastics, if any components are plastic
Just like with things like wood or metal, there are many grades of quality among plastics. The differences between advanced plastics and regular plastics can be as widely divergent as between metals like gold and aluminum.
The higher end plastics, even when up close, look very similar to the gemstones or crystals they are meant to resemble. Jade plastic looks like real jade. Plastic opals look like real opal. And so forth.
For high end costume jewelry, the “point-hardness” of these advanced plastics, that is, how easily the material can be scratched, will be much higher, thus less easily scratched, than cheaper plastics.
When you see patterns or designs in regular plastic, these typically are decals applied to the surface, or just under a clear encasing at the surface. With advanced plastics, these patterns or designs flow throughout the entire piece.
Better metal composites and finishes, with more substance and realistic finishes
In these lines of jewelry, whether higher end or lower end, very little is real 100% metal these days. The chains are composites. The settings for the stones are composites.
In the metal-composite chains and settings used in the lower quality jewelry, at close inspection, you will find them to be cheap, flimsy and light-weight. The metal finishes flake or wear off quickly. Moreover, the metallic finish-colors are off the mark and look somewhat fake. For example, the actual color that may be representing gold, when compared to other quality pieces, may not look like gold at all. There may be rough spots that can get caught on clothing or scratch the skin.
In higher end pieces, manufacturers check their quality, to make sure there are no rough spots. The durability and the finishes hold up well over time. It is difficult to distinguish the composite from the actual metal it is imitating and approximating.
But always inspect your jewelry before you leave the store. When purchasing any piece of costume jewelry, you should feel all over the piece to be sure there are no rough spots
* Better set stones
Stones are typically glued in. If the setting does not have much surface area, the glue will not hold for very long.
In some pieces, the designs give the illusion of “prong-set” stones. In the lower end, the prongs have very sharp points. In the higher end, the prongs have smooth or balled-up tips.
Things To Do To Increase Longevity Of Your New Fashion Jewelry
After purchasing your new pieces of Fashion Jewelry, you will have the option to do two things to make them more durable and lasting:
If the piece has stones which have been glued in, and have open settings on the backs, apply some more glue to the backs of the settings, all along the edges. Use a glue like E6000 or Beacon 527. This will keep the stones from ever popping out. Reason: The glue manufacturers typically use dries hard, with no flexibility. If the pieces are accidentally dropped or hit against something, the shock can make the stone pop away from the hard glue.
By reinforcing them with the E6000 or Beacon 527, these bonds dry like rubber and act like a shock absorber. Thus the stones are less likely to pop off.
Necklace with stones set in settings with open backs
Open back on set stones in necklace
2. On all areas which have metal plated finishes and which will be touching the skin, apply two coats of clear nail polish to these surfaces. This will preserve the plated finishes for a very long time, yet doesn’t affect the shine or sheen of the metal underneath it.
NOTE: This is very generalized advice. Every person’s body oils and chemistry have different effects on the metal finishes. A person may be able to wear a piece of costume jewelry for months and years and it may not disintegrate on them; another person might wear it for a few months, and the metal finishes deteriorate
3. Unfortunately, much of this jewelry is strung on monofilament (clear fishing line). This stringing material dries out and cracks from exposure to ultraviolet light and heat — basically from sunshine.
If you have the change re-string these pieces on cable wire (which is a flexible, nylon coated stringing wire). Two brands of cable wire I especially recommend are Soft Flex and Flexrite. (Most other brands of cable wire have other issues which make them considerably less desirable to use in jewelry).
Cleaning
All jewelry has to be maintained and kept clean. Follow this simple advice for keeping your new jewelry pieces clean and sparkling.
Periodically, give your jewelry a quick bath. In a bowl, mix a very-little-amount of baby shampoo and cold water. Immerse the whole piece of jewelry in this bath, just long enough to loosen any dirt. Take it out.
Under cold water, rinse it off. Take a paper towel or cloth, and dry the piece off. NOTE: “Pat Dry” with the towel. Don’t “Rub”.
Then, you might take a hair dryer, setting it on the lowest setting, and keeping it 6–8” away from your piece, and blow dry. DON’T LET YOUR PIECES GET TOO HOT. An alternative strategy is to put your piece of jewelry in front of a small fan.
Dry both sides. Leave your piece out in the open air over night, to be sure there is no moisture trapped in closed crevices.
Always remember that the side laying against the towel or cloth may still be more damp than the side facing up. So, before storing your piece, check and be sure it is dry.
Store your piece flat in a zip lock plastic bag. Be sure to push the air out of bag before sealing bag. One simple way to do this is to insert a straw into the bag, and seal the top as close to the straw as you can get. Suck out the air, remove the straw, and finish sealing the zip-lock bag closed.
Then lay your bagged up piece on flat surface. You do not want your piece to be jumbled into a pile. You do not want to hang your jewelry on a stand. The weight of the beads will stretch out the stringing material.
Put your pieces in a cool, dry place out of sunlight. Never store two pieces on top of each other without something to separate them. Don’t pile up jewelry on top of other jewelry.
At a restaurant, if you drip gravy on your necklace, how do you clean it off? If it is something that has caked or dried on it, you may have to soak it in a solution of a very-little-amount of baby shampoo and cold water. Use a q-tip to clean away the spotted areas.
Your Reproduction Vintage Pieces Should Be Around For 30, 40, even 50 years
Your goal is to have your reproduction vintage to be around 30, 40, 50 years from now. It will keep its value. These pieces should not be disposable.
Go to your antique stores, ask to see their vintage jewelry from the 1930s, 40s to 60s, and look and see at the availability, quantity and cost of high-end costume jewelry. This will give you an idea of what you’re getting with your investment.
In these older pieces, some were made from Lucite or other high-end plastics of the time. And other pieces were copies crafted in regular plastic. Lucite is a glass-like acrylic resin. It has a resilience, a hardness, and a malleability which made it perfect for costume jewelry. Regular plastic lacks the clarity and sparkle, yellows with age, and scratches much more easily.
Your new higher-end fashion jewelry — better made, more attractive, more appealing — will increase in value over the decades instead of ending up in the trash.
QUESTION: What was your initiation into that phenomenon called “Bead Spill”?
This was mine..
“Yikes!” she screamed, shaking the ground, the store, the parking lot, in fact, the whole wide world, and I was, to everyone’s regret, caught in that earth-shattering scream. I was carefully balancing twelve trays of loose beads, moving them to their new shelves when, behind my back, I heard that cry for help, that screech of fear, that siren of bead hell.
I instinctively turned. It wasn’t something I thought out and planned rationally. It wasn’t something that arose intuitively from my gut. It was pure animal instinct. Stimulus-Response. Lust. Fear. Gluttony. Raw Emotion. I tried to juggle the twelve trays as they fled my nurturing hands and arms.
And I urgently called to the beads. Which had been in the trays. Which were now flying out of my hands.
As if to calm them, I said, “Beads, you won’t fall.” You won’t get hurt. You won’t leave the safety and sanctity of these trays. Good beads. Good, good beads.
And, for a brief moment, I thought I had saved all these little, little, beautiful, beautiful, very round, very round beads from a fate almost worse than death. The trays were juggling and for a moment, I believed they had started to re-stack themselves. They were home free. One back on top of another on top of another….
If it weren’t for that scream and that deep primal instinct ripping my fear and anxiety from the depths of my soul, and the fact that it is hard to pivot wearing sneakers on a hard wood floor, juggle twelve trays of ever-more terrified loose glass beads, and respond to a lady in distress, the situation would have come to a pleasant end.
But alas, that was not to be.
With some shame, some guilt, much surprise and yes, a lot of embarrassment, this was to be my grand initiation into the phenomenon commonly known as The Bead Spill. What a mess!
I know a lot of people have a fantasy where they are bathing in a tub of beads. It’s sensuous. Caressing. You’re at one with the God of the Beads.
This wasn’t like that. This was thousands of round objects falling and running and spreading every which way. Along the walls, behind the legs of chairs and tables, under people’s feet. In with the dust, the dog hairs, and previously spilled beads or beads that had mysteriously escaped their trays.
She should have whispered, “Shoo Fly!”
Not screamed “Yikes!”.
YIKES!
I’ve never carried twelve trays of loose beads at once again.
Bead spills are not rare occurrences. In fact, some people spill beads like other people drink water.
There are the people who like to carry big purses in small places. These people are prone to sudden turns and distractions. Guaranteed spills!
These people need to understand the interrelationships between space, lack of space and time. Simple physics. Bead spills have physics, and I’m sure could easily be considered a science. Like, if you drop a bead, in what direction does it go? How far does it go? How fast does it travel? Do red beads behave similarly as blue beads? If someone dropped you from the top of a building, would you end up going in the same direction, and as far? Probably not.
So what is it about beads that makes things happen like dropping them off to the right, and finding them off to the left? Bead spills do not have the same physics as pick-up-sticks. That is for sure. They have laws of gravity and mass and energy all of their own.
Then there are the people who are torn between their love of beads and their love for their pets. It doesn’t matter if it’s a cat, a dog, a parrot or a fish. Beads spill. It could be a monkey or a ferret or even a Rogue Elephant. Beads spill. Sometimes it’s a dog AND a cat or a parrot AND a ferret. Beads spill.
People need to understand that animals understand the situation. Animals do not want to share their love — especially with beads. Beads are beautiful, but don’t need water or food. Beads are comforting to touch, but don’t need grooming. Beads are glorious in their splendor, but will not bite. It should come, then, as no surprise, that animals, when near any pile of beads, will instinctively have the urge to make them spill in ways you never thought of. Animals spill beads, but for more selfish reasons than humans.
The strategies of animals are legend, and have been written down in a secret book — Bead Spill Techniques for Dogs and Cats. You’ve seen these techniques in practice. Your cat angling for attention, moves toward you to sit in your lap — of course, moves toward you over your tray of beads. Your dog taking the pose to beg for treats while you’re moving your tray of beads from one end of the table to the other. Your pet actually eating those particular beads you’re working with right now. You catch them, but suddenly their tail goes swoof, and you are down on your hands and knees again picking up millions and millions of tiny, very small, eye-straining beads.
These animal-based-skills are very practiced and endless. Animals do not like playing second fiddle to beads. And if the pile of beads has been organized to accommodate the needs of a particular project, well, so much the better. They score more bead spill points.
Picking up spilled beads is a familiar routine. There’s nothing like dropping 14KT gold delica seed beads onto a gold shag carpet, getting on your hands and knees, and delving into product reclamation. Picking up bead spills works better when set to jazzercise music, but no music will suffice as well. Some people get crafty, and stretch a nylon stocking across the intake collection valve of a vacuum cleaner. Other people, however, are just plain tired of picking up beads. They let them stay where they fall. On the floors. In the couches. In clothing, in boxes, in food, in pots and pans.
New beaders seem especially concerned and anal-compulsive about spilled beads. They spot an errant bead, and rush to pick it up and place it in a container somewhere. Seasoned beaders have learned to live with such minor nuisances as combing beads out of their hair.
I again find myself writing a set of instructions for a piece to appear in a bead magazine later this year. It can be such a frustrating process for ME — the writer. And that’s because I don’t want it to be a frustrating process for anyone else. This is not easy to do.
Because this is for a magazine, I have to considerably stream-line my instructions and diagrams. Often that means assuming the reader has some experience and understanding with certain techniques or certain materials. Sometimes this means leaving out some things which are thought to be “obvious”. And it means leaving out a lot of the “Why.”
With this particular project, I don’t have space to explain why I chose FireLine rather than regular beading thread, though this was a critical choice to the success of the piece. I don’t have space to explain why I use peanut beads the way I do, though this too is critical for success. You could not substitute another bead for the peanut beads because this particular shape plays an important structural role in the piece. But no one reading the instructions will know this.
There is no room allowed for explaining why I changed the right angle weave thread-path from the traditional approach. And I don’t have any space to detail all the inspirational factors and color theory choices which influenced my design. If someone knew these, they probably could do more than merely re-make my piece. They could make my piece their own.
Diagrams are often critical for understanding how to proceed. Hopefully not in this case, but with other magazine articles, the editors have taken five or more separate diagrams and combined them into one. Try following the thread paths and you get vertigo. You get a searing headache. You get Jackson Pollock’s version of bead weaving on a page.
It is difficult enough to write instructions without them getting edited down to 2 or 3 magazine pages.
But for the instructions I give to my students in my classes, I no longer worry about page-length. I use some of the narrative to “think aloud” so my students can see the selection criteria I use and the choices I make. I present each step three ways: (1) written out, (2) photograph of piece at that stage, and (3) a diagram.
Some pointers I’ve learned for writing, at least, better instructions:
1) People learn in different ways. Some can read the text. Some need to look at a series of progressive images. Others are great at following diagrams. You need to be good at all three.
2) Include pictures of critical points in the project’s progress. Also include a picture of the finished piece.
3) Know how to begin the process. Include more details, images and diagrams related to beginning the process.
4) Write the steps logically and in order.
5) Keep each Step “short and simple”, and manageable.
6) Do not over-assume about your reader’s ability.
7) More problems occur for the reader when moving from one step to the next step, than accomplishing each particular step itself.
8) Provide encouragement along the way.
9) Show milestones and ways for people to track their progress.
10) Anticipate problems that might occur, or where your reader might get lost.
11) Pretest your instructions.
12) Clearly list all materials and tools needed. If some materials might be difficult or too pricey for someone to acquire, list substitutes.
13) If there are more than 7–10 steps to do, then categorize and group the steps into sets that are no longer than 7–10 steps.
14) Provide informational warnings so that people will be able to figure out if they have done something incorrectly or have started down the wrong track.
Instructions are often some of the worst-written documents you can find. Like me, you have probably had many infuriating experiences with badly written instructions.
By the point in your career where you become comfortable creating your own projects, and writing your own instructions, you probably have a lot of what is called “assumptive knowledge.” These are the kinds of things you do over and over again, to the point where you no longer think about them. They don’t end up getting included in your instructions because of this phenomenon. But these “assumptive knowledge” steps are often the key things novice jewelry makers trip up on. They need to be spelled out.
The piece pictured was supposed to be a straight line of beadwork, to be connected into a consistently-sized tube. Our local bead group was making this piece, and 10 of 11 of us did it wrong. All our tubes started to look snake-like and crooked. These instructions jumped from Step 1 to Step 4, back to Step 2, then over to Step 9. They were full of contingencies — do Step 1 if such and such is happening, but Step 5 if something else is happening. Almost each step had its own set of footnotes. There were 25 Steps and only 2 diagrams summarizing all the steps, each illustrating about 15 separate thread paths.
QUESTION: At what point did you realize you were addicted to beads?
People are always saying how addicting beads are. They express surprise that the pull of beads is so strong. They can’t stop buying and accumulating beads. They can’t go anywhere without stopping at the local bead store for a bead fix. They find themselves intentionally fooling or deceiving themselves about how many beads they actually have, or how much money they have spent on them.
Yes, beads are very addicting. Even though your drawers are full, you never have enough.
We asked our students, customers and colleagues to complete this sentence:
I never knew how addicting this was until….
…My car automatically turned into the parking lot in front of the bead store.
…I was laying in bed looking at my ceiling tiles and realized they were done in a “Peyote” stitch pattern!
…I made my beaded fish in progress into a screen-saver. It is all about the process, when will I finish? who cares… I have this beautiful thing to handle and see as I work. Such a pleasure!
… I began hiding a stash of money to buy beads: “It’s not like I’m sleeping around….I’m just buying beads.”
… I went shopping for clothes, but came back with only one bag — a bag of mixed beads.
…. I used 3 checks to pay for my order — one from a joint account with my husband, a second from an account in my name only, and a 3rd from my son’s account — luckily I had his checkbook in my purse. So now, my husband will think that I’m only spending a little bit, I can fool myself, and my son doesn’t care one way or the other.
… I converted my dining room to a bead room, and made my family eat in the den on TV trays.
… I found that despite my long and mostly constant love of fabric — I am after all a lifetime seamstress, having been comforted by the smell and color of fabric stores and the chush, chush, chushing of my mom’s Kenmore machine since first memories — could not resist the magnetic pull into the unknown. There, standing at the front door of my local craft store with nothing on my mind or agenda but 2 yards of multi-colored backing fabric for a client’s project, I saw the front of my wobbly plastic basket steering to the Northwest (Fabric is definitely to the Southwest) with such abandon that the lovely glass shelves in the center front of the store were in danger!
…I turned to beads for solace and a quiet focus. I have been going through a very hard time trying to keep a very ailing relationship together and when I could have been stressed out and worrying, I spent the time quietly beading. When I just wanted to go to bed and stay there for days, I was able to sit in my living room with my son and do bead work. To him, I was being with him and calm; to me, I was hiding in my beadwork and being near him. Beads have been my refuge. I have even read where hand needle work is a stress reliever, I am a living testament to that!
…I saw seed beads in what I scooped out of my cat box! I took my bead work and worked in the car on vacation. Every time I vacuum the sound of beads is heard. It seems every purse I clean out has some beads in it. I find beads on the back porch, when I sweep. It is a really tough decision, when I come to the off ramp which leads to the bead store and I really need to get home! I have more beads than projects for them!
…I gave up a Shoe Addiction for this…it better be worth it!
Today, it is imperative that that any jewelry designer who wants to sell their pieces must have an online presence. This could be as simple as a listing in a online directory like Yelp. You might have a Facebook page or Instagram account or a Pinterest board. You might have a website that functions like a billboard. Or you may have a website with its own commercial shopping cart.
Many jewelry designers, however, choose to place their business on one of the many craft marketplaces online. Etsy, perhaps, is the most widely known. Like anything else, this approach has some pros and some cons. Below I list some things to think about before choosing one or more sites. It is a smart move, however, to be located on more than one marketplace site.
I have found that many people get frustrated with these sites, in that sales can be minimal, or the numbers of people they are competing with seems daunting. But I have found these same people not doing all the necessary “good business” tasks, such as some intensive and persistent marketing of their wares, and smart photo and text detail for their pieces.
Question: WHAT KINDS OF EXPERIENCES HAVE YOU HAD, and WHAT KINDS OF TIPS CAN YOU OFFER?
Here’s some of the things I have found.
First, there are many, many online marketplaces to choose from. Some let you set up your own website, and others show your merchandise as part of a larger marketplace. Each has pros and cons. Perhaps one lesson is: “Don’t put all your eggs in one basket.”
The PROS to look for with any site: – low commission on sales – good traffic – ease of setting up your shop – having a lot of control over how your shop looks; how customizable it is – no monthly fees – web host does a lot of promotion – site has a good search function – site has good statistics, and lets you easily track traffic and what has sold, at what price point, and when, for both of your specific merchandise, as well as for all merchants with similar merchandise
The CONS to look for with any site: – high commissions and/or fees – when site is too big, may be difficult to get noticed – host limits how you list and present your items – host restricts your contact with your customers
Other types of questions to ask:
– Does site handle the billing and payments for you? – What kind of marketing does the site do? – Is it relatively easy to set up your site and keep it updated? – Are there any limitations on the numbers of items you might list at one time? – Are there any limitations on the number or size of photos you can include on your site? – How and where will your items appear in a search listing on the host’s site?
NOTE: Many sites put you at the front of the line for the first 30 days you have registered with them. Then they apply their regular ranking and rating algorithm, which, when you are new, puts you toward the bottom of the listing.
– What payment methods/options are allowed? – Does the site restrict items to “Handmade” only, and how is “Handmade” defined? You do not want to compete with cheap, imported, machine made jewelry. – How easy is it to contact customer service? Do they provide a lot of easy-to-follow tutorials for setting up and managing your site?
Different types of fees that might be assessed: 1. Listing fee 2. Sales commissions, usually as a percent of sale 3. Renewal fees (when listings are time limited) 4. Monthly site maintenance fees 5. Share of advertising fees 6. An extra shipping or postage charge to use when they handle your shipping, or enable you to purchase and print out a shipping label on the website
Some Tips and Advice:
(1) Your items should be different enough from others to set you apart, and get you remembered (2) If your items are similar to others, you might consider competing on price (3) Do NOT depend on the host to promote your site; you must actively — that means, almost every day — do things to promote your site. (4) Don’t just list your items and let them sit there (5) Excellent photos are a must (6) Treat your online shop as a business, not a hobby (7) Categorize and label your jewelry and jewelry lines; picture the words someone might type into a search bar in order to find this jewelry, and use those as key words in your labeling (8) Let your passion shine
Many, many people you will be competing with do not necessarily have good business sense, particularly when it comes to pricing their jewelry. People, in general, tend to underprice their pieces. They go out of business quickly. But while they’re in business, you are competing with them, and often you find it hard to compete on price.
This is a given. That means you have to spend more energy on marketing your competitive advantages, in order to justify the prices you need to charge, in order to stay in business. Some of this will come down to better presentation — more facts and great detailed images about your jewelry, and more details about the how your jewelry will benefit your customer. Better presentation equals more trust; more trust should translate into more sales. Some more competitive advantages: your jewelry is better made; it uses better materials; your line of jewelry is broader; you have better customer care policies; your style is more unique; your jewelry supports as “cause”.
And many, many more people you will be competing with have very good business sense. There are over 6 million items of jewelry on sale on Etsy at any one time — many by sharp, savvy artists. To get seen, heard and responded to takes emphasizing your competitive advantages, as well as persistent, broadly targeted marketing.
While I occasionally use armatures in my beadwork projects, I have a psychological aversion to them as somehow contaminating my beadwork, making it less pure, taking the sacred and making it profane. I think what I viscerally react to is how often, the way people use the armatures, makes the piece look more crafty or less finished.
Nevertheless, when you need your beadwork to hold a shape, what other things can you resort to?
What kinds of experiences do you have with armatures? What kinds of materials have you used, and which to you like to use best?
How do you marry the beadwork with the armature? Camouflage?
About Armature
Armature is used to create and preserve shape within a piece. It is a type of “skeleton” or internal structure.
Your goals, as a bead artist and jewelry designer, are to select an appropriate material and size of the armature, so that it does not compete or detract from your finished piece. You do not want your piece to look or feel “crafty.” You want it to look and feel artistic and well-designed. You do not want your piece to feel weak, or somehow insufficient, given the wearer’s and the viewer’s expectations.
You do not want the essence of the armature’s materials in any way to work against the essence of the material(s) your beads are made of. Usually, but not always, this means hiding the armature inside the piece.
In making your selection of armature, you need to understand the design-relationships between those sections of the piece requiring armature, and why they require it.
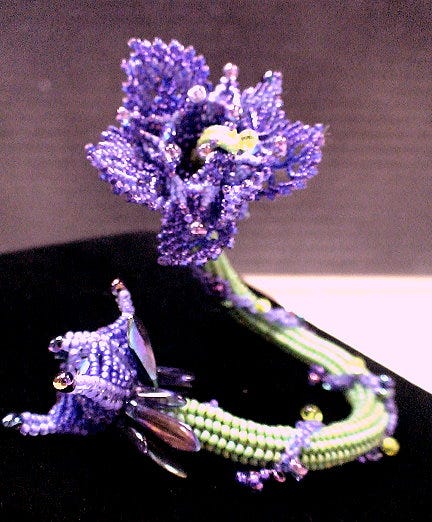
One reason is to create or preserve a Shape. In Autumn’s End (pictured), Kathleen Lynam wanted to turn the somewhat soft, floppy and flimsy Ndebele tube into a solid, 3-dimensional tube which maintained a consistence 3-D s cylindrical shape.
A second reason to use an armature is to Pose. In Autumn’s End, she wanted the Ndebele tube to make a circle around a person’s wrist, and, once there, stay in form and place. Thus, our armature needs some degree of flexibility, but at the same time, it must be able to hold the pose, as well.
A third reason has to do with Action. She was concerned with Action, when a part of her piece had to be animated in some way. This is somewhat important with Autumn’s End, in that our wearer will have to pull open and push closed on the wristlet, to get it on and off, and to position it comfortably on the wrist..
There are many types of materials bead artists and jewelry designers use to make armatures. Sometimes this involves stuffing with cotton or fiber fill. It might involve using tin foil. Othertimes, we might use a toothpick, dowel, straw, tubing, wire, or metal rod. We can also create the armature using glue or floor wax to create a solid or stiffened structure. We can also create our armature from sculpted clay, like polymer clay or metal clay or plastic wood.
Given the shape and pose requirements of Autumn’s End, her choices came down to plastic aquarium tubing, a thick-gauge wire, or plumber’s solder. The tubing would not have met her “pose” and “action” requirements anywhere near as well as the solder does. Nor would a thick gauge wire.
In this piece, she used the idea of “Armature” in a secondary way. She painted the flowers and leaves with acrylic floor wax. This stiffened the threads — what would be considered the canvas of the piece — so that these threads, too, turned into a type of armature preserving “shape” and “pose”.
Sometimes, jewelry must conform to a type of numerology — odds or evens or multiples of some number, like the number 3 — related to the numbers of beads or the numbers of strands or the numbers of drops.
Do you have a personal preference for ODDS or EVENS?
Such as,
— The number of beads on a strand?
— The number of strands in a necklace or bracelet?
— Or the number of bangle bracelets you wear on one arm?
— Or the number of beads you use to begin a peyote stitch project?
— Or the number of drops you include in your piece, or dangles you include in an earring?
— Or the number of colors or elements repeated in a pattern or jewelry segment?
— Or the number of fringes on an earring?
Is this ODDS/EVENS preference consistent all the time?
Or is it situational? That is, in certain circumstances you prefer ODDS, and in others, EVENS.
Is there any experiential, aesthetic or hypothetical basis for your preferences?
If you have a preference for one over the other, has does that affect your design process?
Do you get more compliments, when you are wearing one- or three-strand necklaces, than when you are wearing a two-strand or four-strand necklace?
Historically in Europe, it was considered bad luck and inappropriate to have an EVEN number of strands in a necklace. If you had a very long necklace that you would occasionally wrap around your neck multiple times, then it had to be long enough so that you could wrap it around an ODD number of times — such as tripled, never doubled. Even today, in etiquette books, such as “Miss Manners”, the rule is “Always Wear Odd Numbers of Strands of Pearls.” No explanation is given.
Russians even believe that you should never give an even number of flowers to your wife or girlfriend!
In ancient Babylon, even numbers were believed to be unlucky and somewhat demonic. To them, something should never be repeated an even number of times.
An ODD number of beads lets you define a specific center and focus.
Cognitively we prefer things with clear pointers and with clear symmetry.
But we also like balance and harmony and things to be distributed EVENLY.
Where do you come down in this ODDS vs. EVENS debate?
Abstract: Creativity isn’t found, it is developed. Creativity is a phenomenon where both something new and, at the same time, somehow valuable is created. While some people come to creativity naturally, in fact, everyone can develop their creative ability. Thinking creatively involves the integration and leveraging of three different kinds of ideas — insight and inspiration, establishing value, and implementing something. We work through creative thinking through divergence (that is, generating many possibilities), and convergence (that is, reducing the number of these possibilities). There are ten attributes associated with creative problem solving: fluency, flexibility, elaboration, originality, complexity, risk-taking, imagination, curiosity, assessment, and implementation. Last, different strategies are discussed for enhancing creativity and overcoming creative blocks.
CREATIVITY ISN’T FOUND, IT’S DEVELOPED
Kierkegaard — and I apologize for getting a little show-off-y with my reference — once described Creativity as “a passionate sense of the potential.” And I love this definition. Passion is very important. Passion and creativity can be summed up as some kind of intuitive sense made operational by bringing all your capabilities and wonderings and technical know-how to the fore. All your mechanical, imaginative and knowledge and skills grow over time, as do your abilities for creative thinking and applications. Creativity isn’t inherently natural. It is something that is developed over time as you get more and more experience designing jewelry.
You sit down, and you ask, what should I create? For most people, especially those getting started, they look for patterns and instructions in bead magazines or how-to books or websites online. They let someone else make all the creative choices for them. The singular creative choice here is picking what you want to make. And, when you’re starting, this is OK.
When you feel more comfortable with the materials and the techniques, you can begin to make additional choices. You can choose your own colors. You can make simple adaptations, such as changing out the bead, or changing the dimensions, or changing out a row, or adding a different clasp.
Eventually, however, you will want to confront the Creativity issue head on. You will want to decide that pursuing your innermost jewelry designer, no matter what pathway this takes you along, is the next thing, and right thing, to do. That means you want your jewelry and your beadwork to reflect your artistic hand. You want to develop a personal style. You want to come up with your own projects.
But applying yourself creatively is also work. It can be fun at times, but scary at others. There is an element of risk. You might not like what you end up doing. Your friends might not like it. Nor your family. You might not finish it. Or you might do it wrong. It always will seem easier to go with someone else’s project, already proven to be liked and tested — because it’s been published, and passed around, and done over and over again by many different people. Sometimes it seems insurmountable, after finishing one project, to decide what to do next. Exercising your creative abilities can sometimes be a bear.
But it’s important to keep pushing on. Challenging yourself. Developing yourself. Turning yourself into a bead artist or jewelry designer. And pursuing opportunities to exercise your creative talents even more, as you enter the world of design.
What Is Creativity?
We create. Invent. Discover. Imagine. Suppose. Predict. Delve into unknown or unpredictable situations and figure out fix-it strategies for resolution and to move forward. All of these are examples of creativity. We synthesize. Generate new or novel ideas. Find new arrangements of things. Seek out challenging tasks. Broaden our knowledge. Surround ourselves with interesting objects and interesting people. Again, these are examples of creativity.
Yet, creativity scares people. They are afraid they don’t have it. Or not enough of it. Or not as much as those other people, whom they think are creative, have. They don’t know how to bring it to the fore, or apply it.
But creativity shouldn’t scare you. Everyone has some creative abilities within themselves. For most people, they need to develop it. Cultivate it. Nourish it. They need to learn various tools and skills and understandings for developing it, applying it and managing it. Creativity is a process. We think, we try, we explore, we fall down and pick ourselves up again. Creativity involves work and commitment. It requires a lot of self-awareness — what we call metacognition. It takes some knowledge, skill and understanding. It can overwhelm at times. It can be blocked at other times.
But it is nothing to be scared about. Creativity is something we want to embrace because it can bring so much self-fulfillment, as well as bring joy and fulfillment to others. Creativity is not some divine gift. It is actually the skilled application of knowledge in new and exciting ways to create something which is valued. Creativity can be acquired and honed at any age or any experience level.
For the jewelry designer, it’s all about how to think creatively. Thinking creatively involves the integration and leveraging of three different kinds of ideas — insight and inspiration, establishing value, and implementing something.
(1) Seeing something out of nothing (perception). Technically, we talk about this as controlling the relationship of space to mass. You begin with a negative space. Within this space, you add points, lines, planes and shapes. As you add and arrange more stuff, the mass takes on meaning and content. The designer has to apply creative thinking in finding inspiration, choosing design elements, arranging them, constructing them, and manipulating them.
(2) Valuing something (cognition). Connections are made. Meaning and content, when experienced by people, result in a sense of appeal and value. We refer to this as desire and expression. Value can relate to the worth or cost of the materials, the intuitive application of ideas and techniques by the artist, the usefulness or functionality of the piece, or something rare about the piece. Value can center on the power to leverage the strengths of materials or techniques, and minimize their weaknesses. The designer has to apply creative thinking to anticipate how various audiences will judge the piece.
(3) Implementing something (acceptance). Jewelry design occurs within a particular interactive context and dialog. The designer translates inspirations into aspirations. Aspirations are then translated into design ideas. Design ideas are implemented, refined, changed, and implemented again until the finished product is introduced publicly. The design process has to be managed. When problems or road-blocks arise, fix-it strategies and solutions need to be accessed and applied. All this occurs in anticipation of how various audiences will respond to the jewelry, and convey their reactions to the artist, their friends, family and acquaintances, and make choices about wearing it and buying it and displaying it publicly. The designer has to apply creative thinking in determining why anyone would like the piece, want the piece, buy the piece, wear the piece, wear it publicly, and wear it again and again, or give it as a gift to someone else.
Types of Creativity
Creativity has two primary components: (1) originality, and (2) functionality or value.
The idea of originality can be off-putting. It doesn’t have to be. The jewelry, so creatively designed, does not have to be a totally and completely new and original design. The included design elements and arrangements do not have to be solely unique and never been done before.
Originality can be seen in making something stimulating, interesting or unusual. It can represent an incremental change which makes something better or more personal or a fresh perspective. It can be something that is a clever or unexpected rearrangement, or a great idea, insight, meaningful interpretation or emotion which shines through. It can include the design of new patterns and textures. It can accomplish connections between seemingly unrelated phenomena, and generate solutions. It can be a variation on a technique or how material gets used. It can be something that enhances the functionality or value of the piece.
Creativity in jewelry design marries that which is original to that which is functional, valued, useful, worthwhile, desired. These things are co-dependent, if any creative project is to be seen as successful. For jewelry designers, creativity is not the sketch or computer aided drawing. It is not the inspiration. It is not the piece which never sees the light of day, because then it would represent a mere object, not jewelry. Creativity requires implementation. And for jewelry designers, implementation is a very public enterprise.
What Does It Take To Be Creative?
Creative people tend to possess a high level of energy, intuitiveness, and discipline. They are also comfortable spending a great deal of time quietly thinking and reflecting. They understand what it means to cultivate emotions, both within themselves, as well as relative to the various audiences they interact with. They are able to stay engaged with their piece for as long as it takes to bring it to completion. They fall in love with their work and their work process.
Creativity is not something that you can use up. To the contrary, the more you use your creativity, the more you have it. It is developmental, and for the better jewelry designer, development is a continual, life long process of learning, playing, experimenting and doing.
To be creative, one must have the ability to identify new problems, rather than depending on others to define them. The designer must be good at transferring knowledge gained in one context to another in order to solve a problem or overcome something that is unknown. I call this developing a designer tool box of fix-it strategies which the designer takes everywhere. The designer is very goal-oriented and determined in his or her pursuit. But, at the same time, the jewelry designer also understands and expects that the design process is very incremental with a lot of non-linear, back-and-forth thinking and application. There is an underlying confidence and belief, however, that eventually all of this effort will lead to success.
How Do We Create?
It’s not what we create, but how we create!
The creative process involves managing the interplay of two types of thinking — Convergence and Divergence. Both are necessary for thinking creatively.
Divergent thinking is defined as the ability to generate or expand upon options and alternatives, no matter the goal, situation or context.
Convergent thinking is the opposite. This is defined as the ability to narrow down all these options and alternatives.
The fluent jewelry designer is able to comfortably weave back and forth between divergence and convergence, and know when the final choices are parsimonious and the piece is finished, and when the final choices will be judged as resonant and successful.
Brainstorming is a great example of how creative thinking is used. We ask ourselves What If…? How about…? Could we try this or that idea…? The primary exercise here is to think of all the possibilities, then whittle these down to a small set of solutions.
Creative Thinking
Creative thinking first involves cultivating divergent thinking skills and exposing ourselves to the new, the different, the unknown, the unexpected. It is, in part, a learning process. Then next, through our set of convergent thinking skills, we criticize, and meld, and synthesize, and connect ideas, and blend, and analyze, and test practicality, as we steer our thinking towards a singular, realistic, do-able solution in design.
Partly, what we always need to remember, is that this process of creative thinking in jewelry design also assists us finding that potential audience or audiences — weaver, buyer, exhibitor, collector — for our creative work. Jewelry is one of those special art forms which require going beyond a set of ideas, to recognizing how these ideas will be used. Jewelry is only art only when it is worn. Otherwise, it is a sculptural object.
There are 10 aspects to creative thought. Each should be considered as a separate set of skills, both for divergent as well as convergent thinking, which the jewelry designer wants to develop within him- or herself. Initially, the designer wants to learn, experiment with and apply these skills. Over time, the designer wants to develop a level of comprehension and fluency to the point that the application of each of this skills is somewhat automatic.
Fluency: Having a basic vocabulary in jewelry design, and the ability to see how these concepts and design elements are present (decoding) and arranged (composition, construction and manipulation). Divergence: to generate as many possible elements and combinations to increase number of possible designs.
Flexibility: Ability to adapt selections and arrangements, given new, unfamiliar or unknown situations. Divergence: generate a range and variety of possible configurations leading to same solution.
Elaboration: Ability to add to, embellish or build upon ideas incorporated into any jewelry design. Divergence: generate the widest variety of attributes of design elements and combinations which have value-added qualities, given a particular design.
Originality: Ability to create something new or different which has usefulness and value. Divergence: to delineate many ideas and concepts which are both new and have value.
Complexity: Ability to conceptualize difficult, multi-faceted, intricate, many-layered ideas and designs. Divergence: to take a solution and break it down or reinterpret it into as many multiple facets or multiple layers as possible.
Risk-Taking: Willingness to try new things or think of new possibilities in order to show the artist’s hand publicly and stand apart. Divergence: to elaborate the widest possible scenarios for publicly introducing the piece, given various design options, as well as all the ways these potential audiences might interact and use the jewelry, and all the ways these audiences might influence others, as well.
Imagination: Ability to be inspired, and to translate that inspiration into an aspiration. Divergence: to think of many ways an inspiration might be described, interpreted, or experienced physically and emotionally, and to identify the many different ways inspirations might be interpreted into a jewelry design.
Curiosity: Ability to probe, question, search, wanting to know more about something. Divergence: questioning the situation from many angles and perspectives.
Assessment: Ability to anticipate shared understandings, values and desires of various audiences for any piece of jewelry. Divergence: identifying all the possible audiences a piece of jewelry might have, and all the different ways they might judge the piece as finished (parsimonious) and successful (resonant).
Implementation: Ability to translate aspirations into a finished jewelry design and design process. Divergence: delineating all the possibilities an aspiration might get translated into a design, evaluated against all the possibilities the design could be successfully, practically and realistically implemented.
Enhancing Creativity and Overcoming Creativity Block
So, what kinds of creative advice can I offer you about enhancing your creativity? How can you nurture your creative impulses? How can you overcome roadblocks that might impede you?
Here is some of my advice:
Success Stories. While you are fiddling with beads and wire and clasps and everything else, try to be as aware as you can of why your successes are successful. What are all the things you did to succeed? On what points does everyone agree the project succeeds?
Un-Block. Don’t set up any road blocks. Many people, rather than venture onto an unknown highway of creativity, put up walls to delay their path. If they just had the right beads. Or the right colors. Or sufficient time. Or had learned one more technique. Or had taken one more class. Or could find a better clasp. These are excuses. Excuses to avoid getting creative.
Adapt. Anticipate contingencies. It amazes me how many people come into my shop with a picture out of a magazine. We probably can find over half the components, but for the remaining components pictured which we don’t have in stock, we suggest substitutes. But, NO, the customer has to have it exactly like the picture, or not at all. Not every store has every bead and component. Many beads and components are not made all the time. Many colors vary from batch to batch. Many established companies have components especially made up for them — and not available to the general public. The supplies of many beads and components are very limited — not unlimited. Always be prepared to make substitutions and adapt.
Play. Be a kid again. Let your imagination run wild. Try things. Try anything. If the world says your color combination is ugly, don’t listen to them. Do it anyway. Ignore all restrictions. Forget about social and art conventions.
Be Curious. Play “What If…” games. What if a different color? What if a different technique? What if a different width or length? What if a different style of clasp. Re-arrange things. Tweak. Take out a bead board, and lay out beads and findings on the board, and re-order everything — Ask yourself: More or less satisfying?
Embrace the New / Challenge yourself. Don’t do the same project over and over again, simply because you have proven to yourself that you can make it. While you might want to repeat a project, with some variations, to learn more things, too much doing of the same-ole, same-ole, can be very stifling.
Create An Imaginative Working Space / Manage Disruptions and Disruptors. You need comfortable seating, good lighting, smart organization of parts and tools and projects-in-process. Some people like music playing. If family or friends tend to interrupt you, explain to them you need some boundaries at certain times of the day or days of the week.
Evaluate / Be metacognitive. Learn from failures. You have invested time, money and effort into making these pieces. And not everything works out, or works out well. Figure out why, and turn these failed pieces into lessons and insights. Give yourself permission to be wrong. Build up your skills for self-awareness, self-management and self-assessment.
Take a break / Break your daily routine / Incubate it / Sleep on it. And if you suddenly find your productivity interrupted by Bead-Block and Artist-Block and Jeweler’s-Block, put your project down. Take a break. Mull on things awhile. Put yourself in a different environment. Take a walk. Sleep. A period of interruption or rest from a problem may aid creative problem-solving in that it lets us let go of or forget some misleading cues, thoughts, feelings and ideas.
Network / Connect With Other Jewelry Designers and Artists / Collaborate on a Project. Here you want to tap into and absorb someone else’s energy, knowledge and insights. Surround yourself with interesting and creative people. Learn different ways of knowing and doing. Get encouragement. Find a mentor. The fastest way to become creative is to hang around with creative people.
Do something out of the ordinary. Something unexpected. Or something just not done. This will shock your system to think in different ways. To see things in a new light. To recognize contradictions. Robert Alan Black gives great advice. He shouts at the blocked: Break A Crayon. He shouts again: Draw Outside The Lines. And I would add and shout: Stick your hands into a bowl full of mud or jello.
These are all great advice.
Make creativity a habit. Make it routine in your daily life.
– Keep a journal. Write down your thoughts and experiences and insights.
– As you create a new piece, keep a running written log of all the choices you are making.
– Challenge yourself. Change colors, arrangements, sizes and shapes. Create forms and new components. Think of different silhouettes.
– Expand your knowledge base and skills. Look for connections with other disciplines.
-Surround yourself with interesting things and interesting people. Get together regularly. Collaborate. Take a field trip together.
What Should I Create?
The process of jewelry making begins with the question, What Should I Create?
You want to create something which results in an emotional engagement. That means, when you or someone else interacts with your piece, they should feel some kind of connection. They might see something as useful. It may have meaning. Or it may speak to a personal desire. It may increase a sense of self-esteem. It may persuade someone to buy it. It may feel especially powerful or beautiful or entertaining. They may want to share it with someone else.
You want to create something that you care about. It should not be about following trends. It should be about reflecting your inner artist and designer — what you like, how you see the world, what you want to do. Love what you are making. Otherwise, you run the risk of burning out.
It is easier to create work with someone specific in mind. This is called backwards design. You anticipate how someone else would like what you do, want to wear it, buy it, and then let this influence you in your selection about materials, techniques and composition. This might be a specific person, or a type of person, such as a potential class of buyers.
Keep things simple and parsimonious. Edit your ideas. You do not want to over-do or under-do your pieces. You do not have to include everything in one piece. You can do several pieces. Showing restraint allows for better communication with your audiences. Each piece you make should not look like you are frantically trying to prove yourself. They should look like you have given a lot of thought about how others should emotionally engage with your piece.
There is always a lot of pressure to brand yourself. That means sticking with certain themes, designs or materials. But this can be a little stifling, if you want to develop your creativity. Take the time to explore new avenues of work.
You want to give yourself some time to find inspirations. A walk in nature. A visit to a museum. Involvement with a social cause. Participation in a ritual or ceremony. Studying color samples at a paint store. A dream. A sense of spirituality or other feeling. A translation of something verbal into something visual. Inspirations are all around you.
Final Words of Wisdom
We don’t learn to be creative We become creative. We develop a host of creative thinking skills. We reflect and make ourselves aware of all the various choices we make, the connections we see, the reactions we get, and the implications which result.
We need to be open to possibility.
We need to have a comfort level in taking the unknown or unexpected, and bridging the differences. That is, connecting what we know and feel and project to ideas for integrating all the pieces before us into a completed jewelry design. We need to become good translators, managing our choices from inspiration to aspiration to completed design.
We need to be able to hold on to the paradoxes between mass and space, form and freedom, thought and feeling, long enough so that we can complete each jewelry making project. We need to be comfortable while designing during what often become long periods of solitude.
We need to know jewelry and jewelry making materials and techniques inside and out. We need to know how to maximize their strengths and minimize their weaknesses. We need to be able to discover new ways of designing with them. It is critical that we put ourselves on a path towards greater fluency, flexibility and originality.
We must be willing to give and receive criticism.
We must be aware, not only of our desires, goals and understandings, but those of our various audiences, as well.
Be motivated by the design process itself, and not its possible and potential external rewards.
We must be very reflective and metacognitive of how we think, speak and work as jewelry designers.
We need to give ourselves permission to make mistakes.
We must design things we care about.
_________________________________________
FOOTNOTES
Besemer, S.P. and D.J. Treffinger. Analysis of Creative Products: Review and Synthesis. Wiley Online Library, (1981).
Maital, Shlomo. “How IBM’s Executive School Fostered Creativity,” Global Crisis Blog, April 7, 2014. Summarizes Louis R. Mobley’s writings on creativity, 1956.
March, Anna Craft. Creativity in Education. Report prepared for the Qualifications and Curriculum Authority, March, 2001.
Seltzer, Kimberly and Tom Bentley. The Creative Age: Knowledge and Skills for the New Economy. Demos, 1999.
Torrance, E. P. The Torrance Tests of Creative Thinking-Norms-Technical Manual Research Edition- Verbal Tests, Forms A and B-Figural Tests, Forms A and B. Princeton, NJ: Personnel Press, 1966.
Torrance, E. P. The Torrance Tests of Creative Thinking-Norms-Technical Manual Research Edition- Verbal Tests, Forms A and B- Figural Tests, Forms A and B. Princeton, NJ: Personnel Press, 1974.
Turak, August. “Can Creativity Be Taught,” Forbes, May 22, 2011.
The Jewelry Designer makes many choices when creating a piece of jewelry. Lots of things to manage and accomplish.
Probably the two most important choices, right up front, in creating a wearable art-piece that will be around for future generations are your: (1) Stringing Material, and (2) Clasp
When you work with so many customers in a store, and so many students in classes, you begin to see that people are not necessarily that great in selecting clasps. Many are in a clasps-rut — they use the same clasp over and over again.
Others pick out clasps they find appealing, whether or not they would visually or functionally work with the piece they have made.
Few people anticipate how they are going to attach the clasp to their beadwork, often resulting in an overly long, awkwardly connected clasp assembly.
So, how to you go about choosing clasps?
Clasps always seem like they’ve been someone’s last thought. They should be the first thought. Or at least thought about concurrently with the design of the piece. But they should never be the last thought.
As clasps should be thought of in their entirety — as clasp assemblies. Clasp assemblies include all the rings, loops and other hardware necessary to attach the clasp to the beadwork. The clasp itself may be beautiful, but the entire clasp assembly may not be.
But many people get so excited creating their beadwork, that they forget about the clasp — until the last moment. You can tell when the jewelry maker hasn’t put much thought into their choice of clasp in many ways. Often, the clasp doesn’t look like it was meant to go with the bead work or general design. It might be out of proportion. It might be a different texture or sensibility. Its function — how you open and close it, while wearing your jewelry — might seem odd, perhaps unnatural. And not only does the choice of clasp seem as an after-thought, but how to attach to the bead work to that clasp seems un-thought out, as well.
So it’s not surprising, that when we were repairing jewelry on a regular basis, about 80% of the pieces to be fixed had broken at the clasp.
It is best to, in part, build your design around your clasp. If your piece has a centerpiece or focal point, then how does this link up to or coordinate with the clasp. At the least, when visualizing your beadwork, include an image of the clasp and how it is attached at both ends. The world is full of clasps. Not every clasp is a jeweler’s best friend. But it depends.
The clasp needs to visually fit with the beadwork. It needs to function as the artist intended. It needs to function in a way the wearer can relate to, use and handle. It needs to be appropriate for the piece and the context in which it is too be worn. It should not compete with the beadwork. It should complement it. Ideally, at least from a design perspective, your clasp should look and feel as if it were an integral part of the entire piece.
In a Gallery setting, if you are selling your jewelry there, you usually want a very functional, but not overwhelming, clasp. You are selling your beadwork, and you don’t want your clasp to compete with this.
In a Department Store, setting, however, often the clasp sells the piece. In this setting, choosing a clasp requires a different kind of logic, thinking and anticipation.
Some clasp-types are “expected” to be a part of the piece — even if the particular choice of type would not be the best choice in the world. Traditions dictate clasp choices in some situations.
The former owner of a local Tennessee pearl company was very frustrated with clasps. She sold a lot of finished pearl jewelry at very high prices, and had been using 14KT gold pearl and safety clasps. Her customers sent a lot of their pearl necklaces and bracelets back for repairs, because their clasps broke. And this company felt, because the prices of these pieces were very high, that they were obligated to replace the clasps and re-string these pearl-knotted pieces at no additional charge. 14KT clasps — particularly the pearl, safety and filigree box clasps — do not hold up well, because gold is a very soft metal.
Replacing clasps on a pearl-knotted piece is quite some job. You have to cut up the piece to free up each bead, and then you begin the knotting and finishing off processes again. It turns out, the 14KT clasps were not the only expensive part of the bracelets — making the knots between each pearl was the time-consuming and costly part.
She desperately wanted to reduce the number of repairs. Her first idea was to replace the pearl and safety clasps with other styles which were sturdier. However, these pieces didn’t sell. People wanted the pearl and filigree clasps. The designs of these clasps were so traditional and so locked into their expectations for what pearl-knotted jewelry should look like, that they would not compromise.
Her second effort, she tried replacing the 14KT pearl and filigree clasps with gold-filled ones which were stronger, but this made her customers very angry — they wanted 14KT gold.
So, her final strategy, she returned to using 14KT gold pearl clasps, and doubled her prices. She built in the cost of one repair into the prices she charged. And only then could she present her happy face to her customers, and her somewhat-happy face to herself when she was in private.
A LESSON IN USING COLOR SIMULTANEITY EFFECTS: The Contemporized Etruscan Collar
Several years ago, I had been asked to do a week-long jewelry design workshop in Cortona, Italy. The topic I selected was on Contemporizing Traditional Etruscan Jewelry. One of the projects I developed for the workshop was this Contemporized Etruscan Collar. The challenge, here for me, was to create a sophisticated, wearable, and attractive piece that exemplified concepts about contemporizing traditional jewelry.
Contemporizing Traditional Jewelry has to do with how you take particular traditional forms and techniques, and both add your personal style to the pieces, as well as make them more relevant to today’s sense of fashion and style. The challenge for the designer is how to keep traditional ideas essential and alive for today’s audience.
Things clicked. I found a traditional Etruscan Collar that I immediately connected with.
The Contemporized Etruscan Collar
The contemporized piece basically consists of two staggered and overlapping bead-woven strips. The bead-woven technique used is the Ndebele Stitch (sometimes called Herringbone).
There are many design theory elements incorporated into this piece, including dimensionality, curvature, malleability, and movement. One of the more interesting theories I applied here has to do with color simultaneity effects.
Color Simultaneity Effects
Picking colors is about making strategic choices. Picking colors is very revealing about the jewelry artist’s understanding of how the bead asserts its needs for color. One set of color-theories employed to make these kinds of choices has to do with Simultaneity Effects. Colors in the presence of other colors get perceived differently, depending on the color combination.
For example, a White Square on a Black background looks bigger than a Black Square on a white background. White reaches out and overflows the boundary; black contracts.
Another example: Gray always picks up some of the color characteristics of other colors around it. Gray next to orange will appear to have an orange tone to it. Gray next to green will appear to have a green tone to it. A “Gray” bead is one, the color of which, has a strong gray or black tone to it.
Besides the obvious “gray”, these other colors function as a “gray”: montana blue, alexandrite, colorado topaz, prairie green. Many color-lined and silver-lined beads can function as a “gray”, particularly when the glass color is other than clear. Many metallic or otherwise reflective surface beads can function as a “gray”.
A final example of simultaneity effects has to do with how people sense whether colors are warm or cool. In one composition, depending on the color mix, a particular color might be felt as “warm”. In a second composition, with a different color mix, that same color might be felt as “cool”. You can picture a yellow square surrounded by white feels lighter, brighter and a different temperature than its counterpart surrounded by black. A red square surrounded by black feels darker, duller, and a different temperature than its counterpart surrounded by white.
Existence of these simultaneity effects is a great piece of information for the designer. There will be gaps of color and light between beads. Many bead colors are imperfect, particularly in combination. Playing with simultaneity effects gives the designer tools to overcome some of the color limitations associated with the bead and the gaps of light between beads. These allow you to “blend” and build “bridges” and create “transitions.”
Look back at the images of the Ndebele-stitched piece. When you work with beads, there are always gaps between them. In the Ndebele-stitch, there are many and very pronounced gaps of light between beads. This can be very threatening to a viewer. People are pre-wired to avoid things which might harm them, such as snakes and spiders. This is our fear- or anxiety-response.
We can summarize most color theories as a set of principles the brain uses — both in perception and cognition — to find a state of color or colors which are harmonious. That is, people like to see and feel comfortable and safe with colors which harmonize and go together. When we start to lose that harmonious state of color, this makes the brain edgy. When the brain starts to get edgy, we start to interpret pieces as boring, monotonous, scary, dangerous, will cause death. We innately reject, as part of our pre-wired fear response, that which does not follow good principles of color.
Any viewer’s brain will immediately try to interpret what it sees and make sense of it. This includes jewelry. The viewer’s brain needs to know immediately whether to approach or flee. Each time the eye/brain comes to the end of the bead and is confronted with a gap of light separating it from the next bead, it’s similar to a person approaching a cliff, and getting asked to jump off of that cliff.
No one wants to jump off a cliff. And no one’s eye/brain wants to jump over a gap of light between two beads. It’s risky. It’s work. Things don’t feel harmonious.
We have to fool ourselves, that is, our brain, in some way. Color theories offer us many possible ideas on how to do this. I find using simultaneity effects works especially well in jewelry compositions using beads. Certain colors, when juxtaposed, create their own meanings, and fool the brain into thinking it sees something in these gaps, or is somehow more motivated to fill in the gaps, and proceed from one bead to the next.
In this Etruscan Collar project, many of my color choices were based on an understanding of simultaneity effects.
The DESIGN PERSPECTIVE is very focused on teaching beaders and jewelry makers how to make choices. Choices about what materials to include, and not to include. Choices about strategies and techniques of construction. Choices about mechanics. Choices about aesthetics. Choices about how best to evoke emotions.
These choices must also reflect an understanding of the bead and its related components. How do all these pieces, in conjunction with stringing materials, assert their needs? Their needs for color, light and shadow. Their needs for durability, flexibility, drape, movement and wearability. Their needs for social or psychological or cultural or contextual appropriateness — an appropriateness that has to do with satisfaction, beauty, fashion and style, as well as power and influence.
This DESIGN PERSPECTIVE contrasts with the more predominant Craft Approach, where the beader or jewelry maker merely follows a set of steps and ends up with something. Here, in this step-by-step approach, all the choices have been made for them. They never learn the implications of using one bead vs. another, one stringing material vs. another or one clasp vs. another.
And this DESIGN PERSPECTIVE also contrasts with another widespread approach to beading and jewelry making — the Art Tradition — which focuses on achieving ideals of beauty, whether the jewelry is worn or not. Here the beader or jewelry maker learns to apply art theories learned by painters and sculptors, and assumed to apply equally to beads and jewelry, as well. Jewelry is judged as it sits on a mannequin or easel. Functionality is subsumed under Appeal. Things like the strap, clasp assembly and bail are merely seen as supplemental to the piece, as a frame is to a painting or a pedestal to sculpture.
The Craft Approach and the Art Tradition ignore too much of the functional and contextual essence of jewelry. Because of this, they often steer the beader and jewelry maker in the wrong directions. Making the wrong choices. Exercising the wrong judgments. Applying the wrong tradeoffs between aesthetics and functionality and context.
The focus of the DESIGN PERSPECTIVE is strategic thinking. At the core of this thinking are a series of design principles and their skillful applications. These principles go beyond a set of techniques. These principles and the strategies for applying them provide the beader and jewelry maker with some clarity in a muddled world.
Learning about Design begins with the belief that there are many different kinds of information that must come together and be applied to make a finished and successful piece of jewelry. Art. Architecture. Physical mechanics. Sociology, Anthropology and Psychology. Some Business. Even some Party Planning. It is impossible to clearly learn and integrate all this information all at once.
When all this knowledge which needs to come to bear in creating and constructing a piece of jewelry is learned haphazardly or randomly, as most people do, it becomes problematic. It becomes more difficult or too confusing to successfully bring into play all these kinds of things the beader or jewelry maker needs to know when designing and constructing a piece of jewelry in the moment.
Thus, the beader and jewelry maker best learn all this related yet disparate information in an developmental, hierarchical order, based on some coherent grammar or set of rules of design. Seemingly disparate skills are learned as interrelated, integrated clusters. By learning within this organized structure and informational hierarchy, the jewelry artist best sees how everything interrelates and comes together. The designer develops the ability to decode expressive information, and to fluently organize and arrange it. This is how disciplinary literacy is developed within the DESIGN PERSPECTIVE.
So, we begin with a Core set of skills and concepts, and how these are interrelated and applied. Then we move on to a Second Set of skills and concepts, their interrelationships and applications, and identifying how they are related to the Core. And onward again to a Third Set of skills and concepts, their interrelationships and applications and relationship to the Second Set and the Core, and so forth.
In the DESIGN PERSPECTIVE, “Jewelry” is understood as Art, but is only Art as it is worn. It is not considered Art when sitting on a mannequin or easel. Because of this, the principles learned through Craft or Art are important, but not sufficient for learning good jewelry design and fashioning good jewelry.
Learning good jewelry design creates its own challenges. All jewelry functions in a 3-dimensional space, particularly sensitive to position, volume and scale. Jewelry must stand on its own as an object of art. But it must also exist as an object of art which interacts with people (and a person’s body), movement, personality, and quirks of the wearer, and of the viewer, as well as the environment and context. Jewelry serves many purposes, some aesthetic, some functional, some social and cultural, some psychological.
The focus of the DESIGN PERSPECTIVE is on the parts and their construction. How do you choose parts? How should they be used, and not be used? How do you assemble them and combine them in such a way that the whole is greater than the sum of the parts? How do you create and build in support systems within your jewelry to enable that greater movement, more flexibility, better draping, longer durability? How do you anticipate stresses and strains? How do you parsimoniously use all these parts, making them resonate and evoking that emotional response from your audience to your style, vision and creative hand that you so desire?
The beader and jewelry maker are seen as multi-functional professionals, similar to an architect who builds houses and an engineer who builds bridges. In all these cases, the professional must bring a lot of very different kinds of skills and abilities to bear, when constructing, whether house or bridge or jewelry. The professional has to be able to manage artistic design, functionality, and the interaction of the object with the person and that person’s environment.
Women don’t just wear pieces of jewelry — they inhabit them.
Buying a piece of jewelry for yourself — a necklace, a bracelet, earrings, a brooch, something else — isn’t a task easily given to someone else. It’s often not a spur of the moment thing either. You just don’t rush off to the local boutique or the local Wal-Mart, grab whatever you see, and go home.
I’m not talking about that impulse buy during your leisurely visit to the mall. I’m referring to purchasing those pieces of jewelry you know will have to do a lot of the hard work to accessorize your wardrobe and help you get the compliments and notice of your family, friends and co-workers you comport with and compete with each and every day.
No, buying a piece of jewelry for yourself is a multi-purposed moment, one which must be thought through carefully and one which must be savored. Lest you buy the wrong piece. That doesn’t really go with what you intend to wear. Or is over-priced. Or poorly made. Or conveys the wrong impression about status. Or is out of fashion. Or something one of your friends already has.
The jewelry you buy has to conform to quite a long list of essential criteria before you could ever think of buying it. It is something you will wear more than once. As such, it is your companion. Your necklace is not merely lying around your neck. Or your bracelet around your wrist. Or your earrings dangling from your ears.
Jewelry can cause you to lose face with others. It can irritate or scratch your skin, or get caught up in your hair. It might weigh you down or stretch or tear your ear lobes. Jewelry can break without warning in the most unexpected and embarrassing of places. It can get caught on things, sometimes hurting you in the process.
Jewelry conveys to the world something about who you really are, or think you are. As such, jewelry is very personal. Your private, innermost, most soul searching choices made very public for all to see.
As you caress it, as you touch the smooth or faceted or creviced beads and metal parts or the clasp or the material the beads are strung on, when you twist and move the piece within your hand, you are confirming to yourself the extent to which your jewelry is doing its job.
When you buy new jewelry, the dilemmas multiply. How will the new compare to the old? Will it be able to handle all these responsibilities — looking good, representing you, fitting in with your wardrobe, meeting the expectations of others? Like divorcing, then remarrying, changing your jewelry can take some time for readjustment.
And you do not want to be seen as noncommittal to your jewelry. This would sort of be like going to a hotel, but not unpacking your suitcase while staying in the room. Conveying some sort of social or psychological distance from your jewelry can be very unsettling for others.
So you need to inhabit it. You need to inhabit your jewelry, wear it with conviction, pride and satisfaction. Be one with it.
Inhabiting jewelry often comes with a price. There becomes so much pressure to buy the “right” pieces, given all the roles we demand our jewelry to play, that we too often stick with the same brands, the same colors, the same styles, the same silhouettes. We get stuck in this rut and are afraid to step out of it.
Or we wear too many pieces of jewelry. The long earrings, plus the cuff bracelets on both arms, plus the head band, plus the hair ornament, plus the 7-strand necklace, plus the 5 rings. We are ever uncertain which piece or pieces will succeed at what, so hopefully, at least some combination or subset of what we wear will work out.
In a similar way, we wear over-embellished pieces — lots of charms, lots of dangles, lots of fringe, lots of strands. Something will surely be the right color, the right fit and proportion, the right fashion, the right power statement, the right reflection of me.
And our need to inhabit our jewelry comes with one more price. We are too willing to overpay for poorly made pieces in our desperation to have that right look. The $100.00 of beads strung on elastic string. The poorly dyed stones which fade in the light. The poorly crimped and overly stiff pieces with little ease for accommodating movement and frequent wear.
It is OK to inhabit our jewelry. In fact, it is necessary, given all we want jewelry to do for us. But we need to be smart about it. We need to learn to recognize better designs and better designers.
To what extent do (and should) business concerns influence the artistic choices bead and jewelry artists make?
I’d say “A Lot!”
But this isn’t what a lot of artists like to hear.
You have to market to audiences. You may have to standardize things to be able to make the same thing over and over again. You may have to work in a production mode and repeat making certain designs, rather than freely create and design anew each time. You have to price things so that they will sell, and you have to price things so that you can make a sufficient profit. You can’t undersell yourself, like offering discounts to family, friends and co-workers.
You have to conform to prevalent styles and colors and forms. You have to make things which will photograph well for sale online. You have to make things that local stores want and are willing to buy or put on consignment. You may end up with a lot of “one size fits all.”
You find that if you want to make your jewelry design into a successful business, you may have to compromise with yourself, your artistic drives and sensibilities. You may have to limit what you offer. In order to make that sale. In order to make a profit. And stay in business.
Business involves: – Putting your artwork on a sound cost/revenue footing – Developing market-driven strategies (as opposed to product-driven ones) – Pricing your pieces for sale – Implementing various selling strategies – Compromising artistic and design choices, in the interest of the business — Understanding how the creative marketplace works
Over and over again, I have seen one jewelry artist after another fail as a business. The reasons repeat themselves as well.
1. A reluctance to learn how to conduct oneself as a business.
Many jewelry artists get so excited after selling their first piece, that they think they don’t have to get too involved with business principles. They understand their “business” as a “necklace-by-necklace” endeavor. Make something, sell it. Doesn’t matter what the price. Doesn’t matter to whom. Doesn’t matter if making the piece in the first place is in line with the resources you currently have to make the piece, or will drive you in debt in order to get those resources.
Artists need to focus on what’s called “Velocity” — the rate of sales, rather than the number of sales. You need to have in place sufficient strategies for keeping the money turning over at a constant rate. If you can’t maintain this rate, you go in the hole. You make something. You sell it. You reallocate the money you just made to reinvesting in more inventory, replacing the inventory you sold, evaluating the pros and cons of the sale that just happened, adjusting accordingly, and strategizing how to keep this velocity going at a constant, or ever-increasing, velocity.
And artists need to keep good records, and implement good accounting principles.
2. Gets Bored.
People who get started are very excited. They’ve made a lot of pretty pieces, and someone has bought some of them. But then you need to leave your creative mode, and enter a production mode. You need to discipline yourself to make the same things over and over again. Many artists quickly lose interest.
3. A fear of marketing your own things
You won’t succeed without marketing. Marketing is more than advertising. It includes all forms of self-promotion. It includes doing research on your markets and market niches, how to reach them, how to get their attention, how to get them to translate this attention into needs and wants and desires, and how to get them to part with some money.
Many artists are shy about self-promotion. Time to train yourself, if this is you, to get over it.
4. Trying to please all audiences
When people get started, they are reluctant to use the “No” word. They want to please everyone. But when you get started, you can’t. It will put you out of business.
Let’s say you have some jewelry that is predominantly purple. Someone at work loves the jewelry, but asks if you can make it in red. If you don’t have an inventory of red beads, and will have to go out and buy them, it may make this sale foolish, from a business standpoint. You can’t buy just one bead at a time; you need to buy strands or packages of these beads. You will have a lot left over.
When you start, you need to pursue a strategy of depth, rather than breadth. You want to buy a limited number of pieces in large quantities to get adequate price breaks. So, initially, your designs will be limited, as well. You need to be able to say No. No to your family. No to your friends. No to the people you work with.
In my experience, such as the situation with red vs purple beads above, when you say No, the potential customer tends to make a face. Pitiful. Angry. Frustrated. Sad. Pleading. If you can wait 60 seconds, in almost every case, the customer stops making this face, and says, “OK, I’ll take what you have in purple.” But so many jewelry artists can’t wait that 60 seconds.
And don’t give these people discounts. They’re already getting it cheaper, than if they bought the same piece in a store. One major way your business will get built up is word-of-mouth. You don’t want some of that information to include extremely low price expectations that will never be self-supporting in your business.
5. Doesn’t do homework on the competition
You need to understand how other jewelry artists you compete with function as a business.
How do they define their markets? How do they price things? What kinds of inventory do they carry? What kinds do they NOT carry? Where do they advertise? How do they promote themselves? How do they define their competitive advantage — that is, all the reasons people should buy from them, rather than from anyone else, like you? Where do they sell things — stores, shows, fairs, online, etc? What seems to work better for them?
You can find a lot of this out by Googling. You can look for jewelry designers. Directories of jewelry designers. You can plug in a jewelry designer’s website, and see where they are listed, and who lists them.
6. Doesn’t Educate Self About The Business Marketplace
You already know that you want to sell your pieces. But why would someone else want to sell them for you?
What’s in it for that gallery or consignment shop or boutique? How do they make money? What’s their customer base? Why do they shop there? What are their preferences? What is the feel and flavor of what the businesses carry in their shops?
Most businesses spend years establishing a reputation and brand. They attract customers who, in turn, are attracted to that brand identify. So they are looking for certain similar things they already carry or fit with the theme or perspective of their business. But, at the same time, they don’t want the exact same things. They already have those things. They want things that coordinate and compliment. If your style is avant garde, and the business style is Victorian romantic, there is not going to be a fit. It won’t work out for you in this location.