I have found Instagram the best social media site for promoting your jewelry sales, and their algorithm has changed for the better for us
Before, Instagram would show new posts to 1% of your followers first and, depending on the response, share further.
This favored accounts with a large following, such as influencers or jewelry designers with especially large followings, since their 1% is a lot more than the 1% of a small account.
Now, every new post will be shown to a random group of users, usually ones with a shared interest in the kind of posts you create. Think: followers of your followers who don’t yet follow you will get prioritized. Aggregators accounts, like influencers, will get diminished a bit. In a similar vein, co-occurring is this situation: If you post an image on your own feed as well as with an influencer’s feed, that image will only appear on your own feed, not on the influencer’s. Instagram’s goal is to reward originality and the creator.
This is great news for smaller accounts: it widens the funnel of potential engagement with each post.
Reels are still important, but they’re no longer the only ones.
Focus on posting a mix of Reels, still images, and carousels. Should NOT be all reels all the time. The important factor is that you are giving your followers value. Make them feel like you are giving them something.
Give people something to read (in the post or the caption)
Provide an insider point of view to your jewelry-making process
Choose an eye-catching cover image for all posts (hook them)
Better lighting often solves many issues of gaining and keeping attention. Also bring people in close to the elements in the image. Focus on a a section of the piece. Show them your hands at work. Don’t pull back for that wide shot of everything necessarily.
Bring people in close, show them what you’re doing.
Give viewers a reason to watch your entire Reel.
NO’s: Instead of simply showing your work, using captions such as:
❌ “Here’s my latest piece of jewelry…”
❌ “I have an event coming…”
❌ “My website is now live…”
YES’s: Capture their attention first, and then make your announcement:
✅ “Here’s how I turned this run-of-the-mill necklace into an exciting one..” finishing with “This piece is now available”
✅ “You won’t believe how this piece turned out…” followed by “Come see this piece live at my next show.”
WARNINGs: Less time-lapse of showing each step after it has been completed, and more showing something actionable, like implementing each step.
Come up with something that will make people hang out until the interesting part. Come up with things to make people stick around. Bring them close-in to the action. Be sure they see you sometime in the images. Be sure, at the end or towards the end, they see the outcome, such as the finished piece or section of the piece, or completed step.
End with a CALL TO ACTION. Such as, direct them to your website where they can purchase the finished piece, or to your website where they can sign up for your newletters.
__________________________________
I hope you found this article useful. Please consider sharing.
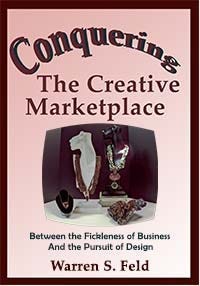
SO YOU WANT TO BE A JEWELRY DESIGNER Merging Your Voice With Form
So You Want To Be A Jewelry Designer reinterprets how to apply techniques and modify art theories from the Jewelry Designer’s perspective. To go beyond craft, the jewelry designer needs to become literate in this discipline called Jewelry Design. Literacy means understanding how to answer the question: Why do some pieces of jewelry draw your attention, and others do not? How to develop the authentic, creative self, someone who is fluent, flexible and original. How to gain the necessary design skills and be able to apply them, whether the situation is familiar or not.
I was 4th place finalist, Swarovski jewelry competition
I highly recommend entering many art and jewelry design competitions each and every year. This is a good way to
· Raise your visibility
· Practice your self-promotion skills
· Get feedback on your work
· Gain more legitimacy and credibility
· Promote your value
· Keep aware of current trends and expectations in jewelry design
· Further inspire your clients
Competitions can supercharge your jewelry design growth and career.
The First Competition I Entered
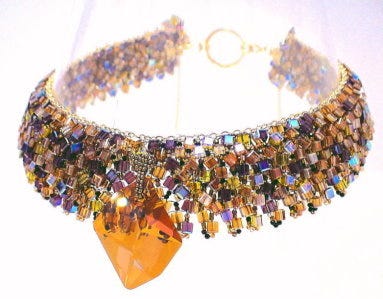
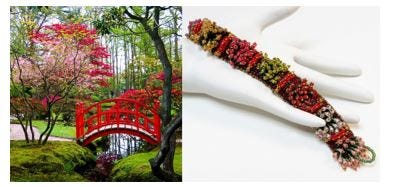
In 2004, I submitted an entry (see image above) to the Swarovski Be Naturally Inspired jewelry design competition. I downloaded a copy of the rules and set to work. The project had to be at least 75% Swarovski Austrian crystal beads, stones, or other components. You had to submit an image of your final piece, an image of your inspiration, an artist bio, and an artist statement about your piece and how you translated your inspiration into the finished piece.
This image of the Grand Canyon at sunrise was my inspiration:
Grand Canyon Sunrise
I set out to work. Created the general design, selected the technique I wanted to use, and with determination and a lot of trial and error, created the finished piece. In the process, I discovered that different Austrian crystal colors, when used together, tended to blur boundaries and lose some of that distinct color sense that I wanted. I had to solve that problem, which I did, by using black 1.8mm delica beads between each crystal bead. This helped create sharper boundaries.
Up until that point, I had not written any kind of bio or artist statement. I was uneasy about how to describe the finished piece, such as what to call attention to. I had to do several drafts of each. Was a great exercise.
Submitted the piece. Heard back that I was a finalist. Then I had to send them the original piece. I had trouble letting go and saying goodbye. I found one package to use, then rejected it. Then another package, and rejected that. The fifth packaging idea was finally satisfying. Then I held onto the ready-to-ship package for almost a week before taking it over to the UPS shop. I had to insure it. The value was priceless to me. But I had to pick a number. And I prayed that the package would not get lost or damaging.
Swarovski emailed me that it had arrived safely.
I was invited to the awards ceremony they held in their offices in New York City.
And said goodbye again to my piece which was headed for their museum in Innsbruck Austria.
You Are Always A Winner
Whether you win or lose, you are, in fact, experiencing a rich source of inspiration and learning. There never really is a setback.
At the very least, you most likely will be included in a publicly presented list of submitters. You have already increased your visibility.
If your submission is accepted, you have something to list on your resume or list of achievements. You can use this as talking points when selling to a client, store or gallery. You can add this information to wherever you showcase the submitted work. You can embellish your descriptions with information from the materials you submitted for contest entry.
You can generate press releases, social media posts, special email announcements. You can send out updates as your submission progresses through the competition process, such as should you become a semifinalist.
As you do these kinds of things to increase your visibility, this builds credibility and brand awareness. Many store and gallery owners watch these contests closely, often making note of the better pieces and their designers, often following the designers over their career.
Whether The Feedback Is Positive or Negative — It Always Gives You A Better Understanding of Yourself As a Designer
Feedback provides clues to why your jewelry has VALUE to them. What do they want to know about it? How does the design help them solve a problem? What key attributes of VALUE should you promote to your clients?
Participating in competitions gives you a great opportunity to practice speaking about yourself and your jewelry, and seeing how others react.
Competitions provide many clues about what is relevant in the moment. They force you to figure out how to relate you and your design sense to a set of competition rules and expectations.
All this public visibility will actually inspire some people to spread the message about you. Generating word-of-mouth is often the most successful type of marketing.
Competitions Are Juried
Periodically do online searches for jewelry and art competitions. If the active link is a newsletter or mailing list of some sort, give them your email address. Some art competitions will allow submissions of jewelry; others will not.
It’s important to learn in an organized, developmental way. You want to be always asking how things are interrelated. What depends on what? You want to pose what-if questions so that you can train yourself to anticipate the implications and consequences of making one choice over another. What happens If? What happens When? What enhances? What impedes? What synergizes? What can be leveraged, and toward what objective? You want to reflect on your outcomes.
Some places for learning:
Local craft or bead store Community college University (art, fiber arts, metalsmithing, fashion) Jewelry design program Fashion schools Bead and Jewelry Making Magazines Social media groups Self-taught, crafting at home On-the-job training Certifications Art institutes Art grants How-to books Video tutorials Networking with other craft artists
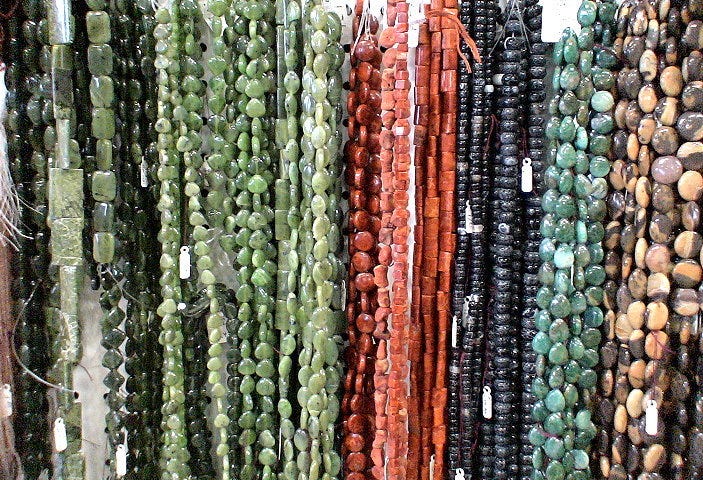
Types of Beading and Jewelry Making
There is so much to know, and so many types of choices to make. Which clasp? Which stringing material? Which technique? Which beads? Which strategy of construction? What aesthetic you want to achieve? How you want to achieve it? Drape, movement, context, durability.
Sample of Techniques:
Stringing Assembling Bead Weaving Bead Working Wire Working Wire Wrapping Wire Weaving Silversmithing, Metal Work Cold Connections Fabrication Casting Fiber Arts, Knitting, Crochet Micro-Macrame Bead Embroidery Kumihimo, Knotting, Braiding CAD (Computer Aided Design) Enameling Lampworking and Glass Blowing Stamping Engraving Polymer Clay, Precious Metal Clay, Sculpting Lapidary Woodwork, Carving
Types of Tasks Jewelry Makers and Beaders Do
Adjust, reshape, resize, create and attach clasp assemblies Cutting stones, setting stones, determining value and authenticity of stones CAD (Computer Aided Design), 3-D Printing Fabrication, stamping, engraving, casting, soldering, cold connections, shaping metal wire and sheet, annealing Model and mold building, sculpting Manage thread tension, create self-supporting shapes, manage movement, drape and flow String, weave, netting, embellish, embroider, knit, crochet, braid, knot, wrap, assemble Understand jewelry-making as a process, from beginning to end Select color, proportion, volume, shape, forms, size, silhouettes, themes Place and Arrange design elements and components Read patterns, figures, graphs Select materials and techniques Determine measurements Assess stress, strain, strength, suppleness, stability and synergy Understand and access the creative marketplace, introduce their pieces publicly
Learning Objectives
A. Technical Mechanics
1. Managing tension, whether using thread, cord, string or wire
2. Holding your piece to work it
3. Reading simple patterns, figures, graphs
4. Selecting appropriate materials
5. Identifying areas of potential weakness, and strategies for dealing with these
6. Determining measurements, including width and length of a piece, especially in relationship to bead and other component sizes
7. Extending your piece, such as adding thread or wire
8. Finishing off your piece and adding the clasp assembly
B. Understanding Craft Basis of Technique or Stitch
Starting the technique or stitch
Implementing the basic technique or stitch
3. Finishing off the basic technique or stitch
4. Learning variations on the technique or stitch
5. Embellishing the Stitch, including fringe, edge, bail, strap, connectors
C. Understanding Art & Design Basis of Technique or Stitch
1. Learning implications when choosing different sizes/shapes of beads or other components, or using different stringing materials
2. Understanding relationship of the technique or stitch in comparison to other techniques or stitches
3. Understanding how bead asserts its need for color
4. Creating your own design with this technique or stitch, in reference to design elements and jewelry design principles of composition
5. Creating shapes, components and forms with this technique or stitch, and establishing themes
6. Building in structural supports, and other support elements, into the design
D. Becoming a Bead Weaving or Jewelry Making Designer
1. Developing a personal style
2. Valuing or pricing your work
3. Teaching others the technique or stitch
4. Promoting yourself and your work
5. Advocating for jewelry as “Art” and as “Design”
Types of Tools Needed To Get Started
Scissors Chain nose pliers (inside of jaws smooth) Flat Nose Pliers Side Cutters Flush Cutters Tweezers and Awl Assorted sizes of hard wire, cable wire, bead cord and bead, thread, elastic string Ruler Crimping pliers Hammers and mallets Steel block plate Doming block, anvil Sizing cones Hand held torch and fire-proof work surface Bead stoppers / clamps Color wheel Work Surface or Pad Bead board Round nose pliers Ring, Jump Ring, and bracelet mandrels Needles, wax Jeweler’s saw and blades Good lighting Comfortable seating
Finding jobs and pathways utilizing your skills as a jewelry designer…
There are actually many career pathways for people who have backgrounds in jewelry making and bead working. Besides the obvious pathways of making jewelry to sell, or teaching jewelry making, there are still many job and career opportunities for you.
Jewelry maker Illustrator Fashion designer Stylist Metalsmith Teacher Lapidary Gemologist Jewelry repair Wood worker Fiber artist Lampworking and glass blowing Physical and Occupational Therapist Counseling Custom designer Engraver Sales Merchandising Website design Data analyst Grants writer/reviewer Program director Video instructor or host Jewelry assessor Display and Packaging Influencer Writer Business Developer
Learn to Think and Speak and Work
Like a Jewelry Designer!
Making and designing jewelry is fun, awesome, challenging and rewarding. You enter a world full of inspiration, creativity, color, texture, construction, beauty and appeal. With your jewelry, you impact the lives of many people as they go about their day, attend special events, or interact with friends, acquaintances and strangers.
As a jewelry designer, you have a purpose. Your purpose is to figure out, untangle and solve, with each new piece of jewelry you make, how both you, as well as the wearer, will understand your inspirations and the design elements and forms you chose to express them, and why this piece of jewelry is right for them.
Your success as a designer is the result of all these choices you make. Our courses are here to help you learn and apply key insights about materials, techniques and the jewelry design process when making these kinds of choices. We also introduce you to things you need to know when trying to conquer the creative marketplace.
Empower yourself to become fluent, flexible and original in jewelry design.
I have created an updated, extended version of this class online, which you can register for. The class is divided into 18 short video tutorials on such topics of seed and delica beads, metal beads, clasps, stringing materials, adhesives, miscellaneous findings, and the like. There is a downloadable handout that accompanies each video segment.
19 lesson modules. This class is $30.00.
You can find it online and register here.
16 Important Lessons I Learned Doing Craft Shows!
In this SO YOU WANT TO DO CRAFT SHOWS… video tutorial class, I discuss critical choices jewelry designers need to make when doing craft shows. That means, understanding everything involved, and asking the right questions.
Learn How To…
…Find, Evaluate and Select Craft Shows Right For You
…Determine a Set Realistic Goals Right For You
…Compute a Simple Break-Even Analysis
…Best Ways to Develop Your Applications and Apply
…Understand How Much Inventory To Bring
…Best Promote and Operate Your Craft Show Business
Doing craft shows is a wonderful experience. You can make a lot of money. You meet new people. You have new adventures. And you learn a lot about business and arts and crafts designing.
19 lesson modules. This class is $45.00.
You can find it online and register here.
Learn An Easy-To-Use Pricing Formula
and Some Marketing Tips
Especially Relevant for Jewelry Designers!
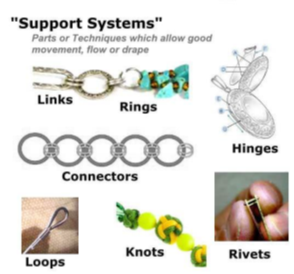
CHOOSING CLASPS AND CLASP ASSEMBLIES AND SUPPORT SYSTEMS
In Jewelry Design, when we speak of “choosing a clasp,” we are referring to something broader than the clasp itself. We are referring to what is called the “Clasp Assembly”. The “Clasp Assembly” is everything that has to come together in order to attach your beadwork to the clasp. The “CLASP ASSEMBLY” usually consists of several parts. Besides the Clasp itself, there are probably jump rings and connectors, crimp beads, clamps or other jewelry findings. If we had an S-clasp, the clasp assembly would also include 2 soldered rings (one on each side) plus, if using a cable wire, the loop created with the cable wire and crimp bead which attach and secure the wire around the soldered rings.
The “Clasp Assembly” is a more specific term for the more general jewelry-design terminology called a Support System. The Clasp Assembly is the most important support system in any piece of jewelry. In any one piece, there are usually 1 or more support systems. In a bracelet, you might only have the one support system — the clasp assembly. In a necklace you might have three or five. You want your clasp assembly to be able to adjust to your wearer’s movements somewhat independently of how your beadwork adjusts to this movement. Often, you want the clasp to stay in one place, while the beadwork moves to and fro, out and in, up and down, with the wearer’s movements. This only works if you build support systems into your piece. When you see someone whose necklace has turned around on her neck, this is an example of poor Design. This is not natural to necklaces. Usually the poor design has to do with insufficient support systems built into the necklace.
The most obvious support systems or joints are interconnected “rings” and “loops” and “knots.” Other support systems include “hinges” and “rivets” among other concepts. The support systems through a necklace or bracelet play several roles, and are similar to the joints in your body. They aid in movement. They prevent any one piece from being adversely affected by the forces this movement brings to the piece. They make the piece look and feel better, when worn. They keep segments within the piece from getting too stiff or too tight or too rigid. They help absorb excess force placed on your components because of movement, keeping them from cracking, splitting apart or breaking.
With needle and thread bead stringing, one of the more important support system is the knot you tie to secure your beadwork to the clasp. The knot absorbs excess force. It allows the bracelet or necklace to move easily on and with your body. Because of this support function that knots play, it usually is NOT a good idea to apply glue to the knots. This would cause the knots to stiffen up, create lots of tension on the thread, and cause it to break from force and movement. They would lose their support function.
The best clasp is one that has no moving parts. These include toggles, buttons, slides, S-clasps, and hook & eye clasps.
One clasp element that we jewelry designers call a “moving part” is a tongue. If a metal piece is bent into a “V” or “Arch” shape, and is forced to move back and forth as it gets pushed in and pulled out of the basic clasp, we consider this a moving part. When you bend metal back and forth, it breaks. When metal is bent into a V or Arch, and is pushed/pulled, it will break. In any clasp, where you have a metal part that is bent back and forth in use, we call this a moving part.
The clasp should be proportional to the beads used in the piece. The full Clasp Assembly should be proportional to the piece as a whole. If half your bracelet is taken up by the Clasp Assembly, then there’s a problem here.
Don’t forget that you can also use clasps in a way where they can be worn on the front, not just behind the neck. They can be used to sit on the side or on the bottom. Clasps which are very decorative are used in this way.
All clasps work well in necklaces. In bracelets, however, care and consideration should be paid to how difficult or easy it is to secure and undo the clasp — especially if the wearer has to accomplish these steps by her or himself.
In better pieces, the clasp seems as if it is an organic and integral part of the rest of the piece. It does not feel as it were an add-on.
Types of clasps:
I never knew there were so many choices
So many little parts. So many little things. Are you supposed to know what to do with them all? Do you really need that many? I never learned how to use all these things. What are they for?
I thought, when I started, there was just one kind of clasp. Or maybe two. I didn’t even know how to use these things.
When I started stringing beads, I always used my favorite clasp at the time — the lobster claw. I put a lobster claw on everything, and any old lobster claw I could find, no matter what it was made of. The guy-proof special. The student-proof special. The special that always worked and that everyone knew how to operate.
The tricky part, though, was what to put on the other side. It needed a ring, but what kind of ring? If you used a jump ring, the split in it was often difficult to adjust so that there was no gap. Even if you adjusted it so there was no gap, after wearing your necklace a few times, suddenly there was a gap. The string pulled through. Or the lobster claw pulled through. The top of the lobster claw broke or bent out easily. You couldn’t always manipulate and operate the thing. That mechanical mechanism inside was designed for people with very small hands, long and narrow fingers and even longer finger nails.
I never liked the barrel clasps — another very guy-proof special. The threads always stripped on me. Or they would unscrew themselves, as my body moved my necklace, and the necklace moved the clasp. Some had eye-lets, and these would always break — again from moving back and forth, and up and down, and back and forth and up and down. Metal breaks when you bend it back and forth. These broke.
At one point, I graduated to toggle clasps. These were and are considered the best clasps. They are considered the easiest to get on and off and the most secure. But I never really liked them personally because they were always out of proportion to my necklace and bracelet designs. Always too big. Always unsexy. And the less expensive ones broke. Virtually all toggles are cast, and cast pieces break when confronted with excess force. They crumble and break. Especially the cheaper ones.
Most people, however, buy either Toggle Clasps or Lobster Claws.
Over the years, I discovered that there are many types of clasps, and each had pros and cons in terms of usability and durability. My personal favorites are variations on the Hook & Eye Clasp. These don’t compete with my beadwork. You can always find something that coordinates with the beads. They pass the “Guy Test” — guys can figure out how to open and close them. But these are my choices I make for myself. Everyone needs to decide which types of clasps they prefer and under what circumstances.
There really isn’t a perfect clasp for every situation.
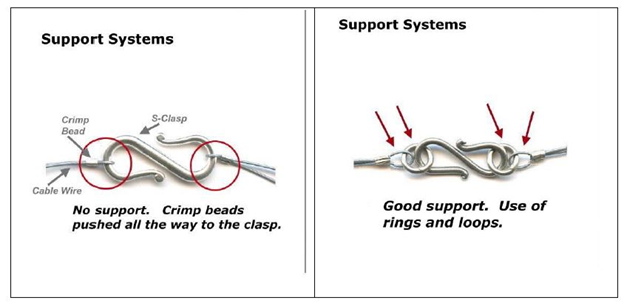
For most clasps, you usually attach your bead work to separate rings on each end (preferably a soldered ring, if this will work), and then attach the rings to either side of the clasp. In a similar way, if using a cable wire, you don’t want to push your crimp bead all the way up to the clasp. You want to allow a small loop in the cable wire between the crimp and the clasp. You want to build in support, jointedness and movement. You want the clasp to be able to rest on the neck (or the wrist), and not move when the wearer moves. You want the beadwork, on the other hand, to be able to move freely and independently of the clasp, as the wearer moves. If there is any resistance to movement in your piece, if things are too stiff, everything breaks — the clasp breaks, the string breaks, the beads break. If you can’t build in sufficient support systems into your piece, you might as well have a mannequin for a client.
Some more clasps:
SPRING RING
This is the cheapest and worst clasp. I really hate these. Its mechanical mechanism breaks easily. Too easily. But, on the other hand, it is also sleek and dainty, and there are few other clasps which are. If you are making a dainty piece, and you know it will only be worn occasionally, you might get away with using this clasp. Otherwise, if you’ve bought a piece with a spring ring clasp, you’ll probably want to replace it before it breaks.
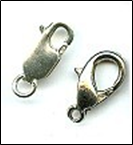
LOBSTER CLAW
This is a very popular style, but it has some weak design elements. The lip (top curved part) is not designed to handle excess force that comes from tugging or pulling. Its mechanical mechanism breaks easily. Often the levers are difficult to maneuver. However, this clasp does pass the guy test. Guys can figure out how to open and close it. It’s relatively inexpensive. There are many styles of lobster claws, so you usually can always find something which can work with the design and flow of your piece. These clasps are OK for inexpensive to moderate pieces. They are inappropriate for more expensive pieces of jewelry, say over $200.00. When I see lobster claws on expensive pieces of jewelry, this is usually a sign that there are other construction flaws in the piece.
PEARL or SAFETY CLASP
These are clasps that if the hook comes undone, something catches it before the necklace or bracelet falls off. Very popular clasp, and a traditional element in many pieces, such as a pearl-knotted necklace or a Victorian style necklace. In fact, you would be hard-pressed to use an alternative clasp in a pearl-knotted necklace or vintage piece, because people expect to see this type, or similar type of clasp, such as a filigree box clasp. Not a great design, however. The hook element must be bent back and forth many times as it is taken in and out of the clasp. It’s a moving part. This causes it to break sooner than later.
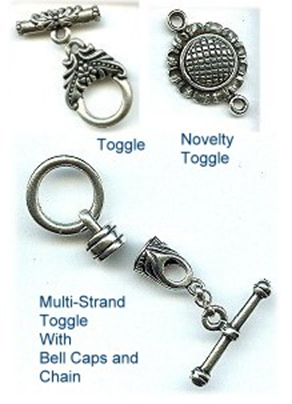
TOGGLE and BUTTON CLASPS
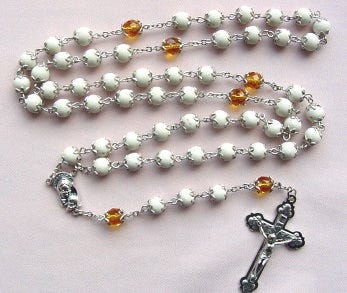
If the Toggle Clasp visually fits with your design, this is considered the best clasp. It is considered the easiest to get on and off, and the most secure. Almost every toggle has been cast, and the ring and the bar are very tightly engineered to work with each other. NEVER mix and match rings and bars. Always use these as a set.
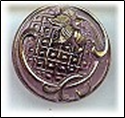
The main drawback, for me, of the toggle clasp, is that they tend to look bulky, often presenting a visual issue for me. They do make novelty toggles, such as the sunflower one pictured above, or a leaf and stem or flower and stem or butterfly and butterfly wing. These work.
Another major thing to keep in mind with toggle clasps is that the last half inch or so of beads on the side of the piece connected to the bar, must be small enough to slip the width of the bar PLUS the width of these beads far enough through the circle part of the toggle, that you can seat the bar correctly, like in a saddle. When using larger beads in your piece, you might need to begin and end your strand with smaller beads.
For multiple strand pieces, you would typically add a string of jump rings or a piece of chain to the bar side, and stagger each strand up the chain. Say you have a 3-strand necklace. You could add a 3-link piece of chain to the bar side. You would attach one strand to the top link; the second strand to the middle link; and the third strand to the bottom link. In this way, when you pull the bar through the ring, you are only pulling 1 thickness of beads plus the bar through the hole — not three multiple thicknesses of beads. You do not need to do this on the ring side, but many people do, for symmetry purposes.
Most people use toggles. What a lot of people don’t know is that you should not mix and match your rings and bars. Toggles should always be used as a set. When you go into a store to buy these, if they sell them mix-and-match, you don’t want to buy there. In a large store like ours, if you’re putting a bunch of toggles on a tray, be sure you know what goes with what. When they get bagged up at the register, be sure there’s no confusion about what goes with what. And store them so that there is no confusion about what goes with what.
You can make your own toggle-style clasps, using buttons or large beads. You have so many more colors, looks, textures to play with, when using buttons and beads, rather than the premade clasps you would find in the store. One side of your piece is a button and the other side is a loop. The button can be a real button, or a large bead. The great thing about button clasps is that you can incorporate the clasp as part of the design of the piece. You can match colors and beads that blend right in with the piece itself.
In a bead strung piece, you would tie off a button or large bead at one end, string your beads on, and make a loop with your stringing material at the other end. You would come back through about 2–3” through the beads in your piece, to anchor off your stringing material. To make this loop attractive, people cover it with seed beads, like size 11/0, 8/0 or 15/0 seed beads. Some designers use 15/0 or 13/0 sized charlottes. Charlottes are seed beads with one facet on one side of each bead. Using charlottes ups the visual perception of the value of the piece, though not the cost of doing so.
For bead-woven bracelets, the button clasp (a form of a toggle) sometimes works better from a design standpoint.
Making the button clasp:
The hardest part in making a button clasp is the button hole. If the hole is too small, it’s hard to get the button or bead in and out. If the hole is too large, the button or bead can slide out and the piece will be lost.
To make the button hole (loop), attach a thread to the piece, preferably a little further back from the end of the piece. Where exactly you locate the button loop depends on your design; however, in most pieces, stepping back from the edge ends up with a better looking and more durable product.
After anchoring the thread to the piece where you want it, now string several small beads — usually size 11/0 or size 8/0 seed beads — until you have a line of beads when looped, will fit snugly over your button or bead. Some designers like to use size 13/0 charlottes to cover the loop. This makes the loop feel like it’s an attractive metal piece.
Bring the needle and thread around and anchor the loop to the piece.
Tie it. Now bring your needle and thread back through the loop, one or more additional times (until it’s getting very tight inside the bead), reinforcing the bead hole.
Now tie it off, and weave the loop end into the piece, hiding the end of the thread.
Now, take your bead or button, and attach it to the other end of your bracelet. Ideally, you want to step the bead or button a bit back from the edge. When choosing a bead, it must be large enough for the loop to be secured underneath it.
Do not attach a bead or button flush to the surface of the piece. Allow enough space for the loop to clasp underneath it. This is easily achieved by placing a size 11/0 or 8/0 seed bead between your piece and the bead or button. Or make a tight loop of beads to connect the surface of the piece through the button shank. When making this kind of loop, usually size 15/0 seed beads work best.
If the bead is elongated, you must anchor it at the center, not through either end. Otherwise, there would be no place for the loop to clasp beneath the bead.
There is not a sure-fire way to measure a loop to fit perfectly over a button or bead. So don’t beat yourself up if you don’t get it right the first time or two. As a general rule of thumb, the length of the loop should be a bit more than twice the diameter of the button or bead. Keep practicing and you will get to a point where it will work by instinct.
So, to repeat, you would preferably locate the loop and the button a little bit back from each edge of the piece. When you start at the edge, this is the weakest part of the piece, and the pulls and tugs on the clasp will start to tear at this edge. Also, if you start at each edge, when you put the loop over the button, you’ll have an area of skin showing. When you set both the loop and button back a ways from the edge, when you put the loop over the button, it draws the two edges together.
If we look at the button from the side of the piece, you would want to put an 11/0 or 8/0 seed bead between the button and the surface of the piece. This accomplishes two things. First, when the loop goes over the button, it will rub on a bead, not the threads. This prevents these threads from fraying. It also turns out that when the loop goes over the button and rests on a bead, it sits it better, thus reducing the amount of back and forth movement that occurs as the bracelet is worn on the wrist.
S-CLASPS
From a functional standpoint, this is a great necklace clasp. From a usability standpoint, however, it’s a disaster. Most people don’t know how to use these properly. When you don’t use them properly, they don’t function as well.
The simple S-Clasp Assembly consists of an S-shaped piece and 2 soldered rings (one on each side). These rings are your “support system” or “jointedness”. They allow the S-clasp to maintain its position behind the neck, and the beadwork to move freely, as the wearer moves.
Using these: First you do your beadwork. Then you tie off each end to the soldered rings. Then you position each hook-arm relative to the spine. On one side of the “S”, you should position the hook-arm so the O-ring cannot slide out, as if the arm had been soldered to the spine. On the other side of the “S”, you need to position the hook-arm so that the O-ring can slide out, but only with some resistance by the hook.
Most people are clueless about the need to position the hook-arms, and how you do it. So they end up bending each arm back and forth, and they break off, or they slip off the soldered rings. And the S-clasp doesn’t rest securely behind the neck, or allow the beadwork to move freely as the person moves.
S-clasps come in a wide range of styles and prices.
HOOK & EYE CLASPS
This is a very good clasp for necklaces, but not as functionally good as the toggle or S-clasps. This is the type of clasp that I prefer to use on my pieces. It is very user friendly. These don’t compete with my beadwork as “art.”
The hook and eye clasp consists of two parts — a hook and a ring or figure 8. If you can position the hook so that the O-ring can slide out, but only with some resistance by the hook, you can use this both on bracelets and necklaces. If the hook-arm is a cast piece and will not move, they tend to only work with necklaces.
Always assume your wearer is right handed. When the wearer reaches back behind her neck for the hook, she should be grabbing this with her right hand.
These come in many styles and price points.
People can usually and easily figure out how to use these. They don’t compete with the artistry of your beadwork.
They have a slight functional flaw in that the hook can work itself free from the ring, when the piece is worn. If you can do this with your piece, you want the hook to face up, (not down).
A choker clasp is special kind of hook and eye clasp. These are usually for multiple strand pieces. The “ring” side is a length of chain, so that the hook can attach in more than one place. This makes the length adjustable. I find it useful to build in some length-adjustability into all my pieces. This is easy to do with hook and eye clasps.
MAGNETIC CLASPS
People in general hate clasps, so they love these. These work well in necklaces. While people love these for bracelets, functionally they pose some issues. To open and close a magnetic clasp, you never pull them apart. This weakens the settings for the magnets, and the magnets eventually pop out. Instead, slide the two sides apart, or crack them open like a nut, or as if one side was on a hinge. Never pull. You can see on a bracelet how the wearer might be tempted to pull them open. The bracelet wearer may also pull on the beadwork itself to open the clasp, thus weakening the bracelet.
Always do some extra reinforcement on the two ends of your pieces where they attach to the clasp.
Magnets come in different strengths, but are not labeled as such. You need to test the strength before you use them.
I suggest adding a safety chain to a bracelet. We hear over and over again stories of how people lost their bracelets to the ravages of an all-too-metallic environment. They’ve lost them to the refrigerator door. One woman lost hers to a car door on her visit to the mall. Luckily for her, when she returned to her car — There it was!
SNAP CLASPS
Snap clasps are like the snaps you have on a blouse or pair of pants. These are usually used in bead woven pieces, but they can be used on strung pieces. They are generally easy to get open and closed. They become part of the piece and its design itself, thus not competing with the artistry of the bead weaving. These clasps do wear out, as they are repeatedly opened and closed. There are many manufacturers and brands of these clasps, and variations in styles. The best ones are made of brass or steel, and have the “male” part be as square-ish as possible. If the base is too narrow, the ring slips off easily.
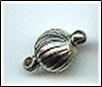
BARREL CLASPS AND SCREW CLASPS
Barrel clasps are very popular with college age and early 20’s. Never use a sterling silver barrel clasp. As the silver softens at body temperature, the threads soften and strip. Barrel clasps have a weak design element on each end where the clasp is to be connected to the ends of the piece. Most barrel clasps use a type of eye pin/head pin, and these break as they get bent back and forth from movement. With barrel clasps, you should always use another intervening ring — a jump ring, split ring or soldered ring — to attach your beadwork to the clasp.
For most types of clasps and other jewelry findings, though not all, you need to use an intervening ring — a soldered ring, a split ring or a jump ring . You attach your beadwork to the ring and the ring to the clasp or finding. Only in this way will you get enough support and jointedness.
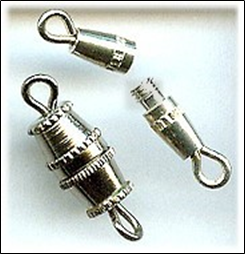
Screw clasps tend to look like a bead with a loop on either side.
Usually, one side, sometimes both sides, screw open. These are very attractive and work very well to maintain the organic flow of your piece. However, the threads strip easily, and it’s difficult to readily figure out how to screw/unscrew the loop out from the bead. Usually the wearer ends up ruining the clasp after a few wearings, since it’s difficult to figure out which way to turn each screw-end — especially while wearing the piece — and the threads strip.
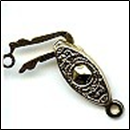
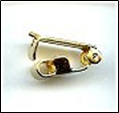
FOLDOVER CLASP
These clasps are found on a lot of jewelry. They are pretty easy to attach. They are pretty easy for the wearer to use them. On one side of the clasp, there is a closed loop. This is attached to one end of the piece, usually with a jump ring. It is fixed. The other end is a tongue that snaps over a base and is held in place by friction. This tongue slips over a ring on the other side of the piece, and then tightly onto its base. After opening and closing this clasp several times, the tongue tends to bend upward, thus losing its friction-based tight close. You can use a chain-nose pliers to push the tongue back and regain the friction. Eventually this tongue breaks off.
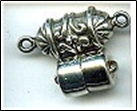
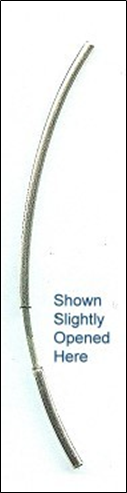
FRICTION CLASP or BAYONETTE CLASP
Here a curved metal tube on one side slips into a curved metal tube on the other, and is held in place by friction. Or, in another design, a straight pin is pushed into a rubber tube, where the rubber tube fits snugly around the pin, holding it in place. These come long and sleek, or squat and fat.
The friction clasp pictured above looks great on sleek pieces. For most of these, it’s easy to slip beads or charms over the clasp without having to partially or fully dis-assemble it. These are usually soldered or glued and clamped on to the piece. You need to pay attention to the size of the internal diameter of the opening. You want your cable wire or cord to fit snugly into this opening. Put some glue (any glue except Super Glue, and preferably a jewelers glue like E6000 or Beacon 527) on the cable wire or cord. Stick it in. Use a chain nose pliers to clamp the ends down snug. Don’t clamp them flat. When you clamp them flat, it looks weird and annoying.
NOTE: Super Glue has few uses in jewelry. The jeweler’s version of Super Glue is called G-S Hypo Cement, which takes longer to set. Super Glue dries like glass, so the bond becomes like a piece of glass. Movement causes the bond to shatter like a piece of glass. And the broken bond looks like a broken piece of glass.
The jeweler’s glues, like E6000 and Beacon 527 dry like rubber. The bond acts like a shock absorber.
BOX CLASP
The basic design here is a box where a bent piece of metal (called a tongue) slips into one side of the box, and is held in place by an internal latch. We consider the tongue and the internal latch moving parts, since these move back and forth and can break.
Box Clasps often look great, but they don’t last a long time. The internal latch often wears out. The tongue is bent up and down each time it is place in or removed from the clasp. After too many times, the metal breaks. It’s hard to find replacements. What’s nice about these are that they come in a wide range of prices and styles, and can adapt easily to the organic sensibility of your piece. Great for moderately priced jewelry. Functionally a bit of a risk for more expensive jewelry, but visually may be just what the designer ordered.
Sterling box clasps pose a problem, if the clasp rests on the wrist or neck. Sterling softens at body temperature. When the internal latch softens, it releases the tongue. Jewelry coming out of Mexico is notorious for this happening. Say you have a problematic clasp. You don’t have to throw it away. You can use larger beads on either side of the clasp, so that it never rests on the skin.
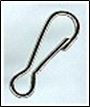
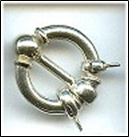
LANYARD CLASP
This is a wire that is bent into a clasp shape. One end of the wire overlaps that of the other side, and is “springy”. These clasps will lose their “springy-ness” over time. I like to use these clasps with hemp necklaces. They work well with thick cords. They have a primal feel about them.
From a design theory perspective, the base of the clasp is an interesting element. It is basically an arch pinched at its base. This completely changes the mechanical properties of the arch, turning it into a spring. The spring absorbs all the force of the arm, when the arm is bent back and forth to open and close the clasp. If this arch were a V-shape, bending it back and forth would break it. In the Curved-Shape, bending back and forth will also break it. But pinching it, the movement is accommodated by and the forces absorbed by the clasp.
Lanyard clasps come very functional like that pictured. They come fancier, as well. Some of the fancier ones are good substitutes for lobster claws. Lanyard clasps are widely used in name-badge lariats and necklaces.
SLIDE CLASP
These are made for multi-strand necklaces and bracelets, from 2-strand to 9-strand. They are basically two inter-fitting tubes with loops soldered onto them. They are very sleek. They come plain and patterned. They don’t compete with your beadwork. They work for bracelets and necklaces. This is one of the only clasps that has been coming down in price over time. The market is telling you that this is a good clasp, and I agree with the market.
I especially like these clasps for bracelets. They have a way of keeping all the strands of a multi-strand piece laying nicely and separately and spread out. With a lot of other clasps, the multiple strands overlap, get entangled, and don’t lay as well as intended. Usually, one person, wearing a bracelet using these slide clasps, can maneuver these on and off without much difficulty. Another plus.
In many flat, wide beadwoven pieces, I often suggest sewing these in place to use as the clasp.
You do not need to use any intervening rings with this clasp.
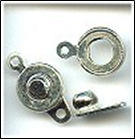
DOOR KNOCKER CLASPS
Here we have a loop with a slight opening, with a bar and knob that moves from the base of the loop, over and into the slight opening. These are attractive. They are relatively easy to use. They do lose their friction in holding the knob into the opening. With these, two removable loops hold the beadwork in place, so you could make many strands of bead work, ending each with a soldered ring wide enough to slip the clasp, and use them interchangeably with this clasp. Or you could use this clasp when you want to change the number of strands of beads you want to wear at one time.
A BEAD is anything that has a hole in it. And you can do a lot of things with things that have holes.
You can put these things on string.
You can sew these things onto fabric.
You can weave these things together with threads.
You can knot or braid or knit or crochet these things together.
You can combine and wrap and en-cage these things with metal wires and metal sheets.
You can work these things into projects with clay, polymer clay and metal clay.
You can embellish whatever you can think of — dolls, tapestries, clothes, shoes, scrapbooks, pillows, containers, and vases.
You can incorporate these things into basket weaving, wood work, and kumihimo.
You can use these as money or for trade.
You can use these things in scientific experiments.
You can fuse these things together.
You can incorporate these things into projects involving stained glass, mosaics, or multi-media art.
You can use these to make yourself look prettier through adornment.
You can decorate your house and your household things with these things.
You can texture surfaces with these things, using glues, cements or resins.
You can use them as game pieces.
You can use these as ornamental or decorative objects.
You can sort them and organize them and stack them and arrange them and assemble them once or twice or over and over again.
Beads can become an armature to support the structure of something else.
You can use these symbolically by colors, shapes or sizes to signify emotions, spiritual connections, and life’s rights of passage.
You can construct models with these, such as architectural or biological or chemical.
Beads can be used to communicate emotions, beliefs, status and power, and social acceptability.
You can establish fashions and styles with these, or use these to measure the level of someone’s taste.
You can buy these pre-made, or make your own.
You can do a lot of things with beads. Most people begin by Stringing beads, and graduate to things like Weaving beads, Embellishing with beads on Fiber, Knotting and Braiding with beads, and Wire Working with beads. A few people learn to hand-make Lampwork glass beads, or learn to sculpt with Polymer Clay or Precious Metal Clay, or learn to solder using Silver-Smithing techniques.
And you can feel self-satisfied and secure in the knowledge that, should everything else in the world around you go to pot, we will all be back to bartering with beads.
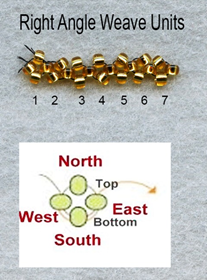
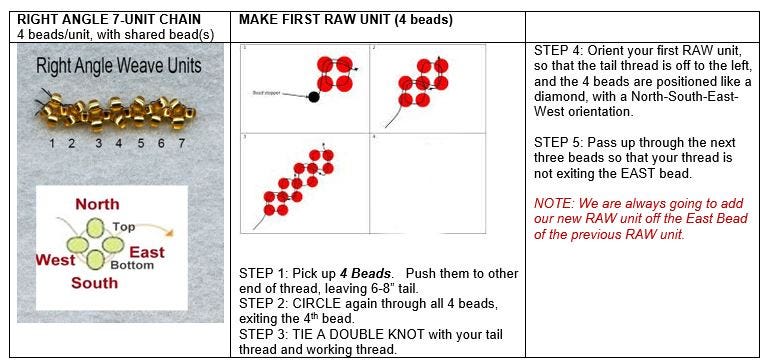
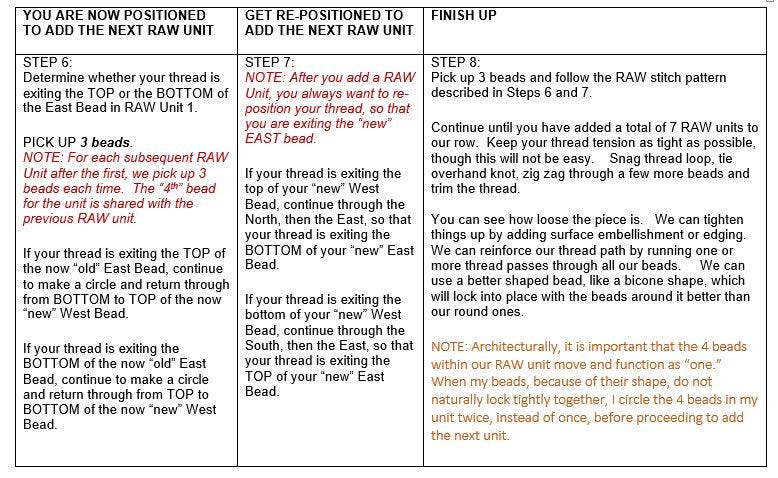
The RAW Stitch typically is a circle of 4 beads (a Right Angle Weave Unit) connected to another circle of 4 beads (a second RAW unit), with one bead shared. The thread path follows a “figure 8” pathway. As you add units, you will find yourself going up and around in one direction, then going down and around to add the next couple units, then up and around, and then down and around, and so forth, always following that figure 8. At no point should the thread show within the negative space surrounded by our 4 beads. This is the reason for the more convoluted Figure 8 pathway which underlies the stitch. NOTE: We can use more than 4 beads in each unit. Many people use more than 4 beads to hide the threads from showing between each bead.
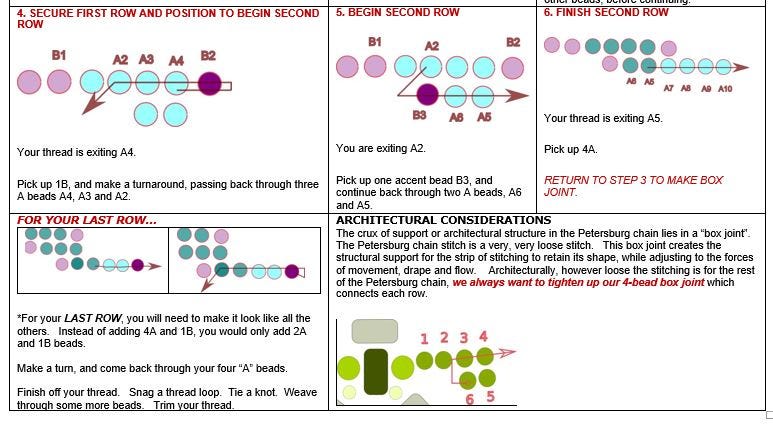
The St. Petersburg Chain stitch is a relatively simple stitch that generates a long, thin, flat length of beadwork. Traditionally, two lengths are created and connected together up and down the inside edges with a decorative bead.
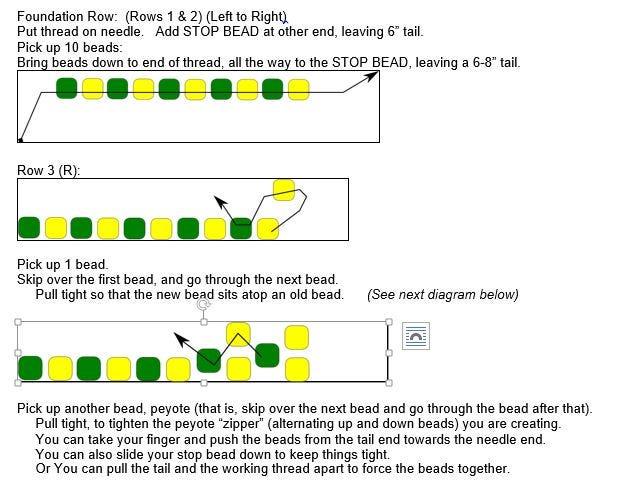
This stitch is known by the herringbone or zig-zag pattern the beads make when stitched together. The stitch is very soft and fluid. It results in a very beautiful texturing and patterning. A lot of thread shows in this stitch, and, in this case, is a charming part of the whole effect. The beads sit in regular columns in angled pairs, forming a “V” (thus, herringbone,) shape.
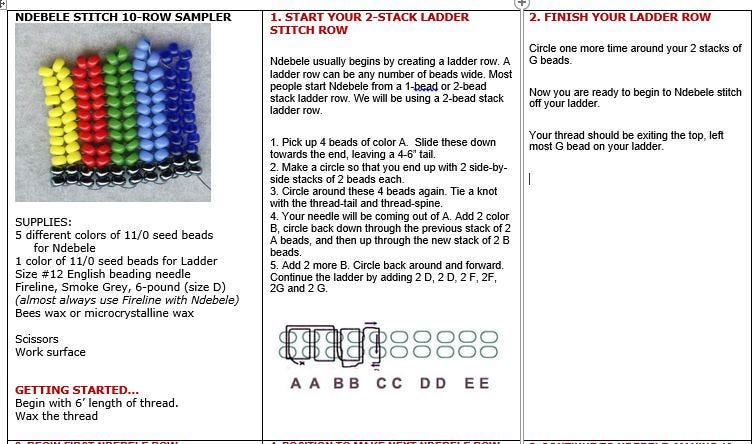
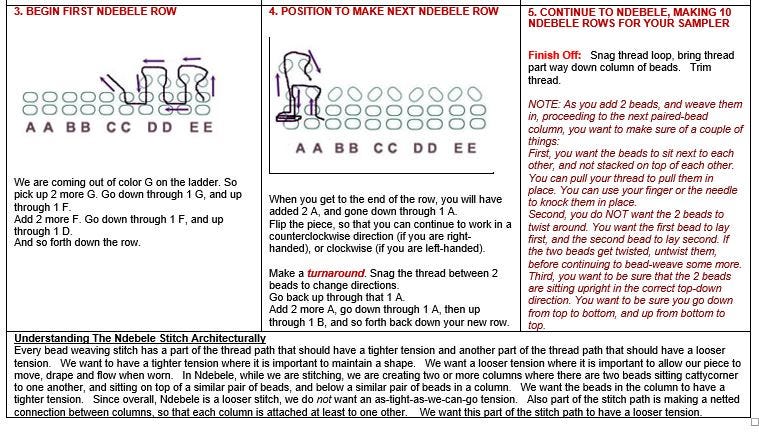
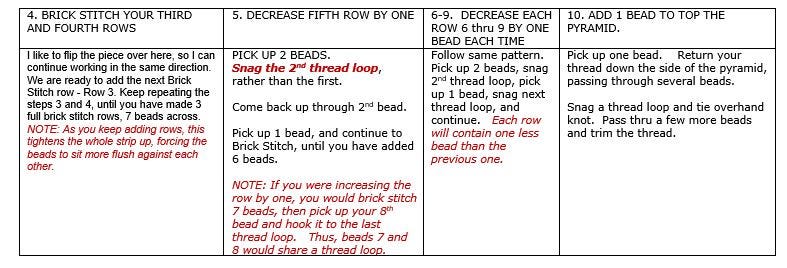
With BRICK STITCH, beads are woven and locked into place by snagging the thread loops between them. As you add a new bead, you snag the thread loop (bridge) between them, and pull the bead down to the already completed rows. The BRICK STITCH always begins with a Ladder Row.
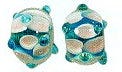
“Japanese Fragrance Garden Bracelet”, piece and inspiration, FELD, 2018
BECOMING THE BEAD ARTIST AND JEWELRY DESIGNER: The Ongoing Tensions Between Inspiration and Form
Abstract: As a jewelry designer, you have a purpose. Your purpose is to figure out, untangle and solve, with each new piece of jewelry you make, how both you, as well as the wearer, will understand your inspirations and the design elements and forms you chose to express them, and why this piece of jewelry is right for them. Not as easy as it might first appear.This involves an ongoing effort, on many levels, to merge voice and inspiration with form. Often challenging, but very rewarding.
BECOMING THE BEAD ARTIST AND JEWELRY DESIGNER: The Ongoing Tensions Between Inspiration and Form
As a jewelry designer, you have a purpose. Your purpose is to figure out, untangle and solve, with each new piece of jewelry you make, how both you, as well as the wearer, will understand your inspirations and the design elements and forms you chose to express them, and why this particular piece of jewelry is right for them. Not as easy as it might first appear.
You will want the piece to be beautiful and appealing. So you will be applying a lot of art theories about color, perspective, composition and the like. You will quickly discover that much about color use and the use of lines and planes and shapes and so forth in art is very subjective. People see things differently. They may bring with them some biases to the situation. Many of the physical materials you will use may not reflect or refract the color and other artistic effects more easily achieved with paints.
You want the piece to be durable. So you will be applying a lot of theories and practices of architects and engineers and mechanical physicists. You will need to intuitively and intrinsically understand what about your choices leads to the jewelry keeping its shape, and what about your choices allows the jewelry to move, drape and flow. You also will be attentive to issues of physical mechanics, particularly how jewelry responds to forces of stress, strain and movement. This may mean making tradeoffs between beauty and function, appeal and durability, desire and acceptance.
You want the piece to be satisfying and accepted by various wearing and viewing audiences. So you will have to have some understanding of the role jewelry plays in different people’s lives. Jewelry is more than some object to them; jewelry is something they inhabit — reflective of soul, culture, status, aspiration. You will recognize that people ascribe the qualities of the jewelry to the qualities of the person wearing it. You will bring to the forefront ideas underlying psychology and anthropology and sociology, and even party planning, while designing your jewelry or introducing it publicly. You may find the necessity to compromise part of your vision for something socially acceptable, or in some degree of conformance with a client’s taste or style.
BECOMING THE BEAD ARTIST AND JEWELRY DESIGNER
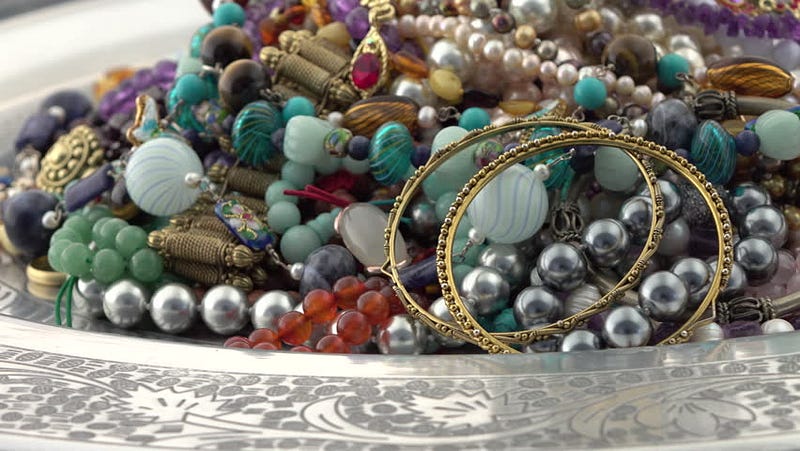
Sometimes becoming a designer begins by touching some beads. Or running a strand of pearls through your hand. Or the sight of something perfectly worn around the wrist, or upon the breast, or up near the neck. Or trying to accessorize an outfit. Or finding something for a special occasion.
Jewelry designers are extraordinarily blessed to do what they love for a living. For many, they have turned a hobby into an avocation into a lifestyle.
But it’s not like a regular job. There are many intangibles. Such as, what exactly is creativity and creative thinking? What are all the things that have to come together to recognize that creative spark when it hits you in your heart, gut or head, and how to translate that into something real, with beauty, with function, and with purpose? How do you mesh your views of and desires for aesthetics and functionality with those of your many audiences — wearer, viewer, buyer, seller, collector, exhibiter, teacher and student?
What exactly does it mean to design jewelry, and how do you know it is the right path for you? This is a tough question. You may love jewelry, but not know how to make it. You may get off on creative problem solving or be a color addict but not know what specific techniques and skills you need to learn, in what organized way, with what direction, leading you towards becoming that better jewelry designer. You may wonder what it means and what it takes to be successful as a designer. You may feel the motivation, but not know what the jewelry designer really has to do each day.
You may be taking classes and getting some training, but how do you know when you have arrived? How do you know when you have emerged as a successful professional jewelry designer? And what are your responsibilities and obligations, once you get there?
THERE IS SO MUCH TO KNOW
There is so much to know, and so many types of choices to make. Which clasp? Which stringing material? Which technique? Which beads? Which strategy of construction? Which silhouette? What aesthetic you want to achieve? How you want to achieve it? Drape, movement, context, durability? How to organize and manage the design process?
And this is the essence of this series of articles — a way to learn all the kinds of things you need to bring to bear, in order to create a wonderful and functional piece of jewelry. Whether you are just beginning your beading or jewelry making avocation, or have been beading and making jewelry awhile — time spent with the material in these segments will be very useful. You’ll learn the critical skills and ideas. You’ll learn how these inter-relate. And you’ll learn how to make better choices.
Everyone knows that anyone can put beads and other pieces together on a string and make a necklace. But can anyone make a necklace that draws attention? That evokes some kind of emotional response? That resonates with someone where they say, I want to wear that! or, I want to buy that!? Which wears well, drapes well, moves well as the person wearing it moves? Which is durable, supportive and keeps its silhouette and shape? Which doesn’t feel underdone or over done? Which is appropriate for a given context, situation, culture or society?
True, anyone can put beads on a string. But that does not make them artists or designers. From artists and designers, we expect jewelry which is something more. More than parts. More than an assemblage of colors, shapes, lines, points and other design elements. More than simple arrangements of lights and darks, rounds and squares, longs and shorts, negative and positive spaces. We expect to see the artist’s hand. We expect the jewelry to be impactful for the wearer.
We want to gauge how the designer grows within the craft, and takes on the challenges during their professional lives. This involves an ongoing effort to merge voice and inspiration with form. Often this effort is challenging. Sometimes paralyzing. Always fulfilling and rewarding.
Jewelry design is a conversation. The conversation in ongoing, perhaps never-ending. The conversation is partly internal and partly external. The conversation is partly a reflection about process, refinement, questioning, translating feelings into form, impressions into arrangements, life influences into choice. It touches on desire. It reflects value and values. Aesthetics matter. Architecture and function matters. People matter. Context and situation matter.
Jewelry focuses attention. Inward for the artist. Outward for the wearer and viewer. In many directions socially and culturally and situationally. Jewelry is a voice which must be expressed and heard, and hopefully, responded to.
At first that voice might not find that exact fit with its audience. There is some back and forth in expression, as the jewelry is designed, refined, redesigned, and re-introduced publicly. But jewelry, and its design, have great power. They have the power to synthesize a great many voices and expectations into something exciting and resonant.
JEWELRY DESIGN: An Occupation In Search Of A Profession
Jewelry design is an activity which occupies your time.
How the world understands what you do when you occupy that time, however, is in a state of flux and confusion, and which often can be puzzling or disorienting for the jewelry artist, as well.
Is what you are doing merely a hobby or an avocation? Is it something anyone can do, anytime they want, without much preparation and learning?
Is what you do an occupation? Does it require learning specialized technical skills? Is it something that involves your interaction with others? Is it something you are paid to do?
Or is what you do a profession? Is there a specialized body of knowledge, perspectives and values, not just mechanical skills, to learn and apply? Do you provide a service to the public? Do you need to learn and acquire certain insights which enable you to serve the needs of others?
Are you part of another occupation or profession, or do you have your own? Is jewelry design merely a craft, where you make things by following sets of steps?
Is jewelry design an art, where your personal inspirations and artistic sense is employed to create things of aesthetic beauty for others to admire, as if they were sculptures? Is the jewelry you create to be judged as something separate and apart from the person wearing it?
Or is jewelry design its own thing. Is it a design activity where you learn specialized knowledge, skills and understandings in how to integrate aesthetics and functionality, and where your success can only be judged at the boundary between jewelry and person — that is, only as the jewelry is worn?
The line of demarcation between occupation and profession is thin, often blurred, but for the jewelry designer, this distinction is very important. It feeds into our sense of self and self-esteem. It guides us in the choices we make to become better and better at our craft, art and trade. It influences how we introduce our jewelry to the public, and how we influence the public to view, wear, exhibit, purchase or collect the things we make.
What Does It Mean To Become A Professional?
At the heart of this question is whether we are paid and rewarded either solely for the number of jewelry pieces which we make, or rather for the skill, knowledge and intent underlying our jewelry designs.
If the former, we do not need much training. Entry into the activity of jewelry design would be very open, with a low bar. Our responsibility would be to turn out pieces of jewelry. We would not encumber ourselves too much with art theory or design theory. We would not concern ourselves, in any great depth, and certainly not struggle with jewelry’s psycho-socio-cultural impacts.
If the latter, we would need a lot of specialized training and experience. Entry into the activity of jewelry design would be more controlled, most likely staged from novice to master. Our responsibility would be to translate our inspirations into aspirations into designs. It would also be to influence others viewing our work to be inspired to think about and reflect and emote those things which have excited the artist, as represented by the jewelry itself. And it would also be to enable others to find personal, and even social and cultural, success and satisfaction when wearing or purchasing this piece of jewelry.
To become a professional jewelry designer is to learn, apply and experience a way of thinking like a designer. Fluent in terms about materials, techniques and technologies. Flexible in the applications of techniques and the organizing of design elements into compositions which excite people. Able to develop workable design strategies in unfamiliar or difficult situations. Communicative about intent, desire, purpose, no matter the context or situation within which the designer and their various audiences find themselves. Original in how concepts are introduced, organized and manipulated, and in how the designer differentiates themselves from other designers.
The designs of artisans who make jewelry reflect and refract cultural norms, societal expectations, historical explanations and justifications, psychological precepts individuals apply to make sense of themselves within a larger setting. As such, the jewelry designer has a major responsibility, both to the individual client, as well as to the larger social setting or society, to foster that the ability for the client to fulfill that hierarchy of needs, and to foster the coherency and rationality of the community-at-large.
All this can happen in a very small, narrow way, or a very large and profound way. In either case, the professional roles of the jewelry designer remain the same. Successfully learning how to play these roles — fluency, flexibility, communication, originality — becomes the basis for how the jewelry designer is judged and the extent of his or her recognition and success.
Why People Like To Bead and Make Jewelry
Most people, when they get started beading or making jewelry, don’t have this overwhelming urge to become a star jewelry designer. On the contrary, fame and fortune as a designer are some of the furthest things from their minds. Most people look to jewelry making and beading to fulfill other needs.
Over the years I’ve seen many people pick up beading and jewelry making as a hobby. They are drawn to these for many reasons, but most often, to make fashionable jewelry at a much lower cost than they would find for the same pieces in a Department store, or to repair jewelry pieces they especially love. When you start with the parts, and the labor is all your own, it is considerably less expensive than the retail prices you would find in a store for the same pieces.
Some people want to make jewelry for themselves. Others want to make handmade gifts. Giving someone something of great value, that reflects a personal expression of creativity, and a labor of love — you can’t beat it. And everyone loves jewelry.
When people get into beading and jewelry making, they discover it’s fun. They tap into their inner-creative-self. They see challenges, and find ways to meet them. They take classes. They buy books and magazines. They join beading groups and bead societies and jewelry making collaboratives. They have beading and jewelry making parties with their friends. They scour web-sites on-line looking for images of and patterns for jewelry. They comb the web and the various beading, jewelry-making and craft magazines, looking for sources and resources. They join on-line jewelry and bead boards, on-line forums, on-line web-rings, on-line ezines, groups, and on-line blogs. They take shopping trips to malls and boutiques and like little good Agatha Christies and Sherlock Holmes, they spy, looking for fashions, fashion trends, and fashionistas. They attend traveling bead shows. And every town they visit, they schedule some free time to check out the local bead stores and boutiques.
As people get more into beading and jewelry making, some discover that these avocations are not only sources of artistic self-expression, but also have many meditative qualities. They are relaxing. They take your mind off the here and now, and transport you to a very calming place.
Still, for others, beading and jewelry making become a way to earn some extra income. They might be to supplement what you’re making now. They might be ways to generate some extra dollars after you retire. They might be the start of your own business as a designer of jewelry. They might be a sense of independence and self-reliance. Having someone pay you for something you made is often the hook that gets people addicted to beadwork and jewelry making.
Most people, however, are content just to make jewelry. There are no professional Design paths to pursue. They may realize that they are out there somewhere, but don’t particularly care. Or sometimes they are unfamiliar with or can’t see all the possibilities. Perhaps they get stuck. No mentor, no book, no magazine, no project to entice them or spark an interest in something more than what they are doing now.
For those fewer people, however, who get a whiff of what it means to design jewelry, and jewelry which resonates, well, what a trip they are in for.
Do You Chase The Idea or The Material?
It is important up front to ask yourself, as a jewelry artist, what is more important to you: the piece of jewelry itself, or the reason why it was made? The idea? Or the material object?
The idea is about cause and effect. How the inspiration resulted in choices about colors, materials and techniques. How the artist’s intent is revealed through choices about composition, arrangements and manipulation of design elements. How the jewelry relates to the person and to the body? How the artist anticipates how others will understand whether a piece is finished and successful, and whether the piece incorporates these shared understandings into the choices made about design.
As solely a material object, the jewelry so designed shies away from resonance. It becomes something to be judged apart from the wearer. It too often gets co-opted by global forces tending towards standardization and same-old-same-old designs. The designer’s mastery is barely referenced or attended to. The designers voice is reduced to noise. The very real fear is that, with globalization and standardization, the designer’s voice will no longer be needed.
Jewelry as idea fosters communication and connection between the artist and his or her various audiences. It bridges thinking. It bridges emotion. It bridges social, cultural and/or situational ties. It goes beyond simple adornment and ornamentation. It becomes interactive, and emerges from a co-dependency between artist and audience, reflective and indicative of both.
Analyzing reasons, finding connections, and conceptualizing forms, components and arrangements are the primary functions of jewelry designer survival.
Otherwise, why make jewelry? Why make something so permanent to reflect your inner motivations, efforts, even struggles, to translate inspiration into this object? Why make something wearable, especially when each piece is usually not worn all the time? Why make something that might have such an intimate relationship with the body and mind? Why make something that can have real consequences for the wearer as the jewelry is worn in social, cultural or specific situational settings?
The Challenging Moments
Developing yourself as a jewelry designer has several challenging moments. You want to maintain high expectations and goals for yourself, and see these through. Some challenging moments include the following:
1. Learning your craft and continually growing and developing within your profession
2. Recognizing how jewelry design goes beyond basic mechanics and aesthetics, thus, differs from craft and differs from art, and then learning and working accordingly.
3. Getting Inspired
4. Translating Inspiration into a design
5. Implementing that design both artistically and architecturally by finding that balance between beauty (must look good) and functionality (must wear well)
6. Organizing your work space and all your stuff
7. Managing a design process
8. Introducing your pieces publicly, and anticipating how others (wearer, viewer, seller, marketer, exhibitor, collector, teacher, student, for example) will desire your pieces, as well as judge your pieces as finished (parsimonious) and successful (resonant)
9. Infusing your pieces with a sense of yourself, your values, your aesthetics, your originality
10. Developing a fluency and flexibility when working with new materials, new techniques and technologies, and new design expectations, including well-established ideas about fix-it strategies when confronted with unfamiliar situations
11. Differentiating your jewelry and yourself from other jewelry designers
12. If selling your pieces, then linking up to and connecting with those who will market and buy your pieces
Some Bottom-Line Advice For The Newly Emerging Jewelry Designer
Always keep working and working hard. Set up a routine, and do at least one thing every day.
Find a comfortable place to work in your home or apartment. Develop strategies for organizing the projects, your supplies and your tools, and for keeping things generally organized over time. But don’t overdue the organizing thing. A little chaos can be OK, and even, sometimes, trigger new ideas.
Give yourself permission to play, experiment, go down many paths. Everything you work on doesn’t have to meet the criterion of perfection, be cool, or become the next Rembrandt. A key part of the learning process is trial and error, hypothesis, test, and conclusion. This helps you develop fix-it strategies so that you can overcome unfamiliar or problematic situations, enhancing your skills as a designer.
Don’t let self-doubt and any sense of impending failure take over you, and paralyze you. Designer’s block, while it may happen occasionally, should be temporary. Jewelry projects usually evolve, and involve some give and take, change and rearrangement. Often the time to complete a project can be lengthy, and you have to maintain your interest and inspiration over this extended time period.
Don’t get stuck in a rut. Try new materials. Try new designs. Try new styles. Try to add variation, new arrangements, smart embellishments. Learn new techniques and technologies.
Some people kindly refer to their unfinished projects as UFOs (Un-Finished Objects). Others less kindly refer to them as abortions. Let’s just call them un-finished projects.
You’ll find you have a lot of unfinished beading, craft and jewelry making projects. They might be waiting for more supplies, or finding the right color or clasp. They might be waiting for you to learn or re-learn a particular skill or technique. They might be waiting for more time or motivation. You might have discovered another more exciting project to do in your most recent issue of Bead & Button magazine, and want to get to that immediately, even though you haven’t finished your last project.
You might begin a project, and then as you get into it, put it down, pick it up again, find that you forgot what you were going to do in the first place. You might have inadvertently cannibalized some of your other Un-Finished Projects to help you finish a particular project on hand, and then not be able to find these very same UFOs you intended to come back to and finish, having forgotten you cannibalized them.
As one of my friends remarked, “I’m going to have to live a very long time, or else I won’t get anything done!”
People do funny things with their unfinished projects. One woman I know puts them in a clear jar, and let’s them stack up as an artwork in progress. Some people work on them in rotation, with some kind of system, lazy-susan-tray or otherwise. Others take the time to tear them up and reclaim the parts. That’s definitely not me. I leave them laying around, piled up on bead trays. Many people swap them.
I hate people who finish each bead project before starting another. Don’t you?
How can they? How much true-grit can anyone person have, or be allowed to have? Getting a grip on one’s beadwork — Is that really possible? Can you really weed out your unfinished projects, and reclaim your beads, and make clear, definite, timely decisions about which projects you will start, which projects you will finish, and which ones you won’t? Is there a pill for this? Either a stimulant or a cure?
My friend Adonna wrote to me…
“I am so jealous of people who finish things. I have tons of ufo’s and I want to keep learning new stuff. Beaded beads really do fascinate me… like the sparkly wheels. I have clipped the instructions, printed off the net, bought stuff from Halpenny and Ruby Fisch and have yet to sit down in a quiet space and do it. Then there is all the polymer clay ideas. If I had a room like Linda’s…… I’d be paralyzed with what to do FIRST… I guess I have to learn to go to my small room I now have and really get the stuff into separate corners. Beads, sewing, polymer, wire… then put the TV and dvd player in middle on a swivel stand, and close the door.
“I have realized LONG ago, that the fun is in starting something new, the challenges of finding all the pieces to work with, and learning and doing the beginning. When I can visualize the END, I stop and move on. You should see the ufo’s in quilting, doll/bear making, even a few pieces of clothes, and all of the useable incorrect size patterns and not to mention the 1,910+ collectibles.
“Some of the problems in finishing is surely the ‘Now What?’ concept of what to do with it all. I cannot wear all the finished jewelry. Certainly NOT give it away….would rather throw it away or let the executor deal with it at the junk shop than to give it to people who just politely say “thank you” and have no intention of wearing it even once a year.”
How many people throughout time have heard the sound of a dropped bead on the floor?
Or the sharp whoosh of air that comes from the cutting of a cord?
Or the dull oomph you hear when you crush a metal clasp into place?
Or the feel of the tug and pull of the thread as the needle is pulled through the cloth?
Or the resistance of the tensile strength of the wire as it is bent into a shape?
Did they see a sudden flash of light, a sudden recognition of artistic achievement? Probably not.
But it meant something to them. Subtle. Unconscious. The exercise of the hand in craft often taps into some sense of self-expression or –awareness. Creativity rewards you. It reaffirms who you are. Your worth, your value, your artistry. It is fulfilling, fun, happy, reassuring, exciting, introspective.
The exercise of your hand in craft, art and design often reconfirms that you are part of some larger group or culture, as well. You have a shared sense of what expression and awareness mean. You repeat the same steps in creation. You choose similar parts or design compatible patterns. People recognize your creative efforts when they see or wear your pieces.
Hand Craft. The feel on the fingertips and on the palm of your hand. The pattern of light that registers on your eye and then gets translated by your brain. The anticipated weight and movement of the piece as it’s worn.
The shared implications of all this, and the full range of possibilities are understood by everyone. This mutual understanding helps you cement relationships with other groups or individuals. Relationships and meanings are extensions of your hand in craft.
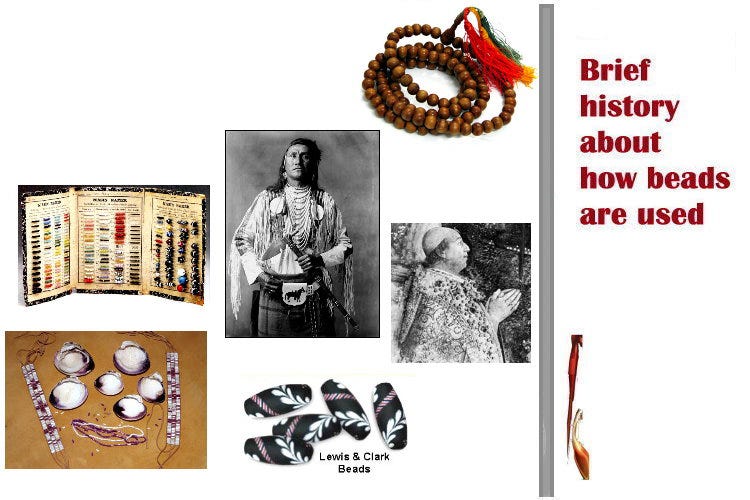
Hand Crafts. Beads and Jewelry. Beads and Jewelry. Beads and Jewelry. Beads and Jewelry as Hand Crafts. Beads and Jewelry have been used all throughout time. They appear in every culture in the world. Although they are not always used in the same ways or for the same reasons.
Wampum
SOMETIMES BEADS ARE USED INSTEAD OF MONEY
Sometimes beads are used instead of Money. When people look at beads, they have an intrinsic value that people seem to recognize and share. In many cultures, people place more confidence in using their beads as their Money, instead of their own coins and currency.
And in our own world, this is often true as well, as we go to bead swaps, or swap one piece of jewelry for something else of value. We barter with beads. We do this all the time. Beads and beaded jewelry have a monetary life all their own. “I’ll give you this______ , if I can have the beaded bracelet you are wearing.”
And so many times, people will come in the shop and ask to work for beads. And we have plenty for them to do.
Trade Beads
BEADS WERE USED IN TRADE
In a similar way, beads were used in Trade. This is more true historically than today, but a little bit today. When two groups want to trade with each other, it’s hard to come to terms. Because people, for whatever reasons, seem to be able to come to agreement on the value of beads, beads were used in various ways during the negotiation process.
Global Trade Routes
About 300, and 400 and 500 years ago, explorers set out from various European countries, and visited far-away places like China and India and Africa, and North and South America. When they set off on their explorations, they brought with them what we call Trade Beads. These were glass beads that were made in Venice, Bohemia and the Netherlands.
In Europe at this time, the folks looked down on glass beads. They used them in projects involving bead embroidery and mimicking tapestries where they could get a more 3-dimensional look with the beads than they could with the fibers.
But they shied away from glass beads in jewelry. Too cheap. Too low class. Glass was trash. For jewelry, they preferred the high test octane beads made from gemstones and precious metals. But those darn glassmakers in Venice and Bohemia and The Netherlands kept churning glass beads out. I think there were some technological improvements that occurred at this time, that made it easier/cheaper/ more efficient to make glass beads, but I don’t know this for a fact. Still, no one really wanted them.
The explorers took these glass beads with them, and at first gave them away as gifts. They assumed that people from other, “less sophisticated” cultures, would dismiss these glass beads as well. But alas and alack, these other “less worldly” men and women did not. They liked the glass beads. They liked them a lot. Some cultures even saw spiritual qualities in these glass beads.
It wasn’t long before the explorers started trading these beads, instead of giving them away. Some of the trade beads made in Europe were very generic; others were more specialized designs, colorations or etchings specific to certain countries or regions, like Africa or Persia.
When these explorers came to North America, the Indians here, at first, wanted blue beads. You see, they couldn’t easily make a blue color with the natural materials they were using — stones, shells, antler and wood. The explorers were thrilled about this. Blue was the cheapest color to make. So, the explorers found this trade to be very profitable. It wasn’t too long, however, before the Indians met their needs for blue, and started asking for yellow and red. You see, it takes real gold to make the colors yellow and red. And the trading became nearer and dearer for the explorers.
These French Traders continued their explorations down the Missouri and Mississippi Rivers. They discovered the freshwater pearl cultures of the Mississippi Indians in the area around Tennessee, and traded beads for these pearls which they sent back to Europe. These freshwater pearls soon earned the name “Royal Pearls”, and were restricted for use and wear by the royalty across Europe.
Even today, royal families continue to import Tennessee freshwater pearls. They have these sewn into their undergarments. After all, it’s widely believed that wearing a pearl against your skin ensures your future wealth.
And, I always wondered if you could speculate why the Indians sided with the French in the French and Indian Wars, against the British. Could it have been that the French supplied them with beads, and the British did not?
People With The More Beads Have The More Power!
ANOTHER WAY PEOPLE USE BEADS IS FOR POWER
Another way people use beads is for reasons of Power. People with the more beads have the more power. When you get into beading, you learn this very quickly. Who has the most beads? The most Reds? The most Purples? The most delicas? Beads, in this sense, define social relationships, who’s more important than whom, and pathways of success.
Ogalala Sioux Indian Reservation Lands
About 400 years ago, among the Oglala Sioux Indians in the Dakotas, there was a big women’s movement. The women of this tribe wanted greater say and control over tribal matters, they saw an opportunity to assert themselves, which they did, and they won. This whole incident was oriented around beads.
So what happened four hundred years ago? You had French traders traveling through Canada, and coming down into the Dakotas. They brought with them these glass Trade Beads, and traded them for pelts. One of the major roles of women in Indian tribes was to make beads. They would spend all day, every day, making beads out of stones and wood and antlers and shells. When these French traders came with these pre-made beads, it freed up a lot of time. And in this one tribal group, the women took advantage of this free time, asserted themselves, and won.
Sioux bead embroidery
One of the things the women did to mark their success was to change the costuming of the men. Before the movement, men wore beaded embroidery strips tacked down linearly along their sleeves. After the movement, the women tacked down only part of the embroidery strips — the rest allowed to flow out like ribbons. So when the men went off hunting or fighting or whatever they did, they wore the mark of the women — their ribbons would flow.
Rosary
SOMETIMES BEADS ARE USED FOR SPIRITUAL AND RELIGIOUS REASONS
Sometimes, beads are used for Spiritual and Religious Reasons. You can picture a rosary in the Catholic Church. By touching and moving your hand along this bead chain, it helps you feel closer to God. It helps you feel more spiritual. It helps you remember the rituals. In Buddhism, they use something like a rosary. In Confucianism in China they use something like a rosary called Immortal Beads.
The threatened Pope
During the Middle Ages in Europe, only priests were allowed to wear rosaries and have beaded adornments. Priests had their parishioners make them rosaries and beaded this and beaded that. After awhile, the priests with the more rosaries and the more elaborate rosaries, gained higher status. So they kept accumulating, and accumulating, and accumulating, until, at one point, one of the Popes felt very threatened. Many priests were becoming as adorned as he was. So the Pope issued an edict that said everyone could wear rosaries and have beaded adornments.
The fact that you can wear beaded jewelry today, instead of making them for your priest or minister or rabbi or imam or whatever, goes back to the insecurity of one of those Popes.
Zulu Beadwork
LAST, BEADS ARE USED FOR PURPOSES OF COMMUNICATION
Last, beads are sometimes used for Communication. They are used symbolically. Different colors have different meanings. Different patterns have different meanings. Different shapes have different meanings.
Among the Zulu Tribes in South Africa during Apartheid, you had some Zulu tribes who adopted Christianity and identified with the colonialists. And you had other tribes that did not. Among the tribes that did not, they developed a very elaborate communication system using beads. Besides what colors were next to each other, they used a lot of triangles in their patterns. It was important if the triangle faced down, or up, and again what the colors were.
SPEAKING WITH BEADS. Zulu Arts from Southern Africa. by J. (photographs), E. Whyte. Morris New York , 1994
These folks might bead a necklace, or a loin-cloth. They might do a beaded doll, or a hat, or a blanket or tapestry. Something beaded. They would come out during the day, and flash the results of their secrecy, plotting and chicanery. They might say something very general with their beadwork, like “I’m mad at the world today”. Or they might get very specific, such as “I’d like to get together with you tomorrow night at 8:00, but not before I’ve met with your brother.”
These Zulu tribes kept up this communication system for about 70–80 years — all during Colonialism and Apartheid. When Apartheid ended, no one carried on the tradition. Not a complete surprise.
Today Zulu beadwork is very fashionable, particularly in Europe. But no one knows what they are saying. They are just doing pretty patterns.
Beading in the United States Today
A Social Movement Dating Back to the 1960s
Today, beading in the United States has been part of an ever-growing social movement that began in the 1960s, and, whether you know it or not, you are caught up in it, even unto today.
In the early 1960s, two new stringing materials were developed and introduced to beading. The first — NYMO Thread — was a nylon thread created by the shoe industry to attach the bottom of the shoe to the top of the shoe. This is widely used in upholstery. The second was called Tiger Tail. This was a flexible, nylon-coated cable wire. Cable wires are wires that are braided together and encased in nylon.
Before the 1960s, there really wasn’t a durable stringing material. People mostly used either cotton or silk thread, or nylon fishing line. Cotton and silk thread naturally deteriorate in about 3–5 years, so anything done on these has to be re-done every 3–5 years. Fishing line dries out and cracks when exposed to ultraviolet light and heat, that is, sunshine.
Because there was not a durable stringing material, beading, for the most part historically, was viewed as just a home craft. It did not attract artists. It did not attract fine craftspersons. It did not attract academics. It did not encourage people to experiment and push the envelop with the craft.
While occasionally in history, if you look back, you do see elaborate bead work, such as Russian bead embroidery during the 1800s and French beaded purses in the 1920’s, — this intricate beadwork was most often done by people who were slaves, or serfs or indentured servants. When they were freed, their beadwork stopped or diminished. So, when the Czar was deposed at the turn of the century, there began a major decline in Russian bead embroidery. Or when France passed labor laws in the late 1930’s, there were no more beaded purses. A rational person doesn’t want to spend all that money on beads, and take all that time making something, if it is going to fall apart.
With the introduction of Nymo and Tiger Tail in the 1960s — materials that do not break down easily — beading began to attract academics and artists and fine craftspersons. This movement began in Southern California, and gradually spread across the country. The first bead society was founded in Los Angeles in the 1960s. Today there are over 200 bead societies across the United States. The explosion in the availability of bead magazines didn’t begin until the latter part of the 1990s. The fact that you can get very excited about beads today, even thinking about selling jewelry made with them — 40 to 50 years ago, you wouldn’t have had those thoughts.
Beading has a very different energy and dynamic than a lot of other crafts, because it is only very recently begun to be thought of as an art form.
I don’t mean to drag a poor Elephant by its tail, kicking and screaming, into our bead world against its wishes. Nor do I perceive the elephant to be a threat, like you might see an Elephant in the boudoir, or the fine china store. And I don’t want you to shut your eyes and pretend not to notice that this Elephant is here, standing shoulder to shoulder with every beader and jewelry maker around.
The Elephant is not a joke. And the fact that it is “Rogue” makes it more important than ever to figure out why it’s here, among size #10 English beading needles, and Czech size 11/0 seed beads, and Austrian crystal beads. It seems so worldly, yet other-worldly, our Elephant. It’s not our muse. It’s not our Cassandra. It has no secret plan or strategy. It does not depend on its size to make its point. It does not hesitate to stomp and chomp and clomp because the beads before it are raku or glass or gemstone or crystal or metal or plastic. But a Rogue Elephant in the middle of our craft room forces upon us a completely different logic, so that we can make sense of it all.
Only the beader or jewelry artist who is willing to submerge her- or him-self completely in this wonderfully off-centered picture — Rogue Elephant, beads, stringing materials, clasps and all — will really get the fullness of this humor, this wisdom, and the splendor of beading and jewelry making as a form of art that is worn.
And that’s what happened with me. Though not all at once. Struggling excitedly, creative frustration, wondrous illusion — that’s how I would describe my over 30 years stringing beads, weaving beads, combining wire with beads, soldering silver with beads, entangling fibers with beads.
Somewhere along the way I felt that Rogue Elephant staring at me from a distance. I moved closer to him. And all the applications and all the techniques and all the materials and all the making-selling-making-selling-making-selling began to cohere into something very real. Very meaningful. Integrally resonant. I discovered my Rogue Elephant and beaded him.
How do you stop an elephant from passing through the eye of a needle?
Tie a knot in its tail.
The issues and inspirations that drive the artist
This is a fable for all jewelry artists who aspire to become one with Design. How to Bead a Rogue Elephant becomes an evolving tale and collection of personal perspectives and experiences on the issues and inspirations that drive me, and that drive other bead and jewelry-making artist in their designs.
“Design” is the operative word here. A Rogue Elephant does not present an obstacle, nor create any opportunities, for the artist, unless that artist understands, follows through and is committed to Jewelry as an Art Form, and realizes that jewelry is art only as it is worn.
Jewelry as art isn’t a happenstance. It is made up of a lot of different kinds of parts. These must be strategically and thoughtfully brought together. They are brought together as a kind of construction project. The results of this project must be beautiful and appealing. They must be functional and wearable. And this all comes about through design. Jewelry must be designed. And designed it is.
Rogue Elephants are big, and jewelry design is a big task. Rogue Elephants move in unpredictable, yet forceful ways. And jewelry must be designed with movement in mind. Rogue Elephants come with a surface scape, texture and environment, against which the jewelry must look good. And again, good jewelry emerges primarily from the design perspective and the control of the bead, and all the other incumbent parts by the jewelry artist.
Most beaders and jewelry makers don’t get to the point where they can fully answer Why some pieces of their jewelry get good attention, and others do not? They have fun making things. They match outfits. They give gifts. They sell a few pieces. They use pretty beads and other components. And sometimes they get compliments. Other times they do not.
Thus, they don’t necessarily know what to do with the pieces they are playing with. They don’t control these pieces, or the process of combining them. They follow patterns and instructions. And do these again. And again and again. Their artistic goals are to complete the steps and end up with something. They might stick to one or a few techniques they feel comfortable with. There is an unfamiliarity with the “bead” –What is it? Where did it come from? What makes it special as a medium of art and light and shadow? How does it relate to other beads or clasps or stringing materials or jewelry findings? What happens to the bead over time? When they look at the bead, what do they see?
But luckily, beading for many artists is an evolving obsession. This obsession leads them to contemplate the bead and its use. The bead and its use in art. The bead and its use in jewelry. The bead and its relationship to the artist’s studio. Beads are addictive. Their addictiveness leads the beader or jewelry maker to seek out that Rogue Elephant that haunts them along the distant horizon. They know they want to bead it. They’re not sure how. But they steer themselves along the pathway to find out. This pathway isn’t particularly straight, level or passable. But it’s a pathway nonetheless. And the ensuing possibilities for learning and growing as an artist and designer along the way reap many worthwhile and satisfying rewards. I call this CONTEMPLATION.
The first step in this pathway is to figure out how to get started with beads and jewelry making. You need supplies. You need work spaces and storage strategies and understanding how to get everything organized. You need to anticipate bead spills and many unfinished projects. You need to learn to plan your pieces. You need to get a handle on the beads (and all the other pieces), and how to use them. I call this PLAY.
Whatever the reason, most beaders and jewelry makers don’t get past PLAY. They are content following patterns and making lots of pieces, according to the step-by-step instructions in these patterns. They might fear testing themselves against broader rules of artistic expression. They might not want to expend the mental and physical energy it takes to get into design. They just want to have fun. And if they never notice that Rogue Elephant hugging the horizon, that’s fine with them.
At some point, some beaders and jewelry makers will want to start educating themselves to get a little below the surface. Rather than mechanically following a set of steps, or randomly assembling things bead by bead, you want to know more about what is really going on. How do I hold my piece to work it? How do I manage my thread tension? How do I select colors? What clasp might work best? If you find yourself at this point, PLAY is not enough. You need to start DABBLING.
But for those beaders and jewelry makers for whom the Rogue Elephant is very disturbing, no matter how far away he may be, there are these wonderfully exciting, sensually terrific, incredibly fulfilling things that you find as you try to bead your Rogue Elephant, ear, trunk, feet, bodice and all. You learn to play with and dabble with and control the interplay of light and shadow, texture and pattern, dimensionality and perspective, strategy and technique, form and function, structure and purpose. You begin sharing your designs with friends and strangers, perhaps even teaching classes about how to make your favorite project, or do your preferred technique. You might also create a small business for yourself and sell your pieces. Your sense of artistry, your business acumen, your developing design perspective — you need all this, if you are to have any chance of catching up with your Rogue Elephant, let alone beading him. As you begin to evolve beyond the simple craft perspective to one of artistry and then design, you enter the stage I call CREATE.
As your jewelry pieces become more the result of your design intuition and acuity, you begin to wonder how other artists capture, be-jewel, and release their own Rogue Elephants. How did they get started? What was their inspiration? What motivated them to delve into beading, stick with it, and take it to the next level? Do they make their pieces for show or for sale? You begin to recognize how some pieces of beadwork and jewelry are merely “craft”, and others are “art”. You get frustrated with beautiful pieces that are unwearable and fashionable pieces that lack durability and pieces that sell that are poorly constructed. You see many good ideas, some well-executed, but many not. I call this SAFARI.
Part of this SAFARI is historical. And the more recent socio-cultural-artistic history of beading in America is a fantastic tale of curiosity, grit, creative expression, ambition and technological advances in materials. Beading exploded across America in the late 1980s and 1990s and owes much to its many fore-mothers and a few fore-fathers that began their beadwork careers at this time, as well as those who founded the many beadwork magazines so prominent today. The other part of the SAFARI is learning life’s lessons, and incorporating these into beadwork and jewelry making approaches and designs.
As you begin to articulate what works and does not work in various pieces in terms of form, structure, art theory, relationships to the body, relationships to psychological and cultural and sociological constructs, you complete your evolution as a jewelry designer. You add a body of design theory and practice to your already honed skills in art, color, bead-stringing, bead-weaving and wire working. You find and bead your Rogue Elephant. I call this GALLERY HOPPING.
As you compare yourself as Designer to other jewelry designers all over the world, this is partly a personal adventure as you self-experience your intellectual growth as an artist. And it is partly an adventure of evaluating how well other artists have succeeded in this same quest, as well. One very revealing pathway is following how artists contemporize traditional designs. Still another follows the artist who revives vintage styles. Or the pathway that finds the artist elevating fringe, edging, strap, bail and surface embellishment to the same level of “art” as the centerpiece. And yet another pathway which looks at multimedia beadwork, and how artists seek to maintain the integrity of each medium within the same piece. You might explore that pathway which involves collaboration. I call this stage DESIGN MANAGEMENT.
Your adventure along this pathway towards design — your success at beading your Rogue Elephant — is very fulfilling. Whether you walk, run, skip or crawl or some mix of the above, it’s a pathway worth following. You’ve learned to transcend the physicality and limitations of your workplace, tools and supplies. You’ve learned to multi-task and organize and construct your project as if you were architecting or engineering a bridge. You have discovered how to dress and present yourself for success, including strategies for self-promotion. You’re a Designer. You have learned to present yourself and promote yourself as a Jewelry Artist. You’ve evolved as a Beader and Jewelry-Designer and are feeling a true SATISFACTION.