So what prevents so many jewelry makers and other artist types from living their authentic lives? What prevents so many designers from making choices and taking advantage of opportunities which are not limited by anyone — not limited by friend or family or boss or colleague or perceptions of cultural and social norms?
Aloise was sitting there, fidgeting, only half listening to the discussion in my class about jewelry design, when, suddenly, unusually with a forceful voice and expression, she said, No one likes her stuff. No positive feedback in response to seeing any of her necklaces or bracelets or earrings. She loved her designs, she stated plainly, convincingly. But no one else seemed to. Her designs did not resonate with her friends and the people around her. She loved making jewelry. She loved her style. She loved the pieces and materials she was using. But, because of the nil-to-negative feedback, she never felt authentic as an artist.
If you saw her pieces, you would immediately come to the conclusion that there was no reason for the negative feedback, except, perhaps, that her pieces did not reflect the current fashion. Well conceived. Well-made. Clearly a point of view.
My response to her was simple: They are not the judge, you are. The problem for you is not your design skills. The problem is that you need to either to connect with a different audience, or, much more difficult, you need to learn how better to express what makes sense and has value for you in your own jewelry design work to your current audience. It’s like thinking your design process out loud — how you made choices about materials, techniques and composition.
Design Is A Tool For Expressing Authenticity
Authenticity and design are integral to each other. Design is a tool for expressing your authenticity. You will have difficulty feeling and expressing your authentic self in public without reference to good design. And, ultimately, you can’t have good design without an ability to express your authentic self. Cannot have one without the other.
Authenticity means conveying a sense of your being genuine. Real. True to your values. Consistent and coherent in how you relate your inspiration to your aspiration when creating a piece of jewelry. Then, continuing to be consistent and coherent as you implement your aspiration, understandably making changes and tweaks along the way, into your finished jewelry design. This requires a lot of honesty with yourself. A lot of self-reflection and what is called metacognition. Your jewelry becomes a sincere expression of you and you-the-creator’s vision.
That’s authenticity. The sum of all your choices in the design process. Technical. Artistic. Social. Philosophical. Each piece of jewelry you make is evidence to the world about all the choices you have made. Choices about translating vision into a tangible form. Selection of visual elements, product functionality, technology and technique. Accepting or rejecting client desires and hoped for experiences. Steering your business towards particular ideas about branding. Design can enhance. It can amplify. It can set boundaries. It can increase accessibility. Engage. Impact.
Gennifer refused! She refused to listen to me about how important it is to relate the materials you choose to your design goals. She made wrap bracelets, usually two bands around the wrist. She sold them for $300 each. Took her about 2 hours to make each one. The materials she used were cheap. If the price tag you put on your jewelry has no relationship to the effort and materials you put into it, you’re not being authentic.
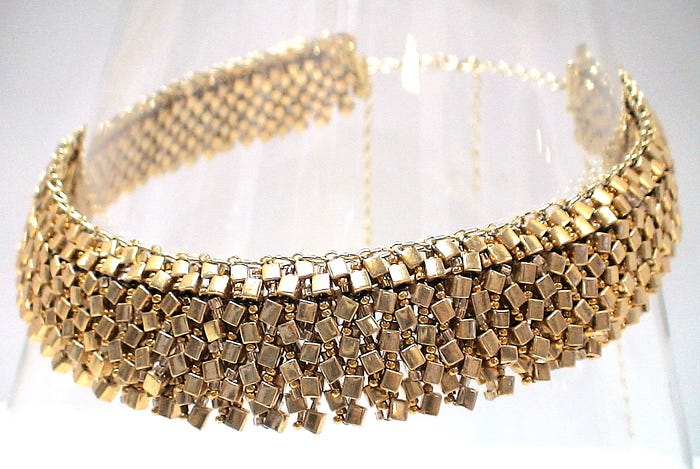
A wrap bracelet consists of beads ladder-stitched between two pieces of leather. She used Indian leather, which dries out and cracks easily. Does not hold up. She stitched her beads with fishing line. Fishing line in sunlight and heat dries out and cracks. Very quickly. She used glass beads from China. Glass beads from China typically are a clear bead with a color coating. The side of all her beads along the full almost 20” length of the bracelet which touched the skin had lost their color. Originally black, they were now white with peeling black. No reinforcement was placed on either end, so, on either end, again pretty quickly, the stitching would start to break and the two supporting strands of leather would come apart.
Gennifer’s wrap bracelets probably had $10–12 of materials in them plus two hours of labor. Her $300 price tag was not representative of appropriate design. She should have upped the quality of her materials: Greek leather, Czech glass or gemstone beads, micro bead cord for the stitching. She should have reinforced both ends, such as using a silk wrap technique. Then her pieces would be durable and justify the price tag, and be much more authentic to herself as a designer. Or, she should charge what her pieces are really worth: perhaps $75–100. I’ve yet to meet one of her customers who has gotten more than six months of use out of her pieces. To me, if Gennifer thinks she is being authentic, I’d tell her it’s contrived.
About Authenticity
Authenticity is multiplex. It functions on several planes.
You have material authenticity. Given the value you want to assign to your piece, your choice of materials, and how you leverage them, should be the highest, appropriate quality in durability, sustainability and craftsmanship.
You have technical and technological authenticity. Your choice of techniques and technologies, and how you leverage them, should bring your design to that optimum (sometimes called parsimonious) point of efficiency and effectiveness. That is, that perfect point where you can maintain both shape and suppleness.
There is emotional authenticity. Good jewelry should resonate with the customer. It should evoke genuine emotions in line with your audience’s intended desire(s).
There is cultural authenticity. Good jewelry shows respect and acknowledges any cultural influences and inspirations, when design elements are borrowed or otherwise represented.
There is contemporary design authenticity. In contemporary design, the designer substitutes personal values and understandings for those of traditional socio-cultural norms and values which influence more traditional design. You must always show respect for tradition while concurrently using your own authentic self as the measure and rationale for successful design choices within any designing process. You must overcome pressures to conform and present a curated version of yourself.
Another type is personal authenticity. As a jewelry designer, you always have something to say. It can be simple such as what you think might be beautiful or wearable or appropriate for a certain situation. It might be more complex where you make a series of interrelated choices relating your values and desires to those of your client.
Dilemmas For The Designer
For me, I grew up with both parents and teachers discouraging me from pursuing my creative self through the arts. Doctor or lawyer. Basically, those were the two allowed choices, as I was steered and tracked and encouraged (or discouraged) over all my young and teenage years. [Parents, if your child tells you who they are, support them!]
Finally, in my early 20’s, having achieved some separation from my overbearing career police, I made an attempt for a few years to paint. Pretty. Ok technique. No reflection of who I was as a person except perhaps, in the choice of subject matter. I tried to convey emotions and meanings, but, primarily ended up with pretty paintings to decorate my apartment. Friends and family loved them. Sold a few. But none of this was coming together as a reflection of my authentic self. I was in my 20’s but hadn’t found anything authentic about me.
Twenty years later, when I began to make jewelry, I felt a strong connection. With jewelry, I had to create something meaningful for both myself and my client. Both our understandings. Both our values. Both our desires. Jewelry by its nature requires this kind of dialogue. That challenge stirred me. It forced me to come to grips by reflecting on what I wanted the object I created to be, and how that compared to what someone else wanted. Add on top of this was the fact the design had to account for the fact that the wearer moves around and never wants to look clownish. Jewelry design, under these circumstances, becomes very complex. And, as a result of all this thinking and concerning and anticipating and interacting, my sense of authenticity began to grow and clarify and grow and clarify some more.
From my experiences, and those of my students and colleagues, I can identify several dilemmas and challenges for the designer who wants to find their authentic self and successfully express it through the designing of jewelry.
The originality dilemma. You don’t design in a vacuum. And most certainly, many of the design choices you make have been influenced by other designers around you. Finding a balance between originality and the influence of others can be daunting. But think about it this way. Define ‘originality’ as differentiation. Your authenticity will emerge and shine by the way you differentiate yourself from other designers and influencers.
The art market dilemma. For many of us, we want some level of commercial success. Often this means compromising our integrity as we bow to things like fashion, market trends, client expectations, commercial requirements and limitations. Sometimes, when commercializing what we do, we use the label “authentic” to commodify our jewelry, when we are really stretching the imagination and legitimacy here. The challenge is to find balance between making a living and maintaining true authenticity.
The shared understanding dilemma. Successful design emerges from the insights and applications of the values and desires of the artist in coordination and conjunction with the assumptions, values and desires of the client. That might mean some compromising. Some give and take. Some less authenticity. The designer must decide to what degree personal integrity will be compromised in the design process.
The vulnerability dilemma. Since jewelry must be introduced publicly — for someone to wear, to be exhibited, to be sold, to be collected — the designer, of necessity, must open themselves up. Be exposed. Be given critique and criticism. There is doubt and self-doubt. There is a questioning of whether you are truly genuine. The designer is faced with determining how to overcome feelings of vulnerability and how much ego-self-protection they want to build into what they do.
The evolution dilemma. You grow, you learn, you change over time. What you thought was your authentic self (and all that that meant) earlier in your career may be different than what it is now and how you want to express it now. In a similar way, your authentic self may vary a bit from one context to another. This might result in a tension between the consistency and coherency of your body of work as these relate to your authentic self as you see / feel / sense it in the moment. The designer, in this case, must grapple with whether to change or not, or if so, how much to change. If you are already an established business with a strong brand identity, this becomes especially difficult to deal with. Changing your brand identity is especially hard. You don’t want to be rejected by or confuse your audience.
During my jewelry designing career, all these challenges confronted me. I can honestly say that there is a give and take, from piece to piece that I have designed, between achieving that authentic self, and having to make some compromises. Often, when I find I have had to compromise too much — usually to conform to my client’s wishes — I concurrently design a piece in the abstract, one I can create which majorly resonates with many aspects of my personal authenticity as an artist.
One last point. Look around at all the jewelry available for sale and that people wear. There is a lot of sameness. Standardization. Very machine-made looking. In some sense, lacking in personality and individuality. Infusing your jewelry design with your authentic self helps you differentiate yourself from mass-produced or superficial alternatives.
How someone actually goes about finding and expressing their authentic self varies from person to person. This isn’t a straightforward process. You the designer must be guided by your own self-reflection, empathy and commitment to your core values, beliefs and desires. You must strive to align your choices about design with your inner convictions.
And remember: Rogue Elephants are always authentic. They can be no other way.
_______________________________
I hope you found this article useful. Please consider sharing. Thank you for clicking the CLAP HANDS icon at the bottom of this article.
Keep From Letting ‘Doubt’ Paralyze You As A Jewelry Designer
For the novice, all that excitement at the beginning, when thinking about making jewelry and making some pieces, sometimes collides with a wall of developing self-doubt.
It’s not easy to quiet a doubt.
As a jewelry artist, you organize your life around an inspiration. There is some fuzziness here. That inspiration has some elements of ideas, but not necessarily crystal clear ones. That inspiration has some elements of emotions — it makes you feel something — but not necessarily something you can put into words or images or fully explain. You then need to translate this fuzzy inspiration into materials, into techniques, into color, into arrangements, into a coherent whole.
You start to make something, but realize you don’t know how to do it. But you want to do it, and do it now. However, to pick up the needed skills, you realize you can’t learn things all at once. You can’t do everything you want to do all at once. That initial excitement often hits a wall. Things take time to learn. There are a lot of trial and error moments, with a lot of errors. Pieces break. Combining colors and other design elements feels very awkward. Picking the right clasps and rings and connectors and stringing materials is fraught with implications. Silhouettes are confusing. You might get the right shape for your piece, but it is difficult to get the right movement, drape and flow, without compromising that shape.
To add to this stress and strain, you need to show your jewelry off. You might want someone to like it. To want it. To need it. To desire it. To buy it. To wear it. To wear it more than once. To wear it often. To exhibit it. To collect it. To show and talk about it with others. And how will all these other people recognize your creative spark, and your abilities to translate that spark into a wonderful, beautiful, functional piece of jewelry, appropriate for the wearer and appropriate for the situation?
Frequently, because of all this, the artist experiences some sense of doubt and self-doubt. Some paralysis. Can’t get started. Can’t finish something. Avoiding showing your pieces to others. Wondering why you became a jewelry designer in the first place.
Doubt holds you back from seizing your opportunities.
It makes getting started or finishing things harder than they need to be.
It adds uncertainty.
It makes you question yourself.
It blocks your excitement, perhaps diminishing it.
Doubt and Self-Doubt should be useful in forcing you to think about and question your choices. However, for many jewelry designers, it mostly holds them back.
Having doubt and self-doubt is common among all artistic types. After all, for much of what you do and how you spend your time, you’re mostly alone with your thoughts.
What becomes important is how you manage and overcome it. You do not want your doubts to get in the way of your creative process and disciplinary development. You want your doubts, rather, to inform them.
8 Major Ways Doubts Can Force You Into That Abyss
There are 8 major ways in which jewelry designers get caught beginning to fall into that abyss we call self-doubt:
1) What If I’m Not Creative Enough or Original Enough or Cannot Learn or Master or Don’t Know a Particular Technique?
2) What If No One Likes What I Make?
3) What If No One Takes Me Seriously As An Artist And Designer?
4) I Overthink Things and Am A Bit of a Perfectionist.
5) How Can I Stay Inspired?
6) Won’t People Steal My Work?
7) Being Over Confident or Under Confident
8) Role Confusion
1. What If I’m Not Creative Enough or Original Enough or Cannot Learn or Master or Don’t Know a Particular Technique?
Everyone has some creativity baked into their being. It is a matter of developing your way of thinking and doing so that you can apply it. This takes time.
So does originality. The word originality can be very off-putting, but it does not have to be.
At first, when you are getting started making jewelry, originality will mean that you will try different ways of personalizing projects. There are always things you can do to bring some aspects of originality to your pieces. This might be the choice of colors, or using a special clasp, or rearranging some elements in your composition.
Again, as with creativity, the ability to be more and more original will evolve over time. It is helpful to think of originality, not necessarily as coming up with something completely new, but rather as differentiation — how you differentiate yourself from other jewelry designers.
For almost everyone, you don’t begin your design career at the height of your levels of creativity and originality. Yes, if you look around you, other people are more creative and original than you or have more skills than you. Don’t let these observations be a barrier to your own development as a jewelry designer. You get there through persistence and hard work. You handle your inner critic. You may not be there, yet — the key word here is yet. But you will be.
2. What If No One Likes What I Make?
We all have fears about how our creativity and originality are going to be evaluated and judged. We project our self-doubts to the doubts we think we see and feel from others. What if no one wants to wear my pieces, or buy my works?
We can’t let these outsider reactions dictate our lives and creative selves. A key part of successful jewelry design is learning how to introduce what we do publicly. At the least, it is the core nature of the things we create that they are to be worn on the body. Jewelry is a very public thing.
Turn negative comments into positive ideas, motivators, insights, explorations. Allow yourself some give and take, some needs to step back awhile, some needs to tweak. Jewelry design and jewelry making are iterative processes. They in no way are linear. Your outcomes and their success are more evolutionary, than guaranteed.
Distressing about what others may think of your work can be very damaging to your self-esteem. It can amplify your worries. Don’t go there.
Don’t become your worst critic.
3. What If No One Takes Me Seriously As An Artist And Designer?
Jewelry design is an occupation in search of a profession. You will find that a lot of people won’t recognize your passion and commitment. They may think anyone can design jewelry. They may think of jewelry making as a craft or some subset of art, not as something unique and important in and of itself. They may wonder how you can make a living at this.
The bottom line: if you don’t take yourself seriously as a jewelry designer, no one else will.
People will take you seriously as they see all the steps you are taking to master your craft and develop yourself as a professional.
4. I Over Think Things And Am A Bit Of A Perfectionist
Some designers let a sense that their work is not as good as imagined get in the way. They never finish anything. They let doubt eat away at them.
Perfectionism is the enemy of the good. It’s great to be meticulous, but emotionally, we get wrecked when anything goes astray, or any little thing is missing, or you don’t have that exact color or part you originally wanted.
Go ahead and plan. Planning is good. It’s insightful. It can be strategic. But also be sure to be adaptable and realistic. Each piece is a stepping stone to something that will come next.
The better jewelry designer develops a Designer’s Toolbox — a collection of fix-it strategies to deal with the unfamiliar or the problematic.
Overthinking can be very detrimental. You can’t keep changing your mind, trying out every option, thinking that somewhere, someplace there exists a better option. Make a choice and get on with it. You can tweak things later.
Yes, attention to detail is important. But so is the value of your time. You do not want to waste too much time on trivial details.
Be aware when you begin over-analyzing things. Stop, take a breath, make a decision, and move on.
5. How Can I Stay Inspired?
Designing a piece of jewelry takes time, sometimes a long time. That initial inspirational spark might feel like it’s a dying ember.
Don’t let that happen.
Translate that inspiration into images, colors, words, sample designs, and surround your work space with these.
Talk about your inspiration in detail with family and friends.
6. Won’t People Steal My Work?
Many jewelry designers fear that if they show their work publicly, people will steal their ideas. So they stop designing.
Yet jewelry design is a very communicative process which requires introducing your work publicly. If you are not doing this, then you are creating simple sculptures, not jewelry.
Yes, other people may copy your work. See this source of doubt as an excuse. It is a self-imposed, but unnecessary, barrier we might impose to prevent us from experiencing that excitement as a jewelry designer. Other people will never be able to copy your design prowess — how you translate inspiration into a finished piece. That is unique and special to you. It is why the general public responds positively to you and your work.
7. Over Confidence can blind you to the things you need to be doing and learning, and Under Confidence can hinder your development as a designer.
Too often, we allow under confidence to deter us from the jewelry design and making tasks at hand. We always question our lack of ability and technical prowess for accomplishing the necessary tasks at hand. It is important, however, to believe in yourself. To believe that you can work things out when confronted with unfamiliar or problematic situations. It is important to develop your skills for thinking like a designer. Fluency. Flexibility. Originality. There is a vocabulary to learn. Techniques to learn. Strategies to learn. These develop over time with practice and experience. You need to believe in your abilities to develop as a designer over time.
With over confidence comes a naivete. You close off the wisdom to listen to what others have to say or offer. You stunt your development as an artist. You overlook important factors about materials and techniques to the detriment of your final designs and products. You close yourself off to doubt and self-doubt, which is unfortunate. Doubt and self-doubt are tools for asking questions and questioning things. These help you grow and develop as an artist and designer. These influence your ability to make good, professional choices in your career.
8. Role Confusion
Jewelry artists play many roles and wear different hats. Each has its own set of opportunities, requirements, and pressures that the artist must cope with. It’s a balancing act extraordinaire.
First, people who make jewelry wear different hats: Artist and Designer, Manufacturer, Distributor, Retailer, and Exhibitor.
Second, people who make jewelry have different needs: Artistic Excellence, Recognition, Monetary Gain, or Financial Stability.
Third, the artist needs to please and satisfy themselves, as well as other various clients.
Fourth, the artist constructs pieces which need to function in different settings: Situational, Cultural, Sociological, Psychological.
Last, the artist must negotiate a betwixt and between situation — a rite of passage — as they relinquish control over the piece and its underlying inspirations to the wearer and the viewer, who have their own needs, desires and expectations.
This gets confusing. It affects how you pick materials and supplies. Which techniques you use. What marketing strategies you employ. How you value and price things. Anticipating who your audience is. And the list goes on.
It is important to be aware (metacognitive) of what role(s) you play when, and why. Given the role, it is important to understand the types of choices you need to make, when constructing a piece of jewelry. It is critical to understand the tradeoffs you will invariably end up making, and their consequences for the aesthetic, emotional and functional success of your pieces.
Some Advice
While doubt and self-doubt can hinder our development as jewelry designers, some degree of these may be helpful, as well.
To develop yourself as a jewelry designer, and to continue to grow and expand in your profession, you must have a balanced amount of both doubt and self-doubt. Uncertainty leads to questioning. A search for knowledge. Some acceptance of trial and error and experimentation. A yearning for more reliable information and feedback.
Jewelry design uses a great deal of emotion as a Way of Knowing. Emotions cloud or distort how we perceive things. They may lead to more doubt and worry and lack of confidence. But they also enhance our excitement when translating inspirations into designs.
· Don’t let your inner doubts spin out of control. Be aware and suppress them.
· Be real with yourself and your abilities.
· Keep a journal. Detail what your doubts are and the things you are doing to overcome them.
· Create a developmental plan for yourself. Identify the knowledge, skills and understandings you want to develop and grow into.
· Remember what happened in the past the last time doubt got in your way. Remember what you did to overcome this doubt. Remember that probably nothing negative actually happened.
· Talk to people. These can be friends, relatives and colleagues. Don’t keep doubts unto yourself.
· Don’t compare yourself to others. This is a trap. Self-reflect and self-evaluate you on your own terms.
· Worrying about what others think? The truth is that people don’t really care that much about what you do or not do.
· Don’t beat yourself up.
· Get re-inspired. This might mean surrounding yourself with images and photos of things. It might mean a walk in nature. It might me letting someone else’s excitement flow over to you.
It’s important to learn in an organized, developmental way. You want to be always asking how things are interrelated. What depends on what? You want to pose what-if questions so that you can train yourself to anticipate the implications and consequences of making one choice over another. What happens If? What happens When? What enhances? What impedes? What synergizes? What can be leveraged, and toward what objective? You want to reflect on your outcomes.
Some places for learning:
Local craft or bead store Community college University (art, fiber arts, metalsmithing, fashion) Jewelry design program Fashion schools Bead and Jewelry Making Magazines Social media groups Self-taught, crafting at home On-the-job training Certifications Art institutes Art grants How-to books Video tutorials Networking with other craft artists
Types of Beading and Jewelry Making
There is so much to know, and so many types of choices to make. Which clasp? Which stringing material? Which technique? Which beads? Which strategy of construction? What aesthetic you want to achieve? How you want to achieve it? Drape, movement, context, durability.
Sample of Techniques:
Stringing Assembling Bead Weaving Bead Working Wire Working Wire Wrapping Wire Weaving Silversmithing, Metal Work Cold Connections Fabrication Casting Fiber Arts, Knitting, Crochet Micro-Macrame Bead Embroidery Kumihimo, Knotting, Braiding CAD (Computer Aided Design) Enameling Lampworking and Glass Blowing Stamping Engraving Polymer Clay, Precious Metal Clay, Sculpting Lapidary Woodwork, Carving
Types of Tasks Jewelry Makers and Beaders Do
Adjust, reshape, resize, create and attach clasp assemblies Cutting stones, setting stones, determining value and authenticity of stones CAD (Computer Aided Design), 3-D Printing Fabrication, stamping, engraving, casting, soldering, cold connections, shaping metal wire and sheet, annealing Model and mold building, sculpting Manage thread tension, create self-supporting shapes, manage movement, drape and flow String, weave, netting, embellish, embroider, knit, crochet, braid, knot, wrap, assemble Understand jewelry-making as a process, from beginning to end Select color, proportion, volume, shape, forms, size, silhouettes, themes Place and Arrange design elements and components Read patterns, figures, graphs Select materials and techniques Determine measurements Assess stress, strain, strength, suppleness, stability and synergy Understand and access the creative marketplace, introduce their pieces publicly
Learning Objectives
A. Technical Mechanics
1. Managing tension, whether using thread, cord, string or wire
2. Holding your piece to work it
3. Reading simple patterns, figures, graphs
4. Selecting appropriate materials
5. Identifying areas of potential weakness, and strategies for dealing with these
6. Determining measurements, including width and length of a piece, especially in relationship to bead and other component sizes
7. Extending your piece, such as adding thread or wire
8. Finishing off your piece and adding the clasp assembly
B. Understanding Craft Basis of Technique or Stitch
Starting the technique or stitch
Implementing the basic technique or stitch
3. Finishing off the basic technique or stitch
4. Learning variations on the technique or stitch
5. Embellishing the Stitch, including fringe, edge, bail, strap, connectors
C. Understanding Art & Design Basis of Technique or Stitch
1. Learning implications when choosing different sizes/shapes of beads or other components, or using different stringing materials
2. Understanding relationship of the technique or stitch in comparison to other techniques or stitches
3. Understanding how bead asserts its need for color
4. Creating your own design with this technique or stitch, in reference to design elements and jewelry design principles of composition
5. Creating shapes, components and forms with this technique or stitch, and establishing themes
6. Building in structural supports, and other support elements, into the design
D. Becoming a Bead Weaving or Jewelry Making Designer
1. Developing a personal style
2. Valuing or pricing your work
3. Teaching others the technique or stitch
4. Promoting yourself and your work
5. Advocating for jewelry as “Art” and as “Design”
Types of Tools Needed To Get Started
Scissors Chain nose pliers (inside of jaws smooth) Flat Nose Pliers Side Cutters Flush Cutters Tweezers and Awl Assorted sizes of hard wire, cable wire, bead cord and bead, thread, elastic string Ruler Crimping pliers Hammers and mallets Steel block plate Doming block, anvil Sizing cones Hand held torch and fire-proof work surface Bead stoppers / clamps Color wheel Work Surface or Pad Bead board Round nose pliers Ring, Jump Ring, and bracelet mandrels Needles, wax Jeweler’s saw and blades Good lighting Comfortable seating
Finding jobs and pathways utilizing your skills as a jewelry designer…
There are actually many career pathways for people who have backgrounds in jewelry making and bead working. Besides the obvious pathways of making jewelry to sell, or teaching jewelry making, there are still many job and career opportunities for you.
Jewelry maker Illustrator Fashion designer Stylist Metalsmith Teacher Lapidary Gemologist Jewelry repair Wood worker Fiber artist Lampworking and glass blowing Physical and Occupational Therapist Counseling Custom designer Engraver Sales Merchandising Website design Data analyst Grants writer/reviewer Program director Video instructor or host Jewelry assessor Display and Packaging Influencer Writer Business Developer
I am writing an article about how jewelry designers began their careers/hobbies/avocations.
I would be interested in you sharing your stories.
Some of the questions I want to explore in my article:
1) How did you get started making jewelry? motivations, intentions, whether the start was very dramatic or mundane, whether you thought it was fate, destiny, luck, personal choice. Was there a particular point in time, or some kind of evolution?
2) What was your first moment of validation like? Not when you started making jewelry per se, but when you started telling people and feeling like an ‘artist’ or ‘designer’. It might have been a quiet admission, coming out to yourself as an artist. It might have been something public, like selling a piece, exhibiting it, some reaction from a client. It might have been some kind of break-through or finding newness or inspiration. It might have been a feeling of originality. A lot of people make jewelry, and can be very talented at it, but do not consider themselves as ‘artists’ or ‘designers’.
3) To what extent did beginning as a jewelry artist/designer feel like a response to society or family or local culture? Art doesn’t exist only because of feelings and emotions. There is a complex infrastructure within which the jewelry designer needs in order to survive. How would you describe this infrastructure within which you work and because of it you can survive. To what extent does it help you to enhance your work and vocation? To what extent does it impede you?
4) Were there special circumstances that were critical in your beginning and development as a jewelry artist/designer? Were there specific excitements, anxieties, challenges you faced?
5) For you, was there a beginning, and then a beginning again? Describe how difficult it was to begin again. How did it feel/seem to question or know whether you could create again?
6) What kinds of things have enabled you to keep going as a jewelry artist/designer? What contributed to your ability to survive your creative life?
I may or may not reference what you share in my final article. Unless you specifically tell me it’s OK, I will not use anyone’s real name in my article.
I appreciate you taking the time to share. I know a lot of jewelry designers and would-be jewelry designers can learn a lot from your experiences.
That’s it for now! There is a lot of creative expression all around the world right now. Hope you get to experience a lot of it, either first hand, or through social media online.
Ceramic jewelry, including clay, porcelain, earthenware, and stoneware, can relieve stress, aid relaxation, improve circulation, and balance energy flow throughout the body, making it a flexible and holistic tool for enhancing overall well-being. Clay, with its grounding and stabilizing qualities, fosters a sense of rootedness within the wearer, while porcelain’s smooth and delicate texture similarly imparts a calming and harmonizing energy, encouraging relaxation and tranquility. Earthenware’s rustic charm, on the other hand, nurtures a connection with the natural world, promoting balance and vitality, while stoneware, renowned for being strong and durable, provides a solid foundation for stability and endurance, so you can navigate life’s challenges with resilience and grace. So, whether you’re seeking inner peace, improved circulation, or balanced energy flow, ceramic jewelry offers a holistic approach to self-care and empowerment.
Finding peace with ceramic jewelry
Ceramic jewelry, including stoneware and clay pieces, alleviates stress and anxiety through its grounding qualities, tactile nature, and connection to the natural world, offering wearers a soothing respite from the pressures of daily life. In particular, clay jewelry’s natural, earthy qualities have a soothing effect on the mind and body. The tactile experience of wearing clay pieces encourages you to focus on the present moment and serves as a grounding, anchoring force amidst the whirlwind of untamed thoughts and emotions. Clay’s inherent warmth and texture is also comforting, creating a sense of connection to the natural world and offering a moment of respite from daily stressors. Similarly, stoneware jewelry also has a grounding effect thanks to its rugged texture and earthy hues. This material promotes emotional resilience and confidence, helping you retain a sense of inner calm amidst life’s challenges. In particular, the tactile experience of handling stoneware pieces serves as a tangible reminder of the earth’s enduring resilience, offering comfort and reassurance in times of uncertainty.
Boosting blood flow for wellness
Since ceramic jewelry promotes relaxation, it can also aid blood flow throughout the body, which results in better oxygenation of the body’s tissues, faster healing of injuries, and a greater sense of vitality and well-being (when the body’s relaxed, blood vessels dilate, allowing for smoother blood flow throughout the body). In particular, earthenware, with its warm and rustic texture, offers comfort that, in turn, encourages relaxation, therefore helping to promote better blood circulation. Porcelain, on the other hand, has a smooth, delicate surface and gentle touch that encourages relaxation and reduces tension in the skin and muscles. This can help improve circulation without causing irritation, making porcelain a great option for individuals with sensitive skin. Moreover, porcelain jewelry’s circulatory benefits can also help lower inflammation in the body. Enhanced blood flow and oxygenation encourage the delivery of vital nutrients and immune cells to inflamed tissues, accelerating healing and diminishing swelling and discomfort. This reduction in inflammation is especially advantageous for individuals with inflammatory conditions like arthritis, tendonitis, or muscle strains. By enhancing circulation, porcelain jewelry not only alleviates pain but also promotes healing in affected areas, offering relief and improved well-being.
Exploring ceramic jewelry’s energetic properties
Drawing from principles of Traditional Chinese Medicine, ceramic jewelry is also believed to possess inherent energetic properties that help harmonize and regulate the body’s subtle energy systems, therefore promoting balance, vitality, and overall well being. Specifically, ceramic jewelry interacts with the body’s energy systems to rectify imbalances or blockages in the flow of chi (vital life or energy force flowing throughout the body). So, for example, porcelain, with its smooth and refined surface, is associated with a gentle and harmonious energy flow, promoting relaxation and tranquility. It’s a great choice for anyone seeking a sense of inner peace and serenity in their daily lives. Clay, on the other hand, possesses an earthy warmth and grounding qualities believed to help anchor chi and promote stability and resilience. As a result, clay jewelry offers wearers a holistic approach to well-being, nurturing both inner strength and a deeper connection to the world around them.
Ceramic jewelry, including clay, porcelain, earthenware, and stoneware, can relieve stress, aid relaxation, improve circulation, and balance energy flow throughout the body. With their innate healing qualities, these pieces become not just accessories, but transformative tools for holistic well-being, inviting wearers to begin a path of self-care and empowerment.
_______________________________
I hope you found this article useful. Please consider sharing.
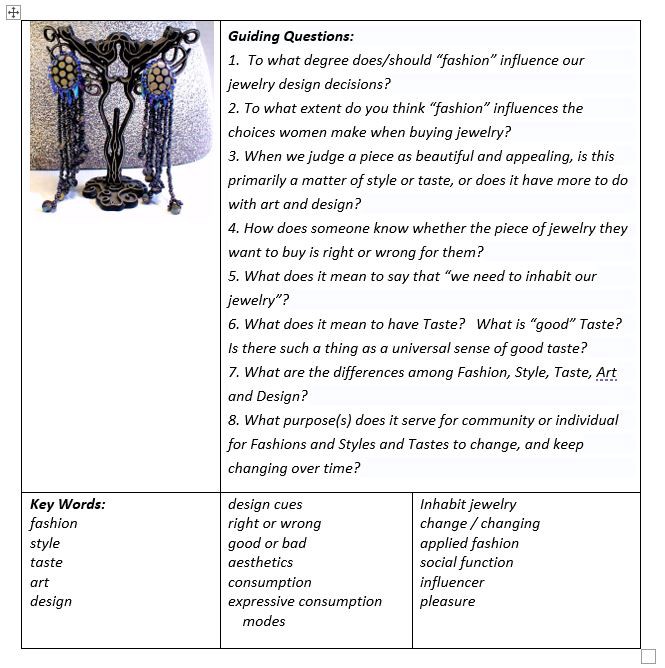
How does the wearer or buyer of jewelry know they have made the right aesthetic choice? What are the cues and clues people use when making these consumer choices? How does attention to fashion, taste, style, art and/or design help the wearer or buyer lower the risk for making the wrong choice? This article discusses answers to these questions for the jewelry designer. That designer must be comfortable managing these things as they play out in a process of innovation, adoption, and diffusion. That designer must be sensitive to the fact that the rules underlying good aesthetics may or may not coordinate those rules underlying a person’s desire for pleasure.
How Can We Know We Have Made The Right Aesthetic Choices?
Wearers and buyers of jewelry often look for a socially acceptable way to confirm they’ve made the right aesthetic choices. They may have picked a blue necklace, but was it the right blue? They may have decided upon a 24” necklace, but was this the right length? They may have gone with gemstones, but were they the right gemstones?
What are these cues and clues people use when deciding to wear or purchase a piece of jewelry? They could listen to the jewelry designer, if that person is present at the point of a transaction. But more likely than not, the designer is not. They could look at how this designer’s jewelry was displayed. Or the packaging. Or read the designer’s description. Or look at images on a website. Or check out other people wearing this designer’s jewelry. Yet, even if the designer were present, and all this other information were available, however, why should the wearer or buyer trust the designer? Isn’t there still a high level of risk for making the less than or more than right or wrong choice?
Our wearer or buyer is a consumer of aesthetics, when selecting a piece of jewelry. They are probably not experts in jewelry design or jewelry making materials and techniques. They are looking for something appealing, but concurrently socially and psychologically acceptable. They may want to feel part of a larger group. Or, they may want confirmation about a sense of individual identity and a way to distinguish themselves from the larger group. They may want reassurance that they are living life the way life should be lived, at least according to social and cultural norms. And there is a perceived risk here, should they make the wrong choice. We want to experience aesthetic pleasures, but our insecurities often mean we look for validation from other people around us, when consuming those aesthetic pleasures.
The actual ways and the actual clues and cues we look for to legitimize our aesthetic choices will vary from person to person. But we can look at five different ways to define the consumption of aesthetic expression and pleasure to begin to get a kind of understanding for the dynamics of what is going on here. Each is associated with a set of socio-cultural rules and consequences when acquiring products like jewelry. These five expressive-consumption modes are,
1.Fashion
2.Taste
3.Style
4.Art
5.Design
Let’s settle on some initial ideas about each of these, and then elaborate further through the remainder of this chapter.
Fashion: Often considered the substitution of someone else’s taste for your own, and is assumed to represent Good Taste. Fashion satisfies the needs of the person to feel connected to a group, to imitate a sense of good taste, and to adapt to changes around them. It considerably lowers the risk for any aesthetic choices.
Taste: A person’s ability to recognize beauty in whatever form she or he finds it, in our case here, jewelry. Good Taste is associated with how well principles of beauty and art have been applied.
Style: Will vary with particular cultures or events or historical periods or individual identities. Style communicates an expectation about meaning and its expression and what form it should take within a composition as seen by the outlook of the jewelry wearer or buyer. It might be referenced by terms like classic, modern, religious, Gen-X, casual, and the like. The principal forces in the creation of style are tradition and the experience of other jewelry the person is familiar with. Style on one level is the way a person applies their taste when choosing an aesthetic. Styles change and evolve in response to the influence of contemporary life.
Art: Represents beauty regardless of context. Regardless of whether it is worn or sitting on an easel. There are no pragmatic considerations involved.
Design: Represents the recognition of the most parsimonious relationship between beauty and function within any one piece of jewelry as it is worn. Jewelry requires that the piece not only satisfies the aesthetic needs of the person, but also fulfills a practical need.
AESTHETICS
What is the essence of beauty — what we call aesthetics?
When someone wears or buys a piece of jewelry, the choice of any aesthetic, as represented by that piece of jewelry, can become very problematic. The idea of aesthetics must be thought through by the person as she or he decides to touch or wear or share or part with some money or to walk away from the jewelry item.
But one person’s aesthetic sensibility is not necessarily the same as anyone else’s. There are few universal aesthetic ideas. Most things are so subjective and so context- or situationally-specific. Rules defining personal pleasure and rules defining beauty and appeal may co-exist, but they are not necessarily the same or in harmony. We know this because, from person to person, tastes, styles and fashions differ.
One response, where such differences exist, is to rely on fashion and art to define for us how pleasure and appeal should co-exist at any one moment in time. If we cannot find universally-accepted, common rules of aesthetics, then perhaps, we should let the social group or the social majority define it for us. Beauty, then, becomes not a property of the object per se, but an aesthetic judgment based on a subjective feeling. Our sense of good taste or fashion or style or art or design is a constructed one; it is not inherent in any particular jewelry design.
This brings us back to the idea that people want to minimize their sense of risk when making the right choices about wearing or buying a piece of jewelry. There is this inner need for validation. Part of that need is met by constructing and communicating a feeling or thought about what a consensus about taste might look like. Such a consensus, in reality, does not exist. But an idea of it emerges from preferences, assumptions, expectations, values, and desires. An idea of it emerges from how well the jewelry designer has managed the design process. That is, how well the designer has anticipated shared understandings of the various client audiences the jewelry is meant for, and incorporated these into the content of the design.
CONSUMPTION
Fashion, Taste, Style, Art and Design are each closely linked to the idea of consumption. These represent different ways of identifying preferences for certain types of jewelry and which directly affect the wearer’ or buyer’s choices in the marketplace. These preferences do not, however, necessarily trigger the wearing or purchase of a piece of jewelry. The interaction of these preferences with consumption is more complex and more depending on social interaction or personal motivation and strategy. People tend to emulate others (or distinguish themselves from others) or seek to reconfirm certain ideas which create certain habits and preferences, which in turn influence consumption of one piece of jewelry over another.
Yes, people want agency. They want to be free to choose jewelry that gives them pleasure. But they want validation and acceptance, as well. Most of that results from the understandings about the content of the jewelry. That is, how the content relays meanings through the aesthetic and design choices of the jewelry designer. We want the people around us to know who we are and what we have become. Jewelry makes a big statement here.
FASHION
Fashion is the socially acceptable, culturally-endorsed and safe way to distinguish oneself from others, while at the same time, re-affirming membership in a group. The person is allowed to be both an individual as well as a member of a group. With fashion, the individual can have both a sense of taste of their own as well as expect others to share it. Jewelry, from a fashion perspective, is embedded with the same values as our own. It is assumed that the community of fashion is the real community of universal good taste. That assumption means that the rules of beauty and appeal are understood as directly linked to and in harmony with the rules of finding pleasure.
Fashion may be thought of encompassing two things: (1) the jewelry object itself, and (2) the process of gaining acceptance for that object. That process moves from the designer to a client to that client’s audiences and public acceptance. That process extends from inspiration to aspiration to implementation to early adoption by fashion influencers and the diffusion of the jewelry throughout a particular social network. Eventually, though, there is a decline of acceptance over time.
The fashion object — in this case jewelry — must have discernable characteristics. These must be perceivable. They must anticipate how others will understand them. They must be communicative. These characteristics must show value; that is, something about them must be measurable in either relative (example, it’s better than what I have now) or objective terms (example, it is worth twice as much as my other piece).
Fashion denotes a broad social consensus about good taste. If a piece of jewelry is “not fashionable,” it means that, at least in a particular moment, it would be judged as boring, monotonous, unsatisfying or even ugly.
TASTE
Taste is an individuals’ personal aesthetic choices. Taste is how any individual judges what is beautiful, good and correct. These choices are influenced by social relations and dynamics.
Taste denotes preference. If a piece of jewelry is “not your taste,” this means you don’t like it.
STYLE
Style is about agency and choice. It is strongly influenced by broadly accepted social constructs, such as time period, geography, religion, class, cultural identify. Style suggests that anything can be acceptable as long as it makes you feel good and that you are showing your authentic self.
Style denotes the manner in which something is expressed. If a piece of jewelry is “not your style,” this means it does not present your beliefs in the way you want them expressed.
ART
Everyone wants a little art in their lives. They want beauty around them. It inspires them. It makes them feel good. They do not want to be encumbered with practical considerations in every moment of the day. Great color combinations and component arrangements are reassuring, pleasuring, uplifting. Jewelry communicates a sense of the designer’s hands that have touched it, the imagination that created it, and the work that has gone into it.
Art denotes the way the design elements and composition reflect principles of harmony and variety embedded in art theories. If a piece of jewelry is “not art,” this means it is not sufficiently harmonious.
DESIGN
Jewelry, however, is not a framed painting hanging in a museum. It is something that is worn. It is something that must continue to look good, even as the person wearing it moves from room to room, one lighting situation to another, one context to another.
Design denotes the way tradeoffs are made between beauty and function in the most parsimonious way. If a piece of jewelry is “not design,” this means that if you added (or subtracted) one more element to (or from) the piece, the piece would be judged more finished and more successful.
INFLUENCERS: Fashion Change Agents
Influencers are people positioned at the intersection of fashion, style and taste. They are fashion change agents. They are key to the dynamics of adoption and diffusion, coherence and contagion. They may play out these roles in an ephemeral, non-professional way, or, they may be prominent professionals in a community, a network or online. The jewelry designer is not necessarily positioned or skilled enough to adequately influence who wears or buys their jewelry. Today’s jewelry designer needs to get a good sense of how influence and influencers operate within the creative marketplace for the pragmatic purposes of managing adoption and diffusion of the jewelry she or he has created.
Influencers are one of the backbones of internet culture. Their business model centers on ways to shape everything we do in our lives from how we shop to how we learn to how we dress. Influencers are part micro-celebrity and part entrepreneur. They are opinion leaders and have been able to garner a large audience. They have proven themselves to be able to exploit how people distribute their time and attention.
It is important to get a handle on the change-agent role of the influencer. Specifically,
a) The influencer is probably not one of the earliest adopters of a newly introduced piece or line of jewelry
b) The influencer communicates using both visual and verbal representations of the jewelry, and usually needs some assistance from the designer with content
c) Influencers as people are usually more interested about fashion-style-taste than the general public they are trying to influence; they may not be up-to-date on all the current fashions, but they have the inherent skills to communicate and legitimate and instigate any fashion choice
d) Influencers have the creative skill to aesthetically and artistically assemble stylish jewelry presentations; they can articulate what good taste means in the context the jewelry as presented; they are often creators of accepted standards of good jewelry design and dress behavior
The influencer plays multiple roles from innovator, information transmitter, opinion shaper, knowledge base, social legitimizer.
It is estimated that 50% of the female population and 25% of the male population monitor fashion information on a regular basis, from surfing websites, perusing magazines, shopping, and talking about fashion. But it the influencer who best locks in their attention to any particular fashion item.
APPLIED FASHION: Inhabiting Your Jewelry
The jewelry designer needs to be sensitive to how this all plays out from the wearer’ or buyer’s point of view.
My clients and my students repeatedly ask about what the current fashion colors are? Did I see what so-and-so was wearing on TV or at an awards show? But usually, at least in Nashville, TN, a sense of fashion plays a small part in the day-to-day decisions most people make about the jewelry they want to wear.
Buying a piece of jewelry for yourself — a necklace, a bracelet, earrings, a brooch, something else — isn’t a task easily given to someone else. It’s often not a spur of the moment thing either. You just don’t rush off to the local boutique or the local Wal-Mart, grab whatever you see, and go home. I’m not talking about that impulse buy during your leisurely visit to the mall. I’m referring to purchasing those pieces of jewelry you know will have to do a lot of the hard work to accessorize your wardrobe and help you get the compliments and notice of your family, friends and co-workers you comport with and compete with each and every day.
No, buying a piece of jewelry for yourself is a multi-purposed moment, one which must be thought through carefully and one which must be savored. Lest you buy the wrong piece. That doesn’t really go with what you intend to wear. Or is over-priced. Or poorly made. Or conveys the wrong impression about status. Or is out of fashion. Or something one of your friends already has.
The jewelry you buy has to conform to quite a long list of essential criteria before you could ever think of buying it. It is something you will wear more than once. As such, it is your companion. Your necklace is not merely lying around your neck. Or your bracelet around your wrist. Or your earrings dangling from your ears. Jewelry can cause you to lose face with others. It can irritate or scratch your skin, or get caught up in your hair. It might weigh you down or stretch or tear your ear lobes. Jewelry can break without warning in the most unexpected and embarrassing of places. It can get caught on things, sometimes hurting you in the process.
Jewelry conveys to the world something about who you really are, or think you are. As such, jewelry is very personal. Your private, innermost, most soul searching choices made very public for all to see. As you caress it, as you touch the smooth or faceted or crevice’d beads and metal parts or the clasp or the material the beads are strung on, when you twist and move the piece within your hand, you are confirming to yourself the extent to which your jewelry is doing its job.
When you buy new jewelry, the dilemmas multiply. How will the new compare to the old? Will it be able to handle all these responsibilities — looking good, representing you, fitting in with your wardrobe, meeting the expectations of others? Like divorcing, then remarrying, changing your jewelry can take some time for readjustment. And you do not want to be seen as noncommittal to your jewelry. This would sort of be like going to a hotel, but not unpacking your suitcase while staying in the room.
Conveying some sort of social or psychological distance from your jewelry can be very unsettling for others. So you need to inhabit it. You need to inhabit your jewelry, wear it with conviction, pride and satisfaction. Be one with it. Inhabiting jewelry often comes with a price. There becomes so much pressure to buy the right pieces, given all the roles we demand our jewelry to play, that we too often stick with the same brands, the same colors, the same styles, the same silhouettes.
We get stuck in this rut and are afraid to step out of it. Or we wear too many pieces of jewelry. The long earrings, plus the cuff bracelets on both arms, plus the head band, plus the hair ornament, plus the 7-strand necklace, plus the 5 rings. We are ever uncertain which piece or pieces will succeed at what, so hopefully, at least some combination or subset of what we wear will work out.
In a similar way, we wear over-embellished pieces — lots of charms, lots of dangles, lots of fringe, lots of strands. Something will surely be the right color, the right fit and proportion, the right fashion, the right power statement, the right reflection of me.
And our need to inhabit our jewelry comes with one more price. We are too willing to overpay for poorly made pieces in our desperation to have that right look. The $100.00 of beads strung on elastic string. The poorly dyed stones which fade in the light. The poorly crimped and overly stiff pieces with little ease for accommodating movement and frequent wear. It is OK to inhabit our jewelry. In fact, it is necessary, given all we want jewelry to do for us. But we need to be smart about it. We need to learn to recognize better designs and better designers.
This need not be expensive at all.
Just smarter.
FASHIONS CHANGE
Every jewelry designer should expect that many fashion preferences and desires will change over time, sometimes very quickly. Consumers can be fickle. They can get bored with the old. They search out new novelties all the time. They try to keep up with trends and fads. As the economy moves up and down, so too do consumer abilities to purchase at a particular price.
New materials come out on the market. So do new techniques and technologies. Clothing and hair styles change silhouettes. Seasons change. The climate is changing. Popular culture changes. Social media goes in a different direction. Global trading opportunities change. Corporations come up with a catchy marketing campaign.
In contemporary culture, it also has become more okay for individual to develop their own sense of style and fashion.
THE DANGER OF HOMOGENATION
If fashion, style and taste lead to everyone wearing and buying similar things, we begin to lose the need for the jewelry designer. The designer becomes more a technician. The task of design becomes more mechanical, step-by-step, ritualized. More a the design process can be taken over by machines.
It is incumbent upon the designer to not lose sight of the essence underlying jewelry design. At its core, this is to create pieces which translate the designer’s inspirations in ways which resonate with others to be similarly inspired. Jewelry design is a communicative collaboration of sorts between designer and client. This will always lead to a wealth of variety and variation never diminished by fashion, style or taste.
__________________________________
FOOTNOTES
Firat. Fuat A. 1991. The Consumer in Post-modernity. Advances in Consumer Research 18. 70–76.
Gronow, Jukka. “Taste and Fashion: The Social Function Of Fashion And Style,” Something Curated, Helsinki, 8/16/2017.
Hebdige. D. 1983. Subculture. The Meaning of Style. London & New York: Methuen.
King, Charles W. “The Dynamics of Style and Taste Adoption and Diffusion: Contributions From Fashion Theory,” Advances in Consumer Research Volume 07, eds. Jerry C. Olson, Ann Arbor, MI: 1980.
Noro, A. 1991. Muoto, moderniteetti ja ‘kolmas’. Tutkielma Georg Simmelin sosiologiasta (Form, Modernity and the ‘Third’. A Study of Georg Simmel’s Sociology). Jyvaskyla: Tutkijaliitto.
Simmel. G. 1950. The Metropolis and Mental Life. In K. H. Wolf (ed.), The Sociology of Georg Simmel. Illinois: Free Press.
Simmel. G. 1991. The Problem of Style, Theory, Culture and Society 8. 63–71.
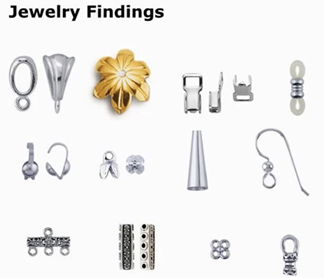
WHY YOU NEED AN ORIENTATION TO BEADS & JEWELRY FINDINGS
Most people who make jewelry learn the craft in a haphazard way. Taking a course here or there. Watching some video tutorials online. Making a few pieces with some friends.
I have found over the years that, because of this, most jewelry designers are unfamiliar with all the various possible choices of stringing materials, clasps, jewelry findings, beads and the like. And they are unfamiliar with the implications of making one choice over another. They do not have a clear conception of how one part relates to another part or relates to how to execute a particular technique.
Because of this, most jewelry designers do not seem to fully understand quality issues associated with the materials they use. They have a weak understanding of what materials should best be used, and best not be used, and with what projects. They do not know what happens to all these different materials over time as the jewelry is worn. They do not know the required design tricks and strategies for making pieces more durable and more comfortable.
That’s why I developed this very comprehensive ORIENTATION TO BEADS & JEWELRY FINDINGS.
This course reviews the various materials jewelry designers use. I point out the pros and cons for selecting and using these. I go over how these impede or enhance function, movement, and the mechanics of construction.
Some topics covered:
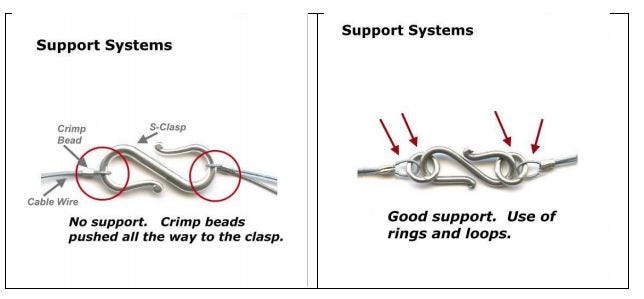
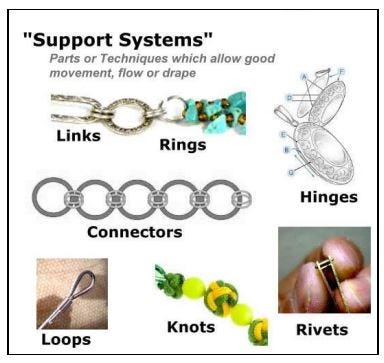
HISTORY, GLASS BEADS, LAMPWORK BEADS, CRYSTAL BEADS, SEED AND DELICA BEADS, METAL BEAD, CLASPS, FINDINGS, STRINGING MATERIALS, TOOLS, ADHESIVES, TYPES OF BEADING AND JEWELRY MAKING, 3 APPROACHES FOR TEACHING BEADING AND JEWELRY MAKING, SUPPORT SYSTEMS AND OTHER ARCHITECTURAL CONSIDERATIONS,
This Series of 18 modules, most around 20 minutes, and totaling a full 5 1/2 hours of introductory materials about all kinds of beads, metals, clasps and stringing materials for the beader and jewelry maker.
And one more thing. For those who take this Orientation, I also have a 75-page article for you to download about getting started in jewelry making. You have a purpose as a jewelry designer: To merge your voice with form. This covers things you will need to know to find that voice.
how to channel your excitement
what types of jobs are available for those with jewelry making skills
Choosing and Using Other Jewelry Findings: Controllers and Adapters
You have to approach the Jewelry Findings with a large measure of respect. “Jewelry Findings” are all the pieces that you use, including clasps, other than stringing materials and beads. They are called “jewelry findings”, because up until about 15 years ago, many of these pieces didn’t exist. People went to sewing notion stores, antique stores, flea markets, hardware stores, cannibalized old jewelry, wherever, and found things and made them work. Because many of these pieces are new, there is not a consensus on what some of these things should be called, so you have a lot of similarly looking pieces that go by different names. I’m sure over time, the name-game will shake out, and there will be more consistency.
Respect these jewelry findings. They are the pieces that get pulled and strained, torn at and squeezed, maligned and misused. These are the pieces that will make or break your piece of jewelry. Understand and respect them.
Many designers fail to make the full range of these pieces available to them. They either don’t know about them, or are afraid of them or think they might use them incorrectly. They too often limit their own design possibilities by relying on the same limited set of findings for everything they make. But the world of possibilities that these jewelry findings open up for us is endless.
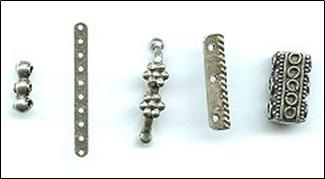
CONTROLLERS: Things Which Control the Positioning of Pieces or Sections within Your Piece:
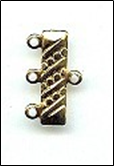
SEPARATOR or SPACER BARS
These are multi-hole pieces that are used to keep multi-strand pieces neat and organized. In a bracelet you might use 3–5, spaced evenly along the length of the piece. In a necklace, you might use 5–7, spaced evenly along the length of the piece.. Some of these pieces are very narrow and meant to be “hidden”. Others have a decorative edge that will be seen as part of the overall design. Separators with a broad surface are referred to as Separator Boxes.
END BARS (can also be used for making earring dangles)
These pieces are basically a bar, with one centered loop off one side, and multiple loops off the other. For a 3-loop end bar (which has 4 loops — 1 centered on one side, and 3 on the other) you would finish off a 3-strand piece on the one side, and then use the single loop on the other side to begin your clasp assembly. The bar can be plain, or very decorative. The bar can be straight, curved, or zig-zagged.
On an earring, with the bar positioned horizontally, you can dangle these one from the other, and create a neat cascading effect with dangles.
These come plain, as well as very decorative.
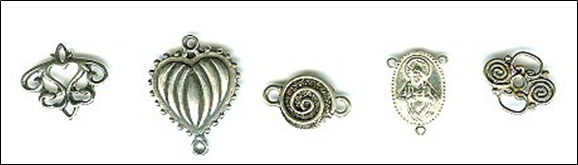
CONNECTORS and LINKABLES
There is a sub-family of jewelry findings originally called “Connectors”, and more recently referred to as “Linkables”. [The word “connectors” didn’t seem to resonate with customers, so they are trying “linkables”, which also doesn’t particularly resonate, because people are unfamiliar with most of these types of parts. That’s unfortunate, because connectors and linkables open up myriad design possibilities.]
Connectors or linkables are pieces that either have a lot of holes in them, or have multiple loops that come off them. They enable the designer to create segments or sections of beads, which are then connected to each other. They enable the designer to re-direct the flow or pathway of the piece, or to start new pathways/directions off the original piece. They allow you to create support systems within your pieces which are very attractive, appealing, and create a higher level of interest on the part of both viewers and wearers.
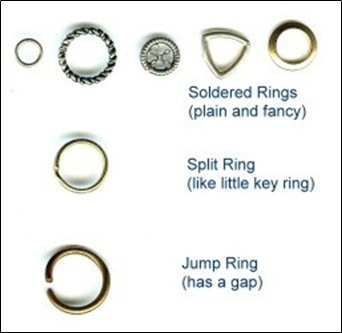
The most basic connectors or linkables are rings of various sorts.
Jump rings have a gap or split in them. Split rings are like little key rings, in which the wire of the ring goes around twice. Soldered rings or stamped solid rings have no gaps whatsoever.
In making a choice among these, you would first try to use a soldered or stamped solid ring. If this won’t work, because you have to make some kind of jump, your second choice is a split ring. If this won’t work, either functionally or sometimes from a visual-appeal standpoint they are not appealing, you would use a jump ring.
To open and close a jump ring, you move the wire ends, on either side of the gap, sideways just a bit, so that you have an opening wide enough to slip over whatever you need to slip them over on. You never pull the wires out and in, just back and forth. After you have connected your pieces to your ring, you close the ring by moving the two ends side to side until the two ends meet. If you have difficulty doing this with your fingers, or the aid of a chain nose pliers, you can purchase a jump ring pliers. With the jump ring pliers, you close the jump ring as best as you can with your fingers. Then you put the jump ring between the jaws of these pliers, and squeeze to close perfectly.
Bead Attach Rings
These are two rings soldered together, one small and one larger. These are primarily used in beaded charm bracelets. If you strung your charms on with your beads, they would get locked between the beads, and not flow freely. Instead, you string on your beads, and string on (through the smaller hole) a bead attach ring, everywhere you want to place a charm. Then you attach the charms, usually using a jump ring or split ring, to the larger hole.
Rosary and Y-Necklace Components, and other multi-hole or multi-loop pieces (see above) let you segment your pieces, or take the strings in different directions.
Beads
There are some beads that are considered a part of the Connector or Linkable family.
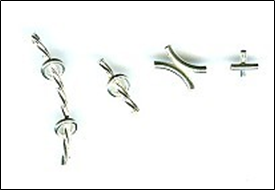
Double beads are either tubes that are soldered together so that the directions of the tubes are different, or you have a tube with one or more rings soldered along its length.
Say you have two tubes soldered together, and one is curved to the left and the other to the right. You take two strings, one through one, and the other through the other tube, add some beads to both, add another 2-tube-double-bead, to twist the strings in the opposite direction, add more beads to each string, another double bead, and so forth. You end up with a bracelet or necklace that looks somewhat like a DNA-strand (double helix).
Say you have a twist tube with two loops soldered to it, one near the top, and the other near the bottom. You can take two of these, and make a long necklace, with one tube+loops positioned on the left side, and a second one positioned on the right side. The wire of this necklace is strung through the tubes. Next, you take another stringing wire from the top loop on the left side and the top loop of the other tube+loops bead on the right side, and make a strand of beads across the chest. Do this again, attaching the lower loops from left to right. You end up with a necklace that also has two strands going across the chest.
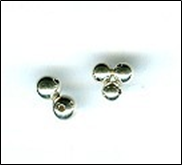
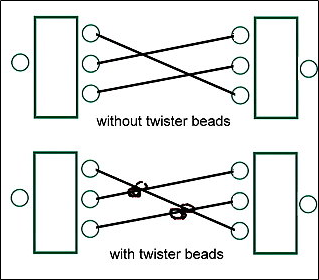
Twister beads are round beads that are soldered together, so that the holes go in different directions. Usually these come as two soldered beads or three soldered beads. You place these in 2-strand or 3-strand necklace or bracelet, at each point you want the strands to cross over each other.
The traditional way to make a twist necklace or bracelet is to take two end bars, and attach the strands in the following way:
Twister beads come in handy because problems arise when these multiple strand pieces are done the traditional way and are worn. First, if you flip one of the end bars over to its other side, you lose the twist as you envision it. Second, when people wear these pieces, they often don’t twist at the points you envisioned, either.
By using two twister beads — in this case, a twister bead comprised of 2 beads soldered together — in the example, the piece will always twist in the way the artist envisions.
Tubes with loops.
These are basically a tube with a loop soldered off the middle. You string these on everyone wherever you to add a drop or pendant to your piece.
ADAPTERS: Things Which Help Adapt Something So It May Be Used Within Your Piece:
BAILS
These are basically pieces that enable you to put a loop somewhere along your strung piece of jewelry. You string these pieces on everywhere you want to add a drop or a pendant. Regular bails look similar to tubes or beads with a soldered loop off the end.
Some loops are set horizontally, and some vertically, and this positioning of the loop may affect how useful it is for your piece. PAY ATTENTION to the positioning of the bail’s loop relative to the positioning of the hole on your pendant piece.
Other types of bails: Pinch bail — basically a fancy V-shaped piece. The legs have pointed pinchers at their ends. You push these pinchers into a horizontally drilled drop. Austrian crystal drops, for example, are horizontally drilled. And you end up with a loop to string through.
Pinch bails come in many sizes, and a few different configurations, today. You need to match the pinch bail and its design to the pendant drop you want to combine it with. When you open and close the pinch bail too many times, it breaks. You are basically taking metal and bending it back and forth. When you try to fit the bail onto the drops, often you break the tops of the drops, particularly if your drops are some type of crystal material. A hazard of using these. So, when planning your projects (and also when pricing these), always assume you will need some extra bails and some extra pendant drops.
While not my favorite thing to do, some people put a drop of super glue where each point or beg of the bail enters the drilled hole.
Snap on bail — basically a fancy lanyard clasp. This is used to make your pendant removable. You can snap on the bail over the stringing wire, and then take it off the stringing wire.
Wire bails — basically a triangular shaped jump ring, where the gap is off to the side, rather than at the bottom. The drop or pendant won’t have a gap to pull through, because the gap is on the side. What I like about these is that people often bring things into the shop to have us convert into some kind of pendant drop, and if I can’t find a regular piece to work, I usually can always make a wire bail work.
Donut bail
The donut bail is used to convert a glass or gemstone donut into a drop. You slip one side of the bail through the donut hole, then push the two loops on the end of the bail together. Then you string through the two loops.
Beaver Tail or Beaver Tail Bail
Beaver tails are flat surfaces with a loop or bail loop attached to one end. You glue the flat surface to your piece, say a piece of fused glass, letting the loop or bail loop to stick out over the top of the piece. If a plain loop, you would add a jump ring or similar piece, to finish off the piece.
Leaf or Foldover Bail
This is a long piece of metal with flat, decorative ends on each side, usually a leaf stamping. You carefully fold this over, creating a loop in the middle. Then you glue either flat surface to the surface of your pendant drop, like a piece of fused glass.
To glue the leaf, foldover, beaver tail or beaver tail bail to a piece, first try either E6000 or Beacon 527. If these don’t work, try a 5-minute epoxy that comes in a dual-syringe. If your piece is smooth glass, you might use some sandpaper or a file to rough up the surface a bit before gluing. If you have still having difficulty with a glass piece, try using glass cement.
SCREW EYES
These pieces are a screw-threaded post, with a loop soldered to the top. You put some glue (any glue except super glue) on the post, push it into a bead — they do not screw into anything — , attach a jump ring to the loop and string the bead on to your piece as a drop.
EXTENDER CHAINS
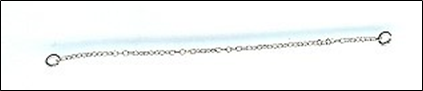
This is a short length of chain, usually with a spring ring clasp on one side, and a bead-drop on the other. You can buy these pre-made, or make your own. These are used to lengthen necklaces. The spring ring clasps onto the existing ring of the necklace; the hook-clasp can clasp into any link on the chain. The bead drop is primarily decorative.
SAFETY CHAINS
These 2 ½” to 3” lengths of chain, have two tiny jump rings, one on each end. These are used to attach to bracelets, to prevent you from losing your bracelet, should the clasp come undone. You can buy these pre-made, or make your own.
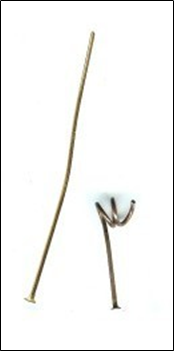
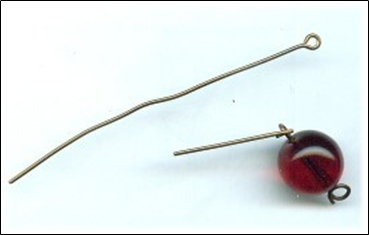
HEAD PINS
Head pins are pieces of wire with a flattened or decorative end or head. You put beads on the head pin, and the head stops them from falling off. You make a loop on the other end, and string these on a necklace, or dangle them from an ear-wire or other loop. You need ½” of exposed wire to make a loop. You can make a single loop, a double loop or a triple loop. Each provides a different level of security, a different visual appearance, and a different impact on the resulting silhouette.
Head pins come in different thicknesses (gauges). Regular thickness: 20 gauge Extra Thin: 22 gauge or 21 gauge Ultra Thin: 24 gauge or 26 gauge
Too many people try to use the longest head-pins they can get. They end up with bent dangles and drops on funny looking necklaces, bracelets and earrings. If you want something “long”, consider making a series of links using eye pins, instead.
When you make your loops on the head pin, make them large enough so that they have sufficient jointedness and support, and will easily slip over the stringing material or finding. I can’t tell you how many times I’ve seen women with earring dangles stuck in a 90 degree angle, because the loops were too small.
EYE PINS
Eye pins are pieces of wire with a loop on one end. These are used to make bead-chains, such as in a rosary. You put one or more beads on the eye pin, then make a loop on the other end. You need ½” of exposed wire to make a loop. These come in different thicknesses (gauges). Regular thickness: 20 gauge Extra Thin: 22 gauge or 21 gauge Ultra Thin: 24 gauge or 26 gauge
You can buy head pins and eye pins pre-made. Or you can easily make your own, using simple wire working techniques.
She came to me overwhelmed. She had bags and bags of jewelry, some in perfect condition, some not so much, some broken. Her aunt had died, and left her a lot of jewelry. That was years ago. Her mother had died more recently, and left her a lot of jewelry, and a lot of half-finished pieces and components and parts. Her mother had dabbled in jewelry making. And regrettably, three more family members, including a grandmother she was very close to, had recently succumbed to the corona virus. And each had left her more bags of jewelry.
She tried sorting these herself, but frustration got the best of her. She knew there were pieces she would wear herself. Other pieces she wanted to keep for sentimental reasons. Parts of pieces she thought she could do something with, re-purposing them. And lots and lots of fine and costume jewelry she wanted to sell.
She felt she needed some more help in sorting and evaluating what she had. She needed to know, What she should do, How she should do it, and Where she should go to do it.
Our consultation covered these considerations:
1) Etiquette
2) Organize and Sort
3) Clean, Identify Areas of Wear, Refurbish
4) Establish Value
5) Keep and Wear, or Keep and Store
6) Re-Purpose
7) Recycle
8) Sell
9) Donate
10) Throw Away
1) Etiquette
Her name was Danali. She was named after her grandmother and a great aunt. Danali felt very guilty and a few other awkward feelings as she thought about giving away or selling all this jewelry. She repeatedly asked herself, “Should I keep all of it?”
Did she have to keep it all? It was important to have this conversation up front. I told her she did not necessarily have to keep everything. The various people who gave her their jewelry would want her to be happy. She needed to do the things which made her happy, whether this meant keeping things, reworking things or selling things.
Was it her decision what to do with the jewelry, or should she involve other members of her family? Her brother asked her for some of it so that he could give it to his wife and daughter. Her step-father wanted to give several pieces to his second wife. I advised her to consider herself first. Some families have a tradition of passing down jewelry. What was her family’s tradition? Was giving some of it to her brother something she wanted to do? Since she wasn’t related to her step-father’s second wife, I told her that I found his desire to be a little unusual, maybe even creepy. Bottom line: the jewelry was passed down to her to make her happy. That had to be the guiding principle here.
She wanted to remake or sell some of the jewelry. Would she be violating someone’s legacy here? Again, I pointed out that she should do what makes her happy. That’s the legacy. Her deceased relatives wanted her to be happy and get pleasure from the jewelry which they had worn or created. Getting pleasure meant both financially and/or aesthetically. They left their jewelry to her because they trusted the decisions she would make. But that did not mean that every piece had to be preserved exactly or stored in some warehouse or safety deposit box or not be sold or shared with others.
Danali needed to talk about giving herself permission to make those particular choices which would make her happy. She needed to acknowledge to herself what she wanted to wear, what she wanted to repurpose, what she wanted to give away, and what she wanted to sell. This was important.
2) Organize and Sort
The next thing she and I worked on was to organize and sort all the pieces. There were a lot of pieces, and this took many hours spread out over several weeks, typically a 2-hour session at a time.
We went one bag or one box at a time. Within each bag or box, we went piece by piece by piece at a time.
For each piece, we created a simple written record: a) Description of piece to best of her and my ability b) What she preferred to do with the piece:
– keep and wear,
– keep and store,
– repurpose,
– cannabalize the parts,
– recycle,
– share with someone else,
– donate,
– sell,
– throw away
These became the sort categories for her jewelry.
c) What I thought the full retail price would be for the piece, if sold in a store. [More about establishing value later.]
In our descriptions, we examined each closely and paid particular attention to these factors:
1. The condition, both top-side and back-side, and whether both top and bottom sides of the piece were finished and detailed, or just one side
2. The type and quality of materials used, such as differentiating fine from costume jewelry, gemstone from glass from plastic, type of metal and if there was an accompanying stamp (like .925 or 14KT or GF), and the like
3. The craftsmanship, especially for hand-made pieces
4. For pieces with better quality gems, then their cuts, their visual qualities, and whether the gems alone were more useful and valuable than the piece as a whole
5. The quality and condition of the clasp and other connector features
6. Looked for evidence of the designer or brand, such as a signature or stamp
7. If there was any paperwork associated with the piece, from designer sketches to valuations to certificates of authenticity to insurance policies to sales receipts
8. For some pieces, we listed a style or decade or era it might be associated with, and wrote down the evidence we used to draw these conclusions
The GOOGLE LENS app will let you take picture of anything, and then search its image database. This was helpful in locating similar pieces, and seeing how they were described and valued. Sometimes we took a picture of the clasp or a particular cut of the stone to see what similar things and information we could find through Google.
With each piece, I had Danali ask herself these questions:
· Did you like it?
· Like it enough to want to keep it?
· Did she have space for it?
· Were other things very similar and duplicative?
· Would a photo of the item be a sufficient keepsake rather than the item itself?
· Could she create or recreate or repurpose something of pleasure and value from any of the parts?
3) Clean, Identify Areas of Wear, Refurbish
A lot of inherited jewelry needs some cleaning, and perhaps some refurbishing and repair. It is important to consider whether you think any particular piece will benefit from this extra effort. This is true whether you want to keep the piece or sell it.
Some jewelry will benefit from a soap and rinse with warm water and mild dish detergent. Other jewelry might need some polishing up, especially if it is made from sterling silver. Of note, plated materials will not polish up and be a shiny color again. Sterling silver will.
Typically, some stones are missing and need to be replaced. A clasp might be missing or might not work well any more. The stringing material may have deteriorated. Some parts of the piece may have chipped or broken off. It may be missing a part, such as the clutch for an earring post. Old rings may need new shanks. Chains may need to be soldered.
Costume jewelry will be particularly difficult to restore. The parts are usually made of materials that cannot be re-soldered. The materials used — beads, stones, findings — may no longer be available, or available in the particular colors available when the jewelry was first made. If the piece was plated, this plating has probably worn away. Re-plating may be difficult or too expensive, given the material value of the piece.
4) Establish Value
It is important to establish value for each piece. It is equally important to use a measure of value that can be standardized for all pieces, and that is understandable.
The value of any one piece of jewelry is not one particular number. It depends on the context. The value could be the price someone would pay for it in a store. It might be the price someone who sells jewelry is willing to pay for it, so that a profit could be made. It might be the value of the materials themselves, irrespective of the design. It might be the value people are willing to pay for pieces made by a particular designer. It might be a value at auction. It might have value only for the person who owns it.
There are several standards for establishing value. Four prominent ones include the following:
1) REPLACEMENT PRICE
2) ESTATE VALUE AT RETAIL
3) ESTATE VALUE AT WHOLESALE
4) INTRINSIC VALUE
Replacement Value. If you bought the same piece new today, what would its price be? This gives you the highest valuation. It is not the value of the piece itself. This value is the least accurate standard. However, it is a number that people can easily relate to. I like to start with the replacement value, because it is so meaningful to the client. And I give the client what are called multipliers — that is, a number to multiply the replacement value by in order to estimate what value they might really be able to get for their pieces, given where they are trying to sell them.
Estate Retail Value. This is the price a piece of jewelry would be sold at to an individual who is looking to purchase the used jewelry for themselves. This value links directly to the jewelry item. These individuals expect to save money compared with buying a similar item new.
There are many sources of estate jewelry. These include people who sell used, older or vintage jewelry through Craigslist, Ebay, various auction houses, garage sales, flea markets, or other online sites. There will be quite a variety here in pricing and pricing strategies. For price comparison purposes, I like to use prices I find on Ebay. I tell my clients to use a multiplier between .40 (representing a 60% reduction in value) and .70 (representing a 30% reduction in value), with .60 or 60% as a reasonable average estimate. So, they would multiply the Replacement Value by .40 to get at the Estate Retail Value.
If the Replacement Value was $100.00, then a reasonable estimate of the Estate Retail Value would be $100.00 times .60, or $60.00. This would be $40.00 less than the Replacement Value. Stated another way: if a similar new piece was selling for $100.00, then someone would expect to pay $60.00 for the used jewelry when purchasing that jewelry for personal use.
Estate Wholesale Value. This is the price a business which sells used jewelry is willing to pay. Businesses have to take into account many more costs — overhead, rent, maintenance, staffing — than individuals buying used jewelry. So these businesses will only be willing to purchase used jewelry at a considerably lower price than the Estate Retail Value. The jewelry these businesses need to purchase have to be resalable at a cost customers are willing to spend, and which also covers their operational costs plus a profit.
Businesses like antique stores, estate jewelers, pawn shops, even some boutiques, may purchase inherited jewelry for resale. You can anticipate that they will want to at least double, and probably triple, their cost to set their own price for their customers.
The Estate Wholesale Value is probably the best value for resalable jewelry which has been inherited. This assumes that most of the inherited jewelry will be sold to a business where that business intends to resell it.
The multipliers I suggest here are between .30 (70% reduction) and .50 (50% reduction), with .35 (65% reduction) as a reasonable estimate.
If the Replacement Value was $100.00, then a reasonable estimate of the Estate Wholesale Value would be $100.00 times .35, or $35.00. This would be $65.00 less than the Replacement Value.
Intrinsic Value. The value here is set by the value of the raw materials, usually less a small processing fee. This value yields the lowest price. This price may be lower than the actual price you might be able to sell your item, so think carefully. Typically the Intrinsic Value is the value of the raw metals and the gems. Style, condition, brand, market demand, among other factors, are not taken into account.
Refineries, Cash-for-Gold businesses, some fine jewelry stores will pay intrinsic value for inherited pieces. Be certain up front, with pieces made up of both precious metals and stones, whether the purchasing business will pay for both, or just one or the other. You may have to remove any stones before taking your pieces into these businesses.
There will be different payment rates for different metals, all based on weight. An average scrap rate for gold or sterling silver will be around 85% of the current market value less a processing fee, say $50.00. They will take the total weight of the metal, calculate the current value, multiply this by .85, and subtract a processing fee. This becomes the Intrinsic Value.
The intrinsic value for any gemstone is based on the wholesale price of the gem less any cost for re-cutting, re-polishing or otherwise refurbishing the stone.
Intrinsic metal prices are well publicized online. Intrinsic stone prices are not, and there will be a wide variation on this, so it is wise to shop around.
Other Value Considerations
There are other factors which may come into play:
– Whether the piece is currently in style or not
– Whether something makes it rare or coveted, such as by a particular designer or brand (look for stamped mark or engraved signature), or is an unusual design or uses particular stones
– Metal and gemstone prices fluctuate quite a bit, and you may be hitting the market at a low (or at a high) point
– The condition of the piece
And just because the piece is costume, not fine jewelry, is not a reason for dismissal. Many costume jewelry pieces are coveted and highly valued today.
OnLine Services
There are many online services which will value your pieces for you. Their fees and reputations will vary widely. Check their online reviews.
There are several national associations for appraisers. These require their members to adhere to a high standard of conduct. You should make sure your appraiser either is a member, or, if not, you know that person to be highly knowledgeable and reputable. This is because anyone can present themselves as an appraiser. There are no federal and state licensures.
An appraisal will
· Clearly state the value and the type of value
· Describe the item in detail
· List the procedures used to determine the value
· Specify the appraiser’s qualifications
· Have the appraiser’s signature
You will also find scrap metal calculators online which will be useful.
5)Keep and Store, or Keep and Wear?
Keep and store. For some pieces, you may want to keep them, even though you do not plan to wear them. They may have some sentimental value. They may have a personal story to tell. You might see yourself wearing them at some time, just not now, and are not ready to part with them.
I suggest keeping at least one piece from each loved one from whom you inherited the jewelry. Pick a piece they may have worn a lot, or worn on a special occasion, or represented their personal style.
You can also display pieces you love, but are not interested in wearing, say in a shadow box you hang on the wall.
Keep and wear. There are most likely many pieces you can see yourself wearing. It’s great to mix old and new pieces together with any outfit. Everything is a matter of styling and your personal taste.
6)Re-Purpose
A brooch becomes a pendant. A pendant becomes an earring. A necklace is remade into two bracelets. A very long necklace or a multiple strand necklace made into two or more necklaces. A shoe-clip becomes a clasp. There are many ways to re-purpose jewelry from one type to another.
You might also repurpose a pin into a curtain pull. Some earring drops into push pins or refrigerator magnets. Use in a mosaic. Embellish a cross stitch canvas. Create a bookmark. Decorate some sandals or sneakers. Use as drawer pulls. Decorate your cell phone. Add some pizazz to a purse or strap.
Lots of ideas. You can also do a search engine search, like on Google or Bing, using the keyword phrase “old jewelry into new” or “grandma’s old jewelry”.
7) Recycle
Sell your scrap. There are places, like refineries, cash-for-gold stores, jewelry stores, and the like, which will buy scrap for its intrinsic value. For metal scrap, they will weigh your pieces and you will get paid, depending on the weight, metal value, less a fee. For stones, places will evaluate their wholesale values, less costs for reconditioning or refurbishing, and less a fee.
Cannabalize the parts. You can break up the pieces of jewelry and reuse the components, beads, clasps and other parts in other jewelry making projects. The parts may have more value as parts than as part of the piece as a whole.
8)Sell
There are many places, both where you live, as well as online, where you can sell your pieces.
Locally, you might contact antique stores, boutiques, jewelry stores, salons or pawn shops. Most likely they will take your items on consignment (that is, you will be paid when the pieces sell). You might try a local flea market or marketplace. You might hold a garage sale.
Online, you might check out Ebay, Craigslist, Rubylane, Etsy, The Real Real (focuses on high-end jewelry), Worthy.com (diamond rings), Tophatter and other jewelry-specific auction sites. Take high resolution photos, at least 500 x 500 pixels in size. Provide good and thorough descriptions. You need to establish, through how you present your items, a high level of trust and credibility.
Ebay especially is a useful source for researching the prices your items might sell at. If you have several items which might only sell for a few dollars each, you can group them together into a “lot,” and sell them as a “lot”.
Be sure to list…
· Description, including anything of particular interest, using words your potential customers will connect with
· Condition, any flaws, any functionality issues
· Color
· Brand
· Size and dimensions
· Estimated value and the basis for that valuation
· List price, as well as minimum acceptable price
· Photos, at least 3 (front, back and side), and use a white background
These online sites will take a 10–15% of your sales price as a fee. There may be some other small fees involved. You should anticipate these fees, when setting your prices.
9)Donate
Let’s say you have a lot of jewelry you like, but doubt you would ever wear it. You don’t want to deal with selling the pieces. So you might think about donating them.
First, think about any friends or relatives who might appreciate these pieces. You could even hold a party and let people pick out the things they like for themselves.
Second, think about donating pieces to charity or nonprofit thrift shops like Good Will or Salvation Army. Other sites, I Have Wings Breast Cancer Foundation; Dress For Success; Support Our Troops; Suited For Change; New Eyes.
Make sure you get a donation receipt.
10)Throw Away
Of course, your last option is to throw the jewelry away.
You do this only after you have exhausted all other options.
Because the history of pearls has been very much a part of the history of nobility, there have been many customs and social expectations that have arisen around pearls. One of these has to do with styles and lengths.
Graduated: Beads are graduated in size, with the largest in the center, and decreasing in size on either side towards the clasp.
Uniform: All the pearls are within .5mm of each other in size.
Choker: One or more strands worn just above the collarbone, typically 15 1/2″ to 16 1/2″.
Princess: 18″ length
Matinee: 22–24″ length
Opera: 30–32″ length
Continuous Strand: A necklace without a clasp, typically over 26″ in length so that it can slip over someone’s head.
Bib: A necklace with many strands, each one longer than the one above it.
Rope: 45″ or longer, sometimes referred to as a lariat.
A necklace enhancer, sometimes referred to as a “necklace shortener”, is like a ring with a latch on one side and a hinge on the other, which lets you open and securely close it. These are most often used with ropes, where you circle the rope over your head 2 or 3 times, to wear like a multi-strand choker. The necklace enhancer clips over the knots in the encircling strands, to secure them together and in place. If you cannot find a necklace enhancer, you might be able to use an S-clasp to achieve the same end.
Odd vs. Even number of strands: This is a personal choice. Traditionally, it was believed that an even number of strands was inappropriate and bad luck. It would be very unusual to see any royalty wear an even number of strands.
I live in Tennessee, which has a special connection to freshwater pearls. Four and five hundred years ago, when French explorers came down through Canada and down the Mississippi River, they discovered that the Mississippi Indians in Tennessee collected pearls embedded in the local mussels which lived along the banks of the Tennessee River. The explorers traded for these pearls, and shipped them back to Europe, where they were reserved for royalty only, and were called “Royal Pearls”.
Before the creation of cultured pearls in the early 1900s, natural pearls were rare and expensive. A jewelry item that today might be taken for granted, say, a 16-inch strand of perhaps 50 pearls, often cost between $500 and $5,000 at the time. Pearls are found in jewelry and mosaics as far back as Egypt, 4200 B.C. At the height of the Roman Empire, when pearl fever reached its peak, the historian Suetonius wrote that the Roman general Vitellius financed an entire military campaign by selling just one of his mother’s pearl earrings.
While Tennessee freshwater pearls are available to anyone today, many royal families in Europe continue to import these pearls. It is the custom, among many royals, and dating back to the time of these French explorers, to have a freshwater pearl sewn into their undergarments. The belief is, if the pearl touches your skin, you will continue to be prosperous and wealthy.
Pearls are harvested in both fresh water (from mussels) and sea water (from oysters). The pearls created by both types of mollusks are made of the same substance, nacre. Nacre is secreted by the mantle tissues of the mollusk. This secretion hardens. When the hardened nacre coats the inside of the shell, we call this Mother of Pearl. When the nacre forms around some irritant, forming a ball-like structure, these become Pearls. Saltwater pearls typically have some kind of bead nucleus around which the nacre forms and hardens. Freshwater pearls typically do not. Besides Tennessee, other major sources of pearls are Japan and China.
Cultured pearls are real pearls produced by inserting a piece of mussel shell (or some other irritant) into the tissue of a mollusk. The mollusk coats this with nacre, creating the pearl. The more coats of nacre the mollusk produces, the more lustrous and pricey the pearl becomes. Mikimoto developed this process in Japan in the early 1900’s.
So, if you take your imagination back to 1763, and look at the United States and Canada mostly East of the Mississippi River, you see French traders and Indians in a partnership of buying and selling freshwater pearls and Czech glass beads and beaver pelts and guns and other supplies. The British are only concerned with kicking the Indians off their land.
Left: Clasp Assembly with no support. Right: Clasp Assembly with support.
CHOOSING CLASPS AND CLASP ASSEMBLIES AND SUPPORT SYSTEMS
From a design perspective, when we speak of “choosing a clasp,” we are referring to something almost always broader, longer and with more volume than the clasp itself. We are referring to what is called the “Clasp Assembly”.
The “Clasp Assembly” is everything that has to come together in order to attach your beadwork to the clasp. The “CLASP ASSEMBLY” usually consists of several parts. Besides the Clasp itself, there are probably jump rings and connectors, crimp beads, clamps or other jewelry findings. If we had an S-clasp, the clasp assembly would also include 2 soldered rings (one on each side) plus, if using a cable wire, the loop created with the cable wire and crimp bead which attach and secure the wire around the soldered rings.
The “Clasp Assembly” is a more specific term for the more general jewelry-design terminology called a Support System. The Clasp Assembly is the most important support system in any piece of jewelry.
In any one piece, there are usually 1 or more support systems. In a bracelet, you might only have the one support system — the clasp assembly. In a necklace you might have three or five.
Support Systems are built into jewelry for many reasons. You want your clasp assembly to be able to adjust to your wearer’s movements somewhat independently of how your beadwork adjusts to this movement. Often, you want the clasp to stay in one place, while the beadwork moves to and fro, out and in, up and down, with the wearer’s movements. This only works if you build support systems into your piece. When you see someone whose necklace has turned around on her neck, this is an example of poor Design. This is not natural to necklaces. Usually the poor design has to do with insufficient support systems built into the necklace.
The most obvious support systems or joints are interconnected “rings” and “loops” and “knots.” Other support systems include “hinges” and “rivets” among other concepts. The support systems through a necklace or bracelet play several roles, and are similar to the joints in your body. They aid in movement. They prevent any one piece from being adversely affected by the forces this movement brings to the piece. They make the piece look and feel better, when worn. They keep segments within the piece from getting too stiff or too tight or too rigid. They help absorb excess force placed on your components because of movement, keeping them from cracking, splitting apart or breaking.
With needle and thread bead stringing, one of the more important support systems is the knot you tie to secure your beadwork to the clasp. The knot absorbs excess force. It allows the bracelet or necklace to move easily on and with your body. Because of this support function that knots play, it usually is NOT a good idea to apply glue to the knots. This would cause the knots to stiffen up, create lots of tension on the thread, and cause it to break from force and movement. They would lose their support function.
The best clasp is one that has no moving parts. These include toggles, buttons, slides, S-clasps, and hook & eye clasps.
One clasp element that we jewelry designers call a “moving part” is a tongue. If a metal piece is bent into a “V” or “Arch” shape, and is forced to move back and forth as it gets pushed in and pulled out of the basic clasp, we consider this a moving part. When you bend metal back and forth, it breaks. When metal is bent into a V or Arch, and is pushed/pulled, it will break. In any clasp, where you have a metal part that is bent back and forth in use, we call this a moving part.
The clasp should be proportional to the beads used in the piece. The full Clasp Assembly should be proportional to the piece as a whole. If half your bracelet is taken up by the Clasp Assembly, then there’s a problem here.
Don’t forget that you can also use clasps in a way where they can be worn on the front, not just behind the neck. They can be used to sit on the side or on the bottom. Clasps which are very decorative are used in this way.
All clasps work well in necklaces. In bracelets, however, care and consideration should be paid to how difficult or easy it is to secure and undo the clasp — especially if the wearer has to accomplish these steps by her or himself.
In better pieces, the clasp seems as if it is an organic and integral part of the rest of the piece. It does not feel as it were an add-on.
Beading requires a lot of mind-body coordination. That takes work. It is work.
Calisthenics are exercises you can do to improve and tone your mind-body coordination when bead weaving.
You have to be able to get from your fingers to the needle to the beads, back along the thread to the needle to the fingers, hands, arms, eyes, mind. And then again. And again. Over and over, one more time. You need to get into a rhythm. All these working parts need to be working. No time for cramping. No time to get tired. No time to lose concentration.
A rhythm. Needle, pick up bead, pull down along thread, check the tension, pick up a bead, pull down along thread, check the tension, pick up a bead….
I noticed that different instructors had various techniques and strategies for maintaining this rhythm. Yes, music was involved sometimes. Othertimes simple meditation or creative reading and discourse. Some people had some stretching exercises that they did. Others tested themselves before proceeding with their big project. Still others did small things to reconfirm their learning.
Throughout this Series, I introduce some of the beading calisthenics that I experienced along the way. If you want to gather materials up so that you can follow along with these calisthenics, here’s the list.
MATERIALS NEEDED FOR ALL THE CALISTHENIC EXERCISES (SUPPLY LIST):
notebook, pencil 1 tube each of Japanese 11/0 seed beads in gray, 3 different colors of orange, black, white, any other 4 colors 1 tube each of Japanese 8/0 seed beads in gray or silver, black, white, orange, any other 4 colors 1 tube each of Japanese 6/0 seed beads in gray or silver, black, white, orange, any other 4 colors 5 gray-scale colors of delicas or 11/0 seed beads Nymo D or C-Lon D thread in black Nymo D or C-Lon D thread in yellow two toggle clasps .018” or .019” flexible cable wire assorted 4mm, 6mm and 8mm beads in various coordinating colors, including grays and oranges in your mix, as well big bowl and a bowl-full of assorted beads Size 10 English beading needles Bees wax scissors beading dishes or trays any kind of graph paper work surface or pad colored pencils a few clasps, (toggles are easy to work with) some crimp beads crimping pliers
BEADING CALISTHENICS #9: Bead Massage
Fill a large bowl with beads of any sort and size. Put your hands into the beads, and squeeze, let go, let the beads run over your hands, feel them in your hands, squeeze them in your hands.
Start to squeeze them in your hands and through your fingers starting with your pinkies, and working across your hand slowly until you get to your thumbs and forefingers, and squeeze them through these. Start again at your pinkies.
Put your palm flat onto the top surface of the bowl of beads. Push down. Then make a fist, and let the beads run through your fingers.
Classic Elegance! Timeless! Architectural Perfection! Learn a simple Pearl Knotting technique anyone can do. No special tools. Beautiful. Durable. Wearable. Easy.
“Over the years, I have found it very difficult for most students (and even my instructors) to get good knots and good hand-knotted construction using a traditional hand-knotting technique with tools. It is difficult to maneuver the knot close to the bead, and it is difficult to keep sufficient tension on your bead cords, as you make the knot. After much trial and experimentation, I developed this set of non-traditional steps. My students usually master this approach on their very first try!” — Warren
Pearl Knotting
Pearl knotting is a relatively easy technique. There are many variations in how to implement the technique. Here I present the steps for a non-traditional approach to pearl knotting. I feel that, for most people, the traditional approach, without a lot of practice, can be a bit awkward, and result in a less-than-desired functional outcome. The non-traditional approach I present here is easier to achieve a better outcome.
There are 4 different ways for starting and finishing off your pearl-knotted piece.
In this non traditional approach, we do NOT use any tools — like tweezers, awls, or tri-cord knotters — to make our knots. We do, however, pull two thicknesses of bead cord through each bead, as does the classical version of the traditional methodology. We minimize the use of glue.
Supplies:
16″ strand of pearls, faux pearls or other beads, approximately 8mm in size, (44–45 beads)
Silk or nylon bead cord with needle attached to one end, matching color, (one 2-meter card). With 8mm Swarovski crystal pearls, you would need a bead cord between .65mm and .70mm in diameter, which, in the Griffin line, is a size 5 or 6.
Twist wire needles (also called Collapsible Eye Needles), size Fine, (2–3 on hand)
Pearl clasp, single strand, approximately 18–20mm long, (1 clasp)
T-pins (or U-pins)
A pad into which you can stick the T-pin (or U-pin)
Scissors.
G-S hypo fabric cement (if your cord is silk)
Either a bic lighter or Beacon 527 glue (if your cord is nylon)
An awl
Chain nose pliers
Ruler
Necklace sizing cone
PEARL KNOTTED NECKLACE
ABOUT PEARLS IN HISTORY
I live in Tennessee, which has a special connection to freshwater pearls. Four and five hundred years ago, when French explorers came down through Canada and down the Mississippi River, they discovered that the Mississippi Indians in Tennessee collected pearls embedded in the local mussels which lived along the banks of the Tennessee River. The explorers traded for these pearls, and shipped them back to Europe, where they were reserved for royalty only, and were called “Royal Pearls”.
Tennessee River Pearls
Before the creation of cultured pearls in the early 1900s, natural pearls were rare and expensive. A jewelry item that today might be taken for granted, say, a 16-inch strand of perhaps 50 pearls, often cost between $500 and $5,000 at the time. Pearls are found in jewelry and mosaics as far back as Egypt, 4200 B.C. At the height of the Roman Empire, when pearl fever reached its peak, the historian Suetonius wrote that the Roman general Vitellius financed an entire military campaign by selling just one of his mother’s pearl earrings.
While Tennessee freshwater pearls are available to anyone today, many royal families in Europe continue to import these pearls. It is the custom, among many royals, and dating back to the time of these French explorers, to have a freshwater pearl sewn into their undergarments. The belief is, if the pearl touches your skin, you will continue to be prosperous and wealthy.
Pearls are harvested in both fresh water (from mussels) and sea water (from oysters). The pearls created by both types of mollusks are made of the same substance, nacre. Nacre is secreted by the mantle tissues of the mollusk. This secretion hardens. When the hardened nacre coats the inside of the shell, we call this Mother of Pearl. When the nacre forms around some irritant, forming a ball-like structure, these become Pearls. Saltwater pearls typically have some kind of bead nucleus around which the nacre forms and hardens. Freshwater pearls typically do not. Besides Tennessee, other major sources of pearls are Japan and China.
Nacre
Cultured pearls are real pearls produced by inserting a piece of mussel shell (or some other irritant) into the tissue of a mollusk. The mollusk coats this with nacre, creating the pearl. The more coats of nacre the mollusk produces, the more lustrous and pricey the pearl becomes. Mikimoto developed this process in Japan in the early 1900’s.
Pearls are soft and they absorb, as well as, reflect light.
NON-TRADITIONAL vs. TRADITIONAL PEARL KNOTTING TECHNIQUES
Hand-Knotting. We put knots between pearls for many reasons. Some reasons have to do with visual aesthetics; others, with structural and architectural concerns.
The knots protect the pearls, should the necklace break. When it breaks, you would lose only one pearl, not all the pearls on the piece.
Pearls are soft, and the surface can easily chip and scratch. Pearls are particularly vulnerable at the hole, where the forces from movement, when the jewelry is worn, force the stringing material to push against the vulnerable edges of the nacre, exposed around the hole of the pearl. Silk cord is very soft, and does not pose a major threat. All other stringing materials — such as nylon bead cord, nylon beading thread, and cable wires — do pose a threat. The knots provide some protection.
Without knots, the pearl’s integrity is threatened, not only by the stringing material, but by the next bead it bumps up against. Other adjacent pearl beads can cause scratches and chips. Metal beads and glass beads will work like hammers against the pearl, as the jewelry moves, when worn.
Knots, when done correctly, are visually attractive. We want our knots to be big enough so that they will not slip into the holes of our beads. We want our knots small enough so that they do not compete with the look of our pearls. The pearls, at all times, should attract the viewer’s focus. The pearls are the star of the piece. Nothing should distract. We want our knots to appear centered over the holes of our beads.
Visually, knots also set off each pearl, as if bracketing them or framing them. For the viewer, this heightens the visually attractiveness of each pearl, moreso, than had the necklace not been knotted.
Structurally, having a knot on either side of the bead, tied tightly in place, so that the bead cannot move freely. Bead cord frays easily,especially if it is silk. We want to restrict the ability of the pearl to move back and forth because of any slack between two knots. We want to restrict the pearl from rotating around the bead cord.
* First, the knots, plus the fact that we will be bringing two cords through each pearl, rather than one, keep the pearl from moving both up and down the cord, as well as around and around the cord, as the jewelry is worn. Pearl holes are very sharp. Picture a broken sea shell, and how sharp it feels as you move your finger along the edge. This is what the hole looks like. If the bead is allowed to move freely, the hole will quickly fray the cord, even cutting it.
Broken mussel shell
* Second, it forces the necklace, as it is subjected to punishing forces resulting from movement, to channel those forces towards the un-glued knots. These un-glued knots easily absorb this force, allowing the necklace to more easily conform to the body, and move with the body. Thus, the force is re-directed around the stringing material, that is, around the knot, instead of directly into it, forcing it against the sharp hole of the pearl. Again, the knots help preserve the integrity of your piece.
NOTE: When using karat gold beads, we do NOT knot on either side of these beads. The knots often force the karat gold beads to dent and squish, when the jewelry is worn. This is also true of many thinner-walled sterling silver beads.
NOTE: When using French wire bullion, we do NOT place a knot between the pearl and the bullion. Instead, we try to anchor the ends of the bullion into the opening of the hole in the pearl.
A Comparison of Traditional and Non-Traditional Techniques.
There are many, many variations on Pearl Knotting techniques.
The major difference between traditional and non-traditional methods is in how the knots are made. Traditional methods use tools, like tri-cord knotters, tweezers or awls, to guide the knots into place. Non-traditional methods do not.
Over the years, I have found it very difficult for most students to get good knots and good hand-knotted construction using tools. It is difficult to maneuver the knot close to the bead, and it is difficult to keep sufficient tension on your bead cords, as you make the knot. This is why I prefer the non-traditional method, which students master much more readily.
If using a traditional technique, I would suggest using a tri-cord knotter, and not a tweezers or awl.
Other Types of Variations Among Techniques:
(1) How many cords are pulled through the bead
I pull two cords through each bead. Some techniques pull only one.
I found that, with only one cord, you don’t get enough resistance to the bead spinning around the cord, when worn. This makes it more likely for the bead’s sharp hole to fray and cut into the cord.
Two cord approaches work best when the hole size from pearl to pearl are relatively consistent. One cord approaches work best when there is noticeable variation in hole size from pearl to pearl.
(2) How many cord thicknesses make up the knot
I pull two cords through the bead, and use one of the cords to tie an overhand knot over the other cord. So, my knot is two cords thick around the core. Some techniques tie a knot using both cords at once, and resulting in a 4-cord thickness knot around the core.
I find that 4-cord-thick knot to be too big, visually competing with the pearls, instead of complementing them. The size of the knot, however, does not impact its structural functionality. Best functionality is achieved with a non-glued knot, and with simpler knots like larks head or overhand knots.
(3) How knots are tied
I use an overhand (half hitch) knot for the knots between beads, but a Larks Head knot to connect the piece to either side of the clasp. Some people use a Larks Head knot for all the knots.
I find that the Larks Head knot, when used between beads, often gets off-center. When the knots are too off-centered, not only can this be visually annoying, but it can force the pearls to sit crookedly all along the necklace line.
My final knot is a square knot, which secures both cords which I have pulled through my beads, and centers this knot between the last two pearls.
(4) How knots are tightened
After you make each knot, you need to be sure to bring the knot as close and as tightly against the pearl as you can.
Visualize:I have two cords exiting the hole of my pearl. First, I take each of my two cords, and I pull them tightly away from each other. This pushes the pearl against the knot below it. Second, I tie an overhand knot and pull tight. Last, I grab each cord and tightly pull them away from each other one more time to be sure the knot is tight and abuts the top of the pearl.
Some techniques have you take your thumbnail, or the tip of your tweezers or awl, and push the knot towards the pearl’s hole. Traditionalists worry that by pulling the two cords apart, you will force the knot into the hole of the bead. However, by selecting the appropriate thickness of cord, and bringing two cords up through the hole of the bead, you will not have this problem.
I find that the thumbnail push doesn’t get close or tight enough. The use of the tools can fray and break the fibers in the cord. It’s one thing to use the tools to guide the knot into place. It’s another thing to use the tools to push and tighten the knots into place.
(5) Whether the piece begins and ends at the clasp, or with French wire bullion between the necklace and the clasp, or with bead tips between the necklace and the clasp, or with no clasp at all.
How you start and end your piece will vary a little bit, depending on whether you are attaching the piece directly to a clasp, using bullion or beads tips intervening between the piece and clasp, or using no clasp at all.
You connect the clasp differently in each case. You make your beginning and final knots differently in each case.
This is a personal choice.
Attaching the cord directly to the clasp is the most difficult. It uses the most technique, so, when I teach this class, this is the approach I use.
Using French wire bullion is a little easier. It looks very finished and pretty when your necklace is completed. But the bullion doesn’t age well. It gets black and dirty.
Using clam-shell bead tips is very easy and the most versatile. It extends the length of the clasp assembly, so there is some visual competition which might be annoying in some cases.
Making a continuous necklace is not that difficult, and allows you to make a long rope that does not need a clasp.
Whatever you do, you want to be sure that your resulting clasp assembly — that is, the clasp and all it takes to attach your beadwork to it — does not visually compete with the beauty of your pearls.
(6) How and where that last knot or last two knots are made
You can attach your last knot directly to the clasp, or bring your cord back through one or two beads, and then tie a knot.
You can run through steps for that last knot, which have you tying one cord off in one place, and tying the second cord off in another place.
You will find other instructions for tying off your cords in one place together.
When you make your last knot, you can tie a single knot, a double knot or a triple knot.
I approach this in a few different ways, depending on whether using a clasp only, or bullion, or bead tip, or no clasp.
If the final knot is going to show, I prefer NOT to end directly to the clasp, but to bring it back through one bead and tie it off between the last two beads.
My final knot is a square knot. This is the only knot in my pieces where I apply glue.
(7) Which Glue and How the Glue is Applied to the Knots
I prefer a “cement” over a regular “glue”. Cements bond immediately with the materials they are applied to. The bonds of most other types of glues are formed as the solvent in the glue evaporates into the air.
With silk, I prefer a fabric cement. I would never use super glue.
With nylon, I prefer to use a jeweler’s glue called Beacon 527 or hold it near a flame to melt the ends.
I prefer to place a very small drop of glue on the inside of the knot. I pull the knot tight, and put another drop of glue on the outside of the knot. This coats the bottom and the top of the knot. I let the glue set for 20–30 minutes. Then, I trim the tails very close to, but NOT right at the knot. Put another drop of glue on each tail, and tamp down on the tails with a tweezers or awl, so the tail-ends appear as part of that final knot, and make the knot pretty.
I try to minimize my use of glue, since glue will considerably diminish some of the structural support properties of the knot. I prefer to apply glue to only one knot in my piece — the very last knot made.
NOTE: With nylon bead cord, you can use a thread zapper or bic lighter to melt the ends of the cords. Where glue is to be used at the ends of the cords to keep them from unraveling, with nylon bead cord, you can melt the ends instead.
(8) Whether you use a flexible metal wire (steel or brass) needle, or make a self needle from the cord itself, using gum arabic.
Here we are using the wire needle that comes attached to the cord, plus a second twist wire (collapsible eye) needle.
What some pearl-knotters worry about is the metal needle snagging the bead cord, during the pearl knotting process. This weakens the cord.
To make a thread-needle, you would take a paring knife and shave the threads at the first 1 1/2″ at the end of your cord. Gently guide the paring knife over the cord until the nubs have been removed from the silk, and the thread has thinned. The more you shave, the thinner your needle will be. With an awl or tweezers, dab a small drop of gum arabic on the ends, and twist the threads between your fingers to make the needle. Cut off any stray fibers. Let dry for a few minutes until stiff.
I prefer the wire needle, because I find it easier to use, and longer lasting. Be aware, that should your wire needle begin to catch on the silk cord running through your bead, pull it out a bit, and then push it back through. It is not that difficult to minimize this problem. It is a lot easier to use the wire needle than your own home-made self-needle.
CHOOSING BEADS
Pearls come in different sizes and shapes, and a myriad of colors.
Some pearls are from nature. These include freshwater pearls (from mussels) and saltwater pearls (from oysters). Pearls can be naturally occurring, or cultured, where people have intervened in the process by introducing an irritant inside the mollusk shell.
Other pearls are “faux” or imitation. These are some kind of core bead with a pearlized finish around it. These are typically described by what makes up the core of the bead. The core could be plastic, glass, shell, or crystal. These are made in different countries around the world and vary in quality.
To differentiate between natural and faux pearls, try these things:
A) Always when buying pearls, check the hole. Most natural pearls have very small holes. The holes usually appear relatively smooth, but not perfectly smooth, round and centered as the holes in faux pearls do. The finishes on many faux pearls are not well applied, particularly at the hole. You often can see the finish chipping off or peeling away from the hole.
B) Rub the pearls against your front teeth. Faux pearls have very smooth surfaces. Natural pearls will have bumps and slightly uneven surfaces. You can feel the differences, when rubbed against your front teeth.
Pearls are typically described in terms of :
Luster: the way pearls seem to glow from within. It’s based on the depth of reflection due to the layering of the aragonite crystal.
Overtone: the translucent “coating” of color that some pearls have. A silver pearl may have a blue overtone or a green overtone, for example.
Orient (sometimes called iridescent orient): the variable play of colors across the surface of the pearl like a rainbow.
Shapes
Thanks to some new nucleating techniques, freshwater pearls can be found in a nearly endless variety of shapes, but the more traditional shapes include:
Round — Perfectly spherical, or very nearly so. These are primarily saltwater pearls. Stick — Long and thin with many irregularities. Rice — Small ovals drilled lengthwise. Potato — Often lumpy, these are typically rounder than rice pearls and may be drilled either lengthwise or widthwise. Nugget — Usually a little more square or pebble shaped than rice or potato pearls and almost always having a flat side. Coin — Large, circular and flat, often about the size of a dime, with the hole drilled end-to-end. Coin shapes include hearts, squares, ovals and large pears and drops. Keishi — Sometimes called “cornflake”, these are flat and highly irregular. Drop — Teardrop, pear or even peanut shapes, drilled either lengthwise, or widthwise at the narrowest end. Button — Rondelle shaped, often with a flatter side, and drilled through the “hub” of the wheel. Blister pearls — pearls that are still attached to the shell of the mollusk.
Colors
Most pearls are color enhanced to become a specific color. First they are bleached, then dyed.
Sizes
Pearl bead sizes are given in millimeters There are 25mm in an inch. Rulers are marked in inches on one side and millimeters on the other.
Hole Sizes
Hole sizes on pearls usually run smaller than on most other beads. The size of the hole is NOT in proportion to the size of the bead. Therefore, when selecting bead cord, you need to have one of your pearls handy, so that you can match the hole size to the cord.
CHOOSING CLASPS AND CLASP ASSEMBLIES
You can use any type of clasp that you prefer.
However, pearl knotted jewelry is very strongly associated with what are called pearl clasps or safety clasps. These are often marquis-shaped clasps, with a hook like tongue that pushes inside them. If the tongue should somehow come undone and slip out, it would catch on a bar in the clasp, saving you from losing your string of pearls.
In terms of that vintage-type look, other widely used clasps are filigree or other box clasps. These are pretty, but not as secure as safety clasps.
Usually, you will want your clasp to compliment and not compete visually with your pearl knotted piece. If you decide to use a very show’y clasp, it should blend organically with the rest of your piece.
You will be attaching your bead cord, either to the loop(s) on the clasp itself, or to soldered rings attached to these loops. You want both these loops, as well as any rings attached to them, to be closed, that is soldered — thus have no gaps in them. If there are attached rings, and they are open, you will want to remove these, and attach the cord to the closed loops on the clasp.
If you are making pearl knotted pieces for re-sale, you would be hard pressed Not to use a pearl or safety clasp, or some similar looking clasp.
The woman who originally owned the American Pearl Company in Tennessee was always looking for a clasp that would be durable, but attractive to her customers. The American Pearl Company made a lot of its money by selling finished jewelry. Safety clasps, particularly those made of 14KT gold, break easily. The tongue bends and breaks, and no longer can wedge into its marquis shaped home. Her biggest frustration was that the clasps on the necklaces and bracelets she sold broke too easily, and the pieces came back for repair. It’s a big effort to re-string pearl knotted pieces, since you have to cut off each pearl individually.
At first she tried switching to other types of clasps, like toggle clasps and lobster claws. But these pieces did not sell. People wanted pearl/safety clasps.
Next, she tried switching from 14KT gold to gold-filled clasps. These did not sell either. People wanted 14KT.
Finally, she gave in somewhat. She returned to the 14KT gold pearl/safety clasps. But she doubled her prices, to build in the cost of one re-stringing.
CHOOSING STRINGING MATERIALS
We recommend, if your project is all pearls, or mostly pearls, that you use silk beading cord.
If your project is very few pearls, or no pearls, say using glass, faux pearls or gemstones, that you use nylon beading cord.
Unfortunately, while nylon bead cord is much, much more durable than silk, nylon ruins pearls. Nylon cuts into the pearl at the bead hole, making the nacre start to chip and flake off. Silk does not do this.
Beading cords are threads which are braided together to make them look pretty. Beading cords are used in projects where you want your stringing material to show. Beading cords are less durable than waxed threads or flexible cable wires. We do not wax beading cord, because this would make the cord look ugly. Waxed beading threads and cable wires can cut into the pearls at the hole, and ruin them. By using beading cords, you are trading off visual appearance for durability.
Silk and nylon bead cord can be purchased in 2-meter (6 feet) lengths on cards with a needle attached, as well as on larger spools without a needle attached. Usually the silk or nylon on spools is a higher quality cord than that on cards. However, most people use the cards because of the convenience of having a needle attached.
At the same quality level, silk beading cord and nylon beading cord have the same pros and cons. They stretch the same, fray the same, get dirty the same — only the silk deteriorates, and the nylon does not.
You can pick a bead cord which matches the color of your beads, or which contrasts or otherwise highlights the color of your beads. In either case, the color should visually compliment, not compete, with the pearls themselves.
A NOTE ABOUT KNOTS AND THEIR FUNCTION
When we knot between beads, the un-glued knot becomes what is called a “support system”. Support systems in jewelry allow what is called “jointedness.” Un-glued knots are support systems, as are loops and rings, hinges and rivets. In this project, the pearls can rotate around the knots, and the knots can contract and expand in response to stresses and strains placed on the necklace when worn.
Support systems allow the piece, as worn, to move freely. When jewelry moves when worn, this puts a tremendous amount of force on each of the components. Support systems allow this force to be absorbed and dissipated, before anything bad happens.
If the piece is too stiff, such as when the knot has been glued, and cannot move freely, the components will break — the cord will break, the clasp will break, the beads will chip, crack and break.
A NOTE ABOUT GLUES AND GLUE-ING
Glue is usually the enemy of good design. We want to minimize its use.
Unfortunately, with hand-knotting, we need to secure the last knot, and, in some cases, the last two knots, with glue. When we finally trim the cord where we have tied that last knot, we use the glue for two reasons, (1) to keep the end of the cut cord from unraveling, and (2) to keep the knot from loosening up and coming un-done.
With silk beading cord, we suggest using a fabric cement. “Cement” is a type of glue which bonds instantly with the cord, when applied. With cement, the bond adheres to all the microfibers that make up the bead cord. “Glue” without the label cement on the package, usually bonds over a period of time while the solvent in the glue evaporates into the air and the bond dries. With glue, the bond tightens like a collar. In this project we suggest G-S Hypo Fabric Cement, because it has a very narrow applicator tip. But any fabric cement will do. You can purchase these at most craft stores and some bead stores.
With nylon beading cord, we suggest a jeweler’s glue like Beacon 527. This glue dries like rubber, and the bond acts like a shock absorber when confronted with excess force. This glue does not come with that great narrow tip, so we suggest applying the glue with a pin or toothpick. This glue dries quickly. Another widely used glue is G-S Hypo Cement which does come with that great tip, but doesn’t dry quickly enough, and I find the fully set bond too stiff. I would never use super glue for this purpose.
In selecting a glue, you want it to — dry quickly — dry clear — not harm the pearls (or other types of beads you are using) — be washable
While some glues dry quickly, most take about 24 hours to set and dry hard. You would not wear your pieces for 24 hours after gluing.
WHAT TOOLS DO I NEED?
In traditional pearl knotting, you use a tool to help you make and secure your knots. This tool would either be a tri-cord knotter, which works well. Or it might be a very pointed tweezers or awl, which are awkward for most people to use, without a lot of practice.
In our non-traditional approach, we do not use tools for knotting. Occasionally, we might use a chain nose pliers or a tweezers, to give us some more leverage, when pulling a cord through a bead. We use scissors to cut the cord. If using French wire bullion, we use a flush cutters to cut this. But we use only our hands to make our knots, position the knots, and tighten the knots.
Over the many, many years I have been in the beading and jewelry making business, I have seen few students able to get the knots done satisfactorily, using the tools, and following the traditional methods. A few students have practiced over and over again to master the technique. But most students give up long before they get to that point. The non-traditional method is mastered in one or two tries. That is one of the reasons we advocate for the non-traditional approach.
Also note, if you squeeze the cord too tightly with tools, you can damage the cord.
RE-STRINGING PEARLS
Know when to restring your pearls.
There are 5 tell-tale signs:
DIRT CHIPPING STRETCH DETERIORATION CLASP FAILURE
Re-string if the knots between your pearls are looking soiled or discolored. Silk, in particular, absorbs body oils and grime. Pearls are porous. They can absorb dirt and become permanently discolored. Sometimes, if there are no knots between beads, your pearls might adversely be affected by the beads next to them. For example, gold beads can blacken pearls, at the point they come in contact.
Re-string if your pearls become chipped, scratched or broken. Pearls are soft and can easily scratch, chip and break. Some of your pearls may need to be replaced, before re-stringing.
Re-string if your pearls are moving around too freely between the knots. Silk stretches over time. Cord which shows, thus is uncovered, increases the chances it will break. Your necklace also may get longer over time, and that extra length may no longer meet your fashion needs.
Re-string if your stringing material breaks.
Re-string if your clasp breaks.
How often do pearls need to be re-strung? This depends on how often you wear them, what they were strung on, and how they were stored and cared for.
In general, pearls need to be re-strung every 3–5 years. If you wear your pearls every day, you will need to re-string them annually. If they were strung on silk bead cord, which is our preference, then silk naturally deteriorates in 3–5 years, and you want to re-string them before the silk starts turning to dust. If they were strung on nylon bead cord or flexible cable wires, these materials do not easily break down, and you might wait 10 years before re-stringing.
If you store your pearls in an air-tight bag, and out of the air and sunlight, you may only have to re-string them every 10–15 years, even when strung on silk beading cord. The bag should be made of a natural material like silk or cotton. Plastic bags chemically interact with the pearl, and will ruin your pearls.
Before you re-string your pearls, you would need to clean them.
First, you should gently wash your pearls while they are still on the old string, with mild soap and warm water. Remove any dirt and hardened oils around the pearls, particularly near the holes. Rinse extremely well so that there is no soapy residue. While you are cleaning your pearls, you want to anticipate what might happen, should the string break. Be sure the drain is covered. You might want to wash the pearls by working inside a colander in your sink.
Next, you must carefully cut the pearls off the old string. To start, place your scissors on the knot between two pearls and cut through the middle of the knot. You don’t want to start on either side of the first knot because the knot could slip inside a pearl and be quite difficult to remove. For the rest of the pearls, snip each knot off by placing the scissors behind each knot and in front of the pearl. Again, work over a surface, where, if you dropped a pearl, you would not lose it.
If there is a pattern to the arrangement of the pearls on your necklace, you might want to lay them out in this pattern, as you cut each one off the string, say on a bead board.
A NOTE ABOUT BUYING PEARLS
When buying pearls, you want to examine:
— Shape — Consistency of shape along your strand. Either very round, or a very interesting shape is considered better. — Size — Consistency of size — either similarity of size or consistency of gradations in size — along your strand. Usually, the larger the pearl, the more valuable it is. — Color — A pleasing blending of color all around the bead, from every angle. Consistency of color along your strand. Rose or silver/white pearls tend to look best on fair skin tones, while cream and gold tones look better on darker complexions. — Luster — High luster and translucency is better than dull or chalky — Surface quality — Few blemishes is better than one with many irregularities. Absence of disfiguring spots, bumps or cracks. — Hole quality — If you see chips around the hole, this is a bad sign and indicative of other problems. Some hole sizes may be so small, that they would be extremely difficult to work with. — Nacre thickness — Thicker is better
A NOTE ABOUT CARING FOR PEARLS
Pearls will last a lifetime and beyond, if cared for properly.
Exposure to heat (such as the top of a TV set or near a stove or fire place), sunlight, and chemicals (such as those in hair spray, cosmetics and perfumes) can damage the nacre of pearls.
How do I safely clean pearls? Use a gentle detergent soap or mild shampoo without dyes and warm water. Be sure to clean around the hole of each pearl. Rinse thoroughly and let dry on a damp cloth overnight. Hot water can permanently damage your pearls. Do not let your pearls soak in the water. Let the pearls and string dry out for 24 hours before wearing.
Never wear your pearls when the string is still wet . Never hang the strand when wet.
Pearls are softer than other gemstones. Always wipe them with a soft cloth after wearing. Perfume oils, makeup, hair sprays and perfumes can spot and weaken their surfaces, as well as the cords they are strung on.
Pearls should be put on after the application of cosmetics, perfume or hair spray. They should be the LAST THINGS PUT ON and the FIRST THINGS TAKEN OFF.
Pearls should be kept away from hard or sharp jewelry that could scratch them.
Pearls are best stored in a soft cloth pouch, or in a separately lined segment of a jewelry box, and out of the air and sunlight. Do not store in a plastic bag. The plastic emits a chemical which makes the pearl surface deteriorate.
Do not shower or swim in your pearl jewelry.
Ammonia and alcohol will ruin pearls. They both draw out the oils in the pearls which give them their luster. Keep pearls away from metal cleaners and tarnish removers.
The more you wear your pearls, the more beautiful they become. Pearls’ luster is maximized when worn often because the oils from the skin react with the surface of the pearl. However, you want your pearls to glow, not yourself; perspiration can be slightly acidic, and eat away at the pearl.
The air in many safes and security deposit boxes is very dry, and can cause pearls to crack or discolor.
A NOTE ABOUT DRILLING PEARL HOLES TO MAKE THEM LARGER
Pearls typically have very small holes. The holes are small because it is too easy to chip and crack the nacre around the holes, when drilling them.
You can, however, make the holes a little larger. You would use a hand-held or battery-operated bead reamer to make the holes in your pearls larger. You want your drill beads to be diamond coated.
You want to work slowly but steadily.
Wear safety goggles. Pearl dust can adversely affect your eye-sight.
Until the 1970s, pearl holes were typically drilled by hand. Pearl companies from Japan would often have boys in India drill holes in pearls. They would hire and train boys who were 9 years old. By the time the boys were 14, many had lost their eye-sight. Thankfully, with the advent of mechanized ways to drill pearls, this practice no longer continues today.
STYLES AND LENGTHS OF PEARL NECKLACES
Because the history of pearls has been very much a part of the history of nobility, there have been many customs and social expectations that have arisen around pearls. One of these has to do with styles and lengths.
Graduated: Beads are graduated in size, with the largest in the center, and decreasing in size on either side towards the clasp.
Uniform: All the pearls are within .5mm of each other in size.
Choker: One or more strands worn just above the collarbone, typically 15 1/2″ to 16 1/2″.
Princess: 18″ length
Matinee: 22–24″ length
Opera: 30–32″ length
Continuous Strand: A necklace without a clasp, typically over 26″ in length so that it can slip over someone’s head.
Bib: A necklace with many strands, each one longer than the one above it.
Rope: 45″ or longer, sometimes referred to as a lariat.
A necklace enhancer, sometimes referred to as a “necklace shortener”, is like a ring with a latch on one side and a hinge on the other, which lets you open and securely close it. These are most often used with ropes, where you circle the rope over your head 2 or 3 times, to wear like a multi-strand choker. The necklace enhancer clips over the knots in the encircling strands, to secure them together and in place. If you cannot find a necklace enhancer, you might be able to use an S-clasp to achieve the same end.
Odd vs. Even number of strands: This is a personal choice. Traditionally, it was believed that an even number of strands was inappropriate and bad luck. It would be very unusual to see any royalty wear an even number of strands.
SELLING YOUR PEARL KNOTTING SKILLS
Selling your pearl knotting skills is a great way to make some money.
Most jewelry stores charge their customers to re-string their pearls between $4.00 and $6.00 per inch.
Most independent jewelry designers charge between $2.50 and $3.50 per inch. These designers re-string pearls on their own, or sub-contract with jewelry stores.
I have also found, when doing craft shows, that I can quickly hand-knot strands of attractive-looking beads, not necessarily pearls, and use these knotted pieces to fill out my inventory. These pieces sell very well, and are very profitable.
BEGINNING YOUR PROJECT
Pearl Knotting Basic Steps
Selecting and Testing Bead Cord 2. Variation #1: Attaching Clasp to Beginning of Necklace 3. Bringing Up The First Pearl and Tying the Knot 4. Continue Pearl Knotting To Get the Length You Want, But Stringing Last Two Beads Without Knotting Between Them 5. Attaching the Other Part of Your Clasp to the End of the Necklace, and Making the Final Knots
Selecting and Testing Bead Cord
We are going to pull two thicknesses of cord through our beads. The bead will be strung on one cord, and we will be pulling a second cord through the hole. We want noticeable resistance to this. Resistance to the point where we feel we need to direct our hand to pull a little harder than we first thought. You might need a chain nose pliers to help you pull the needle through.
You might want to prepare a sample Cord-Size Tester, like I have. Here I have attached cords between sizes 00 and 08. Each cord is doubled. One leg of each cord has a needle attached, and the other leg does not. This lets me test out both cord thickness, as well as knot size.
Most freshwater and saltwater pearls have very small holes. The sizes most used here are between 00 (.3mm) and 03 (.5mm), with 02 (.45mm) the most common.
Most glass beads and gemstone beads require cords between 04 (.6mm) and 08 (.8mm), with the most common 06 (.7mm).
When The Beads Have Different Size Holes…
You always want to start with beads that have very similarly sized holes.
If you buy a strand of real pearls, there is a good chance that the hole sizes might vary. You might need to work from 2 strands of beads to cull enough beads with similar size holes, to pearl-knot.
Another thing you might do, especially if there is a big variation in hole sizes, say when mixing both pearls, glass, metal and/or gemstone beads. You do not necessarily have to put knots between all your beads. You can separate the beads in terms of hole sizes, create a patterned layout, where you plan to knot between beads with similar hole sizes, and not knot between the rest.
It is also very typical that the hole on one side of the bead will be slightly larger than on the other. Picture a drill press. The drill bit pushes down into the bead to make this hole, with the thinner tip end of the bit coming out the other end. It’s risky to drill pearls, so they don’t take bit all the way through.
Another thing you might try: Match the cord size to the smallest hole size. Make double-knots between each bead instead of single knots.
What Length of Cord Will You Need…
The actual length of cord will depend on the size of your beads, thus how many knots you need to make along the length of your cord, as well as your specific hand-knotting technique.
In the traditional rule of thumb, you multiply the length of the necklace you want to make and multiply that by 4 and add 15″. This will give you enough cord to make the necklace, as well as about 15″ or so of cord to hold onto.
For example, using this traditional rule, a 16 1/2″ necklace would need about 81″ of cord. On the cord-on-cards, you get 2 meters or about 79″.
In our non-traditional method, we use about 12″ less of cord, so multiplying your length by 4 and adding 3″ would be the math. So, in our example, for a 16 1/2″ necklace, we would need about 69″ of cord.
With the non-traditional technique instructions below, you can get a 22″ necklace made up of 8mm beads from this 2-meter card.
NOTE: With your silk cord in particular, the last several inches near the attached needle get too frayed during the pearl knotting process, to be useful for your finished piece.
2. VARIATION #1: Attaching Clasp to Beginning of Necklace
Attaching The Clasp To The Beginning Of The Necklace
Open up your bead cord on the card, and unravel the cord off the card.
The cord will be kinky. Pinch the cord between your thumb and forefinger. Run your 2 fingers up and down the length of the cord a few times, pull the cord a bit as you do this, to smooth the kinks out. You do not have to get this perfectly smooth.
You can also run the cord over the edge of a table.
[For a project like a tin cup necklace, where a lot of the cord will show, you can steam iron the cord. Put a towel over the cord before you steam it.]
Test The Length
Let’s test the size of our necklace out, to be sure we have it long enough.
Use a necklace sizing cone or someone’s neck.
Hold the necklace around the cone or neck. Don’t forget to account for any additional length the final part of your clasp will add to your piece. One part of this clasp is already attached to the beginning of the necklace. The other part of the clasp may or may not add additional length.
You will also be making additional knots — at least 2 — and this will add 1/16″ per knot in length.
Necklace Sizing Cone
If you need to add additional beads, you can slide these onto cord B. Review the measurement table at the start of our instructions to determine how many more beads you might need to add.
Maneuver Cord A back down through that last bead, so you can tie a knot where you skipped a bead. Tie additional knots until you get to your last 2 beads.
Attaching the Other Part of Your Clasp to the End of the Necklace, and Making the Final Knots
The Process:
o We will slide the last bead off of Cord B, and re-string it onto Cord A.
o Begin to tie Cord A off to the clasp using a Larks Head knot. Fold Cord A in half about midway between the last bead and the end of the cord. Slip that folded spot through the ring on the clasp, and pull it through, to begin forming your loop.
o Un-anchor your pearl knotted strand.
o Make a “pile: your Cord B, the pearl knotted strand, and Cord A several inches below the clasp and Larks Head knot.
o Pull this “pile” through your Larks Head loop.
o Get everything orderly again: Cord B off to the side, re-anchored pearl knotting strand, clasp with beginnings of Larks Head knot with a big loop that will need to be closed above your pearl knotted strand, and your Cord A off to the other side.
THE CHEAT WAY: Instead of bringing this whole pile through the loop, just take the clasp itself through the loop.
o Bring Cord A back down through that last bead towards the next to last bead. Slip an awl or a tweezers through the loop on your Larks Head knot, preventing that loop from closing all the way onto the clasp. You are now positioned to begin to tighten that Larks Head knot.
o Carefully pull everything more and more tightly — all the beads abutting each other and the clasp.
You cannot do this in one step.
THIS IS HOW I LIKE TO DO THIS:
POSITION THE LAST BEAD SO IT SITS SNUGLY AGAINST THE NEXT-TO-LAST-BEAD
PULL ON THE LOOP, SO THAT YOU FORCE THE CLASP DOWN, SO THAT THE LOOP WITH THE CORD THROUGH IT SITS SNUGLY AGAINST THE LAST BEAD.
HOLD and push down on THE LAST 2 BEADS AND THE CLASP TIGHTLY IN PLACE, SO THEY CAN’T MOVE.
PULL TIGHTLY AND STEADILY ON CORD A, TO PULL OUT THE LOOP OF THE LARKS HEAD KNOT
REMOVE THE AWL
PULL AGAIN, TIGHTLY AND QUICKLY ON CORD A, TO TIGHTEN EVERYTHING UP.
o Double check that everything is tight, especially the clasp relative to the last bead, and the last bead relative to the bead before it.
o Tie a square knot with Cord A and Cord B between the last bead and next to last bead, and glue.
— First take Cord A over B, glue the inside of the knot, pull tight, glue the outside of the knot
— Second, flip the beads over to the other side (180 degrees) so our square knots ends up centered, rather than off to one side.
— Third take Cord B over A, glue the inside of the knot, pull tight, glue the outside of the knot
o Let the glue set, usually within 20–30 minutes.
o At about 10 minutes, and before the glue sets, rub off any excess glue that may have gotten onto the pearls, on either side of the knot.
o Trim off Cord B and Cord A as close to the knot as you can. You can add drop of glue to end of the cords to prevent fraying.
Then, tamp down the trimmed tails, with the awl or chain nose pliers or tweezers or your finger nails, if necessary, into the knot to camouflage them.
o At about 10 minutes, and before the glue sets, rub off any excess glue that may have gotten onto the pearls, on either side of the knot.
Abstract: We create and wear jewelry because we do not want to feel alone. But “not wanting to feel alone” can mean different things to different people.The jewelry artist must have insight here. The artist needs to understand what jewelry really is in order to make the kinds of successful choices about forms, materials, design elements, inspirations, techniques, arrangements, public presentations and exhibitions and the like. There are different frameworks from which the artist might draw such understanding, including the sensation of jewelry as OBJECT, CONTENT, INTENT or DIALECTIC. All these lenses share one thing in common — communication. Although jewelry can be described in the absence of communicative interaction, the artist can never begin to truly understand what jewelry really is without some knowledge about its creation and without somehow referencing the artist, the wearer, the viewer and the context.
WHAT IS JEWELRY, Really?
Simply put, we create and wear jewelry because we do not want to feel alone.
But “not wanting to feel alone” can mean different things to different people. The jewelry designer, in order to make the best choices and the most strategic choices throughout the process of designing a piece of jewelry, requires some detail and clarity here. What does it mean to say that we create and wear jewelry so we do not want to feel alone?
We might want to reaffirm that we are similar (or different) than someone else or some other group or culture. We might want to signal some connection (or disconnection or mal-connection) with a higher power or mystical source or sense of well-being or with some idea, concept or meaning. We might want to express an intent or feeling or emotion.
We might want to differentiate what it means to be yourself relative to something else, whether animate or inanimate, functional or artistic, part of a dialectic conversation with self or other. We might want to signal or differentiate status, intelligence, awareness, and resolution. We might want to separate ourselves from that which is sacred and that which is profane.
Whatever the situation, jewelry becomes something more than simple decoration or adornment. It becomes more than an object which is worn merely because this is something that we do. It becomes more than a functional object used to hold things together. It is communicative. It is connective. It is intentional. And concurrently, it must be functional and appealing and be seen as the result of an artist’s application of technique and technology.
The word jewelry derives from the Latin “jocale” meaning plaything. It is traditionally defined as a personal adornment or decoration. It is usually assumed to be constructed from durable items, though exceptions are often made for the use of real flowers. It is usually made up of materials that have some perceived value. It can be used to adorn nearly every part of the body.
Prehistoric Necklaces 40000 B.C
One of the earliest evidences of jewelry was that of a Neanderthal man some 115,000 years ago. What was it — and we really need to think about this and think this through — which made him craft the piece of jewelry and want to wear it? Mere decoration? Did it represent some kind of status? Or religious belief? Or position or role? Or sexuality and sensuality? Or was it symbolic of something else? Was this a simplified form or representation of something else?
Did this Neanderthal have concerns about craft and technique? Did the making of it require some special or innovative technology? Did the cost of materials come into play? Was this an expression of art? Self? Power? A show of intelligence and prowess? A confirmation of shared beliefs, experiences and values? Was it something he made himself, or was it something given to him as a gift or token of recognition?
Picture yourself there at this very moment. What happened at the point this Neanderthal man put this piece of jewelry on? Did this reduce or increase social and cultural barriers between himself and others? Did this define a new way of expression or a new way of defining the self? Did this impact or change any kind of outcome? Did this represent a divergence between craft and art? Was this piece of jewelry something that had to be worn all the time? Were the purposes and experiences of this Neanderthal man similar to why and how we design and adorn ourselves with jewelry today?
We know that this Neanderthal man was not the last person to wear a piece of jewelry. Jewelry continued in importance over time. Jewelry mattered. It was an object we touched. And it was an object we allowed to touch our bodies. The object had form. The form encapsulated meaning. We allowed others to view the jewelry as we wore it, and when we did not.
Making and wearing jewelry became very widespread about 5,000 years ago, especially in India and Mesopotamia, but worldwide as well. While some cultures banned jewelry or limited its forms and uses (see medieval Japan or ancient Rome, for example), they could not maintain these restrictions over time. People want to support the making of jewelry, the wearing of it, the exhibiting of it in public, and the accumulating of it. People want to touch it. Display it. Comment about it. Talk about it with others. Collect it, trade it, buy it, sell it.
As jewelry designers, we need to understand the why’s … Why make jewelry at all? Why develop different techniques and use different materials and come up with different arrangements? Why do people want to wear jewelry and buy jewelry?
We observe that jewelry is everywhere, worn by all types of people, on various parts of the body, in many different kinds of situations. Jewelry must possess a kind of inherent value for the artist, the wearer, the viewer and the society as a whole.
So we have to continue to wonder, Why is jewelry so coveted universally? Why is it important? How is understanding ‘what jewelry is really’ necessary for making the kinds of successful choices about forms, materials, design elements, inspirations, techniques, arrangements, public presentations and exhibitions and the like?
Let us review the range of definitions and justifications for jewelry before fine-tuning any ideas and conclusions. Each understanding leads us in different directions when filling in the blanks of this constructive phrasing:
Jewelry means to me …..… therefore, These are the types of choices I need to make as a designer to know my pieces are finished and successful, including things like ……… .
These different definitional frameworks about jewelry are things characterized by sensations the jewelry evokes in designer, wearer and viewer.
These frameworks for defining what jewelry really is include,
SENSATION OF JEWELRY AS OBJECT:
1.ROUTINE: Something that we do with little or no reflection
2.MATERIAL: Objects that we use as materials characterized or sorted by design elements, such as color, pattern, texture, volume, weight, reflective and refractive properties
3.ARRANGEMENT AND FORMS: Materials are sorted by various Principles of Composition into arrangements and forms, expressing things like rhythm, focus, and juxtaposition of lines and planes
4.TECHNIQUE: Steps or routines we use to assemble and construct
5.FUNCTIONALITY: Things which have a useful purpose and practicality
SENSATION OF JEWELRY AS CONTENT:
6.MEANING: Things to which we assign meaning(s), especially where such meaning(s) transcends materials, functions and techniques
7.VALUE: Things to which we assign monetary and economic value, particularly materials
SENSATION OF JEWELRY AS INTENT:
8.ORDER OUT OF CHAOS: A sense-making attempt to control and order the world
9.SELF-IDENTITY: An agent of personality
SENSATION OF JEWELRY AS DIALECTIC:
10. INTERACTION AND SHARED UNDERSTANDINGS: A way to create, confirm and retain connections through interaction, desires, and shared understandings
Yet, no matter what the framework we use to try to make sense about what jewelry really is, all these lenses share one thing in common — jewelry is more than ornament and decoration; it is sensation and communication, as well. Although we can describe jewelry in the absence of knowledge about its creation, we cannot begin to understand what jewelry really is without somehow referencing the artist, the wearer, the viewer and the context.
SENSATION OF JEWELRY AS OBJECT
“Tibetan Dreams”, detail, FELD, 2010
Too often, ideas about communication and meaning and intent get too messy and complicated. We seek a simpler framework within which to understand what jewelry is all about. We try to fit the idea of jewelry into the confines of a box we call “object”. It is decoration. Sculptural adornment. Jewelry succeeds as “object” to the extent that everyone everywhere universally agrees to what it is, how it is made, what it is made from, why it was made, and in what ways it is used.
This universality in defining and evaluating jewelry helps us not to feel alone.
Jewelry As Something That We Do. Wearing jewelry might simply be something that we do. We put on earrings. We slip a ring onto a finger. We clasp a necklace around our neck or a bracelet around our wrist. It is habit. Routine. Not something to stop and ask why. A necklace is a necklace. An earring is an earring. We mechanically interact with decorative objects we call jewelry.
Jewelry As A Material. Sometimes we want to get a little more specific and describe what this object or ‘box’ is made of. It is some kind of material. Jewelry encompasses all types of stones and metals, in various shades and colors, and light-impacting properties, which the artist has taken tools to them to shape and sharpen. Sometimes we want to further delineate the character of materials within and around this box. We refer to this as selecting various design elements such as color, pattern, texture.
Jewelry As Arrangements and Forms. Sometimes we want to even further elaborate on our placement of materials within our pieces in terms of Principles of Composition. These Principles refer to arrangements and organized forms to create movement, rhythm, focal point, balance, distribution. We apply this framework in a static way. Jewelry is reduced to an object, somehow apart from its creator and disconnected from any wearer or viewer.
Jewelry As The Application of Technique(s). We can also understand jewelry as object in a more dynamic sense. It is something which is created by the application of one or more techniques. The techniques are applications of ideas often corralled into routines. The object is seen to evolve from a starting point to a finishing point. As object, it is reduced to a series of organized steps. These steps are disconnected from insight, inspiration, aspiration or desire. There is no human governance or interference.
Jewelry As Function and Practicality. In a similar dynamic way, the object may be seen to have function. It may hold up something, or keep something closed. It may, in a decorative sense, embellish a piece of clothing. It may assist in the movement of something else. It is not understood to have any meaning beyond its function. As it coordinates the requirements of form to the requirements of function, it plays a supportive, practical role, not a substantive role. As such, it is unimportant. It might allow the wearer to change position of the necklace on the neck. It might better enable the piece to move with the body. But it should not demand much insight or reflection by creator, wearer, or viewer.
SENSATION OF JEWELRY AS CONTENT
“Tibetan Dreams”, detail, FELD, 2010
However, as we get closer to defining the object as one that is sensed and experienced and which evokes an emotional response, it becomes more difficult to maintain that the object does not reflect meaning, does not result from some kind of thought process and intent, and does not communicate quite a lot about the designer, the wearer, the viewer and the situation. Jewelry when worn and which succeeds becomes a sort of identifier or locator, which can inform the wearer and the viewer about particular qualities or content, such as where you belong, or what you are about, or what your needs are.
Jewelry without content, after all, can skew to the superficial, boring, monotonous, and unsatisfying. Without meaning and value, jewelry has little to offer.
These shared recognitions and valuing of meanings helps us not to feel alone.
Jewelry As Meaning. Jewelry when worn signals, signifies or symbolizes something else. It is a type of recognizable short-hand. It is a powerful language of definition and expression. By representing meaning, it takes responsibility for instigating shared understandings, such as membership in a group or delineating the good from the bad. It might summarize difficult to express concepts or emotions, such as God, love, loyalty, fidelity. It might be a stand-in marker for status, power, wealth, connection and commitment. It might visually represent the completion or fulfillment of a rite of passage — puberty, adulthood, marriage, birthing, and death.
Sometimes, the sensation of jewelry as meaning derives from energy and powers we believe can transfer from the meaning of the materials the jewelry is made of to ourselves. These might be good luck, or good fortune, or good health, or good love, or good faith or protection from harm. Various gemstones, metals and other materials are seen to have mystical, magical and supernatural qualities that, when touching the body, allow us to incorporate these powers with our own.
Jewelry As Value. When we refer to meaning as having power, sacredness, respect, significance, we are beginning to assign a value to it. A sensation of value may emerge from how rare the item is — its material rarity or the rarity of how it was constructed or where it came from or who made it or who was allowed to wear it. It may emerge from how bright it is or the noteworthy arrangement of its elements. Its value may emerge from how pliable or workable the material is. Its value might be set from how tradable it is for other materials, objects, access or activities.
By assigning value, we determine things like importance, uniqueness, appeal, status, need, want, and demand. We establish control over how and how often a piece of jewelry will change hands. We establish some regulation over how individuals in a group, culture or society interact and transact with one another.
SENSATION OF JEWELRY AS INTENT
“Tibetan Dreams”, detail, FELD, 2010
Someone has to infuse the object with all this content, and this proactive act leads us to the idea of intent. Often this imposition of meaning begins with the jewelry artist. Jewelry becomes a means of self-expression. The artist, in effect, tells the world who the artist is, and what the artist wants to happen next.
The artist might be subdued or bold, colorful or monochromatic, simple or complex, extravagant or economical, logical or romantic, deliberate or spontaneous. The artist might be direct or indirect in how meanings get communicated. It is important, in order to understand the meaning of an object, to begin by delineating the artist’s inspiration, aspiration and intent.
The jewelry artist begins with nothing and creates something. The unknown, the unknowable, the nothingness is made more accessible.
The artist fills in a negative space with points, lines, planes, shapes, forms and themes. Color, pattern and texture are added. Things get organized and arranged.
Though often unstated, it becomes obvious that of all the possible choices the artist could have made in design, that some choices were ignored and excluded, while others were not. Some negative space is left so. Some positive space has direction, motion, weightiness. Somethings are abstract; other things realistic. These and related choices have implications and consequences.
The question becomes, what influences that artist’s selections? Successful jewelry reveals the artist’s hand.
Our perceptions of the coherence in the artist’s inspiration and intent, as reflected in our interpretations of that artist’s jewelry, helps us not to feel alone. We may see coherence as a subjective thing or a universally understoodthing. It doesn’t matter which. If we believe we can make sense of things, if the jewelry feels and seems coherent in some way, we feel safe, and that we have reduced the risks in life. We do not feel so left alone.
Jewelry As Creating Order Out Of Chaos. Partly, what the artist does is attempt to order the world. The artist looks for clues within him- or herself (inspiration and intent). The artist formulates concepts and a plan for translating inspiration and intent into a design. The artist determines whether to take into account the expectations of others (shared understandings) about what would be judged as finished and successful.
Jewelry is an object created out of chaos and which has an order to it. The order has content, meaning and value. It has coherency based on color and texture and arrangement.
Jewelry as an organized, ordered, coherent object reflects the hypotheses the artist comes up with about how to translate inspiration into aspiration, and do this in such a way that the derived jewelry is judged positively. The artist anticipates how others might experience and sense the object on an emotional level.
It reflects the shared understandings among artist, wearer and viewer about emotions, desires, inherent tensions and yearnings and how these play out in everyday life.
The artist makes the ordered chaos more coherent, and this coherence becomes contagious through the artist’s choices about creative production and design. The artist lets this contagion spread. To the extent that others share the artist’s ideas about coherence, the more likely the work will be judged finished and successful. And no one — not the artist, not the wearer, not the viewer — will feel alone.
The process of bringing order to chaos continues with the wearer. The wearer introduces the piece of jewelry into a larger context. We have more contagion. The jewelry as worn causes more, ever-expanding tension and efforts at balance and resolution. There is an effort to figure out the original artist intent and ideas about coherence as reflected in design.
Unsuccessful efforts at design, where the artist’s intent becomes obscured, reverse the process, and the object — our piece of jewelry — then brings about decoherence. Decoherence may come in the forms of bad feedback, inappropriate feedback, less than satisfying feedback, or no feedback at all.
Decoherence means the wearer may not get that sense of self s/he seeks. S/he may feel less motivated to wear the piece. S/he may store the piece or give the piece away. As this decoherence filters down to the level of the artist, any necessary support in design may be lost. There will be fewer clients, fewer opportunities to display the works publicly, and fewer sales. The artist’s motivation may diminish.
Jewelry As An Agent of Personality. People wear jewelry because they like it. It becomes an extension of themselves. It is self-confirming, self-identifying and self-reconfirming. Liking a piece of jewelry gets equated with liking oneself, or as a strategy for getting others to express their like for you. Jewelry makes us feel more like ourselves. We might use jewelry to help us feel emotionally independent, or we might come to rely on jewelry for emotional support and feedback, leading us down the path to emotional dependency.
Jewelry may have personal significance, linking one to their past, or one to their family, or one to their group. It may be a way to integrate history with the present. It is a tool to help us satisfy our need to affiliate.
Jewelry may help us differentiate ourselves from others. It may assist us in standing out from the crowds. Conversely, we may use it to blend into those multitudes, as well.
Jewelry fulfills our needs. If we look at Maslow’s Hierarchy of Needs, after meeting our basic physiological needs such as for food and water, and our safety needs, such as for shelter, we can turn to jewelry to meet our additional social needs for love and belonging and self-esteem. Designing and creating jewelry can form an additional basis for our needs for self-actualization.
We may derive our personality and sense of soul and spirit from the qualities we assign the jewelry we wear. We do not merely wear jewelry as some object; more specifically, we inhabit jewelry. If ruby jewelry symbolizes passion, we may feel passion when wearing it. We may use jewelry as an expressive display of who we feel we are and want to be seen as in order to attract mates and sexual partners. We use jewelry in a narcissistic way to influence the alignment of the interests and desires among artist, weaver, viewer, collector, exhibiter, and seller.
In similar ways, we may derive our sense of belief, devotion and faith to a higher power or spiritual being or God from wearing jewelry. It may help us feel more connected to that religious, spiritual something within ourselves. It may remind us to stay on our religious path.
As an agent of our psychological selves, jewelry is used to resolve those core conflicts — Who are we? Why do we exist? How should we relate to other people around us? Jewelry orients us in coming to grips with our self-perceived place within critical contradictions around us. Trust and mistrust. Living and dying. Good and evil. Pleasure and pain. Permission and denial. Love and hate. Experience and expectation. Traditional and contemporary. Rational and reasonable.
SENSATION OF JEWELRY AS DIALECTIC Jewelry As Interaction and Shared Understandings
“Tibetan Dreams”, FELD, 2010
Jewelry is a two-way street. It is a way to create, confirm and retain connections. At its very core, it is interactive and communicative. It is more an action than an object. Jewelry can start a conversation. Jewelry encapsulates a very public, ongoing matrix of choices and interactions among artist, wearer and viewer, with the purpose of getting responses. It is a dialectic.
The optimum position to view jewelry is on a person’s body, where and when its dialectical power is greatest. Again, it is very public, yet concurrently, very intimate. We exhibit jewelry. It forces reaction, response and reciprocity. Jewelry helps us negotiate, in relatively non-threatening ways, those critical tensions and contradictions in life, not merely define them.
It very publicly forces us to reveal our values, delineate tensions and contradictions which might result, and resolve all those betwixt and between qualities which occur as the artist, wearer, viewer, marketer, seller, exhibitor and collector try to make sense of it all. Conversely, jewelry, as worn, may signal that any negotiation would be futile, but this is a dialectic, communicative act, as well.
Jewelry expresses or implies things, the relevance of which emerges through interactions. There is an exchange of meaning. There is some reciprocity between the artist expressing an inspiration with the desire for a reaction, and the wearer evaluating the success of the piece and impacting the artist, in return. We have those coherence-contagion-decoherence behavioral patterns discussed above.
Jewelry is persuasive. It allows for the negotiation of influence and power in subtle, often soft-pedalled ways. It helps smooth the way for support or control. Compliance or challenge. Wealth and success or poverty and failure. High or low status. Social recognition. An expression of who you know, and who might know you. Jewelry is a tool for managing the dynamics between any two people.
Jewelry is emotional and feeling, with attempts by the artist to direct these, and with opportunities for others to experience these. It is not that we react emotionally to the beauty of an object. It is not mechanical or fleeting. It is more of a dialectic. The jewelry is an expression of an artist’s inspiration and intent. We react emotionally to what we sense as that expression as it resonates from the object itself. This resonance ebbs and flows, waxes and wanes, over time as the object is worn in many different situations.
Jewelry draws attention. It becomes a virtual contract between artist and wearer. The artist agrees to design something that will call attention to the wearer and that wearer’s preferred sense of self. The wearer agrees to wear something that reaffirms the artist’s insights for all to witness and experience and draw support.
Jewelry may cue the rules for sexual and sensual interactions. Nurturing and desire. Necklaces draw attention to the breasts. Earrings to the ear and neck. Rings to the hands. Jewelry, such as a wedding band, may confirm a relationship, and signal permission for various forms of touching that otherwise would not be appropriate. The silhouettes and placements of jewelry on the body indicate where it may be appropriate for the viewer to place his gaze, and where it would not.
We don’t feel alone because we have opportunities to have a dialectic experience — a dialogue between self and artist, self and others, self and self — all catalyzed by the piece of jewelry, and our sensation of all the choices that had to be made in order for it to exist, in order for it to feel coherent, in order for it for fulfill desire, and in order for all of this to somehow feel contagious and resonant. We don’t feel alone because the jewelry taps into something inside us that makes us want to wear it, buy it and share it.
Jewelry Ages In Place With Us
Jewelry comforts us as we age in place. The bracelet we got for graduation still worn on an occasion when we are 65. The ring he bought her when she was in her 20’s still worn on the day she passed away.
With jewelry, we will never feel alone as we grow older. As our body changes in pallor and texture. As we gain weight or lose weight. As we change our styles of clothing or hair or activity.
This constellation of material objects, distributed across the human body, reflects transformation, movement, growth, and behavior. These reflect the life we live, and how we lived it. These are a story of how we performed our lives over time. They reveal an otherwise unseen perspective on life as the body ages, and we live through time. They show that not all lived lives have been ad libbed.
The jewelry will also show its age over time. Changes in color, perhaps fading, perhaps becoming duller or spotty. A clasp may have been replaced. The piece may have been restrung. It may have been shortened or lengthened. It may have been worn a lot. Or lost for a while. Or given away. Its associative or symbolic value may have changed.
Jewelry is life performed. Both are observable. Both indicative of our place — our aura — in the world around us as time goes on. Both an experience — often changing — of a point of view from the hand that crafted the piece in the first place, and the desires of the person who wore the piece over time. We possess it and wear it so it reminds us that we are not alone.
Knowing What Jewelry Really Is Translates Into Artistic and Design Choices
Knowing what jewelry really is better connects the artist to the various audiences the artist seeks to reach. It results in better outcomes. More exhibits. More sales. More collections. Better self-esteem. Better representation of self in various contexts and situations.
Jewelry asks the artist, the wearer and the viewer to participate in its existence. In a somewhat subtle way, by allowing communication, dialog, evaluation, and emotion, jewelry allows each one not to feel alone. It allows each one to express intent, establish a sense of self, and introduce these intents and self-expressions into a larger social context.
Jewelry judged as finished and successful results from these shared understandings and desires among artist, viewer and wearer, and how these influence their subsequent choices. These choices extend to materials and arrangements. They extend to how the artist determines what is to be achieved, and how the work is talked about and presented to others. These anticipate the reactions of others, beliefs about saleability, assumptions about possible inclusions in exhibitions, knowing what is appealing or collectible.
The artist is always omnipresent in the jewelry s/he creates. The artist, through the jewelry, and how it is worn on the body, to some extent, arbitrates how other sets of relationships interact, transfer feelings, ideas and emotions, reduce ambiguity, influence one another, and make sense of the world around them.
These sets of relationships, through which jewelry serves as a conduit, include:
artist and wearer wearer and viewer artist and self artist and seller seller and client artist and exhibiter artist and collector exhibiter and collector
In the abstract, jewelry is a simple object. We make it. We wear it. We sell it. We buy it. We exhibit it. We collect it. But in reality, jewelry channels all the artist’s and wearer’s and viewer’s energy — the creative sparks, the tensions, the worries, the aspirations, the representations, the assessments of risks and rewards, the anticipations of influence and affect. Jewelry becomes the touchstone for all these relationships. It is transformational. It is a manifestation of their internal worlds. An essence resonant in context. A comforting togetherness, inclusion, reaffirmation.
The better jewelry designer is one who anticipates these shared understandings about what makes a piece of jewelry finished and successful, and can incorporate these understandings within the jewelry design process s/he undertakes. Knowing what jewelry really is forms a critical aspect of what sets jewelry design as a discipline apart from that of art or craft. Knowing what jewelry really is and how it helps us not feel alone forms the basis of the professional identity and disciplinary literacy of the jewelry designer.
_________________________________________
FOOTNOTES
(1) Grosz, Stephen, The Examined Life: How We Lose and Find Ourselves, NY: W.W.Norton & Company, 2014.
(2) Pravu Mazumdar, Jewellery as Performance: on Gisbert Stach’s Experiments with Jewellery and Life, Klimt02, 11/22/2019