


BEADING CALISTHENICS #10: Daisy Stitch Expansion
Posted by learntobead on August 3, 2013
BEADING CALISTHENICS #10: Daisy Stitch Expansion
I do a day-long workshop called Beading Calisthenics. There are 10 of these exercises. This is the 10th one.
Beading requires a lot of mind-body coordination. That takes work. It is work.
You have to be able to get from your fingers to the needle to the beads, back along the thread to the needle to the fingers, hands, arms, eyes, mind. And then again. And again. Over and over, one more time. You need to get into a rhythm. All these working parts need to be working. No time for cramping. No time to get tired. No time to lose concentration.

A rhythm. Needle, pick up bead, pull down along thread, check the tension, pick up a bead, pull down along thread, check the tension, pick up a bead….
I noticed that different instructors had various techniques and strategies for maintaining this rhythm. Yes, music was involved sometimes. Othertimes simple meditation or creative reading and discourse. Some people had some stretching exercises that they did. Others tested themselves before proceeding with their big project. Still others did small things to reconfirm their learning.
I distilled what I saw others do effectively into 10 fun yet challenging beading calisthenics.
BEADING CALISTHENICS #10: Daisy Stitch Expansion
The challenge here is to see how many variations you can construct using the simple daisy chain stitch.
This is a very simple stitch. Try it out. Experiment. And share your results with the group.
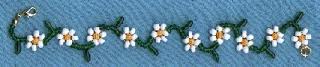
Simplest daisy chain: A stem and a flower with a center bead, then a stem and flower w/center, and so forth.
Start with a line of 5 beads.
Add 5 more beads to your thread. Make the 5th bead a different color. This is your “flower set”. The 5th bead is your center point.
Make a loop by going back through the first of these 5 beads in the set.
Add two more beads to the flower set, and bring the needle through 4th bead in that original set of 5.
So the daisy pattern goes: BEAD 1 to 2 to 3 to 4 to 5 (flower center point bead marked by X) back to 1 to 6 to 7 back to 4 and out.
Pull tight.
Add another line of 5 beads. Continue.
Try the daisy chain above without the stem, so that each flower set is interconnected by one bead — # 4 (which becomes #1 in the next flower). Make your 5th bead a different color.
Next, look at the modified daisy chain pattern below. Try another interconnected daisy pattern, where we would connect each subsequent flower by two beads, instead of one. Here we would make the first daisy’s 3 and 4 become the next daisy’s 1 and 6.
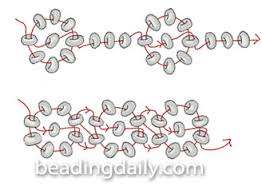
This would go: 1 to 2 to 3 to 4 to 5 (flower center) to 1 to 6 to 7 to 4 up through 3 and out. Then 3 becomes 1 in the next daisy link. The pattern continues in the second link as 1 to 2 to 3 to 4 to 5 (flower center) to 1 to 6 to 7 to 4 up through 3 and out. Then 3 becomes 1 again.
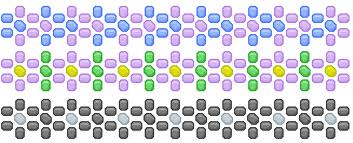
Try the same pattern, this time making the 2nd, 5th and 7th bead the same color, but different than the others.
Try again, making the 1st, 5th and 4th beads the same color, but different than the others.
Try again with any of the patterns, this time using a different size/shape/style of bead for the 5th one.
In Horace Goodhue’s Native American Beadwork book, he details many, many variations, including several that do not result in “flowers”, but rather patterns of lines.

The daisy chain is indicative of a “traditional” design. What kinds of things can you do to make the daisy chain have a more “contemporary” feel? Such as newer metallic colors? Or somehow increasing the dimensionality of each flower so it doesn’t feel so flat? Or creating a color pattern with beads 1 thru 7, so that the pattern is very op-art or contemporary graphic in feel?
Discover more from Warren Feld Jewelry
Subscribe to get the latest posts sent to your email.

Leave a comment