


Bead Stringing With Needle and Thread
Posted by learntobead on May 14, 2020
Needle and thread were very intimidating, and frankly, scared me. I could barely sew a button back on a shirt. My hands seemed so big and bulky — how could I hold onto these extremely thin beading needles? And thread the eye of the needle? And control things? The few times I had hemmed some torn pants, my thread path was more modern art, than functional perfection.
Jayden loved needle and thread. She made everything with it. She kept trying to force me to learn, but I resisted. For years. Resisted for many years. At one point, she retired, and I had to take over teaching her Attaching Clasps class. In that class, she taught both crimping and needle and thread bead stringing. So I had to learn it.
Not as painful as I anticipated. And the resulting pieces felt and moved and looked so much better than cable wires, that I took to it very quickly, and made it my own, so to speak. Needle and thread became my preferred approach. But when I made things to sell, I often reverted back to the cable wires. When cable threads, like FireLine, came along, these became a good compromise, at least for some projects, though not all of them.
HOW TO USE NEEDLE AND THREAD
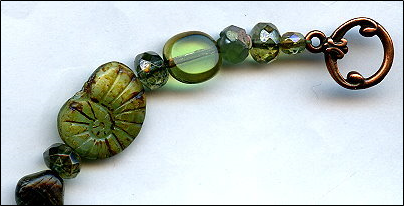
To String a Bracelet, Including How to Wax Your Thread
There are many different types of stringing materials. The best outcomes, from the Art and Design Tradition, are achieved using needle and thread. Beading threads are nylon. Most are shaped like a thin ribbon, rather than round, like sewing thread. Most are bonded, rather than twisted, fibers, which adds a lot of what is called “abrasion resistance.” Twisted fibers have zero abrasion resistance.
With beading threads, your stringing will be the strongest, it will last a long time, it will feel supple and soft, and it will drape and wear the best. It will take the shape of the body, and move the best with the body. With needle and thread, you tie knots to secure your clasps. You do not use crimp beads.
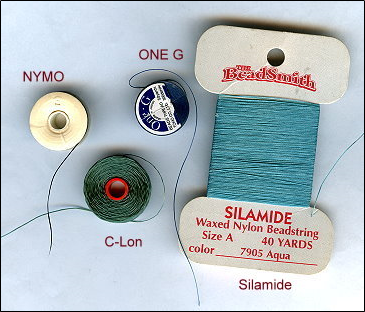
Prominent beading threads including Nymo, C-Lon and One-G. One thread, Silamide, is twisted, rather than bonded, which means it has no abrasion resistance. Beads have very sharp holes — picture broken glass — and Silamide breaks easily. Although it is pre-waxed and little easier to manipulate through your beads, I don’t recommend it. I’m not big on anything that breaks easily.
Using needle and thread does add a lot of time to the creation of a piece. You have to use a needle, which can be awkward. You need to wax your thread, which takes more time. You need to go through your piece THREE times. If you are selling your pieces, very often you won’t be able to recoup your labor, when using needle and thread.
One alternative is to use a cable wire. This goes very quickly and is easy to do. The cable wire is stiff enough to be its own needle. You don’t wax. You only have to go through your piece ONE time. The better cable wires are very strong. There is a stiffness to them that makes the pieces not feel as good when worn, in comparison to thread. You also have to use a crimp bead to hold the cable wires in place, and this is a weaker and somewhat riskier design element than tying a knot in the Clasp Assembly. Cable wire brands that I particularly like and recommend include Soft Flex and Flexrite.
Pieces done on cable wire move in the opposite direction that your body moves. If I wear a needle/thread bracelet on my wrist, and move my wrist to the left, the bracelet will move with me. If I wear a cable wire bracelet on my wrist, and move my wrist to the left, the bracelet will actually move in the opposite direction to the right. The cable wire bracelet does not conform to and take the shape of your wrist, when worn. This becomes a major design problem not always dealt with easily.
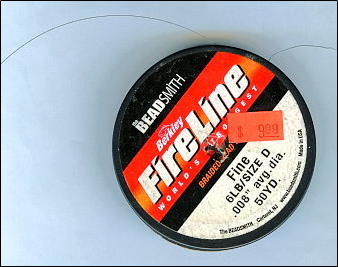
Another alternative to beading thread is to use a hybrid cable thread, such as FireLine or PowerPro or Spiderwire. Cable threads are threads braided together and encased in nylon. Originally these were used as fishing line and adapted by craftspersons for stringing and weaving. You use needles with these cable threads, but you only have to go through your piece one time, instead of 3 times, as you do with thread. You can go through your piece more than once to make your piece stiffer, but you don’t have to. You do not have to wax these cable threads. You can wax them, however, if you want, to increase your thread tension, and add more security against the sharp bead-holes cutting the cable thread.
The cable thread pieces are stiffer than the regular beading threads, but drape better than the cable wires. You tie knots with the cable threads, like with regular beading threads, to secure your clasp. Since you still rely on a needle, using the cable threads goes more slowly than using the cable wires. The PowerPro is a little awkward to use. I really like the FireLine and Spiderwire.
Threads (nylon beading thread)
Unfortunately for me, and for many beginning jewelry artists, the choices were not only about choosing thread instead of cable thread or cable wire. There were many types and brands of beading threads, each with some pros and each with some cons.
The original nylon beading thread is Nymo. Nymo was first developed by the shoe industry to attach the bottom of your shoe to the top of your shoe. It is widely used in upholstery. In the 1980s and earlier, if you wanted to buy Nymo, you bought it on a gigantic wheel — a five lifetime’s supply for us. As beading got more popular, Nymo packaged their thread on smaller and smaller entities, starting with a cone (a little bigger than a fist), then a spool (a little bigger than a thumb), and then a small bobbin. More recently the spool has been replaced by a large bobbin.
It turns out that the company could not get the same product onto a small bobbin. So, the thread on the small bobbin is weaker than the thread on the large bobbin, spool and cone. However, usually only white and black colors are available on the entities larger than the small bobbin.
Nymo is very strong. I suggest, if you have never worked with Nymo, to cut off about a 3 foot length, and try to pull on it and break it between your hands. It will break, but you’ll feel how tough it is. And in bead stringing, we typically go through each bead at least 3 times, so you have 3 thicknesses of this thread inside your piece.
When they make Nymo thread, it is a beige color. To make black, they dye the thread. The black dye tightens the thread, and makes it stronger. To make white, they bleach the thread. The bleach weakens the thread, so white is weaker than black. To make a color thread, they first bleach the thread white and then add a color dye. These color dyes further weaken the thread. So colors are weaker than white, and thus weaker than black. The colors of the thread, however, are consistent from batch to batch.
Nymo comes in many sizes. From smallest to largest, these include: OO, O, A, B, D, F, and G. The most popular and often used size is D (.008″). For a few years, the manufacturer, which had been stamping the size on the bobbin’s side, decided not to stamp any size on the bobbin. I guess people complained, understandably so, and they returned to their original practice.
C-Lon is a newer thread. When they make C-Lon, whatever color it is, that is the color the thread starts as. So, all the colors AND the white AND the black are equally as strong. However, the color from batch to batch will vary, sometimes widely. Overall, we like C-Lon better, particularly for the white and the colors. Black C-Lon is equivalent in strength to the Black Nymo. For white and colors in C-lon, these are stronger than their Nymo compatriots. One drawback to C-Lon is that the ends of the thread fray easily, making it more difficult to get your thread into the eye-hole of the needle, than with Nymo. C-Lon only comes in two sizes — AA (smallest) and D (thickest).
ONE-G is a premium beading thread and is similar in strength to C-Lon. I think its best attribute is that it has a spring-i-ness to it, that makes it much less tiring to use, than Nymo or C-Lon. ONE-G only comes in size D and only in about 12 colors.
Silamide is a pre-waxed thread. The pre-waxing allows the thread to get less tangled up when you use it. However, Silamide breaks very easily, so I don’t recommend it. Why put in all that time into a project if there is a good chance your thread will break?
Beading thread is shaped flat like a ribbon. Sewing thread is shaped round. Sewing threads are not strong enough to use in beadwork.
When choosing a thread to use, sometimes you have to make some compromises and trade-offs.
From one beader:
After finishing the pendant, I thought the necklace needed something more — like individual seed bead daisies attached to a handful of the beads in the necklace. I was working on the necklace on a Sunday night and told my friend I’d have it for her at work on Monday. I had limited thread options at hand: white Nymo or brown embroidery thread. The Nymo would have been a better thread choice, but the white was not aesthetically pleasing against the dark beads. So, I went with the brown embroidery thread. How bad could it be? Ugh! It was so hard to handle and kept fraying. Once the piece came back from photography, I did end up redoing it with brown Nymo.
I find myself switching thread brands and colors from project to project. For bead stringing, I rarely use any other size than D. I most often use the color black, and when I want to use black, I usually grab my ONE-G or Nymo. When I use a color thread, I go for ONE-G, if they have a good color; otherwise, I use C-Lon. If my piece uses any kind of crystal bead, I use FireLine or Spiderwire. There is a cable-thread product called C-Thru-B, which goes in and out of production, but is an excellent product to use with crystal beads and other beads with especially sharp holes.
Color Effects of Thread
Thread color affects the viewer’s perception and evaluation of the piece. People see the thread at the knots. They subconsciously see the threads between each bead. If you are using transparent or translucent beads, the thread color will affect the color of these beads. You can do the same piece using different colored threads, and each of these pieces will look very different.
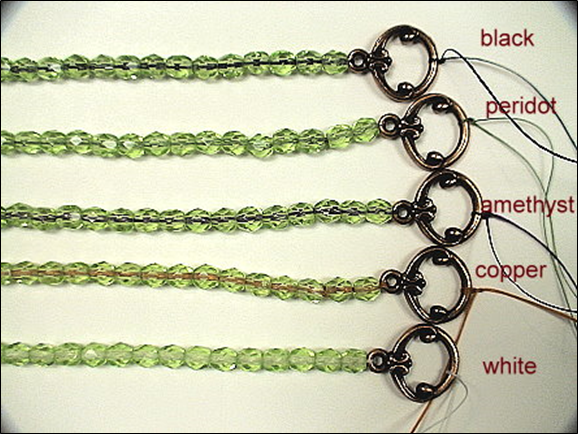
Black always works. Can’t see the knots, only shadows. This makes your piece seem older, richer, more traditional. It gives your piece a patina.
White makes your pieces brighter, sharper, more contemporary looking.
Colors: Most people select a color that is the same or similar to the predominant color in the piece. In this case, there is no color affect. However, you can pick contrasting or complimentary colors, such as using an amethyst colored thread to string peridot colored beads. You can also change the colors of your thread as you work thru your piece.

Needles
The eye of a beading needle is shaped like a rectangular funnel (the opening on one side of this funnel is larger than the opening on the other). Beading thread is shaped like a ribbon.
The eye of a sewing needle is round or a larger, rounder opening. Cotton sewing thread is round.
There are many styles of beading needles. The most used ones include:
English Beading Needles
(Size #10 is good for bead stringing projects;
Sizes #10 and #12 are used most often in bead weaving. There’s also a size #11.)
I like these because they have a little, but not too much, bend to them. They are stiff enough to push through your beads, but can bend a little to take some corners, or to get into the holes between two beads on a string.
Some people like to use Pony brand, rather than the English Beading Needles. Pony needles are made in India. They are a fraction of the cost of the English ones. However, they break very easily. I get too frustrated with my needles breaking too frequently, so I use the English.
Other people like to us Japanese beading needles. These have similar durability to the English ones, but are very stiff and lack that useful “bending” property that I prefer.
These needles come in many sizes. The #10 is the biggest, and the size of the eye hole relative to the needle is proportionately much bigger than that in the thinner sizes. You will also find Size #12, Size #13 and Size #15.
TULIP needles:
These are the top of the line quality needles. They are made in such a way that they bend easily when you want to maneuver them through a bead, but straighten out after you have made your thread pass. A little pricey, but worth it, in my opinion. These come in several varieties and sizes.
Sharps Needles (shorts)
Sharps needles are English but are shorter and considerably stiffer than regular English Beading Needles. These needles are primarily used in bead embroidery, where you have to push the needle through fabric, and a stiffer needle works better here. Some people like to use these for everything, but these are a bit too small for my hand. My hand cramps up when I use them.
These come in Size #10 and Size #12.
Loom Needles (long)
Loom needles are longer than regular English beading needles. When you do loom work, you want to get as many beads on your needle as you can, when passing back and forth, to minimize the chances of snagging a warp thread with your needle.
These come in Size #12.
Big Eye Needles
When your stringing material is ribbon or fabric or yarn or string, you would use a Big Eye Needle. This needle consists of two flexible needles, soldered at each end, and which open up to form a big eye. You wedge the end of your stringing material into one end, and this becomes your trailing end as you string your beads.
These come in a 2” length and a 5” length.
Twist Wire Needles
Twist Wire Needles, sometimes called Collapsible Eye Needles, are used when you can’t get your stiff needle through, and you need to pass through a bead-hole one more time. You take your stiff needle off your thread, and re-thread on the Twist Wire Needle. This will usually go through a hole about three more times, before it begins to unravel. These needles come in many sizes, from Very Fine, Fine and Medium to Heavy and Extra Heavy.
Needle Threaders
These work with sewing thread and needles, but not really with beading thread and needles. When you buy a kit of beading needles at a craft store, they usually come with needle threaders. These won’t work with beading needles. You can get the threader through the eye of the beading needle; however, when you try to pull it back through with the thread, it’s too thick and won’t come back out.
It’s always a good idea to have two or more beading needles on hand. They break. You don’t want to find yourself in the middle of your project and having to run to the store get another needle.
And you will occasionally poke yourself with the needle. Occupational hazard.
Hiding The Knot. When using thread, the knots are so small, that you don’t see them on the finished piece. This is especially true when using Black thread. With black thread, people see a shadow.
When using thicker cords and stringing materials, if you want to hide the knot, use a bead with a larger hole on either end, so that the hole swallows the knot. Or slide a crimp cover over the knot, so it seems like there is a bead there.
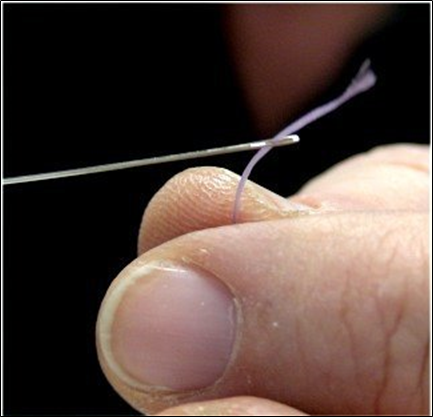
Getting Your Thread Onto Your Needle
Most people try to push the needle onto the thread. This works, but it takes a lot longer than what I am going to suggest. I like to hold the needle steady and pop the thread into the eye of the needle.
First, when using thread as your bead stringing material, you always begin with a wing-span (arm-to-arm’s) length, which is about 6 feet. Six feet of thread will make an 8”-bracelet.
Next, on one end of your length of thread, pinch it between your thumb and forefinger, with a little bit of the tail sticking up.
Pull the thread slowly down so that the top of the thread is at the same level as the top of your forefinger.
We are going to play with this thread. Pinch the thread to pop it up higher, and then pinch the thread to pop it back lower, just below the surface of your forefinger. Do this a couple times so that you can lock into your mind an image of where the thread will pop up..
Bring your needle down parallel with your forefinger. Hold the eye of your needle right above where your thread will pop up. Don’t move your needle. Pinch the thread to pop it right into the eye hole of your needle.
When threading your needle, often it is useful, if your thread is a dark color, to work over a light-colored surface, and if your thread is a light color, to work over a dark-colored surface.
NOTE: If you are using a cable thread like FireLine, this cable thread is round, not flat. To get it on the beading needle, you often have to flatten the end of the cable thread a bit. Run the end between your finger nails, or a tweezer, or a chain nose or flat nose pliers. Don’t pull it through your teeth; it can cut into your teeth.
Wax. Wax. Wax.
A really good artist will wax their thread. Even if the thread says it’s been pre-waxed, you want to re-wax this thread.
We wax our thread to make it strong, less likely to fray, to straighten and stretch it a bit before using, to waterproof and protect the thread from weird body chemistries, from cosmetics, perfumes and hair sprays and from pollutants in the area, as well as to glide through the beads better, and to fill in the jagged edges of the hole of a bead to make it less likely to cut the thread.
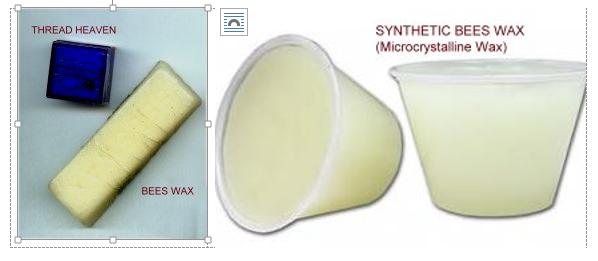
There are different types of threads and conditioners. The primary choices are among pure beeswax, synthetic beeswax (also called microcrystalline wax), and a product called Thread Heaven, which is a thread conditioner, not a wax.
Thread Conditions make the thread less likely to get tangled up and knotted, while you ware working it. Each time you pull the thread through the bead, static electricity builds up. The conditioner prevents this from happening. But it is not a wax. It doesn’t do anything the wax will do.
I suggest you always use beeswax, either pure or synthetic. I do not recommend thread heaven. Natural bees wax will protect the thread for 150 years. The synthetic wax is a little more expensive than the pure wax, but I prefer it. The synthetic does everything the pure one does, only better, and lasts an even much longer time.
Waxing the thread takes very little time, and it can add years to the life of your bead art.
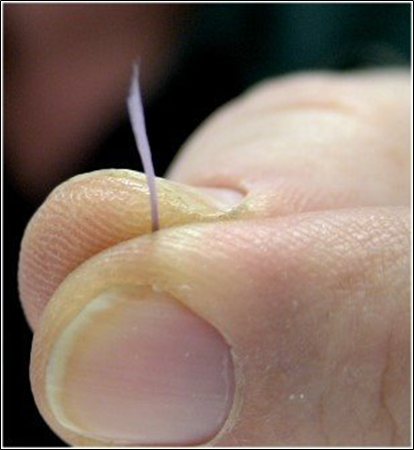
When waxing, we pull our thread through the wax two times. Then we take our two fingers, pinching the thread, and slowing moving down the full length of our thread. Our body temperature melts the wax into the thread. Our fingers also knock off any excess wax on the thread. Always pull by the thread, not by your needle, when waxing.
To feel the effects of waxing, try this:
Take an arm’s length (about 6 feet) of nymo D or C-Lon D
Thread it onto a Size #10 English beading needle.
Double it up, so that you now have your length of thread in half, with two equal lengths extending from either side of your needle’s eye hole.
At the needle end, wrap the thread around your forefinger a couple times. When we pull the thread through the wax, we want to pull by the thread, and NOT by the needle.
Wax the thread twice, then take your two fingers and slowly go down the thread, allowing your body temperature to melt the wax into the thread.
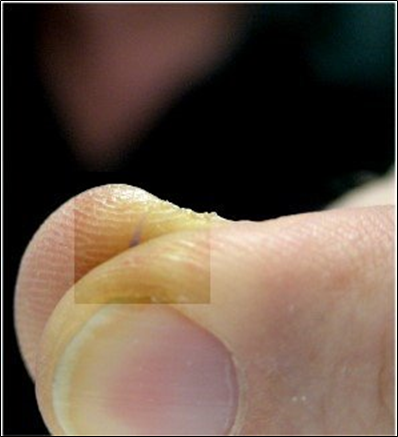
Now un-double your thread. Move your needle up to one end, leaving about an 8–10” tail.
Take your two fingers, pinching the thread, and feel down the length of the thread to find the area that was wrapped around your finger, and did not get waxed. Your fingers will slip.
Now wax two more times from that area on down. Pinch your thread at one end, moving your fingers down the length to melt the wax into the thread.
DOUBLING YOUR THREAD
Some people like to work with a doubled thread. I find this awkward and difficult to control. However, I leave this up to you.
ADDING THREAD
If you are making a piece, like a necklace, at some point, you will run out of thread. After all, 6’ of thread does about an 8” bracelet.
When the length of your thread looks like it will be too short to continue, then you need to tie off and anchor this thread. If you are at one end of your piece, you can tie the thread off to your clasp component. If you are somewhere in the middle of your piece, you would tie off your thread to the spine (that is, the thread already running through your piece. It is good to tie a double knot (two overhand knots).
You never cut your thread at the knot. So, after you have tied your knots, you will run your remaining thread through some beads. Then cut the thread as close to the bead-hole you can get. When you are adding new thread, you will go through a few beads before tying that knot.
MAKING A BRACELET USING NEEDLE AND THREAD
Basic Steps
We are going to string a simple strand of beads, using needle and thread. If you wanted to do some planning and design work, for a fancier arrangement, you would play with your beads on a Bead Board, and temporarily string them, using bead stoppers or hemostats on either end, to secure them in place, until you are satisfied with your layout and design.
We are going to do everything in 3’s. We are going to go through the beads three times. We are going to tie 3 knots each time we reach and/or return to an end.
Supplies:
1 strand 4mm round fire polish or druk beads
Nymo, Size D thread in black
2 size #10 English Beading Needles
Toggle Clasp
Bees Wax
Scissors
Work Surface
OPTIONAL: Bracelet Sizing Cone
OPTIONAL: Bead Board
OPTIONAL: Bead Stoppers or Hemostats
LAY OUT YOUR BEADS ON A BEAD BOARD OR WORK SURFACE.
1. THREAD. Cut a length of thread measured from hand to hand of your outstretched hands. (about 6 feet)
2. NEEDLE. Thread onto a #10 English beading needle. Leave an 8–10” tail. You will need this length of tail in order to finish off your piece.
NOTE: Unlike with cable wire, where you deal with your tails immediately, you deal with the tails from needle/thread work at the very end of your project. So these tails will always be annoyingly in the way while you are making your piece.
3. WAX. Wax your thread
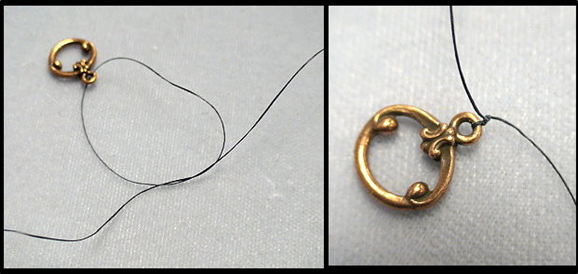
4. ATTACH FIRST CLASP PART. On the end opposite the one with the needle, string on the largest piece of your clasp set. Leave about 8–10” of a tail. Don’t short-change yourself on the tail length. You will need 8–10” to finish off your piece at the end.
Tie 3 over-hand knots. Thus, you take the tail, go over the spine, under the spine, and back up through this developing loop. Pull tight.
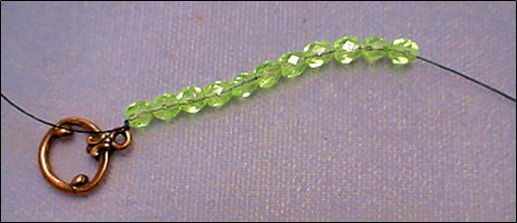
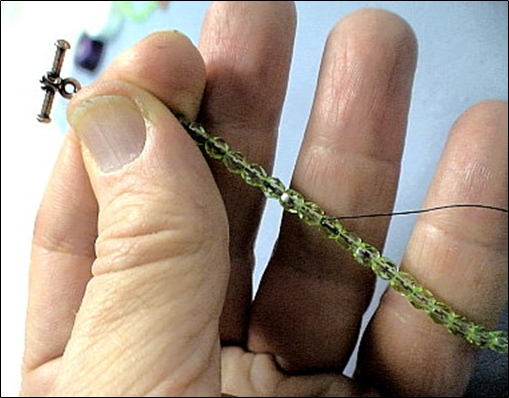
5. STRING YOUR BEADS. Using your needle, put enough beads on the thread until you have made the correct bracelet length, as you want it. Push these beads down so they are flush against the clasp.
The best way to get the beads on the needle, is to use one hand, hold your needle, and spear the hole of your target bead, lifting it up and letting it slide down a bit of your needle. Do this again and again, until you have 4 or more beads on the needle.
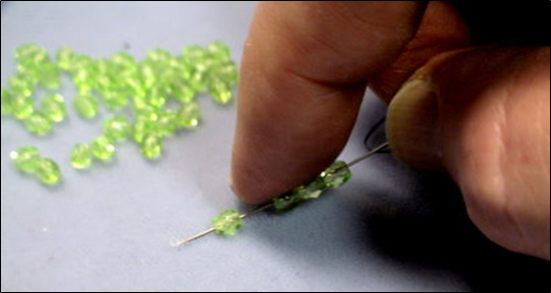
Then take your other hand, and push the beads all the way down to your clasp, tied off on the other end. If you can use only one and to pop your beads onto your needle, then you will increase your speed. But if you have to use two hands to get your beads on the needle, that’s OK.
Do NOT string the beads over the tail. The beads, with needle and thread, are strung over the spine only. We deal with the tails at the very end of the process. [This is unlike with cable wire, where we cover both the spine and the tail at this point.]
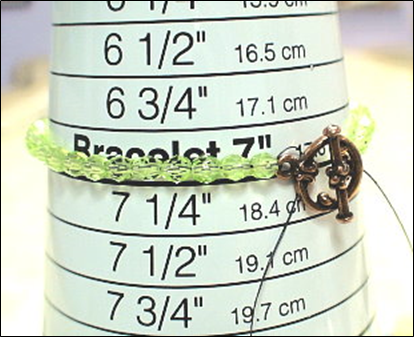
6. TEST LENGTH. Test the length of the bracelet on your wrist or against a sizing cone before tying off the second end. Make any necessary adjustments, such as adding or subtracting beads.
Remember, when you add the 2nd clasp part, you could be adding more length to your piece. With a toggle clasp, you will be adding about 1/2″ more to the length of your piece at this point.
7. ATTACH 2nd CLASP PART. You will be taking the second (and smaller) part of the clasp set and tying this off.
REMEMBER: After this point, you will not be able to make any changes in design, length or ease.
You need to maintain your tension on the beads while doing this. We are going to be using a fancier version of the simple overhand knot. This fancier version gives you more control over your thread tension. If you don’t want to do this, or forget how to do this, you can always tie simple overhand knots.
Let’s begin.
You are the artist.
Your finger is your easel.
Your thumb is your clamp.
The thread is your canvas.
The beads are your paints.
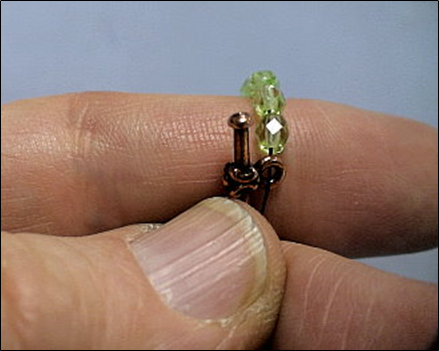
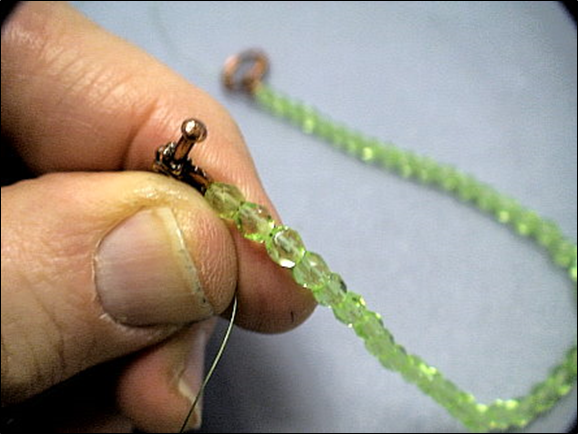
a. Put the length of beads over your forefinger, (from over there towards you) with the already tied-off part of the clasp at the top, and laying in front of your finger, closest to your body.

b. Push the clasp part off to the side, and clamp the beads, the clasp part, and the tension all in place with your thumb.
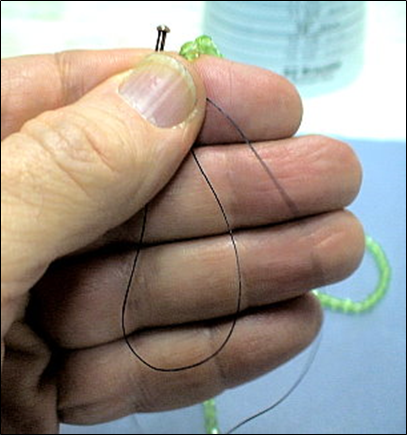
2. Make a U shape with your thread, and tuck under your thumb to hold in place. The U is actually part of your knot.
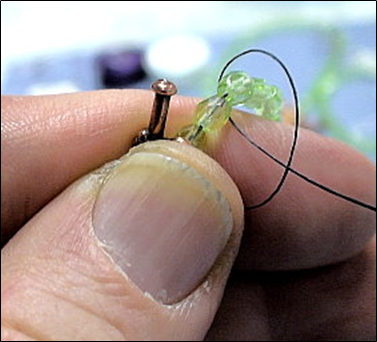
d. Take the end with the needle, and come from behind the string of beads (from outer space towards you), and under the beadwork, but stay over the U-thread and your working thread.

DO NOT take your needle through the U. The U is part of the knot, and you don’t want to tangle up your working thread with your knot.
Don’t pull your bracelet up into the air while working on it. Leave most of it resting on your work surface, pulling the end you are working on up towards you a bit.
e. Pull, pull, pull, pull, pull and watch the loop getting smaller. Before it gets too small, put your needle down, and work the rest with your hand. Move this ever-decreasing-in-size loop in place between your first bead and the clasp part. You’ll have to let go with your thumb until you have the loop positioned. Clamp down again with your thumb.
f. Pull tight, and pull out the U.
g. One more pull — give the thread a good tug — to tighten things up. With your fingers on one hand, pinch the clasp part and hold tight and steady. With the fingers on your other hand, grab your working thread and pull the clasp part tightly against the first beads. You don’t want any thread to be showing.
The first time you do this step is the most important. After this, your clasp is locked in place close to that first bead.
h. This is your first knot.
i. Repeat this fancy version of an overhead knot two more times
NOTE: Your knots are tied around the thread or your previous knot. You could also, instead, have gone back through the loop coming off your clasp component, but this is not necessary. With our instructions, less thread and knots will show at the clasp.
8. 2nd Pass With Needle/Thread. Take your needle, and thread all the way back to the other side of your bracelet (where the larger part of your clasp is).
You cannot do this in one step. You will have to pull your needle out every inch or two. When you pull your needle out, give your thread a tug. You don’t want it to bunch up inside the bead holes.
9. Three More Fancy Knots. Tie three of these special knots with the U.
When you get to your second side, there will be an 8–10” tail annoyingly in the way. Push this behind your hand, so it doesn’t get tangled up with your working thread, as you are trying to tie this fancy knot.
10. 3rd Pass With Needle/Thread. Take your needle, and thread all the way back to the other side.
11. Three More Fancy Knots. Tie three more of these special knots with the U.
12. Finishing Off The Tail. Take you needle and thread, and thread back about 2–3” of beads, and pull your thread through.
At this point, you have a lot of thread and knots near and in the hole of that first bead next to the clasp. You may have to push your needle through and out of that first bead first, and then go back through several other beads.
13. Can You Pop The Knot Back Into The Hole Of The First Bead? Pinch the beads right below the clasp end with your thumb and forefinger. Push these away from you, and, at the same time, pull the tail-thread towards you. You are trying to have the knots next to the clasp pop into the hole of the first bead. Usually you’ll hear and feel a pop. But not always. If you were able to maintain a very tight tension throughout, there may not be a pop.
14. Trim The Tail. Pull the thread away from you, and cut it as close to the bead hole as you can get.
15. Finish Off The Tail On The Other Side. Take your needle off the thread, and put the remaining tail of thread onto your needle.
Repeat steps 12 thru 14.
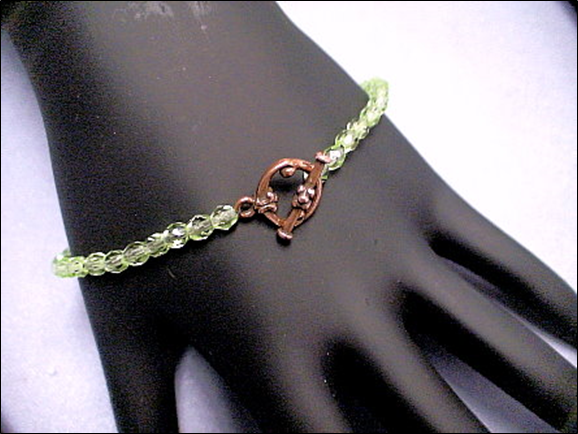
Give It The Once Over…
Once your bracelet is done, look it over carefully. Be sure your thread, where you trimmed your tails, isn’t showing. Be sure that it has sufficient ease.
Needle and thread work loosens up a bit with wear. If your tension is a little on the tighter side, then this will loosen up. If your tension is loose at this point, you may want to run another thread through your piece, anchoring it to both ends, to tighten things up.
Other Articles of Interest by Warren Feld:
Cleaning Sterling Silver Jewelry: What Works!
What Glue Should I Use When Making Jewelry?
Why Am I So Addicted To Beads?
A Very Abbreviated, But Not Totally Fractured, History of Beads
The Martha Stewart Beaded Wreath Project
When Choosing Colors Has You Down, Check Out The Magic Of Simultaneity Effects
The Use of Armature In Jewelry: Legitimate or Not?
Organizing Your Craft Workspace…Some Smart Pointers
You Don’t Choose Clasps, You Choose Clasp Assemblies
Know Your Anatomy Of A Necklace
Mini Lesson: Making Stretchy Bracelets
Mini Lesson: Making Adjustable Slip Knots With Thicker Cords
Mini Lesson: Attaching End Caps, Cones, Crimp Ends
Mini Lesson: Flat Even Count Peyote
Mini Lesson: Right Angle Weave
Everyone Has A Getting Started Story
The Nature-Inspired Creations of Kathleen
The Jewelry Designer’s Orientation To Glass Beads
The Jewelry Designer’s Orientation To Lampwork Beads
The Jewelry Designer’s Orientation To Crystal Beads
The Jewelry Designer’s Orientation To Seed and Cylinder Beads
The Jewelry Designer’s Orientation To Choosing and Using Clasps
How To Design An Ugly Necklace: The Ultimate Designer Challenge
I hope you found this article useful. Be sure to click the CLAP HANDS icon at the bottom of this article.
Also, check out my website (www.warrenfeldjewelry.com).
Subscribe to my Learn To Bead blog (https://blog.landofodds.com).
Visit Land of Odds online (https://www.landofodds.com)for all your jewelry making supplies.
Enroll in my jewelry design and business of craft video tutorials online.
Add your name to my email list.
Discover more from Warren Feld Jewelry
Subscribe to get the latest posts sent to your email.

Leave a comment