Continue Part 2: Controllers and Adapters
Enroll in my jewelry design and business of craft video tutorials online. Begin with my ORIENTATION TO BEADS & JEWELRY FINDINGS COURSE. There are 18 video modules including handouts, which this is one of.
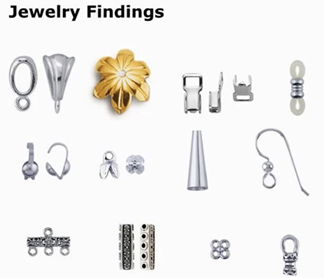
Choosing and Using Other Jewelry Findings:
Preparers
You have to approach the Jewelry Findings with a large measure of respect. “Jewelry Findings” are all the pieces that you use, including clasps, other than stringing materials and beads. They are called “jewelry findings”, because up until about 15 years ago, many of these pieces didn’t exist. People went to sewing notion stores, antique stores, flea markets, hardware stores, cannibalized old jewelry, wherever, and found things and made them work. Because many of these pieces are new, there is not a consensus on what some of these things should be called, so you have a lot of similarly looking pieces that go by different names. I’m sure over time, the name-game will shake out, and there will be more consistency.
Respect these jewelry findings. They are the pieces that get pulled and strained, torn at and squeezed, maligned and misused. These are the pieces that will make or break your piece of jewelry. Understand and respect them.
Many designers fail to make the full range of these pieces available to them. They either don’t know about them, or are afraid of them or think they might use them incorrectly. They too often limit their own design possibilities by relying on the same limited set of findings for everything they make. But the world of possibilities that these jewelry findings open up for us is endless.
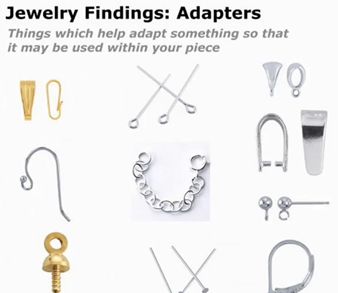
Below is a list of other major jewelry findings used in bead stringing. I’ve tried to group them into three categories to make it a little easier to relate to.
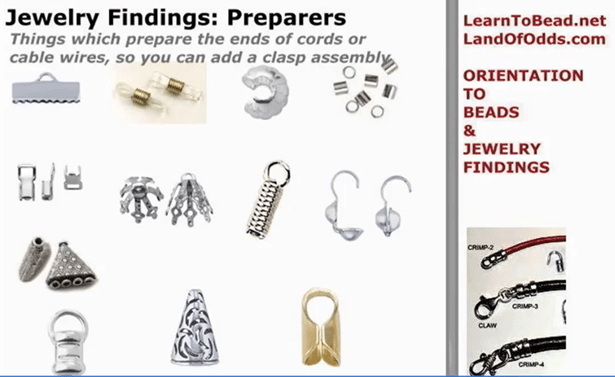
PREPARERS:
Things Which Prepare the Ends of Cords and Stringing Materials:
These kinds of jewelry findings are mostly used with thicker cords, like leather and waxed cotton, but also with cable wires. These enable you to create a “loop end” on each side of the cord or cable.
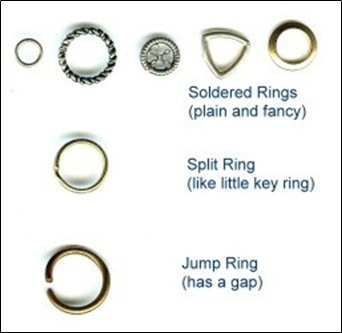
From the two loop ends you have created on each end of your cord, you then continue to create the rest of your clasp assembly. If the loop is big enough (to give you jointedness), or looks substantial enough (like it won’t break from movement), you can attach the clasp directly to the loop. If not, you will want to attach your clasp/ring to jump or split rings, and these, in turn, to your loop ends.
You usually try to match the size of the interior opening on the jewelry finding to the thickness of your cord or cable. For some of these pieces, this match is more important than others.
You always put some glue on your cord or cable before you stick them into the piece. You use glue because all these cords are oily, and some will sweat, as well. They will slip out of the findings — even with tight crimping or clamping — because they are slippery. That’s why you use glue.
I recommend using a glue like E6000 or Beacon 527. Don’t use super glue. Super glue (or the jeweler’s version called G-S Hypo Cement) dries like glass, so the bond will shatter like glass, because all jewelry moves. Also, after it shatters, the bond looks like a broken coke bottle. E6000 and Beacon 527 dry like rubber, so they act as a shock absorber, when the jewelry moves.
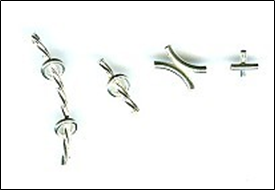
CRIMP ENDS
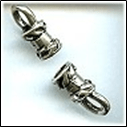
These come very fancy or plain. They come with a small opening to use with cable wires, and wider and wider openings to use with leather or waxed cotton, or even braided leather.
These pieces have a loop at the end of a tube. The tube has 3 bands. The first and third are decorative. The center band is meant to be crushed and crimped. You put some glue on the cord or cable — any glue except super glue — stick it into the tube, and take a pliers and crush the center band as flat as you can get it.
When you crush the middle band, visually, it looks like it is part of a pattern of beads. It doesn’t look like an ugly crushed piece of metal.
Some crimp ends come with a hook, so that you attach a loop on one end and the hook on the other, to create a hook and eye clasp.
These and clamps (see below) work best for preparing the ends of cable wires and thicker cords. Crimp ends tend to be on the pricier side; clamps are very inexpensive. Both hold well, relying on both the glue and the crimp.
CHAIN/CORD ENDS
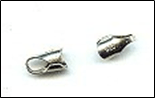
These pieces have a loop at the end of a split tube. For chain, these are soldered on. For cords or cable, you put some glue on (again never super glue), stick it into the split tube, and take a pliers and crush snug, NOT flat. What’s holding these on is the glue. If you crush flat, you lose the bond. Should tightly match cord thickness to interior diameter.
We need to crush snug because we want the glue to adhere to all the interior surfaces. If there are any gaps where the glue has not adhered, the bond will break.
These are terrible pieces, because it is difficult to achieve that perfect bonding with the glue.
END CAPS
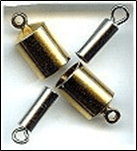
These pieces come in just a few sizes, but many designs. Those pictured are very industrial looking, but they come very decorative, as well. Some pieces have a hole at the end instead of a loop and are labeled “end caps,” but technically, these should be called either a cone or a bead cap. Usually, the interior opening size of the end cap will be listed, such as ID=6mm or ID=8mm or ID=12mm. You coordinate this with the width of whatever you are trying to slip into the end cap. But because of the shape of the end cap, there still may be fit issues.
These pieces have a loop at the end of a hard metal tube. The loop is either an eyelet or a fixed loop. You put some glue (not super glue) on cord or cable and stick in. The glue is all that holds. Should tightly match cord thickness to interior diameter.
Because it is important, for the bond to hold, to get the glue to adhere to all the interior surfaces, and you cannot crush the ends snug, you need to put a lot of excess glue on the cord when you stick it in. And you need to be prepared to wipe away the excess glue that bleeds back out.
You never attach your clasp directly to these pieces. You need an additional intervening ring — jump ring or split ring or soldered ring — between the end cap and your clasp component.
CLAMPS
Ribbon or Bar Clamps:
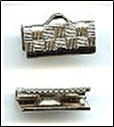
These clamps are folded metal with a loop in the center edge, come in different lengths, and have teeth. These are for ribbons or fabric. You don’t use glue, because the glue will bleed into the ribbon or fabric.
You fold over the end of the ribbon or fabric, making the end pretty, and stick into the clamp, and use a pliers to crush firm. If your material is wider than the clamp you have, you would make several folds in the end, like you would when gift-wrapping a package.
Foldover or Wing Clamps:
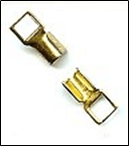
These come in a few different sizes, some with square loops, some with round loops. Some have plain backs; some have patterned backs.
These typically are a loop on top of flat metal with two wings that fold over. You put some glue (not super glue) on the cord or cable, sit in the saddle between the two wings, and use a large pliers, and crush the two wings over each other and over the cord. Crush as flat as you can get it. This is not done in one movement because the wings are stiff and strong. You usually take your pliers and move then to one side, then the other, then back, until you get the two wing position over each other, and you can crush them flat.
One mistake people make with this piece is that they crush snug, not flat. Where the wings overlap each other, this leaves an air passage. Again, we want our glue to adhere to all the interior surfaces. If you crush snug, this air passage will weaken the bond, and your cord will pull out. You have to crush as flat as you can get it, to force the glue up into that air passage.
You can use one clamp for multiple strands, if you wish. You can seat multiple strands of cable wire or leather or whatever into the saddle of one clamp.
These and the crimp ends work the best for preparing the ends of cable wires and thicker cords. Crimp ends are pricier; clamps are cheap. Crimp ends have a design impact; clamps are very utilitarian.
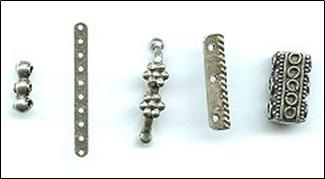
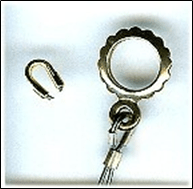
COIL ENDS
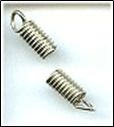
Coil ends have an open ended loop at the top of a tightly wound coil. I don’t like the way these look after they are crushed onto the cord, and they don’t hold up well. One advantage is that the coil functions as a spring, and absorbs a lot of the excess force place on the piece, that comes from movement.
With coil ends, you put some glue, (but not super glue), on the cord, shove it into the coil. You take a chain-nose pliers and crush the first two rings of the coil onto the cord. If you crush too hard, you’ll slice the cord. If you don’t crush hard enough, the cord will pull out.
The way the loop was designed to work, was that you take a pliers, move the open ring to the side, slip on your clasp or ring, and, using the pliers, move the open ring to a closed position again. DON’T DO IT THIS WAY. When you move the loop back and forth, it breaks off easily. These loops are rather brittle. SO, the way you would use this, is that you would take a jump ring or split ring, and attach this to the loop and your clasp piece. As long as you don’t move this loop wire, it stays strong.
Coil ends come in two sizes in terms of the width of the interior diameter. If your cord is thicker than the smaller size, see if you can make it work with this smaller size, anyway. The larger size is more awkward to use. Say you had leather cord. You can take a single-edge razor blade and cut the end at an angle, put some glue on the cord, and shove it into the smaller piece.
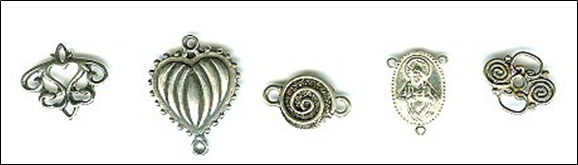
BEAD CAPS
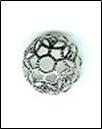
This is a decorative cup-like or bowl-like piece, with a hole in the center. This piece is originally used as a decorative element, to cover one or both sides of a bead, as you string your beads on. However, you can adapt this piece to be an end. You might have multi-strands, where you tie them all off together, and use the bead cap to hide the mess. You might have a bead crocheted rope, and again, use the bead cap to give your piece a decorative end. You glue the bead cap on. Then you take an independent wire or thread, attaching it to your piece about 2–3” from the end, and running it through your piece, through the cap, then finishing off the rest of your clasp assembly.
What’s nice here are that there are hundreds of styles, whereas the more typical jewelry findings look very utilitarian.
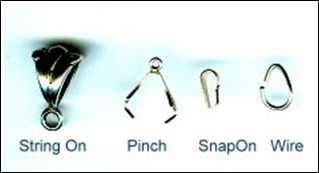
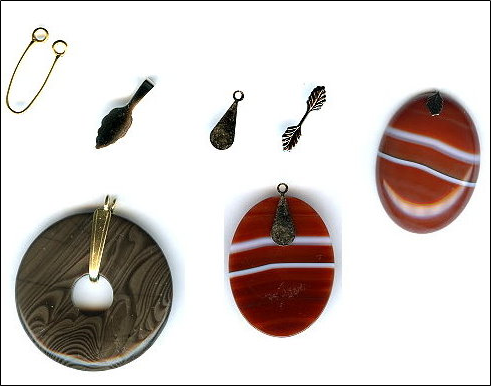
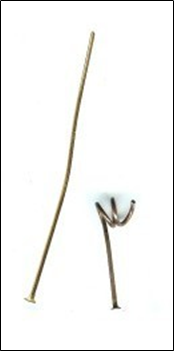
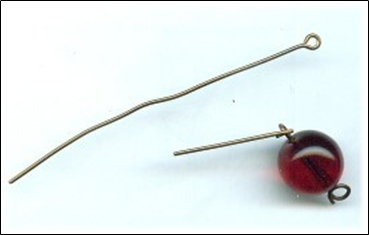
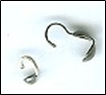
BELL CAPS

A bell cap is a bead cap with a loop on it. This is a decorative cup-like or bowl-like piece, with a loop sticking above the center. This piece is originally used to adapt something, like gluing it to the top of a crystal pendant or bead, to be a drop. But it can be adapted to use as a fancy end-cap. Use glue here. Attach the clasp assembly to an additional jump ring or split ring. Again, there are many, many decorative styles in bell caps, so you won’t have to rely on the typical and very plain specialized jewelry findings.
The arms on the bell cap are somewhat independent, and can be pushed into the shape of whatever piece they are attached to. So, for example, you can take a rough stone, position the bell cap at the top, push on the arms to shape them to the stone, then put glue on each arm and attach the bell cap to the piece.
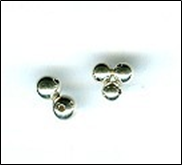
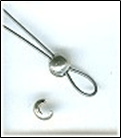
BEAD TIPS (aka, KNOT-COVERS)
These pieces are used to hide knots. One style has a cup with a tongue attached. Another style ends with a loop, not a tongue. The most widely used style — Clam Shell Bead Tip (or double-cup) — has two half cups that close over the knot, and a tongue extending from one end. While some people use these pieces with cable wire, they are primarily designed for use with needle and thread.
These take some practice in learning how to use them. On the first side of your piece, you string on the bead tip, say the clam shell. You tie a bunch of knots in the tail, so your knot is bigger than the hole in the bead tip, and won’t slip out. Cut off the tail. Put a drop of glue on the knot. Here you would use something like superglue. Superglue will make the knot stiff, so it won’t pull through the hole. E6000 will make the knot rubbery, and it will be able to contort and work its way through the hole. Trim the tail. Press the two halves of the clamp together over the knot, so it looks like a bead. Take the tongue, fold it over and through the ring on your clasp, and back to itself, so it forms a loop.
On the other side of your piece, here’s the tricky part. You need to keep your tension on the thread, so the thread doesn’t show when you’re finished. You need to tie a bunch of knots, and complete the rest of the process. This is a 3-hand operation, but you only have 2 hands.
Here you slide the bead tip onto your thread. Use one hand to hold everything tight. Take an awl or a round nose pliers — something where the width graduates into a point, and put the tip where you want your finished knot to end up. Tie an overhand knot over the awl or pliers up high on the wider part of the jaws. Tighten the loop of this knot. Tighten the tension on your thread. Move the loop down the awl or pliers a bit, moving towards the narrow pointed end. Tighten this loop. Check your overall thread tension. Move the loop down a little bit more. Tighten this loop. Check your overall thread tension. When you loop gets to the tip of your awl or pliers, you need to pull your knot tightly, and push the awl or pliers out of the way, AND, you want to maintain the thread tension in your piece. Tie a bunch more knots. Put glue on the knot. Trim the tail. Close the clamp. Loop the tongue into the other part of your clasp. This takes about 5 tries before your body gets that muscle memory to do the task easily and correctly.
When I started in jewelry making, almost every piece used bead tips. I’m not a big fan of this type of piece today. The tongue when bent over to hook and secure the clasp is not jointed enough. It doesn’t leave a big enough loop, so there is tension and these tongues break off. Today, you can tie your piece to the clasp using knots, then slip a crimp cover over the knot, so it looks finished as if there were a bead there. This is both more secure and easier to do.
Some alternatives to tying a globular knot: (1) with needle and thread work, you can tie off an end to an 11/0 seed bead, and have your clam-shell enclose the seed bead, and (2) with cable wire, you can crimp on a crimp bead on the end of your wire, and have your clam-shell enclose the crushed crimp bead.
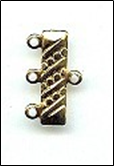
CONES
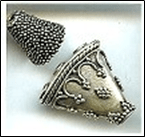
Cones come in many shapes and designs, but basically look like a megaphone. These are used to finish off the ends of jewelry, often to hide a lot of messy knots or unfinished ends inside the cone.
One style of cone is called a 3-to-1 cone (also, 2-to-1 up to 11-to-1). This is a flattened cone, with one hole on one side, and 3 holes on the other. This is supposed to help you finish off a 3-strand piece in a decorative way. You pull each of 3 strands through the 3 holes on one side, and out together through the one hole on the other side. For two of the strands, you tie a large knot or double-knot, cut off the excess tail, and let the knot fall back into the box of the cone. I’ve only known one person in my life who could accomplish this, and maintain sufficient string tension so that none of the cable wire showed on the other side of the cone and as part of the bracelet. For the 3rd string, you would continue creating your clasp assembly. This is a good piece in theory, but not practice. Most people end up tying the three strands into this big, globular knot, and then trying to finish off the clasp assembly, only to have the clasp assembly take up 25–30% of their finished bracelet.
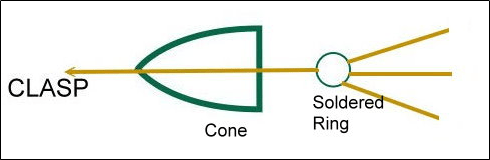
Regular cones are used like lampshades to hide some ugliness. With the typical cone style — that megaphone looking piece, the way you are supposed to use this piece is as follows: You take a soldered ring, something small enough so that it will fit far enough back into the cone, that the cone will hide any of the finishing knots or ends. If we start with a 3-strand necklace, you would tie off each strand to one side of the soldered ring. Then you would take a separate, independent cable wire, hard wire or thread, whatever you are stringing with, and tie it off in a knot to the other side of the soldered ring, pull the whole works into the cone, with the stringing material coming out the narrow end. Then you would finish off your clasp assembly.
The soldered ring, in this case, acts as a “support system”, creating jointedness. Otherwise, without this ring or support system, the cone could not support the resulting stress and strain. Since all the pieces are metal — cable wire, cone, clasp, crimp — , and these would be too stiff and would not move easily, and, as you now know very well, when you bend metal back and forth, it breaks.
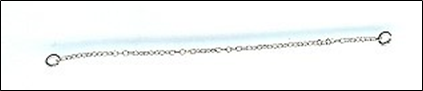
EYEGLASS HOLDER ENDS

A major category of jewelry are eyeglass leashes. You make an eyeglass leash by attaching an eyeglass holder end to the eyeglasses, making a string of beads, attaching the string of beads to a split ring, and attaching the split ring to the eyeglass holder end. You never attach the beadwork directly to the holder ends. Eyeglass leashes take a huge beating, as they are worn, and you need to create as much jointedness as possible, so you don’t ruin someone’s eyeglasses, have the lenses shift position within the frames, or have the leash break. In fact, we want to use a split ring — about 10mm or 12mm in diameter — that is a little larger visually than you might feel comfortable with.
Eyeglass leash holder ends are made from round rubber thong (usually black or clear), flat vinyl (usually black or clear), or elastic cord (comes in many colors). The round rubber thong is the most durable. Elastic cord is not durable at all. There are various style options. Most come with what is called a “coil center”. When the eyeglass leashes are worn, the rubber, vinyl or elastic cord sweats, both from the humidity found in the air, as well as the wearer’s own body sweat. Coil centers tend to slip, so these don’t work well with narrow arms on eyeglasses. Other eyeglass leashes come with a bead center, usually a 6mm glass roller bead. The beads don’t slip.
The ones with bead centers are a little more expensive than the ones with coil centers. One company bought the ones with the coil centers, slipped these off what is basically a rubber band, and slipped on a 6mm glass roller bead. They took a $0.45 cent piece and sold them for $4.00 a piece. People thought they were magic because the beads didn’t slip, so were willing to pay the premium. You can do the same thing. There are about 300 colors of roller beads, so you can personalize your line.
WATCH BAND COMPONENTS

These pieces are used to adapt watch faces so you can make beaded watch bands off them. They consist of a tube designed to slip over the spring bar on each end of a watch face, and some kind of loop or series of holes that come off the tube. Beaded watch bands have become so popular, that now you can purchase watch faces designed specifically to attach these to them.
CRIMP BEADS, CRIMP COVERS, and HORSESHOE WIRE PROTECTORS
Crimp beads come in many styles, sizes and finishes. These are used to secure cable wires to clasps. The crimping process involves crushing the crimp onto the cable wire, first separating the tail wire from the main wire, then creating a lock, and finally re-shaping it so it looks like a bead again.
Crimp Covers
These are U-shaped beads that slip over the crushed crimp. They are used like a lampshade to hide something that is ugly.
You attach the crimp cover in two steps. First, using the tips of your crimping pliers, you push the two sides of the U together, so you have a pretty bead. These are made of a soft metal, so you don’t want to push too hard, or you will crush them. After you get the two sides to meet, you’ll find that the lip on either side doesn’t meet up perfectly.
So, Second, at this point, you return the crimp cover to your crimping pliers, this time resting it between the top notches (thus, furthest from your hand) in each jaw. This will help preserve the roundness of the crimp cover as you manipulate it. Gently push the jaws to force the lips to meet more perfectly. You can slide crimp covers over your crushed crimps. You can also use these to slide over any knots, to hide the knots.
Horseshoe wire protectors
These serve several purposes. (1) It forces you to leave the correct size loop in the cable wire, so that you have the appropriate support system or jointedness. Without the loop, you would be pushing the crimp all the way to the clasp. This is a No-No. You never push the crimp all the way to the clasp — this creates stiffness with metal parts, and general movement would cause these to break.
(2) The horseshoe also makes the loop more finished looking — better than a bare-wire loop. Most people hate a bare, exposed loop. The horseshoe fools the eye/brain here, making it think that the loop is finished and more organically a part of the whole composition.
(3) The horseshoe prevents the cable wire from folding into a V over a period of time and wear. If the wire were to change from an arched loop to a V-loop, the wire then would more easily bend back and forth and break.
There are many choices to make when selecting crimp beads:
Crimp Beads
– tube vs. round
no difference in “holdability”, but most people prefer the tubes
– THE SILVER COLOR ISSUE: sterling silver vs. silver plated vs. silver plated crimp with sterling silver crimp cover vs. argentium silver crimps
Silver-plated crimps are usually plated over brass. Brass has a very high degree of integrity as a jewelry making metal. The plating wears off relatively quickly, and your crimps will look black — basically tarnished brass. More recently, these plated crimps have been plated over aluminum, which can break from the force of the crimping pliers.
Sterling softens at body temperature. If your crimp is resting on the wrist or the neck, there is some risk of it softening and weakening. This risk is minimal, however. If you’ve crimped correctly, you shouldn’t lose sleep over this. I prefer to use the sterling silver crimps; they are often made better than the other crimps.
You can also use a silver-plated crimp to crimp, and slide a sterling silver crimp cover over it.
Argentium has the same silver content as sterling but does not soften as easily at body temperature. These are a lot more expensive than sterling.
– crushing the crimp and re-rounding it vs. crushing, then using crimp cover
Some people don’ t like the look of the re-rounded crimp, or feel uncomfortable trying to re-round them. The crimp covers add about $0.50 — $1.00 more to each piece.
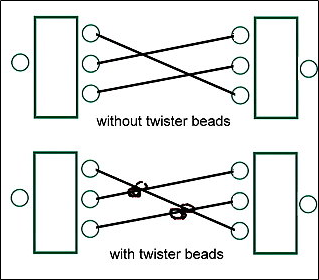
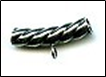
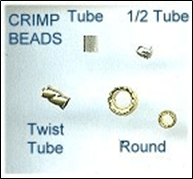
– plain tube vs. twisted tube
The twisted tubes (sometimes called Tornado or Cyclone crimps) are a little more expensive than the plain ones. When you crush the twisted tubes, they look decorative enough that you don’t have to re-round them. You definitely need to re-round the plain ones.
– Regular or long tube vs. short or half tube
Short tubes or half tubes are primarily used in pieces like illusion necklaces, where you have a cluster of beads, and the cord shows, another cluster of beads, the cord shows, etc. Half tubes are used on either side of the clusters to keep the beads in place. When you crush the half tube, the volume of space it takes up is not noticeable. When you crush the regular sized tube, its volume of space is too noticeable and detracts from the general look of the piece. One mistake people make with the short or half tubes, is that, when they use them to finish off the ends of jewelry, their mind tells them to use 2 or 3 of them so that they will “hold better.” A crimp is a crimp, and if you crimped correctly, there is no difference in holdability between the short and longer tubes. Each crushed crimp you add becomes like a little razor blade. All jewelry moves, so you’re increasing the chances, by using more than one crimp on each end, that one of these crimps will cut through the cable wire. One crimp on either end is enough.
– variations on quality/grade of crimp beads
Basically, you get what you pay for!
Here’s how crimp beads are made: You start with a sheet of metal. You roll the metal into a tube. You buff along the seam where the two sides meet, so that it looks like it’s been soldered together. However, there’s really a seam there.
So often, people come into our shop and tell sad tales of failed crimps and broken bracelets and necklaces. They blame themselves. They blame the pliers. But they never blame the crimp beads. In most cases, the crimp is at fault.
Cheap crimps, usually bought in small packages, usually at craft stores, are not made well. When you crush these, they tend to split along the seam. Sometimes you can see the split. Othertimes, you can’t quite see that the two sides of the tube have started to separate. Your cable wires pull out. Or your crimp edges have cut into the cable wire.
An A-grade crimp, usually costing about 3 times what the cheap crimps cost, can hold up to your initial crushing, as well as another 8 or so clamping down on it during the re-rounding process.
There are heavy-duty or A+ grade crimps. These run about 6–8 times what the cheap crimps do. You don’t have to worry about any splitting, no matter how much you work the crimp bead with your pliers.
– using 1 crimp on each end vs. using more than 1 crimp on each end
Using 1 crimp on each end of your piece is sufficient. Using more than 1 crimp on each end is too risky. Sometimes you mind, or your best friend, thinks that is 1 is good, 2 or more would be better. No! When you crush your crimp onto the wire, it becomes like a little razor blade. All jewelry moves, so your crimp is constantly trying to saw through the cable. Using more than one crimp on each end increases the chances that one will saw through. All you are doing is adding razor blades.
– size of crimp
Manufacturers are inconsistent in how they label the sizes of crimp beads. In general:
2mm is the average size For .014, .015, .018, .019 cable wires
1.5mm is small For .010 and .012 cable wires
2.5mm is slightly more than averg For .019 and .024 cable wires
3.0mm is large For .024 cable wires, or thicker cords, or bringing
more than 1 strand thru at a time
4.0mm and larger For thicker cords, or bringing 2+ strands thru
Continue Part 2: Controllers and Adapters
______________________________________________
Other Articles of Interest by Warren Feld:
Cleaning Sterling Silver Jewelry: What Works!
What Glue Should I Use When Making Jewelry?
Why Am I So Addicted To Beads?
A Very Abbreviated, But Not Totally Fractured, History of Beads
The Martha Stewart Beaded Wreath Project
When Choosing Colors Has You Down, Check Out The Magic Of Simultaneity Effects
The Use of Armature In Jewelry: Legitimate or Not?
Organizing Your Craft Workspace…Some Smart Pointers
You Don’t Choose Clasps, You Choose Clasp Assemblies
Know Your Anatomy Of A Necklace
Mini Lesson: Making Stretchy Bracelets
Mini Lesson: Making Adjustable Slip Knots With Thicker Cords
Mini Lesson: Attaching End Caps, Cones, Crimp Ends
Mini Lesson: Flat Even Count Peyote
Mini Lesson: Right Angle Weave
Everyone Has A Getting Started StoryThe Nature-Inspired Creations of Kathleen
The Jewelry Designer’s Orientation To Glass Beads
The Jewelry Designer’s Orientation To Lampwork Beads
The Jewelry Designer’s Orientation To Crystal Beads
The Jewelry Designer’s Orientation To Seed and Cylinder Beads
The Jewelry Designer’s Orientation To Choosing and Using Clasps
How To Design An Ugly Necklace: The Ultimate Designer Challenge
______________________________________________
Thank you. I hope you found this article useful.
Enroll in my jewelry design and business of craft video tutorials online. Begin with my ORIENTATION TO BEADS & JEWELRY FINDINGS COURSE.
Also, check out my website (www.warrenfeldjewelry.com).
Visit Land of Odds online (https://www.landofodds.com)for all your jewelry making supplies.
Add your name to my email list.
Subscribe to my Learn To Bead blog (https://blog.landofodds.com).