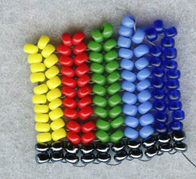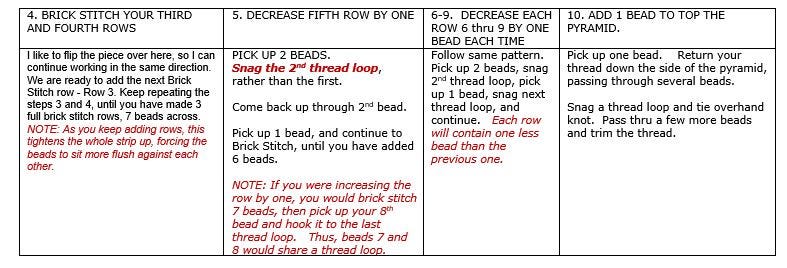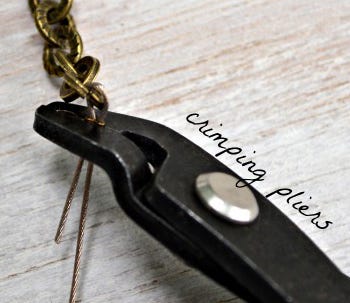
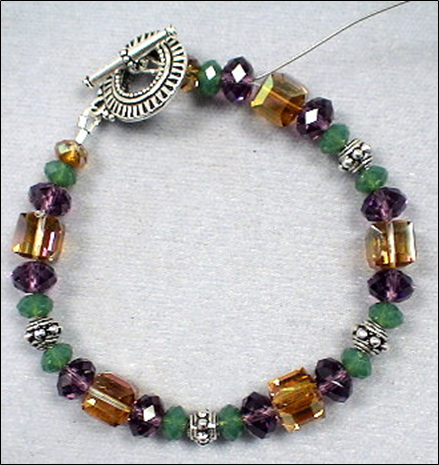
How to Crimp Using Crimp Beads, a Crimp Pliers and Flex Wire
Crimping is a technique for securing a clasp to beads strung on cable wires. Here crimp beads are used instead of tying knots.
Mechanically, crimping does three things:
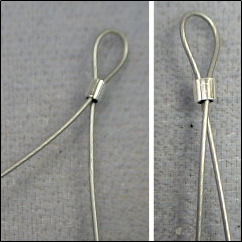
In the first steps in crimping, you need to separate two wires that lead to the clasp component. One wire is your spine — what your beads are strung on. The other wire is your tail — extra wire you will need to cut off.
Second, you need to create a lock to literally lock the two wires in place.
Last, you need to make it pretty. The crushed crimp is ugly, and you need to make it look more like a bead again.
So with your pliers and your crimp bead, you separate the wires and create a lock and make things pretty again. The process is relatively simple and requires only a little practice.
If using a traditional crimping pliers, you would follow the 4-Steps listed below.
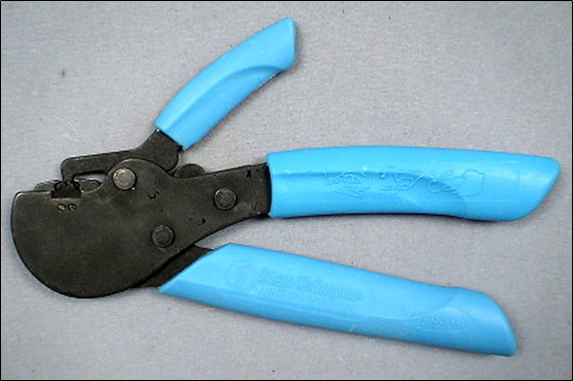
However, you can also use what is called a One-Step Crimper. This crimping pliers does all four steps in one step. If crimping is a technique that you will be doing often, then I suggest investing in a One-Step Crimper.
My warnings to you:
(a)Usually the instructions on the package that comes with your crimping pliers is inadequate to the task. Better designers know this from experience. Less experienced designers, however, rely on these inadequate instructions.
(b) There are over 55 different crimping pliers on the market. The only ones that truly work are the original and the more recent One-Step Crimper. The originals are made in China. I’ve noticed that the major craft stores now sell copies of the original ones. These are made in India. Total disaster. They don’t do the job at all because they have a poor configuration of the jaws.
(c ) When students and customers say they are having trouble crimping, they usually blame themselves or the pliers. What I have found is that have bought cheap crimp beads, usually from one of the craft stores. With crimp beads, you get what you pay for. The plated aluminum ones sold in craft stores break when you crush them. The cheap sterling ones have nickel in the alloy (sterling is 92.5% silver and 7.5% something else we call an alloy), which makes the sterling brittle. Sterling is supposed to have copper in the alloy, which makes it malleable, but many manufacturers substitute nickel to keep the cost of sterling down.
Successful crimping requires that you understand the following:
1 . Which cable wires are best for which projects
2 . How the materials you use affect your success
3. The mechanical process itself, how it works, why it works, and why we do each step
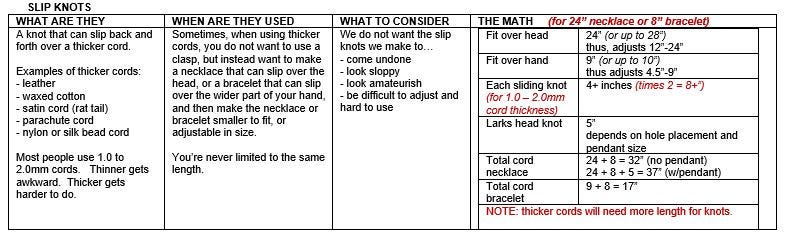
CABLE WIRES
Cable wires are nylon coated, braided wires and are very flexible. These are made for stringing.
[What is called Hard Wire — wire that is not braided and is not encased in nylon — in contrast, is not meant for stringing.]
Cable Wires come in 3 quality grades.
Tiger Tail.The low end is called Tiger Tail. Tiger Tail was the original cable wire product. Today it is the low end of the cable wire line. Most spools of Tiger Tail do not have the words “tiger tail” on their labels. You know it is Tiger Tail because of the price — typically $5.99 or less for a 30ft spool you would find in a bead or craft store.
Tiger Tail wire breaks very easily in and of itself. It kinks easily, and even with the beads on the wire, the kink often shows. The way you attach Tiger Tail to a clasp is that you take the wire through the loop on the clasp, and tie an over-hand knot. You can tie a single knot or a double knot. This actually gives you a very secure connection to the clasp. This is one positive of Tiger Tail.
Unfortunately, when you use crimp beads with Tiger Tail, they too easily cut into the Tiger Tail and make it break. So that is why we suggest tying knots. If you do not like the look of the knotted cable wire here, you can either use beads on each end and which have larger holes so that they swallow the knots. Or, you can slide a crimp cover over the knots, press the two ends on the cover together, and you have something that looks a like a bead to hide your knots.
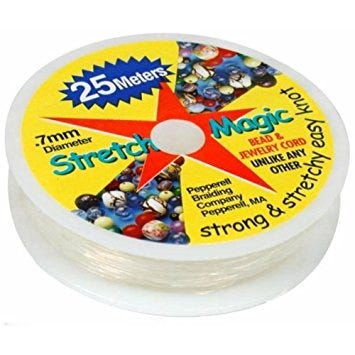
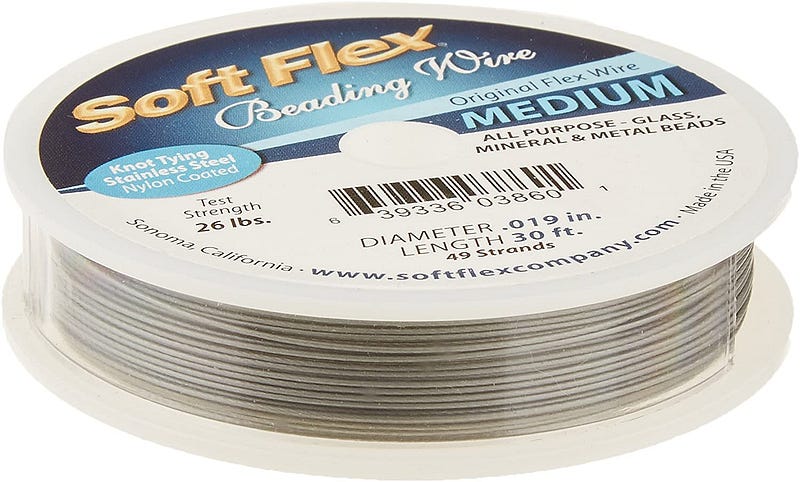
Flex Wire. The middle quality level — what I suggest people start with, if they want to use cable wire as their stringing material — is called Flex Wire. This wire does not break easily. It does not kink easily. However, it is difficult to tie into a knot. So, we use a crimp bead to secure the wire in place.
The price on this is considerably more than the Tiger Tail. It will start between $10.00 and $20.00 for that 30-foot spool.
Professional or Artistic Wire. The top of the line is referred to as Professional or Artistic Wire. Most of these wires are very expensive, and we don’t suggest this level as the place to start.
There are many brands of cable wire. I am particularly fond of two brands — Soft Flex and Flexrite. I find the wire of other brands too stiff, and sometimes not strong enough.
Cable Wires come in different diameters or widths, usually stated in inches.
We recommend the following:
.014″ — .015″ for necklaces: here you want the best drape you can get, and still have a durable piece
.018″ — .019″ for bracelets: here you want the most durability, yet your piece still feels good when worn
.019″ — .024″ for eyeglass leashes: here durability is you primary factor
About Selecting Cable Wires
There is a lot of information on the labels of cable wires. However, while most of this information is necessary, it is not sufficient for determining which wire is best.
The only true measure of cable wire strength is called Tensile Strength, and you will not find this information on the labels. The strength of a cable wire will come from what the wire is made of, what the nylon sheathing is made of, and how thick that nylon sheathing is. You cannot assume that a 49-strand product is stronger than a 21-strand product, without knowing more about the wire composition and the sheathing. That 49-strand product may actually be weaker.
Nor can you assume that a product, the label of which indicates 20-pound strength is necessarily stronger than a product that indicates 10-pound strength. “Pound Strength” is very unreliable as a measure. In most cases, these pound strength numbers on the label are somewhat made up.
Governments provide two definitions for pound strength — what it takes to hold up a fish of a certain weight, and what it takes to reel in a fish of a certain weight. But they leave it up to the factory to determine exactly how to measure and report pound strength. So you are at the mercy of some factory worker in a place like Taiwan, high on Toluene, having the motivation to maintain a pound strength standard.
On most cable wire products, measures of pound strength are not included. Many years ago, pound strength was listed on all cable wires. The people at the factories responsible for the labels, however, could never get the same pound strength listed from batch to batch. One time it might list 20 pounds; another 2 pounds; another 6 pounds; then back to 20 pounds. So the manufacturers told them to leave this information off.
It is very difficult to compare cable wires across brands. Each company organizes its line, from low end to high end, differently. Some companies, like Beadalon, use 7-strands for Tiger Tail, 19-strands for Flex wire, and 49-strands for their Professional wire. But other companies do not use this ordered arrangement of number of strands to quality. In the Soft Flex line, their top-of-the-line 7-strand product is stronger than their 49-strand middle-range product. And don’t assume one brand’s 49-strand wire is equivalent to another’s. They are not. The Soft Flex 49-strand middle range produce is stronger and more subtle than Beadalon’s top of the line 49-strand product.
I actually only recommend 2 brands — Soft Flex and Flex Rite. These are considerably stronger and more subtle than other brands.
Know this: What makes cable wire strong is the nylon sheathing’s ability to maintain the twist in the cable wire. As soon as the integrity of the nylon sheathing is violated, the wires inside immediately untwist and break. I find that the nylon sheathing on most brands is very thin, sometimes porous, and weak chemically.
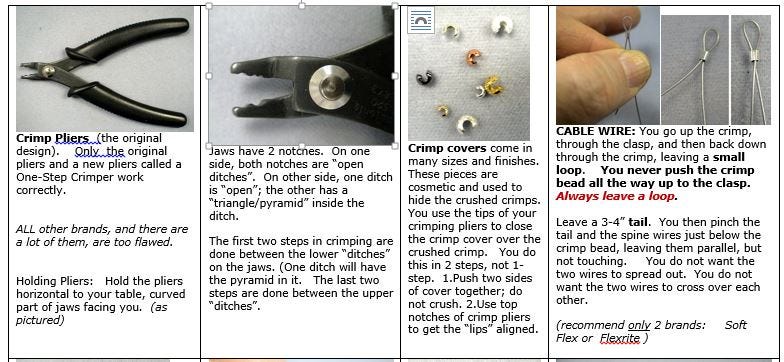
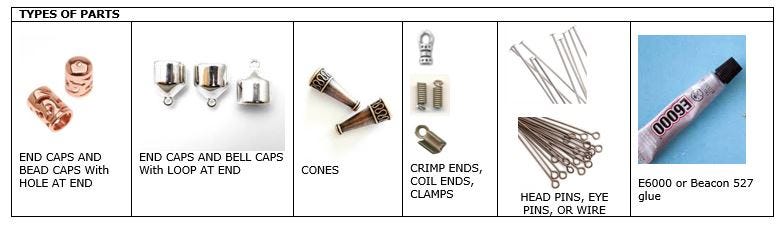
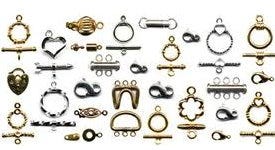
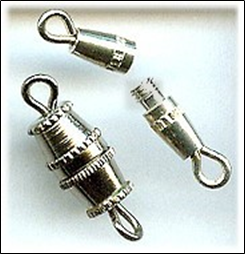
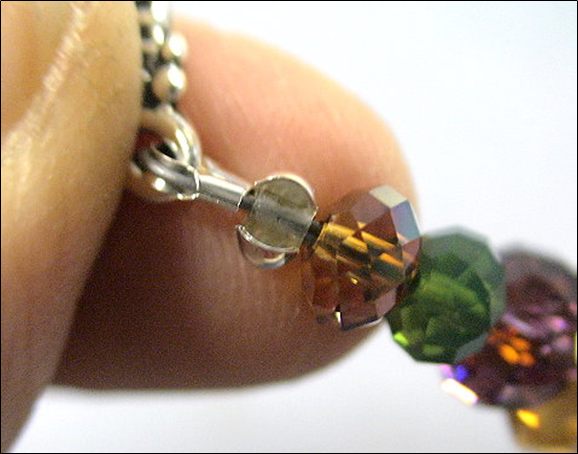
CRIMP BEADS, CRIMP COVERS, and HORSESHOE WIRE PROTECTORS
Crimp Beads
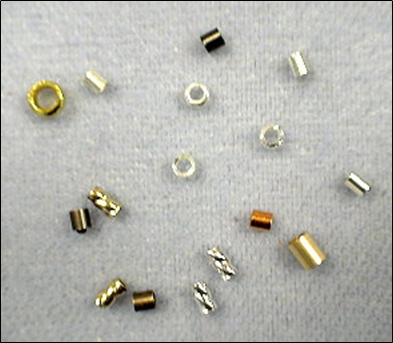
Crimp beads come in many styles, sizes and finishes. These are used to secure cable wires to clasps. You take your cable wire up through the crimp bead, through the loop on the clasp, and back down through the crimp, forming a loop. The crimping process involves crushing the crimp onto the cable wire loop, first, separating the tail and spine wires, then, locking them in place, and finally, re-shaping the crushed crimp so it looks like a bead again.
Sterling silver crimps are usually made the best, especially ones you buy in places other than the big craft stores. For plated crimps, if they are plated over brass (and years ago, they all were plated over brass), than they were very good. Brass is your best jewelry metal. The major issue was that the plating would wear off and you would have a black crimp (basically, tarnished brass). Now, most plated crimps are over aluminum. These break easily when crimped.
I tend to use sterling silver crimps for every piece, though my crimp covers and horseshoes may or may not be sterling, based on the value of the piece, and the finish colors I want to end up with.
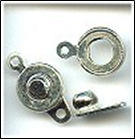
Crimp Covers
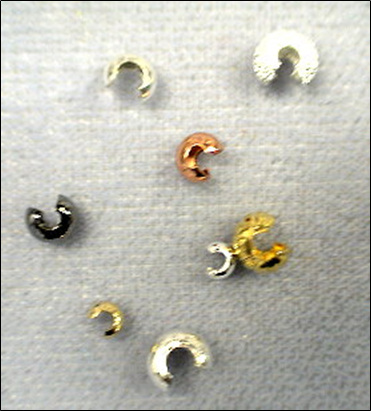
These are U-shaped parts that slip over the crushed crimp. You can slide crimp covers over your crushed crimps. You can also use these to slide over any knots, to hide the knots. Crimp covers come in different sizes, finishes, and texturing. Crimp covers are optional pieces. They act as lamp-shades to hide something ugly, but they serve no structural role, per se.
Closing a crimp cover is done in 2-steps, not one.
(1) Using the tips of your crimping pliers, you push the two sides of the U together, so you have a pretty bead. These are made of a soft metal, so you don’t want to push too hard, or you will crush them. After you get the two sides to meet, you’ll find that the lip on either side doesn’t meet up perfectly, line up perfectly or close perfectly.
(2) At this point, you return the crimp cover to your crimping pliers, this time resting it between the top notch in each jaw. Gently push the jaws to force the lips to meet more perfectly. Sometimes you have to position the pliers in an awkward or odd position, in order to push in the desired direction. The two half-cup shaped ditches in the top position on each jaw helps to keep your crimp cover rounded while you apply pressure to it and shift the relative positioning of each open side.
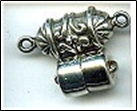
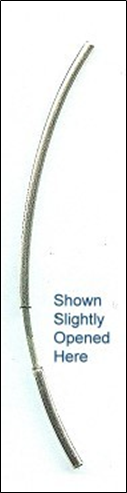
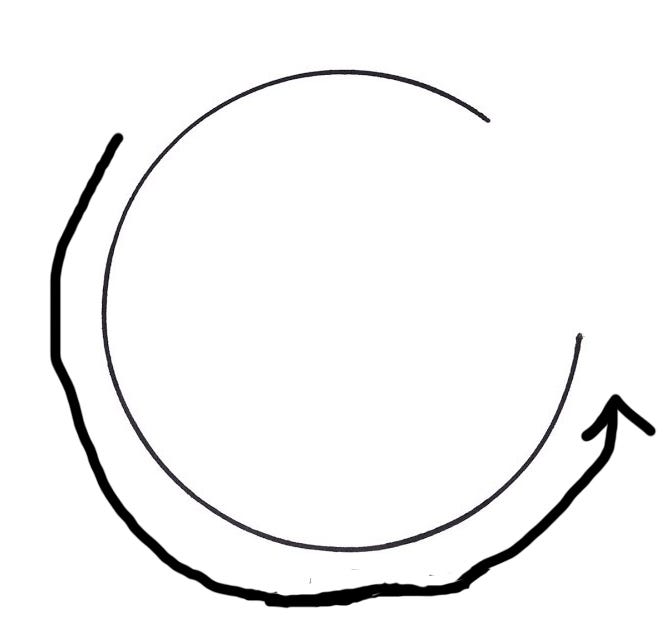
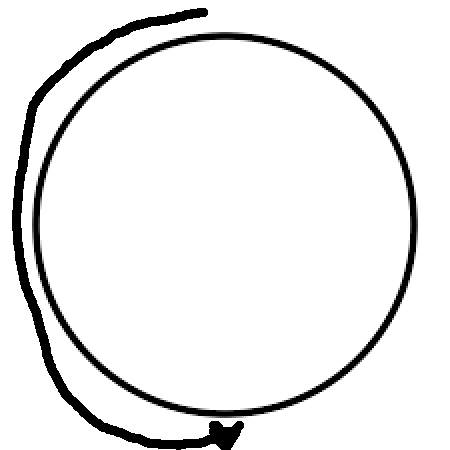
Horseshoe Wire Protectors
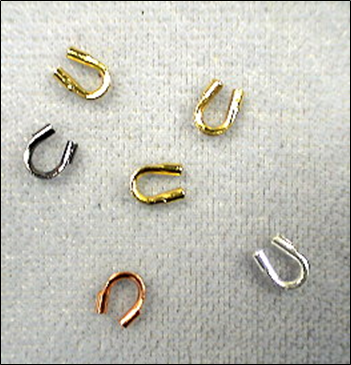
This part is basically a bent tube, with the top of the tube at the arch cut out. These come in many finishes and metals. There is some variation in size relative to how wide an opening the tube has.
Using these serve several purposes.
It forces you to leave the correct size loop in the cable wire, so that you have the appropriate support system or jointedness. Without the loop, you would be pushing the crimp all the way to the clasp. This is a No-No. You never push the crimp all the way to the clasp — this creates stiffness with metal parts, and general movement would cause these to break.
The horseshoe also makes the loop more finished looking — better than a bare-wire loop. Your eye/brain wants you to push the crimp all the way to the clasp. It hates a bare, exposed loop. The horseshoe fools the eye/brain here, making it think that the loop is finished and more organically a part of the whole composition.
The horseshoe prevents the cable wire from folding into a “V-shape” over a period of time and wear. If the wire were to change from an arched loop to a V-loop, the wire then would more easily bend back and forth and eventually break.
You will find that the legs of some horseshoes you will buy have too-narrow openings and won’t fit your cablewire. Also, the thickness of the cablewire along its length will vary somewhat. And sometimes where you cut your cablewire, it sometimes broadens or flattens out the end, making it too big to shove up into the leg. The morals here: have extra horseshoes on hand, and be prepared to cut off some more of the cablewire to get to that area on the wire that has the perfect width.
There are many choices to make when selecting crimp beads:
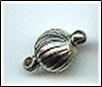
– Do you want to use a tube shape or a round shape
A crimp is a crimp. There is no difference in “holdability” between the tube and the round, but most people prefer the tubes. They sense that the tube covers more area, so it will be more secure.
A round bead actually starts as a tube. They blow air into the tube to puff it up and make it look round.
– If you want to maintain a silver color, how do you do that?
You have several choices here, each with pros and cons. You can use a sterling silver crimp. Sterling silver softens at body temperature. If your sterling crimp rests on the wrist or the neck, there is some risk that it will soften and release its hold. From experience, this risk, if you have crimped correctly, is very small, but the risk exists.
Another option is to use a silver-plated crimp. Silver plated crimps are plated usually over brass. Brass is your best jewelry design metal. Once you crush that brass, you never have to lose any sleep over it. Unfortunately, the plating wears away somewhat quickly, and you are left with a black crimp — basically tarnished brass.
Some people use silver plated crimps and slide sterling crimp covers over them. This adds about $0.90 per piece.
Another option: Use an argentium silver crimp. Both argentium silver and sterling silver are 92.5% silver. It’s the alloy that is different. Argentium is more expensive. There is no risk of argentium silver softening at body temperature.
– How do you achieve a satisfactorily re-rounded bead?
In the traditional crimping processing, you flatten the crimp and then you re-round it so that it looks like a bead again. You do not end up with a great look. Some people can live with this; for others, they are bothered by not seeing a perfectly round bead again.
There is a crimping pliers, which I do not recommend, called the Magical Crimping Pliers. This re-rounds that bead perfectly, but I find, in doing so, it weakens the hold.
You can always crush your crimp bead, and then slide a crimp cover over it, to get that pretty look.
– How many crimp beads should you use on each end — 1 crimp or more than one?
If you have crimped correctly, using 1 crimp on each end of your piece is more than sufficient, even if your beads are very heavy.
Using more than 1 crimp on each end is too risky. Sometimes your mind, or your best friend, thinks that if 1 is good, 2 or more would be better. No! When you crush your crimp onto the wire, it becomes like a little razor blade. All jewelry moves, so your crimp is constantly trying to saw through the cable. Using more than one crimp on each end increases the chances that one will saw through. All you are doing is adding razor blades.
– Should you use a plain tube or a twisted tube?
The twisted tubes (sometimes called Tornado or Cyclone crimps) are a little more expensive than the plain ones. When you crush the twisted tubes, they look decorative enough that you don’t have to re-round them. You definitely need to re-round the plain ones.
– Should you use regular and long tubes or short and half tubes?
Short tubes or half tubes are primarily used in pieces like illusion necklaces, where you have a cluster of beads, and the cord shows, another cluster of beads, the cord shows, etc. Half tubes are used on either side of the clusters to keep the beads in place. When you crush the half tube, the volume of space it takes up is not noticeable. When you crush the regular sized tube, its volume of space is too noticeable and detracts from the general look of the piece.
One mistake people make with the short or half tubes, is that, when they use them to finish off the ends of jewelry, their mind tells them, since these are shorter than usual, to use 2 or 3 of them so that they will “hold better.” A crimp is a crimp, and if you crimped correctly, there is no difference in holdability between the short and longer tubes. Each crushed crimp you add becomes like a little razor blade. All jewelry moves, so you’re increasing the chances one of these crimps will cut through the cable wire. One crimp on either end is enough.
– Are there differences or variations on quality/grade of crimp beads?
The short answer is Yes! Basically, you get what you pay for!
Here’s how crimp beads are made: You start with a sheet of metal. You roll the metal into a tube. You buff along the seam where the two sides meet, so that it looks like it’s been soldered together. However, there’s really a seam there.
So often, people come into our shop and tell sad tales of failed crimps and broken bracelets and necklaces. They blame themselves. They blame the pliers. But they never blame the crimp beads. In most cases, the crimp is at fault.
Cheap crimps, usually bought in small packages, usually at craft stores, are not made well. When you crush these, they tend to split along the seam. Sometimes you can see the split. Othertimes, you can’t quite see that the two sides of the tube have started to separate. Your cable wires pull out. Or your crimp edges have cut into the cable wire.
An A- grade crimp, usually costing about 3 times what the cheap crimps cost, can hold up to your initial crushing, as well as another 8 or so clamping down on it during the re-rounding process.
There are heavy-duty or A+ grade crimps. These run about 6–8 times what the cheap crimps do. You don’t have to worry about any splitting, no matter how much you work the crimp bead with your pliers.
– How do you know what size of crimp bead to buy?
Manufacturers are inconsistent in how they label the sizes of crimp beads. In general, although you may not know exactly what their measurement refers to, when they list:
2mm, this is the average size For .014, .015, .018, .019 cable wires
1.5mm, this is small For .010 and .012 cable wires
2.5mm, this is slightly more than average For .019 and .024 cable wires
3.0mm and 4.0mm, these are large for .024 cable wires, or thicker cords, or bringing more than 1 strand through at a time
LET’S PRACTICE OUR CRIMPING
How to Crimp Using Crimp Beads, a Crimp Pliers and Flex Wire
Supplies:
2mm sterling silver crimp tubes
silver plated crimp cover
silver-plated horseshoe wire protectors
.019” soft flex cable wire
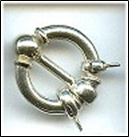
toggle clasp
enough beads to make a bracelet
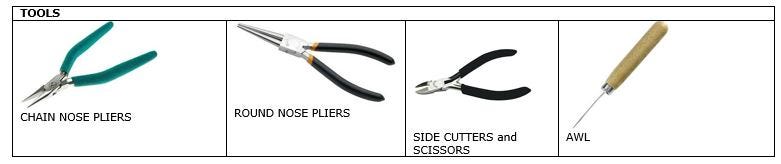
Chain Nose Pliers
Crimping Pliers
Flush Cutters or Cable Wire Cutters
Work Surface
Bracelet Sizing Cone
Bead Board
Bead Stoppers or Hemostats
Before we get started on our bracelet, we are going to practice crimping.
The Traditional Crimping “Pliers”
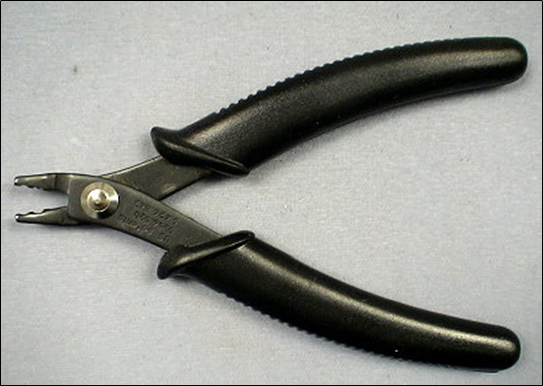
The traditional crimping pliers works with all sizes of crimp beads. In fact, I find it works better than most other types of crimping pliers, whether the micro-crimpers, macro-crimpers or magical crimpers.
If you look closely at the jaws, you will see that each jaw has two notches or ditches on it. The bottom notch or ditch in each jaw (those closest to your hand) is a full ditch on one side, and a ditch with a pyramid or triangle in it on the other side. It is important that you be able to see that pyramid. This is critical to the crimping process. Sometimes when you buy these, and other times when you use these awhile, the pyramid isn’t there or wears away.
The top notch in each jaw (furthest from your hand) has a full ditch on either side.
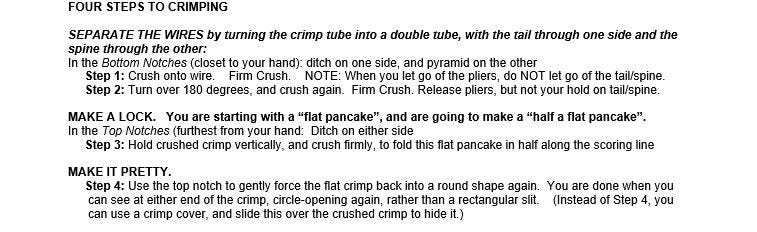
There are four steps in the crimping process. Basically, you use the crimping pliers first to separate the two wires (spine and tail), then second, to lock them in place. The last step is to make things pretty again.
We do the first two steps using the bottom notch in each jaw. We do the last two steps using the top notch in each jaw.
Hold your pliers parallel to the table, with curved part of jaws facing you.
The “Loop”

Position the crimp and the wires, so you leave an adequate “loop” (joint).
The clasp should be able to move freely.
You never push the crimp bead all the way up to the clasp.
Your eye/brain cognition wants you to push the crimp all the way up to the clasp; it sees the bare loop as ugly. You must fight your inner self on this, in order to build in appropriate level of support or jointedness. You are going to have to sacrifice some beauty in order to build in more durability and adaptability to movement.
When crimp/wire/clasp are too tight, and can’t move, then you basically have stiff metal bending back and forth against itself, and it breaks. If the bare loop bothers you, you can always cover the loop with 15/0 or 11/0 seed beads, or 13/0 charlottes.
Or you can use a horseshoe wire protector to cover the loop. What I like about the horseshoe wire protector is that it forces you to leave an ideal sized loop, and also makes what was a bare loop look very finished and appealing.
The “Tail”
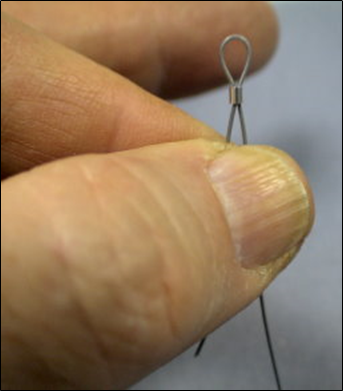
You need to leave about a 3–4” tail on either side. You want to hold the tail so that it runs parallel to the spine, though not touching.
When you crimp by closing and letting go of your pliers, don’t let go of the tail. This is a mistake many people make. When they let go of the pliers, they let go of the tail. Don’t do this. If you let go of the tail at the same time, the tail will either bend over far to one side, creating a “V” with it and the spine. Or, it will cross over the spine.
When we trim our tails, we do not cut them off at the crimp. Instead, we feed back the tail through at least the first (or last) bead, and preferably several other beads, and then cut the tail as close to the hole of the bead it is exiting as possible. You want to be sure that at least your first bead and your last bead have large enough holes, so that they can slip over both the spine and the tail.
Tail sticking out too far and tail crossing over wire:
Finishing Your Piece Off and TrimmingThe Tails
On the first side of your bracelet or necklace, you secure your clasp component with your crimped wire. You then string on your beads. You want at least the first bead, and preferably several beads to slip over both the spine and the tail wires. When you get to the other side, you will add your crimp bead and horseshoe wire protector, slide your remaining clasp component over the tail up into the horseshoe. You need to have a 3–4″ tail remaining. Grab your tail, and bring it back through (top to bottom) of your crimp bead, and through at least your last bead, and preferably several beads.
Now you want to pull things tight, but not too tight, before you crimp that second crimp bead. Hold onto your clasp (or your horseshoe wire protector ) with one hand, and pull the wire with the other, to get everything tight, but not too tight. You do not want your bracelet to have poor “ease” and be too stiff. You should test the length of the bracelet one more time, using a sizing cone or someone’s wrist. Make any necessary adjustments to ease and length.
If your tail is showing on your first side of the bracelet, then trim it off now. Flush cutters or cable wire cutters work well here. If you pull your tail away from the bead, this creates a bit of tension, and when you cut the wire, the wire coming out your bead will pull back a bit into the hole of the bead.
If you haven’t been able to cut the wire flush enough with the bead, and some wire is poking out, work it with your fingers into the hole of the next bead on the string.
Re-check your length and ease.
Now crimp your ending side. Trim the remaining tail as close to the hole of your bead as possible.
NOTE: If you can’t work the tail back through the first bead, then cut it off as close to the crimp as possible. There will be two sharp edges. One will be the crushed crimp itself. The other will be the cable wire. You can’t really cut the wire totally flush with the crimp, so a little bit of a nipple will be protruding. Use an emery board or nail file or metal file and smooth out the rough edges of the crimp, and sharp point of the cable wire. Feel with your finger, until it is smooth. This is not your best option. Your piece will look less finished and be less secure.
Camouflaging the Crimp Bead
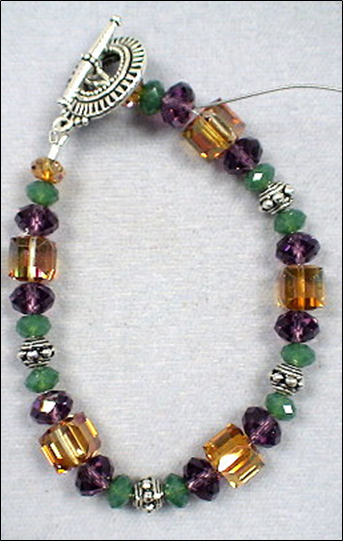
You can always make your crimp beads the second and next to last beads, instead of the first and last. In this case, the crimp will look like it is part of a pattern. The ends will look very finished.

Let’s Crimp: A Practice Exercise
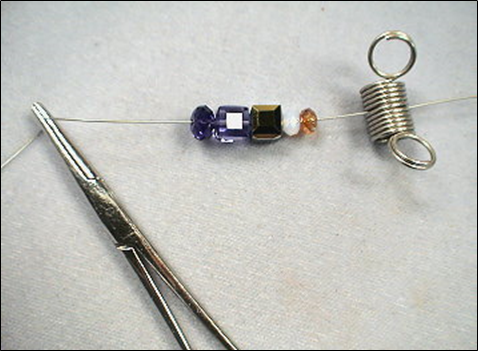
Cut a 15″ length of cable wire.
Horseshoe on first. Take your horseshoe wire protector, holding it so that the arch is toward the ceiling and the legs are to the floor. Take your wire from floor to ceiling, up into the leg, over the arch, and back down through the over leg. Give yourself a 3–4″ tail past the horseshoe.
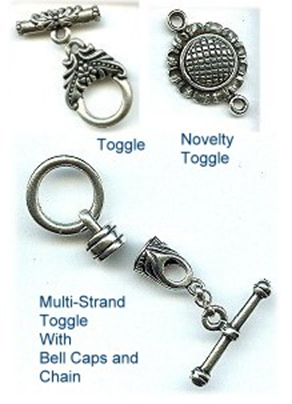
Slide on clasp component. Take your tail wire through the loop on the ring end of your Toggle clasp, and slide that ring’s loop right up into the horseshoe.
Add Crimp Bead. Slide a crimp bead onto the spine of your cable wire, and bring it all the way up to the legs of the horseshoe. As you get close to the tail, you want your crimp to slide over both the spine and the tail.
Pinch the legs of the horseshoe closer together, and get your crimp as close to the legs as possible. You can use your fingers or the tips of your crimping pliers to pinch the horseshoe legs.
Be sure your have left yourself as 3–4″ tail. Make any adjustments.
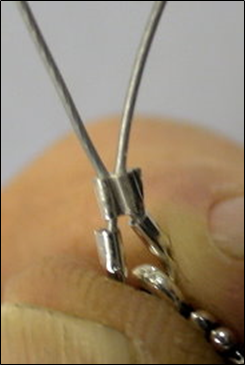
Crimp. Now grab your crimping pliers, holding them parallel to your table, curved part of the jaws bending towards you.
Pinch the tail and spine near to your crimp bead with your thumb and forefinger, making sure that your tail is parallel, but not touching, the spine.

In Bottom Notches (closet to your hand):
ditch on one side, and pyramid on the other
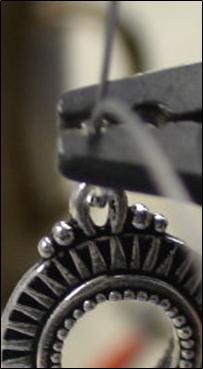
STEPS 1 and 2: Your goal is to separate the wires. The pyramid in your pliers jaw pushes the wires apart, and makes a scoring line down the middle of your crimp, turning it into a double-tube, one wire in each channel.
Step 1: Crush
Sit your crimp bead between the bottom notches in each side. The loop/horseshoe should be laying horizontally, parallel to the table.
Crush the pliers all the way down onto the crimp bead, and let go of the pliers (but not the tail).
Step 2: Turn over 180 degrees, and crush again
When we crushed the first time, the part of the crimp closest to our hand crushed down, but the part furthest from our hand actually flared out a bit. In Step 2, we crush down the part that had flared up.
You end up with a flat pancake. If you look at this flat pancake, you will see a scoring line down the middle. This line was made by our pyramid.
So we turn the crimp over to its other side, and crush again.
In Top Notches (furthest from your hand): Ditch on either side
STEP 3: The goal is to create a lock.
Step 3: Fold flat pancake to make half-a-flat pancake
Sit your crimp bead between the top pair of notches. Hold so that your loop/horseshoe is vertical, thus perpendicular to the table.
Hold the crushed crimp vertically, and crush, to fold this flat pancake in half along the scoring line. You end up with half a flat pancake.

STEP 4: Your goal here is to make things pretty.
Step 4: Re-Round
Use the top notches to gently force and push the flat crimp back into a rounded tube shape again. If you look at either end of the crimp — from the loop end and from the tail end — you want to see a circular shape again, rather than a rectangular slit. It’s best to keep your pliers steady in one place, and turn your wire/crimp bead as you work the pliers. You do not CRUSH; you PUSH on the metal with your pliers to re-round.
Now, your crimp bead is wider than the width of the jaws the pliers. So, you will have to work the top and bottom of the crimp a little bit independently, so that both ends are round again.
NOTE: Instead of Step 4, you can use a crimp cover, and slide this over the crushed crimp to hide it.
But if using a crimp cover, be sure to do Steps 1 thru 3.
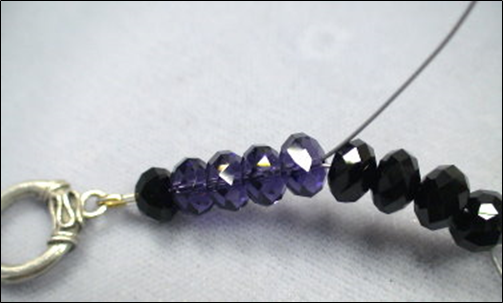
Putting The Beads On.
If you were creating a piece from scratch, and not following a pattern, you would probably use something like clamps, hemostats or bead stoppers. You would cut a length of cable wire — about 12″ more than the bracelet or necklace length you want to end up with. You lay out all your beads and the parts of the clasp assembly on a bead board or other work surface. Then you would clamp one end of your cable wire, slide beads on, and clamp the other end. This would let you add and subtract beads, or change your mind about the patterning, before you finished off the ends with the clasp assembly.
Otherwise, if you are following a particular pattern, you would start by securing one end with a crimp bead, and stringing the rest of the beads on. You would cut your cable wire — about 12″ more than the bracelet length you want to end up with.
Lay out all your beads and the clasp assembly parts on the bead board or some other work surface, in the order they are to be used.

You would attach the largest part of your clasp first — with Toggles, this is the ring — on one end, crimping it in place, and leaving a 3–4″ tail.
Slide on your beads, following the pattern. At least your first bead should slide over both the spine and the tail.
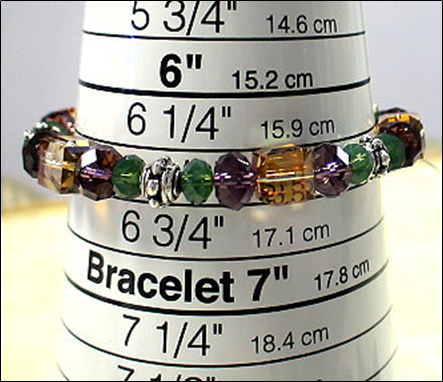
Determine the fit — both length and ease — by clamping or holding with your fingers the open end, and encircling a sizing cone or someone’s wrist with your bracelet. Remember here that the other end of the clasp will add another 1/2″ to this length.
“Ease” — You do not want to pull the cable wire too tight, making it stiff, thus uncomfortable to wear. And you do not want to pull the cable not tight enough, thus allowing the cable wire to show between the beads and the beads and the clasp.
Adjust the number of beads, if necessary.
Add your crimp bead, horseshoe wire protector, the other end of the clasp — in our case, the bar.

Don’t actually crimp things on this side, or trim your tail yet.
Slide the tail back through some beads. Pull tight enough to get an acceptable ease. Test the length and ease again.
When satisfactory, do your final crimping. Slide the tail through some more beads, if possible. Trim the tails on both ends.
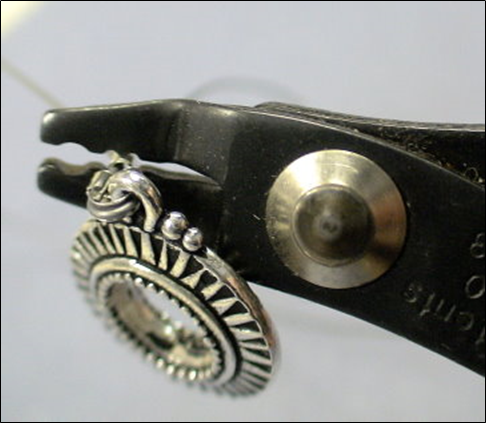
Using a Crimp Cover

Use your pointer finger as an easel and your thumb as a clamp.
Sit your crimp cover on the top of the pad on your pointer finger, as if the cover were a cradle (open side up).
Set your crushed crimp on your cable wire right inside the crimp cover.
Immediately, clamp down over the loop/clasp part with your thumb. Your thumb is pushing down on the wire loop/clasp, so that the crimp cover can’t move.
We close the crimp cover in 2 steps.
Take your crimping pliers, and use the tips of each jaw. With these tips, push the opening of the crimp cover closed as best as you can. Press firm but gently. It is easy to crush these crimp covers. The two lips on each side will not meet perfectly, will not be aligned, and there may be a gap.
The second step is to put the crimp cover between the two top ditches on your crimp pliers (both ditches are open), and gently push to get things in place.
You may have to orient your pliers in some weird angles to get the two halves of your crimp covered lined up correctly.
Give It The Once Over…
Once your bracelet is done, look it over carefully. Be sure your cable wire isn’t showing. Be sure that it has sufficient ease.
Other Articles of Interest by Warren Feld:
Cleaning Sterling Silver Jewelry: What Works!
What Glue Should I Use When Making Jewelry?
Why Am I So Addicted To Beads?
A Very Abbreviated, But Not Totally Fractured, History of Beads
The Martha Stewart Beaded Wreath Project
When Choosing Colors Has You Down, Check Out The Magic Of Simultaneity Effects
The Use of Armature In Jewelry: Legitimate or Not?
Organizing Your Craft Workspace…Some Smart Pointers
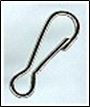
You Don’t Choose Clasps, You Choose Clasp Assemblies
Know Your Anatomy Of A Necklace
Mini Lesson: Making Stretchy Bracelets
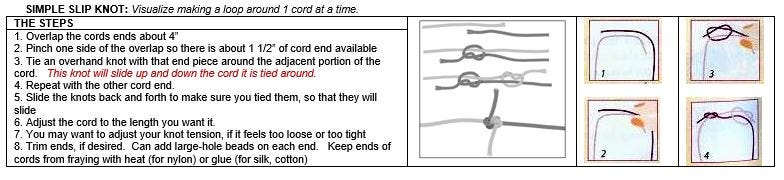
Mini Lesson: Making Adjustable Slip Knots With Thicker Cords
Mini Lesson: Attaching End Caps, Cones, Crimp Ends
Mini Lesson: Flat Even Count Peyote
Mini Lesson: Right Angle Weave
Everyone Has A Getting Started Story
The Nature-Inspired Creations of Kathleen
The Jewelry Designer’s Orientation To Glass Beads
The Jewelry Designer’s Orientation To Lampwork Beads
The Jewelry Designer’s Orientation To Crystal Beads
The Jewelry Designer’s Orientation To Seed and Cylinder Beads
The Jewelry Designer’s Orientation To Choosing and Using Clasps
I hope you found this article useful. Be sure to click the CLAP HANDS icon at the bottom of this article.
Also, check out my website (www.warrenfeldjewelry.com).
Subscribe to my Learn To Bead blog (https://blog.landofodds.com).
Visit Land of Odds online (https://www.landofodds.com)for all your jewelry making supplies.
Enroll in my jewelry design and business of craft video tutorials online.
Add your name to my email list.