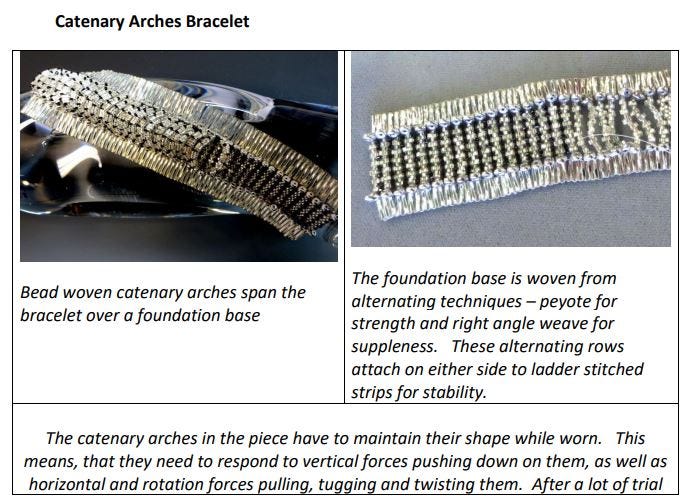
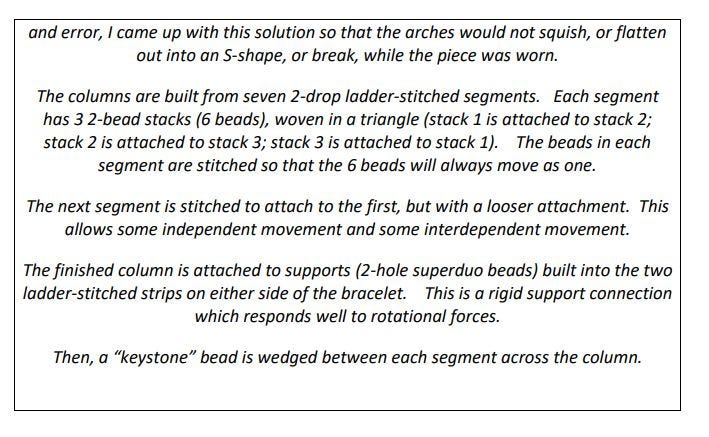
TECHNIQUES AND TECHNOLOGIES:
Knowing What To Do
Warren Feld, Jewelry Designer
warren@warrenfeldjewelry.com

(Begin Top Left) Bead Stringing, Bead Weaving, Wire Working, Metalsmithing
Abstract: Jewelry Making Techniques bring materials together within a composition. Techniques construct the interrelationship among parts so that they preserve a shape, yet still allow the piece of jewelry to move with the person as the jewelry is worn. And Techniques manipulate the essence of the whole of the piece so as to convey the artist’s intent and match it to the desires of wearer, viewer, buyer, seller, exhibitor, collector, student and teacher. Technique is more than mechanics. It is a philosophy. Thoughts transformed into choices. Part of this philosophy is understanding the role of technique to interrelate Space and Mass. Space and Mass are the raw materials of jewelry forms. Technique reduces the contrast between them in a controlled way and with significance for designer and client. Techniques have special relationships to light, texture and ornamentation. Technology enables us to expand our technical prowess with new materials, processes, styles and forms
TECHNIQUES AND TECHNOLOGIES:
Knowing What To Do
Technique is Knowledge, Value, Creation
Jewelry Making Techniques are more than mechanics.
Techniques are ways to implement ideas. To transform thoughts and feelings into choices.
Techniques are knowledge, value and creation.
Jewelry Making Techniques bring materials together within a composition. Techniques construct the interrelationship among parts so that they preserve a shape, yet still allow the piece of jewelry to move with the person as the jewelry is worn. And Techniques manipulate the essence of the whole of the piece so as to convey the artist’s intent and match it to the desires of wearer, viewer, buyer, seller, exhibitor, collector, student and teacher.
There are many different kinds of jewelry making techniques, as well as strategies and variations for implementing them. In fact, the jewelry designer has no proscriptions, no prescriptions, no expectations, no limits on how she or he decides to compose, construct and manipulate materials and structures and supports. It can be a technique that is learned. It can be one approximated. It can be totally new, emergent and spontaneous. It can be socially acceptable or not. The designer can pull, tug, press, cut, carve, sculpt, emboss, embellish, embroider, sew, knit, weave, coil, bend, fold, twist, heat, cool, assemble, combine, dissolve, destruct, cast, wrap, solder, glue, wind, blow, or hammer.
In reality, it is impossible to discuss meaningfully the technique apart from the ideas, abilities and experiences of each jewelry designer, particularly in reference to knowing when a piece should be considered finished and successful. There will be some variations in how any designer applies a technique. This is called skill. One might pull harder or hammer harder than another. One might allow some more ease or looseness than another. One might use easy solder where another might choose hard solder. One might prefer a thinner thickness or gauge of stringing material, and another a thicker one. One might leverage the structural properties of one material, while another might choose other materials with different properties towards the same end. One might apply the technique, following Step XYZ before Step ABC, and another, apply the technique in reverse, altering the steps to be XYA and ABZ.
But our primary focus here is on technique apart from skill. This lets us see why some designers are masterful at technique, while others are not.
While there are a lot of different methods and applications designers can choose from, all too often, however, when selecting techniques, jewelry designers fail themselves (and their clients). They disappoint. They do not understand how to select techniques. They do not fully understand the basic mechanics. They do not fully understand the expressive powers of techniques.
Because of this, they are unaware of the responsibilities, as artist and designer, which come with them. In turn, they make inadequate choices. They might choose the simple, the handy, the already learned. They might choose what they see other designers using. They might choose what they see in magazines and books and videos which get spelled out in Step1-Step2-Step3 fashion.
But often they are naïve in their choices. They lack an understanding of technique and its philosophy. They do not understand that there are lot of things more to any technique beyond its simple mechanics. Techniques are not step-by-step. They are a collection of knowledge, skill, understanding, choices, decisions, tradeoffs, intents with implication and consequence. Techniques anticipate shared understandings between artist and audience about finish and success.
Moreover, jewelry designers often do not recognize that each and every technique can and should be varied, experimented and played with. They do not understand that techniques do not work or accommodate every situation. That is, jewelry designing is not a “Have-Technique-Will-Travel” type of professional endeavor. Techniques need to be selected and adapted to the problems or contexts at hand.
They do not understand that there is more to techniques than securing an arrangement of elements. They do not understand that techniques must find some balance or tradeoffs between maintaining shape(s) and managing support(s), that is movement, drape and flow.
They do not understand how their choice of technique, and the decisions they make about how to apply it, influence the response of others to jewelry materials and forms they create. Technique, compounded by skill, can be very determinative of outcome.
SPACE AND MASS AND A PHILOSOPHY OF TECHNIQUE
Space and Mass are the raw materials of jewelry form. Space is void. Mass is something. Some jewelry depends more on the expression of Space; others more on the expression of Mass. Whatever the designer’s goals and intents, Technique permits a reduction of the contrast between space and mass. Towards this end, Technique communicates the significance of a mass within a space by controlling it. Publicly demonstrating this control communicates intent, meaning and expressiveness.
The jewelry artist begins by confronting a void. There is space, but there is nothing in it. Space.
Into this space or void, the artist introduces mass. This may begin with a point or a line or a plane or a specific shape or color or texture or pattern. More mass is added. Mass.
The designer sets boundaries, places and distributes things, brings things together, determines the scale, signifies directions and dimensions. The designer begins to co-relate the mass to the space around, within, or through it. Mass on Space.
The designer regulates the relationship and relative importance of the surface of the mass to the entirety of the mass itself. Sometimes the mass (or its surface) is expected to be static. Sometimes it is expected to move. Occasionally ornamentation is added. In the context of jewelry, some of this mass should be able to hold a shape; other of this mass should be able to move, drape and flow when worn. Mass on Mass.
Technique makes something out of nothingness. It is designed. It is constructed. The act of implementing a technique – that is, revealing a pattern of choice behaviors — is communicative. It has intent. Mass, Space, Intent.
Eventually, the designer applies Technique to this mass, and in so doing, creates composition. Things are assembled. They are pulled together. The mass suddenly has order. It has organization. It is communicative. It interacts with the desires others place on it. It evokes an emotional response. It references a context or situation in which it is to be worn. Mass, Space, Intent, Content.
Thus, things placed within the space are pulled together, juxtaposed, connected, inter-related in some way. We call this composition. Composition might mean how the jewelry designer
– Treats the surface
– Emphasizes dimension
– Joins units
– Impresses into things, onto things or through things
– Pulls or Stretches or Twists things
– Covers, embellishes, frames or exposes things
– Asserts or changes the scale
– Determines sizes, shapes and volumes
– Arranges, Places, Distributes things
– Relates positive to negative space
– Creates a rhythm, form or theme
– Expects things to move or be static
– Anticipates who might wear it, how it might be worn, and where it might be worn
A piece of jewelry becomes a wholly finite environment within what otherwise would have been nothingness. But filling this space with form is not enough. It is not the end of the designer’s role and responsibility.
With order, organization and communication come significance, meaning, implication, connectedness and consequence for everyone around it. Expression occurs. An explanation or story emerges.
The designer must give this mass-in-space a quality other than emptiness. It must have content, meaning, purpose. The designer must allow this mass-in-space to be enjoyed. Again, expressed. Much of this comes down to materials and techniques.
That means the designer must impose upon this space some personal Philosophy of Technique—hopefully employing artistic and design knowledge, skill and understanding. This philosophy is how this designer thinks-like-a-designer. It becomes a key part of the designer’s fluency, adaptability, and originality as a professional. It is how the designer touches things and brings things together. This is a philosophy of selection, implementation and management of mass-in-space which
– Balances, equalizes, meditates
– Restricts
– Releases
– Senses and newly senses
– Becomes a standpoint, a flashpoint, or a jumping off point
– Sees new possibilities, forecasts, anticipates or expects
– Creates and re-creates feelings
– Plays with tolerances, stresses and strains
– Makes things parsimonious where enough is enough
– Results in things which are finished, successful and resonant
The mass has form and arrangement within space. It begins to convey sensation and feelings and content and meaning. But the designer still has not completed the job. Jewelry cannot be fully experienced in anticipation. It must be worn. It must be inhabited. It must communicate, interact, connect. Any philosophy of technique must account for all of this. Mass, Space, Intent, Content, Dialectic.
The elemental parts and their pleasing arrangement into a whole must allow it to be enjoyed by others. Be influenced by it. Persuaded. A desire to touch it. See it. Wear it. Buy it. Display it. Show it to others. Others, on some level, must accept the designer’s Philosophy of Technique, that is, the designer’s definition with intent for manipulating mass within space, in order to
– Recognize how to look at it and react to it
– Understand how to wear it
– Be inspired as the artist was inspired
– Feel the balance, harmony, variety, cacophony, continuity, interdependence among spaces and masses
– Anticipate the effects of movement, drape and flow
– Get a sense of psycho-socio-cultural release
– Get a sense of psycho-socio-cultural restriction
– Know when the piece is finished and successful
– Judge the piece in terms of value and worth
– Assess the risk within some context of wearing or purchasing it
– Assess the risk within some context of sharing it with others
Designers over time gain fluency in their philosophies of several techniques. Such fluency is recognized and comes to the fore when Techniques serve the desires, understandings and values of both designer and client. Techniques and the philosophies (ways of thinking) which underly them must fully communicate the particular intent, concepts and experiences expressed by the jewelry designer. They must anticipate, as well, the particular shared understandings others have about whether the piece will be judged finished and successful.
Designer and client have a special relationship which comes to light within the composed, constructed and manipulated piece of jewelry as it is introduced and expressed publicly.
Through Technique. Through Skill. And a Philosophy.
TECHNIQUES INVOLVE RELATIONSHIPS
Techniques, and the relative skill in applying them, are used to resolve the relational tensions underlying the craftmanship, artistry and design of any piece of jewelry. How these relationships are implemented and managed affect how the finished jewelry will be perceived sensorially, sensually, and symbolically. These will affect how the wearer/viewer recognizes the artist’s intent. These will affect how the wearer/viewer sees their desires reflected within the piece, thus the value and worth of the piece to them.
In design terms, this is called Expression. Expression in design is the communication of quality and meaning. The designer expresses quality and meaning through the selection, implementation and application of technique. We sometimes refer to this as skill. A technique will have a function. It will have a set of mechanics and processes. It will have purpose. There will be variations in how the mechanics and processes will be put into effect. Sometimes it will require a stiffening up; othertimes a loosening up. A pressing or pulling harder or softer. A curving or straightening. A transformation from 2 dimensions to 3 dimensions. Repositioning. Altering texture.
The technique, its function and application will further get interpreted and transformed, that is, expressed, into wearable art. Similar to how sounds are made into music. And how words are made into literature. There is an underlying vocabulary and grammar to jewelry design, from decoding to comprehension to fluency.
Some aspects of expression are universal, but perhaps most are very subjective, reflective of the interpretations and intents (philosophies) of the artist, the wearer/viewer, and the general culture. Because of this, each and every expression of design through technique will have to resolve some underlying tensions. Of special concern are these tensions and relationships:
- Aesthetic (beauty) vs. Architectural (function)
- Should Parts Be Considered Center Stage or Supplemental
- Special Relationship to Light and Shadow
- Special Relationship to Texture
- Special Relationship to Color and Ornamentation
- Aesthetic vs.Architectural
Jewelry Design all too often is viewed apart from the human body, as if we were creating sculptures, rather than wearable art. Yet its successful creation and implementation is not independent of the body, but moreso dependent upon it. It must feel good, move with the body, minimize the stresses and strains on the components and materials. And look good at the same time.
This sets up a tension in the relationship between the Aesthetic and the Architectural. The problems of jewelry design extend beyond the organizing of space and mass(es) within it. The designer must plan for and create a harmonious and expressive relationship between object and body and between object and person as the object is worn. This often means compromising. Trading off some of the aesthetics for more functionality.

Before you choose and implement any technique…
STOP
ASK YOURSELF:
What about this technique and the steps involved in implementing this technique will help my piece maintain its shape (structure)?
Before you choose and implement any technique…
STOP
ASK YOURSELF:
What about this technique and the steps involved in implementing this technique will help my piece move, drape and low (support)?
- Should Parts Be Considered Center Stage or Supplemental
The question becomes how the various parts or segments of the jewelry should relate to one another. We might have strap, a yoke, a centerpiece or focal point, a bail, and a clasp assembly. The tension here becomes whether the jewelry as a whole should be judged critically as an expression of art and design, or only the centerpiece or focal point should be so judged.
With the latter, the non-center/focus parts of the jewelry are seen merely as supplemental. This is similar to how a frame functions for painting or a pedestal for a sculpture.
With the former, each segment or component part cannot exist or be expressive apart from any other. The piece must be judged as a whole. The whole must be more resonant or evocative than the sum of its parts.
Here we begin to question what exactly technique is. Is it only that set of mechanics and processes applied to only a section of the whole piece of jewelry? Or is it how the designer makes choices about construction and manipulation from getting from one end of the piece of jewelry to the other?
- Special RelationshipTo Light And Shadow
Light and shadow are both critical design elements to be manipulated as a part of the jewelry designer’s active decision making process. Yet, light and shadow affect the experience of any piece of jewelry in ways which are outside that designer’s scope and control, as well.
Light and shadow are necessary for the expression of the artist’s intent and inspiration in jewelry. Because light and shadow move, change character, and come and go with their source, light and shadow have the power to give that mass of component parts a living quality. This effect is compounded (or foiled) as the wearer moves, changes position, travels from room to room or inside to outside.
The designer cannot control all this, but should be able to predict a lot of this behavior, and make appropriate design choices accordingly.
The designer can channel light through the selection of materials and their reflective, absorptive and refractive properties. The designer can play with color, pattern and texture. The designer can be strategic about the placement of positive and negative spaces. The designer can arrange or embellish surfaces in anticipation of all this. The designer can diffuse light or transform or distort colors. The designer can add movement or dimensionality to enliven their forms. The designer can even use light or shadow to hide things which might negatively affect the overall aesthetic.
The points, lines, planes and shapes incorporated into any piece of jewelry become receptacles of light and shadow which can change in character or form as time progresses, people move and contexts change. An important part in the success of jewelry designs is played by the quality and intensity of light (and shadow) within context.
- Special RelationshipTo Texture
Jewelry is experienced both tactilely and visually.
Sometimes these complement each other; othertimes, they compete or conflict. Texture plays a major role here. On the one hand, it expresses something about the quality of the materials used. On the other, it gives a particular quality to light and shadow, and their interplay with the piece as worn.
Designers often select materials partly based on their tactile textures. They might also alter these textures to expand on the variety of expressive qualities that might be offered. The stone might be used as is. It might be smoothed and polished. It might be roughed up, carved or chiseled. The material might end up expressing something about the natural state or about refinement and sophistication.
Visually, the designer makes many choices about how to employ the materials. They may emphasize verticality over horizontality. Projecting over recession. Slow or fast rhythm. Opacity may be altered. The designer produces differing visual expressions based on patterns and how lighting of the surface conveys the sensory experience of these patterns.
A single texture, whether the goal is tactile or visual, is rarely employed alone in jewelry design. The actual variety of materials and treatments produces a complex of textures that must be composed and harmonized and resonant into the jewelry’s expressive and consistent whole.
- Special Relationship To Color and Ornament
Color is a characteristic of all jewelry making materials. It is a constant feature of any piece of jewelry. Materials might be selected for their color and visual appeal. Techniques might be selected for their ability to enhance or play with color and its visual appeal.
Yet, on the other hand, other jewelry making materials and techniques might be selected primarily for their structural properties – that is, their ability to be used to create, maintain, and retain shape or silhouette. They might be used as mere armature or to create that armature. The colors of these materials or the effects resulting from how techniques manipulated them may not be suited to the expressive goals of the designer. Because of the nature of jewelry making techniques and components, there also may be an unintended or unwanted absence of color, such as gaps of light between beads.
Thus, because of these kinds of things, materials with more suitable expressive colors, either as is or as manipulated, are added to the surface as embellishment and ornamentation. Sometimes these materials are dyes or coatings or fired-on chemicals. Sometimes these materials are more substantive materials like glass, gemstone, wood or shell.
These ornamental materials may cover parts of the surface or hide the entire surface of the piece. They may disguise it. They may be used to alter how color is perceived and experienced. They may completely change the experience. But without technique, and a philosophy of technique, these ornamental options may make it impossible to achieve the sensory, visual or structural powers the ornamentation is meant to provide.
The tension arises when the designer makes choices whether the ornamentation is to be used to enhance the expressiveness of the piece as originally designed (applied ornamentation), or, whether the ornamentation is to be used to create a completely different meaning, decorative motif, or symbolic expression, regardless of appropriateness to that original design (mimetic ornamentation).
Applied ornamentation enhances the designer’s power and control to assert intent and inspiration within the jewelry. Often applied ornamentation makes some reference to the underlying structures behind it. But the designer needs to be careful that this doesn’t turn into merely applied decoration. As ornament, whatever is done is integral to the piece. As decoration, it is not.
Mimetic ornamentation is often used to make a piece more familiar, more accepting, more reassuring to various audiences. It might be used to disguise something. It might have symbolic value. Here, too, the designer needs to be careful that this doesn’t turn into merely applied decoration.
A third consideration is whether the ornamentation is critical to the jewelry’s functioning or materials (inherent ornamentation). It is important that it be organic to the piece. That is, it should derive directly from and be a function of the nature of the jewelry and the materials used. It may allow size adjustment. Its placement may reinforce to overcome vulnerabilities. It may redistribute stresses and strains. It may aid in movement. It may assist in maintaining a shape. It may rationalize color, texture and/or pattern within and throughout the piece.
SURVEY OF JEWELRY MAKING TECHNIQUES
There are many, many different types of techniques used in jewelry making. Each encompasses basic mechanics. Each is implemented within a procedure or process. Each is a form of expression.
These techniques or forms of expression differ from each other in terms of the choices the designer makes about how mass should get related to space for creating composition. They differ in how structure (shape) is created and preserved, and in how support (movement, drape and flow) is built in, achieved and maintained. They differ in how pattern and texture is created or added. These techniques differ, apart from the materials used, in how people interact with them, aesthetically, functionally, sensorially and sensually.
These techniques are not mutually exclusive, and are often combined. It is up to the designer to select the technique or techniques to be used, maximizing the strengths and minimizing the weaknesses of each. Usually, the designer, when combining techniques, will want one technique to predominate. The designer does not want the underlying philosophies of two or more techniques to conflict, compete, or not coordinate.
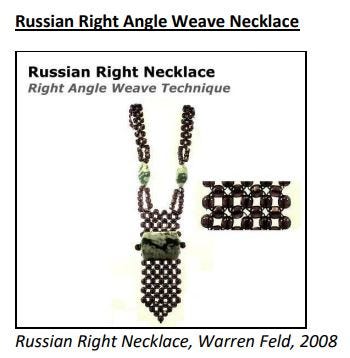
Stringing, Bead Weaving

Beads and other components are assembled together into a composition and silhouette. The stringing materials range from the very narrow, like beading thread, cable thread and cable wire, to thicker, like bead cord, leather, waxed cotton, ribbon, satin cord, and braided leather. The stringing materials are often hidden, and typically play a supplemental role to the beads and other components within any composition.
Philosophy of Technique: Objects are placed and assembled together within a space in relationship to the direction and linearity of some type of stringing material or canvas. There is great attention to the use of points and lines, usually within a singular plane. Shapes are basic, often only in reference to a silhouette. Minimal attention is paid to dimensionality.
A piece is made stable by the rigidity of the stringing material or canvas. The stringing material or canvas is able to withstand tension and compression.
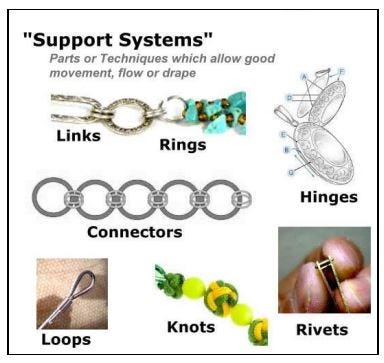
Often, designers place too much reliance on the clasp assembly to provide support (movement, drape and flow), instead of embedding support elements (rings, loops, unglued-knots, hinges, springs, coils, rivets, rotators) throughout the piece. In a similar way, often designers place too much reliance on the placement of objects on the canvas (that is, stringing material) for maintaining structure (shape), instead of other elements that could be used to maintain shape, while mitigating against stress and strain.
Each stringing and bead weaving technique and its procedures and processes for implementation rely on part of the implementation to maintain a shape, and on part of the implementation to allow for movement, drape and flow. The particular technique used to assemble the beads (and related components) sets the tone in pattern, shape, form and texture. Some stringing and bead weaving techniques are great at maintaining shapes. Other techniques are good at allowing for movement. The better techniques are good at accommodating both structure and support.
Knotting, Braiding, Knitting, Crocheting

The stringing materials take center stage, either in combination with other elements, or alone. The composition may or may not include beads and other components. Occasionally glue is used, but its use should be minimized.
Philosophy of Technique: Within a space, the artist places and intertwines various types of stringing materials. The artist varies tightness and looseness, placement and distribution of sizes, volumes and mass to achieve the dual goals of structure and support.
A piece is made stable by the rigidity of the intertwining (knotting, chaining, braiding) of the stringing material or canvas. The intertwined stringing material or canvas is able to withstand tension and compression.
Each strategy for knotting or braiding attempts to simultaneously achieve structure and support. The technique might vary the placement of fixed points with the use of chaining to create lines, forms and planes within the composition. Considerable attention is paid to the positioning of positive and negative spaces.
There is a lot of attention to the use of line. These techniques allow for incorporation of various strategies for achieving a sense of dimensionality. The shapes may be allowed to stretch or contract, allowing easy response to issues resulting from stress or strain. Texture is a major emphasis.
Embroidery, Embellishment, Fringing

Elements are attached to the surface of the canvas. This surface is often referred to as the foundation or base. These elements may be glued or sewn or woven on. The canvas typically plays a diminished or supplemental role, though this is not a requirement.
Philosophy of Technique: The space available has been defined by a particular canvas. This might be a string. This might be a flat surface. Elements are placed on and secured to this surface; the mechanics here relate to structural goals. The pliability, manipulability, and/or maneuverability of the canvas relate to support goals.
A piece is made stable by the rigidity of the stringing material or canvas. The stringing material or canvas is able to withstand tension and compression.
The embellishment may be used to create a particular image, or pattern, or texture. Often it is used to add a sense of dimensionality and/or movement to a piece. It invites people to want to touch the composition because it adds a very sensual quality to a piece beyond the characteristics of the materials or colors used.
Stamping, Engraving, Etching

Elements are embedded on or worked into the surface of the canvas. The canvas may be comprised of any material.
Philosophy of Technique: The space available has been defined by a particular canvas. This is typically a flat surface of some kind, but not limited to any one material. Structural, as well as support, goals depend on the physical, functional and chemical properties of the canvas. Sometimes these properties are altered through the application of the techniques. Texture and pattern are major focuses.
A piece is made stable by the rigidity and material strength of the canvas coupled with that canvas’s ability to maintain its integrity after it has been physically or chemically altered. The resulting canvas is able to with stand tension and compression.
Wire Working, Wire Wrapping, Wire Weaving

Hard Wire is manipulated into forms which hold their shape, serve as structural supports, or create pleasing patterns and textures.
Philosophy of Technique: The designer places wires into a space. The wires may be bent to form lines, planes, shapes and forms. The wires may be interwoven, bundled together, coiled, or otherwise anchored or tied together to create a canvas and form the basic foundation of a piece of jewelry.
During the process of applying a wire technique and creating a piece of jewelry, the physical properties of the wire must be changed. The designer takes wire, applies a technique to it, and continues to apply the technique until the wire is stiff enough to hold a shape. Each time you manipulate wire, it gets harder and harder and harder. If you manipulate it too much, it will become brittle and break. The wire can be pulled, coiled, bent, twisted, or hammered.
A piece is made stable by the stiffness or hardness of the canvas and its material strength, where it is stiff enough to hold a shape, but not so stiff as to become brittle and break. The resulting canvas is able towithstand tension and compression.
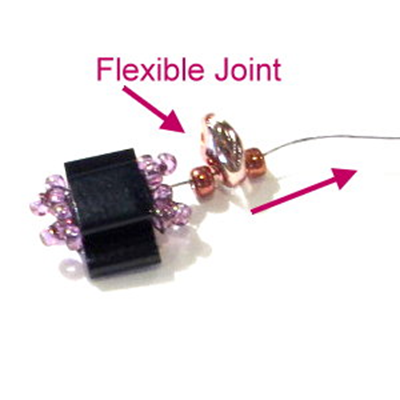
Considerable attention must be paid to strategies of support, that is, how things get joined and jointed. That is, whatever the piece of jewelry, it must be able to move freely, and withstand all sources of stress or strain.
For example, hard wire would not be used as a stringing material. If you put beads on the hard wire to create a bracelet or necklace, the wire would distort in shape when the piece is worn, but not return to its original shape. In this case, you would have to create several segments or components using the wire, and then make some kind of chain to create that jointedness and support. Picture a rosary which is a bead chain made of wire.
Metalsmithing, Fabrication, Cold Connections

Here metal is shaped and formed into a broad, layered canvas or a series of canvases we call components. Layers of sheet, wire and granules, or a series of components may be combined in some way, either to create a more complex composition, increase a sense of dimensionality or movement, or allow for jointedness, connectivity and support. The designer might use heat and solder – fabrication. Or the designer might use rivets, hinges, loops, rings, rotators – cold connections. The layers or the series of components may be textured or not.
Philosophy of Technique: Into a space, the designer places pieces of metal. These pieces of metal may sit side-by-side, on top of each other, overlap, sit perpendicular or at an angle. The components are attached together, using heat and solder, glue, or cold connections. Each layered canvas or component is a composition unto itself.
Canvases and components are rigid shapes and are constructed to withstand stress and strain. When constructing a piece of jewelry, typically the designer interconnects various components in a way which allows movement, drape and flow.
Interconnected components may be thematic or tell a story.
A piece is made stable by the rigidity and material strength of the canvas after it has been successfully altered through shaping, heat, soldered connection, glue or cold connection. The resulting canvas is able to withstand tension and compression, up until the point it bends or dents. Usually, if that happens, the piece can be unbent or undented. Considerable attention must be paid to strategies of support, that is, how things get joined and jointed.
Casting, Modeling, Molding, Carving, Shaping

Here a material is reconfigured and altered into some kind of shape or form. The material may be rigid, like wood or stone. It may be malleable like clay or casting material. The material, once altered, may or may not be subject to additional actions to change its physical, functional or chemical properties, such as the application of heat or cold or a chemical bath.
Philosophy of Technique: The material is positioned within a space. As it is manipulated, it most likely will alter its relationship to that space. It will be able to play many roles from point to line to plane, and from shape to form to theme. The designer must be critically aware of how the technique will alter this relationship between space and mass, and light and shadow, and how these in turn, will affect form and composition.
A piece is made stable by the rigidity of the canvas after it has been shaped. Cast pieces have difficulty responding to strong forces. The resulting canvas is able to withstand tension and compression only to that point before it crumbles and breaks.
Structure and support considerations can either be built into the resulting component, or components may be treated in similar ways as in metalsmithing.
Lampworking, Wound Glass, Encasing

Rods and stringers of glass are heated by a torch and wound around a steel rod called a mandrel. Sometimes shards of glass, sometimes with abstract patterns, sometimes representative of realistic images, are laid on the hot glass, and covered (encased) by a transparent glass wound over them. The result is a bead or pendant or a small sculpture.
Philosophy of Technique: The material slowly enters and occupies a defined space. The artist plays with different types of glass, glass colors and transparencies, rods of glass, pieces of glass, ground up glass, and metallic foils. Things are placed and layered and spiraled. Surfaces can be altered by tools. Once begun, the artist must take the technique to completion. Thus, the artist’s ideas, focus, and intent are very concentrated and intense. Glass as a material requires the manipulation of the interpenetration of mass with space.
A piece is made stable by the properties of the glass. The resulting canvas is able to withstand tension and compression to the extent the properties of the glass will allow.
Glass Blowing

Air is forced through a steel straw. At the end of this straw is a blob of molten glass. The air forces it to hollow out. As this happens, the artist rolls it, hammers it, textures it, domes it, otherwise shapes it until it is a finished piece. The artist may roll the glass over other pieces of glass, to melt them into the piece. As the glass cools, the result might be a bead or a pendant or a small sculpture.
Philosophy of Technique: The material expands within a space. This space may be very narrow and defined, or very expansive, perhaps ill-defined. The resulting object has surface and interior and exterior spaces. The qualities of the surface create a play between mass and space, and their interpenetration.
A piece is made stable by the properties of the glass. The resulting canvas is able to withstand tension and compression to the extent the properties of the glass walls will allow.
Computer Aided Design (CAD), 3-D Printing

Here the artist uses computers to aid in the creation, modification, analysis, or optimization of a design. The output is typically in the form of electronic files or technical drawings for 3-D printing, machining or other manufacturing operation. 3-D printing takes a CAD model and builds it, material layer by layer in an additive manufacturing fashion. Frequently, the 3-D printed object is a casting mold, rather than the finished piece.
Philosophy of Technique: CAD can place points, lines and curves within a 2-dimensional space, or curves, surfaces and solids within a 3-dimensional space. CAD can simulate motion and its impact on any object. It can take into account other parameters and constraints. The final technical output must convey more than information about shape. It must convey information about the extents to which various materials may be used in the design, their dimensions and tolerances. It must convey information about the pros and cons of processes the artist might use in the design.
One pay-off for the artist is that the computer can detail many more ways, and many more unexpected ways, to relate mass to space than typically thought of without it.
HOW TO LEARN TECHNIQUE
A good design, poorly executed, is not worth all that much.
So, how do we learn techniques is ways which help us develop ourselves as designers and be fluent in how we select, implement and apply them?
We need to be very aware of what influences us in our
o Selection of Technique
o Implementation of Technique
o Application of Technique
Selection: Anticipating What Will Happen If And When
We begin to develop our fluency in technique at the point of selection. To select a technique is to anticipate what will happen to the piece of jewelry after it is designed, constructed and worn. This involves all our senses from thought to touch to sight.
When we touch a piece constructed using a particular technique, how will it feel? Will it curve or bend? Will it curve or bend in the direction we need it to? Will it drape nicely on the body? Move easily with the body? Feel comfortable when worn? Will it hold its shape?
When we see a piece constructed using a particular technique, what will be the resulting pattern and texture? What will be the interplay of light and shadow? Will it look good from all sides when sitting on an easel? Will it look good from all sides when someone is wearing it? When that person is moving? Will all color issues be resolved?
We play a What-If game. What-If we used a variation on the technique? What-If we used another technique? What-If we combined techniques or sequenced them or staggered them? What-if we settled for a little less beauty to achieve better movement, drape and flow?
We might do some research. Has the technique been used by another artist or in another project you were attracted to? Was it used successfully? Did it work well in terms of structure and support? Did it contribute to (or at least not detract from) the visual appearance of the piece?
We might do some pre-testing. Will the technique hold up to our expectations? Will it still work with some variation? Will it work under differing circumstances?
We are honest with ourselves about our biases. Will we pick something only because we have done it before? Or we are very familiar with it? Or it is the easiest or path of least resistance?
Implementation: Basic Mechanics and Processes
We want to learn the basic mechanics of each technique in a way which highlights their philosophies – that is, how we think them through. We think about managing:
– Structure and Support
– How To Hold The Piece To Work It
– How To Distribute Stresses and Points of Vulnerability
– How To Create A Clasp Assembly
– How To Finish Off The Piece
Structure and Support. To begin, we know that each and every technique has as part of its mechanics and processes some aspects which help us create and maintain structures (shape). And each and everytechnique has some aspects which help us create and maintain support (movement, drape and flow). We want to be able to break down any technique so that we can recognize what results in what.


Holding The Piece To Work It. Next, the basic mechanics also includes strategies for how to hold the piece while you work it.
Picture yourself as an artist. An artist has an easel and something to use as a clamp to hold things in place.
A bead weaver would use their forefinger on one hand as an easel, pressing the developing bead work project against it, and then take their thumb on that same hand, and clamp down over the work to keep it in place.
A silversmith might use a steel bench block as an easel, and a vice as a clamp.
Someone doing braiding or knotting might use a clipboard as an easel and a bulldog clip as a clamp.
Your challenge is to hold the piece in such a way that you maximize your ability to implement a technique all the while maximizing the strengths of that technique and minimizing its weaknesses. This is called leveraging. You use whatever it is that is equivalent to the artist’s easel and clamp in such a way that you can successfully leverage the technique for your purposes.
Holding your piece correctly also sends signals to your hands telling you when each individual step is completed, and when you are finished.
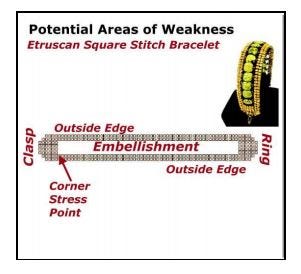
Distribute Stresses and Points of Vulnerability.
In any piece of jewelry, it can be expected that the stress-bearing and strain-bearing strengths and weaknesses of each component will be unevenly distributed throughout the pieces. That is, there will be some areas or points in the piece of jewelry which will be vulnerable to stresses and strains. This may cause the piece to break or lose its shape or otherwise disrupt its integrity.
The jewelry designer needs to be able to easily look at a piece or its sketch or design plan and identify all the points of vulnerability. After identifying these, the designer will need to figure out ways to compensate for these weaknesses in design.
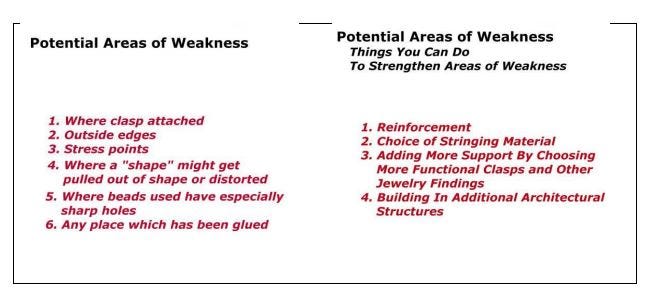
Usually points of vulnerability occur in these places or situations:
- Where the clasp assembly is attached to the piece
- At the beginning and the end of the piece
- Along the edges
- Corners and inside corners
- Where components have very sharp holes or edges
- When using materials which degrade, deteriorate, bleed, rub off, distort, are too soft
- Where there is not an exact fit between two pieces or elements
- Where there is insufficient support or jointedness
These points of vulnerability may need reinforcement. More support or structural elements may need to be added. Things may need to be re-located or positioned within the design. They may need to be eliminated from the design.
Most often, places of vulnerability occur where the structures or supports in place take on the shapes of either H, L, T, or U. Think of these shapes as hazards. These shapes tend to split when confronted with external or internal forces. They tend to split because each leg is often confronted with different levels or directions of force. The legs are not braced. These hazardous shapes cry out for additional reinforcements or support or structural systems.
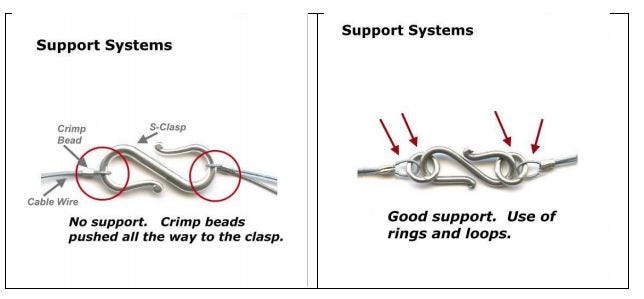
The Clasp Assembly. The “CLASP ASSEMBLY” usually consists of several parts. It includes everything it takes to attach the clasp to your beadwork. Besides the Clasp itself, there are probably jump rings and connectors, crimp beads, clamps, cones, end caps or other jewelry findings.
Visually, the Clasp Assembly is part of the vernacular of the piece. Ideally, it should seem organically related to the piece or at least a logical inclusion.
Structurally, the Clasp Assembly should hold the piece together as the piece is worn. It may have some impact on maintaining the shape of the silhouette.
Most importantly, the Clasp Assembly should be put together as a support system. It is the most important support system in any piece of jewelry. Support systems used in a necklace or bracelet are similar tothe joints in your body. They aid in movement. They prevent any one piece from being adversely affected by the forces this movement brings to the piece. They keep the piece from being stiff. They make the piece look and feel better, when worn.
The Clasp Assembly of any piece of jewelry should be designed first before the rest of the piece is designed, or designed currently with the rest of the piece. Too often, jewelry designers select the clasp after they have finished the rest of the piece. They do not seem to understand how the clasp assembly is an integral part of the implementation of any technique. In this case, not only does the clasp assembly look like it was the last choice, but it usually falls short of meeting its visual, structural and support roles.
Finishing Off The Piece. We always need to step back and reflect whether the piece as designed and implemented will be judged as finished and successful by each of the myriad audiences we hope to please. Will their judgments confirm or reject our philosophy of the particular technique(s) we used?
It is the challenge for the designer not to make the piece under-done or over-done. Each and every material and component part should be integral to the piece as a whole.
Application: Achieving Expressiveness
Expressiveness refers to the power of the piece of jewelry to fit with both the designer’s as well as all other’s expectations about desire, connectedness, power, value and worth. This is one and the same thing as measuring the extent to which both materials and techniques can be seen to have been leveraged, to maximize their strengths and minimize their weaknesses.
A technique has been applied in the most expressive way at that point where the design elements and the materials selected have been composed, manipulated and constructed in the most optimum way. We can judge the degree of expressiveness by honing in on two concepts: Parsimony and Resonance.
Parsimony (maximum applied impact): Parsimony is when you know enough is enough. When the finished and successful piece is parsimonious, the relationship of all the Design Elements and their expressed attributes will be so strong, that to add or remove any one thing would diminish, not just the design, but rather the significance of the design.
Parsimony is sometimes referred to in art and design as Economy, but the idea of economy is reserved for the visual effects. For jewelry designers, we want that economy or parsimony to apply to functional and situational effects, as well. The designer needs to be able to decide when enough is enough.
| Parsimony… – forces explanation; its forced-choice nature is most revealing about the artist’s understandings and intentions – relies on evidence moreso than assumptions to get at criticality – focuses examination of the few elements that make a difference |
Resonance (coherency of applied impact): Resonance is some level of felt energy that is a little more than an emotional response. The difference between saying that piece of jewelry is “beautiful” vs. saying that piece of jewelry “makes me want to wear it”. Or that “I want to touch it”. Or “My friends need to see this.”
Resonance is something more than emotion. It is some kind of additional energy we see, feel and otherwise experience. Emotion is very reactive. Resonance is intuitive, involving, identifying. Resonance is an empathetic response where artist and audience realize a shared (or contradictory) understanding without losing sight of whose views and feelings belong to whom.
Resonance results from how the artist applies technique to control light, shadow, and their characteristics of warmth and cold, receding and approaching, bright and dull, light and dark. Resonance results from how the artist leverages the strengths of materials and techniques and minimizes their weaknesses. Resonance results from social, cultural and situational cues. Resonance results from how the artist takes us to the edge of universal, objective understandings, and pushes us every so slightly, but not too, too far, beyond that edge.
| Jewelry which resonates… | |
| – is communicative and authentic
– shows the artist’s hand as intention, not instinct – evokes both an emotional as well as energetic response from wearer and viewer – shows both degrees of control, as well as moments of the unexpected – makes something noteworthy from something ordinary – finds the whole greater than the sum of the parts
|
– lets the materials and techniques speak
– anticipates shared understandings of many different audiences about design elements and principles, and some obvious inclusion, exclusion or intentional violation of them – results from a design process that appears to have been more systemic (e.g., ingrained within an integrated process) than systematic (e.g., a step-by-step approach) – both appeals and functions at the boundary where jewelry meets person |

TECHNOLOGY AND JEWELRY DESIGN
The potential of technology merged with craft is infinite.
Technology includes things like,
– New methods, processes and materials
– New ways to implement ideas
– Ability to generate new styles
– Opportunity to create meaningful forms
– Unseen contributions to aesthetic structure and composition
– Less costly and/or more production-friendly methods for creating pieces, especially for projects which might not otherwise get implemented
New materials and composites are created and enter the marketplace every year.
New ways of extracting, shaping, finishing, stabilizing materials come on line each year.
Computer Aided Design (CAD) and 3-D printing provide the tools to jewelry designers to create things beyond their imaginations.
Electroforming enables the creation of lightweight pieces from various metals.
Lasers are used to weld, cut and decorate.
Laser-Sintering melts powdered metal, layer by layer, into a finished piece.
Jewelry makers and beaders frequently come up with new techniques, mechanics and processes for creating jewelry. Technology provides creatives with original ways of expression.
“Smart” elements are getting introduced into some designs, transforming your jewelry into a smart device. These might measure health and fitness; might change color and appearance to suit different environments or clothing; might warm or cool the body.
TO WHAT EXTENT SHOULD JEWELRY DESIGNERS
RESPOND TO TECHNOLOGY?
Technology is a very powerful tool. Combined with craftmanship, it can create a new language of shape, object, and sensation. We have to be careful, however, that we use technology to support jewelry which is hand-made, and not supplant it.
The use of technology allows the designer to create new forms and materials that otherwise would not exist. Technology often translates into convenience and more rapid production. In today’s globalized world, this might offer a competitive edge. Technology also enables more customization, and faster customization. Again, in a globalized world, this would offer a competitive advantage. Technology encourages us to look forward, rather than back, for our inspirations and insights.
Again, it is important to emphasize that we do not want all this technological efficiency to diminish the act of “creativity”. We don’t want to standardize everything and reduce everything into a set of how-to instructions. We want to expand our creative abilities. We want to increase the power of the designer to produce pieces reflective of the artist’s hand. We want our jewelry to be as expressive as possible of the needs, wants and desires of our various clientele.
The impact of jewelry on our professional practice. Whether we use new technologies in our professional practice, or not, we cannot escape them. We must be up-to-date and aware of technological impacts on what we do and how we do it.
The impact of technology on work and jobs was the focus of an opinion piece in the New York Times by David H. Autor and David Dorn.
As jewelry designers, we are living through and with all the positives and negatives that arise through this technological change.
- How has technology affected what we do as designers?
- How has it affected what we do to survive and thrive as designers?
- Have we mechanized and computerized the jewelry design business into obsolescence?
- How have you had to organize your jewelry designer lives differently?
given the rise of
-The internet,
-Ebay, Etsy and Amazon.com
-Blogs, Facebook, Twitter, Pinterest, Instagram
-New technologies and materials like precious metal clay, polymer clay, crystal clay, 3-D printing
- What has happened to your local bead stores? Jewelry stores? Boutiques?
- What has happened to bead and jewelry making magazines?
- If you teach classes for pay, or sell kits and instructions, how do you compete against the literally millions of online tutorials, classes, instructions and kits offered for free? How does this affect what you teach or design to sell as kits?
- If you sell jewelry, how do you compete against the 60,000,000 other people who sell jewelry online? How does this affect your marketing, your pricing, your designs?
- If you make part of your living doing the arts and crafts show circuit, will there still be a need for this in the future?
_________________________________________
FOOTNOTES
Autor, David H. and Dorn, David. “How Technology Wrecks the Middle Class”, New York Times, August 24, 2013.
As reference in:
https://opinionator.blogs.nytimes.com/2013/08/24/how-technology-wrecks-the-middle-class/