How To Design, Take Measurements For And Finish Off Multi-Strand Pieces
Multi-strand bracelets and necklaces are always in style and always in demand.
Many designers quickly find out, however, that they are not so easy to construct, and often do not lay on the body the way the designer initially envisioned.
Part of the problem has to do with measurement.
· How long should each strand be?
· How long if the strands are sequential, that is, do not overlap? Here, you will want strands each of a different length.
· How long if the strands do overlap? Usually, if you want overlap, the strands will approximately be the same length.
Related to measurement is some confusion about what you are really measuring — the linear length against a ruler or on a bead board, or, — the circumference length using a person or mannequin or sizing cone.
Actual linear length will vary, based on the diameter sizes of the beads, whether you are dealing with any gradations in bead sizes, and how far apart on the body you want each strand to lay.
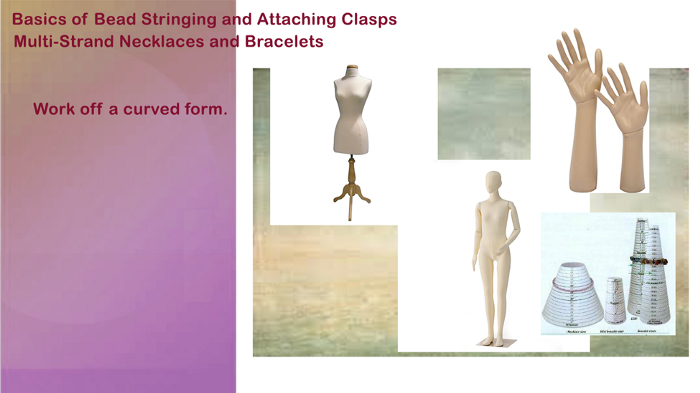
Only circumference length will serve you well here. But this means you will be planning and constructing around a curved surface or plane.
Another part of the problem is choosing the wrong clasps and jewelry findings. Different findings work well under differing situations and circumstances.
Or, related to this, part of the problem could be how the clasp assembly was constructed without sufficient support.
How long should each strand be?
Let me re-phrase this question:
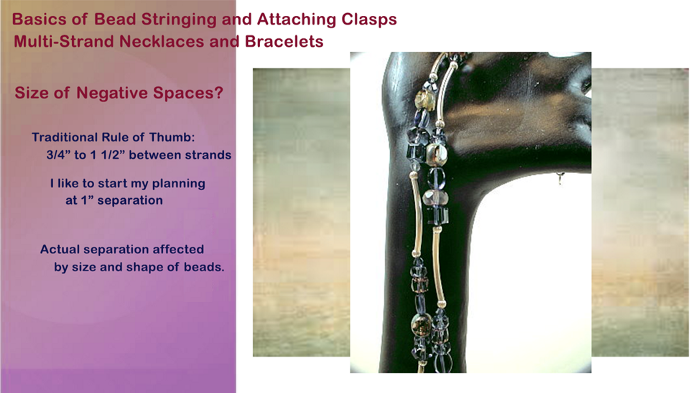
How wide do you want the negative spaces to be measuring at the center of each strand?
Usually, your goal is to have a good consistency in the width of the negative spaces between each strand.
A traditional rule of thumb is that you want each subsequent strand to be 3/4″ to 1 1/2” longer than the previous one. I like to start my planning with 1” separations.
So, if the first strand is 16”, which of course, includes the 1–2” length the clasp assembly will add, then the second will be 17”, the third 18”, and so forth.
This rule of thumb is a good starting point for planning your piece. You will have to modify it based on the characteristics and sizes of the actual beads and components you will be using. Larger beads will take up more of the volume of negative space than smaller beads.
When your beads on the strand are graduated in size, you want to measure and work off your largest bead in each strand.
To get things right, and not get too frustrated, it is easiest to work off of a mannequin or sizing cone or an especially life-size necklace easel.
Working on a flat surface just doesn’t cut it.
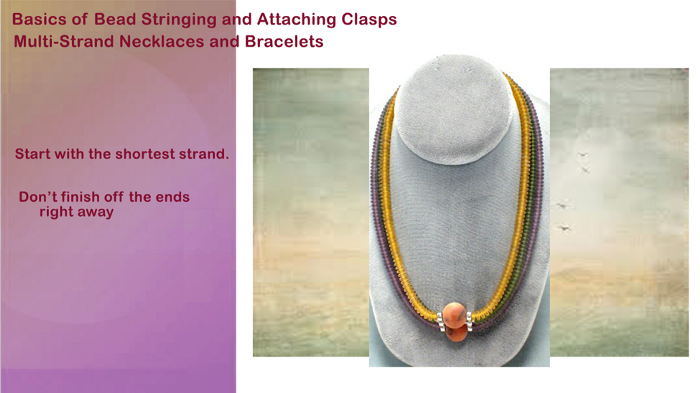
You will also only attach things temporarily until you get all the strand lengths and negative spaces widths the way you want them.
I always begin with the shortest length strand.
If I’m working with cable wires, I end each side with a horseshoe wire protector. This lets me secure the beads on the strand pretty well, and gives me the equivalent of a hook to temporarily hook into my clasp. And it lets me remove the horseshoe wire protector if I want to add or subtract any beads on the cable.
I do not secure the clasp to the horseshoe wire protector or do any crimping until I have all the strands on the necklace arranged the way I want them.
I next try to complete the second smallest strand, and temporarily hook it to the clasp.
I work my way down until the longest strand.
When I am satisfied with everything and how it lays, I begin to finish the connection of each strand to the clasp assembly.
I finish off the first and smallest strand, connecting the clasp permanently, and crimping things in place.
Most likely, I will need to do some adjusting with the next strand. Things don’t work out 100% perfectly in the real world.
I do any necessary adjusting, then I connect that strand to the clasp permanently, and crimp things in place.
I go to the third strand. Most likely, I will need to do some adjusting. When I’m satisfied, usually focusing on the width of the negative space, I crimp.
And so forth down the necklace until the last strand.
With some styles of clasps, I like to use a strong, intervening jump ring, connecting the horseshoe wire protector to the fixed rings on the clasp.
All my jump rings will be the same size.
So, when I am testing things out, I hook the wire protectors (without the extra intervening jump rings) into the fixed rings on the clasp.
When I am ready to make things permanent, I crimp the crimp bead under the horseshoe, then attach the horseshoe to the jump ring and the jump ring to the clasp.
Say you are using a single strand clasp for a multi-strand necklace.
One approach:
You attach a large intervening ring to the clasp, and then attach each string to this large intervening ring.
The size of the ring should allow enough support or jointedness so that the multiple strands do not put too much stress or strain on one another at this point of connection.
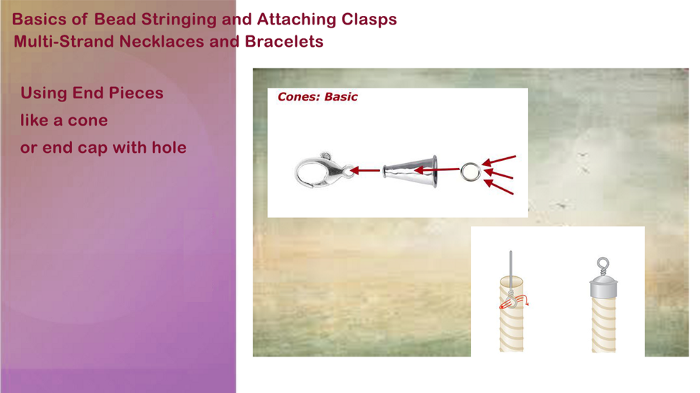
Again, another strategy when using a single strand clasp for a multi-strand necklace, is to use some kind of end piece, like a cone or end cap with a hole.
In this case, you would attach each strand to a soldered ring — that is a ring with no gaps in it. The size of the ring would have to coordinate with the interior diameter of your end piece.
You never pull all the strands through the end pieces. This would put too much strain at that point where they exited the end piece, and attached to the clasp assembly.
You need this soldered ring to work as a support system and absorb and self-adjust to this strain, so your strands won’t break.
So, you attach all the strands to one side of the soldered ring. Then you take another piece of stringing material to the other side of the ring. You pull everything through the opening of the end piece, all the way back so your mess of knots doesn’t show. And you then construct the rest of your clasp assembly.
The soldering ring is your support system. Either the crushed crimps with the required loops, or the series of knots, depending on your stringing material are ugly. Your end pieces act like a lampshade hiding the mess, and making your piece visually appealing.
Still one more strategy is to use an end bar on each side of your piece, which has the number or rings on one side equal to the number of strands in your multi-strand piece, and a single hole on the other side.
You do the rest of your clasp assembly off the one ring on each end bar.
Be sure to use an intervening ring off each single end bar ring, before connecting the clasp.
Let’s say you have a 5-strand necklace, but only a 3-strand clasp.
It is ok to attach more than one strand to a single ring on the clasp. Just be sure this is sufficient support or jointedness.
If not, use a larger intervening ring, like a jump or split ring.
CONQUERING THE CREATIVE MARKETPLACE: Between the Fickleness of Business and the Pursuit of Design
How dreams are made between the fickleness of business and the pursuit of jewelry design
This guidebook is a must-have for anyone serious about making money selling jewelry. I focus on straightforward, workable strategies for integrating business practices with the creative design process. These strategies make balancing your creative self with your productive self easier and more fluid.
Based both on the creation and development of my own jewelry design business, as well as teaching countless students over the past 35+ years about business and craft, I address what should be some of your key concerns and uncertainties. I help you plan your road map.
Whether you are a hobbyist or a self-supporting business, success as a jewelry designer involves many things to think about, know and do. I share with you the kinds of things it takes to start your own jewelry business, run it, anticipate risks and rewards, and lead it to a level of success you feel is right for you, including
· Marketing, Promoting, Branding: competitor analysis, developing message, establishing emotional connections to your products, social media marketing
· Selling: linking product to buyer among many venues, such as store, department store, online, trunk show, home show, trade show, sales reps and showrooms, catalogs, TV shopping, galleries, advertising, cold calling, making the pitch
· Resiliency: building business, professional and psychological resiliency
· Professional Responsibilities: preparing artist statement, portfolio, look book, resume, biographical sketch, profile, FAQ, self-care
SO YOU WANT TO BE A JEWELRY DESIGNER Merging Your Voice With Form
So You Want To Be A Jewelry Designer reinterprets how to apply techniques and modify art theories from the Jewelry Designer’s perspective. To go beyond craft, the jewelry designer needs to become literate in this discipline called Jewelry Design. Literacy means understanding how to answer the question: Why do some pieces of jewelry draw your attention, and others do not? How to develop the authentic, creative self, someone who is fluent, flexible and original. How to gain the necessary design skills and be able to apply them, whether the situation is familiar or not.
The Jewelry Journey Podcast “Building Jewelry That Works: Why Jewelry Design Is Like Architecture” Podcast, Part 1 Podcast, Part 2
PEARL KNOTTING…Warren’s Way Easy. Simple. No tools. Anyone Can Do!
I developed a nontraditional technique which does not use tools because I found tools get in the way of tying good and well-positioned knots. I decided to bring two cords through the bead to minimize any negative effects resulting from the pearl rotating around the cord. I only have you glue one knot in the piece. I use a simple overhand knot which is easily centered. I developed a rule for choosing the thickness of your bead cord. I lay out different steps for starting and ending a piece, based on how you want to attach the piece to your clasp assembly.
SO YOU WANT TO DO CRAFT SHOWS:16 Lessons I Learned Doing Craft Shows
In this book, I discuss 16 lessons I learned, Including How To (1) Find, Evaluate and Select Craft Shows Right for You, (2) Determine a Set of Realistic Goals, (3) Compute a Simple Break-Even Analysis, (4) Develop Your Applications and Apply in the Smartest Ways, (5) Understand How Much Inventory to Bring, (6) Set Up and Present Both Yourself and Your Wares, (7) Best Promote and Operate Your Craft Show Business before, during and after the show.
As I pursue the pathways which have led me to my Rogue Elephant, for the most part, I feel free. I feel I can take responsibilities for the choices I am making, whether to go this way or that. I’m on that road to explore, to critique, to reflect, to ponder, to plan, to strategize, to move on. I feel within myself a purpose in life. This is all good. And right. I feel I have the tools to overcome the unfamiliar and the unknown. Clear. Confident. Not cocky.
However, during most of my childhood, youth and young adult life, my relationships with my relatives sometimes interfered. Irritated. Distracted. Distorted. Got me frustrated. Made me scared. Made me angry.
They are relatives. This is different than relationships with strangers or friends or colleagues. I too easily allowed my relatives to get inside my head. Too easily to be too sensitive and responsive to their own values, beliefs and expectations they placed on me. It made it difficult for me to stay on that path. And search for my Rogue Elephant.
It is that blood connection. That almost primal need for family, clan, tribe. You can’t pull away so easily. Distance yourself from them. Even if you barely know them. Even if you do not share their beliefs and values. Even if you detest them.
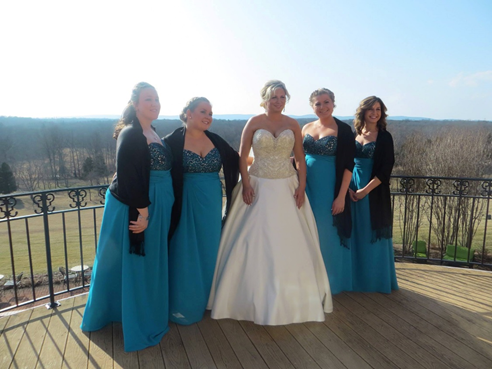
The Bridesmaids’ Bracelets
For years, I fretted. I worried, and fretted, and paced up and down, and down and up. I rubbed my hands in the way that worried people rub their hands. I shouldn’t go. I would not go.
To my niece’s wedding.
My only niece.
Of my only sister.
My niece who I had hoped and prayed and prayed some more that she would never get married. Why couldn’t she just live with the guy? Why marry? Marriage is an encumbrance. It’s an outdated, Middle Ages kind of thing that denigrates women under the guise of protecting them. They sign a contract giving themselves over to the man, vowing to obey. Respect. Follow. Bear babies. Cook. Clean. Even earn a living, if he can’t.
Yet the man keeps the power. His voice to God. Her voice through his to God.
Marriage. Not for me.
And I didn’t want to go.
Too afraid I’d say something or do something to upset people.
Because they would be there.
Those cousins.
And their children.
And their children’s children.
Too many of them, and only one of me.
But my cousins had rejected me because I was gay.
And that hurt.
And then that rejection became an idea of rejection and a symbol of rejection, and I thought how often in life, from when I was very young, to when I was much, much older, — how often in life had I been rejected for some label or category or reason having nothing to do with me. Rejected as a Jew. Rejected as gay. Rejected by friends. Rejected by strangers. Rejected by family.
So toxic.
Didn’t want to deal with this.
Preferred avoidance.
Thought over and over again what excuses I could give my sister.
I thought about this when my niece was 13.
I thought about this when she was 18.
Then 20, and 23, and 24 and finally 28, when I had to make a choice.
My sister and her family were very close to these cousins, closer to them in most ways than to me. Years ago, my sister used to invite me for Thanksgiving and for Passover. And she invited all these cousins, as well. She liked to give a party.
Partying with these cousins was too toxic for me, so I made excuses. Too busy at work. Things too slow in business so couldn’t afford it. Had other things scheduled.
For me to feel comfortable, my sister’s choice would have to have been “ME”, not “THEM”. I felt bad. I felt guilty. I didn’t want to put my sister in this situation. It was easier to come up with an excuse.
But year after year, the situation took its toll. Rejection — a symbol, but painful nonetheless. Not because of the act itself, but the symbolic power of the act to affect me — Rejection — put a wedge between my sister and myself. I did not have the self-confidence, and I didn’t value myself enough, to prevent caving in before this symbolically powerful act of rejection because I was gay.
I was always looking for love and connection, but when around my relatives, all I felt was isolated, confused and in despair.
I didn’t have to deal with this as long as I stayed hundreds of miles away from New Jersey and Maryland and Virginia and Florida. Tucked safely in middle Tennessee.
I Had To Go / I Wanted To Go
The wedding was in March.
The previous summer, I decided I would go. Not exactly sure what changed my mind, perhaps a feeling of familial obligation, perhaps putting my sense of self to the test, perhaps wanting to try out all that good food and cake and drink specially prepared for the occasion. My sister plans the best parties.
I offered to make bracelets for all the bridesmaids.
I wasn’t just being a good guy here. Jewelry and design are at the core of my identity. The jewelry I design is the result of my choices. Choices about colors. Choices about the placement of lines, shapes and forms. Choices about the clasp and how to attach it. Choices about materials and techniques.
My inner being. On display. Irrefutable.
My choices have little to nothing to do with the label “JEW”.
Nor do my choices have much to do with the label “GAY”.
They are about me. A Designer.
Reflected in my jewelry.
And would be on display.
Accept or reject my jewelry.
And you accept or reject me.
On my terms.
My own terms.
Me.
My essence.
My resonance.
My jewelry.
This was my chance to shine. I was going to create a special bead woven design for these bracelets. Something frilly and girly for a wedding, but something also indicative of my style. Something that would not take too much work, but would look very rich and substantial.
I designed what I thought would be the perfect bracelet. A mix of stitches. Great looking beads. Had movement and dimension. But I was struggling to find the perfect color palette. The bracelet was made up of 4 colors, and a 4-color color scheme is one of the most difficult to work with — especially when it comes to beads, which are not available in all colors, let alone 4 colors which could specifically work in a specific color scheme in this specific bracelet.
While I was struggling to pick colors, Dara, my niece, had been doing a little online research, as well. She found two bead-strung bracelets on Etsy that she particularly liked, and shared these with me.
No, No, No!!!
My first reaction was Horror! Oh No!, she wants something bead strung and so non-artisan looking. Making these up would not signify to my terrible cousins nor to my good cousins, who I was all about. As Jayden, my partner, said, buy all the parts and do it quick. You’re not close to your niece, so who cares. But to me, although the work involved would be minimal — it would not be enough of a gift for the wedding.
Don’t get me wrong. The two bracelets Dara picked out were very attractive. They were just so out of sync with everything I wanted to do, and everything I wanted to accomplish. And I had to ask myself: give Dara what she wants, or go off in a different direction?
The question was kind of rhetorical. Of course, I’d give Dara what she wanted. But what to do. How can I construe, mold, fashion, arrange the bracelet to be reflective of me? Jewelry designer Me. Bead artist Me. Worthy cousin to be awed and ooh’ed over Me.
Dara’s Bracelet
The bracelet Dara wanted was 3 strands of 6mm round fire polish beads in two coordinating colors which matched the color of her bridesmaid dresses. The beads were staggered in a V-shape like bowling pins, each section separated by a diagonally placed 3-hole spacer bar.
I thought long and hard about how I could make this general design my own.
A few weeks passed. And an idea came to me. I could bead weave the spacer bars. I could alternate right angle weave and flat peyote to create a stable, rectangular shape. The right angle weave sections would be the two sides, which would allow me to build in the holes. The flat peyote would be the top and the bottom, which would allow me to build in a shape-supporting structure. I would embellish the tops of the bars with 2mm round Austrian crystal beads, and I would create bead woven end caps on either side of the bar, to give the bars a finished and polished look. Then I would use needle and thread to string everything up.
That was my answer.
It was a good one.
So, first, I set about coming up with the bead woven pattern for my spacer bars. This did not take very long because I had a clear idea about what I wanted in my head. What was not in my head, however, was how long to make the bars and how many holes each should have. And would they work in the whole composition.
I ended up making 5 test bracelets, each requiring 11 spacer bars, and each with some variety in the design or placement of the spacer bars, and in the attachment strategy for the clasp.
Now I had three key tasks finished: (1) The design of the spacer bars (2) The construction plan for the bracelet (3) The construction plan for attaching the clasp
Next, selecting the right colors of beads.
First off, I wanted to use 6mm round Austrian crystal beads, instead of Czech glass.
There were images of the bridesmaid dresses on line, but the actual color skirted that area between blue teal and green teal, and not every computer screen showed the color exactly. It became critical to the choice of colors, given some limited choices available in the Swarovski line in this range, whether the dress was more on the green side or more on the blue side.
My sister said Blue.
My niece said Green.
My sister was supposed to send me a fabric sample, but she lost it.
I mocked up 3 bracelets, one all blue teal, one a mix of blue and green teal, and one more green teal.
My sister picked the green.
My niece picked the mix of blue and green.
And my gut, from looking at the computer images, was telling me it should be all blue.
Impasse.
I went with my gut, and settled on all blue, actually a mix of capri blue and Caribbean opal.
There were four bridesmaids. I asked my niece to get their wrist measurements. One the bridesmaids had a very, very thin wrist. Would my design work for her? I agonized over it. The sections were very rigidly organized, and I’d have to remove a whole section at a time. Luckily, this worked OK.
The only other hitch that came up had to do with the availability of the parts.
I designed the piece in September. The wedding was in March. In November, I tried to acquire enough clasps and end bars for the clasp assembly, and found out that both the clasp and end bar I had chosen were either out of stock until the following April, or no longer manufactured.
So began the desperate hunt for these parts. The end bars had to be 22mm wide, or very close to that, with 3 holes and 3 holes spaced out evenly across the bar. Most 3-hole end bars were around 15mm wide. Found some in Israel, which while no longer manufactured, the supplier had just the amount I needed left in stock. Easily found a substitute clasp.
Then there were the beads. Again, I’m in November. The capri beads were out of stock from my supplier, and 2 of my alternative suppliers, but due back by December. The Caribbean opal beads were out of stock, and not due back anytime soon. I found a supplier who charged a little bit more for these, but got enough for my needs.
Whew!
Was Standing In The Same Room As My Relatives The Right Choice?
It was a few weeks before the wedding, and I was wondering if my choice to attend was the right one. Over and over and over again, I played out in my head what I would or would not say to my very inconsiderate, selfish, self-centered, inhospitable, unsympathetic, narrow-minded, prejudiced relatives. One part of me wanted me to be pleasant but distant. Another part of me wanted me to say something pointed and ugly.
I asked each of my friends, what they would do. I wanted so badly to be pointed and ugly. I was leaning in that direction. Of course, I didn’t want to upset my sister or my niece.
I thought back on the event that started it all. It was really so insignificant. An expected invitation to a cousin’s wedding never came. But I hadn’t planned on going. I did expect to receive an invitation, however. Because everyone expected me to receive an invitation. We all had been planning vacations and things to do around this invitation. For well over a year at that point. We had been planning. All of us. When we were going to arrive, where we were going to stay, and what we were going to do. And while I didn’t plan on going, I expected the invitation.
Rogue Elephants Are Shy And Hide In The Presence of Self-Doubt And Life Crises
I’m a firm believer that every few years, we each go through a life crisis. When we are babies, we have to resolve a crisis of finding out who to trust, and who not to. A few life crises later, we’re in puberty, having to resolve whether we’re still a kid, or some kind of adult. Several life crises after puberty, we go through the mother of all life crisis — what we call, cue the digital billboard, the Mid-Life Crisis. This crisis is filled with anger, frustration, regret, disappointment, fear.
My mid-life crisis arrived several years before Dara’s wedding. Eventually I came to terms with mid-life. That’s what I did. And then, immediately after my mid-life crisis, as if the mid-life crisis wasn’t traumatic enough, I had a sudden, almost primal, no, yes it was full-on primal, urge to reconnect with my family. I had grown apart from my sister and father and brother. From my first cousins in Florida and those in New Jersey, New York and Maryland. And from their children, my new second cousins. And I was feeling the need to re-connect. Post mid-life I urgently felt the need to re-connect. Like it was life or death. Connection. Affirmation. Completeness.
And I reconnected.
I slowly began to let everyone know I was gay. They kinda knew and suspected already. But I made it official. Pretty much everyone except my sister was supportive at some level. Eventually she got used to it.
I was invited to my cousin Michele’s oldest son’s wedding. And then, over the next few years, to some other weddings and bar and bat mitzvahs and special occasions. I re-connected. I was happy. Soon there were the occasional phone calls and emails. A few of my cousins sent out the periodic mass emails, and I was on their lists. I kept up with their newsy news and not-so-newsy news, their shared successes, their joys in life, and the every-so-often sadnesses. I felt included. Supported.
It was important to everyone, and you could tell, because they spent so much time doing it, to anticipate the next event we’d all attend. The next event was the marriage of my cousin Michele’s middle son.
It was to be a June wedding. I got a phone call sometime in April from my sister. “Did you get your invitation yet?” And a day later, from my cousin Leslie. “Did you get your invitation yet?” And obviously the answer was, No! Not yet. I kept checking the mail for several days, and then it began to dawn on me that I wasn’t invited. I wasn’t going to be invited. And if not getting invited to an event that I wasn’t planning on going to wasn’t enough of a jolt and shock, both my cousins Michele and Paulette dropped me from their almost daily mass email lists.
I was person non-grata. Why?
I asked myself, Why?
And I asked some cousins, Why?
And it became known that the Why was because I was gay.
And that was that.
Excluded again.
Of course, I wanted my sister to make the choice not to go.
She went.
And that put a wedge in our relationship that never really healed, because it was irreconcilable.
And I got very depressed for a few months afterwards.
There Is A Long History
I do not have to think very long or very hard to realize that my relationships with my relatives soured many years ago. There were slights. Special occasions arranged on dates my family could not attend. Arguments over matzah balls (hard or soft) and Thanksgiving dinners (traditional food or non) and inappropriate racist remarks and jokes. It was my uncle Sid, when asked to stop telling black (N-word) jokes, said, OK!, then began telling polish (P-word) jokes.
There were very barbed comments about home décor, kitchen counters, brands of appliances, whether a kitchen island or not. There were my religious cousins who would not visit New Jersey because they believed the ground outside the New York City metropolitan area was unholy. Who would not eat Kosher food prepared by my mom because she could never prepare food Kosher enough. There were the complaints that there was never enough food. And the constant, mean-spirited gossip relatives vomited out of their mouths about other relatives.
If something happened to me or to either of my parents or to my sister or brother, I could never turn to these relatives for practical or emotional support and help. I felt too alienated from them. They alienated me from them.
So I wasn’t invited to a wedding. So my relationship with my sister and her family never became close — at least for a long while. So I no longer kept up with my cousins and second cousins and all their offspring. So I had some issues with my parents and my school and the dominant Christian culture. That’s largely behind me. Not an obsession. But the oncoming wedding of my sister’s daughter forced me to focus on these things again.
Thank God the wedding only lasted a weekend.
Wedding Weekend
True to form, my sister threw a grand event people are probably still talking about.
In the few months leading up to the wedding, I concentrated on designing the bridesmaids’ bracelets. As I determined how I would make the pieces my own, I got very excited. I developed a very clever and professional way to bead weave the 3-hole separator bars. I combined Right Angle Weave and Flat Peyote, using the structural and inherent properties of each in a strategic way. This allowed be to create holes in the sides through when to thread the strands, and structural support to allow the bars to keep their shape.
I kept thinking that, while the bridesmaids would find the bracelets appealing and desirable, they would never appreciate the amount of thought, work and insight involved in their construction. So, I decided I would later turn this piece into a kit and a workshop. This piece was a great example of my evolving ideas and writings about the architectural bases of bead weaving stitches.
The wedding itself was beautiful, and went off without a hitch. The food was terrific. The location romantic. The flowers and bridal gown beautiful. There were over 200 guests. And about 60 of those I was trying to avoid. Relatives!
I arrived a day earlier. One of my cousins, whom I do speak with occasionally, arrived at the airport at the same time. After we checked in at our hotel, we went to lunch and unloaded about all the relatives. She and I have similar opinions about these people.
In the late afternoon, I stopped by the Bridal Suite, where they had set up to greet guests arriving early and staying at the hotel. You walked into the equivalent of a living room. Off to the left were a bedroom, kitchenette and bathroom. Off to the right were a dining room and an outdoor patio. It was in the 30’s and wet and snowy, so no one went out on the patio.
As more and more people gathered in the Suite, I found myself talking to some folks in the dining room. And then, one by one, two by two, three by three, these cousins I wanted to avoid started filling up the center room. And I found myself backing up against the far dining room wall, seemingly pushing myself into the wall and through it, or so it felt to me. My mind left the room and merged into the wall. I desperately looked for an opening where I could run through the living room and out the door. But more and more people came flooding in. I was having trouble catching my breath, slowly going into panic.
At last, an opening. I escaped. Hyperventilating. I went up to my room, and waited until I regained some composure. My panic attack had run its course.
Twenty minutes later, I returned to the Bridal Suite, bridesmaids’ bracelets in hand. I had put each into its own jewelry box, with the name of the bridesmaid written on a card in each box. They were going to take the bridal pictures in the morning, and I wanted to be sure they were wearing their bracelets. And I secretly wanted a lot of these people crowding this Bridal Suite to get a glimpse of what I had made.
As I had thought, they loved the bracelets — they were beautiful — but were clueless about design. That “full” feedback is so very important to me, but often missing.
Luckily the colors of the bracelet perfectly matched the dresses.
My job was done.
It was many years later, that I was able to distance myself emotionally from these people. Underlying, gnawing tensions here led, forced might be a better word for it, the way towards finding new meanings in life for myself. A source of growth and discovery. I eventually found my Rogue Elephant and beaded him. A crutch, perhaps. A diversion from family, maybe. Or a hand-knee-trunk up. A connection. A purpose.
CONQUERING THE CREATIVE MARKETPLACE: Between the Fickleness of Business and the Pursuit of Design
How dreams are made between the fickleness of business and the pursuit of jewelry design
This guidebook is a must-have for anyone serious about making money selling jewelry. I focus on straightforward, workable strategies for integrating business practices with the creative design process. These strategies make balancing your creative self with your productive self easier and more fluid.
Based both on the creation and development of my own jewelry design business, as well as teaching countless students over the past 35+ years about business and craft, I address what should be some of your key concerns and uncertainties. I help you plan your road map.
Whether you are a hobbyist or a self-supporting business, success as a jewelry designer involves many things to think about, know and do. I share with you the kinds of things it takes to start your own jewelry business, run it, anticipate risks and rewards, and lead it to a level of success you feel is right for you, including
· Marketing, Promoting, Branding: competitor analysis, developing message, establishing emotional connections to your products, social media marketing
· Selling: linking product to buyer among many venues, such as store, department store, online, trunk show, home show, trade show, sales reps and showrooms, catalogs, TV shopping, galleries, advertising, cold calling, making the pitch
· Resiliency: building business, professional and psychological resiliency
· Professional Responsibilities: preparing artist statement, portfolio, look book, resume, biographical sketch, profile, FAQ, self-care
SO YOU WANT TO BE A JEWELRY DESIGNER Merging Your Voice With Form
So You Want To Be A Jewelry Designer reinterprets how to apply techniques and modify art theories from the Jewelry Designer’s perspective. To go beyond craft, the jewelry designer needs to become literate in this discipline called Jewelry Design. Literacy means understanding how to answer the question: Why do some pieces of jewelry draw your attention, and others do not? How to develop the authentic, creative self, someone who is fluent, flexible and original. How to gain the necessary design skills and be able to apply them, whether the situation is familiar or not.
The Jewelry Journey Podcast “Building Jewelry That Works: Why Jewelry Design Is Like Architecture” Podcast, Part 1 Podcast, Part 2
PEARL KNOTTING…Warren’s Way Easy. Simple. No tools. Anyone Can Do!
I developed a nontraditional technique which does not use tools because I found tools get in the way of tying good and well-positioned knots. I decided to bring two cords through the bead to minimize any negative effects resulting from the pearl rotating around the cord. I only have you glue one knot in the piece. I use a simple overhand knot which is easily centered. I developed a rule for choosing the thickness of your bead cord. I lay out different steps for starting and ending a piece, based on how you want to attach the piece to your clasp assembly.
SO YOU WANT TO DO CRAFT SHOWS:16 Lessons I Learned Doing Craft Shows
In this book, I discuss 16 lessons I learned, Including How To (1) Find, Evaluate and Select Craft Shows Right for You, (2) Determine a Set of Realistic Goals, (3) Compute a Simple Break-Even Analysis, (4) Develop Your Applications and Apply in the Smartest Ways, (5) Understand How Much Inventory to Bring, (6) Set Up and Present Both Yourself and Your Wares, (7) Best Promote and Operate Your Craft Show Business before, during and after the show.