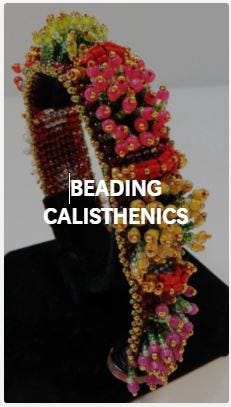
Beading requires a lot of mind-body coordination. That takes work. It is work.
Calisthenics are exercises you can do to improve and tone your mind-body coordination when bead weaving.
You have to be able to get from your fingers to the needle to the beads, back along the thread to the needle to the fingers, hands, arms, eyes, mind. And then again. And again. Over and over, one more time. You need to get into a rhythm. All these working parts need to be working. No time for cramping. No time to get tired. No time to lose concentration.
A rhythm. Needle, pick up bead, pull down along thread, check the tension, pick up a bead, pull down along thread, check the tension, pick up a bead….
I noticed that different instructors had various techniques and strategies for maintaining this rhythm. Yes, music was involved sometimes. Othertimes simple meditation or creative reading and discourse. Some people had some stretching exercises that they did. Others tested themselves before proceeding with their big project. Still others did small things to reconfirm their learning.
Throughout this Series, I introduce some of the beading calisthenics that I experienced along the way. If you want to gather materials up so that you can follow along with these calisthenics, here’s the list.
MATERIALS NEEDED FOR ALL THE CALISTHENIC EXERCISES (SUPPLY LIST):
notebook, pencil 1 tube each of Japanese 11/0 seed beads in gray, 3 different colors of orange, black, white, any other 4 colors 1 tube each of Japanese 8/0 seed beads in gray or silver, black, white, orange, any other 4 colors 1 tube each of Japanese 6/0 seed beads in gray or silver, black, white, orange, any other 4 colors 5 gray-scale colors of delicas or 11/0 seed beads Nymo D or C-Lon D thread in black Nymo D or C-Lon D thread in yellow two toggle clasps .018” or .019” flexible cable wire assorted 4mm, 6mm and 8mm beads in various coordinating colors, including grays and oranges in your mix, as well big bowl and a bowl-full of assorted beads Size 10 English beading needles Bees wax scissors beading dishes or trays any kind of graph paper work surface or pad colored pencils a few clasps, (toggles are easy to work with) some crimp beads crimping pliers
BEADING CALISTHENICS #7: Composition in Gray and Gray
5 gray-scale colors of delicas or 11/0 seed beads gray colored Nymo or C-lon thread, size D yellow colored Nymo or C-lon thread, size D
You can use an existing peyote, brick stitch or loom pattern, or create your own. Try to use or create a pattern that is about 3 inches square. Assign your colors using your 5 gray-scale colors of delicas or 11/0 seed beads.
Evaluate your resulting bead-weaving:
To what extent have you been able to create obvious or desired boundaries between sections or forms within the piece?
To what extent have you been able to create a sense of dimensionality, or forward/receding qualities?
To what extent have you had control over the lines, forms, sections and other design elements, using only gray?
To what extent have you been able to achieve an energy/vitality within the piece, as if it had been multi-colored?
Additional Exercises:
1. Repeat the pattern, using your 5-gray-scale bead colors, and use a bright yellow Nymo or C-Lon Size D thread
2. Repeat the pattern, and substitute a rich colored blue or red bead for one of the grays, plus the other original 4 colors of gray, and the gray Nymo or C-Lon thread
Beading requires a lot of mind-body coordination. That takes work. It is work.
Calisthenics are exercises you can do to improve and tone your mind-body coordination when bead weaving.
You have to be able to get from your fingers to the needle to the beads, back along the thread to the needle to the fingers, hands, arms, eyes, mind. And then again. And again. Over and over, one more time. You need to get into a rhythm. All these working parts need to be working. No time for cramping. No time to get tired. No time to lose concentration.
A rhythm. Needle, pick up bead, pull down along thread, check the tension, pick up a bead, pull down along thread, check the tension, pick up a bead….
I noticed that different instructors had various techniques and strategies for maintaining this rhythm. Yes, music was involved sometimes. Othertimes simple meditation or creative reading and discourse. Some people had some stretching exercises that they did. Others tested themselves before proceeding with their big project. Still others did small things to reconfirm their learning.
Throughout this Series, I introduce some of the beading calisthenics that I experienced along the way. If you want to gather materials up so that you can follow along with these calisthenics, here’s the list.
MATERIALS NEEDED FOR ALL THE CALISTHENIC EXERCISES (SUPPLY LIST):
notebook, pencil 1 tube each of Japanese 11/0 seed beads in gray, 3 different colors of orange, black, white, any other 4 colors 1 tube each of Japanese 8/0 seed beads in gray or silver, black, white, orange, any other 4 colors 1 tube each of Japanese 6/0 seed beads in gray or silver, black, white, orange, any other 4 colors 5 gray-scale colors of delicas or 11/0 seed beads Nymo D or C-Lon D thread in black Nymo D or C-Lon D thread in yellow two toggle clasps .018” or .019” flexible cable wire assorted 4mm, 6mm and 8mm beads in various coordinating colors, including grays and oranges in your mix, as well big bowl and a bowl-full of assorted beads Size 10 English beading needles Bees wax scissors beading dishes or trays any kind of graph paper work surface or pad colored pencils a few clasps, (toggles are easy to work with) some crimp beads crimping pliers
The goal here is to learn a little about managing thread tension.
Pick a favorite bead weaving stitch, such as Peyote, Brick or Ndbele (Herringbone). Plan out how to make a flat length of the weave, about ½” wide and 6” long. You can also do 6 separate pieces about ½” wide and 1” long.
For the first inch, keep a tight tension. For the 2nd inch, make the tension tighter. For the 3rd inch, make it even tighter. For the tightest tension, you might even want to reinforce your stitching, by going through each bead again and again with your thread.
For the fourth inch, try to get a tension a little looser than you typically use. Then the next inch, get even looser. For your final inch, make this the loosest of all.
Now pick a stitch like the Chevron Stitch or the Right Angle Weave Stitch. Work it for a length of 3–4”. These stitches start out very loose.
What different kinds of strategies can you employ to tighten the tension? — Reinforcement? Reinforcement after each small segment of stitches? Or Reinforcement after you’ve completed the whole piece? Changing the type of stringing material you are using? Stitching over a solid form, such as a dowel, pencil or straw or vase or ball? Adding additional beads at key joints? There are these and lots of possibilities. Try them out.
Beading requires a lot of mind-body coordination. That takes work. It is work.
Calisthenics are exercises you can do to improve and tone your mind-body coordination when bead weaving.
You have to be able to get from your fingers to the needle to the beads, back along the thread to the needle to the fingers, hands, arms, eyes, mind. And then again. And again. Over and over, one more time. You need to get into a rhythm. All these working parts need to be working. No time for cramping. No time to get tired. No time to lose concentration.
A rhythm. Needle, pick up bead, pull down along thread, check the tension, pick up a bead, pull down along thread, check the tension, pick up a bead….
I noticed that different instructors had various techniques and strategies for maintaining this rhythm. Yes, music was involved sometimes. Othertimes simple meditation or creative reading and discourse. Some people had some stretching exercises that they did. Others tested themselves before proceeding with their big project. Still others did small things to reconfirm their learning.
Throughout this Series, I introduce some of the beading calisthenics that I experienced along the way. If you want to gather materials up so that you can follow along with these calisthenics, here’s the list.
MATERIALS NEEDED FOR ALL THE CALISTHENIC EXERCISES (SUPPLY LIST):
notebook, pencil 1 tube each of Japanese 11/0 seed beads in gray, 3 different colors of orange, black, white, any other 4 colors 1 tube each of Japanese 8/0 seed beads in gray or silver, black, white, orange, any other 4 colors 1 tube each of Japanese 6/0 seed beads in gray or silver, black, white, orange, any other 4 colors 5 gray-scale colors of delicas or 11/0 seed beads Nymo D or C-Lon D thread in black Nymo D or C-Lon D thread in yellow two toggle clasps .018” or .019” flexible cable wire assorted 4mm, 6mm and 8mm beads in various coordinating colors, including grays and oranges in your mix, as well big bowl and a bowl-full of assorted beads Size 10 English beading needles Bees wax scissors beading dishes or trays any kind of graph paper work surface or pad colored pencils a few clasps, (toggles are easy to work with) some crimp beads crimping pliers
BEADING CALISTHENICS #4: Two-Needle Race Up The Ladder
For each person:2 size #10 English beading needles Nymo D or C-Lon D thread Size 8/0 Japanese seed beads
Here, you need two or more people, or you can compete against yourself. This is a race.
We are going to use two needles and one length of thread to work up through the ladder stitch.
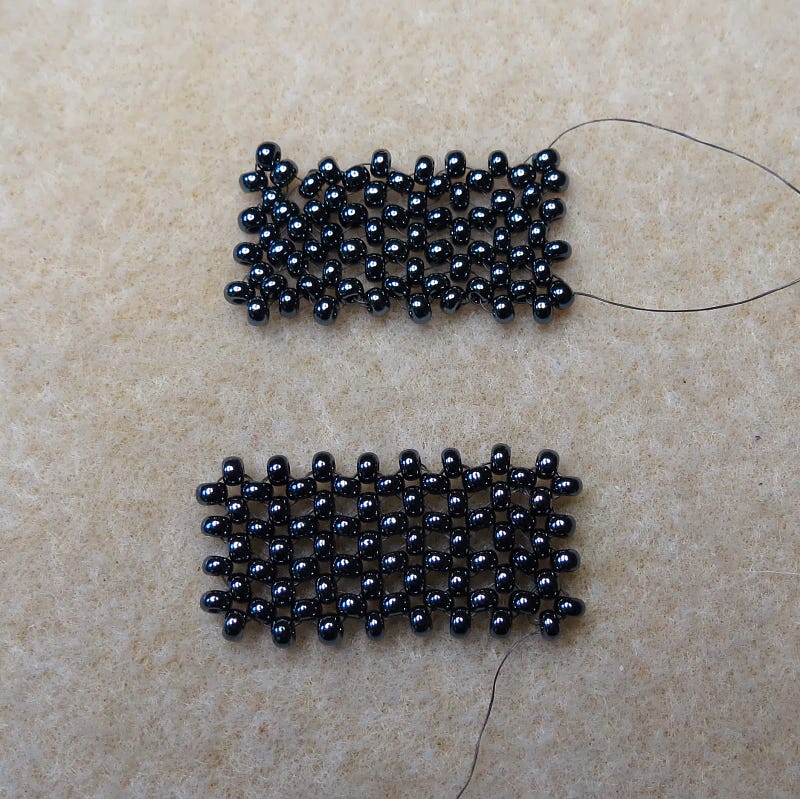
The ladder technique: Double your length of thread. Thread a needle on the end of each side. Pick up the same number of beads on the two needles. Pass the needles in opposite directions through the top beads on each needle. Pull the tension tight. For your first loop (or rung), you’ll need one extra bead on each needle, than for subsequent loops (rungs).
You might start with 4 beads on each needle for the first rung, then 3 beads on each needle for each additional run. Pick up 4 on each needle, crossover. Pull the tension tight. Pick up 3 on each needle, crossover. Pull the tension tight. Keep repeating with 3 beads on each needle.
The ladder looks like this:
Run the race to see who can be the first to make a ladder that is 12 inches long.
Beading requires a lot of mind-body coordination. That takes work. It is work.
Calisthenics are exercises you can do to improve and tone your mind-body coordination when bead weaving.
You have to be able to get from your fingers to the needle to the beads, back along the thread to the needle to the fingers, hands, arms, eyes, mind. And then again. And again. Over and over, one more time. You need to get into a rhythm. All these working parts need to be working. No time for cramping. No time to get tired. No time to lose concentration.
A rhythm. Needle, pick up bead, pull down along thread, check the tension, pick up a bead, pull down along thread, check the tension, pick up a bead….
I noticed that different instructors had various techniques and strategies for maintaining this rhythm. Yes, music was involved sometimes. Othertimes simple meditation or creative reading and discourse. Some people had some stretching exercises that they did. Others tested themselves before proceeding with their big project. Still others did small things to reconfirm their learning.
Throughout this Series, I introduce some of the beading calisthenics that I experienced along the way. If you want to gather materials up so that you can follow along with these calisthenics, here’s the list.
MATERIALS NEEDED FOR ALL THE CALISTHENIC EXERCISES (SUPPLY LIST):
notebook, pencil 1 tube each of Japanese 11/0 seed beads in gray, 3 different colors of orange, black, white, any other 4 colors 1 tube each of Japanese 8/0 seed beads in gray or silver, black, white, orange, any other 4 colors 1 tube each of Japanese 6/0 seed beads in gray or silver, black, white, orange, any other 4 colors 5 gray-scale colors of delicas or 11/0 seed beads Nymo D or C-Lon D thread in black Nymo D or C-Lon D thread in yellow two toggle clasps .018” or .019” flexible cable wire assorted 4mm, 6mm and 8mm beads in various coordinating colors, including grays and oranges in your mix, as well big bowl and a bowl-full of assorted beads Size 10 English beading needles Bees wax scissors beading dishes or trays any kind of graph paper work surface or pad colored pencils a few clasps, (toggles are easy to work with) some crimp beads crimping pliers
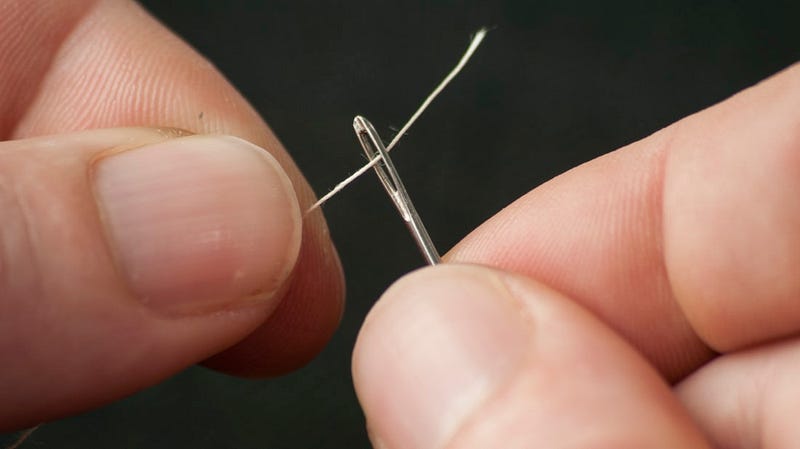
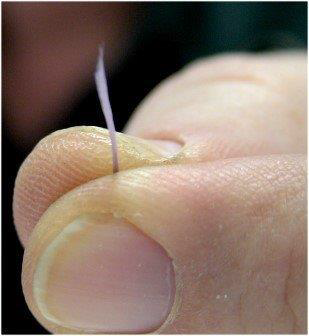
BEADING CALISTHENICS #2: Zen Needle Threading
Take a length of Nymo size D thread and a size #10 English beading needle. Thread the needle the way you are accustomed to doing this. Take the thread end, and thread it again. You may have to trim the tip of the thread.
Now try to thread your needle, this time keeping your eyes closed.
Visualize in your mind what you had just seen with your eyes.
Feel with your hands and body what you had just felt with your hands and body.
Unsuccessful? Then try again. Thread the needle twice with eyes open. Close your eyes. Try again. Visualize. Make your body and mind one with the needle and one with the thread.
Beading requires a lot of mind-body coordination. That takes work. It is work.
Calisthenics are exercises you can do to improve and tone your mind-body coordination when bead weaving.
You have to be able to get from your fingers to the needle to the beads, back along the thread to the needle to the fingers, hands, arms, eyes, mind. And then again. And again. Over and over, one more time. You need to get into a rhythm. All these working parts need to be working. No time for cramping. No time to get tired. No time to lose concentration.
A rhythm. Needle, pick up bead, pull down along thread, check the tension, pick up a bead, pull down along thread, check the tension, pick up a bead….
I noticed that different instructors had various techniques and strategies for maintaining this rhythm. Yes, music was involved sometimes. Othertimes simple meditation or creative reading and discourse. Some people had some stretching exercises that they did. Others tested themselves before proceeding with their big project. Still others did small things to reconfirm their learning.
Throughout this Series, I introduce some of the beading calisthenics that I experienced along the way. If you want to gather materials up so that you can follow along with these calisthenics, here’s the list.
MATERIALS NEEDED FOR ALL THE CALISTHENIC EXERCISES (SUPPLY LIST):
notebook, pencil 1 tube each of Japanese 11/0 seed beads in gray, 3 different colors of orange, black, white, any other 4 colors 1 tube each of Japanese 8/0 seed beads in gray or silver, black, white, orange, any other 4 colors 1 tube each of Japanese 6/0 seed beads in gray or silver, black, white, orange, any other 4 colors 5 gray-scale colors of delicas or 11/0 seed beads Nymo D or C-Lon D thread in black Nymo D or C-Lon D thread in yellow two toggle clasps .018” or .019” flexible cable wire assorted 4mm, 6mm and 8mm beads in various coordinating colors, including grays and oranges in your mix, as well big bowl and a bowl-full of assorted beads Size 10 English beading needles Bees wax scissors beading dishes or trays any kind of graph paper work surface or pad colored pencils a few clasps, (toggles are easy to work with) some crimp beads crimping pliers
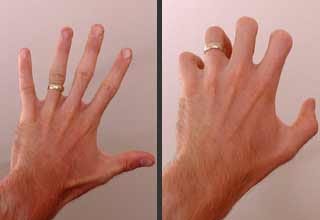
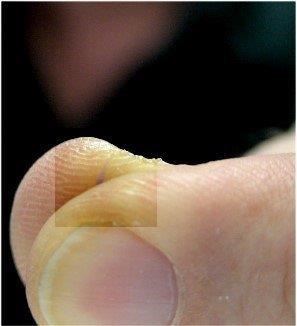
BEADING CALISTHENICS #1: 5-Finger Stretchies
This exercise is used to prevent your fingers from cramping. Often, when beading, you are holding your hand and fingers in a very tight, controlled, sometimes unnatural or uncomfortable position. You should stop periodically, and do 5-Finger Stretchies. This is a wonderful exercise which relaxes the muscles in your hands.
Take one hand and hold it arm out, palm forward. Your arm is parallel to the floor. Your palm, fingers up, is perpendicular to the floor. Tighten every muscle in every finger, and pull each finger inward and downwards towards the point they meet the palm, but don’t touch the palm. Picture making a claw with your pulled back fingers.
Squeeze the tension, release. Squeeze, release. Squeeze, release. Do this rapidly, perhaps 4 squeeze/releases a second. Do this for 10 seconds.
Many beaders love to bead, but lack the time, focus or motivation. They get too busy. They work on several projects at once. They end up with a lot of unfinished projects. Often achieving success gets too frustrating. Paralyzing. There are too many competing demands.
Beading and craft projects can take a long time. You have to maintain your interest over this extended period.
Most of us are like this. So I wanted to know what kinds of things do you do to increase your patience. How do you construct and manage the situations you are in — with all these competing demands for your time and energy — so that you can bead?
Are there some strategic short-cuts you take, when beading or designing, so you can speed things up?
What are your Patience Boosters?
“When I'm working my "day" job, I have a 3 X 5 note pad I carry with me and use it to write or draw ideas until I can get back to the beads.
When I get home I fix supper and bead until bed time. Then on Saturday I pick any projects that I want to get finished and do completion work then.
I find that projects in the "Lost interest category" never get finished and every so often I cut them up and reclaim the beads.”
Infuriating! That’s how many people, beginners and advanced alike, feel when they try to understand patterns and instructions.
Know up-front that most patterns are poorly drawn, and most instructions are poorly written. The instructors who write these often leave out critical steps — especially for new beaders and jewelry makers who are unfamiliar with many of the things these instructors assume that you know. Most often, they leave out critical information showing you the pathway, and how to negotiate that pathway, from where you are to where you are going next. It’s obvious to the instructor. But not so obvious to you.
In patterns, this “where-am-I, where-am-I-going-next” information is frequently unclear or omitted. You did Step 1 OK. You understand what Step 2 is about. But you don’t know how to get from Step 1 to Step 2. Othertimes, the patterns are overly complex, often, in the editorial interest of reducing the number of printed pages. Instead of showing a separate pattern or diagram for each step, the editors frequently try to show you three, four, five or more steps in the same diagram. So you have a bird’s nest of lines, and a spider-web’s road map — and you’re no where.
I tell people, that you need to re-write the instructions and re-draw the patterns or diagrams in a way you personally understand. This is very helpful.
Reading Patterns: Usually patterns are organized starting at the bottom with row 1 or step 1, first moving left to right, and then moving up bottom to the top. Othertimes, but less frequenlty, patterns are drawn so that you move in the opposite direction, starting at the top, moving left to right, then working down towards the bottom. When reading a pattern, you first need to locate whether the pattern goes bottom-up or top-down, or left-right or right-left.
Next, determine the directional flow of the work. Are you moving left to right and then right to left? Are you moving left to right, and then flipping the piece over, so you can continue moving left to right? Are you starting in the middle?
Most patterns and instructions are written from the Right-Handed person’s perspective. Right-Handed people usually work counter-clockwise. If you are Left-Handed, you may want to redraw the pattern or rewrite the instructions. Left-Handed people usually work clockwise.
Now, look at all the special symbols on the pattern, if any. Decipher what each one means before you begin your work. If you don’t know what “11/0” or “cylinder bead” means, for example, use the internet or your local bead or craft store, as a resource for finding out.
Clearly delineate, even draw an outline on the pattern itself with a pen, the thread, string or wire path. Be sure whether you are following a straight line path, or not.
Determine if you are creating one line or row at a time, or more than one line or row at a time.
Sometimes it is helpful to use a post-it note and place it right below the row you are working on. This helps you not lose your place.
If the pattern is fuzzy on how you proceed from one step to the next, try to draw in your own pattern, based on the written instructions, or on what you intuitively feel needs to happen next.
To draw your own patterns, you can find several sources of free graph paper on line. Usually the graph paper is available for a wide range of bead weaving stitches and techniques.
Many people who begin to bead want to rush to the finish line. They want to learn everything at once.
They buy beads and parts indiscriminately. They purchase every book they can find. They take classes on anything that interests them or catches their eye, no matter what the skill levels involved. Many people are not unlike a customer of ours — Lulu Betty — who contracted to make almost 50 pieces of complex jewelry, before ever having made even one piece before. She came into the store, and wanted someone to teach her everything — crimping, stringing, needle and thread work, wire working, silversmithing — in 2 hours.
Beading and jewelry making are not things to rush into. These are not things to learn haphazardly. Not everything is something you can easily pick up without having someone else show you.
This is a hobby and avocation that requires you to know a lot of things. You need to know a lot about materials. You need to know a lot about quality issues underlying these materials, and what happens to these materials over time. You need to be mechanical and comfortable using tools to construct things. You need to learn many basic techniques. You need to understand physical mechanics and what happens to all these materials and pieces, when jewelry is worn. You need to be familiar with art theories and their applications. You need to understand people, their psychology, the dynamics of the groups they find themselves in, and their cultural rules which get them through the day. You need to even be a little bit of a party planner, because often jewelry is worn in a specific context or for a specific occasion.
There is so much to learn, that you can’t learn it all at once. And there is so much to bring to bear, when making a piece of jewelry, that it is difficult to access all this information, if you haven’t learned how everything is interrelated and interdependent.
It’s important to learn in an organized, developmental way. Learn a core set of skills. Then learn another set of skills, and how these link back to the core. Then learn yet another set of skills, how they link back to the first set, and then link back to the core. And so forth. Always ask your self how all these things are inter-related and mutually dependent. Only in this way will you begin to know if you are learning the right way, and learning the right things.
There Are Many Styles of Learning
There are many ways to learn beading and jewelry making.
Most people learn by Rote Memory. They follow a set of steps, and they end up with something. They memorize all the steps. In this approach, all the choices have been made for them. So they never get a chance to learn the implications of their choices. Why one bead over another? Why one stringing material over another? How would you use the same technique in a different situation? You pick up a lot of techniques, but not necessarily many skills.
Other people learn Analogously. They have experiences with other crafts, such as sewing or knitting or other craft, and they draw analogies. Such and Such is similar to Whatnot, so I do Whatnot the same way I do Such and Such. This can work to a point. However, beading and jewelry making can often be much more involved, requiring making many more types of choices, than in other crafts. And there are still the issues of understanding the quality of the pieces you use, and what happens to them, both when jewelry is worn, as well as when jewelry is worn over time.
Yet another way people learn is through Contradictions. They see cheap jewelry and expensive jewelry, and analyze the differences. They see jewelry people are happy with, and jewelry people are not happy with, and analyze the differences. They see fashion jewelry looked down upon by artists, and art jewelry looked down upon by fashionistas, and they analyze the differences.
Assimilation is a learning approach that combines Analogous Learning and Learning Through Contradictions. People pursue more than one craft, keeping one foot in one arena, and another foot in the other. They teach themselves by analogy and contradiction. This assumes that multiple media mix, and mix easily. Often, however, this is not true. Usually one medium has to predominate for any one project to be successful. So assimilative learning can lead to confusion and poor products, trying to meet the special concerns and structures of each craft simultaneously. It is challenging to mix media. Often the fundamentals of each particular craft need to be learned and understood in and of themselves.
Constructing Meanings is one last approach to learning a craft. In this approach, you learn groups of things, and how to apply an active or thematic label to that grouping. For example, you might learn about beading threads, such as Nymo, C-Lon and FireLine, and, at the same time, learn to evaluate each one’s strengths and weaknesses in terms of Managing Thread Tension. You might learn about crystal beads, Czech glass beads, and lampwork beads, and then, again concurrently and in comparison, learn the pros and cons of each, in terms of achieving good color blending strategies. You might learn peyote stitch and Ndebele stitch, and how to combine them within the same project.
In reality, you learn a little in each of these ways. The Constructing Meanings approach, what is often referred to as the Art & Design Tradition, usually is associated with more successful and satisfying learning. This approach provides you with the tools for making sense of a whole lot of information — all the information you need to bring to bear to make a successful piece of jewelry, one that is both aesthetically pleasing and optimally functioning.
Some people kindly refer to their unfinished projects as UFOs (Un-Finished Objects). Others less kindly refer to them as abortions. Let’s just call them un-finished projects.
You’ll find you have a lot of unfinished beading, craft and jewelry making projects. They might be waiting for more supplies, or finding the right color or clasp. They might be waiting for you to learn or re-learn a particular skill or technique. They might be waiting for more time or motivation. You might have discovered another more exciting project to do in your most recent issue of Bead & Button magazine, and want to get to that immediately, even though you haven’t finished your last project.
You might begin a project, and then as you get into it, put it down, pick it up again, find that you forgot what you were going to do in the first place. You might have inadvertently cannibalized some of your other Un-Finished Projects to help you finish a particular project on hand, and then not be able to find these very same UFOs you intended to come back to and finish, having forgotten you cannibalized them.
As one of my friends remarked, “I’m going to have to live a very long time, or else I won’t get anything done!”
People do funny things with their unfinished projects. One woman I know puts them in a clear jar, and let’s them stack up as an artwork in progress. Some people work on them in rotation, with some kind of system, lazy-susan-tray or otherwise. Others take the time to tear them up and reclaim the parts. That’s definitely not me. I leave them laying around, piled up on bead trays. Many people swap them.
I hate people who finish each bead project before starting another. Don’t you?
How can they? How much true-grit can anyone person have, or be allowed to have? Getting a grip on one’s beadwork — Is that really possible? Can you really weed out your unfinished projects, and reclaim your beads, and make clear, definite, timely decisions about which projects you will start, which projects you will finish, and which ones you won’t? Is there a pill for this? Either a stimulant or a cure?
My friend Adonna wrote to me…
“I am so jealous of people who finish things. I have tons of ufo’s and I want to keep learning new stuff. Beaded beads really do fascinate me… like the sparkly wheels. I have clipped the instructions, printed off the net, bought stuff from Halpenny and Ruby Fisch and have yet to sit down in a quiet space and do it. Then there is all the polymer clay ideas. If I had a room like Linda’s…… I’d be paralyzed with what to do FIRST… I guess I have to learn to go to my small room I now have and really get the stuff into separate corners. Beads, sewing, polymer, wire… then put the TV and dvd player in middle on a swivel stand, and close the door.
“I have realized LONG ago, that the fun is in starting something new, the challenges of finding all the pieces to work with, and learning and doing the beginning. When I can visualize the END, I stop and move on. You should see the ufo’s in quilting, doll/bear making, even a few pieces of clothes, and all of the useable incorrect size patterns and not to mention the 1,910+ collectibles.
“Some of the problems in finishing is surely the ‘Now What?’ concept of what to do with it all. I cannot wear all the finished jewelry. Certainly NOT give it away….would rather throw it away or let the executor deal with it at the junk shop than to give it to people who just politely say “thank you” and have no intention of wearing it even once a year.”
Most beaders like to bring their beads wherever they go. Lest they end up in some jail charged with terrorism, today’s air traveling presents special challenges for beading on a plane.
While the rules for what you can and what you cannot bring on a plane seem to vary frequently, you can be sure that scissors, crochet hooks, knitting needles, and many hardware tools, will tend to get you pulled over for a major search, and maybe a major loss of these as well.
Dental floss containers are good substitutes for scissors. And they hold your bobbin of thread in a good, tight way, as well. Supposedly, if your scissors are blunt-ended, they are OK.
Circular knitting needles are usually acceptable. Straight needles made of wood, plastic, or bamboo stand a better chance than metal ones.
Bamboo crochet hooks won’t get taken up.
Keep your beads tightly packaged, and your projects small. You don’t want your beads flying all over the plane. And the seats and tray tables are tight and small.
In case your stuff gets confiscated, bring with you a stamped, self-addressed envelop, so you can have these mailed back to you, instead of tossed in the garbage.
Try to get an EXIT row — more leg room.
Soft tackle boxes make excellent carry-on luggage.
You may want to ship your heavy duty tools and materials to your destination ahead of time, instead of playing the odds of bringing them onto a plane.
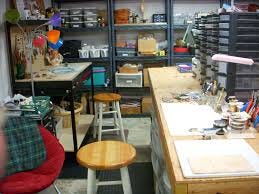
Every crafter, jewelry maker and beader has to decide which part of the house will be taken over by beads, craft supplies, and tools.
Often it’s the whole house.
James is a classic example. James never met a horizontal surface he couldn’t cover up with stuff. So his small beading table blossomed into multiple tables. These blossomed into several TV trays. And these blossomed into piles of stuff on chairs, counter-tops and couches. Stacks appeared in every room on the floors. It was not long before James had six projects on-going in the dining room, one in the kitchen, four in the bedroom, three in the TV room, one in the laundry room. James salivated about tool boxes, and so he bought tool box upon tool box upon tool box, in every size, with every arrangement of drawers and dividers and sections, in industrial colors of bright yellow, fire engine red, charcoal black, and steel gray.
We built a studio off our house. The studio, at first, was for silversmithing. It then also served for lampworking. And then for metal clay. And fused glass. And more beading. The studio then spilled right back into the house. So James wanted an additional studio room to accommodate yet more obsession. And we built an additional studio room off the house.
Years ago, in an internet survey we did about “Where People Beaded In Their Homes”, most people said their dining room or kitchen table was their Primary Creative Place. Meals were banished to the TV or living rooms, lest they be laced with beads. TV trays and cocktail tables were forced into new use. Most families, when queried, could no longer remember what colors the kitchen and dining room walls and cabinets were, as beads took over more and more of these rooms.
Another wrote that she would let us know about her special craft space, once she got things straightened up. She told us, “I don’t actually work there, because it looks like a tornado hit it. I just rush in to grab things, or dump things off, and run out.”
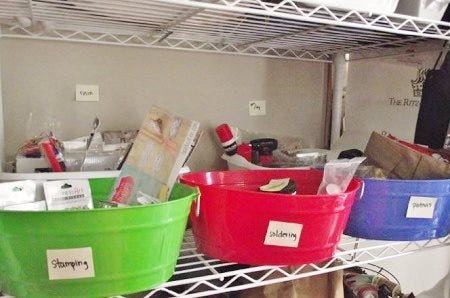
From Kathy Thomason: “I have a craft room lined with shelves and tables. I keep my beads in rolling carts, divided by color with each drawer labeled. I keep all my tools in a basket on one of the tables and I have all my findings in storage containers, divided by color and item and those sit on top of one of the rolling carts. I keep my wires in a drawer, where they are put into small trays and divided by color and type. I have beading trays set up on the tables with a rolling desk chair that can go from table to table. I get everything I need for my current project put on a tray, which I then carry to the living room to do the actual beading so I can be out where the family is.”
Some rooms did double-duty. There was the dining room/bead room. The TV room/bead room. The sewing room/bead room. And the laundry room/bead room. One person wrote that she had to share her bead room with her nursery. This created quite a dilemma in that beads and parts, plastic bags, needles, and threads were not a good fit with cradles and baby toys and baby blankets and, actually, not a good fit with babies.
Some beaders were blessed, however. Their spouses built them special spaces in attics, garages or the once-previously used bedroom. Some wealthier beaders had both a bead room, as well as another room devoted to another craft like sewing.
But most people were forced to take over the biggest table in the house, most often in the dining room.
Every workspace had to accommodate a lot of containers and a lot of room to layout different projects.
Organizing your work space, for some, can mean saving and salvaging their creative lives. Clutter and disorganization is distracting, and can prevent you from making progress on important projects. You don’t want to waste time looking for things. You want to be able to get rid of things you no longer use, without it becoming a major effort to do so. And you do not want to overwhelm yourself with too many half-finished projects laying all over the place.
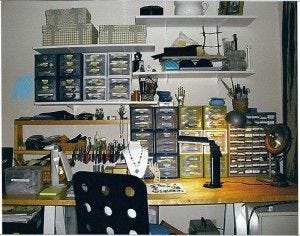
I remember Ginny telling me about her desk. It just wasn’t big enough. So she abutted a folding table next to it. It just wasn’t big enough. So she got another folding table. Again, not big enough. Plus, at each edge the tables met, they were uneven. So she bought some large pieces of plywood, and hardware to nail them together, and lay over all her tables. She ran molding along the outer edges so that beads wouldn’t roll off. Her expanded table was soon over-run, so she set up another smaller table on the opposite wall, and towards which she could wheel her chair. She found herself working on the smaller table, and used her large table for storage.
Ginny had the best chair. Ergonomic. Great back support. Wheels. It spins. It was a chair she could sink into, relax, wheel herself from one side of the room to another. Heavenly. She could sit on it for hours without getting tired. It had good arm rests that didn’t get in the way of beading or stringing.
Ginny was determined to maximize her work space, any way she could. She attached shelving off the wall that would fold up, and fold out, depending on how much horizontal work surface she wanted. She took off the closet door, and built in shelves with drawers that pulled out. In three of these drawers, she stuffed fabric she had accumulated from an earlier obsession. She hung a hanging shoe bag off one side of the closet, and stored “projects-in-progress” in each of the shoe storage slots. She put up pegboard along all the open wall space. She hung over-the-door wire storage racks on the entry door to the room — one on the back and one on the front of the door.
She hated clutter. But each time she put into effect another plan to improve the efficiency of her bead room set-up, she ended up with more and more clutter. A jumble. Beads begat beads begat beads begat books, papers, half-finished projects, storage containers and more supplies.
She read a book by Jo Packham called Where Women Create: Inspiring Work Spaces of Extraordinary Women. She looked for beautiful and inspirational and practical ideas so that she could create in an environment conducive for creativity. One of many questions raised in the book, was “Do you like to listen to music while you create?” She did. Where would she put the stereo and the speakers now?
[Another question asked in this book was “Where did you like to work as a child?” Ginny liked to work in her bedroom under a blanket. ]
Ginny failed to anticipate the “administrivia” of it all. She had to keep everything labeled. She now had to keep records of what she bought at what price. She had sketch books of ideas. She had pictures torn out of magazines. She had pattern upon pattern of designs. She had lists of addresses, websites and phone numbers of sources. She had to coordinate trays of several unfinished projects. She needed to add two filing cabinets, which she shoved underneath one side of her expanded table.
She bought a computer and installed a phone and internet connection, so she could keep up with her bead research as she worked. She forgot to add some space to store all the bead and jewelry magazines she subscribed to and never threw away. She threw them in a pile on the floor in a corner and under part of her expanded table.
Her sister, who visited almost everyday, gave Ginny two hanging plants “for the studio.” Just what Ginny needed. But Ginny was too embarrassed not to find places for these, as well.
Ginny began to realize that her creative energies were getting used up in planning and maintaining her environment. She was too tired to think about making jewelry. So she moved some of her stuff, and her great ergonomic chair, to a table in what today is rumored to have been her dining room, and where she wouldn’t have to deal with it all. …And she moved just a few little things to a tray that sits on top of a throw pillow that sits on top of her living room couch.
As every beader has experienced, the beads take over more and more of your home. Eventually, if you keep beading and making jewelry long enough, you’ll need a second home. Or you’ll be forced to open up a bead store of your own.
As one of my friends remarked recently, in a controlled panic, “I’m out of space, and I have nowhere to go.”
And not to complicate things, but to complicate things…. If you are selling yourself, it is very advisable to set up a “Business” area separate from your “Craft” area.
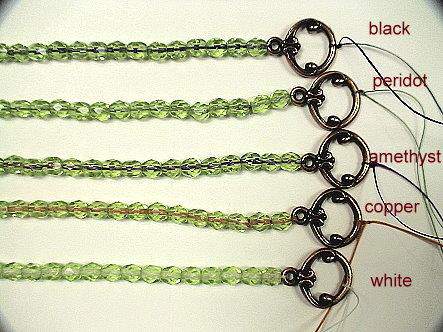
Thread color affects the viewer’s perception and evaluation of the piece.
People see the thread at the knots. They subconsciously see the threads between each bead. If you are using transparent or translucent beads, the thread color will affect the color of these beads. You can do the same piece using different colored threads, and each of these pieces will look very different.
Black always works. Can’t see the knots, only shadows. This makes your piece seem older, richer, more traditional. It gives your piece a patina.
White makes your pieces brighter, sharper, more contemporary looking.
Colors: Most people select a color that is the same or similar to the predominant color in the piece. In this case, there is no color affect. However, you can pick contrasting or complimentary colors, such as using an amethyst colored thread to string peridot colored beads. You can also change the colors of your thread as you work thru your piece.
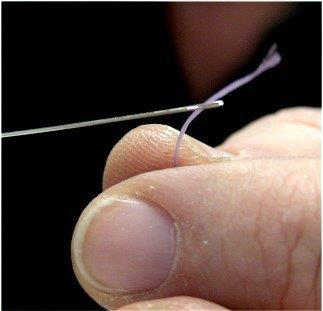
There are two ways to thread a needle. The logical way, the way your mind and brain and eyeball and heart and gut all say to do is this:
– Take the thread in one hand, and the needle in the other. Push the needle onto the thread. Keep poking the thread with the needle until the thread meets the hole and slips through. Then pull on the thread.
The illogical, but more correct way, is to pop the thread into the needle:
Put the thread between your thumb and fore-finger, and pinch it. Pull it down between your fingers so that the end slips just below the top surface of your fingers. Place the needle over your fingers, lining up the eye hole just above the gap between your two fingers where the thread is hiding, and keep the needle from moving. Squeeze your thumb and forefinger together, so that the thread pops straight up and into the eye-hole. Voila! Magic. Then pull on the thread.
When cutting your thread off the bobbin or spool, if you cut at a slight angle, it makes it easier to get the thread through the eye hole of the needle.
Another trick: Rather than wet the top end of your thread with spit by placing the thread in your mouth, wet the eye hole of your needle. The water that gets trapped in the eye hole will draw up the thread, as you put it to the hole.
Abstract: We create and wear jewelry because we do not want to feel alone. But “not wanting to feel alone” can mean different things to different people.The jewelry artist must have insight here. The artist needs to understand what jewelry really is in order to make the kinds of successful choices about forms, materials, design elements, inspirations, techniques, arrangements, public presentations and exhibitions and the like. There are different frameworks from which the artist might draw such understanding, including the sensation of jewelry as OBJECT, CONTENT, INTENT or DIALECTIC. All these lenses share one thing in common — communication. Although jewelry can be described in the absence of communicative interaction, the artist can never begin to truly understand what jewelry really is without some knowledge about its creation and without somehow referencing the artist, the wearer, the viewer and the context.
WHAT IS JEWELRY, Really?
Simply put, we create and wear jewelry because we do not want to feel alone.
But “not wanting to feel alone” can mean different things to different people. The jewelry designer, in order to make the best choices and the most strategic choices throughout the process of designing a piece of jewelry, requires some detail and clarity here. What does it mean to say that we create and wear jewelry so we do not want to feel alone?
We might want to reaffirm that we are similar (or different) than someone else or some other group or culture. We might want to signal some connection (or disconnection or mal-connection) with a higher power or mystical source or sense of well-being or with some idea, concept or meaning. We might want to express an intent or feeling or emotion.
We might want to differentiate what it means to be yourself relative to something else, whether animate or inanimate, functional or artistic, part of a dialectic conversation with self or other. We might want to signal or differentiate status, intelligence, awareness, and resolution. We might want to separate ourselves from that which is sacred and that which is profane.
Whatever the situation, jewelry becomes something more than simple decoration or adornment. It becomes more than an object which is worn merely because this is something that we do. It becomes more than a functional object used to hold things together. It is communicative. It is connective. It is intentional. And concurrently, it must be functional and appealing and be seen as the result of an artist’s application of technique and technology.
The word jewelry derives from the Latin “jocale” meaning plaything. It is traditionally defined as a personal adornment or decoration. It is usually assumed to be constructed from durable items, though exceptions are often made for the use of real flowers. It is usually made up of materials that have some perceived value. It can be used to adorn nearly every part of the body.
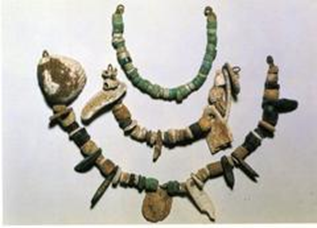
Prehistoric Necklaces 40000 B.C
One of the earliest evidences of jewelry was that of a Neanderthal man some 115,000 years ago. What was it — and we really need to think about this and think this through — which made him craft the piece of jewelry and want to wear it? Mere decoration? Did it represent some kind of status? Or religious belief? Or position or role? Or sexuality and sensuality? Or was it symbolic of something else? Was this a simplified form or representation of something else?
Did this Neanderthal have concerns about craft and technique? Did the making of it require some special or innovative technology? Did the cost of materials come into play? Was this an expression of art? Self? Power? A show of intelligence and prowess? A confirmation of shared beliefs, experiences and values? Was it something he made himself, or was it something given to him as a gift or token of recognition?
Picture yourself there at this very moment. What happened at the point this Neanderthal man put this piece of jewelry on? Did this reduce or increase social and cultural barriers between himself and others? Did this define a new way of expression or a new way of defining the self? Did this impact or change any kind of outcome? Did this represent a divergence between craft and art? Was this piece of jewelry something that had to be worn all the time? Were the purposes and experiences of this Neanderthal man similar to why and how we design and adorn ourselves with jewelry today?
We know that this Neanderthal man was not the last person to wear a piece of jewelry. Jewelry continued in importance over time. Jewelry mattered. It was an object we touched. And it was an object we allowed to touch our bodies. The object had form. The form encapsulated meaning. We allowed others to view the jewelry as we wore it, and when we did not.
Making and wearing jewelry became very widespread about 5,000 years ago, especially in India and Mesopotamia, but worldwide as well. While some cultures banned jewelry or limited its forms and uses (see medieval Japan or ancient Rome, for example), they could not maintain these restrictions over time. People want to support the making of jewelry, the wearing of it, the exhibiting of it in public, and the accumulating of it. People want to touch it. Display it. Comment about it. Talk about it with others. Collect it, trade it, buy it, sell it.
As jewelry designers, we need to understand the why’s … Why make jewelry at all? Why develop different techniques and use different materials and come up with different arrangements? Why do people want to wear jewelry and buy jewelry?
We observe that jewelry is everywhere, worn by all types of people, on various parts of the body, in many different kinds of situations. Jewelry must possess a kind of inherent value for the artist, the wearer, the viewer and the society as a whole.
So we have to continue to wonder, Why is jewelry so coveted universally? Why is it important? How is understanding ‘what jewelry is really’ necessary for making the kinds of successful choices about forms, materials, design elements, inspirations, techniques, arrangements, public presentations and exhibitions and the like?
Let us review the range of definitions and justifications for jewelry before fine-tuning any ideas and conclusions. Each understanding leads us in different directions when filling in the blanks of this constructive phrasing:
Jewelry means to me …..… therefore, These are the types of choices I need to make as a designer to know my pieces are finished and successful, including things like ……… .
These different definitional frameworks about jewelry are things characterized by sensations the jewelry evokes in designer, wearer and viewer.
These frameworks for defining what jewelry really is include,
SENSATION OF JEWELRY AS OBJECT:
1.ROUTINE: Something that we do with little or no reflection
2.MATERIAL: Objects that we use as materials characterized or sorted by design elements, such as color, pattern, texture, volume, weight, reflective and refractive properties
3.ARRANGEMENT AND FORMS: Materials are sorted by various Principles of Composition into arrangements and forms, expressing things like rhythm, focus, and juxtaposition of lines and planes
4.TECHNIQUE: Steps or routines we use to assemble and construct
5.FUNCTIONALITY: Things which have a useful purpose and practicality
SENSATION OF JEWELRY AS CONTENT:
6.MEANING: Things to which we assign meaning(s), especially where such meaning(s) transcends materials, functions and techniques
7.VALUE: Things to which we assign monetary and economic value, particularly materials
SENSATION OF JEWELRY AS INTENT:
8.ORDER OUT OF CHAOS: A sense-making attempt to control and order the world
9.SELF-IDENTITY: An agent of personality
SENSATION OF JEWELRY AS DIALECTIC:
10. INTERACTION AND SHARED UNDERSTANDINGS: A way to create, confirm and retain connections through interaction, desires, and shared understandings
Yet, no matter what the framework we use to try to make sense about what jewelry really is, all these lenses share one thing in common — jewelry is more than ornament and decoration; it is sensation and communication, as well. Although we can describe jewelry in the absence of knowledge about its creation, we cannot begin to understand what jewelry really is without somehow referencing the artist, the wearer, the viewer and the context.
SENSATION OF JEWELRY AS OBJECT
“Tibetan Dreams”, detail, FELD, 2010
Too often, ideas about communication and meaning and intent get too messy and complicated. We seek a simpler framework within which to understand what jewelry is all about. We try to fit the idea of jewelry into the confines of a box we call “object”. It is decoration. Sculptural adornment. Jewelry succeeds as “object” to the extent that everyone everywhere universally agrees to what it is, how it is made, what it is made from, why it was made, and in what ways it is used.
This universality in defining and evaluating jewelry helps us not to feel alone.
Jewelry As Something That We Do. Wearing jewelry might simply be something that we do. We put on earrings. We slip a ring onto a finger. We clasp a necklace around our neck or a bracelet around our wrist. It is habit. Routine. Not something to stop and ask why. A necklace is a necklace. An earring is an earring. We mechanically interact with decorative objects we call jewelry.
Jewelry As A Material. Sometimes we want to get a little more specific and describe what this object or ‘box’ is made of. It is some kind of material. Jewelry encompasses all types of stones and metals, in various shades and colors, and light-impacting properties, which the artist has taken tools to them to shape and sharpen. Sometimes we want to further delineate the character of materials within and around this box. We refer to this as selecting various design elements such as color, pattern, texture.
Jewelry As Arrangements and Forms. Sometimes we want to even further elaborate on our placement of materials within our pieces in terms of Principles of Composition. These Principles refer to arrangements and organized forms to create movement, rhythm, focal point, balance, distribution. We apply this framework in a static way. Jewelry is reduced to an object, somehow apart from its creator and disconnected from any wearer or viewer.
Jewelry As The Application of Technique(s). We can also understand jewelry as object in a more dynamic sense. It is something which is created by the application of one or more techniques. The techniques are applications of ideas often corralled into routines. The object is seen to evolve from a starting point to a finishing point. As object, it is reduced to a series of organized steps. These steps are disconnected from insight, inspiration, aspiration or desire. There is no human governance or interference.
Jewelry As Function and Practicality. In a similar dynamic way, the object may be seen to have function. It may hold up something, or keep something closed. It may, in a decorative sense, embellish a piece of clothing. It may assist in the movement of something else. It is not understood to have any meaning beyond its function. As it coordinates the requirements of form to the requirements of function, it plays a supportive, practical role, not a substantive role. As such, it is unimportant. It might allow the wearer to change position of the necklace on the neck. It might better enable the piece to move with the body. But it should not demand much insight or reflection by creator, wearer, or viewer.
SENSATION OF JEWELRY AS CONTENT
“Tibetan Dreams”, detail, FELD, 2010
However, as we get closer to defining the object as one that is sensed and experienced and which evokes an emotional response, it becomes more difficult to maintain that the object does not reflect meaning, does not result from some kind of thought process and intent, and does not communicate quite a lot about the designer, the wearer, the viewer and the situation. Jewelry when worn and which succeeds becomes a sort of identifier or locator, which can inform the wearer and the viewer about particular qualities or content, such as where you belong, or what you are about, or what your needs are.
Jewelry without content, after all, can skew to the superficial, boring, monotonous, and unsatisfying. Without meaning and value, jewelry has little to offer.
These shared recognitions and valuing of meanings helps us not to feel alone.
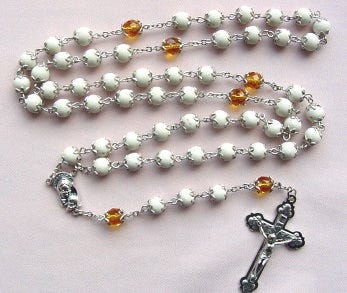
Jewelry As Meaning. Jewelry when worn signals, signifies or symbolizes something else. It is a type of recognizable short-hand. It is a powerful language of definition and expression. By representing meaning, it takes responsibility for instigating shared understandings, such as membership in a group or delineating the good from the bad. It might summarize difficult to express concepts or emotions, such as God, love, loyalty, fidelity. It might be a stand-in marker for status, power, wealth, connection and commitment. It might visually represent the completion or fulfillment of a rite of passage — puberty, adulthood, marriage, birthing, and death.
Sometimes, the sensation of jewelry as meaning derives from energy and powers we believe can transfer from the meaning of the materials the jewelry is made of to ourselves. These might be good luck, or good fortune, or good health, or good love, or good faith or protection from harm. Various gemstones, metals and other materials are seen to have mystical, magical and supernatural qualities that, when touching the body, allow us to incorporate these powers with our own.
Jewelry As Value. When we refer to meaning as having power, sacredness, respect, significance, we are beginning to assign a value to it. A sensation of value may emerge from how rare the item is — its material rarity or the rarity of how it was constructed or where it came from or who made it or who was allowed to wear it. It may emerge from how bright it is or the noteworthy arrangement of its elements. Its value may emerge from how pliable or workable the material is. Its value might be set from how tradable it is for other materials, objects, access or activities.
By assigning value, we determine things like importance, uniqueness, appeal, status, need, want, and demand. We establish control over how and how often a piece of jewelry will change hands. We establish some regulation over how individuals in a group, culture or society interact and transact with one another.
SENSATION OF JEWELRY AS INTENT
“Tibetan Dreams”, detail, FELD, 2010
Someone has to infuse the object with all this content, and this proactive act leads us to the idea of intent. Often this imposition of meaning begins with the jewelry artist. Jewelry becomes a means of self-expression. The artist, in effect, tells the world who the artist is, and what the artist wants to happen next.
The artist might be subdued or bold, colorful or monochromatic, simple or complex, extravagant or economical, logical or romantic, deliberate or spontaneous. The artist might be direct or indirect in how meanings get communicated. It is important, in order to understand the meaning of an object, to begin by delineating the artist’s inspiration, aspiration and intent.
The jewelry artist begins with nothing and creates something. The unknown, the unknowable, the nothingness is made more accessible.
The artist fills in a negative space with points, lines, planes, shapes, forms and themes. Color, pattern and texture are added. Things get organized and arranged.
Though often unstated, it becomes obvious that of all the possible choices the artist could have made in design, that some choices were ignored and excluded, while others were not. Some negative space is left so. Some positive space has direction, motion, weightiness. Somethings are abstract; other things realistic. These and related choices have implications and consequences.
The question becomes, what influences that artist’s selections? Successful jewelry reveals the artist’s hand.
Our perceptions of the coherence in the artist’s inspiration and intent, as reflected in our interpretations of that artist’s jewelry, helps us not to feel alone. We may see coherence as a subjective thing or a universally understoodthing. It doesn’t matter which. If we believe we can make sense of things, if the jewelry feels and seems coherent in some way, we feel safe, and that we have reduced the risks in life. We do not feel so left alone.
Jewelry As Creating Order Out Of Chaos. Partly, what the artist does is attempt to order the world. The artist looks for clues within him- or herself (inspiration and intent). The artist formulates concepts and a plan for translating inspiration and intent into a design. The artist determines whether to take into account the expectations of others (shared understandings) about what would be judged as finished and successful.
Jewelry is an object created out of chaos and which has an order to it. The order has content, meaning and value. It has coherency based on color and texture and arrangement.
Jewelry as an organized, ordered, coherent object reflects the hypotheses the artist comes up with about how to translate inspiration into aspiration, and do this in such a way that the derived jewelry is judged positively. The artist anticipates how others might experience and sense the object on an emotional level.
It reflects the shared understandings among artist, wearer and viewer about emotions, desires, inherent tensions and yearnings and how these play out in everyday life.
The artist makes the ordered chaos more coherent, and this coherence becomes contagious through the artist’s choices about creative production and design. The artist lets this contagion spread. To the extent that others share the artist’s ideas about coherence, the more likely the work will be judged finished and successful. And no one — not the artist, not the wearer, not the viewer — will feel alone.
The process of bringing order to chaos continues with the wearer. The wearer introduces the piece of jewelry into a larger context. We have more contagion. The jewelry as worn causes more, ever-expanding tension and efforts at balance and resolution. There is an effort to figure out the original artist intent and ideas about coherence as reflected in design.
Unsuccessful efforts at design, where the artist’s intent becomes obscured, reverse the process, and the object — our piece of jewelry — then brings about decoherence. Decoherence may come in the forms of bad feedback, inappropriate feedback, less than satisfying feedback, or no feedback at all.
Decoherence means the wearer may not get that sense of self s/he seeks. S/he may feel less motivated to wear the piece. S/he may store the piece or give the piece away. As this decoherence filters down to the level of the artist, any necessary support in design may be lost. There will be fewer clients, fewer opportunities to display the works publicly, and fewer sales. The artist’s motivation may diminish.
Jewelry As An Agent of Personality. People wear jewelry because they like it. It becomes an extension of themselves. It is self-confirming, self-identifying and self-reconfirming. Liking a piece of jewelry gets equated with liking oneself, or as a strategy for getting others to express their like for you. Jewelry makes us feel more like ourselves. We might use jewelry to help us feel emotionally independent, or we might come to rely on jewelry for emotional support and feedback, leading us down the path to emotional dependency.
Jewelry may have personal significance, linking one to their past, or one to their family, or one to their group. It may be a way to integrate history with the present. It is a tool to help us satisfy our need to affiliate.
Jewelry may help us differentiate ourselves from others. It may assist us in standing out from the crowds. Conversely, we may use it to blend into those multitudes, as well.
Jewelry fulfills our needs. If we look at Maslow’s Hierarchy of Needs, after meeting our basic physiological needs such as for food and water, and our safety needs, such as for shelter, we can turn to jewelry to meet our additional social needs for love and belonging and self-esteem. Designing and creating jewelry can form an additional basis for our needs for self-actualization.
We may derive our personality and sense of soul and spirit from the qualities we assign the jewelry we wear. We do not merely wear jewelry as some object; more specifically, we inhabit jewelry. If ruby jewelry symbolizes passion, we may feel passion when wearing it. We may use jewelry as an expressive display of who we feel we are and want to be seen as in order to attract mates and sexual partners. We use jewelry in a narcissistic way to influence the alignment of the interests and desires among artist, weaver, viewer, collector, exhibiter, and seller.
In similar ways, we may derive our sense of belief, devotion and faith to a higher power or spiritual being or God from wearing jewelry. It may help us feel more connected to that religious, spiritual something within ourselves. It may remind us to stay on our religious path.
As an agent of our psychological selves, jewelry is used to resolve those core conflicts — Who are we? Why do we exist? How should we relate to other people around us? Jewelry orients us in coming to grips with our self-perceived place within critical contradictions around us. Trust and mistrust. Living and dying. Good and evil. Pleasure and pain. Permission and denial. Love and hate. Experience and expectation. Traditional and contemporary. Rational and reasonable.
SENSATION OF JEWELRY AS DIALECTIC Jewelry As Interaction and Shared Understandings
“Tibetan Dreams”, FELD, 2010
Jewelry is a two-way street. It is a way to create, confirm and retain connections. At its very core, it is interactive and communicative. It is more an action than an object. Jewelry can start a conversation. Jewelry encapsulates a very public, ongoing matrix of choices and interactions among artist, wearer and viewer, with the purpose of getting responses. It is a dialectic.
The optimum position to view jewelry is on a person’s body, where and when its dialectical power is greatest. Again, it is very public, yet concurrently, very intimate. We exhibit jewelry. It forces reaction, response and reciprocity. Jewelry helps us negotiate, in relatively non-threatening ways, those critical tensions and contradictions in life, not merely define them.
It very publicly forces us to reveal our values, delineate tensions and contradictions which might result, and resolve all those betwixt and between qualities which occur as the artist, wearer, viewer, marketer, seller, exhibitor and collector try to make sense of it all. Conversely, jewelry, as worn, may signal that any negotiation would be futile, but this is a dialectic, communicative act, as well.
Jewelry expresses or implies things, the relevance of which emerges through interactions. There is an exchange of meaning. There is some reciprocity between the artist expressing an inspiration with the desire for a reaction, and the wearer evaluating the success of the piece and impacting the artist, in return. We have those coherence-contagion-decoherence behavioral patterns discussed above.
Jewelry is persuasive. It allows for the negotiation of influence and power in subtle, often soft-pedalled ways. It helps smooth the way for support or control. Compliance or challenge. Wealth and success or poverty and failure. High or low status. Social recognition. An expression of who you know, and who might know you. Jewelry is a tool for managing the dynamics between any two people.
Jewelry is emotional and feeling, with attempts by the artist to direct these, and with opportunities for others to experience these. It is not that we react emotionally to the beauty of an object. It is not mechanical or fleeting. It is more of a dialectic. The jewelry is an expression of an artist’s inspiration and intent. We react emotionally to what we sense as that expression as it resonates from the object itself. This resonance ebbs and flows, waxes and wanes, over time as the object is worn in many different situations.
Jewelry draws attention. It becomes a virtual contract between artist and wearer. The artist agrees to design something that will call attention to the wearer and that wearer’s preferred sense of self. The wearer agrees to wear something that reaffirms the artist’s insights for all to witness and experience and draw support.
Jewelry may cue the rules for sexual and sensual interactions. Nurturing and desire. Necklaces draw attention to the breasts. Earrings to the ear and neck. Rings to the hands. Jewelry, such as a wedding band, may confirm a relationship, and signal permission for various forms of touching that otherwise would not be appropriate. The silhouettes and placements of jewelry on the body indicate where it may be appropriate for the viewer to place his gaze, and where it would not.
We don’t feel alone because we have opportunities to have a dialectic experience — a dialogue between self and artist, self and others, self and self — all catalyzed by the piece of jewelry, and our sensation of all the choices that had to be made in order for it to exist, in order for it to feel coherent, in order for it for fulfill desire, and in order for all of this to somehow feel contagious and resonant. We don’t feel alone because the jewelry taps into something inside us that makes us want to wear it, buy it and share it.
Jewelry Ages In Place With Us
Jewelry comforts us as we age in place. The bracelet we got for graduation still worn on an occasion when we are 65. The ring he bought her when she was in her 20’s still worn on the day she passed away.
With jewelry, we will never feel alone as we grow older. As our body changes in pallor and texture. As we gain weight or lose weight. As we change our styles of clothing or hair or activity.
This constellation of material objects, distributed across the human body, reflects transformation, movement, growth, and behavior. These reflect the life we live, and how we lived it. These are a story of how we performed our lives over time. They reveal an otherwise unseen perspective on life as the body ages, and we live through time. They show that not all lived lives have been ad libbed.
The jewelry will also show its age over time. Changes in color, perhaps fading, perhaps becoming duller or spotty. A clasp may have been replaced. The piece may have been restrung. It may have been shortened or lengthened. It may have been worn a lot. Or lost for a while. Or given away. Its associative or symbolic value may have changed.
Jewelry is life performed. Both are observable. Both indicative of our place — our aura — in the world around us as time goes on. Both an experience — often changing — of a point of view from the hand that crafted the piece in the first place, and the desires of the person who wore the piece over time. We possess it and wear it so it reminds us that we are not alone.
Knowing What Jewelry Really Is Translates Into Artistic and Design Choices
Knowing what jewelry really is better connects the artist to the various audiences the artist seeks to reach. It results in better outcomes. More exhibits. More sales. More collections. Better self-esteem. Better representation of self in various contexts and situations.
Jewelry asks the artist, the wearer and the viewer to participate in its existence. In a somewhat subtle way, by allowing communication, dialog, evaluation, and emotion, jewelry allows each one not to feel alone. It allows each one to express intent, establish a sense of self, and introduce these intents and self-expressions into a larger social context.
Jewelry judged as finished and successful results from these shared understandings and desires among artist, viewer and wearer, and how these influence their subsequent choices. These choices extend to materials and arrangements. They extend to how the artist determines what is to be achieved, and how the work is talked about and presented to others. These anticipate the reactions of others, beliefs about saleability, assumptions about possible inclusions in exhibitions, knowing what is appealing or collectible.
The artist is always omnipresent in the jewelry s/he creates. The artist, through the jewelry, and how it is worn on the body, to some extent, arbitrates how other sets of relationships interact, transfer feelings, ideas and emotions, reduce ambiguity, influence one another, and make sense of the world around them.
These sets of relationships, through which jewelry serves as a conduit, include:
artist and wearer wearer and viewer artist and self artist and seller seller and client artist and exhibiter artist and collector exhibiter and collector
In the abstract, jewelry is a simple object. We make it. We wear it. We sell it. We buy it. We exhibit it. We collect it. But in reality, jewelry channels all the artist’s and wearer’s and viewer’s energy — the creative sparks, the tensions, the worries, the aspirations, the representations, the assessments of risks and rewards, the anticipations of influence and affect. Jewelry becomes the touchstone for all these relationships. It is transformational. It is a manifestation of their internal worlds. An essence resonant in context. A comforting togetherness, inclusion, reaffirmation.
The better jewelry designer is one who anticipates these shared understandings about what makes a piece of jewelry finished and successful, and can incorporate these understandings within the jewelry design process s/he undertakes. Knowing what jewelry really is forms a critical aspect of what sets jewelry design as a discipline apart from that of art or craft. Knowing what jewelry really is and how it helps us not feel alone forms the basis of the professional identity and disciplinary literacy of the jewelry designer.
_________________________________________
FOOTNOTES
(1) Grosz, Stephen, The Examined Life: How We Lose and Find Ourselves, NY: W.W.Norton & Company, 2014.
(2) Pravu Mazumdar, Jewellery as Performance: on Gisbert Stach’s Experiments with Jewellery and Life, Klimt02, 11/22/2019
How many people throughout time have heard the sound of a dropped bead on the floor?
Or the sharp whoosh of air that comes from the cutting of a cord?
Or the dull oomph you hear when you crush a metal clasp into place?
Or the feel of the tug and pull of the thread as the needle is pulled through the cloth?
Or the resistance of the tensile strength of the wire as it is bent into a shape?
Did they see a sudden flash of light, a sudden recognition of artistic achievement? Probably not.
But it meant something to them. Subtle. Unconscious. The exercise of the hand in craft often taps into some sense of self-expression or –awareness. Creativity rewards you. It reaffirms who you are. Your worth, your value, your artistry. It is fulfilling, fun, happy, reassuring, exciting, introspective.
The exercise of your hand in craft, art and design often reconfirms that you are part of some larger group or culture, as well. You have a shared sense of what expression and awareness mean. You repeat the same steps in creation. You choose similar parts or design compatible patterns. People recognize your creative efforts when they see or wear your pieces.
Hand Craft. The feel on the fingertips and on the palm of your hand. The pattern of light that registers on your eye and then gets translated by your brain. The anticipated weight and movement of the piece as it’s worn.
The shared implications of all this, and the full range of possibilities are understood by everyone. This mutual understanding helps you cement relationships with other groups or individuals. Relationships and meanings are extensions of your hand in craft.
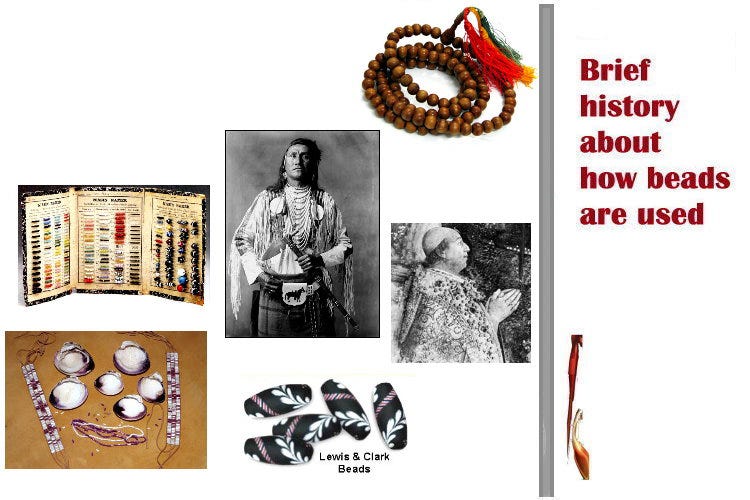
Hand Crafts. Beads and Jewelry. Beads and Jewelry. Beads and Jewelry. Beads and Jewelry as Hand Crafts. Beads and Jewelry have been used all throughout time. They appear in every culture in the world. Although they are not always used in the same ways or for the same reasons.
Wampum
SOMETIMES BEADS ARE USED INSTEAD OF MONEY
Sometimes beads are used instead of Money. When people look at beads, they have an intrinsic value that people seem to recognize and share. In many cultures, people place more confidence in using their beads as their Money, instead of their own coins and currency.
And in our own world, this is often true as well, as we go to bead swaps, or swap one piece of jewelry for something else of value. We barter with beads. We do this all the time. Beads and beaded jewelry have a monetary life all their own. “I’ll give you this______ , if I can have the beaded bracelet you are wearing.”
And so many times, people will come in the shop and ask to work for beads. And we have plenty for them to do.
Trade Beads
BEADS WERE USED IN TRADE
In a similar way, beads were used in Trade. This is more true historically than today, but a little bit today. When two groups want to trade with each other, it’s hard to come to terms. Because people, for whatever reasons, seem to be able to come to agreement on the value of beads, beads were used in various ways during the negotiation process.
Global Trade Routes
About 300, and 400 and 500 years ago, explorers set out from various European countries, and visited far-away places like China and India and Africa, and North and South America. When they set off on their explorations, they brought with them what we call Trade Beads. These were glass beads that were made in Venice, Bohemia and the Netherlands.
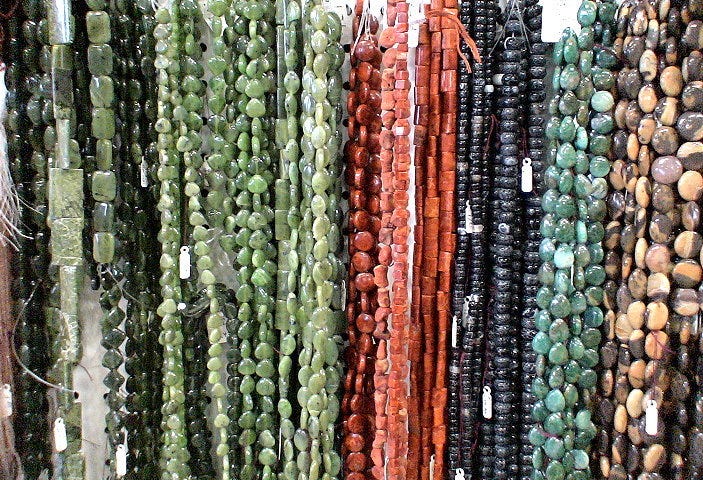
In Europe at this time, the folks looked down on glass beads. They used them in projects involving bead embroidery and mimicking tapestries where they could get a more 3-dimensional look with the beads than they could with the fibers.
But they shied away from glass beads in jewelry. Too cheap. Too low class. Glass was trash. For jewelry, they preferred the high test octane beads made from gemstones and precious metals. But those darn glassmakers in Venice and Bohemia and The Netherlands kept churning glass beads out. I think there were some technological improvements that occurred at this time, that made it easier/cheaper/ more efficient to make glass beads, but I don’t know this for a fact. Still, no one really wanted them.
The explorers took these glass beads with them, and at first gave them away as gifts. They assumed that people from other, “less sophisticated” cultures, would dismiss these glass beads as well. But alas and alack, these other “less worldly” men and women did not. They liked the glass beads. They liked them a lot. Some cultures even saw spiritual qualities in these glass beads.
It wasn’t long before the explorers started trading these beads, instead of giving them away. Some of the trade beads made in Europe were very generic; others were more specialized designs, colorations or etchings specific to certain countries or regions, like Africa or Persia.
When these explorers came to North America, the Indians here, at first, wanted blue beads. You see, they couldn’t easily make a blue color with the natural materials they were using — stones, shells, antler and wood. The explorers were thrilled about this. Blue was the cheapest color to make. So, the explorers found this trade to be very profitable. It wasn’t too long, however, before the Indians met their needs for blue, and started asking for yellow and red. You see, it takes real gold to make the colors yellow and red. And the trading became nearer and dearer for the explorers.
These French Traders continued their explorations down the Missouri and Mississippi Rivers. They discovered the freshwater pearl cultures of the Mississippi Indians in the area around Tennessee, and traded beads for these pearls which they sent back to Europe. These freshwater pearls soon earned the name “Royal Pearls”, and were restricted for use and wear by the royalty across Europe.
Even today, royal families continue to import Tennessee freshwater pearls. They have these sewn into their undergarments. After all, it’s widely believed that wearing a pearl against your skin ensures your future wealth.
And, I always wondered if you could speculate why the Indians sided with the French in the French and Indian Wars, against the British. Could it have been that the French supplied them with beads, and the British did not?
People With The More Beads Have The More Power!
ANOTHER WAY PEOPLE USE BEADS IS FOR POWER
Another way people use beads is for reasons of Power. People with the more beads have the more power. When you get into beading, you learn this very quickly. Who has the most beads? The most Reds? The most Purples? The most delicas? Beads, in this sense, define social relationships, who’s more important than whom, and pathways of success.
Ogalala Sioux Indian Reservation Lands
About 400 years ago, among the Oglala Sioux Indians in the Dakotas, there was a big women’s movement. The women of this tribe wanted greater say and control over tribal matters, they saw an opportunity to assert themselves, which they did, and they won. This whole incident was oriented around beads.
So what happened four hundred years ago? You had French traders traveling through Canada, and coming down into the Dakotas. They brought with them these glass Trade Beads, and traded them for pelts. One of the major roles of women in Indian tribes was to make beads. They would spend all day, every day, making beads out of stones and wood and antlers and shells. When these French traders came with these pre-made beads, it freed up a lot of time. And in this one tribal group, the women took advantage of this free time, asserted themselves, and won.
Sioux bead embroidery
One of the things the women did to mark their success was to change the costuming of the men. Before the movement, men wore beaded embroidery strips tacked down linearly along their sleeves. After the movement, the women tacked down only part of the embroidery strips — the rest allowed to flow out like ribbons. So when the men went off hunting or fighting or whatever they did, they wore the mark of the women — their ribbons would flow.
Rosary
SOMETIMES BEADS ARE USED FOR SPIRITUAL AND RELIGIOUS REASONS
Sometimes, beads are used for Spiritual and Religious Reasons. You can picture a rosary in the Catholic Church. By touching and moving your hand along this bead chain, it helps you feel closer to God. It helps you feel more spiritual. It helps you remember the rituals. In Buddhism, they use something like a rosary. In Confucianism in China they use something like a rosary called Immortal Beads.
The threatened Pope
During the Middle Ages in Europe, only priests were allowed to wear rosaries and have beaded adornments. Priests had their parishioners make them rosaries and beaded this and beaded that. After awhile, the priests with the more rosaries and the more elaborate rosaries, gained higher status. So they kept accumulating, and accumulating, and accumulating, until, at one point, one of the Popes felt very threatened. Many priests were becoming as adorned as he was. So the Pope issued an edict that said everyone could wear rosaries and have beaded adornments.
The fact that you can wear beaded jewelry today, instead of making them for your priest or minister or rabbi or imam or whatever, goes back to the insecurity of one of those Popes.
Zulu Beadwork
LAST, BEADS ARE USED FOR PURPOSES OF COMMUNICATION
Last, beads are sometimes used for Communication. They are used symbolically. Different colors have different meanings. Different patterns have different meanings. Different shapes have different meanings.
Among the Zulu Tribes in South Africa during Apartheid, you had some Zulu tribes who adopted Christianity and identified with the colonialists. And you had other tribes that did not. Among the tribes that did not, they developed a very elaborate communication system using beads. Besides what colors were next to each other, they used a lot of triangles in their patterns. It was important if the triangle faced down, or up, and again what the colors were.
SPEAKING WITH BEADS. Zulu Arts from Southern Africa. by J. (photographs), E. Whyte. Morris New York , 1994
These folks might bead a necklace, or a loin-cloth. They might do a beaded doll, or a hat, or a blanket or tapestry. Something beaded. They would come out during the day, and flash the results of their secrecy, plotting and chicanery. They might say something very general with their beadwork, like “I’m mad at the world today”. Or they might get very specific, such as “I’d like to get together with you tomorrow night at 8:00, but not before I’ve met with your brother.”
These Zulu tribes kept up this communication system for about 70–80 years — all during Colonialism and Apartheid. When Apartheid ended, no one carried on the tradition. Not a complete surprise.
Today Zulu beadwork is very fashionable, particularly in Europe. But no one knows what they are saying. They are just doing pretty patterns.
Beading in the United States Today
A Social Movement Dating Back to the 1960s
Today, beading in the United States has been part of an ever-growing social movement that began in the 1960s, and, whether you know it or not, you are caught up in it, even unto today.
In the early 1960s, two new stringing materials were developed and introduced to beading. The first — NYMO Thread — was a nylon thread created by the shoe industry to attach the bottom of the shoe to the top of the shoe. This is widely used in upholstery. The second was called Tiger Tail. This was a flexible, nylon-coated cable wire. Cable wires are wires that are braided together and encased in nylon.
Before the 1960s, there really wasn’t a durable stringing material. People mostly used either cotton or silk thread, or nylon fishing line. Cotton and silk thread naturally deteriorate in about 3–5 years, so anything done on these has to be re-done every 3–5 years. Fishing line dries out and cracks when exposed to ultraviolet light and heat, that is, sunshine.
Because there was not a durable stringing material, beading, for the most part historically, was viewed as just a home craft. It did not attract artists. It did not attract fine craftspersons. It did not attract academics. It did not encourage people to experiment and push the envelop with the craft.
While occasionally in history, if you look back, you do see elaborate bead work, such as Russian bead embroidery during the 1800s and French beaded purses in the 1920’s, — this intricate beadwork was most often done by people who were slaves, or serfs or indentured servants. When they were freed, their beadwork stopped or diminished. So, when the Czar was deposed at the turn of the century, there began a major decline in Russian bead embroidery. Or when France passed labor laws in the late 1930’s, there were no more beaded purses. A rational person doesn’t want to spend all that money on beads, and take all that time making something, if it is going to fall apart.
With the introduction of Nymo and Tiger Tail in the 1960s — materials that do not break down easily — beading began to attract academics and artists and fine craftspersons. This movement began in Southern California, and gradually spread across the country. The first bead society was founded in Los Angeles in the 1960s. Today there are over 200 bead societies across the United States. The explosion in the availability of bead magazines didn’t begin until the latter part of the 1990s. The fact that you can get very excited about beads today, even thinking about selling jewelry made with them — 40 to 50 years ago, you wouldn’t have had those thoughts.
Beading has a very different energy and dynamic than a lot of other crafts, because it is only very recently begun to be thought of as an art form.