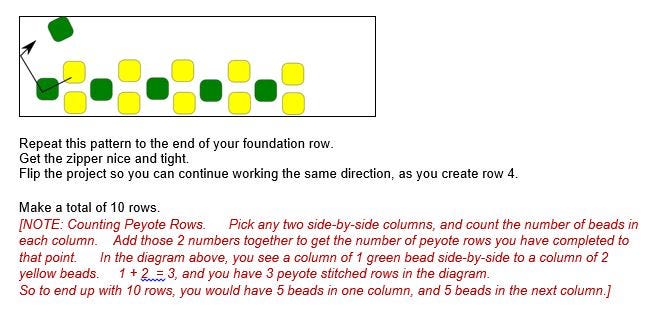
Recently, one of my jewelry making friends, while attempting to attach a clasp to a bracelet she was making, exclaimed in frustration: “I MAKE ALL THE MISTAKES IN THE BOOK!”
My first thought was, What are these mistakes?
And that led me to ask this question of my readers:
QUESTION:
WHAT ARE SOME OF THE MISTAKES THAT YOU HAVE MADE THAT SHOULD BE IN THE BOOK?
From me: I am usually working on projects and waiting on customers or answering their questions at the same time. What I have done, more times than I can count is one of two things. I either pick up my work to continue the project, and head in the wrong direction. Or, I repeat the last step I did rather than continue with the next step.
Those are the most common mistakes I make too. Another one I make is one there’s no excuse for. I pick up 2 beads instead of one and don’t notice until I get back around to the mistake in the next row or round.
Skipping a bead, or leaving thread around the edge of a bead and only realising you have done so after you have woven in the ends, I had to redo a beaded bezel this afternoon after doing the first one. 😦
I sometimes think I will be able to back out my thread by stitching in reverse instead of taking off the needle and pulling the thread out. Bites me in the behind every time.
Kate McKinnon, author of “Contemporary Geometric Beadwork”, recommends breaking the offending double bead (delicas, or seed beads) by pushing a map pin through it and into a rubber eraser. Works great. Once I tried using a needle nose pliers to break the bead, but the glass sliced through the Fireline thread, so that move is too risky for me!
The only thing about doing that, Evelyn is that you end up with a little bit of loose visible thread where the extra bead was, if you don’t burst the thread. If it is on the inside, or will be covered by layers of embellishment then you may be able to get away with it, but may be obvious on a simpler piece.
It would for that technique because you can take it down into the columns of herringbone between the sections of peyote. The problem I had today was with a peyote bezel, I tried doing that but it wouldn’t lie flat and I had the extra bulk from the second thread, so I just redid the bezel — I’m just fussy about the finish.
What are all the mistakes in the book that you make? Share in the comments section.
Needle and thread were very intimidating, and frankly, scared me. I could barely sew a button back on a shirt. My hands seemed so big and bulky — how could I hold onto these extremely thin beading needles? And thread the eye of the needle? And control things? The few times I had hemmed some torn pants, my thread path was more modern art, than functional perfection.
Jayden loved needle and thread. She made everything with it. She kept trying to force me to learn, but I resisted. For years. Resisted for many years. At one point, she retired, and I had to take over teaching her Attaching Clasps class. In that class, she taught both crimping and needle and thread bead stringing. So I had to learn it.
Not as painful as I anticipated. And the resulting pieces felt and moved and looked so much better than cable wires, that I took to it very quickly, and made it my own, so to speak. Needle and thread became my preferred approach. But when I made things to sell, I often reverted back to the cable wires. When cable threads, like FireLine, came along, these became a good compromise, at least for some projects, though not all of them.
HOW TO USE NEEDLE AND THREAD To String a Bracelet, Including How to Wax Your Thread
There are many different types of stringing materials. The best outcomes, from the Art and Design Tradition, are achieved using needle and thread. Beading threads are nylon. Most are shaped like a thin ribbon, rather than round, like sewing thread. Most are bonded, rather than twisted, fibers, which adds a lot of what is called “abrasion resistance.” Twisted fibers have zero abrasion resistance.
With beading threads, your stringing will be the strongest, it will last a long time, it will feel supple and soft, and it will drape and wear the best. It will take the shape of the body, and move the best with the body. With needle and thread, you tie knots to secure your clasps. You do not use crimp beads.
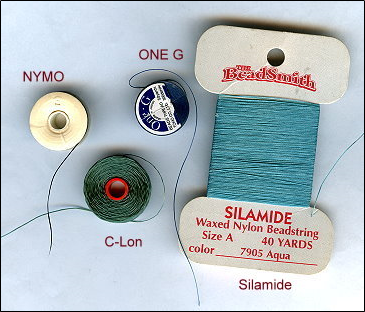
Prominent beading threads including Nymo, C-Lon and One-G. One thread, Silamide, is twisted, rather than bonded, which means it has no abrasion resistance. Beads have very sharp holes — picture broken glass — and Silamide breaks easily. Although it is pre-waxed and little easier to manipulate through your beads, I don’t recommend it. I’m not big on anything that breaks easily.
Using needle and thread does add a lot of time to the creation of a piece. You have to use a needle, which can be awkward. You need to wax your thread, which takes more time. You need to go through your piece THREE times. If you are selling your pieces, very often you won’t be able to recoup your labor, when using needle and thread.
One alternative is to use a cable wire. This goes very quickly and is easy to do. The cable wire is stiff enough to be its own needle. You don’t wax. You only have to go through your piece ONE time. The better cable wires are very strong. There is a stiffness to them that makes the pieces not feel as good when worn, in comparison to thread. You also have to use a crimp bead to hold the cable wires in place, and this is a weaker and somewhat riskier design element than tying a knot in the Clasp Assembly. Cable wire brands that I particularly like and recommend include Soft Flex and Flexrite.
Pieces done on cable wire move in the opposite direction that your body moves. If I wear a needle/thread bracelet on my wrist, and move my wrist to the left, the bracelet will move with me. If I wear a cable wire bracelet on my wrist, and move my wrist to the left, the bracelet will actually move in the opposite direction to the right. The cable wire bracelet does not conform to and take the shape of your wrist, when worn. This becomes a major design problem not always dealt with easily.
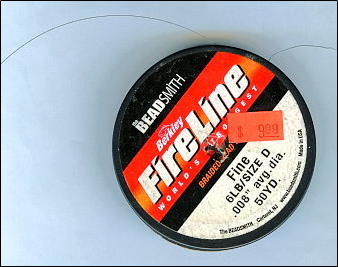
Another alternative to beading thread is to use a hybrid cable thread, such as FireLine or PowerPro or Spiderwire. Cable threads are threads braided together and encased in nylon. Originally these were used as fishing line and adapted by craftspersons for stringing and weaving. You use needles with these cable threads, but you only have to go through your piece one time, instead of 3 times, as you do with thread. You can go through your piece more than once to make your piece stiffer, but you don’t have to. You do not have to wax these cable threads. You can wax them, however, if you want, to increase your thread tension, and add more security against the sharp bead-holes cutting the cable thread.
The cable thread pieces are stiffer than the regular beading threads, but drape better than the cable wires. You tie knots with the cable threads, like with regular beading threads, to secure your clasp. Since you still rely on a needle, using the cable threads goes more slowly than using the cable wires. The PowerPro is a little awkward to use. I really like the FireLine and Spiderwire.
Threads(nylon beading thread)
Unfortunately for me, and for many beginning jewelry artists, the choices were not only about choosing thread instead of cable thread or cable wire. There were many types and brands of beading threads, each with some pros and each with some cons.
The original nylon beading thread is Nymo. Nymo was first developed by the shoe industry to attach the bottom of your shoe to the top of your shoe. It is widely used in upholstery. In the 1980s and earlier, if you wanted to buy Nymo, you bought it on a gigantic wheel — a five lifetime’s supply for us. As beading got more popular, Nymo packaged their thread on smaller and smaller entities, starting with a cone (a little bigger than a fist), then a spool (a little bigger than a thumb), and then a small bobbin. More recently the spool has been replaced by a large bobbin.
It turns out that the company could not get the same product onto a small bobbin. So, the thread on the small bobbin is weaker than the thread on the large bobbin, spool and cone. However, usually only white and black colors are available on the entities larger than the small bobbin.
Nymo is very strong. I suggest, if you have never worked with Nymo, to cut off about a 3 foot length, and try to pull on it and break it between your hands. It will break, but you’ll feel how tough it is. And in bead stringing, we typically go through each bead at least 3 times, so you have 3 thicknesses of this thread inside your piece.
When they make Nymo thread, it is a beige color. To make black, they dye the thread. The black dye tightens the thread, and makes it stronger. To make white, they bleach the thread. The bleach weakens the thread, so white is weaker than black. To make a color thread, they first bleach the thread white and then add a color dye. These color dyes further weaken the thread. So colors are weaker than white, and thus weaker than black. The colors of the thread, however, are consistent from batch to batch.
Nymo comes in many sizes. From smallest to largest, these include: OO, O, A, B, D, F, and G. The most popular and often used size is D (.008″). For a few years, the manufacturer, which had been stamping the size on the bobbin’s side, decided not to stamp any size on the bobbin. I guess people complained, understandably so, and they returned to their original practice.
C-Lon is a newer thread. When they make C-Lon, whatever color it is, that is the color the thread starts as. So, all the colors AND the white AND the black are equally as strong. However, the color from batch to batch will vary, sometimes widely. Overall, we like C-Lon better, particularly for the white and the colors. Black C-Lon is equivalent in strength to the Black Nymo. For white and colors in C-lon, these are stronger than their Nymo compatriots. One drawback to C-Lon is that the ends of the thread fray easily, making it more difficult to get your thread into the eye-hole of the needle, than with Nymo. C-Lon only comes in two sizes — AA (smallest) and D (thickest).
ONE-G is a premium beading thread and is similar in strength to C-Lon. I think its best attribute is that it has a spring-i-ness to it, that makes it much less tiring to use, than Nymo or C-Lon. ONE-G only comes in size D and only in about 12 colors.
Silamide is a pre-waxed thread. The pre-waxing allows the thread to get less tangled up when you use it. However, Silamide breaks very easily, so I don’t recommend it. Why put in all that time into a project if there is a good chance your thread will break?
Beading thread is shaped flat like a ribbon. Sewing thread is shaped round. Sewing threads are not strong enough to use in beadwork.
When choosing a thread to use, sometimes you have to make some compromises and trade-offs.
From one beader:
After finishing the pendant, I thought the necklace needed something more — like individual seed bead daisies attached to a handful of the beads in the necklace. I was working on the necklace on a Sunday night and told my friend I’d have it for her at work on Monday. I had limited thread options at hand: white Nymo or brown embroidery thread. The Nymo would have been a better thread choice, but the white was not aesthetically pleasing against the dark beads. So, I went with the brown embroidery thread. How bad could it be? Ugh! It was so hard to handle and kept fraying. Once the piece came back from photography, I did end up redoing it with brown Nymo.
I find myself switching thread brands and colors from project to project. For bead stringing, I rarely use any other size than D. I most often use the color black, and when I want to use black, I usually grab my ONE-G or Nymo. When I use a color thread, I go for ONE-G, if they have a good color; otherwise, I use C-Lon. If my piece uses any kind of crystal bead, I use FireLine or Spiderwire. There is a cable-thread product called C-Thru-B, which goes in and out of production, but is an excellent product to use with crystal beads and other beads with especially sharp holes.
Color Effects of Thread
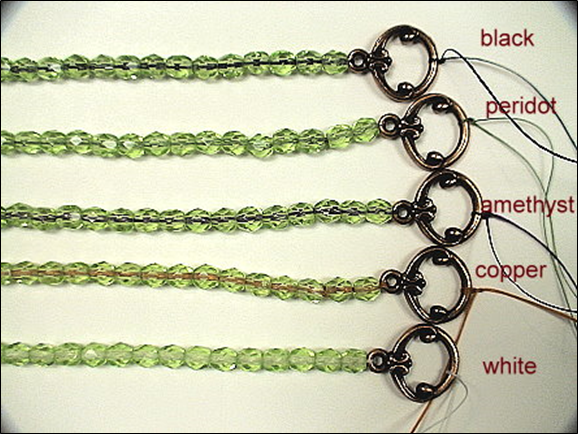
Thread color affects the viewer’s perception and evaluation of the piece. People see the thread at the knots. They subconsciously see the threads between each bead. If you are using transparent or translucent beads, the thread color will affect the color of these beads. You can do the same piece using different colored threads, and each of these pieces will look very different.
Same bead, different colors of thread
Black always works. Can’t see the knots, only shadows. This makes your piece seem older, richer, more traditional. It gives your piece a patina.
White makes your pieces brighter, sharper, more contemporary looking.
Colors: Most people select a color that is the same or similar to the predominant color in the piece. In this case, there is no color affect. However, you can pick contrasting or complimentary colors, such as using an amethyst colored thread to string peridot colored beads. You can also change the colors of your thread as you work thru your piece.
Needles
The eye of a beading needle is shaped like a rectangular funnel (the opening on one side of this funnel is larger than the opening on the other). Beading thread is shaped like a ribbon.
The eye of a sewing needle is round or a larger, rounder opening. Cotton sewing thread is round.
There are many styles of beading needles. The most used ones include:
English Beading Needles (Size #10 is good for bead stringing projects; Sizes #10 and #12 are used most often in bead weaving. There’s also a size #11.)
I like these because they have a little, but not too much, bend to them. They are stiff enough to push through your beads, but can bend a little to take some corners, or to get into the holes between two beads on a string.
Some people like to use Pony brand, rather than the English Beading Needles. Pony needles are made in India. They are a fraction of the cost of the English ones. However, they break very easily. I get too frustrated with my needles breaking too frequently, so I use the English.
Other people like to us Japanese beading needles. These have similar durability to the English ones, but are very stiff and lack that useful “bending” property that I prefer.
These needles come in many sizes. The #10 is the biggest, and the size of the eye hole relative to the needle is proportionately much bigger than that in the thinner sizes. You will also find Size #12, Size #13 and Size #15.
TULIP needles: These are the top of the line quality needles. They are made in such a way that they bend easily when you want to maneuver them through a bead, but straighten out after you have made your thread pass. A little pricey, but worth it, in my opinion. These come in several varieties and sizes.
Sharps Needles (shorts) Sharps needles are English but are shorter and considerably stiffer than regular English Beading Needles. These needles are primarily used in bead embroidery, where you have to push the needle through fabric, and a stiffer needle works better here. Some people like to use these for everything, but these are a bit too small for my hand. My hand cramps up when I use them.
These come in Size #10 and Size #12.
Loom Needles (long) Loom needles are longer than regular English beading needles. When you do loom work, you want to get as many beads on your needle as you can, when passing back and forth, to minimize the chances of snagging a warp thread with your needle.
These come in Size #12.
Big Eye Needles When your stringing material is ribbon or fabric or yarn or string, you would use a Big Eye Needle. This needle consists of two flexible needles, soldered at each end, and which open up to form a big eye. You wedge the end of your stringing material into one end, and this becomes your trailing end as you string your beads.
These come in a 2” length and a 5” length.
Twist Wire Needles Twist Wire Needles, sometimes called Collapsible Eye Needles, are used when you can’t get your stiff needle through, and you need to pass through a bead-hole one more time. You take your stiff needle off your thread, and re-thread on the Twist Wire Needle. This will usually go through a hole about three more times, before it begins to unravel. These needles come in many sizes, from Very Fine, Fine and Medium to Heavy and Extra Heavy.
Needle Threaders These work with sewing thread and needles, but not really with beading thread and needles. When you buy a kit of beading needles at a craft store, they usually come with needle threaders. These won’t work with beading needles. You can get the threader through the eye of the beading needle; however, when you try to pull it back through with the thread, it’s too thick and won’t come back out.
It’s always a good idea to have two or more beading needles on hand. They break. You don’t want to find yourself in the middle of your project and having to run to the store get another needle.
And you will occasionally poke yourself with the needle. Occupational hazard.
Hiding The Knot. When using thread, the knots are so small, that you don’t see them on the finished piece. This is especially true when using Black thread. With black thread, people see a shadow.
When using thicker cords and stringing materials, if you want to hide the knot, use a bead with a larger hole on either end, so that the hole swallows the knot. Or slide a crimp cover over the knot, so it seems like there is a bead there.
Getting Your Thread Onto Your Needle
Most people try to push the needle onto the thread. This works, but it takes a lot longer than what I am going to suggest. I like to hold the needle steady and pop the thread into the eye of the needle.
First, when using thread as your bead stringing material, you always begin with a wing-span (arm-to-arm’s) length, which is about 6 feet. Six feet of thread will make an 8”-bracelet.
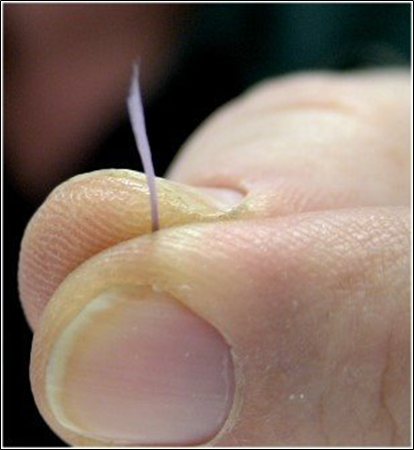
Next, on one end of your length of thread, pinch it between your thumb and forefinger, with a little bit of the tail sticking up.
Pull the thread slowly down so that the top of the thread is at the same level as the top of your forefinger.
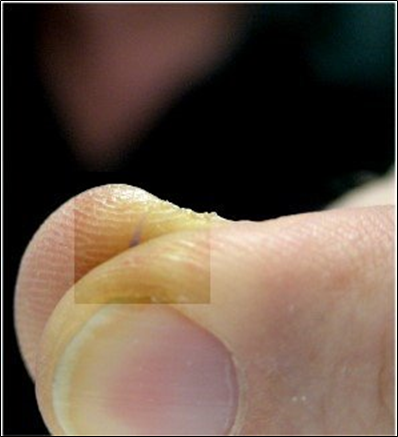
We are going to play with this thread. Pinch the thread to pop it up higher, and then pinch the thread to pop it back lower, just below the surface of your forefinger. Do this a couple times so that you can lock into your mind an image of where the thread will pop up..
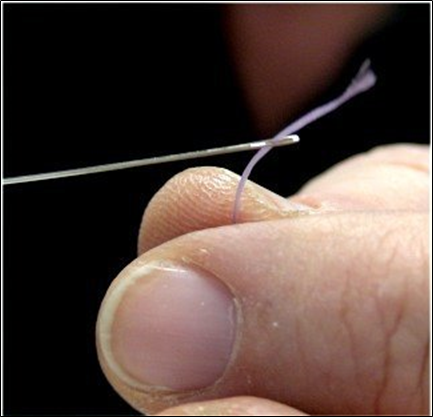
Bring your needle down parallel with your forefinger. Hold the eye of your needle right above where your thread will pop up. Don’t move your needle. Pinch the thread to pop it right into the eye hole of your needle.
When threading your needle, often it is useful, if your thread is a dark color, to work over a light-colored surface, and if your thread is a light color, to work over a dark-colored surface.
NOTE: If you are using a cable thread like FireLine, this cable thread is round, not flat. To get it on the beading needle, you often have to flatten the end of the cable thread a bit. Run the end between your finger nails, or a tweezer, or a chain nose or flat nose pliers. Don’t pull it through your teeth; it can cut into your teeth.
Wax. Wax. Wax.
A really good artist will wax their thread. Even if the thread says it’s been pre-waxed, you want to re-wax this thread.
We wax our thread to make it strong, less likely to fray, to straighten and stretch it a bit before using, to waterproof and protect the thread from weird body chemistries, from cosmetics, perfumes and hair sprays and from pollutants in the area, as well as to glide through the beads better, and to fill in the jagged edges of the hole of a bead to make it less likely to cut the thread.
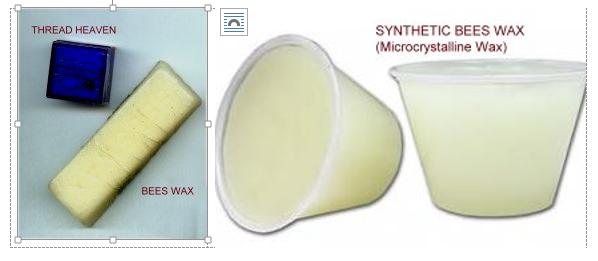
There are different types of threads and conditioners. The primary choices are among pure beeswax, synthetic beeswax (also called microcrystalline wax), and a product called Thread Heaven, which is a thread conditioner, not a wax.
Thread Conditions make the thread less likely to get tangled up and knotted, while you ware working it. Each time you pull the thread through the bead, static electricity builds up. The conditioner prevents this from happening. But it is not a wax. It doesn’t do anything the wax will do.
I suggest you always use beeswax, either pure or synthetic. I do not recommend thread heaven. Natural bees wax will protect the thread for 150 years. The synthetic wax is a little more expensive than the pure wax, but I prefer it. The synthetic does everything the pure one does, only better, and lasts an even much longer time.
Waxing the thread takes very little time, and it can add years to the life of your bead art.
When waxing, we pull our thread through the wax two times. Then we take our two fingers, pinching the thread, and slowing moving down the full length of our thread. Our body temperature melts the wax into the thread. Our fingers also knock off any excess wax on the thread. Always pull by the thread, not by your needle, when waxing.
To feel the effects of waxing, try this:
Take an arm’s length (about 6 feet) of nymo D or C-Lon D
Thread it onto a Size #10 English beading needle. Double it up, so that you now have your length of thread in half, with two equal lengths extending from either side of your needle’s eye hole. At the needle end, wrap the thread around your forefinger a couple times. When we pull the thread through the wax, we want to pull by the thread, and NOT by the needle.
Wax the thread twice, then take your two fingers and slowly go down the thread, allowing your body temperature to melt the wax into the thread. Now un-double your thread. Move your needle up to one end, leaving about an 8–10” tail. Take your two fingers, pinching the thread, and feel down the length of the thread to find the area that was wrapped around your finger, and did not get waxed. Your fingers will slip. Now wax two more times from that area on down. Pinch your thread at one end, moving your fingers down the length to melt the wax into the thread.
DOUBLING YOUR THREAD
Some people like to work with a doubled thread. I find this awkward and difficult to control. However, I leave this up to you.
ADDING THREAD
If you are making a piece, like a necklace, at some point, you will run out of thread. After all, 6’ of thread does about an 8” bracelet.
When the length of your thread looks like it will be too short to continue, then you need to tie off and anchor this thread. If you are at one end of your piece, you can tie the thread off to your clasp component. If you are somewhere in the middle of your piece, you would tie off your thread to the spine (that is, the thread already running through your piece. It is good to tie a double knot (two overhand knots).
You never cut your thread at the knot. So, after you have tied your knots, you will run your remaining thread through some beads. Then cut the thread as close to the bead-hole you can get. When you are adding new thread, you will go through a few beads before tying that knot.
MAKING A BRACELET USING NEEDLE AND THREAD
Basic Steps
We are going to string a simple strand of beads, using needle and thread. If you wanted to do some planning and design work, for a fancier arrangement, you would play with your beads on a Bead Board, and temporarily string them, using bead stoppers or hemostats on either end, to secure them in place, until you are satisfied with your layout and design.
We are going to do everything in 3’s. We are going to go through the beads three times. We are going to tie 3 knots each time we reach and/or return to an end.
Supplies: 1 strand 4mm round fire polish or druk beads Nymo, Size D thread in black 2 size #10 English Beading Needles Toggle Clasp Bees Wax
Scissors Work Surface OPTIONAL: Bracelet Sizing Cone OPTIONAL: Bead Board OPTIONAL: Bead Stoppers or Hemostats
LAY OUT YOUR BEADS ON A BEAD BOARD OR WORK SURFACE.
1. THREAD. Cut a length of thread measured from hand to hand of your outstretched hands. (about 6 feet)
2. NEEDLE. Thread onto a #10 English beading needle. Leave an 8–10” tail. You will need this length of tail in order to finish off your piece.
NOTE: Unlike with cable wire, where you deal with your tails immediately, you deal with the tails from needle/thread work at the very end of your project. So these tails will always be annoyingly in the way while you are making your piece.
3. WAX. Wax your thread
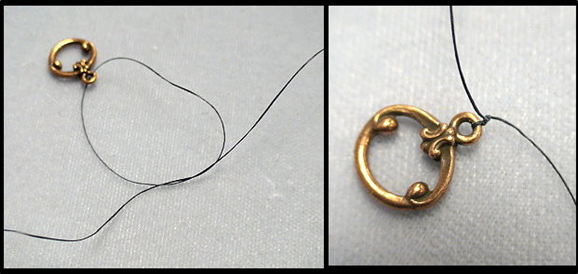
4. ATTACH FIRST CLASP PART. On the end opposite the one with the needle, string on the largest piece of your clasp set. Leave about 8–10” of a tail. Don’t short-change yourself on the tail length. You will need 8–10” to finish off your piece at the end.
Tie 3 over-hand knots. Thus, you take the tail, go over the spine, under the spine, and back up through this developing loop. Pull tight.
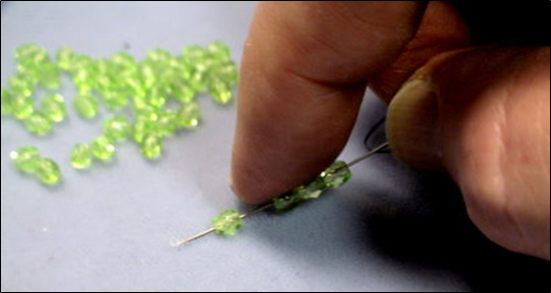
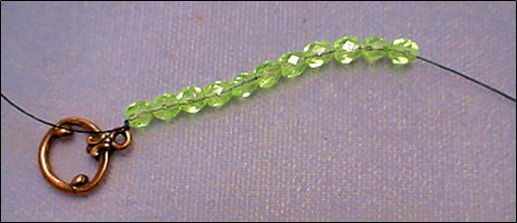
5. STRING YOUR BEADS. Using your needle, put enough beads on the thread until you have made the correct bracelet length, as you want it. Push these beads down so they are flush against the clasp.
The best way to get the beads on the needle, is to use one hand, hold your needle, and spear the hole of your target bead, lifting it up and letting it slide down a bit of your needle. Do this again and again, until you have 4 or more beads on the needle.
Then take your other hand, and push the beads all the way down to your clasp, tied off on the other end. If you can use only one and to pop your beads onto your needle, then you will increase your speed. But if you have to use two hands to get your beads on the needle, that’s OK.
Do NOT string the beads over the tail. The beads, with needle and thread, are strung over the spine only. We deal with the tails at the very end of the process. [This is unlike with cable wire, where we cover both the spine and the tail at this point.]
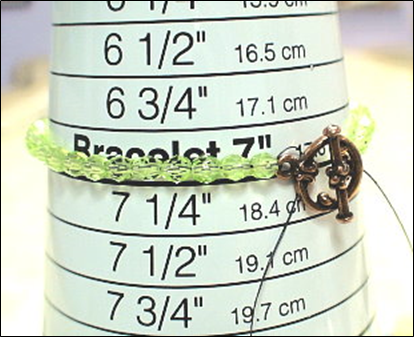
6. TEST LENGTH. Test the length of the bracelet on your wrist or against a sizing cone before tying off the second end. Make any necessary adjustments, such as adding or subtracting beads.
Remember, when you add the 2nd clasp part, you could be adding more length to your piece. With a toggle clasp, you will be adding about 1/2″ more to the length of your piece at this point.
7. ATTACH 2nd CLASP PART. You will be taking the second (and smaller) part of the clasp set and tying this off.
REMEMBER: After this point, you will not be able to make any changes in design, length or ease.
You need to maintain your tension on the beads while doing this. We are going to be using a fancier version of the simple overhand knot. This fancier version gives you more control over your thread tension. If you don’t want to do this, or forget how to do this, you can always tie simple overhand knots.
Let’s begin.
You are the artist. Your finger is your easel. Your thumb is your clamp. The thread is your canvas. The beads are your paints.
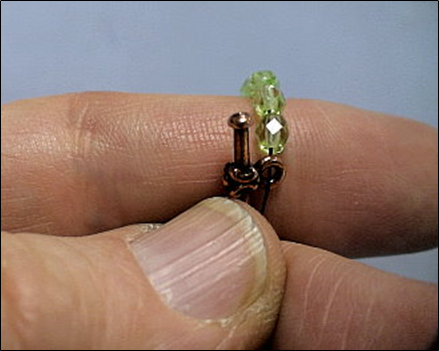
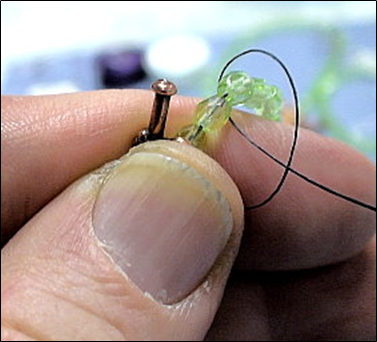
a. Put the length of beads over your forefinger, (from over there towards you) with the already tied-off part of the clasp at the top, and laying in front of your finger, closest to your body.
b. Push the clasp part off to the side, and clamp the beads, the clasp part, and the tension all in place with your thumb.
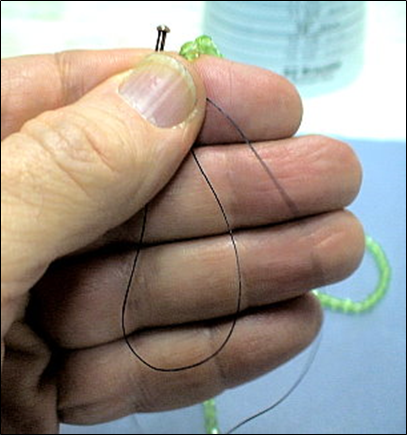
2. Make a U shape with your thread, and tuck under your thumb to hold in place. The U is actually part of your knot.
d. Take the end with the needle, and come from behind the string of beads (from outer space towards you), and under the beadwork, but stay over the U-thread and your working thread.
DO NOT take your needle through the U. The U is part of the knot, and you don’t want to tangle up your working thread with your knot.
Don’t pull your bracelet up into the air while working on it. Leave most of it resting on your work surface, pulling the end you are working on up towards you a bit.
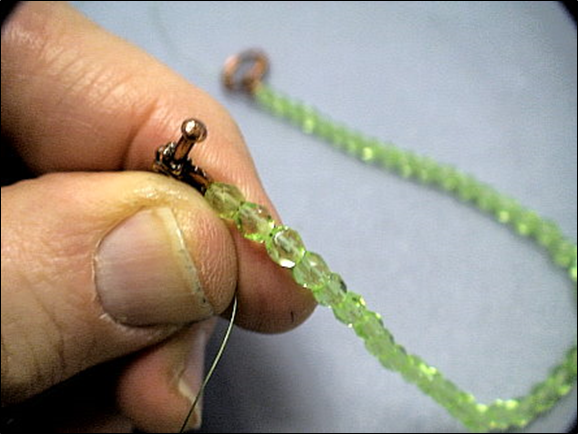
e. Pull, pull, pull, pull, pull and watch the loop getting smaller. Before it gets too small, put your needle down, and work the rest with your hand. Move this ever-decreasing-in-size loop in place between your first bead and the clasp part. You’ll have to let go with your thumb until you have the loop positioned. Clamp down again with your thumb.
f. Pull tight, and pull out the U.
g. One more pull — give the thread a good tug — to tighten things up. With your fingers on one hand, pinch the clasp part and hold tight and steady. With the fingers on your other hand, grab your working thread and pull the clasp part tightly against the first beads. You don’t want any thread to be showing.
The first time you do this step is the most important. After this, your clasp is locked in place close to that first bead.
h. This is your first knot.
i. Repeat this fancy version of an overhead knot two more times
NOTE: Your knots are tied around the thread or your previous knot. You could also, instead, have gone back through the loop coming off your clasp component, but this is not necessary. With our instructions, less thread and knots will show at the clasp.
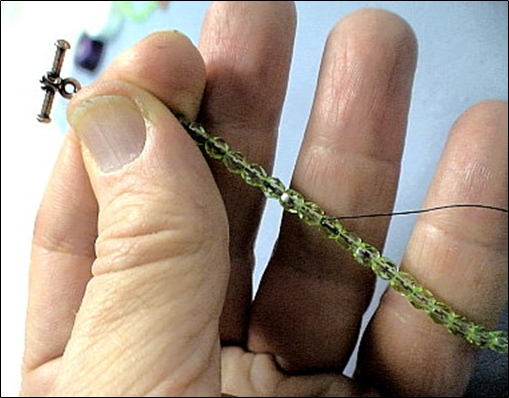
8. 2nd Pass With Needle/Thread. Take your needle, and thread all the way back to the other side of your bracelet (where the larger part of your clasp is).
You cannot do this in one step. You will have to pull your needle out every inch or two. When you pull your needle out, give your thread a tug. You don’t want it to bunch up inside the bead holes.
9. Three More Fancy Knots. Tie three of these special knots with the U.
When you get to your second side, there will be an 8–10” tail annoyingly in the way. Push this behind your hand, so it doesn’t get tangled up with your working thread, as you are trying to tie this fancy knot.
10. 3rd Pass With Needle/Thread. Take your needle, and thread all the way back to the other side.
11. Three More Fancy Knots. Tie three more of these special knots with the U.
12. Finishing Off The Tail. Take you needle and thread, and thread back about 2–3” of beads, and pull your thread through.
At this point, you have a lot of thread and knots near and in the hole of that first bead next to the clasp. You may have to push your needle through and out of that first bead first, and then go back through several other beads.
13. Can You Pop The Knot Back Into The Hole Of The First Bead? Pinch the beads right below the clasp end with your thumb and forefinger. Push these away from you, and, at the same time, pull the tail-thread towards you. You are trying to have the knots next to the clasp pop into the hole of the first bead. Usually you’ll hear and feel a pop. But not always. If you were able to maintain a very tight tension throughout, there may not be a pop.
14. Trim The Tail. Pull the thread away from you, and cut it as close to the bead hole as you can get.
15. Finish Off The Tail On The Other Side. Take your needle off the thread, and put the remaining tail of thread onto your needle.
Repeat steps 12 thru 14.
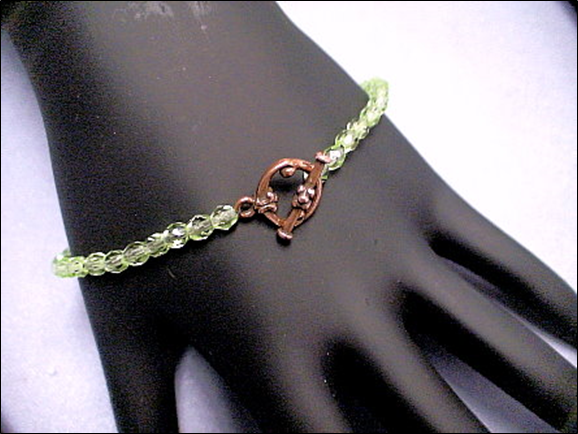
Give It The Once Over…
Once your bracelet is done, look it over carefully. Be sure your thread, where you trimmed your tails, isn’t showing. Be sure that it has sufficient ease.
Needle and thread work loosens up a bit with wear. If your tension is a little on the tighter side, then this will loosen up. If your tension is loose at this point, you may want to run another thread through your piece, anchoring it to both ends, to tighten things up.
I’m a store dog, from a long line of store dogs. My name is Lily. I’m part Chihuahua and part Shiatsu. Other store dogs have it much easier than I do, because I work in a Bead Shop. Wherever I try to lay down, there are beads. In the classroom, people are talking, talking, talking and waiving those needles all around. In the front, everyone wants to pet me and make nice — not my thing. And, try as I may, and feign as I might, I don’t think I’ll ever master this — beading and jewelry making.
5/5
Warren took me aside, and held me tight. He told me Connie had died yesterday.
I am so sad. I lost my best friend. I know Connie is together with Rosie by her side. – Lily
5/1 Thunder and lightning all day. Sorry Warren, No McCabe workshop for you. I come first. – Lily
4/27 Again, Daisy. Jayden dropped Daisy off at the store. And what is the first thing she does when she walks into the store? She runs to everyone, one at a time, and kisses each of them. Daisy, THOSE ARE MY PEOPLE!!!!! Paws off! – Lily
4/25 It was Daisy all week. Daisy on Monday. Daisy on Tuesday. Daisy on Wednesday. Daisy on Thursday and Friday and Saturday. All she does is sleep in her green cushioned chair in the front of the store. She slept right through Attaching Clasps and Bead Study and Wire Clinic and Pearl Knotting. And I saw Vera sneak Daisy and extra treat. – Lily
4/20 Have you ever gotten a bead stuck in the matted hair on your snout just below your eyes? Quite a perspective. – Lily
4/18 Daisy, dastardly daisy doodle, got in trouble yesterday. She jumped up on the bead table, and was taken to the dark bathroom for time out.
A Vanderbilt professor did a study that showed that dogs didn’t really smile. Then, what’s this! -Lily
4/17 They waxed the floors last night.
Wheeeeeeeeeeeee!!!! #^Vdkla@)(!%
Oooh, they missed a bead. – Lily
4/15 These substitute UPS drivers don’t get it.
Nip or Treat!
No treat, you get nipped. – Lily
4/12 “Do you think we should give Lily a T.R.E.A.T.?” That means, Bark twice, Whine moderately, and Paw up. Mmmmmm… – Lily
4/10 Thunder and lightning, Oh My!
The only safe place to hide is under Warren’s chair.
Too bad it’s on wheels. – Lily
4/8 Connie was worth waiting for!
I love Connie! – Lily
4/7 Tomorrow is Bead Study. Can’t wait. Connie takes good care of me. That’s why I like to jump up on the seat next to her, and curl up and look cute.
She’s very good about not dropping beads on top of me. – Lily
4/4 Becky came to the store again today. I thought she was shy. Now she’s all store dog — barking, greeting, kissing.
A lady came in, bent over, and Becky kissed her! No, no, no, that’s not how it’s supposed to be done. I’m the only kissy-face around here! – Lily
4/3 I laid on my back, my soft tummy up waiting for someone to rub it. 20 minutes. 30 minutes. Nothing.
I know what to do in this situation.
“Lily, WHEWWWW!!!!” – Lily
4/1 — even later I was playing with my baby toy, as I do after work each day. Somehow, I fell over off the chair, and rolled a bit. A bit too far, and right into Jayden’s TV tray, where she was working. It’s too high up to see.
The tray fell over, and now I see what she was working on — very pretty.
And Jayden smiled a big smile. Or was it a frown? I can’t tell this far away on the ground. I know she loves me. – Lily
4/1 — later Daisy came to work today. I don’t know why she bothers. You could slap her up and down the side of the snout with beads, and she wouldn’t care.
I’ve dug a secret hole for Daisy in the back yard, near the rear fence and the bamboo. She’s stronger than I am, so I’m a bit afraid to push her in.
But consider her warned….. – Lily
4/1 Richard stuck a red price tag on the hair on the back of my neck. He said it showed everyone how precious I am. Then why were they laughing? – Lily
3/31 Jayden likes to play dress-up with dogs and anyone else around her. I’ve been through it all — bows, hair clips, ribbons, Austrian crystal necklaces, Austrian crystal leashes, sweaters, embellished sweaters and embellished sweaters with further embellishment. Thank God I don’t have any lips, or she’d be putting lipstick on me.
Recently, she’s been struggling about how to dress-up Daisy. Her hair is too short for hair clips and bows. And her breast is broad and large, but her neck is tiny and narrow. She can’t pull off those necklaces of hers. – Lily
3/30 I have a pronounced underbite. Girls think it’s cute. It goes with my pug nose. I’m still able to crush the crimp onto the wire, though, but I can’t get my jaw and teeth to re-round them. – Lily
3/29 Oooh! Some of my hair got sewn into one of Warren’s works.
I hope he doesn’t notice. – Lily
3/28 Got myself tangled up here in black Nymo thread. Around my paws a few times, and my tail, and it feels like it’s cutting up into my butt. I’ve been chewing at it for hours now.
Thank God it’s the Nymo on the bobbin and not on the spool. I’d never be able to chew through that. – Lily
3/24 I sat through another Orientation class of Warren’s.
Rosie, one of the last store dogs, went to every class and soaked in all the material.
I can’t help it if she mastered tubular peyote after two years. That damn step up.
In a bead store, “adorable” just gets you so far.
Mastering the step up — now that will get you put on a doggy pedestal for life.- -Lily
3/18 I can’t believe Warren got even smaller treats.
I expect everyone to give me a treat every day, or at least, ever time they come in.
That means, Marje and Richard and Nola and Linda and Nancy and Tiffany and Connie and Vera and Cecilia and Bonnie and Ethel and Mary and Andrea and The Postman and The UPS Man and The FedEx Man and Beverly and Kathleen (even though she doesn’t like dogs) and Susan and Susie and Dagmar and Terry and Sandy and Warren and Jayden. -Lily
3/17 Richard put a green self-stick label on me, so I could wear the green like everyone else.
At least, I think that’s why he did it. -Lily
2/24 Ronnie brought Becky today and Jayden left Daisy at the store.
NO NOT AGAIN.
Becky is too big to play with. Daisy gets all the attention, and she doesn’t even like to bead. -Lily
2/24— later Becky found Daisy’s bone and hid it.
Daisy found it. And hid it somewhere else.
Becky found it. [“It’s there, you big dog,” I said.] Then hid it.
Daisy found it again, and took it somewhere else.
Fun to watch, but they’re both slobbering over all the beads on the floor. -Lily
2/3 Stepped on another needle today.
I guess Size #10 needles ARE bigger than Size #12’s. – Lily
1/11 Dastardly Daisy Doodle came to work again today. I don’t know why she doesn’t stay home. She doesn’t like to bead.
Today, as usual, Daisy slipped her rubber bone with the wheel on it into Vera’s larger than life, at least larger than Daisy, canvas bag.
And in return, copped one of Vera’s peyote stitched pieces. I wonder how long it will take Vera to notice. -Lily
I can’t help it if she could Square Stitch. After all, she had a much larger snout than I do.
It was much easier for her to thread the needle. -Lily
1/4 I snorted a bead today. It was an 11/0 Japanese Miyuki seed bead in turquoise luster.
I guess it’s true what they say about seed beads. They are not all exactly the same size. The 11/0 aqua transparent I snorted yesterday was much smaller. -Lily
I was driving down the interstate, not really going anywhere, but enjoying the ride. As the billboards passed, and the cows passed, and the gas-stations passed, and as I passed car after car and truck after truck, I began to begin to suppose — suppose I used some particular beads, with these other beads, in this configuration, with this design. Just suppose.
My mind wandered a bit for a moment, distracted by something along the side of the road I caught in the corner of my eye, and then I returned to thinking about my piece and its design. I needed a sense of the clasp and how it fit with my visualization of the beads. I wanted to evoke a feeling. An emotion. A sensibility. A restrained elegance. Something different than for my sweaty body, somewhat tired and disheveled, somewhat stiff, driving an older car along a long stretch of road. Flat. The same grass, bush, tree, grass, bush, tree, grass, bush, tree over and over again.
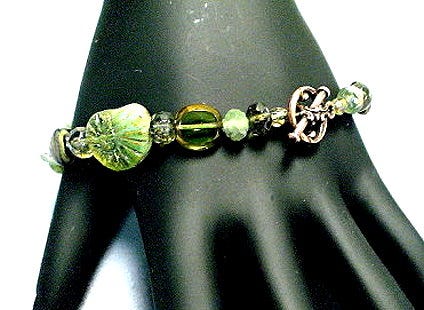
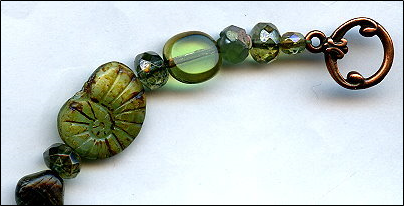
I wanted to create five segments, each with a subtle color and pattern variation. The clasp had to fit in with that pattern. Should I string it on cable wire, thread or FireLine (a cable thread)? This one would be FireLine. I’d go through three times to steady the beads from wobbling on the line. Black FireLine. Black was important this time.
I wanted to try to bead-weave off the bead-strung piece. I’d need to subtly build in some delicas into the patterning, and some way to drop them down from the line of the string, so I could weave off them. I wanted to use some shapes I hadn’t made much use of before — 15mm angel wings, 12x6mm bell flowers, and fireballs or crystals. Police lights in the distance. A purple-y blue. Blinking rapidly. In succession. I slowed down. And slowed down some more. I lost my train of thought and wondered for a few seconds to remember what I had been thinking about.
My lady wearing my necklace would be in a long, slimming gown, with a low cut neckline, and hair pulled back. She was busty, but not too busty. She would be walking rapidly down ramps and stairs, through rooms and parties, turning frequently to talk to one person, then another. My necklace had to move with her, like a natural extension of her persona. That meant colors would have to flash and sparkle from every angle of every bead, and from every segment of beads.
But too much sparkle would be overwhelming, so I’d need some subtle color shadings and blendings that would catch the eye, but not hurt it. That would intrigue, and not disappoint. That would flatter, and not make clownish. And that necklace would have to stay in one place. That means thread or FireLine, and a well-jointed and supported clasp assembly, starting with a simple hook and eye.
It was an accident.
Oh, no, not my fantastic fantasy of a necklace. The cars, police lights, police cars, fire engine, and the police, and a few by-standers. My necklace would be no accident. It would be a star upon a star upon a star. Whoops, I’m veering a little bit off the roadway here. I’m still within eye-sight of those police troopers, so I don’t want to do that. Got to pay more attention to the road. Stop designing jewelry in my head. At least, for now.
I’ll soon be at the next big town on the map, to check out all the bead stores there.
DESIGN — MORE THAN A BUMP IN THE ROAD
Design is more than a road trip. It’s more than a day-dream interrupted by a bump in the road. It’s not triggered by flashing lights, nor disrupted by them. Design doesn’t suddenly drape itself around you because you’ve visited every bead store between here and there. It doesn’t become a part of you because you’ve attended X-number of bead shows and taken Y-number of jewelry making workshops. Design is something more.
Design means having some intention in life. It means screaming Here I Am without having to scream. It means interpreting the inner you for the outer them. To Design with Beads makes this process wondrous. It means capturing light and shifting shadows within colors and shapes and sizes and materials, front, left, center, curve and crevice, inside-out and outside-in. Design doesn’t get any better than designing with beads.
But there is a self-awareness factor. As an artist. A creator. Someone who esteems themselves. With courage. And direction. And meaning. With curiosity. Attention. And detail.
It’s something more than calling yourself a Jewelry Designer. And it’s something more than other people, upon seeing your work, calling you a Jewelry Designer — only because that is what you call yourself. Designers are artists who find their inner designer self — creating resplendently, appropriately, exuding desire, fantasy and a certain edginess in appeal. Their designs may speak loudly or softly, but in each case, they resonate.
Most people who call themselves Designers, avoid design. They might follow trends or fads. They might shy away from choosing colors or patterns. They might rely on simple rhythms, unthreatening, un-announcing, un-tantalizing, un-sexy. They might resort to simple lines, instead of shapes and forms. They compensate for a lack of understanding of contemporary jewelry design principles by over-embellishing, or using overly-expensive materials, or placing their jewelry in overwhelming packages with tissues and informational cards and business cards and perfumed essences of something.
How many times, I cannot tell you, have I walked through craft shows and jewelry shows, or paged through jewelry and bead magazines, or examined the pictures of the winners and runners-up of numerous and prominent jewelry design competitions, and been disappointed. Dull. Unwearable. Inappropriate materials, clasps and components. Unimaginative. Seemingly copied. Weak color choice. Boring rhythms. Balance for the sake of balance, symmetry for the sake of symmetry. Predictable. Safe. Unreflective of the artist’s unique human hand. Overly embellished. Ignorant of the art in craft, or the craft in art.
The good designer sees jewelry as art as it is worn. No matter where the person is. No matter what the person looks like. No matter what the person is doing. Jewelry must hold up as art as it is worn. It can only do so if the artist has attended to design principles.
Design Principles help us understand why people find some jewelry attractive, and other jewelry not. The first set of these design principles we call Rules of Composition. Using these rules is more a conviction, than an established, conscious fact.
But way, way before you get to these rules, you go through a trial and error, almost happenstance, process of discovery. It’s in the little things, some clever strategy, some fortuitous decision, some working down an unknown pathway to see what happens. This is how you begin to discover the designer in you. This is how a few jewelry designers discovered art and design for themselves.
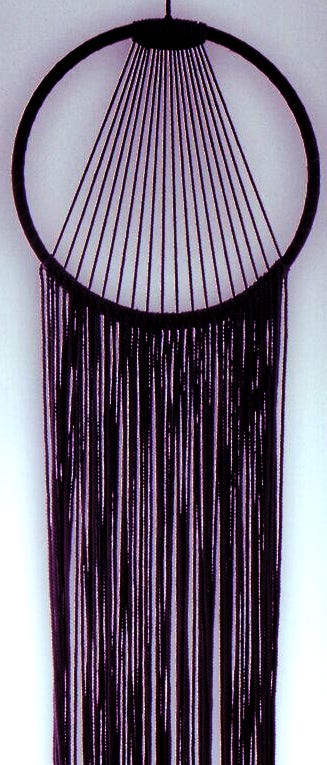
For Arynthia, today a prominent jewelry designer and instructor, she felt she crossed that initial threshold with her bead woven garden urn. She created a vessel with little beads that kept its shape. No easy feat, especially at the time.
Her vessel took hundreds of hours in figuring out how to create it. And she created and re-created it many, many times. Three dimensional bead woven pieces tend to collapse on themselves from the weight of the beads, and the lack of structural supports to keep their shapes. Most bead woven vessels and 3-dimensional objects are woven over another object — a jar, a vase, a ball, a piece of wood or Styrofoam — to keep the shape.
With Arynthia’s urn, she gave it four shoulders. Arynthia had always sewn. She was adept at making jackets that kept their shape at the sleeves and shoulders. She applied these insights to her bead weaving strategy in making her garden urn. She created a shoulder at the North, East, South and West points at the top of her circular urn. It worked. She had solved the core design problem before her.
The first time she made her successfully structured garden urn, she said it looked like a strawberry. So there were more design decisions to come, before she claimed final success — an urn that held its shape and looked like a garden urn. She had told me that the garden urn evolved through 25 or so versions, until she was satisfied with the design. And she, as a designer, evolved with her piece, as well.
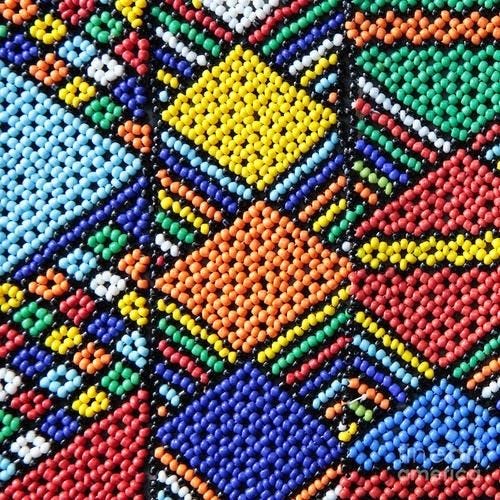
Lanie, (another noted jewelry instructor), took a different path in her design evolution. When she initially got into beading, she would deconstruct existing pieces, and analyze the stitches. When she began her career, there were few contemporary bead weaving artists. There were many Native Americans and Africans creating bead weavings, and they provided most of her examples. How did they hold the piece together? How did they function? What about the stitchery allowed the piece to flow, curve, and move without breaking? What were the specific steps involving in stitching? Were there any commonalities and universals among pieces from different bead weaving artists?
Lanie translated what she saw into contemporary designs. Her observations about structure became explanations about structuring bead woven pieces. Things clicked. She became a designer.
And finally, we have Geoff. Geoff had no particular goals or aspirations when he started making jewelry. It was something that kept him busy. Kept his mind from wandering and his attention focused and grounded. Allowed him to be creative. He tried every technique — bead stringing, netting, peyote, brick, right angle weave. He went back and forth. Beading is somewhat addictive, and he found himself addicted. But nothing at the moment felt like self-expression.
Geoff began to teach the peyote stitch. He was rigorous. He drove his students to try more and more things. And then more things. He was never satisfied. He wanted to achieve something he could not articulate. His students suffered for it. He was disappointed in them. And he distanced himself from them.
While playing with another stitch — the right angle weave — he found he could build upon the stitch, and layer it. Not only could he layer it, but he could give it dimension and shape. He constructed mattresses filled with coils of beads which formed multidimensional objects — a certain realism and sculpture-like precision. With this same stitch, it was easy to create layers of beads over these mattresses, resulting in beautiful forms and objects. He broke out of his box with these discoveries in techniques.
With this more dimensional and sculptural right angle weave as his base, he found his calling. His new insights created more new insights as he applied his ideas in different situations, with different goals and with different materials. He began blossoming as a designer.
As the Jewelry Artist comes to know jewelry and discovers their personal take on style or technique, the Jewelry Artist comes face to face with Design. Every artist’s pathway is different.
Jewelry Design is the application of basic principles of artistic expression. These principles involve:
1. COMPOSITION 2. MOVEMENT, Flow, Drapery, and Torque 3. FORMS in Relationship to the Body and the Mind, including Functionality and Support 4. TECHNIQUES and MATERIALS
These principles are merely rules for making choices about how to proceed, or not to proceed. About what to include in your pieces, and what not to include. How to anticipate wearer and viewer issues, and how not to screw up here. What techniques will work best, and which will not.
The jewelry designer delineates the Design Process, something that works for her or him, and something that allows her/him to apply the rules.
The jewelry designer articulates for her- or himself an Inspiration, sometimes very specifically, but other times vaguely.
The jewelry designer Plans out his or her designs, with the rules in mind.
S/he sets Goals for the piece — its attributes and their justification for why they must be included, and other attributes excluded, in the piece, and again, with the rules in mind.
S/he defines Standards about quality, wearability, context-sensitivity, timeliness and the like, with the rules in mind.
The jewelry designer then sets up a Schedule and a Routine, things that work for her or him, and begins to work.
And day-dreaming about jewelry design can take you to all sorts of places.
I swear I keep sticking my needle into my finger to reality-check that I’m still alive. Good, Red … I’m still alive. That this mess of a jewelry making project before me, one I keep starting, then stopping, then starting, then putting it away, and then retrieving it, and starting it again is more than a blur, a fog of my imagination. I have this great, intricate beaded necklace to make. And I can’t seem to get it done.
I’ve gone through two packs of 25 beading needles. I pick another one up. I bend it. The needle-hole catches my eye. My eye twitches a bit. Why would I ever want to thread this needle and start this project one more time? Bend now. I can’t wait for you to bend when I’m in the middle of things.
Oh, and the guilt. Everytime I stop, I think I’m being selfish. If I go outside, someone will get sick. If I complain that I’m BORED, CLIMBING UP THE WALLS, SAYING NASTY THINGS ABOUT JESUS, someone will die.
And I love beading and making jewelry. I do it all the time. Almost every day. Hours a day. Never one iota of boredom. Mind never wandering. Until now. Until I’m forced to stay inside.
I can’t focus. I can’t read. I am even getting tired of complaining to my husband. Who doesn’t care. Has never pierced his finger with a needle. And should he ever, he wouldn’t know what to do, anyway. [You know I just want to take this needle and see how he reacts. But I won’t.]
I can’t believe, and you won’t believe, what I just did. For the 8th time just in the last couple hours. I ali-kazam’d with my fingers and commanded the beads to usher themselves into this spectacular, wonderful, beautimous piece of jewelry. And did they? No. Out of spite? Now I’m losing focus again.
My house has become the Hanoi Hilton Hotel. John McCain is in the cell next to mine. He has a window. But the floors lay at a 30-degree angle. My floors are flat. But he has a window. I’ve managed to chip off over 60 pieces of brick off the walls. I’ve spent the last 375 days trying to drill holes in them with whatever I can find. A shard of glass. A rusted nail. A piece of metal I’ve wedged off the bars. I’ve slowly, with cleverly pinched fingers, positioned just so, manipulated the threads in my pants, rolling them, working them off in long threads. I am so sure I can drill those holes. My confidence has me believing I can secure the material to string them on.
But I digress.
They say you can survive a quarantine with a smile. I’m better off than a Neanderthal because I have a roof over my head and a grocery that delivers. That should make me smile. Neanderthals lived and hunted and played in packs. I am free to live and hunt and play by myself. This should make me smile. Neanderthals never knew what was going to happen next. I don’t know what’s going to happen next either. This should make me smile. Neanderthals never expected perfection. I do. I’m not smiling.
The news is making me crazy. So I turn it off. Now no news is making me crazy. I spend more time with my friends on Facebook. My friends are getting whiny and beginning to repeat themselves — over and over again. So I stopped linking on to Facebook. I miss my friends. I made a schedule for myself to keep me occupied and, frankly, feeling some sense of safety and security. I cannot keep to it for the life of me. So I threw it out. And made another schedule.
They say sit back and relax. There have been worse times in our history. Be helpful to one another. Show kindness, understanding. Be flexible. Get outside, if possible. Eat well. Get enough sleep. Try to connect with one person each day. Be positive.
I’m trying.
I decided to do small beading projects — ones I can finish in a few hours. This keeps me from getting overwhelmed. It gives me a feeling of accomplishment. I can sense I am living each day by day, instead of feeling I’m losing touch with time.
I do other things between projects, instead of one project after another. I go outside. Make a phone call. Bake something.
I pick projects which will develop a skill I’m unfamiliar with, or further develop a skill that I already know. Learning is very rewarding, and keeps me focused and happy.
And instead of keeping to a routine per se, I spend some time re-organizing my supplies and workroom. I feel better in my re-organizing mode, rather than following a schedule.
If we’re to cope with our beading addiction, we may have to figure out, at least part of the way, how to bead in a car. We’re not talking water beading on the car when it gets wet. We are talking about taking beads and stringing material and clasps and all those other little pieces, and making jewelry, while traveling in a car. As the passenger. Not the driver. Or, I think not the driver. Addictions can be very powerful.
So, this all begs the question: How DO you bead in a car?
Most people say, “Don’t!”
Or, “Only if the light is Red!”
But others say it is possible under certain circumstances.
Bonnie’s Advice:
Put two pillows on your lap, and wedge them between you and the dash board, to create a type of table and shock absorber.
Use a “lap desk” that has ridges around it. Lay fleece on it.
If also using dishes or containers, put fleece in each one, as well. The fleece “holds the beads”. Regular material does not work.
The pillows absorb a lot of the bumps.
Don’t put too many beads out at a time.
For bead stringing, use long bracelet gift boxes, or something with a deep groove in it.
You can also take a piece of fleece and put it OVER your beadwork as you’re working. Or you can put your beadwork into a ziplock sandwich bag, and work on it at the opening of the bag.
Vera’s Advice:
Put beads in a fleece-lined Frisbee.
Have a towel folded up on you on the other side of the console to cushion the frisbee, so it doesn’t move.
Kathleen’s Advice: As the passenger, for bead crochet: Real easy. Use a tray lined with fleece. Pray to God you don’t hit bumps and stuff.
Pullencreek:
It is not easy beading in a car as a passenger but it can be done if you are persistent and determined. I use a shoebox lid with soft suede underneath my beadwork but it is difficult to thread while riding down the road.
Satine: Definitely NOPT while you are driving! LOL
I’ve tried beading in a car. First off, take a lot, a lot, a lot of extra beads, unless you want to spend most of your trip trying to pick them up off the floor, under the seats, in the water cup holders, in fact, they fly everywhere. Don’t bother. Just bring a lot of beads.
Learn how to shift your hands in sequence and harmony with bumps. You let them move up and back down at the same time, and with the same rhythm as your car goes up, and then back down. If one arm moves at a different rate, or to one side or the other, instead of straight up and down, it can be all over. You have to start again. And if both arms move too fast or too slow, OOPS, you have to start again.
A few times, I tried to incorporate a lot of double-sided tape and some velcro to keep things in place. Especially on those side roads. They are a killer. Doesn’t work as good as shifting your body up and down in sync with the car over it goes over humps and bumps and pot holes and changes from asphalt to concrete.
Be sure to be stern with the driver. You cannot have them hollering at you to stop. Or laughing at you. Or giving you directions. They need to be quiet.
Don’t work on major, massive projects. Keep things simple. Do things in very, very small steps. And for God’s sake, don’t worry about perfection.
You might first practice with make-up. See if you can put on lipstick and mascara and face powder while traveling in a car. If you master that, making jewelry won’t seem so hard.
But, if you’re OCD, and can’t stand things being out of place, don’t even think about bringing your beads and beading supplies into your car!
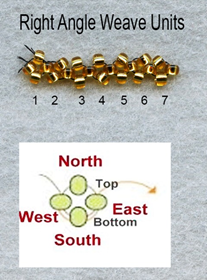
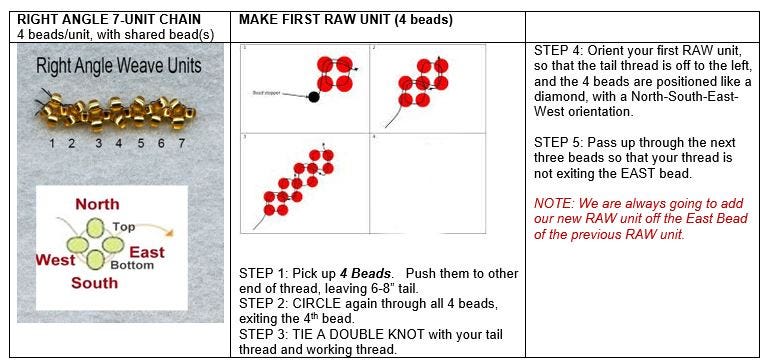
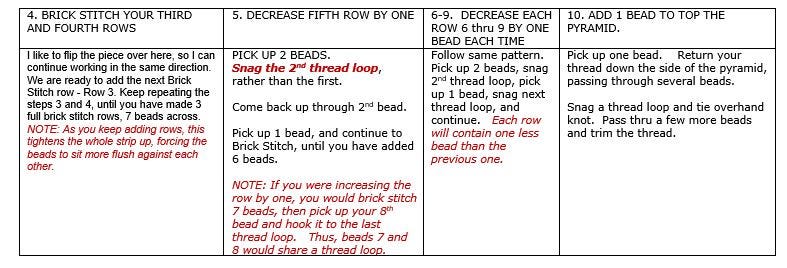
The RAW Stitch typically is a circle of 4 beads (a Right Angle Weave Unit) connected to another circle of 4 beads (a second RAW unit), with one bead shared. The thread path follows a “figure 8” pathway. As you add units, you will find yourself going up and around in one direction, then going down and around to add the next couple units, then up and around, and then down and around, and so forth, always following that figure 8. At no point should the thread show within the negative space surrounded by our 4 beads. This is the reason for the more convoluted Figure 8 pathway which underlies the stitch. NOTE: We can use more than 4 beads in each unit. Many people use more than 4 beads to hide the threads from showing between each bead.
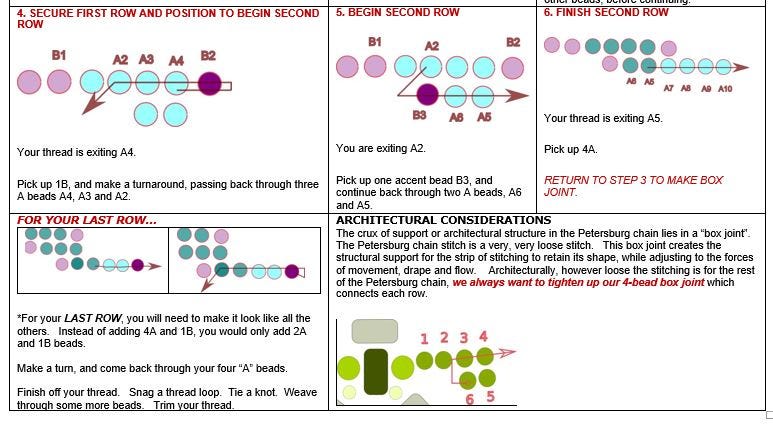
The St. Petersburg Chain stitch is a relatively simple stitch that generates a long, thin, flat length of beadwork. Traditionally, two lengths are created and connected together up and down the inside edges with a decorative bead.
This stitch is known by the herringbone or zig-zag pattern the beads make when stitched together. The stitch is very soft and fluid. It results in a very beautiful texturing and patterning. A lot of thread shows in this stitch, and, in this case, is a charming part of the whole effect. The beads sit in regular columns in angled pairs, forming a “V” (thus, herringbone,) shape.
With BRICK STITCH, beads are woven and locked into place by snagging the thread loops between them. As you add a new bead, you snag the thread loop (bridge) between them, and pull the bead down to the already completed rows. The BRICK STITCH always begins with a Ladder Row.
You stare at a bead, and ask what it is. You put some thread on a needle, then the bead on the needle, and ask what to do. You stitch a few beads together, and wonder what will become of this. You create a necklace, and ask how it will be worn. And you stare at each bead again, and think where do all these feelings welling up within you come from — beauty, peace and calm, satisfaction, magic, appeal, a sensuousness and sexuality. Your brain and eye enter into this fantastic dance, a fugue of focusing, refocusing, gauging and re-gauging light, color, shadow, a shadow’s shadow, harmony, and discord.
You don’t just bead.
There’s a lot involved here. You have to buy beads, organize them, buy some extra parts, think about them, create with them, live with some failed creations, and go from there. If there wasn’t something special about how beads translate light into color, shade and shadow, then beading would simply be work. But it’s not.
You have to put one next to another…..and then another. And when you put two beads next to each other, or one on top of the other, you’re doing God’s work. There’s nothing as spectacular as painting and sculpting with light.
This bead before me — why is it so enticing? Why do I beg it to let me be addicted? An object with a hole. How ridiculous its power. Some curving, some faceting, some coloration, some crevicing or texturing, some shadow, some bending of light. That’s all it is. Yet I’m am drawn to it in a slap-silly sort of way.
When I arrange many beads, the excitement explodes geometrically in my being. Two beads together are so much more than one. Four beads so much more than two. A hundred beads so much more than four. The pleasure is uncontainable.
I feel so powerful. Creative. I can make more of what I have than with what I started with.
And the assembling — another gift. String through the hole, pull, tug, align, and string through the hole, pull, tug, align, and string through the hole, pull, tug, align, and string through the hole, pull, tug, align. So meditative. Calming. How could beads be so stress-relieving, other-worldly-visiting, and creative-exciting at the same time?
Contemplation.
To contemplate the bead is to enter the deep reaches of your mind where emotion is one with geometry, and geometry is one with art, and art is one with physics, and beads are one with self.
So these days, I confront my innermost feelings about beads. What I enjoy, and what I do not. What I have learned, and what I have not. What I want to achieve, and what I fear I cannot.
It’s not that, originally, I wanted to bead much of anything. I imagined what I wanted to create, and quickly found I couldn’t create it. This became my Rogue Elephant — the sum of all my jewelry design ambitions, and my fluency and ultimate success with it.
I had very specific ideas of what my beadwork should look like, and how it should function. I did not want to be considered a painter who uses beads, or a sculptor who uses beads. I wanted to be considered a bead artist. A bead artist who legitimately uses beads, and not paints, and not clays or stone. This was my dilemma.
Alas, this was the basis of all my fears. Could bead artists intentionally design with light in a fundamentally different way than painters use paint, or sculptors use clay or stone? If I beaded a mannequin, I’d be painting or sculpting.
But what if I beaded a Rogue Elephant? Something that moved. Something that reacted differently in different situations. Something that appeared in different contexts. Would my beadwork stand up to some test of grammar, poetry, art, vision and even love?
I was tentative, at first, about beading, but that Rogue Elephant kept getting in my way. To tame it, to get rid of it, to make sense of it, I had to bead it.
But how? Should I? Could I? Would I? It’s huge! It’s fast! It’s ornery!
Should I make my Elephant some kind of necklace or anklet to wear? How about a little hat? I can tubular peyote around its trunk OK, but what about its ears? What do I do there? That mid-section is awfully rotund. Fringe would be pretty, hanging around some kind of blanket. But, alas, wouldn’t it just drag along the ground?
The main problem is, though, that this beast keeps moving. How am I ever going to get anything to look good, and stay looking good, on this Elephant if it keeps moving? After all, Rogue Elephants don’t Pose. They’re not “Vogue” Elephants. They’re “Rogue” Elephants. They’re too busy tossing their heads at everything else in sight.
If I use large beads, I can accomplish this feat faster, but not necessarily as elegantly. Should my Elephant be elegant? Sophisticated? Earthy? Adventurous? Bohemian? Fashion-aware or fashion-I-don’t-care?
I can not get this Rogue Elephant out of my mind. The thoughts of beading it seem insurmountable, unconquerable. My eyes strain, my hands ache, my back stiffens at these thoughts. It will never get done. I won’t finish it. I won’t do it. I most certainly don’t have the time. I’ll try something easier, like a toy rabbit or a stick. A small stick. A very small, very straight, perfectly round stick. Surely not an Elephant, a Rogue one at that.
Calm down, I say to myself. Stop hyperventilating. Wipe those clammy palms. Don’t let the task before you scare you before you even start.
I grit my teeth. I stand up straight. I squeeze my hands into a fist. I hold my fisted-hands stiffly and tightly against my right and left sides. I lift my chin up ever-so-slightly until my eyes meet his. I stare that Rogue Elephant right into the face for those few seconds it stands in my field of vision. I will bead you. I will bead you. I will bead you.
I set my mantra going. I try to focus on my inner self. I reach way back to grab my inner being, setting its life force and motivation on track to complete this awesome task.
I will bead you. I can bead. I will bead you. I can bead. I will bead you. I can bead. I will bead you. I can bead.
Glue. Thank God someone invented glue. I could corner that Elephant, pour buckets of glue on him, and use a leaf blower to blow a pile of beads right onto that beast. They’ll stick. I’ll be done. Whatever happens, happens. That’s what I’ll do.
But I wouldn’t be happy. And that Elephant would probably want to scratch and itch. Beads would pop off. The glue would yellow. That Elephant wouldn’t be able to walk with any sense of style or grace. It might trip. It would probably fall down, actually. And not be able to get up. Pitiful. It would lose its Rogue-ness. It’s essence of being. I would tame it, yet more than humble it. Where’s the excitement? Glue just won’t do.
I will bead you. I can bead. I will bead you. I can bead. I will bead you. I can bead. I will bead you. I can bead.
How about Mardi Gras beads? These beads, already ironed into place onto a string, could be wrapped around and around and around. Purple Iris’s. Topaz AB’s. Olivine Lusters. They’d be colorful. They’d shine. They’d sparkle. It would be like lassoing a steer — over and over again. I don’t know if my Elephant would stand still for that. Perhaps I could corral him. I could tape one end of the bead string to the tail. Then go around and around and around his body until I reached the other end of the trunk. I’d parade the Elephant in front of all the other Elephants out there, and they’d all want to look as dapper. Everyone the Elephant meets, in fact, will want to be wrapped in bead-ropes. How easy, how simple, how divine.
Once I let my Elephant out of the corral, however, I fear the bead-ropes will reposition themselves and slip off and look sloppy. My Elephant would have to lose its Rogue-ness to pull off this look. My Elephant would have to stand still and pose. I don’t think my Elephant would stand for that. In fact, I know he wouldn’t. The jungle is not a circus, and the banks of the jungle watering hole do not provide a level pedestal for such an event. My elephant would be perplexed. And the result would not be satisfactory beadwork. He’d be off in an instant. This would be a mess — a big Mardi Gras mess. Only sanitation workers in New Orleans getting paid much overtime would have any determined appreciation.
I will bead you. I can bead. I will bead you. I can bead. I will bead you. I can bead. I will bead you. I can bead.
Just what is the recipe then? Take needle and thread, add beads, mix lightly, separate whites and darks, bake, turn once, and voila? Do I have to have a recipe? A determined strategy? A plan of action? Can’t I just bead it? Do I have to think about how to get the beadwork to stay in place? Look good? Look great? Must the Elephant still be able to run with the beadwork on? If the Elephant runs, must the beadwork stay on? And still look good? Oh, dear, my head is beginning to hurt. I don’t know if I can do all this. And be satisfied.
And the poor Elephant. It looks at me one more time. It’s green eyes dart on me. Challenging me. Daring me. Perhaps fearing me and my determination. Perhaps pondering the why’s and wherefores of my insistence that he be beaded — in totality, Rogue-ness and all. The Elephant turns its head, touching his long torso from shoulder to belly with his trunk. His tusks shift uncomfortably. I’m sure the Elephant is wondering How! — How would the beads go on? How would they be arranged? How could he continue to walk and drink and eat and talk? How would the other Elephants react? How could anyone ever begin to bead a Rogue Elephant?
My Elephant looks at me one more time — staring directly into my eyes. It’s more than a glance. He stares, as if to say, it can’t be done. My Elephant lifts its trunk, extends its ears, snorts, shakes its tail, turns and darts away toward the horizon.
I will bead you. I can bead. I will bead you. I can bead. I will bead you. I can bead. I will bead you. I can bead.
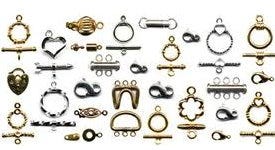
So many little parts. So many little things. Are you supposed to know what to do with them all? Do you really need that many? I never learned how to use all these things. What are they for?
I thought, when I started, there was just one kind of clasp. Or maybe two. I didn’t even know how to use these things.
Too many choices.
When I started stringing beads, I always used my favorite clasp at the time — the lobster claw. I put a lobster claw on everything, and any old lobster claw I could find, no matter what it was made of. The guy-proof special. The student-proof special. The special that always worked and that everyone knew how to operate.
The tricky part, though, was what to put on the other side. It needed a ring, but what kind of ring? If you used a jump ring, the split in it was often difficult to adjust so that there was no gap. Even if you adjusted it so there was no gap, after wearing your necklace a few times, suddenly there was a gap. The string pulled through. Or the lobster claw pulled through. The top of the lobster claw broke or bent out easily. You couldn’t always manipulate and operate the thing. That mechanical mechanism inside was designed for people with very small hands, long and narrow fingers and even longer finger nails.
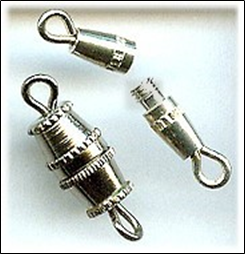
I never liked the barrel clasps — another very guy-proof special. The threads always stripped on me. Or they would unscrew themselves, as my body moved my necklace, and the necklace moved the clasp. Some had eye-lets, and these would always break — again from moving back and forth, and up and down, and back and forth and up and down. Metal breaks when you bend it back and forth. These broke.
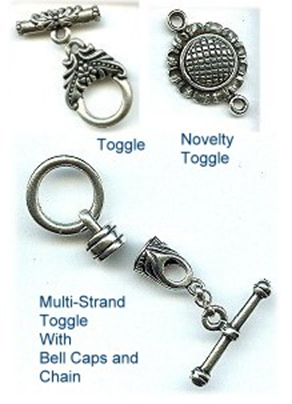
At one point, I graduated to toggle clasps. These were and are considered the best clasps. They are considered the easiest to get on and off and the most secure. But I never really liked them personally because they were always out of proportion to my necklace and bracelet designs. Always too big. Always un-sexy. And the less expensive ones broke. Virtually all toggles are cast, and cast pieces break when confronted with excess force. They crumble and break. Especially the cheaper ones.
Most people, however, buy either Toggle Clasps or Lobster Claws.
Over the years, I discovered that there are many other types of clasps, and each has pros and cons in terms of usability and durability. My personal favorites are variations on the Hook & Eye Clasp. These don’t compete with my beadwork. You can always find something that coordinates with the beads, so that the viewer is not impeded from cognitively “making that complete circle.” That is, the clasp feels organically a part of the piece. They pass the “Guy Test” — guys can figure out how to open and close them. But these are my choices I make for myself. Everyone needs to decide which types of clasps they prefer and under what circumstances. There really isn’t a perfect clasp for every situation.
And that’s an important lesson: There isn’t a perfect clasp for every situation.
For most clasps, you usually attach your bead work to separate rings on each end (preferably a soldered ring, if this will work), and then attach the rings to either side of the clasp.
In a similar way, if using a cable wire, you don’t want to push your crimp bead all the way up to the clasp. You want to allow a small loop in the cable wire between the crimp and the clasp. This allows what is called support — things which enable your pieces to move, drape and flow.
You want to build in support, jointedness and movement. You want the clasp to be able to rest on the neck (or the wrist), and not move when the wearer moves. You want the beadwork, on the other hand, to be able to move freely and independently of the clasp, as the wearer moves. If there is any resistance to movement in your piece, if things are too stiff, if there are too many stresses and strains, everything breaks — the clasp breaks, the string breaks, the beads break. If you can’t build in sufficient support systems into your piece, you might as well have a mannequin for a client.
Another lesson: The best clasps are ones that have no moving parts.
A toggle has no moving parts. An S-clasp has no moving parts.
When we talk about moving parts, in jewelry design, there are the obvious mechanical mechanisms, like in a spring ring or lobster claw.
Then the more subtle things in jewelry design we call moving parts. Whenever we have a metal piece that must bend back and force when used, we consider this a moving part, because through movement, it can break. For example, a box clasp has 2 moving parts. It has the tongue which gets pushed in and out. And it has a mechanism inside the box which holds the tongue in place, and gets pushed in and out.
Now, it doesn’t mean you don’t use clasps with moving parts. It just means, that if your clasp has moving parts, you need to do addition design things, such as adding more support components, to compensate for any potential vulnerabilities.
Some more clasps:
SPRING RING
This is the cheapest and worst clasp. I really hate these. Its mechanical mechanism breaks easily. Too easily. But, on the other hand, it is also sleek and dainty, and there are few other clasps which are. If you are making a dainty piece, and you know it will only be worn occasionally, you might get away with using this clasp. Otherwise, if you’ve bought a piece with a spring ring clasp, you’ll probably want to replace it before it breaks.
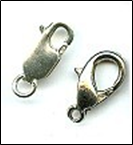
LOBSTER CLAW
This is a very popular style, but it has some weak design elements. The lip (top curved part) is not designed to handle excess force that comes from tugging or pulling or getting your jewelry caught on something. Its mechanical mechanism breaks easily. Often the levers are difficult to maneuver. However, this clasp does pass the guy test. Guys can figure out how to open and close it.
It’s relatively inexpensive. There are many styles of lobster claws, so you usually can always find something which can work organically with the design and flow of your piece. These clasps are OK for inexpensive to moderate pieces. They are inappropriate for more expensive pieces of jewelry, say over $200.00. When I see lobster claws on expensive pieces of jewelry, this is usually a sign that there are other construction flaws in the piece.
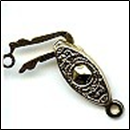
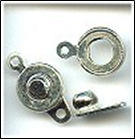
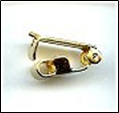
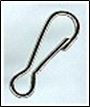
PEARL or SAFETY CLASP
These are clasps that if the hook comes undone, something (ie, a bar inside the other piece of the clasp) catches it before the necklace or bracelet falls off. Very popular clasp, and a traditional element in many pieces, such as a pearl-knotted necklace or a Victorian style necklace. In fact, you would be hard-pressed to use an alternative clasp in a pearl-knotted necklace or vintage piece, because people expect to see this type, or similar type of clasp, such as a filigree box clasp. Not a great design, however. The hook element must be bent back and forth many times as it is taken in and out of the clasp. It’s a moving part. This causes it to break sooner than later.
TOGGLE and BUTTON CLASPS
If the Toggle Clasp visually fits with your design, this is considered the best clasp. It is considered the easiest to get on and off, and the most secure. Almost every toggle has been cast, and the ring and the bar are very tightly engineered to work with each other. NEVER mix and match rings and bars. Always use these as a set.
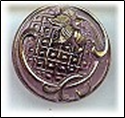
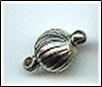
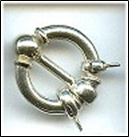
The main drawback, for me, of the toggle clasp, is that they tend to look bulky, often presenting a visual issue for me. They do make novelty toggles, such as the sunflower one pictured above, or a leaf and stem or flower and stem or butterfly and butterfly wing. These work. Also, in some simpler designs, the toggle clasp becomes that visual center — the natural focal point we like to design in to our pieces .
Another major thing to keep in mind with toggle clasps is that the last half inch or so of beads on the side of the piece connected to the bar, must be small enough to slip the width of the bar PLUS the width of these beads far enough through the ring part of the toggle, that you can seat the bar correctly, like in a saddle. When using larger beads in your piece, you might need to begin and end your strand with smaller beads.
For multiple strand pieces, you would typically add a string of jump rings or a piece of chain to the bar side, and stagger each strand up the chain. Say you have a 3-strand necklace. You could add a 3-link piece of chain to the bar side. You would attach one strand to the top link; the second strand to the middle link; and the third strand to the bottom link. In this way, when you pull the bar through the ring, you are only pulling 1 thickness of beads plus the bar through the hole — not three multiple thicknesses of beads. You do not need to do this on the ring side, but many people do, for symmetry purposes.
Most people use toggles. What a lot of people don’t know is that you should not mix and match your rings and bars. Toggles should always be used as a set. When you go into a store to buy these, if they sell them mix-and-match, you don’t want to buy there. In a large store like ours, if you’re putting a bunch of toggles on a tray, be sure you know what goes with what. When they get bagged up at the register, be sure there’s no confusion about what goes with what. And store them so that there is no confusion about what goes with what.
Button
You can make your own toggle-style clasps, using buttons or large beads. You have so many more colors, looks, textures to play with, when using buttons and beads, rather than the pre-made clasps you would find in the store. One side of your piece is a button and the other side is a loop. The button can be a real button, or a large bead. The great thing about button clasps is that you can incorporate the clasp as part of the design of the piece. You can match colors and beads that blend right in with the piece itself.
In a bead strung piece, you would tie off a button or large bead at one end, string your beads on, and make a loop with your stringing material at the other end. You would come back through about 2–3” through the beads in your piece, to anchor off your stringing material. To make this loop attractive, people cover it with seed beads, like size 11/0, 8/0 or 15/0 seed beads. Some designers use 15/0 or 13/0 sized charlottes. Charlottes are seed beads with one facet on one side of each bead. Using charlottes ups the visual perception of the value of the piece, though not the cost of doing so.
For bead-woven bracelets, the button clasp (a form of a toggle) sometimes works better from a design standpoint.
Making the button clasp:
The hardest part in making a button clasp is the button hole. If the hole is too small, it’s hard to get the button or bead in and out. If the hole is too large, the button or bead can slide out and the piece will be lost.
To make the button hole (loop), attach a thread to the piece, preferably a little further back from the end of the piece. Where exactly you locate the button loop depends on your design; however, in most pieces, stepping back from the edge ends up with a better looking and more durable product.
After anchoring the thread to the piece where you want it, now string several small beads — usually size 11/0 or size 8/0 seed beads — until you have a line of beads when looped, will fit snugly over your button or bead. Some designers like to use size 13/0 charlottes to cover the loop. This makes the loop feel like it’s an attractive metal piece.
Bring the needle and thread around and anchor the loop to the piece.
Tie it. Now bring your needle and thread back through the loop, one or more additional times (until it’s getting very tight inside the bead), reinforcing the bead hole.
Now tie it off, and weave the loop end into the piece, hiding the end of the thread.
Now, take your bead or button, and attach it to the other end of your bracelet. Ideally, you want to step the bead or button a bit back from the edge. When choosing a bead, it must be large enough for the loop to be secured underneath it.
Do not attach a bead or button flush to the surface of the piece. Allow enough space for the loop to clasp underneath it. This is easily achieved by placing a size 11/0 or 8/0 seed bead between your piece and the bead or button. Or make a tight loop of beads to connect the surface of the piece through the button shank. When making this kind of loop, usually size 15/0 seed beads work best.
If the bead is elongated, you must anchor it at the center, not through either end. Otherwise, there would be no place for the loop to clasp beneath the bead.
There is not a sure-fire way to measure a loop to fit perfectly over a button or bead. So don’t beat yourself up if you don’t get it right the first time or two. As a general rule of thumb, the loop should be a bit more than twice the diameter of the button or bead. Keep practicing and you will get to a point where it will work by instinct.
So, to repeat, you would preferably locate the loop and the button a little bit back from each edge of the piece. When you start at the edge, this is the weakest part of the piece, and the pulls and tugs on the clasp will start to tear at this edge. Also, if you start at each edge, when you put the loop over the button, you’ll have an area of skin showing. Hence, the viewer won’t be able to make a circle around the piece. When you set both the loop and button back a ways from the edge, when you put the loop over the button, it draws the two edges together. This makes it easier for the viewer to make that complete circle.
If we look at the button from the side of the piece, you would want to put an 11/0 or 8/0 seed bead between the button and the surface of the piece. This accomplishes two things. First, when the loop goes over the button, it will rub on a bead, not the threads. This prevents these threads from fraying. It also turns out that when the loop goes over the button and rests on a bead, it sits it better, thus reducing the amount of back and forth movement that occurs as the bracelet is worn on the wrist.
S-CLASPS
From a functional standpoint, this is a great necklace clasp. From a usability standpoint, however, it’s a disaster. Most people don’t know how to use these properly. When you don’t use them properly, they don’t function as well.
The simple S-Clasp Assembly consists of an S-shaped piece and 2 soldered rings (one on each side). These rings are your “support system” or “jointedness”. They allow the S-clasp to maintain its position behind the neck, and the beadwork to move freely, as the wearer moves.
Using these: First you do your beadwork. Then you tie off each end to the soldered rings. Then you position each hook-arm relative to the spine. On one side of the “S”, you should position the hook-arm so the O-ring cannot slide out, as if the arm had been soldered to the spine. On the other side of the “S”, you need to position the hook-arm so that the O-ring can slide out, but only with some resistance by the hook.
Most people are clueless about the need to position the hook-arms, and how you do it. So they end up bending each arm back and forth, and they break off, or they slip off the soldered rings. If the arms are not positioned correctly, the S-clasp doesn’t rest securely behind the neck, or allow the beadwork to move freely as the person moves.
S-clasps come in a wide range of styles and prices. You can always find something that allows the viewer to make the complete circle.
HOOK & EYE CLASPS
This is a very good clasp for necklaces, but not as functionally good as the toggle or s-clasps. This is the type of clasp that I prefer to use on my pieces. It is very user friendly. I can always find a design that allows that organic fit. These don’t compete with my beadwork as “art.”
The hook and eye clasp consists of two parts — a hook and a ring or figure 8. If you can position the hook so that the O-ring can slide out, but only with some resistance by the hook, you can use this both on bracelets and necklaces. If the hook-arm is a cast piece and will not move, they tend to only work with necklaces.
Always assume your wearer is right handed. When the wearer reaches back behind her neck for the hook, she should be grabbing this with her right hand.
These come in many styles and price points. You can always find something that will allow your viewer to make that complete circle.
People can usually and easily figure out how to use these. They don’t compete with the artistry of your beadwork.
They have a slight functional flaw in that the hook can work itself free from the ring, when the piece is worn. If you can do this with your piece, you want the hook to face up, (not down).
A choker clasp is special kind of hook and eye clasp. These are usually for multiple strand pieces. The “ring” side is a length of chain, so that the hook can attach in more than one place. This makes the length adjustable.
I find it useful to build in some length-adjustability into all my pieces. This is easy to do with hook and eye clasps by adding a short piece of chain on one side.
MAGNETIC CLASPS
People in general hate clasps, so they love these. These work well in necklaces. While people love these for bracelets, functionally they pose some issues.
To open and close a magnetic clasp, you never pull on them. This weakens the settings for the magnets, and the magnets eventually pop out. Instead, slide the two sides apart, or crack them open like a nut, or as if one side was on a hinge. Never pull.
You can see on a bracelet how the wearer might be tempted to pull them open. The bracelet wearer may also pull on the beadwork itself to open the clasp, thus weakening the bracelet.
Always do some extra reinforcement on the two ends of your pieces where they attach to the clasp.
Magnets come in different strengths, but are not labeled as such. You need to test the strength before you use them.
I suggest adding a safety chain to a bracelet. We hear over and over again stories of how people lost their bracelets to the ravages of an all-too-metallic environment. They’ve lost them to the refrigerator door. One woman lost hers to a car door on her visit to the mall. Luckily for her, when she returned to her car — There it was!
SNAP CLASPS
Snap clasps are like the snaps you have on a blouse or pair of pants. These are usually used in bead woven pieces, but they can be used on strung pieces. They are generally easy to get open and closed. They become part of the piece and its design itself, thus not competing with the artistry of the bead weaving. These clasps do wear out, as they are repeatedly opened and closed. There are many manufacturers and brands of these clasps, and variations in styles. The best ones are made of brass or steel, and have the “male” part be as square-ish as possible. If the base is too narrow, the ring slips off easily.
BARREL CLASPS AND SCREW CLASPS
Barrel clasps are very popular with college age and early 20’s. Never use a sterling silver barrel clasp. As the silver softens at body temperature, the threads soften and strip. Barrel clasps have a weak design element on each end where the clasp is to be connected to the ends of the piece. Most barrel clasps use a type of eye pin/head pin, and these break as they get bent back and forth from movement. So, not a good idea to attach your beadwork directly to the clasp. With barrel clasps, you should always use another intervening ring — a jump ring, split ring or soldered ring — to attach your beadwork to the clasp.
For most types of clasps and other jewelry findings, though not all, you need to use an intervening ring — a soldered ring, a split ring or a jump ring . You attach your beadwork to the ring and the ring to the clasp or finding. Only in this way will you get enough support and jointedness.
Screw claspstend to look like a bead with a loop on either side.
Usually, one side, sometimes both sides, screw open. These are very attractive and work very well to maintain the organic flow of your piece — making that complete circle. However, the threads strip easily, and it’s difficult to readily figure out how to screw/unscrew the loop out from the bead. Usually the wearer ends up ruining the clasp after a few wearings, since it’s difficult to figure out which way to turn each screw-end — especially while wearing the piece — and the threads strip.
FOLDOVER CLASP
These clasps are found on a lot of jewelry. They are pretty easy to attach. They are pretty easy for the wearer to use them. On one side of the clasp, there is a closed loop. This is attached to one end of the piece, usually with a jump ring. It is fixed. The other end is a tongue that snaps over a base and is held in place by friction. This tongue slips over a ring on the other side of the piece, and then tightly onto its base. After opening and closing this clasp several times, the tongue tends to bend upward, thus losing its friction-based tight close. You can use a chain-nose pliers to push the tongue back and regain the friction. Eventually this tongue breaks off.
FRICTION CLASP or BAYONETTE CLASP
Here a curved wire on one side slips into a curved tube on the other, and is held in place by friction. Or a straight pin is pushed into a rubber tube, where the tube fits snugly around the pin, holding it in place. These come long and sleek, or squat and fat.
The friction clasp pictured above looks great on sleek pieces. For most of these, it’s easy to slip beads or charms over the clasp without having to partially or fully dis-assemble it. These are usually soldered or glued and clamped on to the piece. You need to pay attention to the size of the internal diameter of the opening. You want your cable wire or cord to fit snugly into this opening. Put some glue (any glue except Super Glue, and preferably a jewelers glue like E6000 or Beacon 527) on the cable wire or cord. Stick it in. Use a chain nose pliers to clamp the ends down snug. Don’t clamp them flat. When you clamp them flat, it looks weird and annoying .
Super Glue has few uses in jewelry. The jeweler’s version of Super Glue is called G-S Hypo Cement, which takes longer to set. Super Glue dries like glass, so the bond becomes like a piece of glass. Movement causes the bond to shatter like a piece of glass. And the broken bond looks like a broken piece of glass.
The jeweler’s glues, like E6000 and Beacon 527 dry like rubber. The bond acts like a shock absorber.
BOX CLASP
The basic design here is a box where a bent piece of metal (called a tongue) slips into one side of the box, and is held in place by an internal latch. We consider the tongue and the internal latch moving parts, since these can break.
Box Clasps often look great, but they don’t last a long time. The internal latch often wears out. The tongue is bent up and down each time it is place in or removed from the clasp. After too many times, the metal breaks. It’s hard to find replacements. What’s nice about these are that they come in a wide range of prices and styles, and can adapt easily to the organic sensibility of your piece. Great for moderately priced jewelry. Functionally a bit of a risk for more expensive jewelry, but visually may be just what the designer ordered.
Sterling box clasps pose a problem, if the clasp rests on the wrist or neck. Sterling softens at body temperature. When the internal latch softens, it releases the tongue. Jewelry coming out of Mexico is notorious for this happening. Say you have a problematic clasp. You don’t have to throw it away. You can use larger beads on either side of the clasp, so that it never rests on the skin.
LANYARD CLASP
This is a wire that is bent into a clasp shape. One end of the wire overlaps that of the other side, and is “springy”. These clasps will lose their “springy-ness” over time. You see these a lot with name badge jewelry. I like to use these clasps with hemp necklaces. They work well with thick cords. They have a primal feel about them.
From a design theory perspective, the base of the clasp is an interesting element. It is basically an arch pinched at its base. This completely changes the mechanical properties of the arch, turning it into a spring. The spring absorbs all the force of the arm, when the arm is bent back and forth to open and close the clasp. If this arch were a V-shape, bending it back and forth would break it. In the Curved-Shape, bending back and forth will also break it. But pinching it, the movement is accommodated by and the forces absorbed by the clasp.
Lanyard clasps come very functional like that pictured. They come fancier, as well. Some of the fancier ones are good substitutes for lobster claws. Lanyard clasps are widely used in name-badge lariats and necklaces.
SLIDE CLASP
These are made for multi-strand necklaces and bracelets, from 2-strand to 9-strand. They are basically two inter-fitting tubes with loops soldered onto them. They are very sleek. They come plain and patterned. They work with friction. They don’t compete with your beadwork. They work for bracelets and necklaces. This is one of the only clasps that has been coming down in price over time. The market is telling you that this is a good clasp, and I agree with the market.
I especially like these clasps for bracelets. They have a way of keeping all the strands of a multi-strand piece laying nicely and separately and spread out. With a lot of other clasps, the multiple strands overlap, get entangled, and don’t lay as well as intended. Usually, one person, wearing a bracelet using these slide clasps, can maneuver these on and off without much difficulty. Another plus.
In many flat, wide beadwoven pieces, I often suggest sewing these in place to use as the clasp.
You do not need to use any intervening rings with this clasp.
DOOR KNOCKER CLASPS
Here we have a loop with a slight opening, with a bar and knob that moves from the base of the loop, over and into the slight opening. These are attractive. They are relatively easy to use. They do loose their friction in holding the knob into the opening.
With these, two removable loops (soldered rings) hold the beadwork in place. You could make many strands of bead work, ending each with a soldered ring wide enough to slip the clasp, and use them interchangeably with this clasp. Or you could use this clasp when you want to change the number of strands of beads you want to wear at one time.
Picture: One Clasp plus a set of necklaces, worn singly, or together.
Beading requires a lot of mind-body coordination. That takes work. It is work.
Calisthenics are exercises you can do to improve and tone your mind-body coordination when bead weaving.
You have to be able to get from your fingers to the needle to the beads, back along the thread to the needle to the fingers, hands, arms, eyes, mind. And then again. And again. Over and over, one more time. You need to get into a rhythm. All these working parts need to be working. No time for cramping. No time to get tired. No time to lose concentration.
A rhythm. Needle, pick up bead, pull down along thread, check the tension, pick up a bead, pull down along thread, check the tension, pick up a bead….
I noticed that different instructors had various techniques and strategies for maintaining this rhythm. Yes, music was involved sometimes. Othertimes simple meditation or creative reading and discourse. Some people had some stretching exercises that they did. Others tested themselves before proceeding with their big project. Still others did small things to reconfirm their learning.
Throughout this Series, I introduce some of the beading calisthenics that I experienced along the way. If you want to gather materials up so that you can follow along with these calisthenics, here’s the list.
MATERIALS NEEDED FOR ALL THE CALISTHENIC EXERCISES (SUPPLY LIST):
notebook, pencil 1 tube each of Japanese 11/0 seed beads in gray, 3 different colors of orange, black, white, any other 4 colors 1 tube each of Japanese 8/0 seed beads in gray or silver, black, white, orange, any other 4 colors 1 tube each of Japanese 6/0 seed beads in gray or silver, black, white, orange, any other 4 colors 5 gray-scale colors of delicas or 11/0 seed beads Nymo D or C-Lon D thread in black Nymo D or C-Lon D thread in yellow two toggle clasps .018” or .019” flexible cable wire assorted 4mm, 6mm and 8mm beads in various coordinating colors, including grays and oranges in your mix, as well big bowl and a bowl-full of assorted beads Size 10 English beading needles Bees wax scissors beading dishes or trays any kind of graph paper work surface or pad colored pencils a few clasps, (toggles are easy to work with) some crimp beads crimping pliers
BEADING CALISTHENICS #8: Speaking With Beads
Zulu Beadwork
During Apartheid in South Africa, there were those Zulu tribes that adopted Christianity and identified with the colonialists, and there were those tribes that did not. The tribes that did not created a very elaborate communication system using beads.
Besides what colors were next to each other, they used a lot of triangles in their patterns. It was important if the triangle faced up or down, and again what the colors were. With their beadwork, they could “say” something very general, like “I’m mad at the world,” or something very specific, like “I’d like to get together with you tomorrow night at eight, but not before I’ve met with your brother.”
The challenge here is to create your own symbolic communication system using beads and their patterning within a piece of jewelry.
First write a sentence or paragraph about something that you will want to reduce to symbols, and illustrate by constructing a necklace.
Second develop a cipher: This would be a list of each symbol and its meaning or referent. For example, “red” might stand for “women” and “blue” might stand for “men”. A diagonal line leaning left might be “safety”, and one leaning right might be “danger.” Someone using your cipher should be able to make sense of your beadwork and what statement you are trying to make with it.
Third, using graph paper and colored pencils, sketch out what your piece would look like, in order to express the statement you want to make. Have a friend use your cipher and see if they can “read” your piece of jewelry, as drawn on the graph paper.