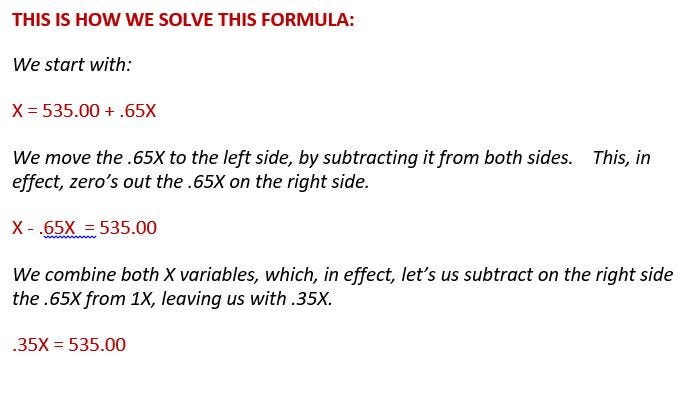
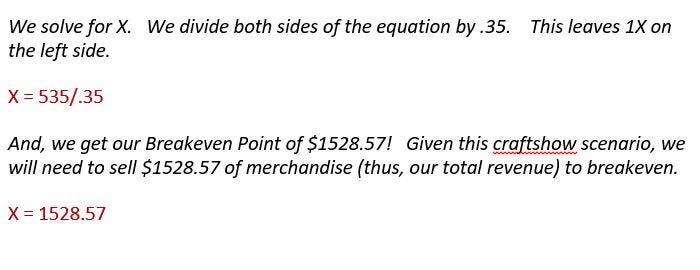
Translating thoughts, feelings, emotions into color, form, structure. Can never get enough of this. But where does all this creativity come from?
I remember in college — way back when — I took a physiological psychiatry class with a professor name Ina Samuels. Dr. Samuels was one of my mentors. She discussed what was new-thinking then, how the brain is this self-actualizing entity. Thoughts reside less in certain defined areas of the brain, and are more a collection of organized chemical-electrical pathways traversing the brain, all around and within it. Memories are more defined pathways that get traversed a lot.
The brain has the ability to invent, and re-invent itself. It is self-stimulative. The brain pleasures itself with creative thoughts over and over and over again each day. Sexy. Sensual. The act of creating is almost masturbatory. The brain discovers, organizes, reinforces and remembers.
Of course, I did not wax so eloquently on my final exam in Dr. Samuel’s class. She gave me a C, and I was embarrassed to have performed so poorly. I got carried away with creatively building upon my understanding of neural pathways, synapses, and thinking — too much so, that my thoughts were way off course. I carried the discussion to mechanics of three way connections and power boosters and revolving tracks — all ideas never before expressed in texts or classes or on final exams.
Yes, I let my creativity carry the day. While it didn’t earn me a good grade at the time, it sure was fun. To be wrapped up in my insights, imaginations, and good ole fashioned, solid in an organizing way, brain sex.
One of my clients, Jan, had taken a few of my classes, was very excited about beading and jewelry making. She began selling her pieces to the people she worked with. She was a traveling salesperson for a health care company, and met lots of people on her travels. And everyone wanted her pieces.
Week after week, Jan would return to the shop and buy a few hundred dollars of beads. and week after week, she enthusiastically reported that she was selling her pieces right and left. After several months, she remarked that she needed to take my Pricing class. As she continued to talk and elaborate about her pricing strategies, she remarked that she typically added $15.00 to the cost of her materials, and that sometimes, her prices were probably lower than the cost of her materials.
Hmmmm….
So if she paid $55.00 for the materials in her piece, she might price it at $70–75.00. A great deal for her customer. But not so great for Jan. I told her to raise her prices.
My niece’s 6-year old daughter told me the other day, “Warren, I wish I could get a job where I can make bracelets all day!” How cute! She definitely would have a lot of fun making jewelry. She most certainly could make money doing it. But I don’t think she was old enough to appreciate the amount of work, strategic thinking, and marketing and good business sense involved, in order to succeed.
But maybe she did. Jewelry making tapes into our creative souls, our artistic essence. The fact that you can make money at it, moreover, serves to heighten the experience.
Two girls — one 12 and one 13 years old — were determined to make money that summer. They had had some experience setting up a lemonade stand last year, but they were ready to make the big bucks. So they turned to jewelry. They created an attractive shelter along the side of the road, and posted clever signs — REFRESHING SPARKLES — to catch drivers going and coming in either direction. Instead of lemonade, however, their customers found cool earrings, and breezy necklaces, and yummy bracelets. And the two girls found success!
While there are many business challenges for jewelry designers, — young and old, alike — you can most assuredly answer the question — Can You Really Make Money Selling Jewelry? — with a resounding YES! It takes some planning. Some Moxie. Some start-up money. Some marketing. And some luck. But it can be done.
For people who sell their jewelry, their art is both a business as well as a source of creativity and self-expression. To be successful, they need to bring an understanding of business fundamentals to the business, and they need to find enthusiasm for business in similar ways to how they found their passion for jewelry. There will be ups and downs, as the economy changes or fashions and styles change. They will wear multiple hats — designer, distributor, manufacturer, retailer — and not always be sure which hat to wear when. They will need to understand marketing, pricing and selling. They will need to have a feel for reading and understanding people.
Successful jewelry design businesses today share several traits. They have a focus on what they do as a business model. They are comfortable working long stretches in a production mode — even though this can be very boring for the artist. They have some comfort level with both bricks and clicks. I don’t think you can have a successful business today without both a real physical presence somewhere and some on-line visibility as well.
Jewelry businesses today also must learn to quickly adapt to competition. This is not only competition from other local, regional or national jewelry designers, but from overseas, as well. Remember in the 1970s, when Asian manufacturers started selling low cost Native American jewelry, they almost put the Native American jewelry makers out of business. Today Chinese lampwork companies are wiping out the opportunities for low-end, simple, basic lampwork glass beads made in America. And adapt is the key word here. It may mean having to specialize in higher quality items, or relying on materials or designs unique to your locale. It may mean having to provide more educational and informational materials with your products to give them a competitive advantage.
Your market today may be international. if you have images of your pieces on-line, then someone in Taiwan or France can view posted images just as easily as someone in Nashville or San Francisco. They may buy your designs. They may copy your designs. Reality, what a concept here.
Successful jewelry designers keep their work fresh and relevant. They build in evaluative components into their business. They do a lot of product and ideas research. They experiment with concepts and other markets. They acutely know their competition. They strive to create a brand identify for their pieces. Branding not only best secures your client to you as a designer, but makes it that much difficult for other jewelry makers to copy your work and present it as their own.
How many times have you heard a jewelry artist say…
I can’t bear to part with my pieces.
My jewelry is too precious to me.
I only give a few pieces that I make away as gifts to friends and family.
I’ve never sold anything.
Selling would take the fun out of it.
And then, someone offers to buy a piece she is wearing, and the rest is history. A sale! Sold! They paid so much more than it cost me! Right off her wrist! Gotta make another! That was so fast! That was so easy!
My friend Connie used to make things only for friends. She always wore the things she made. At one point, she was repeatedly approched in various stores around town by women who wanted to buy the pieces aroundher neck.
At first, Connie quoted them, what she thought were outlandish prices. No one hesitated. Connie was awe-struck, but didn’t say No. I don’t know if she secretly wore a sign on her back — JEWELRY FOR SALE — or, somehow stuck out her cheek in such a way, as if asking to be kissed, that people came over to her, but she was getting quite good at attracting buyers. At TJMAX, at TARGET, at MACY’s, at DILLARDS, at SEARS, at KROGERS and PUBLIX. She kepy upping her prices each time, and no one had yet to blink!
Jona had made many things before, but had never sold anything. Then she had one of those weeks. It started in a Dalt’s restaurant. The waitress had to have them. She had to have Jona’s earrings. She had to have them now. Any price. So Jona suggests a price, the waitress laid the money on the table, and Jona slowly removed each earring from each ear, and said a silent Good-bye. Later that week, one of her friends was desperate. The wedding was this weekend. The piece of jewelry she had purchased for herself went lost. She remembered one of Jona’s pairs, and asked for it, and insisted on paying for it.
Elizabeth wanted to show her best friend at work the kinds of jewelry she was making. One day, she brought a box of jewelry in with her to work. At lunch time, they spread all the pieces out on a table. All of a sudden, the table was mobbed by other women in the lunch room. They were grabbing, trying on, and throwing money down right and left.
Ingren had a box of her mother’s jewelry stored away in a closet. She didn’t particularly like these pieces, and would never wear them, but knew they had some value. She took pictures of each one, and placed them on EBAY to see if she could auction them off. She sold all but one within a week’s time.
Those first jewelry sales can result in a big high. They are thrilling. Exciting. Very motivating. Selling that first piece feels like it can change your life.
But it’s that second sale that begins to determine if you can make a business out of it. Can you do it again? Is it as much fun? Now all of a sudden you have to think about record keeping, government forms, tracking inventory, maing enough product, adequately pricing your stuff, and marketing to recruit and retain customers.
The situation doesn’t seem quite the same anymore.
But believe me, it’s not as onerous as it might appear at first.
And selling your jewelry keeps getting better and better and better!
Before the pandemic, I was trying to arrange some Enrichment Travel tours. One was to Rome. This was part of the itinerary. If any group wants me to lead a Jewelry Discovery Tour to Rome or elsewhere, I would be happy to talk with you about this. — Warren@warrenfeldjewelry.com
Some favorite sites and studios in Instanbul:1. Topkapi Museum, Treasury Section Guided Tour
Once the palace of the Sultans of the Ottoman Empire, Topkapi is a vast treasury of Islamic culture, jewelry, costumes, science and weaponry. This tour is of the Treasury section (7 Halls of Exhibits) of the Topkapi Palace Museum (3rd courtyard) where you will find masterpieces of Turkish art of jewelry from different centuries and exquisite creations from the Far East, India and Europe.(2 hours guided tour of Treasury Section; 1–2 hours free time for guests to wander other parts of museum on their own.) Open every day except Tues, 9am-4:45pm (til 6:45 in april- october) 2015: most of Treasury Section is under restoration and is closed; check back for when work is finished)
WALKING TOUR OF ARTISAN JEWELRY GALLERIES IN NISANTASI / TESVIKIYE AREA Nisantasi / Tesvikiye is one of the best shopping districts of Istanbul. It contains designer label stores, very nice restaurants and cafes, a beautiful mall, and a few outstanding hotels. It is home to several galleries showcasing the best of Turkish jewelry artists and artisan jewelry. The store hours in this district are typically 11–7pm Tuesday through Saturday. Need to verify Monday and Sunday hours.
Urart (abdi ipekci Cad. 18/1)
One of Turkey’s most established jewelry companies, Urart makes re-creations, and also chic interpretations, of ancient Anatolian designs and motifs, Hittite symbols of noblesse and glory, the arabesques of Islamic art speaking to the infinity, Seljuk tiles echoing the dreams of the Silk Road or fluid objects of modern life… Design commits to matter, not only the striking form but also the wisdom that abides at the heart of a culture.
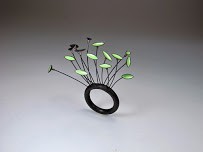
İn her first years, Zeynep Erol was mainly inspired by nature and created forms with her own modern interpretation. İn later years however, her designs have become more geometrical. Zeynep Erol’s Jewelry reflects her spiritual inner world, affections, relations, feelings, desires and change in the philosophy of life. The main materials used by Zeynep Erol in creating her pieces are; green, white and red gold (18k) together with silver (950). The selection of the remaining materials and the precious stones are chosen differently for each particular theme she wants to get across. A wide range of materials such as coconut shells, pearls, brilliants, sapphire, ruby, emeralds, quartz, glass, rose cut and uncut diamonds, sandalwood and feathers are used by her as necessary.
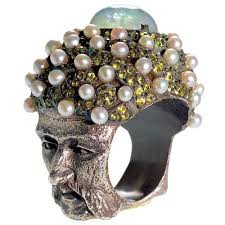
Based in Istanbul, jeweller and sculptor Aida Bergsen creates jewellery with different themes that reflect traces of her hometown and its multi-layered cultural fibre. She Draws inspiration mainly from mythological heroes, organic forms and the human anatomy. Each of her wearable sculptures are meticulously crafted in wax then transformed into timeless jewels using traditional techniques.”I try to re-inerprate traditional crafts and skills in jewellery making in order to create a more contemporary approach. I like to have a play on the contrast between light and shadow as I believe it is key in capturing form at a deeper level.”Aida
Bergsen was awarded with the “étoile de mode” at BIJHORCA in Paris and she was named the first runner- up for the very prestigious Couture Show Las Vegas in 2011 and 2014.
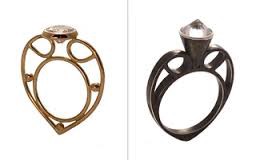
ECNP Gallery is a contemporary jewelry gallery showing the designs and collections of Ela Cindoruk and Nazan Pak. Partners since 1989, Ela and Nazan’s designs and creative process have reflected their philosophy of ‘less is more’. The duo have participated in numerous fairs in Turkey and abroad; their works can be found in many museum shops and galleries. Ela has received the 2012 Red Rot Design Award. Same year, the creative duo was awarded 2012 Jewelry Designer of the Year Award of Elle Style Awards. On September 2014, the designers opened their new showroom and studio, on the 21st year work anniversary. The showroom also has a gallery under its roof, Ela and Nazan’s a long time dream, a reflection of their commitment to design and aesthetic and their ambition to this gallery hosts design exhibits and aims at becoming a meeting point for the design/art world.
SODA, founded in 2010, focuses on contemporary trends in art, particularly of jewelry artists. They are interested in showcasing the use of new materials and design concepts. Some permanent artist representations as well as rotating exhbitis.
7. Alef(Tesvikiye Mh, Haci Emin Efendi Sokak, No:4)
This goldsmith adapts classical goldsmith principles to contemporary techniques and designs. Alef’s founder, jewelry designer Yeşim Yüksek,
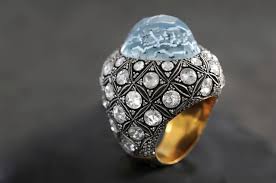
BoyBeyi is a family-run business that has been around for more than 100 years, their collection features many traditional rose-cut diamonds, as well as modern and colorful pieces, all inspired by the Turkish culture.
WALKING TOUR OF JEWELRY GALLERIES, JEWELRY AND BEAD SHOPS IN AND NEAR THE GRAND BAZAAR
This walking tour takes you in and around the Grand Bazaar, discovering jewelry galleries displaying works by local artists, as well as a myriad of stores in the Grand Bazaar which sell jewelry, beads and beading supplies.
Tiara(yavuz Sinan mah., rakip gumus pala cad. No; 69)
Antique jewelry, award-winning designs, modern designs that reflect trends in the world, some might find at Tiara Jewelry … Byzantine, Roman and Ottoman cultures, inspired by the collections, since the ancient civilizations in history has produced reflections of jewelry. Traditional hand-made items by craftsmen in the production of valuable, native jewelry lovers to win the admiration of the foreign guests
Widely considered to be one of Istanbul’s top jewellers, with several locations throughout the city. The cuffs are studded with precious stones, the necklaces are vintage-inspired, and the gold rings are topped with enormous yellow diamonds. The Bazaar outpost is Kafkas’ first store, and you’ll often find the owners presiding behind the glittering displays.
Sevan Bıçakçı has started his journey as a jeweler when he was only 12 years old as an intern in Hovsep Çatak’s workshop. His first personal collection that he created in 2002 was inspired by the historical Grand Bazaar — Sultanahmet area where he spends a considerable part of his daily life. Since then his unique designs that require intensive craftsmanship have been attracting the attention of collectors as well as some distinguished stores.
4. Walk up Nuruosmaniye Caddessi Past the heart of jewelry and bead stores in the Grand Bazaar
There are piles and piles of antique rings, bracelets, necklaces, and earrings from Central Asia, as well as walls covered in strands of colorful beads made out of precious and semiprecious stones.
OPTIONAL: 3 block side trip to http://www.haciburhan.com) aka Emin Bead Company, Sterling Silver Handcrafted Turkish Beads. Sell different silver jewelry, beads and accessories for silver jewelry. Wholesale. Eminsinan Mah. Yeniceriler Cad. Evkaf Sok. No: 15 (Formerly 9) Cemberlitas, Fatih (verify store hours)
5. Angel Old Jewellery (kiliccilar sok., cuhaci han No: 36)
When you’re visiting this tiny, poorly lit (the blindingly bright interior doesn’t do their products any justice) store, you will be transformed into a museum where you can purchase anything you want from a collection of princess-worthy jewelry. From tiaras to necklaces, brooches to bracelets, these elegant pieces are bedecked with intricate, precious stones like diamonds. This store has both antique pieces, as well as new jewelry that looks vintage due to a special ageing method they use.
In the Grand Bazaar’s Cevahir Bedestani, Bagus sells the proprietor’s own reasonably priced collection of handmade jewelry made with silver and semiprecious stones as well as intriguing pieces imported from countries including India, Nepal, Thailand, and Indonesia.
Before the pandemic, I was trying to arrange some Enrichment Travel tours. One was to Rome. This was part of the itinerary. If any group wants me to lead a Jewelry Discovery Tour to Rome or elsewhere, I would be happy to talk with you about this.
ROME 1. JEWELRY GALLERIES WALKING TOUR, ROME. There are several stores/galleries specializing in artisan jewelry, with both some very famous local jewelry designers, as well as some less known between the Piazza di Spagna (Spanish Steps) and Piazza del Orologi. This is a 1.25 mile (2.1km) leisurely jewelry shopping tour along ancient walking streets in the heart of historic Rome, where we discover the works of local jewelry artisans. (5 hour walking tour with dinner break; begin at 3pm (any day except Monday) when these shops are most likely to be open. Typical hours: open 10-1:30pm and 3:30-7:30pm).
Damiani, via condotti 84 (All Damiani collection jewels are exclusive and unique creations, combining the allure of Italian jewelry with the unmistakable, always modern and fashionable Damiani taste.)
4. Melis Massimo Maria, via dell’Orso 57 (ancient techniques reproduced in gold)
5. Studio Giorelleria R. Quattrocolo, via della Scrofa 54 (both antique jewelry and jewelry produced in their own workshop studio, including their line of micro-mosaics)
6. Alternatives, via della Chiesa Nuova 10 (Specializes in contemporary. Avant guard jewelry and is dedicated to the promotion of both newcomers and internationally established artists from all over the world)
7. Del Fina Delettrez, via Governo Vecchio 67 (Delfina Delettrez Fendi is a designer and jeweller based in Rome. Original use of figurative surrealism and natural iconography including hands, eyes, bees, and lips.)
~~~~~~~~~~~~~~~~~~~~~~~~~~
ROME 2. SHOPPING TRIP TO ARTISAN MARKET IN ROME. Visit to Mercato Monti, 30+ artisans selling fashions, jewelry and accessories, first 3 Sundays and last Saturday of the month, 8am-8pm, inside exhibit hall of Palatino Hotel, via Leonina 46. (4 hours)
Whenever possible, I suggest trying to get net terms with your suppliers. Net terms is a form of trade credit. Instead of paying upfront for your supplies, your suppliers will give you some predetermined period of time to pay for these goods. You get your supplies right away without having to pay until an agreed-upon future date.
Usually, you would get Net 30 terms, meaning you would pay within 30 days. Sometimes, if you have not paid within the terms set, you might get assessed a penalty fee.
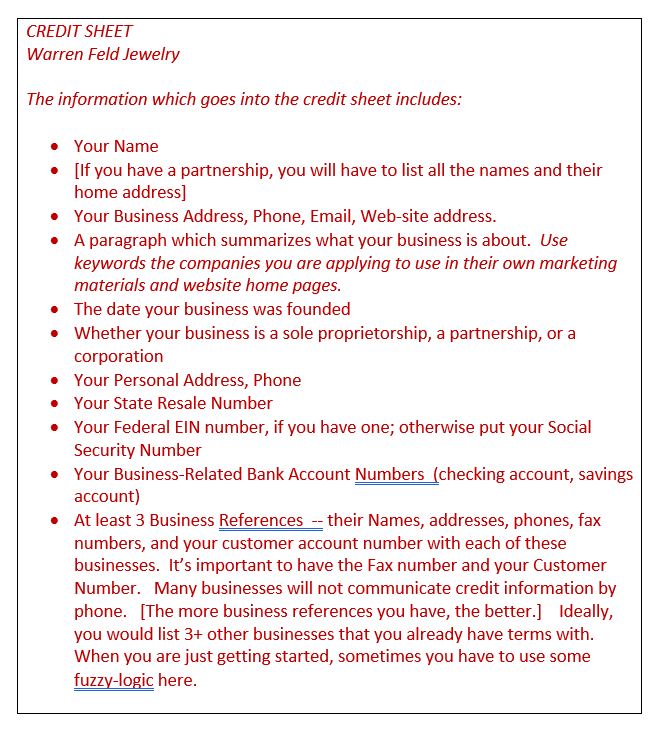
To apply for net terms with any supplier, you would submit a Credit Sheet.
CREDIT SHEET
You will want to prepare a Credit Sheet which lists the following information. You give this sheet to businesses where you want to apply for terms.
When you buy things from businesses, you can pay cash (sometimes check or credit card) — this is considered Pre-Payment.
You can pay COD (cash on delivery), but there is usually an extra COD charge tacked on.
Or you can pay on terms or “on account”, usually signified as Net 30 or Net 10, where you would have 30 or 10 days to pay your bill. If you don’t pay within that time, the business may take away your privilege to buy on terms, or charge you a late fee.
Getting paid for your work can range from the straight-forward to the nightmare. People love your work, but often, you will find that people will be slow or resistant to pay for it. You run into this with consignment shops. you run into this with custom work for clients. You run into this with retail shops to whom you’ve offered net 30 terms. You run into this with contract and grant work, particularly with government agencies and non-profits. You run into this with people who pay you by check. (NOTE: I don’t accept checks for payment in my own design work.)
You need to get paid so you can move on to the next project.
No money, no inventory, no once-in-a-blue-moon fancy dinner.
Structuring Payments
If you are doing a lot of custom work, your clients will probably pay you in increments, say 50% up front, and 50% upon completion.
If you are doing a lot of consignment, the shops may pay for anything of yours that sells perhaps quarterly. Beware that often consignment shops are slow to pay their consignees.
If you are selling wholesale to other retailers, you might have extended them terms, say Net 30, where you expect to get paid at the end of the term period. If you extend terms to someone, get them to complete a credit application ahead of time.
For each piece sold, or for several pieces sold at the same time, you will be generating some kind of invoice.
Each month, you might also be following up with your customers with a statement form, showing what has been paid, and what still needs to be paid.
INVOICE or STATEMENT FORMS (2-part forms — one for you and one for your customer). You can get a blank pad at a local stationery store, or have these pre-printed with your business name, address and phone.
More Advice
1. Establish a clear payment policy, put it in writing, post it on your website.
2. Find out in advance when the client or business will pay you.
3. Ask if the client needs a W9 form from you in order to pay you.
4. Be clear on whom in the company is responsible for paying you, and be sure to send your invoice to that particular person. If there are also special procedures for you to follow, in order to get paid, get clarity on these right up front.
5. Don’t be shy about using a collection service — even if this means you’ll only receive a portion (say 50%) of the money originally owed you.
6. Invoice your customers promptly.
7. Stay on top of your receivables. If a customer is late, send a reminder note. If a customer is very late, assess a penalty, say 1.5 or 2% per month. Be sure if you charge penalties that these are clearly specified in your written and posted payment policies.
8. Don’t worry about losing the customer. If you are polite but firm, the customer will probably stay with you. If the customer is a dead-bead, then you do not need to continue to do business with them.
9. For large orders, you might ask for a deposit, say 25–50%.
10.Accept multiple payment options. If someone is having difficulty paying you on time, perhaps they can pay you with a credit card.
11.You might offer early payment discounts.
12.Do not payout any commissions or royalties to sales or design staff until the full invoice is paid by the customer.
Check out this new book by Warren Feld Ebook or Print
Doing craft shows is a wonderful experience. You can make a lot of money at craft shows, you meet new people, you have new adventures. You learn a lot about business and arts and crafts designing.
IF… you do your homework when selecting them, and verify all information
IF… you are very organized in preparing for them, setting up, selling and re-packing up
IF… you promote, promote, promote.
In this book, I discuss 16 lessons I learned, Including How To
(1) Find, Evaluate and Select Craft Shows Right for You,
(2) Determine a Set of Realistic Goals,
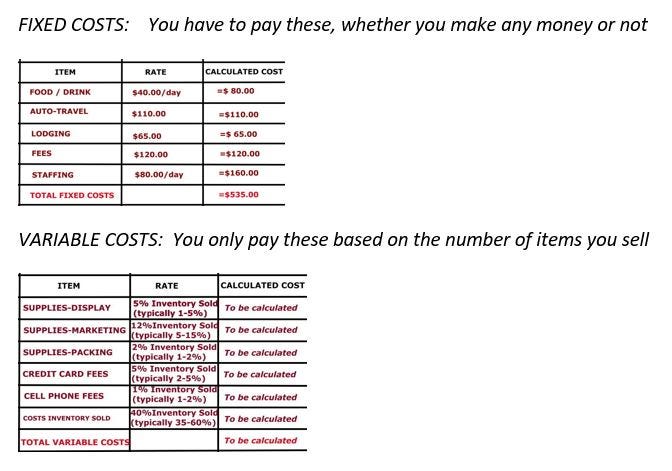
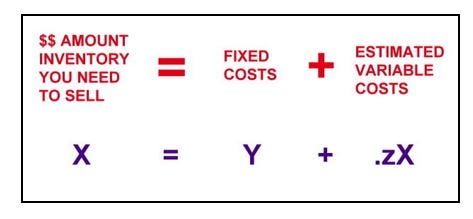
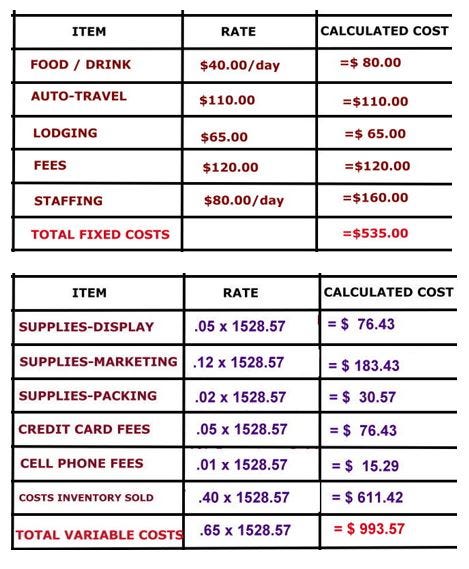
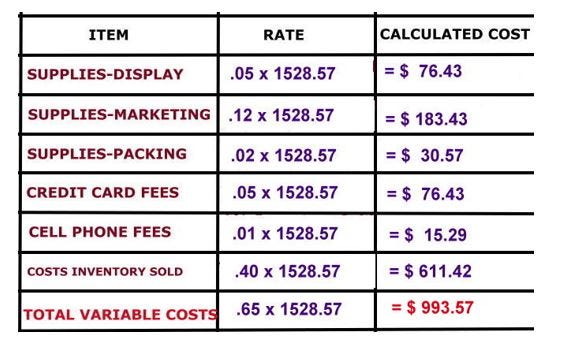
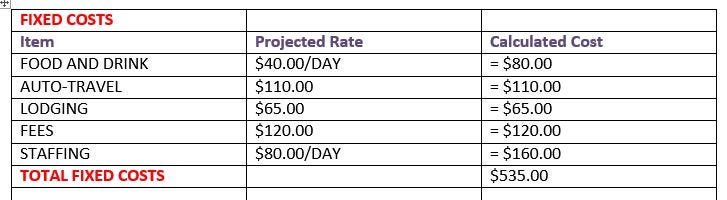
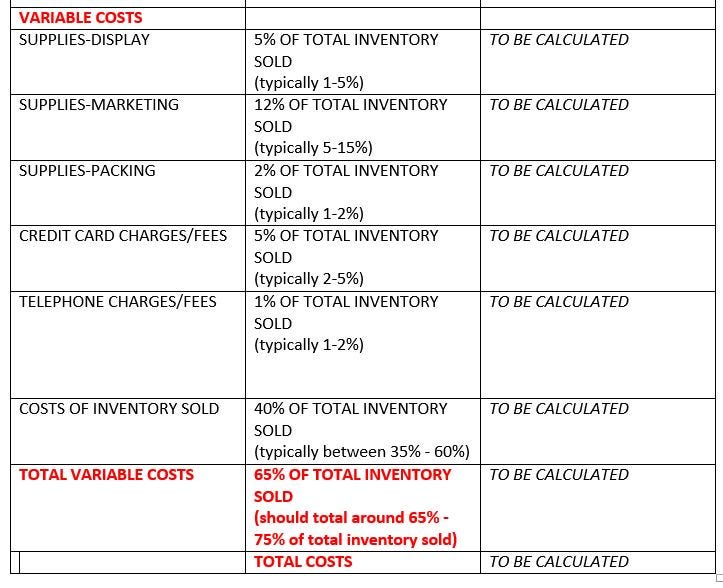
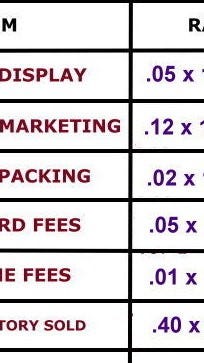
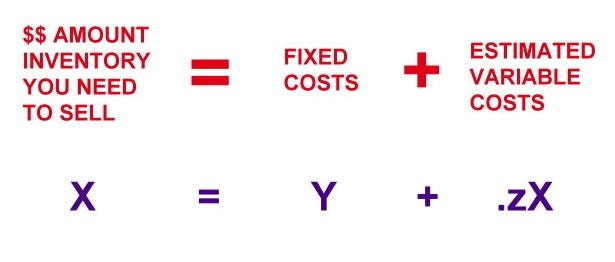
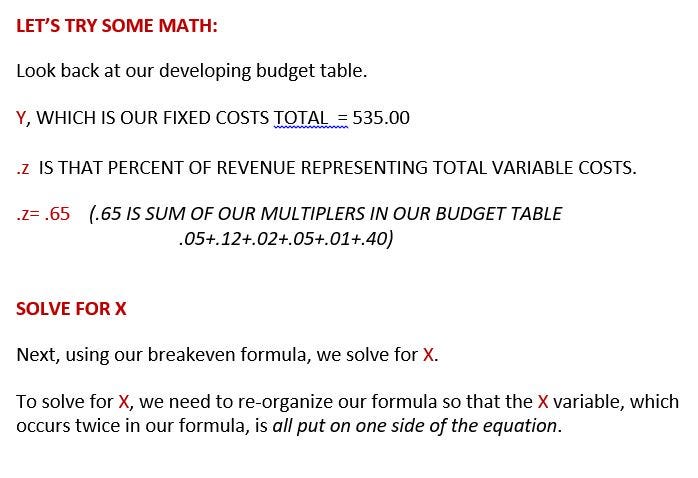
(3) Compute a Simple Break-Even Analysis,
(4) Develop Your Applications and Apply in the Smartest Ways,
(5) Understand How Much Inventory to Bring,
(6) Set Up and Present Both Yourself and Your Wares,
(7) Best Promote and Operate Your Craft Show Business.
Table of Contents
What You Will Learn, p. 1
Intro to Book and Acknowledgements, p. 3
LESSON 1: Not Every Craft Show Is Alike, p. 13
LESSON 2: Research All Your Possibilities, p. 27
LESSON 3: Know Which Craft Shows Are For You, p. 31
LESSON 4: Set Realistic Goals / Determine Break-Even Point, p. 39 LESSON 5: Get Those Applications In Early, p. 71
LESSON 6: Promote, Promote, Promote, p. 83
LESSON 7: Set Up For Success, p. 87
LESSON 8: Bring Enough Inventory To Sell, p. 121
LESSON 9: Sell Yourself And Your Craft At The Show, p. 125
LESSON 10: Make A List Of Things To Bring, p. 141
LESSON 11: Be Prepared To Accept Credit Cards, p. 145
LESSON 12: Price Things To Sell, p. 147
LESSON 13: Keep Your Money Safe, p. 151
LESSON 14: Generate Follow-Up Sales, p. 163
LESSON 15: Take Care Of Yourself, p. 167
LESSON 16: Be Nice To Your Neighbors, p. 169
Some Final Words Of Advice, p. 173
Helpful Resources, p. 175
~~~~~~~
SO YOU WANT TO DO CRAFT SHOWS 16 Lessons I Learned Doing Craft Shows
But when you think jewelry and speak jewelry and work jewelry, this is what you have become. This is your purpose.
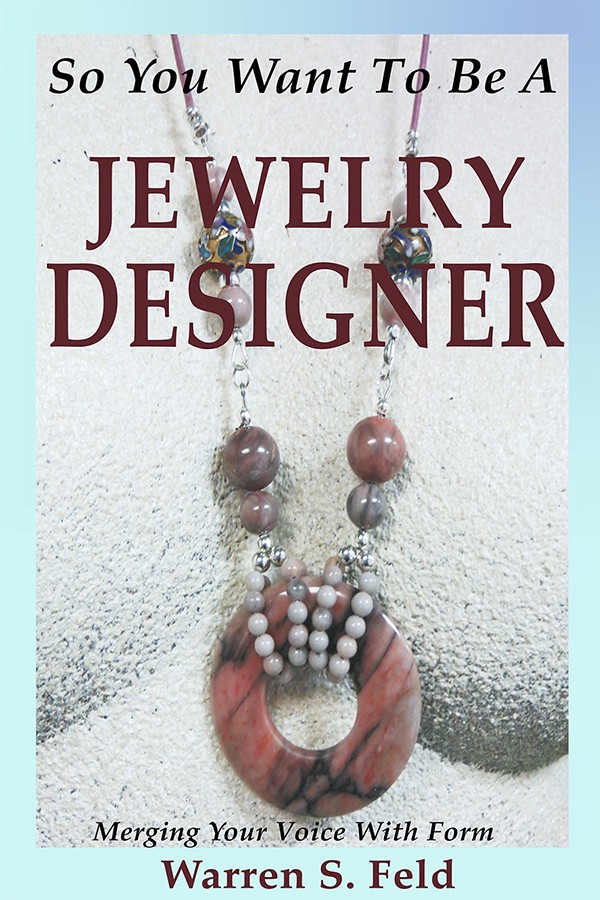
Becoming a Jewelry Designer is exciting. With each piece, you are challenged with this profound question: Why does some jewelry draw people’s attention, and others do not? When designers turn to how-to books or art theory texts, however, these do not uncover the necessary answers. They do not show you how to make trade-offs between beauty and function. Nor how to introduce your pieces publicly. You get insufficient practical guidance about knowing when your piece is finished and successful. In short, you do not learn about design. You do not learn the essentials about how to go beyond basic mechanics, anticipate the wearer’s understandings and desires, or gain management control over the process.
So You Want To Be A Jewelry Designer reinterprets how to apply techniques and modify art theories from the Jewelry Designer’s perspective. This very detailed book, by jewelry designer Warren S. Feld, reveals how to become literate and fluent in jewelry design.
Section 1-JEWELRY BEYOND CRAFT, p. 19 1. Jewelry Beyond Craft, p. 21
Section 2-GETTING STARTED, p. 27 2a. Becoming the Bead Artist and Jewelry Designer, p. 29 2b. 5 Questions Every Jewelry Designer Should Have An Answer For, p. 39 2c. Channeling Excitement, p. 51 2d. Developing Your Passion, p. 65 2e. Cultivating Practice, p. 79
Section 3-WHAT IS JEWELRY, p. 97 3. What Is Jewelry, Really?, p. 99
Section 4-MATERIALS, TECHNIQUES AND TECHNOLOGIES, p. 113 4a. Materials — Knowing What To Know, p. 115 4b. Techniques and Technologies — Knowing What To Do, p. 143 4c. Mixed Media, Mixed Techniques, p. 175
Section 5-RULES OF COMPOSITION, CONSTRUCTION, AND MANIPULATION, p. 179 5a. Composition — Playing With Blocks Called Design Elements, p. 181 5b. The Jewelry Designer’s Approach To Color, p. 197 5c. Point Line Plane Shape Form Theme, p. 231 5d. Jewelry Design Principles: Composing, Constructing, Manipulating, p. 253 5e. How To Design An Ugly Necklace — The Ultimate Challenge, p. 289 5f. Architectural Basics, p. 309
5g. Architectural Basics — Anatomy of a Necklace, p. 335 5h. Architectural Basics — Sizing, p. 343
Section 6-DESIGN MANAGEMENT, p. 349 6a. The Proficient Designer: The Path To Resonance, p. 351 6b. Jewelry Design: A Managed Process, p. 377 6c. Designing With Components, p. 387
Section 7-INTRODUCING YOUR DESIGNS PUBLICLY, p. 407 7a. Shared Understandings and Desires, p. 409 7b. Backward-Design Is Forwards Thinking, p. 437
Section 8-DEVELOPING THOSE INTUITIVE SKILLS WITHIN, p. 445 8a. Creativity Isn’t Found, It’s Developed, p. 447 8b. Inspiration and Aspiration, p. 459 8c. Your Passion For Design, p. 467
Section 9-JEWELRY IN CONTEXT, p. 483 9a. Contemporary Jewelry Is Not A Look — It’s A Way Of Thinking, p. 485 9b. Contemporizing Traditional Jewelry, p. 499 9c Fashion Style Taste Art Design, p. 513 9d. Designing With The Brain In Mind: Perception, Cognition, Sexuality, p. 523 9e. Self-Care, p. 535
Section 10-TEACHING DISCIPLINARY LITERACY, p. 543 10. Teaching Disciplinary Literacy In Jewelry Design, p. 545
Final Words of Advice, p. 579 Thank You, p. 581 About Warren Feld, p. 583 Other Articles and Tutorials, p. 587
In this very detailed book, with thoroughly-explained instructions and pictures, you are taught a non-traditional Pearl Knotting technique which is very easy for anyone to learn and do. Does not use special tools. Goes slowly step-by-step. Presents a simple way to tie knots and position the knots to securely abut the bead. Anticipates both appeal and functionality. Shows clearly how to attach your clasp and finish off your cords. And achieves that timeless, architectural perfection we want in our pearl knotted pieces.
Most traditional techniques are very frustrating. These can get overly complicated and awkward. They rely on tools for making and positioning the knots. When attempting to follow traditional techniques, people often find they cannot tie the knots, make good knots, get the knots close enough to the beads, nor centered between them. How to attach the piece to the clasp gets simplified or glossed over.
Fortunately, Pearl Knotting doesn’t need to be this hard.
Pearl Knotting…Warren’s Way teaches you how to:
· Hand-knot without tools
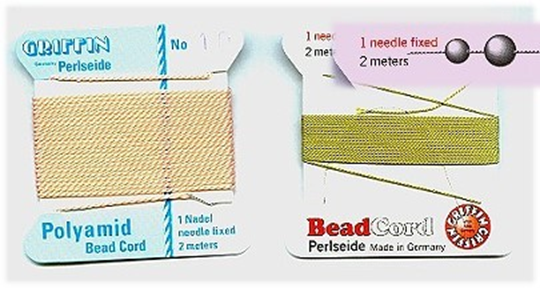
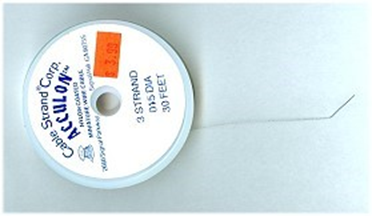
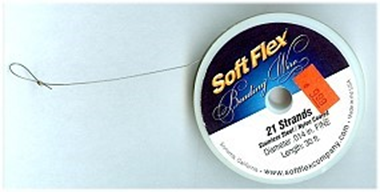
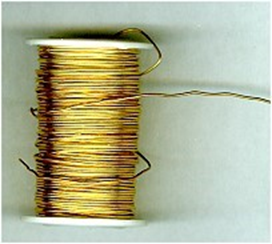
· Select stringing materials
· Begin and finish pieces by (1) attaching directly to the clasp, (2) using French wire bullion, (3), using clam shell bead tips, or, (4) making a continuous piece without a clasp
· Add cord
· Buy pearls, care for them, string and restring them, store them
By the end of this book, you will have mastered hand-knotting pearls.
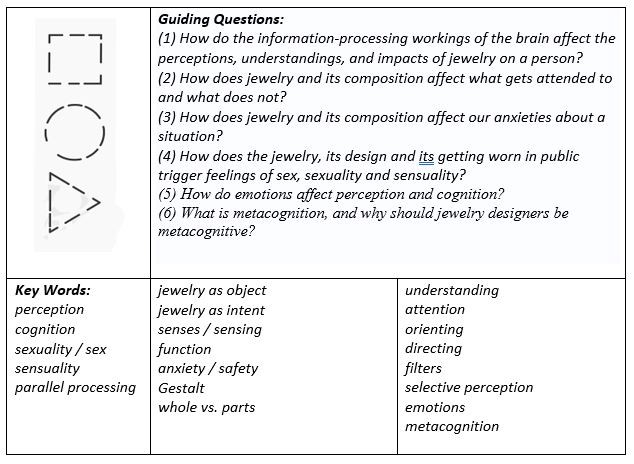
Jewelry plays a lot of psychological functions for both the wearer and the viewer, so it is important to understand some things about perception and cognition and how the brain processes information. The jewelry designer plays with various design elements, let’s call these parts. The designer arranges these parts into a composition, let’s refer to this as the whole. The brain takes in information about, that is, attends to each part, and information about the whole, and assigns a meaning to these. The designer must anticipate all this, especially understanding Gestalt behavior. So the designer is not only dealing with aesthetic and functional considerations in their designs, but also the psycho-social-emotional triggers and filters these may represent. Some of these emotions may evoke a sense of sex, sexuality and sensuality. Last, jewelry designers must be very aware — metacognitive — of how they think through design, and be able to turn their experiences into thinking routines.
DESIGNING WITH THE BRAIN IN MIND
Jewelry plays a lot of psychological functions for the wearer, the viewer, and the buyer, so it is important to understand some things about perception and cognition and how the brain processes information. Jewelry is used to meet the individual’s needs for self-esteem and self-actualization. A sense of oneness and uniqueness. Or conversely, a sense of being a part of a larger group or community. A sense of survival and protection. A re-affirmation of values and perspectives. A connection to a higher power or spirituality. A sense of fantasy. An orientation to what is up and what is down and what is left and what is right.
The jewelry designer plays with various design elements, let’s call these parts. The designer arranges these parts into a composition, let’s refer to this as the whole. The brain takes in information about, that is, attends to each part, one by one, and then gathers information about the whole, and assigns a meaning to all these. Because of how the brain works, there may be several meanings that rise up to the surface, so the brain has to filter and prioritize these somehow. The resulting assigned meaning(s) results in some type of behavior. At its simplest level, the behavior is either one of placing attention or one of suggesting movement. The behavior, whatever it is, reaffirms for the observer that their goals are getting met or that there is some consistency and coherency with personal values and desires.
The designer must anticipate all this. So the designer is not only dealing with aesthetic and functional considerations in their designs, but also the psycho-social-emotional triggers and filters these may incur. Some of these emotions may evoke a sense of sex, sexuality and sensuality. Jewelry has sensual qualities. It has gender associations. It may symbolically represent what is safe and what is not to view or to touch.
PERCEPTION
Perceptions are ways of regarding, understanding or interpreting something. We perceive using our senses. We touch, we see, we feel, we hear, we smell, we sense positioning. Perceptions are subjective, and each person has their own subtle differences, even when responding to the same design or event. In fact, different people may have very different perceptions about the same design or event. Their assumptions, expectations and values may further color their perceptions.
Each person filters their perceptions with each move, each conversation, and each situation. Such filters may contingently alter perceptions. Perceptions are not fixed. They are very sensitive to the context and the situation. Any type of filter may result in selectively perceiving some things, but not others. In design work, our clients might selectively focus on brighter lights, louder sounds, stronger odors, sharper textures, silhouettes, proportions, placements and distributions, balance, harmony and variety. Selective perception can add some more muddiness to the interaction especially as designer and client try to find and develop the shared understandings necessary for success.
Adequately sharing understandings within a situation and among the people in it depends on the amount of information available to each person and how correctly they interpret it. Perception is one of the critical psychological abilities we have in order to survive in any environment.
The designer needs to be open to understanding how the client perceives the design tasks and proposed outcomes, and to adjust their own perceptions when the management of the relationship calls for this. There is no formula here. Each situation requires its own management strategy. Each designer is left with their own inventiveness, sensitivity, and introspective skills to deal with perceptions. But it comes down to asking the right questions and actively listening.
How does the client begin to understand your product or service? Can the client describe what they think you will be doing and what the piece or product might look like when finished? Can the client tell you how the finished piece or product will meet their needs and feelings? Can the client tell you about different options? How will they interpret what you want them to know? What impressions do you want to leave with them? Do they perceive a connection between you as a designer and your design work as proposed? What levels of agreement and disagreement exist between your perceptions and theirs? Can you get at any reasons which might explain their perceptions, and any agreement or difference? Can you clear up any misperceptions?
The jewelry designer needs to distinguish between how the jewelry is perceived when it is not worn from when it is worn. When not worn, jewelry is an object admired and perceived more in art or sculptural terms. When worn, jewelry is an intent where perceptions about the jewelry as object are intertwined, complicated, distorted, amplified, subjugated — you get the idea — with the needs and desires of the individual as that person presents the self and the jewelry as worn in context. Either set of perceptions may support one another, or they may be contradictory.
COGNITION
Cognition involves how the brain processes our perceptions, particularly when these perceptions are incomplete or contradictory or otherwise messy or unresolvable. Cognition focuses on how the brain takes in existing knowledge and creates new knowledge. Cognition is both conscious or unconscious, concrete or abstract, intuitive or conceptual. Cognition may influence or determine someone’s emotions. Metacognition is your own awareness of your strategies and methods of thinking and problem-solving.
The brain takes in a lot of information all at once. The brain looks for clues. It compares clues to information stored in memory. Typically different parts of the brain will simultaneously process (e.g., parallel processing) either different clues or the same clues in different ways. Some information will have greater relevance or resonance than others. Some information will be rejected. Some information will be recategorized or reinterpreted.
You can think of all these mental processes going on in the brain as a huge, self-organizing undertaking, but happening within minute fractions of a second. What happens is very context- or situation-specific. The goal is the creation of some kind of understanding. This understanding will have some logic to it. It will be compatible with and reaffirm the individual’s memories, assumptions, expectations, values and desires. This understanding will typically result in some kind of behavioral response. The response will most often be related to attention or movement. The understanding and the behavioral response will likely get stored in memory.
Attention
The cognitive process starts with attention. Attention has to do with how we focus on some perceptual information, and not on others. A key function of attention is how to identify irrelevant data and filter it out, enabling other more significant data to be distributed to other parts of the brain for further processing.
Picture a piece of jewelry. This jewelry will present many stimuli — color, placement, proportion, balance, volume, positioning, its relation to the human body, the context within which it is worn, perhaps how comfortable it feels, symmetry, and the list can go on and on. Which perceptual clues are most important to the person who needs to decide whether to wear or buy it? Attention is the first cognitive step in determining how to answer this, though the observer does not always consciously grasp the specifics of what is going on.
There are two types of attention: (1) Orienting, and (2) Directing.
Orienting Attention works more reflexively. For example, we are prewired in our brainstem with a fear or anxiety response. This helps us reflexively avoid snakes and spiders. This anxiety response has major implications for how people initially respond to jewelry as it is worn.
Say a stranger is in a room and wearing a necklace. You approach the entrance to this room. You see the stranger who is wearing the jewelry. Your brain has to instantaneously evaluate the situation and determine if it is safe for you to approach and continue to enter the room, or whether you need to be fearful and turn around and flee. Jewelry can play a key role here.
The jewelry signals the primary information the brain needs to make this judgment. Perceptions are filtered to the very basic and very elemental. First the viewer wants to be able to make a complete circle around the jewelry. Anything which impedes this — an ugly clasp assembly, poor rhythm, colors that don’t work together, uncomfortable negative spaces — makes the brain edgy. If the brain gest edgy, the jewelry will start to get interpreted as boring, monotonous, unsatisfying, ugly, and we can go all the way to will cause death.
After the viewer makes that complete circle, a second perception kicks in and becomes key to whether the brain will signal it’s either OK to approach or, instead, you better flee. This second perception is a search for a natural place for the eye/brain to come to rest. In jewelry we achieve this by such things as placing a pendant in the center or graduating the sizes of the beads or doing something with colors.
In slightly more technical terms, the jewelry draws the observer to a focal point at which they can sense an equilibrium in all directions. The viewer feels physically oriented. The jewelry composition presents a coordinated form which connects spaces and masses within something that feels / looks / seems like a unique harmony. The observer is made to feel, as she or he is attenuating to how mass relates to space within the composition, that not only is each element of the jewelry related to the ones preceding or following it, but that each element is contributing to the concept of the whole — the jewelry form is greater than the sum of its parts. There is continuity. There is coherence. Space and mass are interdependent. The distinction among parts is removed. The brain likes this. It searches for it. It makes it restful.
The full experience of the jewelry only gains its full meaning within its total expression. The significance of the total jewelry composition unfolds as the observer moves about its separate parts. This expression, in turn, as it relates to the attention processes of cognition, gets reduced to the confluence of the two clues of (a) making a complete circle, and (b) finding a place to come to rest. If the two clues are satisfying, the jewelry is viewed as finished and successful, and the immediate environment is seen as safe.
The jewelry designer controls the limits and the possibilities for attention. If jewelry design were merely a matter of organizing a certain number of parts, the process would be very mechanical and not at all creative. All jewelry design would be equally good (or more likely, bad). The purpose of good jewelry design is to express particular meanings and experiences for the wearer, viewer or buyer to attend to. Jewelry design is only successful to the extent these are fully communicated to the observer, and are fully sensitive to how perception and cognition play out in our brains. That is, how the jewelry, through its design, enhances or impedes perception and cognition.
Directing Attention, the other type of attention, signals to the observer the possibilities for or constraints on movement. It is more deliberate rather than reflexive. It can divide one’s attention so that the person can pay attention to more than one thing at the same time. Using our example, there could be several strangers in the room, each wearing a different style and design of necklaces. As our observer walks into the room, attention can be shifted from one person / jewelry to another, or focused on one person / jewelry alone.
Directing Attention determines the potential for movement, so that the observer can anticipate the possibilities, or conceive the limits. With whatever piece of jewelry is worn, how freely or easily can the person shift positions, stand, run, dance, lay down? Will any type of movement change the appeal of the jewelry as worn? Is there anything about the design of the jewelry which anticipates different kinds of movements and positioning? Will the appeal of the jewelry remain should the wearer move to a different type of lighted situation or into a shadow? How much ease should be built into the construction of the piece?
The aesthetics of mass and space, such as the interplay of points, lines, planes and shapes, are rooted in a person’s psychology in order to arouse predictable patterns of experience. There seems to be a constant human need to perceive and attend to spatial relationships which distinguish harmony from cacophony. This psychological response to form most likely is connected to a person’s mechanisms for balance, movement and stature.
On the simplest level, observers use jewelry to assist them in knowing what is up and what is down, and what is left and what is right. Jewelry is used similarly in this directing sense as the floors, walls and ceilings are used towards this end in a room, or the horizon, landscape and trees are used outside. Without any clues about positioning, a human being would fall down and not be able to get up.
Picture, for example, how you might feel when the person standing next to you has one earring stuck in a 90 degree angle, or is only wearing one earring, or has a necklace mispositioned and slightly turned around the neck. You most likely feel a bit uncomfortable, perhaps uncomfortable enough to let the person know the jewelry needs to be adjusted in position, or that they seem to be missing an earring. Or perhaps not so comfortable to raise the issue publicly.
GESTALT: The Whole Vs. The Parts
One mechanism of cognition is called a Gestalt. At its root, Gestalt means that the whole composition is more meaningful than the meanings of its individual parts. There is a chicken and egg type of debate within the field about whether the person attends to the parts first with a stronger emergent whole, or whether the person needs to understand the whole first and use this understanding to interpret the parts. But for jewelry designers, we do not have to get into the debate here. Jewelry designers need to recognize that the resulting whole composition should always be more resonant, more finished-feeling and more successful than any of the individual design elements incorporated into the piece.
At its core, people are motivated to recognize entire patterns or configurations. If there are any gaps or flaws or mis-directions, the brain, cognitively, has a tendency to fill in the gaps or ignore the flaws or mis-directions. Where perceptual information does not exist or is somehow incomplete, the brain will fill in the blanks, so to speak, using perceptions about proximity, similarity, figure-ground, continuity, closure, and connection. This all involves work on the part of the brain. The brain may generate resistance towards this end, unless somehow coerced or tricked by aspects of the design choices themselves.
Jewelry will have a lot of gaps of light throughout. The individual beads and components do not blend into each other. They are distinct points of information. Instead, from the brain’s point of view, there are the equivalent of cliffs between each one. The brain, in effect, is asked to jump each cliff. It may be resistant to do so. The brain wants harmony. The brain wants to connect the dots into a smooth line. Or, if the composition were separate lines, the brain wants to connect the lines into a smooth, coherent plane. Or, if there were several distinct lines and planes, the brain wants to integrate these into a recognizable shape or form. But again, all this is not automatic. The brain will resist to do any more work than necessary. The designer will need to make smart, influencing, persuading choices in the design. The Gestalt mechanism is a set of these kinds of choices.
The brain needs to be sufficiently motivated to make the effort to harmonize the pattern or configuration. Gestalt is one of the cognitive, motivating, innate forces the brain uses. In music, when the brain hears part of a melody, it not only hears the notes, but also something else, let’s, for simplicity, call this a tune. This something else allows the brain to anticipate how the melody will continue. If the melody at this point changes key, the brain anticipates how the melody will play out in the new key as a similar tune but with different notes before it is played. How the brain interacts with a piece of jewelry has parallels.
One obvious example is the use of color simultaneity effects. Here the color of the next bead is affected by the color of the previous bead. Place a grey bead next to an orange bead, and the grey bead will take on some orange tones. Both beads get perceived as blended or bridged, even though, in reality, they are not. The observer generalizes the relationship between the two stimuli rather than the absolute properties of each. Take three beads, one emerald, one olivine and one grey. You would not normally find these two greens within the same composition. Place the grey bead between the two greens and, because of simultaneity effects, the two greens will harmonize as the grey forces a blending or bridging.
Jewelry designers need to learn the basic principles or laws of Gestalt. This allows them to predict the interpretation of sensation and explain the way someone will see their compositions. It allows them to anticipate how their jewelry will arouse predictable patterns of emotions and responses in others.
These laws can be used as guides for improving the design outcomes. They can be used to influence what design elements should be included. In what forms / volumes / placements / other attributes these design elements should take. How design elements should be arranged. How construction and function should best relate to aesthetics. How the jewelry should be worn. How the jewelry might coordinate with other clothes and accessories or contexts.
These principles are based on the following:
Principle of Proximity: In an assortment of elements, some which are closer together are perceived as forming groups. Emphasizes which aspects of elements are associated.
Principle of Similarity: Elements within an assortment are grouped together if similar. This similarity could be by color or shape or other quality. If the assortment is comprised of many elements, some similar and some dissimilar, the brain will sort this out so that the similar ones, no matter where placed within the assortment, will be perceived and grouped together.
Principle of Closure: People tend to perceive objects as complete, even when incomplete, rather than focusing on any gaps or negative spaces. When parts of the whole are missing, people tend to fill in the missing parts. The brain is preset to attempt to increase the regularity of sensation or the equilibrium within an experience or event.
Principle of Symmetry:The mind perceives objects as being symmetrical and forming around a center or focal point. Similar symmetrical elements will be grouped as one. The brain will attempt to make something which is asymmetric be perceived as symmetric as best as it can. The brain equates symmetry to coherency.
Principle of Common Fate: Elements are perceived as lines which move along the smoothest path. We perceive objects as having trends of motion. In jewelry design, think about something like rhythm. The beads are not moving in reality, but we perceive a direction and a quality of movement.
Principle of Continuity: Elements of objects tend to be grouped together, and therefore integrated into perceptual wholes, if they are aligned with an object. If two objects are next to each other or overlap, the brain tends to see each object distinctly as two separate wholes, if the elements within each object are aligned and continuous. Picture a 2-strand necklace. The brain will be primed to see these as 2 separate strands or wholes, rather than one whole necklace. Objects with abrupt and sharp directional changes will less likely be perceived as a whole.
Principle of Past Experience: Under some circumstances, visual stimuli are categorized according to past experience. Especially when faced with unknown or unfamiliar objects, the brain will resort to using past experience as a means for interpretation and whether to group elements within the objects as a whole.
DESIGNS CREATE EMOTIONS
There is a growing body of knowledge of the mechanics of sensory processes in cognition. A good design creates positive emotions for the viewer, wearer and/or buyer. Jewelry designers need a deeper understanding of types of emotions and their psychological underpinnings. People develop emotions with jewelry on three levels: (1) visceral (intrinsic), (2) behavioral (behavior), and reflective (reflection).
(1) Visceral (wants to feel): attractiveness, first impressions, feelings
(2) Behavioral (wants to do): usability, function, performance, effectiveness
(3) Reflective (wants to be): meaning, impact, shared experience, psycho-socio-cultural fit
METACOGNITION
Metacognition is an awareness of your own thought and problem-solving processes. It involves a search for patterns and the meanings behind them. It involves a lot of reflection. It involves a sensitivity to the choices made when confronting any unfamiliar or unknown situation. It concerns an awareness of why some choices worked better than others, or not at all.
For jewelry designers, it is important to take metacognition one step further. It is important to turn your experiences into thinking routines. These routines are fix-it strategies you bring with you when overcoming difficult or unfamiliar situations.
SEX, SEXUALITY, AND SENSUALITY
As a jewelry designer, you have to be very aware of the roles jewelry plays in sex, sexuality and sensuality. The act of sex. Everything leading up to it. Eroticism. Sex, however, differs from sensuality. Sensuality is how the jewelry brings out the sensual — the gratification of the appetite for visuals, sounds, tastes, smells and touch. Sensuality always makes jewelry desirable. But perhaps no two people experience the sensuality of a piece of jewelry in the same way.
These sex-sexuality-sensuality roles include,
(1)The Peacock Role
(2)The Gender Role
(3)The Safe Sex Role
One sexual role of jewelry is the Peacock Role. People wear personal adornment to attract the viewer’s attention. This means that the jewelry not only needs to be flashy enough, but also must contain culturally meaningful elements that the viewer will recognize and be sufficiently meaningful as to motivate the viewer to focus his or her attention on the jewelry and who is wearing it.
These culturally meaningful elements might include the use of color(s), talismans, shapes, forms. They clue the viewer to what is good, appealing, appropriate, and to what is not. But the jewelry must also provide clues to the individuality of the wearer — her (or his) personal style, social or cultural preferences, personal senses of the situation in which they find themselves.
Another of these sexuality roles — The Gender Role — is to define gender and gender-rooted culture. Certain jewelry, jewelry styles, and ways of wearing jewelry are associated with females, and others with males. Some are used to signal androgyny, others polyamory or gender fluidity. You can easily label which jewelry looks more masculine, and which more feminine. Some jewelry is associated with heterosexuality, and others with homosexuality. I remember when men, in a big way, started wearing one earring stud, it was critical to remember whether to wear the stud in the left ear lobe (hetero) or the right one (gay). For engaged and married women, it is important to recognize which style of ring is more appropriate, and which hand and finger to wear these on.
One of the most important sexuality roles, however — The Safe Sex Role — concerns the placement of jewelry on the body. Such placement is suggestive of where it is safe, and where it is unsafe, to look at or to touch the person wearing it. The length of the necklace, relative to the neck, the breast, or below the breast. How long the earring extends below the lobe of the ear. Whether the person wears bracelets. The size of the belt buckle. If a person has body piercings, where these are — the navel, the eyebrow, the nose, the lip.
Jewelry calls attention to areas of the body the wearer feels are safe to view or touch. It’s like taking a sharpie marker and drawing a boundary line across the body. Jewelry gives the viewer permission to look at these areas, say above the line, and not others below the line. Jewelry may give the viewer permission to touch these areas, as well. The wearer may want to call attention to the face, the neck, the hands, the ankle, but also to the breasts, the naval, the genital area.
We know that certain areas of the body are more sexually arousing than others. We know that different people are more or less comfortable with these areas on the body. But how does the wearer communicate that? How does the wearer communicate her (or his) personal views of what is sexually acceptable without having to physically and verbally interact with someone in order for that person to find out?
Jewelry. How jewelry is worn is one of the most critical and strategic ways for achieving this Safe-Sex goal. The linear form of the jewelry imposes a boundary line on the body. Do not cross it. And make no mistake, this boundary line separates the permissible from the impermissible, the non-erotic from the erotic, the safe from the unsafe. In a similar way the centerpiece focuses attention as if it were an arrow pointing the way. Jewelry is not just a style preference thing. It’s a safe-sex preference thing, as well.
When news of the AIDS epidemic first burst on-stage in the 1980s, you witnessed a very dramatic change in jewelry and how it was worn. Right before the AIDS epidemic, large long earrings were style. Remember shoulder dusters. But as awareness of AIDS spread, most women stopped wearing earrings for awhile. Then gradually, they began wearing studs. Then very small hoops. It wasn’t until around 2004 that some women wore the new chandelier earrings, and you saw longer earrings on actresses as they paraded down the red carpets of one award show after another.
Prior to AIDS, the necklace style was for longer necklaces — 24” to 36” long. The necklaces were full — multi-strand, lots of charms and dangles. Again, as awareness of AIDS spread, the necklace profile changed rapidly to no necklace at all, or to thin, short chains and chokers. You would typically find ONE charm, not many, on a necklace. Attention was pulled away from the genital area, the navel and the breasts, all the way back up to the face.
Prior to AIDS, necklaces and earrings were the best-sellers in my store. After AIDS, it became bracelets. Holding hands. Not necking. Not fondling. Not sexual intercourse. Holding hands was now the acceptable norm. This was safe.
Body piercings came into major vogue during the 1980s. And look what typically got pierced. Noses, belly buttons, eyebrows, lips. This of this as a big Body Chart for safe sex.
As society became more understanding of AIDS and how it spread, the jewelry became larger. It extended to more areas of the body. People wore more of it. But in 2009, it was still restrained, when compared to what people wore before the 1980s.
In the sexual hunt between the sexes, jewelry plays an important boundary-defining role. Let’s not forget about this. Jewelry, in some sense, is an embodiment of desire. Jewelry communicates to others how the wearer comes to define what desire might mean for the self. It communicates through placement, content, embellishment and elaboration.
Jewelry does not have to be visibly erotic, or include visual representations of sexual symbols, in order to play a role in sexuality and desire — a role that helps the hunter and the hunted define some acceptable rules for interacting without verbal communication.
___________________________________
FOOTNOTES
Canel, Melissa. The Role of Perceptions in Conflict. April 9, 2016. As referenced:
Choosing and Using Other Jewelry Findings:
Preparers
You have to approach the Jewelry Findings with a large measure of respect. “Jewelry Findings” are all the pieces that you use, including clasps, other than stringing materials and beads. They are called “jewelry findings”, because up until about 15 years ago, many of these pieces didn’t exist. People went to sewing notion stores, antique stores, flea markets, hardware stores, cannibalized old jewelry, wherever, and found things and made them work. Because many of these pieces are new, there is not a consensus on what some of these things should be called, so you have a lot of similarly looking pieces that go by different names. I’m sure over time, the name-game will shake out, and there will be more consistency.
Respect these jewelry findings. They are the pieces that get pulled and strained, torn at and squeezed, maligned and misused. These are the pieces that will make or break your piece of jewelry. Understand and respect them.
Many designers fail to make the full range of these pieces available to them. They either don’t know about them, or are afraid of them or think they might use them incorrectly. They too often limit their own design possibilities by relying on the same limited set of findings for everything they make. But the world of possibilities that these jewelry findings open up for us is endless.
Below is a list of other major jewelry findings used in bead stringing. I’ve tried to group them into three categories to make it a little easier to relate to.
PREPARERS:
Things Which Prepare the Ends of Cords and Stringing Materials:
These kinds of jewelry findings are mostly used with thicker cords, like leather and waxed cotton, but also with cable wires. These enable you to create a “loop end” on each side of the cord or cable.
From the two loop ends you have created on each end of your cord, you then continue to create the rest of your clasp assembly. If the loop is big enough (to give you jointedness), or looks substantial enough (like it won’t break from movement), you can attach the clasp directly to the loop. If not, you will want to attach your clasp/ring to jump or split rings, and these, in turn, to your loop ends.
You usually try to match the size of the interior opening on the jewelry finding to the thickness of your cord or cable. For some of these pieces, this match is more important than others.
You always put some glue on your cord or cable before you stick them into the piece. You use glue because all these cords are oily, and some will sweat, as well. They will slip out of the findings — even with tight crimping or clamping — because they are slippery. That’s why you use glue.
I recommend using a glue like E6000 or Beacon 527. Don’t use super glue. Super glue (or the jeweler’s version called G-S Hypo Cement) dries like glass, so the bond will shatter like glass, because all jewelry moves. Also, after it shatters, the bond looks like a broken coke bottle. E6000 and Beacon 527 dry like rubber, so they act as a shock absorber, when the jewelry moves.
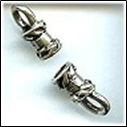
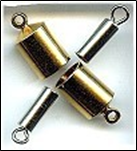
CRIMP ENDS
These come very fancy or plain. They come with a small opening to use with cable wires, and wider and wider openings to use with leather or waxed cotton, or even braided leather.
These pieces have a loop at the end of a tube. The tube has 3 bands. The first and third are decorative. The center band is meant to be crushed and crimped. You put some glue on the cord or cable — any glue except super glue — stick it into the tube, and take a pliers and crush the center band as flat as you can get it.
When you crush the middle band, visually, it looks like it is part of a pattern of beads. It doesn’t look like an ugly crushed piece of metal.
Some crimp ends come with a hook, so that you attach a loop on one end and the hook on the other, to create a hook and eye clasp.
These and clamps (see below) work best for preparing the ends of cable wires and thicker cords. Crimp ends tend to be on the pricier side; clamps are very inexpensive. Both hold well, relying on both the glue and the crimp.
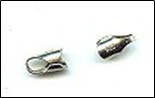
CHAIN/CORD ENDS
These pieces have a loop at the end of a split tube. For chain, these are soldered on. For cords or cable, you put some glue on (again never super glue), stick it into the split tube, and take a pliers and crush snug, NOT flat. What’s holding these on is the glue. If you crush flat, you lose the bond. Should tightly match cord thickness to interior diameter.
We need to crush snug because we want the glue to adhere to all the interior surfaces. If there are any gaps where the glue has not adhered, the bond will break.
These are terrible pieces, because it is difficult to achieve that perfect bonding with the glue.
END CAPS
These pieces come in just a few sizes, but many designs. Those pictured are very industrial looking, but they come very decorative, as well. Some pieces have a hole at the end instead of a loop and are labeled “end caps,” but technically, these should be called either a cone or a bead cap. Usually, the interior opening size of the end cap will be listed, such as ID=6mm or ID=8mm or ID=12mm. You coordinate this with the width of whatever you are trying to slip into the end cap. But because of the shape of the end cap, there still may be fit issues.
These pieces have a loop at the end of a hard metal tube. The loop is either an eyelet or a fixed loop. You put some glue (not super glue) on cord or cable and stick in. The glue is all that holds. Should tightly match cord thickness to interior diameter.
Because it is important, for the bond to hold, to get the glue to adhere to all the interior surfaces, and you cannot crush the ends snug, you need to put a lot of excess glue on the cord when you stick it in. And you need to be prepared to wipe away the excess glue that bleeds back out.
You never attach your clasp directly to these pieces. You need an additional intervening ring — jump ring or split ring or soldered ring — between the end cap and your clasp component.
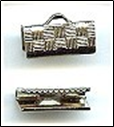
CLAMPS Ribbon or Bar Clamps:
These clamps are folded metal with a loop in the center edge, come in different lengths, and have teeth. These are for ribbons or fabric. You don’t use glue, because the glue will bleed into the ribbon or fabric.
You fold over the end of the ribbon or fabric, making the end pretty, and stick into the clamp, and use a pliers to crush firm. If your material is wider than the clamp you have, you would make several folds in the end, like you would when gift-wrapping a package.
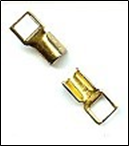
Foldover or Wing Clamps:
These come in a few different sizes, some with square loops, some with round loops. Some have plain backs; some have patterned backs.
These typically are a loop on top of flat metal with two wings that fold over. You put some glue (not super glue) on the cord or cable, sit in the saddle between the two wings, and use a large pliers, and crush the two wings over each other and over the cord. Crush as flat as you can get it. This is not done in one movement because the wings are stiff and strong. You usually take your pliers and move then to one side, then the other, then back, until you get the two wing position over each other, and you can crush them flat.
One mistake people make with this piece is that they crush snug, not flat. Where the wings overlap each other, this leaves an air passage. Again, we want our glue to adhere to all the interior surfaces. If you crush snug, this air passage will weaken the bond, and your cord will pull out. You have to crush as flat as you can get it, to force the glue up into that air passage.
You can use one clamp for multiple strands, if you wish. You can seat multiple strands of cable wire or leather or whatever into the saddle of one clamp.
These and the crimp ends work the best for preparing the ends of cable wires and thicker cords. Crimp ends are pricier; clamps are cheap. Crimp ends have a design impact; clamps are very utilitarian.
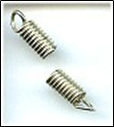
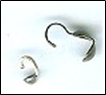
COIL ENDS
Coil ends have an open ended loop at the top of a tightly wound coil. I don’t like the way these look after they are crushed onto the cord, and they don’t hold up well. One advantage is that the coil functions as a spring, and absorbs a lot of the excess force place on the piece, that comes from movement.
With coil ends, you put some glue, (but not super glue), on the cord, shove it into the coil. You take a chain-nose pliers and crush the first two rings of the coil onto the cord. If you crush too hard, you’ll slice the cord. If you don’t crush hard enough, the cord will pull out.
The way the loop was designed to work, was that you take a pliers, move the open ring to the side, slip on your clasp or ring, and, using the pliers, move the open ring to a closed position again. DON’T DO IT THIS WAY. When you move the loop back and forth, it breaks off easily. These loops are rather brittle. SO, the way you would use this, is that you would take a jump ring or split ring, and attach this to the loop and your clasp piece. As long as you don’t move this loop wire, it stays strong.
Coil ends come in two sizes in terms of the width of the interior diameter. If your cord is thicker than the smaller size, see if you can make it work with this smaller size, anyway. The larger size is more awkward to use. Say you had leather cord. You can take a single-edge razor blade and cut the end at an angle, put some glue on the cord, and shove it into the smaller piece.
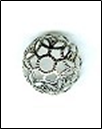
BEAD CAPS
This is a decorative cup-like or bowl-like piece, with a hole in the center. This piece is originally used as a decorative element, to cover one or both sides of a bead, as you string your beads on. However, you can adapt this piece to be an end. You might have multi-strands, where you tie them all off together, and use the bead cap to hide the mess. You might have a bead crocheted rope, and again, use the bead cap to give your piece a decorative end. You glue the bead cap on. Then you take an independent wire or thread, attaching it to your piece about 2–3” from the end, and running it through your piece, through the cap, then finishing off the rest of your clasp assembly.
What’s nice here are that there are hundreds of styles, whereas the more typical jewelry findings look very utilitarian.
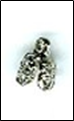
BELL CAPS
A bell cap is a bead cap with a loop on it. This is a decorative cup-like or bowl-like piece, with a loop sticking above the center. This piece is originally used to adapt something, like gluing it to the top of a crystal pendant or bead, to be a drop. But it can be adapted to use as a fancy end-cap. Use glue here. Attach the clasp assembly to an additional jump ring or split ring. Again, there are many, many decorative styles in bell caps, so you won’t have to rely on the typical and very plain specialized jewelry findings.
The arms on the bell cap are somewhat independent, and can be pushed into the shape of whatever piece they are attached to. So, for example, you can take a rough stone, position the bell cap at the top, push on the arms to shape them to the stone, then put glue on each arm and attach the bell cap to the piece.
BEAD TIPS (aka, KNOT-COVERS)
These pieces are used to hide knots. One style has a cup with a tongue attached. Another style ends with a loop, not a tongue. The most widely used style — Clam Shell Bead Tip (or double-cup) — has two half cups that close over the knot, and a tongue extending from one end. While some people use these pieces with cable wire, they are primarily designed for use with needle and thread.
These take some practice in learning how to use them. On the first side of your piece, you string on the bead tip, say the clam shell. You tie a bunch of knots in the tail, so your knot is bigger than the hole in the bead tip, and won’t slip out. Cut off the tail. Put a drop of glue on the knot. Here you would use something like superglue. Superglue will make the knot stiff, so it won’t pull through the hole. E6000 will make the knot rubbery, and it will be able to contort and work its way through the hole. Trim the tail. Press the two halves of the clamp together over the knot, so it looks like a bead. Take the tongue, fold it over and through the ring on your clasp, and back to itself, so it forms a loop.
On the other side of your piece, here’s the tricky part. You need to keep your tension on the thread, so the thread doesn’t show when you’re finished. You need to tie a bunch of knots, and complete the rest of the process. This is a 3-hand operation, but you only have 2 hands.
Here you slide the bead tip onto your thread. Use one hand to hold everything tight. Take an awl or a round nose pliers — something where the width graduates into a point, and put the tip where you want your finished knot to end up. Tie an overhand knot over the awl or pliers up high on the wider part of the jaws. Tighten the loop of this knot. Tighten the tension on your thread. Move the loop down the awl or pliers a bit, moving towards the narrow pointed end. Tighten this loop. Check your overall thread tension. Move the loop down a little bit more. Tighten this loop. Check your overall thread tension. When you loop gets to the tip of your awl or pliers, you need to pull your knot tightly, and push the awl or pliers out of the way, AND, you want to maintain the thread tension in your piece. Tie a bunch more knots. Put glue on the knot. Trim the tail. Close the clamp. Loop the tongue into the other part of your clasp. This takes about 5 tries before your body gets that muscle memory to do the task easily and correctly.
When I started in jewelry making, almost every piece used bead tips. I’m not a big fan of this type of piece today. The tongue when bent over to hook and secure the clasp is not jointed enough. It doesn’t leave a big enough loop, so there is tension and these tongues break off. Today, you can tie your piece to the clasp using knots, then slip a crimp cover over the knot, so it looks finished as if there were a bead there. This is both more secure and easier to do.
Some alternatives to tying a globular knot: (1) with needle and thread work, you can tie off an end to an 11/0 seed bead, and have your clam-shell enclose the seed bead, and (2) with cable wire, you can crimp on a crimp bead on the end of your wire, and have your clam-shell enclose the crushed crimp bead.
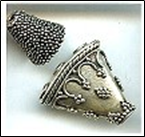
CONES
Cones come in many shapes and designs, but basically look like a megaphone. These are used to finish off the ends of jewelry, often to hide a lot of messy knots or unfinished ends inside the cone.
One style of cone is called a 3-to-1 cone (also, 2-to-1 up to 11-to-1). This is a flattened cone, with one hole on one side, and 3 holes on the other. This is supposed to help you finish off a 3-strand piece in a decorative way. You pull each of 3 strands through the 3 holes on one side, and out together through the one hole on the other side. For two of the strands, you tie a large knot or double-knot, cut off the excess tail, and let the knot fall back into the box of the cone. I’ve only known one person in my life who could accomplish this, and maintain sufficient string tension so that none of the cable wire showed on the other side of the cone and as part of the bracelet. For the 3rd string, you would continue creating your clasp assembly. This is a good piece in theory, but not practice. Most people end up tying the three strands into this big, globular knot, and then trying to finish off the clasp assembly, only to have the clasp assembly take up 25–30% of their finished bracelet.
Regular cones are used like lampshades to hide some ugliness. With the typical cone style — that megaphone looking piece, the way you are supposed to use this piece is as follows: You take a soldered ring, something small enough so that it will fit far enough back into the cone, that the cone will hide any of the finishing knots or ends. If we start with a 3-strand necklace, you would tie off each strand to one side of the soldered ring. Then you would take a separate, independent cable wire, hard wire or thread, whatever you are stringing with, and tie it off in a knot to the other side of the soldered ring, pull the whole works into the cone, with the stringing material coming out the narrow end. Then you would finish off your clasp assembly.
The soldered ring, in this case, acts as a “support system”, creating jointedness. Otherwise, without this ring or support system, the cone could not support the resulting stress and strain. Since all the pieces are metal — cable wire, cone, clasp, crimp — , and these would be too stiff and would not move easily, and, as you now know very well, when you bend metal back and forth, it breaks.
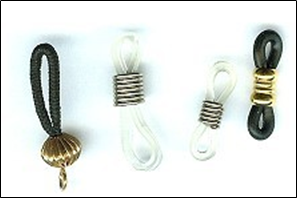
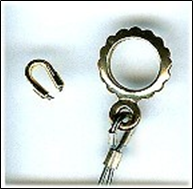
EYEGLASS HOLDER ENDS
A major category of jewelry are eyeglass leashes. You make an eyeglass leash by attaching an eyeglass holder end to the eyeglasses, making a string of beads, attaching the string of beads to a split ring, and attaching the split ring to the eyeglass holder end. You never attach the beadwork directly to the holder ends. Eyeglass leashes take a huge beating, as they are worn, and you need to create as much jointedness as possible, so you don’t ruin someone’s eyeglasses, have the lenses shift position within the frames, or have the leash break. In fact, we want to use a split ring — about 10mm or 12mm in diameter — that is a little larger visually than you might feel comfortable with.
Eyeglass leash holder ends are made from round rubber thong (usually black or clear), flat vinyl (usually black or clear), or elastic cord (comes in many colors). The round rubber thong is the most durable. Elastic cord is not durable at all. There are various style options. Most come with what is called a “coil center”. When the eyeglass leashes are worn, the rubber, vinyl or elastic cord sweats, both from the humidity found in the air, as well as the wearer’s own body sweat. Coil centers tend to slip, so these don’t work well with narrow arms on eyeglasses. Other eyeglass leashes come with a bead center, usually a 6mm glass roller bead. The beads don’t slip.
The ones with bead centers are a little more expensive than the ones with coil centers. One company bought the ones with the coil centers, slipped these off what is basically a rubber band, and slipped on a 6mm glass roller bead. They took a $0.45 cent piece and sold them for $4.00 a piece. People thought they were magic because the beads didn’t slip, so were willing to pay the premium. You can do the same thing. There are about 300 colors of roller beads, so you can personalize your line.
WATCH BAND COMPONENTS
These pieces are used to adapt watch faces so you can make beaded watch bands off them. They consist of a tube designed to slip over the spring bar on each end of a watch face, and some kind of loop or series of holes that come off the tube. Beaded watch bands have become so popular, that now you can purchase watch faces designed specifically to attach these to them.
CRIMP BEADS, CRIMP COVERS, and HORSESHOE WIRE PROTECTORS
Crimp beads come in many styles, sizes and finishes. These are used to secure cable wires to clasps. The crimping process involves crushing the crimp onto the cable wire, first separating the tail wire from the main wire, then creating a lock, and finally re-shaping it so it looks like a bead again.
Crimp Covers
These are U-shaped beads that slip over the crushed crimp. They are used like a lampshade to hide something that is ugly.
You attach the crimp cover in two steps. First, using the tips of your crimping pliers, you push the two sides of the U together, so you have a pretty bead. These are made of a soft metal, so you don’t want to push too hard, or you will crush them. After you get the two sides to meet, you’ll find that the lip on either side doesn’t meet up perfectly.
So, Second, at this point, you return the crimp cover to your crimping pliers, this time resting it between the top notches (thus, furthest from your hand) in each jaw. This will help preserve the roundness of the crimp cover as you manipulate it. Gently push the jaws to force the lips to meet more perfectly. You can slide crimp covers over your crushed crimps. You can also use these to slide over any knots, to hide the knots.
Horseshoe wire protectors
These serve several purposes. (1) It forces you to leave the correct size loop in the cable wire, so that you have the appropriate support system or jointedness. Without the loop, you would be pushing the crimp all the way to the clasp. This is a No-No. You never push the crimp all the way to the clasp — this creates stiffness with metal parts, and general movement would cause these to break.
(2) The horseshoe also makes the loop more finished looking — better than a bare-wire loop. Most people hate a bare, exposed loop. The horseshoe fools the eye/brain here, making it think that the loop is finished and more organically a part of the whole composition.
(3) The horseshoe prevents the cable wire from folding into a V over a period of time and wear. If the wire were to change from an arched loop to a V-loop, the wire then would more easily bend back and forth and break.
There are many choices to make when selecting crimp beads:
Crimp Beads
– tube vs. round
no difference in “holdability”, but most people prefer the tubes
– THE SILVER COLOR ISSUE: sterling silver vs. silver plated vs. silver plated crimp with sterling silver crimp cover vs. argentium silver crimps
Silver-plated crimps are usually plated over brass. Brass has a very high degree of integrity as a jewelry making metal. The plating wears off relatively quickly, and your crimps will look black — basically tarnished brass. More recently, these plated crimps have been plated over aluminum, which can break from the force of the crimping pliers.
Sterling softens at body temperature. If your crimp is resting on the wrist or the neck, there is some risk of it softening and weakening. This risk is minimal, however. If you’ve crimped correctly, you shouldn’t lose sleep over this. I prefer to use the sterling silver crimps; they are often made better than the other crimps.
You can also use a silver-plated crimp to crimp, and slide a sterling silver crimp cover over it.
Argentium has the same silver content as sterling but does not soften as easily at body temperature. These are a lot more expensive than sterling.
– crushing the crimp and re-rounding it vs. crushing, then using crimp cover
Some people don’ t like the look of the re-rounded crimp, or feel uncomfortable trying to re-round them. The crimp covers add about $0.50 — $1.00 more to each piece.
– plain tube vs. twisted tube
The twisted tubes (sometimes called Tornado or Cyclone crimps) are a little more expensive than the plain ones. When you crush the twisted tubes, they look decorative enough that you don’t have to re-round them. You definitely need to re-round the plain ones.
– Regular or long tube vs. short or half tube
Short tubes or half tubes are primarily used in pieces like illusion necklaces, where you have a cluster of beads, and the cord shows, another cluster of beads, the cord shows, etc. Half tubes are used on either side of the clusters to keep the beads in place. When you crush the half tube, the volume of space it takes up is not noticeable. When you crush the regular sized tube, its volume of space is too noticeable and detracts from the general look of the piece. One mistake people make with the short or half tubes, is that, when they use them to finish off the ends of jewelry, their mind tells them to use 2 or 3 of them so that they will “hold better.” A crimp is a crimp, and if you crimped correctly, there is no difference in holdability between the short and longer tubes. Each crushed crimp you add becomes like a little razor blade. All jewelry moves, so you’re increasing the chances, by using more than one crimp on each end, that one of these crimps will cut through the cable wire. One crimp on either end is enough.
– variations on quality/grade of crimp beads
Basically, you get what you pay for!
Here’s how crimp beads are made: You start with a sheet of metal. You roll the metal into a tube. You buff along the seam where the two sides meet, so that it looks like it’s been soldered together. However, there’s really a seam there.
So often, people come into our shop and tell sad tales of failed crimps and broken bracelets and necklaces. They blame themselves. They blame the pliers. But they never blame the crimp beads. In most cases, the crimp is at fault.
Cheap crimps, usually bought in small packages, usually at craft stores, are not made well. When you crush these, they tend to split along the seam. Sometimes you can see the split. Othertimes, you can’t quite see that the two sides of the tube have started to separate. Your cable wires pull out. Or your crimp edges have cut into the cable wire.
An A-grade crimp, usually costing about 3 times what the cheap crimps cost, can hold up to your initial crushing, as well as another 8 or so clamping down on it during the re-rounding process.
There are heavy-duty or A+ grade crimps. These run about 6–8 times what the cheap crimps do. You don’t have to worry about any splitting, no matter how much you work the crimp bead with your pliers.
– using 1 crimp on each end vs. using more than 1 crimp on each end
Using 1 crimp on each end of your piece is sufficient. Using more than 1 crimp on each end is too risky. Sometimes you mind, or your best friend, thinks that is 1 is good, 2 or more would be better. No! When you crush your crimp onto the wire, it becomes like a little razor blade. All jewelry moves, so your crimp is constantly trying to saw through the cable. Using more than one crimp on each end increases the chances that one will saw through. All you are doing is adding razor blades.
– size of crimp
Manufacturers are inconsistent in how they label the sizes of crimp beads. In general:
2mm is the average size For .014, .015, .018, .019 cable wires
1.5mm is small For .010 and .012 cable wires
2.5mm is slightly more than averg For .019 and .024 cable wires
3.0mm is large For .024 cable wires, or thicker cords, or bringing
more than 1 strand thru at a time
4.0mm and larger For thicker cords, or bringing 2+ strands thru
She came to me overwhelmed. She had bags and bags of jewelry, some in perfect condition, some not so much, some broken. Her aunt had died, and left her a lot of jewelry. That was years ago. Her mother had died more recently, and left her a lot of jewelry, and a lot of half-finished pieces and components and parts. Her mother had dabbled in jewelry making. And regrettably, three more family members, including a grandmother she was very close to, had recently succumbed to the corona virus. And each had left her more bags of jewelry.
She tried sorting these herself, but frustration got the best of her. She knew there were pieces she would wear herself. Other pieces she wanted to keep for sentimental reasons. Parts of pieces she thought she could do something with, re-purposing them. And lots and lots of fine and costume jewelry she wanted to sell.
She felt she needed some more help in sorting and evaluating what she had. She needed to know, What she should do, How she should do it, and Where she should go to do it.
Our consultation covered these considerations:
1) Etiquette
2) Organize and Sort
3) Clean, Identify Areas of Wear, Refurbish
4) Establish Value
5) Keep and Wear, or Keep and Store
6) Re-Purpose
7) Recycle
8) Sell
9) Donate
10) Throw Away
1) Etiquette
Her name was Danali. She was named after her grandmother and a great aunt. Danali felt very guilty and a few other awkward feelings as she thought about giving away or selling all this jewelry. She repeatedly asked herself, “Should I keep all of it?”
Did she have to keep it all? It was important to have this conversation up front. I told her she did not necessarily have to keep everything. The various people who gave her their jewelry would want her to be happy. She needed to do the things which made her happy, whether this meant keeping things, reworking things or selling things.
Was it her decision what to do with the jewelry, or should she involve other members of her family? Her brother asked her for some of it so that he could give it to his wife and daughter. Her step-father wanted to give several pieces to his second wife. I advised her to consider herself first. Some families have a tradition of passing down jewelry. What was her family’s tradition? Was giving some of it to her brother something she wanted to do? Since she wasn’t related to her step-father’s second wife, I told her that I found his desire to be a little unusual, maybe even creepy. Bottom line: the jewelry was passed down to her to make her happy. That had to be the guiding principle here.
She wanted to remake or sell some of the jewelry. Would she be violating someone’s legacy here? Again, I pointed out that she should do what makes her happy. That’s the legacy. Her deceased relatives wanted her to be happy and get pleasure from the jewelry which they had worn or created. Getting pleasure meant both financially and/or aesthetically. They left their jewelry to her because they trusted the decisions she would make. But that did not mean that every piece had to be preserved exactly or stored in some warehouse or safety deposit box or not be sold or shared with others.
Danali needed to talk about giving herself permission to make those particular choices which would make her happy. She needed to acknowledge to herself what she wanted to wear, what she wanted to repurpose, what she wanted to give away, and what she wanted to sell. This was important.
2) Organize and Sort
The next thing she and I worked on was to organize and sort all the pieces. There were a lot of pieces, and this took many hours spread out over several weeks, typically a 2-hour session at a time.
We went one bag or one box at a time. Within each bag or box, we went piece by piece by piece at a time.
For each piece, we created a simple written record: a) Description of piece to best of her and my ability b) What she preferred to do with the piece:
– keep and wear,
– keep and store,
– repurpose,
– cannabalize the parts,
– recycle,
– share with someone else,
– donate,
– sell,
– throw away
These became the sort categories for her jewelry.
c) What I thought the full retail price would be for the piece, if sold in a store. [More about establishing value later.]
In our descriptions, we examined each closely and paid particular attention to these factors:
1. The condition, both top-side and back-side, and whether both top and bottom sides of the piece were finished and detailed, or just one side
2. The type and quality of materials used, such as differentiating fine from costume jewelry, gemstone from glass from plastic, type of metal and if there was an accompanying stamp (like .925 or 14KT or GF), and the like
3. The craftsmanship, especially for hand-made pieces
4. For pieces with better quality gems, then their cuts, their visual qualities, and whether the gems alone were more useful and valuable than the piece as a whole
5. The quality and condition of the clasp and other connector features
6. Looked for evidence of the designer or brand, such as a signature or stamp
7. If there was any paperwork associated with the piece, from designer sketches to valuations to certificates of authenticity to insurance policies to sales receipts
8. For some pieces, we listed a style or decade or era it might be associated with, and wrote down the evidence we used to draw these conclusions
The GOOGLE LENS app will let you take picture of anything, and then search its image database. This was helpful in locating similar pieces, and seeing how they were described and valued. Sometimes we took a picture of the clasp or a particular cut of the stone to see what similar things and information we could find through Google.
With each piece, I had Danali ask herself these questions:
· Did you like it?
· Like it enough to want to keep it?
· Did she have space for it?
· Were other things very similar and duplicative?
· Would a photo of the item be a sufficient keepsake rather than the item itself?
· Could she create or recreate or repurpose something of pleasure and value from any of the parts?
3) Clean, Identify Areas of Wear, Refurbish
A lot of inherited jewelry needs some cleaning, and perhaps some refurbishing and repair. It is important to consider whether you think any particular piece will benefit from this extra effort. This is true whether you want to keep the piece or sell it.
Some jewelry will benefit from a soap and rinse with warm water and mild dish detergent. Other jewelry might need some polishing up, especially if it is made from sterling silver. Of note, plated materials will not polish up and be a shiny color again. Sterling silver will.
Typically, some stones are missing and need to be replaced. A clasp might be missing or might not work well any more. The stringing material may have deteriorated. Some parts of the piece may have chipped or broken off. It may be missing a part, such as the clutch for an earring post. Old rings may need new shanks. Chains may need to be soldered.
Costume jewelry will be particularly difficult to restore. The parts are usually made of materials that cannot be re-soldered. The materials used — beads, stones, findings — may no longer be available, or available in the particular colors available when the jewelry was first made. If the piece was plated, this plating has probably worn away. Re-plating may be difficult or too expensive, given the material value of the piece.
4) Establish Value
It is important to establish value for each piece. It is equally important to use a measure of value that can be standardized for all pieces, and that is understandable.
The value of any one piece of jewelry is not one particular number. It depends on the context. The value could be the price someone would pay for it in a store. It might be the price someone who sells jewelry is willing to pay for it, so that a profit could be made. It might be the value of the materials themselves, irrespective of the design. It might be the value people are willing to pay for pieces made by a particular designer. It might be a value at auction. It might have value only for the person who owns it.
There are several standards for establishing value. Four prominent ones include the following:
1) REPLACEMENT PRICE
2) ESTATE VALUE AT RETAIL
3) ESTATE VALUE AT WHOLESALE
4) INTRINSIC VALUE
Replacement Value. If you bought the same piece new today, what would its price be? This gives you the highest valuation. It is not the value of the piece itself. This value is the least accurate standard. However, it is a number that people can easily relate to. I like to start with the replacement value, because it is so meaningful to the client. And I give the client what are called multipliers — that is, a number to multiply the replacement value by in order to estimate what value they might really be able to get for their pieces, given where they are trying to sell them.
Estate Retail Value. This is the price a piece of jewelry would be sold at to an individual who is looking to purchase the used jewelry for themselves. This value links directly to the jewelry item. These individuals expect to save money compared with buying a similar item new.
There are many sources of estate jewelry. These include people who sell used, older or vintage jewelry through Craigslist, Ebay, various auction houses, garage sales, flea markets, or other online sites. There will be quite a variety here in pricing and pricing strategies. For price comparison purposes, I like to use prices I find on Ebay. I tell my clients to use a multiplier between .40 (representing a 60% reduction in value) and .70 (representing a 30% reduction in value), with .60 or 60% as a reasonable average estimate. So, they would multiply the Replacement Value by .40 to get at the Estate Retail Value.
If the Replacement Value was $100.00, then a reasonable estimate of the Estate Retail Value would be $100.00 times .60, or $60.00. This would be $40.00 less than the Replacement Value. Stated another way: if a similar new piece was selling for $100.00, then someone would expect to pay $60.00 for the used jewelry when purchasing that jewelry for personal use.
Estate Wholesale Value. This is the price a business which sells used jewelry is willing to pay. Businesses have to take into account many more costs — overhead, rent, maintenance, staffing — than individuals buying used jewelry. So these businesses will only be willing to purchase used jewelry at a considerably lower price than the Estate Retail Value. The jewelry these businesses need to purchase have to be resalable at a cost customers are willing to spend, and which also covers their operational costs plus a profit.
Businesses like antique stores, estate jewelers, pawn shops, even some boutiques, may purchase inherited jewelry for resale. You can anticipate that they will want to at least double, and probably triple, their cost to set their own price for their customers.
The Estate Wholesale Value is probably the best value for resalable jewelry which has been inherited. This assumes that most of the inherited jewelry will be sold to a business where that business intends to resell it.
The multipliers I suggest here are between .30 (70% reduction) and .50 (50% reduction), with .35 (65% reduction) as a reasonable estimate.
If the Replacement Value was $100.00, then a reasonable estimate of the Estate Wholesale Value would be $100.00 times .35, or $35.00. This would be $65.00 less than the Replacement Value.
Intrinsic Value. The value here is set by the value of the raw materials, usually less a small processing fee. This value yields the lowest price. This price may be lower than the actual price you might be able to sell your item, so think carefully. Typically the Intrinsic Value is the value of the raw metals and the gems. Style, condition, brand, market demand, among other factors, are not taken into account.
Refineries, Cash-for-Gold businesses, some fine jewelry stores will pay intrinsic value for inherited pieces. Be certain up front, with pieces made up of both precious metals and stones, whether the purchasing business will pay for both, or just one or the other. You may have to remove any stones before taking your pieces into these businesses.
There will be different payment rates for different metals, all based on weight. An average scrap rate for gold or sterling silver will be around 85% of the current market value less a processing fee, say $50.00. They will take the total weight of the metal, calculate the current value, multiply this by .85, and subtract a processing fee. This becomes the Intrinsic Value.
The intrinsic value for any gemstone is based on the wholesale price of the gem less any cost for re-cutting, re-polishing or otherwise refurbishing the stone.
Intrinsic metal prices are well publicized online. Intrinsic stone prices are not, and there will be a wide variation on this, so it is wise to shop around.
Other Value Considerations
There are other factors which may come into play:
– Whether the piece is currently in style or not
– Whether something makes it rare or coveted, such as by a particular designer or brand (look for stamped mark or engraved signature), or is an unusual design or uses particular stones
– Metal and gemstone prices fluctuate quite a bit, and you may be hitting the market at a low (or at a high) point
– The condition of the piece
And just because the piece is costume, not fine jewelry, is not a reason for dismissal. Many costume jewelry pieces are coveted and highly valued today.
OnLine Services
There are many online services which will value your pieces for you. Their fees and reputations will vary widely. Check their online reviews.
There are several national associations for appraisers. These require their members to adhere to a high standard of conduct. You should make sure your appraiser either is a member, or, if not, you know that person to be highly knowledgeable and reputable. This is because anyone can present themselves as an appraiser. There are no federal and state licensures.
An appraisal will
· Clearly state the value and the type of value
· Describe the item in detail
· List the procedures used to determine the value
· Specify the appraiser’s qualifications
· Have the appraiser’s signature
You will also find scrap metal calculators online which will be useful.
5)Keep and Store, or Keep and Wear?
Keep and store. For some pieces, you may want to keep them, even though you do not plan to wear them. They may have some sentimental value. They may have a personal story to tell. You might see yourself wearing them at some time, just not now, and are not ready to part with them.
I suggest keeping at least one piece from each loved one from whom you inherited the jewelry. Pick a piece they may have worn a lot, or worn on a special occasion, or represented their personal style.
You can also display pieces you love, but are not interested in wearing, say in a shadow box you hang on the wall.
Keep and wear. There are most likely many pieces you can see yourself wearing. It’s great to mix old and new pieces together with any outfit. Everything is a matter of styling and your personal taste.
6)Re-Purpose
A brooch becomes a pendant. A pendant becomes an earring. A necklace is remade into two bracelets. A very long necklace or a multiple strand necklace made into two or more necklaces. A shoe-clip becomes a clasp. There are many ways to re-purpose jewelry from one type to another.
You might also repurpose a pin into a curtain pull. Some earring drops into push pins or refrigerator magnets. Use in a mosaic. Embellish a cross stitch canvas. Create a bookmark. Decorate some sandals or sneakers. Use as drawer pulls. Decorate your cell phone. Add some pizazz to a purse or strap.
Lots of ideas. You can also do a search engine search, like on Google or Bing, using the keyword phrase “old jewelry into new” or “grandma’s old jewelry”.
7) Recycle
Sell your scrap. There are places, like refineries, cash-for-gold stores, jewelry stores, and the like, which will buy scrap for its intrinsic value. For metal scrap, they will weigh your pieces and you will get paid, depending on the weight, metal value, less a fee. For stones, places will evaluate their wholesale values, less costs for reconditioning or refurbishing, and less a fee.
Cannabalize the parts. You can break up the pieces of jewelry and reuse the components, beads, clasps and other parts in other jewelry making projects. The parts may have more value as parts than as part of the piece as a whole.
8)Sell
There are many places, both where you live, as well as online, where you can sell your pieces.
Locally, you might contact antique stores, boutiques, jewelry stores, salons or pawn shops. Most likely they will take your items on consignment (that is, you will be paid when the pieces sell). You might try a local flea market or marketplace. You might hold a garage sale.
Online, you might check out Ebay, Craigslist, Rubylane, Etsy, The Real Real (focuses on high-end jewelry), Worthy.com (diamond rings), Tophatter and other jewelry-specific auction sites. Take high resolution photos, at least 500 x 500 pixels in size. Provide good and thorough descriptions. You need to establish, through how you present your items, a high level of trust and credibility.
Ebay especially is a useful source for researching the prices your items might sell at. If you have several items which might only sell for a few dollars each, you can group them together into a “lot,” and sell them as a “lot”.
Be sure to list…
· Description, including anything of particular interest, using words your potential customers will connect with
· Condition, any flaws, any functionality issues
· Color
· Brand
· Size and dimensions
· Estimated value and the basis for that valuation
· List price, as well as minimum acceptable price
· Photos, at least 3 (front, back and side), and use a white background
These online sites will take a 10–15% of your sales price as a fee. There may be some other small fees involved. You should anticipate these fees, when setting your prices.
9)Donate
Let’s say you have a lot of jewelry you like, but doubt you would ever wear it. You don’t want to deal with selling the pieces. So you might think about donating them.
First, think about any friends or relatives who might appreciate these pieces. You could even hold a party and let people pick out the things they like for themselves.
Second, think about donating pieces to charity or nonprofit thrift shops like Good Will or Salvation Army. Other sites, I Have Wings Breast Cancer Foundation; Dress For Success; Support Our Troops; Suited For Change; New Eyes.
Make sure you get a donation receipt.
10)Throw Away
Of course, your last option is to throw the jewelry away.
You do this only after you have exhausted all other options.
I’m not proud to admit it, but I used to string things on fishing line and dental floss. It was there. I knew about it. I understood it. It was simple. Uncomplicated. Didn’t need directions. Didn’t need a 20-minute explanation about when these were used, and when they were not, or what they were used for, and what they were not.
Then I discovered Tiger Tail cable wire. This seemed magical, somehow. It was something more than fishing line or dental floss. It seemed strong. It was metal. It was masculine. You could swing from trees on it. You could tie up old planks together to secure them. You could string things on easily without a needle. You didn’t need glue. You didn’t need bead tips or knot covers. It tied easily to clasps. And although, it turned out, the Tiger Tail broke rather easily, I’d pretend like it never broke for me.
Luckily, today, beaders have been blessed with an abundance of stringing materials to choose from. Each has it’s pros and cons. Each much better than the choices I had a few decades ago.
When beaders and jewelry makers select stringing materials, they need to ask a lot of questions of the people who sell these products, as well as the people who use them. You’ll get a lot of contradictory advice. But you need a lot of information to help make your choices. For me, I prefer stringing materials that don’t break easily, allow pieces to drape nicely, move freely and correctly with the body, and are relatively easy to use. But don’t we all.
From a design perspective, you typically get your best results with needle and thread. Needle and thread projects always take the shape of your body. So they feel the best, move the best, and drape the best. However, needle and thread are very involved and time-consuming to do. Especially if you’re selling your stuff, it’s difficult to use needle and thread and expect to recoup your labor costs. As long as you know what the ideal is, however, it becomes a little easier to step back from the ideal, and compensate for any weaknesses through various design techniques and devices.
Threads, Needles, and More Threads
I discovered Nymo beading thread, Size #12 English beading needles, and Tiger Tail cable wire. This wasn’t a match made in heaven. I didn’t take to it like a duck takes to water. It wasn’t a piece of cake.
Have you ever seen a beading needle? They’re so thin. They have even thinner eye holes. First you learn that cotton sewing thread is round and sewing needles have round holes. Next you learn that nylon beading thread is flat like a ribbon, and beading needles have rectangular, narrow holes.
The shape of the eye-hole of a beading needle is like a funnel –one side of the hole is bigger than the other. If you are having trouble fitting that thread through the hole, turn the needle around. Try again.
I started with size #12 needles. I find #10 needles to be more useful for bead stringing and both #10 and #12 most useful for bead weaving. Proportionally, the eye holes in the #10 are much bigger than those in the smaller, thinner needles.
Major Beading Threads
NYMO thread is the granddaddy of them all. It comes in many colors and thicknesses. It doesn’t look like it, but it is one of the strongest things you can string things on. With NYMO, the black is stronger than the white. The white is stronger than the colors.
C-LON thread (also called SuperLon) is a relatively new thread. It’s similar to Nymo, but a little stronger. It comes in a lot of colors, but only a couple of thicknesses. In our store, if you came in for a Nymo product, and there was an equivalent C-Lon product, we would suggest you switch to C-Lon. With C-Lon, the colors and the white are as strong as the black. All are as strong as Nymo black.
ONE-G thread is made by TOHO. This is a premium nylon beading thread, and much more expensive than Nymo or C-Lon. I’m very fond of the strength of the thread, and the feel, give and take of the thread while I’m beading. It has a stretching quality to it that makes it less tiring to use on long projects. It’s my beading thread of choice.
SILAMIDE is a prewaxed thread. Lots of beaders love this. I’m not a big fan of this because it breaks very easily. Some people suggest that you double the thread to deal with the breakage issue, but I find it awkward to use a doubled thread. Even though Silamide is prewaxed, if you purchased it from us, we would tell you to wax it. There’s no waxy buildup on it, and this, we feel, is the major advantage of waxing.
When you use beading thread as your stringing or weaving material, you want to pass through each bead about 3 times. Most weaving techniques do this automatically as part of the step-pattern of the technique.
I advise all my students to wax their thread before they use it. The wax has these advantages:
Protects the thread from chemicals in the environment, including pollutants in the air, chemicals in a person’s sweat, and chemicals in cosmetics and hair sprays. Natural beeswax will protect the thread for 150 years. Synthetic beeswax provides protection for centuries more.
The hole of a bead looks like a broken coke bottle. The wax will fill in some of the jagged rim, lowering the risk of the hole cutting your thread.
Helps you maintain a tighter thread tension while you weave or string.
There are products called thread conditions. One brand, now defunct, was called Thread Heaven. When you keep pulling the thread through your beads over and over again, static electricity builds up. This results in the thread getting tangle up and knotted while you work. The conditioner prevents this from happening. Waxing will not.
You cannot use both products. You have to pick one. I suggest always picking the wax.
The Hybrid “Cable Thread”
Every year there are many new stringing materials. Many start as advances in fishing lines. One recent advance is what I call the hybrid “cable thread”. These are made from threads that are braided together (instead of braided wires as in a cable wire, see below) and encased in nylon,
Three brands — Power Pro, WildFire, and FireLine are very prominent. I especially like the FireLine.
You use these with needles, but do not have to wax them, though I suggest you do. You don’t have to go through your beads three times, like with the threads. Once is sufficient, though I sometimes go through 2 or 3 times to firm up the way the beads lay on the stringing material, and so the beads don’t wobble.
You don’t necessarily have to wax the FireLine, but a lot of people like to do this. The major advantage of waxing is that the wax protects the integrity of the nylon encasing. Cable threads are strong only to the point the nylon encasing is able to maintain the twist in the braided threads. As soon as the encasing is violated, the thread immediately untwists and breaks. You might pierce the thread with the needle as you are working your piece; the wax will melt into the hole and plug it. A pollutant in the air, or a chemical in someone’s sweat, or cosmetics or hairspray will make the nylon encasing deteriorate. Perfume oils will dissolve it. The wax provides a protective shield to minimize this happening.
If you wax it, this will increase your thread tension considerably. In most projects a tight tension is very desirable. With some very tight bead weaving stitches, like Peyote, cable threads may result in too tight a tension. Usually, I use regular beading thread with the Peyote stitch. With weaving stitches with loose tension, like Right Angle Weave or Ndebele, the cable thread’s tightness is an advantage, giving you more control over managing the thread tension as you work your piece.
Beading thread is flat and shaped like a ribbon. Beading needles have rectangular holes. FireLine, however, is shaped round. To make it easier to thread FireLine into a beading needle, you can flatten the end of the FireLine. I pull the end between two of my fingernails. You can also use a chain nose pliers to flatten the end. Then pop it into your needle. Don’t pull this through your teeth. It will cut into your teeth.
Pieces done with the cable threads lay stiffer and feel stiffer than the threads, like Nymo or C-Lon, but they drape and feel much better than the cable wires.
Many stringers and bead weavers have switched to cable threads.
Bead Cords
For some types of jewelry projects, you don’t want to cover and hide all the stringing material with beads. You might be putting knots between beads, or you might be doing macramé, braiding or kumihimo with beads, or you might be doing something like a Tin Cup necklace, where you have a cluster of beads, then some cord showing, then another cluster of beads, then more cord showing, and you get the idea.
In this case, if we used threads, the raw and waxed threads would be kind of ugly. Most cable wires, if showing, would be ugly. So instead, we use what is called Bead Cord.
Bead Cords are threads which have been braided together to make the stringing material look pretty. However, we don’t wax the bead cord to deal with issues like fraying or stretching. This would ugly it up.
Thus, when we use Bead Cord, we are trading off durability for appearance. If we were going to cover all the bead cord with beads, then this would not be the best choice of stringing material. You would want to use either a thread or cable wire, in this case.
There are many brands and qualities of bead cord.
Most people prefer Griffin Bead Cord, which comes on cards, and has a needle fixed to one end of the 2-meter long cord. There are many colors and thicknesses. It is available in Nylon and in Silk. I’d give this cord a grade of a “B”. What people like about this cord is that it comes with a needle attached on one end. This makes it easier to use when you are knotting between beads. It allows you to start with a thicker cord.
I recommend using silk bead cord if your project is all pearls or mostly pearls. I suggest using nylon bead cord if your project is very few pearls or no pearls. Unfortunately, every other type of stringing material, except the silk, will ruin the pearls. These other materials cut into the nacre around the pearl, starting at the hole, leading to cracking and chipping around the bead, thus ruining them. Only silk won’t cut into the pearls. Unfortunately, silk naturally deteriorates in 3–5 years, so anything you do on silk will have to be re-done every 3–5 years.
Nylon doesn’t deteriorate, so that’s why we suggest it for everything else. Now some people tell me things were always done on silk. I tell them nylon wasn’t always. But I can reverse hats. Say you’re selling your pieces. There’s more marketing cache if you say “it was strung on silk”, than if you said “it was strung on nylon.” You can make it your customer’s problem to re-string in 3–5 years.
Basically, at the same level of quality, the pros and cons of nylon and silk are the same. At the same quality level, they fray the same, stretch the same and get dirty the same. It’s just that the silk deteriorates and the nylon does not.
Bead cords are also used in knotting, macramé, braiding, bead crochet and kumihomo.
C-lon or S-lon (same thing, two different brand names) is the A-grade nylon. It comes in 4 thicknesses. It’s excellent.
Flexible Cable Wires
When I first started beading and making jewelry, I was not a big fan of thread. I was never one to sew. Needle and thread seemed so complicated. It took so long. The threads seemed to break. They frayed. They stretched. They got tangled up and they got knotted up. It was hard to see and keep in my field of vision a very thin thread on a very thin needle going through some very small beads. I poked myself with the needle. It made me cranky.
I turned to Tiger Tail cable wire. Cable wires are flexible wires that are braided together and encased in nylon. The wire is stiff enough to be its own needle. Stringing beads on a cable wire seemed so perfect. You only had to go through your beads once. The wire was stiff enough to be its own self-needle. Zip, zip. Fast, fast. For years, I made everything on cable wires. Always satisfied, never a complaint.
Today, there are many brands, qualities and distinctions of cable wires. There are easily over 24 choices. Each brand organizes its worst to best wires differently. None of the brands provides sufficient information on their labels to make a fully informed choice. It’s very confusing. It’s virtually impossible to compare across brands. You need to know the materials the braided wires are made of, the thicknesses of the finished wires, and the number of wires braided together within the cable, the material the nylon sheathing is made of, and the thickness of this sheathing.
The true measure of wire strength is called “tensile strength.” This is the amount of force it takes to keep the wire from untwisting within the nylon sheathing. Tensile strength depends on what the wire is made of, what the nylon sheathing is made of, and how thick and nonporous this nylon sheathing is. This information is not found on any of the labels.
On the labels of these products, the manufacturers list the number of strands braided together within the cable. This gives you some information, but not enough information to make a choice. You don’t know what the wire is made of, or it might say “stainless steel”, but there are hundreds of grades of stainless steel. They do not list what the nylon sheathing is made of, or how thick and nonporous it is. Some companies differentiate their lowest from highest qualities based on the number of strands. For example, one company’s low end is 7-strand and its high-end is 49-strand. However, other companies do not differentiate by number of strands. Another company’s 7-strand high end product is stronger and softer than its middle-range 49-strand product. It’s middle range 49-strand product is stronger and softer than that first company’s high-end 49-strand product.
A long time ago, manufacturers put “pound strength” on their labels. It’s on some labels, but not all. The actual pound strength numbers change more often than feels comfortable.
There are no government standards about measuring “pound strength.” Because of this, whenever you see “pound strength” on a label, whatever the product, you need to take this with a large degree of skepticism. First, there are two definitions of how to measure pound strength — (1) how heavy the fish is that the line will support, and (2) how much force the line will support when reeling in a fish of a given weight. But because there are no standards, it is up to the factory to put whatever they want. Most of these wires are made in total or in part in one factory in Taiwan. The person at the factory responsible for labeling pound strength many years ago never got it right, and never got it the same. One batch would show 20#, then the next time it might show 2#, then 5#, back to 20#, down to 10#. Since he could never get this right, the manufacturers asked him to leave this information off the label.
There are many brands of flexible, nylon coated cable wires. These cable wires can be grouped into three levels of quality:
— Craft (Tiger Tail) — Designer (Flex Wire) — Professional or Artist
I start people at the Designer (flex wire) quality cable wires. Most craft stores only carry the Craft quality. This is rather useless. Most bead stores carry the Craft and Designer levels, and sometimes the Professional or Artist level as well. The “best” level is extremely expensive, so I feel the beader or jewelry-maker needs to justify the extra expense when moving up to this quality. I’ve rarely seen a situation where the Professional quality was needed.
Tiger Tail was the original cable wire, and today it is the low-end product. It’s the Craft level wire, and all brands carry it. Often you don’t see the word Tiger Tail on the label. You can tell it’s Tiger Tail because it’s very cheap — substantially cheaper than anything else — usually under $5.99 for a 30ft spool. Tiger Tail wire breaks very easily in and of itself. The wire tends to kink. The way you should attach Tiger Tail to the clasp is to tie the wire into a knot or a double-knot. This gives you a very secure connection to the clasp.
Tiger Tail Cable Wire
Flex-wire is the Designer Level. Flex-wire (again available in several forms in each of the brand lines) is noticeably more expensive than the Tiger Tail — usually starting at $10.99 — $18.99 and up for a 30ft spool. It does not break easily in and of itself. It does not kink. However, it is very difficult to tie into a knot. So you have to use a crimp bead in order to hold the wire in place and secure the clasp. [I only recommend 2 brands — Soft Flex and Flexrite. These are very supple; the nylon sheathing has a high degree of integrity; they are very strong]
Flex wire cable wire
The way you use a crimp bead is that you take the wire and go through the crimp, through the clasp, then back through the crimp. You crush the crimp with a pliers (preferably a crimping pliers) to hold it into place. The major reason to use a crimp bead is to make your piece look more finished, than if you had tied a knot. However, it does make your piece less secure.
When you crush your crimp bead onto the wire, this flattened crimp becomes like a little razor blade. All jewelry moves. So your crimp is constantly trying to saw through your wire. On Tiger Tail, crimps easily cut through the wire, so that is why we suggest tying a knot. If you don’t like the look of the knot, you can either use beads on either end with large enough holes to swallow the knot. Or you can use a piece called a crimp cover and slip this over the knot, squeeze it shut, and it looks like you have a bead there.
With Flex-wire, this wire is so strong that we feel very comfortable recommending that you use a crimp bead on each end. However, and this is a big However, we DO NOT suggest that you use more than one crimp on each end. Sometimes your friends, or your mind, will tell you that if 1 crimp was good, then using 2 or 3 crimps on each end will be more secure. It’s not. All you are doing is adding razor blades. You’re increasing the chances that one of these crimps will cut through the wire.
If you’ve crimped correctly, one crimp on either end is sufficient. It doesn’t matter what the shape or the size of the crimp bead is. It doesn’t matter how heavy the beads are.
Cable wires come in different thicknesses.
For necklaces, you want to choose the thinnest wire that is the most durable. This is because the major design goal here is to have your necklace drape as best and as comfortably as possible. We suggest something around .014” or .015”. If someone sits at their desk and fidgets with the necklace a lot, then this thinner thickness will break. In this case, since durability is becoming an issue, the .018″ or .019″ will work fine.
For bracelets, you want to use the thickest wire that is most comfortable. Bracelets take a huge beating on a daily basis. We suggest something around .018” or .019”.
For eyeglass leashes, we suggest .024” or .019”. These take the most beating. You don’t want the leash or the eyeglasses themselves to break.
Cable wires are fast and easy. They are not as involved as using needle and thread. However, with the cable wires, the finished projects tend to be stiff. They don’t lay well. They don’t move well at all. If you make a bracelet with needle and thread, the bracelet, when worn, conforms to your wrist. If you move your wrist to the right, your bracelet also moves in the same direction to the right. If you made that same bracelet on cable wire, the wire takes the shape of a circle. Your wrist is actually oval. If you moved your wrist to the right, the bracelet done on cable wire would actually move in the opposite direction — to the left.
Lots of deep physics here. But the results are obvious, and often embarrassing. This most often happens with necklaces that turn around when worn, bringing the clasp front and off-centered, sometimes making the wearer look somewhat clownish.
Most brands of cable wire I find too stiff. They have major problems of draping and moving with the body. They lay on the body funny. Two brands I find particularly good, and these are the only brands I use, are Soft Flex and Flexrite.
Hard Wire
People use hard wire to make things like ear wires and clasps, earring dangles, chains, rosaries, coils and components, and wire-wrapped settings for stones.
But hard wire is not a stringing wire. You can’t simply put beads on it and attach the ends. The hard wire would bend and distort, but not return to its original shape, like a cable wire would.
There are many kinds of hard wire.
At the low end is called Craft Wire. Craft Wire is plated wire over steel or a brass alloy of steel. Craft Wire is bad for finished jewelry projects. It’s OK for practice. It’s OK for stationary objects like a beaded ornament. All jewelry moves. The plating doesn’t bond at all to steel. So when you bend the steel back and forth, the plating tends to wear off quickly. Also when you bend steel back and forth, it doesn’t take long before it breaks.
Craft wire, no matter the brand, tends to be packaged like the white spool pictured below.
Above Craft Wire is Plated Copper Wire. If you need to work with a plated wire, then Plated Copper Wire is a great product. There are many brands. The packaging varies but it never looks like that of the craft wire above. The plating and enameling bonds well to copper, so it takes a very long time to wear off. Also, when you bend copper back and forth, it takes a very long time to break. It comes in lots of colors and lots of metallics.
Higher in quality than plated wire is called “Raw” wire. In our store, we sell raw brass, raw copper, raw nickel. We sell sterling silver wire, fine silver wire, gold-filled wire and a new metal called argentium silver. Argentium is tarnish-resistant sterling silver.
The sizes of wire are measured by “gauge”. What Gauge means is that somewhere on earth there is a standard sized pipe. Gauge refers to how many wires will fit into the pipe. So, if you can fit 20 wires into the pipe, the wire is 20 gauge. If you can only fit 6 wires into the pipe, that wire is 6 gauge.
When buying wire, another choice to make is how HARD or stiff the wire should be at the start of your project. Wire is usually sold as “Hard”, “Half-Hard”, or “Dead-Soft.
With “Hard” hard wire, you can’t bend the wire. This is useful when making a hat pin or stick pin. You cut the length of wire you want. You take a metal file and file one end into a point. The wire is stiff, so it will easily puncture a hat or a fabric, without bending. However, if you wanted to make a loop on one end of the hard wire, say to make an earring dangle, you could not; it won’t bend.
With “Half-Hard” and “Dead-Soft” wire, you can manipulate the wire. You can twist it, bend it, curve it, wrap it, hammer it. Each time you manipulate the wire, you harden it. If you keep manipulating and manipulating the wire, it eventually hardens to the point where it is “Hard”, that is, unbendable. If you kept going still, the wire would become brittle and break.
Your goal as a wire artist is to find that level of hardness/softness where, after you manipulate the wire the way you want, you’ll end up with wire that keeps its shape, stays in place, or if it is holding a stone in, that the stone won’t pop out.
If I want to make an earring dangle by putting some beads on a wire, and bending one end into a loop so that I can hang it, if I started with “Half-Hard” wire, I would grab the end of my wire with a round nose pliers, twist my wrist to form the loop-shape, and let go of the wire with the pliers. I can trust that the loop-shape will keep its shape.
If I had started with “Dead-Soft” wire, however, and repeated this same procedure, the loop would open up and lose its shape. The wire is too soft. To start at “Dead-Soft”, I probably would have to grab the wire at both ends with vises or pliers, twist the wire until it started to harden, make a loop with a round nose pliers, and perhaps hammer on this loop a bit — all before I could trust that the loop-shape will keep its shape.
Most wire artists and how to books tell you to start at dead soft. Many of my students and customers who follow these directions have their bracelets pull apart, their shapes distort, their stones pop out of their settings. This is because they have not manipulated the dead soft wire enough to get it stiff enough. I suggest, either starting with half hard wire, or to twist the dead soft wire somewhat to stiffen it before you begin to shape it.
Plated Craft and Copper-Core wire typically comes as “dead soft”. It is up to the manufacturer to determine what that means. So, you will find that one company’s dead soft might be stiffer or softer than another’s. Typically, if I start at dead soft, I twist the wire or hammer it to harden it a little bit, before I start my projects.
Some Other Popular Stringing Products
Elastic String: People hate clasps. So they love this material. You put the beads on, tie a surgeon’s or square knot, put a drop of glue on the inside, then the outside of the knot, cut the tails, and that’s it. Comes in different colors, different thicknesses, different textures. Does deteriorate a little over time, and it does lose its memory. There are many brands. Some labels say they don’t deteriorate or lose their memory, but from experience, they all do.
The elastic string which is round lasts a long time. The elastic string which is flat like floss shreds rather quickly.
When using elastic string, you first take some super glue and coat the beginning 3/4″ to 1” of the string. Let it dry. Take a single edge razor blade and cut the end at an angle, so you have a point, and the end becomes a self needle. Put your beads on. Then tie a surgeon’s knot or square knot. As you tie your knot, put a drop of glue on the inside of the knot, pull tight, and put another drop of glue on the outside of the knot. Any glue EXCEPT super glue.
We suggest E6000 or Beacon 527, but, with this product, you can use school glue, rubber cement or elmers glue. Super glue dries like glass, so the bond becomes like a piece of glass. When you pull the string, the bond shatters like glass. Moreover, the broken bond looks like a piece of broken glass. The other glues dry more like rubber, so when you pull on the string, the bond acts like a shock absorber.
Elastic string can deteriorate in about 1–2 years, depending on its exposure to the air and sunlight.
Illusion Cord (monofilament): Basically a thin fishing line. Used to make illusion necklaces. Small crimp beads are used to hold clusters of beads in place. Not particularly durable. Any monofilament will dry out and crack from exposure to ultraviolet light and heat.
Hemp: Used with various macramé, micro-macrame, knotting and braiding techniques.
Irish Waxed Linen: Similar to hemp, but a higher quality. Used for more fashion-oriented jewelry that incorporates macramé, knotting and braiding techniques. In jewelry, the waxiness of this product draws dust and dirt to it. You might want to use, instead, an unwaxed bead cord for jewelry.
Leather: Always popular. Greek leather is the highest quality. Don’t shower in this. It makes the leather dry out and crack.
Waxed Cotton: A more durable leather substitute. It doesn’t have that great earthy smell of leather, however. Simply a waxed or glazed cotton wrapped around a nylon monofilament. You can shower in this.
Pearl Cotton #8: Used in making bead-knitted bags. 11/0 seed beads will slip over the Pearl Cotton #8.
Rubber Thong: Another leather substitute and more durable. Very soft to the skin.
Satin Cord (Rat Tail): A shiny, colorful cord that’s used to hang pendants from. Pretty. Frays relatively quickly. Not durable at all.
Organza Ribbon: The type of ribbon that you would string beads on. Use a Big-Eye needle to get your beads onto the ribbon.
Memory Wire: A stainless steel coil, like a slinky. Cut off some rings, put beads on, then, bend the ends. Caution: Memory wire will ruin all your jewelry tools. If you are using Memory Wire, then use industrial strength tools — things you would find in a wood-working shop.
Making money at fairs and shows isn’t as easy as it seems. As Roland and Rolanda quickly found out. They thought all it took was to rent a table at any show or fair, lay out their jewelry, wait for customers to come by, and purchase their stuff.
All through the shows, they sat on chairs reading books, waiting for people to come by. They spent more money on inventory, packing, displays and travel than they ever made.
And they never developed any kind of plan of action.
Roland and Rolanda needed to set realistic goals:
– (1) how much money did they have to get started and sustain themselves?
– (2) what was their break-even point?
– (3) what did they need to prepare themselves to “sell”?
(4) what amount of repeat business and follow-up sales were they looking for?
Typical Budget Items
BUDGET
How much money will you need?
Make a list of all possible costs. There are the obvious like transportation, lodging and meals, and the costs of displays, packing and marketing, and the costs of the parts used to make the pieces which sell.
Entry fees will vary widely from show to show. They cold cost $25/day up to $400 and up per day. They could go as high as $5000 per day.
If you have a specific craft show in mind, review their rules, and what they entry fees cover, and do not cover.
What are the costs of extras, like electricity, tables, special lighting? Do they also collect a percent of sales? Do they offer special services, like booth sitting, for extra fees? Is parking free, or do they charge? Do you need to provide additional insurance? Will you need to purchase special licenses, registration and permits, such as an out-of-state wholesale license?
THERE ARE TWO TYPES OF COSTS TO ACCOUNT FOR: Fixed Costs and Variable Costs
There are two types of costs: Fixed and Variable
You need to prepare a budget to be sure you can pay for what you are committing yourself to.
You will need display supplies, packing supplies, marketing and promotion supplies, and probably some food and drink for yourself. You will be traveling. You may have to stay overnight somewhere. You will probably have some credit card finance charges and cell-phone charges associated with sales you make. You may need to pay someone to help you staff your booth. You probably will be paying various fees — entry, electricity, table rental. And you will need enough money to buy enough supplies to make up your inventory.
Your breakeven point is when your revenues = your costs.
How much money do you want to make?
At the very least, you want to come home from the show and breakeven. That is, you want to cover all your costs.
So, in your budget, you have begun to list all your costs.
Now, how much inventory will you need to make, and sell, in order to breakeven?
Inventory: Bring 4x what you need to sell
At this point, we are going to talk about inventory in terms of retail prices, not in terms of numbers of items, and not in terms of wholesale costs.
Our total inventory would equal the total of all retail prices (=the prices you are selling each piece at), if every piece sold.
A good rule of thumb for figuring out how much inventory to bring is this:
You will need to bring with you, at a minimum, 4 times the inventory (=total retail dollars) you hope to sell.
YOU WILL NEED TO BRING WITH YOU, AT A MINIMUM, 4 TIMES THE INVENTORY YOU HOPE TO SELL.
For example, if you need to sell $200.00 of merchandise to breakeven, you will need to bring $800.00 of merchandise with you. Again, $800.00 is the total of all the retail prices of what you bring.
If you want to take in another $100.00 of sales on top of your breakeven, then you will need to sell $300.00 (=$200 + $100) of merchandise, and then you will need to bring a total of $1200.00 (=$800+$400) of inventory. This is $400.00 more inventory that you would need to bring to make one hundred more dollars over your breakeven point. Again, $1200.00 is the total of all the retail prices.
BREAKEVEN ANALYSIS
I want to introduce you to a quick and dirty breakeven analysis. I call this “Quick and Dirty” because we are using imperfect information. However, this imperfect information is good enough to help us make a decision whether a particular craft show is worth the risk.
Your breakeven point is where you have sold enough inventory to cover your costs. That is, the total retail dollars you have taken in equals the sum of your fixed plus your variable costs.
We use our quick and dirty breakeven analysis to answer the question: How much inventory do I need to sell in order to breakeven?
Let’s familiarize ourselves more with the components of the formula, and then review the math.
Examples of Fixed Costs
FIXED COSTS
Fixed costs are costs that remain the same, regardless of how many items you sell at your craft fair.
Fixed costs include things like fees, travel, food, and staffing. Again, you have to lay out this money for fixed costs whether you made no money at all, or made a bucket full of money at your craft fair.
Examples of Variable Costs
VARIABLE COSTS
Variable costs are costs that get incurred when each unit is sold.
Thus, variable costs fluctuate based on the number of units sold. If you seel very few pieces, your variable costs are small. If you sell a lot of pieces, your variable costs will be much higher.
Variable costs include special packaging and displays, brochures and business cards handed out with each sale, credit card fees you are charged by the banks after each sale, and the cost of the parts used to make each piece that has sold.
We estimate variable costs using some industry standards about the percent of total retail price these costs are associated with.
Tamaya Soul Necklace by FELD
NOTES:
When we calculate the cost of inventory, we differentiate between the cost of those pieces which we actually have sold from the cost of those pieces we did not sell.
For purposes of developing a budget and calculating a breakeven analysis, to help us decide whether a particular craft show is worth the risk, we focus only on the estimates based on what we sell.
From an overall business standpoint, because you will want to bring 4x the inventory of what you predict will be sold, and these additional out of pocket expenses associated with the pieces which would not be soldhave not been included in our breakeven analysis, you will need to be realistic, whether you can afford the show, or not.
Examples of Investment Costs
INVESTMENT COSTS
There are some additional costs you will incur which are also not included in our breakeven analysis. I’m going to call these “investment costs.” Investment costs are things you pay for which have to last a very long time, and which you will use at many, many craft shows.
These include “long term assets”, such as buying tables na dchairs, a tent, and display cases.
These also include “long term liabilities”, such as paying down loans and credit card charges over a longer period of time.
We do not include these investment costs in our breakeven analyses.
FIXED AND VARIABLE COSTS LAID OUT WITHIN A BUDGET TABLE
FIXED AND VARIABLE COSTS LAID OUT WITHIN A BUDGET TABLE
Say you will be doing a 2-day craft show out of town, 200 miles away from home. And you will need to hire 1 person to help you. Let’s look at our budget for doing this particular craft show.
You have budgeted for your fixed and variable costs as shown in the table above. I have plugged in some typical numbers into this budget table.
Our fixed costs are relatively easy to figure out.
Our variable costs, however, will have to be estimated. These variable costs are keyed off the retail prices you set for your jewelry. We will use some industry percent of price standards, as well as our breakeven analysis formula, to help us figure out the “TO BE CALCULATED” variable costs in our budget table.
Calculate Estimated Variable Costs Using Rates (aka, multipliers)
For example,
I have used 12% as the proportion of the total retail price that would be spent on marketing costs. These costs would include brochures, business cards, a post card mailing, some promotional ads, some effort to contact previous customers to let them know you will be at this craft show. The industry standard for marketing ranges between 5 and 15 per cent.
If you are getting started, you can use my numbers presented in this table. After you have done a few craft shows, you can begin to analyze your own sales and cost data, to develop what are called multipliers for each variable line-item category.
Again, our quick and dirty analysis is keyed off our retail prices.
I am assuming that you already know how to set fair and reasonable prices for your merchandise. If not, I would suggest reviewing my PRICING AND SELLING video tutorial.
BREAKEVEN ANALYSIS
LET’S TRY SOME MATH:
THIS IS HOW WE SOLVE THIS FORMULA:
Let’s review this breakeven formula application again, in English.
For those of you who haven’t had algebra, or are somewhat math-phobic, I want to go over the mathematical analysis in more English terms. It is important to understand the concepts, and to understand how to do the math.
First, we have the breakeven formula itself. Basically, it says:
100% of Breakeven revenue Equals The Total of all our costs.
Some of these costs are fixed, meaning we have to pay for them, whether we make any money or not.
Some of these costs are variable, meaning we only incur these costs when we sell something. The amount of variable costs “Varies” based on how much we sell.
We are trying to figure out how much we need to sell in order to breakeven. We can easily figure out our fixed costs. We estimate our variable costs as a percent of revenues.
In this particular example, Our fixed costs were $535.00. So, Y = $535.00 We estimated our variable costs as 65% of revenues. So our variable costs = .65 times X.
This is all the information we need to do the algebra in the formula and figure out our breakeven revenue=costs point, which we have called “X”.
We begin to re-state the formula as: 100% of revenue equals $535.00 + 65% of revenue.
So, we continue to play with the formula so that we get: Total Breakeven Revenues on one side of the equals sign, and everything else on the other side. We have to do this is a few steps.
We re-write the formula again: 100% of revenue minus 65% of revenues equals $535.00.
And we simplify this a little by writing the formula as: 100% minus 65% times revenues = $535.00
And simplifying the formula even more, we subtract 65% from 100% and get 35%, and the formula reads: 35% times revenues = $535.00
Since we want to end up with 100% of revenues on one side of the equation, and the dollar amount that this 100% equals on the other side, we have to do one more math step. To change .35X to 1X, we have to divide it by .35.
Mathematically, if we do something to one side of the equation, we have to do it to the other side, as well. That’s how we get: 100% of revenues = $535.00 divided by 35%.
And the answer is that our breakeven revenue, where our sales equals our costs, is $1528.57
So, to breakeven, we would need to sell a retail total of 41528.57 of merchansie at our 2-day show. To sell that much inventory, we would need to bring about 4x that much, or $6,000.00 of inventory with us.
While we do not include the costs of this additional inventory, and which we assumed would not sell, we still need to anticipate in our realistic goal setting process, the financial impact of all this.
Let’s update our budget table for this 2-day craft show example:
ONE MORE EXAMPLE
Now, let’s review our breakeven analysis with another example.
Say you are doing a 1-day craft show, close to home, low fees, you bring your own tables, and you don’t need electricity, and don’t need extra staffing. Also, you don’t plan on doing a lot of marketing.
First, you begin to set up a Budget.
Here we have fixed costs equal to $70.00.
Our variable costs we estimate to be 54% of our total revenues.
Next, we calculate our breakeven point, using our quick and dirty formula.
Breakeven Analysis Formula
We see our breakeven point is $152.17. And using our rule of thumb about how much inventory to bring, we need to bring 4 x $152.17, or about $600.00 of inventory.
The Next Question To Ask Ourselves: How Much Profit Do You Want To Make?
How much more money do you want to make above and beyond your breakeven point?
You don’t just want to breakeven. You want to make a profit. At our breakeven point, we have covered both our fixed costs and our variable costs. Our fixed costs are now all paid for.
As we bring in more addition revenues, we will have more variable costs to cover, and only based on how much more we sell.
Example 1 above: In our first example, our breakeven point was $1528.57.
In this example, 65 cents of each dollar in price that was earned was spent on variable costs, and 35 cents on each dollar earned was spent on fixed costs.
As we go beyond our breakeven point, and become profitable, again in this example, we would be spending only 65 cents out of each additional revenue dollar for variable costs.
We would have no more fixed costs.
If we had sold one more dollar, we would have had 35 cents remaining. We could have used that remaining 35 cents out of each dollar of additional revenue to pay for some of our investment costs, as well as pay ourselves something.
Profit Goal
How much of a profit goal you want to set is your personal choice. However, I like to tell students that breaking even at the show itself is OK, if you also have strategies in place to generate follow-up sales, either through repeat sales between shows, or repeat sales at the next show.
WHAT DID THEY NEED TO PREPARE THEMSELVES TO “SELL”?
Selecting and doing craft shows requires research and planning. And it requires an ability to keep up a good “Retail Personality” while standing on your feet for ong hours, sometimes when it’s too hot or too cold or too windy and dusty.
Selling Jewelry requires a different mind-set than Creating Jewelry. If you don’t have the personality for Selling, bring a friend with you who does.
WHAT AMOUNT OF REPEAT BUSINESS AND FOLLOW-UP SALES SHOULD YOU LOOK FOR?
A good goal to set is to generate repeat business equal to 25%. So, if you have 10 sales at the show, your goal would be to get 3 repeat sales. These could occur when the customer contacts you between shows. These could also occur at the next show you do, when the customer buys from you again.
You will make a might higher profit and experience better long-term outcomes, through repeat business. With repeat business, you can considerably lower your variable costs, particularly those associated with marketing. Because of this, that 2nd or follow-up sale is often more important than that 1st sale at the show.
Lesson 4 was to set Realistic Goals.
It is OK to start small. To start locally. To gradually take on bigger and bigger shows, while you are establishing your reputation and building a following.
You obviously want to keep your expenses to a minimum, and there can be some steep up-front costs, such as creating a sufficient inventory.
Starting small gives you a chance to test out your ideas about costs, whether you like doing craft shows, whether there is a good fit between your merchandise and the shows, and whether there is a good fit between your personality and doing craft shows.
When you start, you might be able to share booth space with another friend who has a business, and share some of those other fixed costs, like travel and fees.
Do your homework when selecting craft shows which fit well with your goals and your budget. Figure out your breakeven point, and how much inventory you need to bring to make a profit.