Learn To Bead

At Land of Odds / Be Dazzled Beads – Beads, Jewelry Findings, and More

Posts Tagged ‘warren feld’

Saying Good-bye! To Your Jewelry: A Rite Of Passage

Posted by learntobead on July 14, 2021

Canyon Sunrise, Necklace by Warren Feld, 2008

One of the most difficult things I have to do as a designer is say Good-Bye! to my pieces. I make something. I put it out there for sale. Someone buys it. I will probably never see it again. Yes, I can make another one, but that’s not the same thing. That’s not the point.

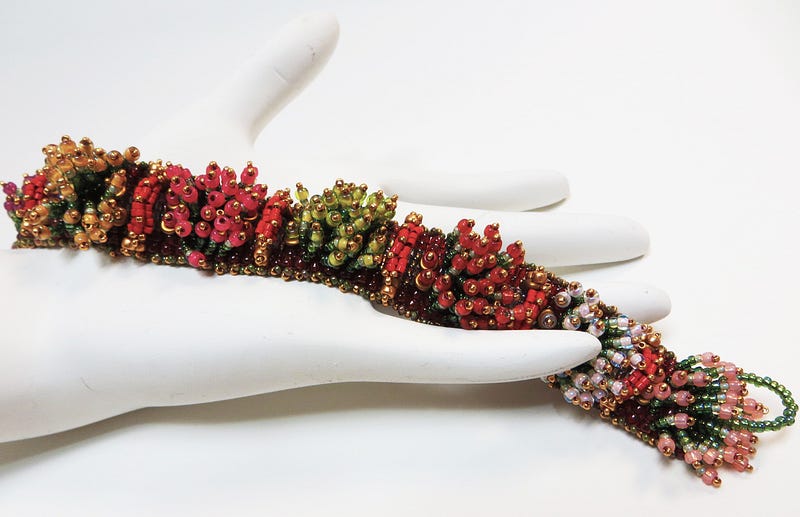
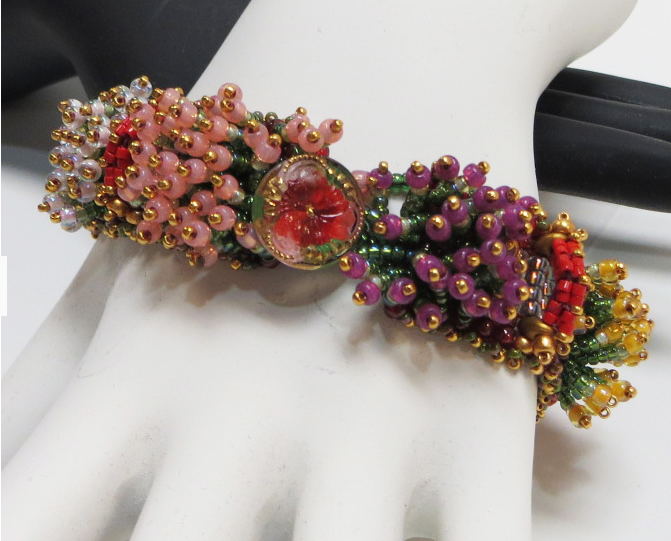
I submitted the necklace piece pictured above to a Swarovski Create Your Style Contest in 2008. The theme was be naturally inspired. My inspiration was this sunrise image of the Grand Canyon.

Grand Canyon at sunrise

I was selected as a Finalist. I was invited to their offices in New York City to attend the awards ceremony. I was so excited.

I had poured my all into this piece. Hours upon hours upon hours perfecting the stitching. Experimenting with using the stitching in a 3-dimensional way. Creating a curvature along the upper sides where normally it would be a sharp edge. Selecting a 5-color scheme and figuring out how to create sharper boundaries between colors when using Swarovski crystal beads. Varying the shape, size and type of beads used within the stitch. Designing a clasp assembly which I hoped looked like a mirror of the rising sun. None of these were easy tasks. Because the fully completed piece took about 100 hours to do and contained over $1500 worth of parts, I did all this experimentation and trial and error using 3″ long samples.

I had to send off my piece to New York prior to the ceremony. And from there, my piece would be flown to Innsbruck, Austria to reside in their Swarovski Museum.

I was proud. Got the big head and paraded it around. Shared my news widely, of course.

But when the day came to pack my piece up, … not a good day.

This day actually dragged on for a week.

First, I started with one jewelry box to place the piece in. Not satisfied. So another box. Not satisfied. And another box. Still not satisfied. I combed my jewelry packaging catalogs, and found 3 more choices I thought would work. I ordered these and had them shipped overnight.

Success. One of the three was perfect.

Next, I had to put this jewelry box into a larger shipping box. Easy to find a box. But my stupid brain could not come to grips with how I wanted to place the jewelry box into the shipping box. How much filler would I need? What type — paper, styrofoam, bubble wrap. Normally, I do not have difficulty making these kinds of choices. But not this time.

I would line the shipping box, sit the jewelry box in one direction, then stop. I would remove the jewelry box, change how I lined the shipping box, replace the jewelry box in another direction, then stop. I would remove the jewelry box, again decide differently how it was to lay in the shipping box, then try to line the box, cover the jewelry box, add some paper work, and seal the shipping box. Plastic tape or paper tape? Another delay while I decided.

I did not want to let go of my beautifully designed piece of jewelry. I let my next choice create a particularly high barrier. Which shipper?

The postal service was less expensive, but less reliable.

UPS was very expensive, more reliable, but what if they weren’t? It was going to New York City. How does any shipper reliability ship to New York City?

FedEx? Maybe, but I was not familiar enough with them.

Insure the package? For how much?

Certified? Signature required?

I struggled considerably over each choice. And I never struggle over these kinds of choices.

Well, at this point, my piece was in its jewelry box. My jewelry box was in its shipping box. My shipping box was sealed. I took my jewelry cum jewelry box cum sealed shipping box to UPS. The clerk had to pull it out of my hand.

And there it went.

Good-bye!

Don’t worry, it arrived safely.

I traveled to New York City for the ceremony. There was champagne and hor d’oeuvres. There were the other finalists mostly from America, but from other parts of the world, as well. There was even the Brazilian consulate general there to represent an artist from Brazil. We were all packed in the very, very bright and sparkly offices of Swarovski.

There was my piece. My Canyon Sunrise. Sitting pretty among the other pieces. Reassuring it was still there. It was in good company. I enjoyed listening to the comments of people as they admired it. I learned a lot from speaking and sharing with the other jewelry designers.

Canyon Sunrise won 4th place.

And, I had a chance to say Good-bye! one more time.

When I returned home, I immediately went to work on recreating my piece, but this time with another challenge. I took the same 5 colors I used in the original piece, and shifted the proportions around. I did not add a pendant drop in the center, nor did I recreate the elaborate clasp assembly in the back. But I had a physical piece — a cousin — to put on display with my other jewelry pieces. I could show people more than a photograph of the original piece. This was very satisfying. I was ready to move on to other projects.

Canyon Twilight, necklace by Warren Feld, 2008

Relinquishing Your Jewelry Design To Others: A Rite of Passage

One of the most emotionally difficult things designers do is saying Good-bye! to their designs as they hand them over to their client or otherwise expose their work publicly. The designer has contributed so much thinking and has spent so much time (and sometimes so much money) to the project that it is like ripping away an integral part of your being.

This is the moment where you want to maintain the conversation and engage with your audience, but look at this from a different perspective. Your relationship with your design is evolving and you need to evolve with it. Its innate intimacy is shifting away from you and getting taken over by someone else.

But you still have needs here. You want that client to ask you to design something else for them. You want the client to share your design with others, expanding your audience, your potential clients, your validation and legitimacy as a designer. And you want to prepare yourself emotionally to take on the next project.

Relinquishing control over your design is a rite of passage. At the heart of this rite of passage are shared understandings and how they must shift in content and perspective. Rites of passage are ceremonies of sorts. Marking the passage from one status to another. There are three stages:

(1) Separation

You pass your design to others. You become an orphan. You have made a sacrifice and want something emotionally powerful and equal to happen to you in return. Things feel incomplete or missing. There is a void wanting to be fulfilled. You realize you are no longer sure about and confident in the shared understandings under which you had been operating .

(2) Transition (a betwixt and between)

There is a separation, a journey, a sacrifice. The designer is somewhat removed from the object or project, but not fully. The shared understandings constructed around the original project become fuzzy. Something to be questioned. Wondering whether to hold on to them or let go. Pondering what to do next. Playing out in your head different variations in or changes to these shared understandings. Attempting to assess the implications and consequences for any change.

These original shared understandings must undergo some type of symbolic ritual death if the designer is to move on. Leverage the experience. Start again. As simple as putting all the project papers in a box to be filed away. Or having a launch party. Or deleting files and images on a computer. Or accepting payment. Or getting a compliment. Or having a closure-meeting with the client to review the process after it has been completed.

(3) Reincorporation

The designer redefines him- or her-self vis-à-vis the designed object or project. The designer acquires new knowledge and new shared understandings. There is some reaffirmation. Triumph. This usually involves a new resolve, confidence and strategy for starting new projects, attracting new clients, and seeking wider acceptance of that designer’s skills and fluency in design.

The designer has passed through the rite of passage. The jewelry or other designed object or project has been relinquished. The designer is ready to start again.

But as a designer, you will always be managing shared understandings. These most likely will have shifted or changed after the design is gone. And new ones will have to be constructed as you take on new assignments.

_______________________________

Thank you. I hope you found this article useful.

Also, check out my website (www.warrenfeldjewelry.com).

Subscribe to my Learn To Bead blog (https://blog.landofodds.com).

Visit Land of Odds online (https://www.landofodds.com)for all your jewelry making supplies.

Enroll in my jewelry design and business of craft video tutorials online. Begin with my ORIENTATION TO BEADS & JEWELRY FINDINGS COURSE.

Check out my Jewelry Making and Beadwork KITS.

Add your name to my email list.

_____________________

Other Articles of Interest by Warren Feld:

The Jewelry Design Philosophy: Not Craft, Not Art, But Design

What Is Jewelry, Really?

The Jewelry Design Philosophy

Creativity: How Do You Get It? How Do You Enhance It?

Disciplinary Literacy and Fluency In Design

Becoming The Bead Artist and Jewelry Designer

5 Essential Questions Every Jewelry Designer Should Have An Answer For

Getting Started / Channeling Your Excitement

Getting Started / Developing Your Passion

Getting Started / Cultivating Your Practice

Becoming One With What Inspires You

Architectural Basics of Jewelry Design

Doubt / Self Doubt: Major Pitfalls For The Jewelry Designer

Techniques and Technologies: Knowing What To Do

Jewelry, Sex and Sexuality

Jewelry Making Materials: Knowing What To Do

Teaching Discplinary Literacy: Strategic Thinking In Jewelry Design

The Jewelry Designer’s Approach To Color

Point, Line, Plane, Shape, Form, Theme: Creating Something Out Of Nothing

The Jewelry Designer’s Path To Resonance

Jewelry Design Principles: Composing, Constructing, Manipulating

Jewelry Design Composition: Playing With Building Blocks Called Design Elements

Contemporary Jewelry Is Not A “Look” — It’s A Way Of Thinking

Posted in Art or Craft?, art theory, bead weaving, beads, beadwork, business of craft, color, craft shows, creativity, design management, design theory, design thinking, jewelry design, jewelry making, Learn To Bead, professional development, Stitch 'n Bitch, wire and metal | Tagged: , , , | Leave a Comment »

Bead Weaving An Arch -The Japanese Fragrance Garden Bracelet Project

Posted by learntobead on April 17, 2020

JAPANESE FRAGRANCE GARDEN BRACELET

PLANNING YOUR PROJECT
 Thinking about the types of choices made for this project

The Japanese Garden Bracelet is a fun project that students love. It is for students who have some familiarity with bead weaving. I had been experimenting with various strategies for bead weaving an “arch” shape (parabolic arch) which can keep its physical shape while the bracelet is worn. Not an easy task. It has required hours and hours of trial and error. The final choices here were influenced by the architecture of Antonio Gaudi, building a column in segments, and then forcing it into a tight arch configuration.

This project is also a good example of how you can use a natural setting for inspiration. This setting influences color choice, color positioning, as well as shape and its placement. This is the image that inspired this piece.

In this fragrance garden landscape, we see the red moon bridge over a glistening pond of water. Commonly used Japanese garden plants that unfurl flowers include peony, chrysanthemum and, near water features, Japanese water iris. Flowering shrubs include azalea, camellia and hydrangea, all of which provide strong winter interest.

We feel that each plant, walkway, stone and other related elements have been deliberately placed, some shaped and others allowed to grow at will. Japanese gardens are designed to express their cultural values and philosophies. The gardens express the fragility of existence as well as time’s unstoppable advance. I believe the Japanese Fragrance Garden Bracelet captures all this.

It is important, I believe, for a contemporary piece of jewelry to have a sense of dimensionality, movement, and a strong use of color. In contemporary pieces, we also want some sense of the violation of straight lines and flat planes.

MANAGING SUPPORT SYSTEMS AND OTHER ARCHITECTURAL ISSUES

Whenever you create a piece of jewelry, it is important to try to anticipate how your choice of techniques and materials might positively or negatively affect how the piece moves and feels when worn, as well as your piece’s overall durability.

Towards this end, it is important to redefine your techniques and materials in architectural terms. The important term or concept we think about when we begin our piece is called a “Support System”. A support system is anything that gives your piece “jointedness”, that is, allows the piece to move easily when worn, and allows the piece to adapt to the negative forces any movement places on your piece, making your piece feel more comfortable to wear and more durable.

The bridges are basically parabolic arches.

Parabolic Arch
Parabolic Arches by Antonio Gaudi

Antonio Gaudi is a famous architecture from Barcelona, Spain. Much of his fantastical work is organized around and supported by parabolic arches.

The arch is made up of a series of stacked stones, each fitted together, then shaped. They way these segments are pieced together supports the shape, and this shape supports the weight of the structures resting on them. I tried to mimic his architectural/construction ideas with bead weaving.

After a lot of trial and error, my “arch” (which is called a “bridge” in this project) is constructed using 2-stack ladder stitch. It is made up of 4 ladder stitched components. Within each component, all the beads need to be very tightly stitched together. Between any two components, the stitched connection needs to be looser. When the bridge is attached to the foundation of the bracelet, a 15/0 seed bead is wedged between each of the 4 ladder stitched components to force that arching shape, and keep that arching shape, no matter the stresses or strains put on the bracelet when worn.

The Ladder Stitch and the Bridge Construction

The bridge is constructed using a 2-drop ladder stitch. “2-drop” means that we pick up 2 beads at a time, and treat them as “one”.

Each 2 beads or drops is referred to as a “stack”.

The ladder stitch is used to connect stacks.

The bridge consists of 4 connected stacks.

The 4 connected stacks are, in turn, connected together into what is called a “Column Segment”.

Each bridge consists of 4 connected Column Segments.

All the beads in any one column segment should be tight enough to “move as one”.

The connection between any two column segments is looser, so they can move somewhat independently, and thus be able to bend into an arch.

STEP:Making the Bridge

Column Segment Component 1 of 4

Start with 3–4’ of thread. Wax your thread.

Pick up 4 COLOR Q (11/0 delicas).

Slide these beads down to one end, leaving 6” tail.

STEP: Create 2 Stacks

Return through the first bead added, and continue through the other three beads to make a circle.

DOUBLE CHECK that you still have your 6” tail.

With your fingers, push beads together so that you have 2 stacks of 2 beads side by side.

Take the tail and the working thread and tie an overhand knot. This will make getting started to create your column segment easier to manage.

Take your needle through 1 stack so it is exiting the opposite side from the tail.

STEP: Add 3rd Stack, Column Segment One

Pick up 2 more COLOR Q.

Make a “circle” by returning through the opposite side, exiting where you started.

STEP: Secure 3rd Stack

Continue your “circle” through the 2-bead-stack you just added.

STEP: Add 4th Stack, Column Segment One

Add 1 more 2-bead-Stack.

Pick up 2 beads.

“Circle” back through the previous Stack.

Return through the new stack.

STEP: Connect 4th Stack to the 1st Stack To Finish Column Segment Component

Attach the last Stack to the first to create a column segment.

Fold the stacks so that two stacks are sitting in front of the other two stacks.

“Circle” through first 2-bead stack, back through the last 2-bead stack.

NOTE: If you are not on the opposite side of the tail, keep circling until you are.

Tighten this up.

You are now positioned to add the 2nd column segment to our bridge component.

Create Column Segment 2 of 4

STEP: Create 2nd Column segment

Pick up 4Q.

Return back down the previous stack.
 [Pick up 4 beads]
 [Down 2 beads]

Pull tight.

You should have 2 new stacks sitting on top of 2 existing stacks.

STEP: Return

Return back up the original stack, and the new 2-bead stack.
 [Up 4 beads]

STEP: Circle around two new Stacks

Circle around the 2 new stacks, exiting where you started.
 [Down 2 beads, 
 then up 2 beads]

Pull tight.
 You can push the new paired stacks towards the first column segment beneath it.

STEP: Add 3rd Stack to 2nd Column Segment

Pick up 2Q.

Return back down through (un-topped) Stack in previous column segment, (in this case, 1st column segment).
 [Pick up 2 beads]
 [Down 2 beads]

STEP: Return

Return up through remaining “untopped” Stack in previous column segment (in this case 1st column segment).
 [Up 2 beads]

STEP: Add 4th Stack to Column Segment 2

Add 4th Stack to 2nd column segment.

Pick up 2Q.

Return through previous stack in new column segment (in this case segment 2)

[Pick up 2 beads]
 [Down 2 beads]

NOTE: Do NOT travel all the way down through column segment one.

STEP: Secure Stacks

Your thread is exiting the bottom of a 2-bead stack.

a. Return back one more stack to the previous stack. Come up this stack.

b. Come forward one stack. Go down this stack.

c. Go forward and up the next stack.

d. Continue forward, going down the next stack.

e. Return back one stack. Go up this stack.

[BACK ONE, FORWARD THREE, BACK ONE:

Return back one stack.
 Up 2.
 Go forward one stack.
 Down 2.
 Go forward one stack.
 Up 2.
 Go forward one more stack.
 Down 2.
 Return back.
 Up 2
 ]

  • *REALITY CHECK:
     If you created the thread path correctly, all 4 stacks in new segment (in this case segment 2) should be connected.
     You cannot push any stack aside like you would opening a curtain drape.

STEP 29: Add 3rd and 4th column segments

Completed bridge with 4 column segments

Repeat the pattern in STEPS 22–28.

NOTE: Remember: You are securing the new column segment to the previous column segment only.

NOTE: So, when adding 3rd column segment, you begin by picking up 4Q, returning back down 2-bead stack in column segment 2.

DO NOT go all the way back through column segment 1.

Other Articles of Interest by Warren Feld:

Pearl Knotting Warren’s Way

Mini Lesson: Making Stretchy Bracelets

Mini Lesson: Making Adjustable Slip Knots With Thicker Cords

Mini Lesson: How To Crimp

Mini Lesson: Attaching End Caps, Cones, Crimp Ends

Mini Lesson: Brick Stitch

Mini Lesson: Flat Even Count Peyote

Mini Lesson: Ndebele Stitch

Mini Lesson: Petersburg Chain

Mini Lesson: Right Angle Weave

I hope you found this article useful. Be sure to click the CLAP HANDS icon at the bottom of this article.

Also, check out my website (www.warrenfeldjewelry.com).

Subscribe to my Learn To Bead blog (https://blog.landofodds.com).

Visit Land of Odds online (https://www.landofodds.com)for all your jewelry making supplies.

Enroll in my jewelry design and business of craft video tutorials online.

Add your name to my email list.

This Japanese Garden Bracelet is available as a kit from Land of Odds online.

Posted in Stitch 'n Bitch | Tagged: , , , , | Leave a Comment »

BEZELWORKS PENDANT Workshop by Warren Feld, 4/12-13/2014

Posted by learntobead on February 7, 2014

Center for Beadwork &  Jewelry Arts:  Workshops

CBJA

WORKSHOPS

Warren Feld

BEZELWORKS PENDANT

2-Day
Workshop

Sat/Sun, 4/12-13/2014,

10am-5pm, Sat

10am-4pm, Sun

(with a break for lunch)

Held at

Be Dazzled Beads

718 Thompson Lane, Ste 123

Nashville, TN 37204

FEES: $90.00 plus supplies[Optional Kit available for purchase from instructor.Olive Fire Agate, $135.00]

Registration
Deposit: $90.00

The instructional
fee does not cover the cost of supplies
.

You may register
in person at Be Dazzled Beads, or by phone with a credit card (615-292-0610),
or by mail with a check to 718 Thompson Lane, Ste 123, Nashville,
TN 37204

limited to 12 registrants

registration
by

March 24th, 2014

beadschool@
landofodds.com

615-292-0610


CENTER for BEADWORK & JEWELRY
ARTS
718 Thompson Lane, Ste 123
Nashville, Tennessee
37204
PHONE:  615-292-0610
FAX:
615-292-0610
www.landofodds.com
/beadschool/

beadschool@landofodds.com

Location,
Lodging,

Access by Car, Plane

Center For Beadwork & Jewelry Arts - beadworking and jewelry-making classes
Be Dazzled Beads and
The Center for Beadwork & Jewelry Artsin Nashvile, Tennessee

welcomes

Warren Feld

April 12-13, 2014

10am-5pm Sat (with break for lunch)

10am-4pm Sun (with break for lunch)

BezelWorks Pendant


Intermediate/Advanced Level

2 Days

Saturday – Sunday, April 12-13, 2014, 10am-5pm
(Sat), 10am-4pm (Sun)

(with a break for lunch)

FEES: $90.00 plus supplies

[Optional Kit available for puchase from instructor.

Olive
Fire Agate, $135.00
]

Registration
Deposit: $90.00

Registration by March
24th, 2014

BezelWorks Pendant


Guest Instructor:  Warren Feld

Intermediate/Advanced Level

Wear that mystical, bead-bezeled stone close to your heart!  Use tubular
peyote, circular peyote, and spirtal tube Ndebele stitches while
exploring design ideas about fringe, edge, bail, surface embellishment and strap.


The BezelWorks Pendant has a Center Piece, around which we create a
bezel or frame, then do some edge and surface embellishment. Attached
to this Center Piece is a bead woven butterfly bail. This piece
hangs from a bead woven strap. For the bead artist working from
an Art perspective, the frame, embellishment, bail, and strap should
be seen as supplemental to the center piece. But if working from
a Design Perspective, all these components should be seen more wholistically.

So, not only will we be creating a beautiful piece in this workshop.
We will also be discussing the implications for the choices we make
about each element or component for creating a successful and satisfying
piece. This includes our choices about managing the transition from
one element to the next.

The techniques we will be applying in this piece include:

– tubular peyote, open back bezel
– circular peyote
– fringe
– tubular spiral ndebele

Art or Design?

If jewelry is “art”, is the entire piece the art, or only
the center piece, or central focal part the art? Classical art theory
holds that the fringe, strap, edging, bail, and other similar parts
should supplement or support the center piece or focal center. This
theory holds that these jewelry structures are not art. They should
function like a frame to a painting, or a pedestal to a sculpture.

It is, however, often difficult to separate the jewelry’s anatomy like this, with
one part important and the other parts supplemental. This BezelWorks
Pendant project is, in part, designed to foster ideas, discussion
and debate about the roles of fringe, edge, strap, bail and surface
embellishment. Each of these is critical to the finished piece.

For each of these anatomical parts or extensions to our piece of jewelry, we
need to understand it in terms of:

– What it is, its purpose, its role

– What value it has to the piece

– How it makes the piece more or less satisfying

– What principles should regulate it

– Whether it is part of the art or not


Center Piece

The central project: A BezelWorks Pendant, with open-back peyote bezel. How
do we go about designing an aesthetically pleasing, well-functioning,
center piece? What functions does the center piece serve? How do
we make choices about size, design, proportions, placement?

Edge, Frame, Boundary, Line 

The Center Piece has a bezel, creating an interior edge encircling our stone. In
addition, the we weave a frame around the entire Center Piece, creating
an additional key edging component.

Edging is used to give a finished look to the piece. It might be used to hide threads.
It might be used to hide any irregularities in how beads line up
or are juxtaposed. An edging strategy is especially critical, however,
for creating, preserving, blurring, or otherwise affecting the boundary
line, line curvature, and/or silhouette of the center piece or the
piece of jewelry as a whole.

What role does the “border” of a piece play? Does it mark a beginning/ending?
How does it help the viewer appreciate the emotional content of the piece?

What kinds of positioning issues are associated with the placement on an edge,
boundary, border or line?


Fringe and Surface Embellishment

We weave Fringe Embellishment off our Frame. So what exactly is fringe, and what
can fringe be? How does the fringe make the piece more or less satisfying?
There are numerous possibilities.

 In good jewelry design, the Fringe and/or other Surface Embellishment would play
either a supporting, or a co-equal role, with the center piece.
It would not overwhelm or be overdone. It would seem as if the fringe
were organic part of the piece. It would not seem like an afterthought.
If it’s primary purpose is to hide flaws, no one should notice.
Too often, designers overdo the fringe.

Straps

The Center Piece hangs from a thin, twisted Ndebele tube Strap. What are the visual
and functional purposes of the strap? What should the strap look
like? How should the strap be connected to the piece? Where should
the strap be connected to the piece? To what extent is or should
the strap be as an integral part of the piece of jewelry as art?
How does the strap define a silhouette? How does the strap make
the piece more or less satisfying?

Bails

In our piece, a Bail is connected directly to the Center Piece, and the strap
moves through it. A bail changes the visual and artistic relationship
between the strap and the center piece. How might this be helpful,
and how not? The bail poses similar design challenges as the strap
— size, proportion, placement and attachment. However, it has to
succeed at one additional task — it has to control the visual,
aethestic and functional transitioning between the center piece
and the strap.

The Canvas

We have two things which serve as “Canvas”. The most obvious is the
stringing material. In this project, we use beading thread for some
parts, and a cable thread for others. The other part which serves
as “Canvas” are the woven beads which for the basis of
our Frame, and off of which we add Fringe.

The “canvas” in a piece of jewelry may be the stringing material, and how it
is worked off of. It might be another piece of beadwork, such as
a beaded base, off of which some center piece is developed. It might
be a core line of beads. It might be a piece of fabric or other
material. How does the canvas influence the interpretation of jewelry
as art? How should the canvas interact with the main piece and its
components? To what extent should it become part of the artwork
itself; and to what extent, not? Classic Art theory suggests that
the canvas should NOT be a part of the artwork at all.

What Techniques Students Need To Know Before The Workshop

The skill level required: Intermediate/Advanced. The student must be
comfortable with tubular peyote and the ndebele stitch.

Additional workshop information found here.

About Warren Feld

www.warrenfeldjewelry.com

Artist’s Statement: 

WARREN FELD
Jewelry Designer

Director, Center for Beadwork & Jewelry Arts and www.LearnToBead.net

For Warren Feld, Jewelry Designer, beading and jewelry making endeavors have been wonderful
adventures. These adventures, over the past 25 years, have taken Warren from the basics of bead stringing and bead weaving, to wire working and silver smithing, and onward to more complex jewelry
designs which build on the strengths of a full range of technical skills and experiences.

He, along with his partner Jayden Alfre Jones, opened a small bead shop in downtown Nashville, Tennessee, about 20 years ago, and called it Land of Odds. Over time, Land of Odds evolved from a bricks and mortar store into a successful internet business —www.landofodds.com
. In the late 1990s, James and Warren opened up another bricks and
mortar bead store — Be Dazzled Beads — in a trendy neighborhood of Nashville called
Berry Hill. Together both businesses supply beaders and jewelry artists with all the supplies and parts they need to make beautiful pieces of wearable art.

In 2000, Warren founded The Center For Beadwork & Jewelry Arts (CBJA) — www.landofodds.com/beadschool. CBJA is an educational program, associated with Be Dazzled Beads in Nashville, for beaders and jewelry makers. The program approaches education from a Design Perspective. There is a strong focus here on skills development. There are requirements for sequencing the
student’s classes; that is, taking classes in a developmental order. There is a major emphasis on teaching how to make better choices when selecting beads, other parts and stringing materials, and how
to bring these altogether into a beautiful, yet functional piece of jewelry.

Location,
Lodging,


//
//

Posted in beadwork | Tagged: , , , | Leave a Comment »

VOTE FOR ME

Posted by learntobead on January 20, 2011

VOTE FOR ME

I entered my jewelry work in a contest called ARTISTS WANTED: A YEAR IN REVIEW. There are many judging levels to the contest. One of them is a public review. The public is asked to judge and rate the collection online. If you have the opportunity, I would appreciate if you would visit the website. At the top right corner, are a five star rating system, with 5 as the highest score. Voting ends around February 8th.

Go to:
http://www.artistswanted.org/oddsshop

Thanks — Warren

Posted in Contests, jewelry design | Tagged: , , , | Leave a Comment »