


JEWELRY DESIGN TIPS: Bead Stringing With Needle and Thread
Posted by learntobead on April 19, 2020

CHOOSING STRINGING MATERIALS
There are many types of stringing materials to choose from. Each has its own pros and cons. These types include,
o Beading Thread
o Flexible Nylon Coated Cable Wires
o Cable Threads (a hybrid between the cable wires and the beading threads, such as FireLine)
o Bead Cord
o Elastic String
o Hard Wire
The primary choice is between needle and thread vs. cable wire.
You always get your best design or functional outcome with needle and beading thread. Projects strung on thread always take the shape of your body, so they move with the body, drape the best, feel the best. Needle and thread, however, is very involved — you have to use a needle, you have to wax the thread, you typically go through each bead at least 3 times. If you are trying to sell your pieces, it is almost impossible to get your labor out of a needle and thread project.
Flexible, nylon coated Cable Wires are much simpler and quicker to use. But the outcomes tend to be stiff, not move as well, or drape as well. However, by adding support systems, such as rings and loops, within your piece — ways to increase jointedness — you can make your cable wire project function a little more closely to that of needle and thread.
In terms of other stringing materials, cable threads (such as FireLine) often offer a good compromise between the functional qualities and marketing concerns of needle/thread and cable wire projects.
Bead Cords are threads braided together so they look pretty. Bead Cord is used when you want your stringing materials to show, such as when putting knots between beads, or doing something like a Tin-Cup necklace, where you have a cluster of beads, and the cord shows, another cluster of beads, the cord, and so forth. Bead Cord trades off durability for visual appearance. If you were covering the whole string with beads, you would not want to use bead cord.
Elastic String is very popular, and avoids the issues of attaching clasps; however, it is not a durable product and loses its “memory” over time.
A last choice is hard wire. Hard wire is not a stringing wire. You can’t put a strand of beads on hard wire and attach a clasp; the metal wire will bend, kink and break from bending back and forth. Hard wire is used to create structural components, chains or shapes, which you can begin to link up, that is, build in support systems, in order to construct a bracelet or necklace.
Basic Steps: Using Needle and Thread to String Beads
Needle/Thread Bead stringing is a technique for securing a clasp to beads strung on beading thread or cable thread. Here you tie knots to secure your beadwork to your clasp. The process is relatively simple and requires only a little practice.
Successful Needle/Thread Bead Stringing requires that you understand the following:
1. Which threads or cable threads are best for which projects
2. Which needles work best
3. How to wax your thread
4 . How the materials you use affect your success
5 . The mechanical process itself, how it works, why it works, and why we do each step
THE BASIC STEPS:
With needle and thread, you always go through your beads 3 times. In a bead strung piece,that means you are going to take your needle and thread back and forth 3 times.
In fact, we are going to do everything in 3’s. We are going to go back and forth 3 times. As we get to each end,we are going to tie 3 knots.
- Create your pattern.

2. You would cut your thread — about 6′ (a wingspan).
3. Lay out all your beads and the clasp assembly parts on the bead board or some other work surface, in the order they are to be used.
4. Thread your needle.
5. Wax your thread.
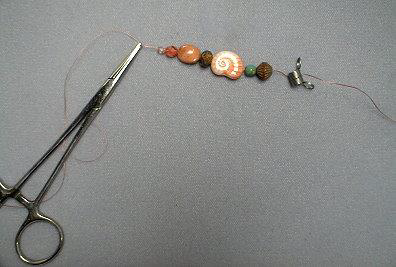
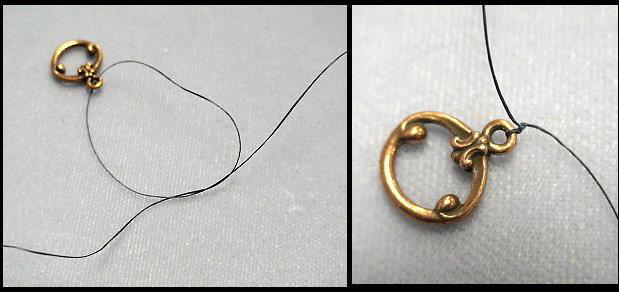
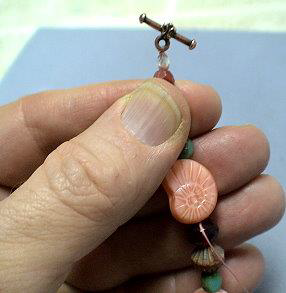
6. You would attach the largest part of your clasp — with Toggles, this is the ring — on one end, tying three overhand knots, and leaving a 8–10″ tail.
7. Slide on your beads, following the pattern.
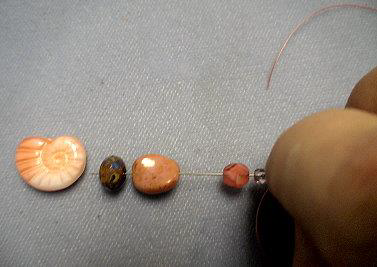
NOTE: We only slide the beads over the thread spine, not the tail. With needle/thread work, we deal with the tails at the very end. They will be annoyingly in the way until then.

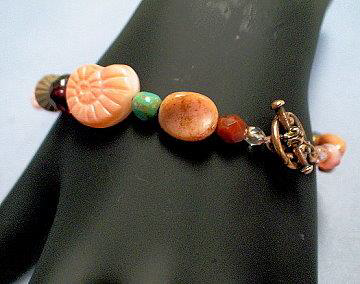
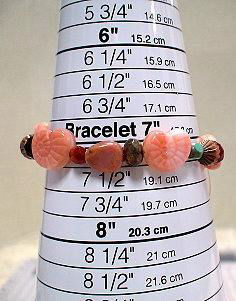
8. Determine the fit — both length and ease — by clamping or holding with your fingers the open end, and encircling a sizing cone or someone’s wrist with your bracelet. Remember here that the other end of the clasp will add another 1/2″ to this length.
Adjust the number or patterning of beads, if necessary.
NOTE: You need to make all your size and patterning adjustments BEFORE you attach the 2nd part of the clasp.
9. Tie off the other clasp-component — with the Toggle, this is the bar — making three knots.
10. Bring your needle/thread back to the ring side, and tie three more knots.
11. Bring your needle/thread one more time back to the bar side.
12. Tie three more knots.
13. Bring your needle/thread back through towards the ring about 1 1/2″ to 2″.
14. Tie 3 more knots.
15. Finishing off the tail. We want to see if we can pop any excess threads or knots which are showing back into the hole of that first bead.
Pinch the beads under the clasp and pull away from you while you grasp your thread and pull this towards you. Sometimes you will feel or see a pop.
Trim the tail.
16. Thread the tail on the other side of the bracelet onto a needle, and repeat these last two steps.
HOW TO USE NEEDLE AND THREAD
To String a Bracelet, Including How to Wax Your Thread
There are many different types of stringing materials. The best outcomes are achieved using needle and thread. Beading threads are nylon. Most are shaped like a thin ribbon, rather than round, like sewing thread. Most are bonded, rather than twisted, fibers, which adds a lot of what is called “abrasion resistance.”
With beading threads, your stringing will be the strongest, it will last a long time, it will feel supple and soft, and it will drape and wear the best. It will take the shape of the body, and move the best with the body. These jewelry qualities are referred to as “ease.” Needle/Thread projects have a natural ease to them. Achieving good ease is much more problematic with other stringing materials.
With needle and thread, you tie knots to secure your clasps. Prominent beading threads including Nymo, C-Lon and One-G. One thread, Silamide is a pre-waxed thread and it is twisted, rather than bonded, which means it has no abrasion resistance. Although it is pre-waxed and little easier to manipulate through your beads, I don’t recommend it. I’m not big on anything that breaks easily.
Using needle and thread does add a lot of time to the creation of a piece. You have to use a needle, which can be awkward. You need to wax your thread, which takes more time. You need to go through your piece THREE times. If you are selling your pieces, very often it is difficult to recoup your labor costs, when using needle and thread. In this case, people often revert to using a cable wire as their stringing material.
Bead Stringing with cable wires goes very quickly and is easy to do. The cable wire is stiff enough to be its own needle. You don’t wax. You only have to go through your piece ONE time. The better cable wires are very strong. There is a stiffness to them that makes the pieces not feel as good when worn, in comparison to thread. You also have to use a crimp bead to hold the cable wires in place, and this is a weaker and somewhat riskier design element than tying a knot in the Clasp Assembly. Cable wire brands that I like include Soft Flex and Flexrite.
Pieces done on cable wire move in the opposite direction that your body moves. If I wear a needle/thread bracelet on my wrist, and move my wrist to the left, the bracelet will move with me. If I wear a cable wire bracelet on my wrist, and move my wrist to the left, the bracelet will actually move in the opposite direction to the right. The cable wire bracelet does not conform to and take the shape of your wrist, when worn. This becomes a major design problem not always dealt with easily.
Another alternative to beading thread is to use a hybrid cable thread, such as FireLine or PowerPro or Spiderwire. Cable threads are threads braided together and encased in nylon. Originally these were used as fishing line and adapted by craftspersons for stringing and weaving. You use needles with these cable threads, but you only have to go through your piece one time, instead of 3 times, as you do with thread. You can go through your piece more than once to make your piece stiffer, but you don’t have to. You do not have to wax these cable threads. You can wax them, however, if you want, to increase your thread tension, and add more security against the sharp bead-holes cutting the cable thread.
The cable thread pieces are stiffer than the regular beading threads, but drape better than the cable wires. You tie knots with the cable threads, like with regular beading threads, to secure your clasp. Since you still rely on a needle, using the cable threads goes more slowly than using the cable wires. The PowerPro is a little awkward to use. I really like the FireLine and Spiderwire.
Threads (nylon beading thread)
There are many types and brands of beading threads, each with some pros and each with some cons.
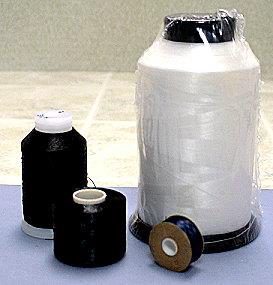
The original nylon beading thread is Nymo. Nymo was first developed by the shoe industry to attach the bottom of your shoe to the top of your shoe. It is widely used in upholstery. In the 1980s and earlier, if you wanted to buy Nymo, you bought it on a gigantic wheel — a five lifetime’s supply for us. As beading got more popular, Nymo packaged their thread on smaller and smaller entities, starting with a cone (a little bigger than a fist), then a spool (a little bigger than a thumb), and then a small bobbin. More recently the spool has been replaced by a large bobbin.
It turns out that the company could not get the same product onto a small bobbin. So, the thread on the small bobbin is weaker than the thread on the large bobbin, spool and cone. However, usually only white and black colors are available on the entities larger than the small bobbin.
Nymo is very strong. I suggest, if you have never worked with Nymo, to cut off about a 3 foot length, and try to pull on it and break it between your hands. It will break, but you’ll feel how tough it is. And in bead stringing, we typically go through each bead at least 3 times, so you have 3 thicknesses of this thread inside your piece.
When they make Nymo thread, it is a beige color. To make black, they dye the thread. The black dye tightens the thread, and makes it stronger. To make white, they bleach the thread. The bleach weakens the thread, so white is weaker than black. To make a color thread, they first bleach the thread white and then add a color dye. These color dyes further weaken the thread. So colors are weaker than white, and thus weaker than black. The colors of the thread, however, are consistent from batch to batch.
Nymo comes in many sizes. From smallest to largest, these include: OO, O, A, B, D, F, and G. The most popular and most often used size is D.
C-Lon is a newer thread. When they make C-Lon, whatever color it is, that is the color the thread starts as. So, all the colors AND the white AND the black are equally as strong. However, the color from batch to batch will vary, sometimes widely. Overall, we like C-Lon better, particularly for the white and the colors. Black C-Lon is equivalent in strength to the Black Nymo. For everything else, it is stronger. One drawback to C-Lon is that the ends of the thread fray easily, making it more difficult to get your thread into the eye-hole of the needle, than with Nymo. C-Lon only comes in two sizes — AA (smallest) and D (thickest).
ONE-G is a premium beading thread and is similar in strength to C-Lon. I think its best attribute is that it has a spring-i-ness to it, that makes it much less tiring to use, than Nymo or C-Lon. ONE-G only comes in size D and only in about 12 colors.
Silamide is a pre-waxed thread. The pre-waxing allows the thread to get less tangled up when you use it. However, Silamide breaks very easily, so I don’t recommend it. Why put in all that time into a project if there is a good chance your thread will break?
Beading thread is shaped flat like a ribbon. Sewing thread is shaped round. Sewing threads are not strong enough to use in beadwork.
Other Articles of Interest by Warren Feld:
Best Way To Thread Your Needle
Bead Stringing With Needle and Thread
Turning Silver and Copper Metals Black: Some Oxidizing Techniques
Color Blending; A Management Approach
Cleaning Sterling Silver Jewelry: What Works!
What Glue Should I Use When Making Jewelry?
When Choosing Colors Has You Down, Check Out The Magic Of Simultaneity Effects
When Your Cord Doesn’t Come With A Needle…What You Can Do
What To Know About Gluing Rhinestones
Know Your Anatomy Of A Necklace
How Does The Jewelry Designer Make Asymmetry Work?
I hope you found this article useful. Be sure to click the CLAP HANDS icon at the bottom of this article.
Also, check out my website (www.warrenfeldjewelry.com).
Subscribe to my Learn To Bead blog (https://blog.landofodds.com).
Visit Land of Odds online (https://www.landofodds.com)for all your jewelry making supplies.
Enroll in my jewelry design and business of craft video tutorials online.
Add your name to my email list.
Discover more from Warren Feld Jewelry
Subscribe to get the latest posts sent to your email.

Leave a comment