Some people kindly refer to their unfinished projects as UFOs (Un-Finished Objects). Others less kindly refer to them as abortions. Let’s just call them un-finished projects.
You’ll find you have a lot of unfinished beading, craft and jewelry making projects. They might be waiting for more supplies, or finding the right color or clasp. They might be waiting for you to learn or re-learn a particular skill or technique. They might be waiting for more time or motivation. You might have discovered another more exciting project to do in your most recent issue of Bead & Button magazine, and want to get to that immediately, even though you haven’t finished your last project.
You might begin a project, and then as you get into it, put it down, pick it up again, find that you forgot what you were going to do in the first place. You might have inadvertently cannibalized some of your other Un-Finished Projects to help you finish a particular project on hand, and then not be able to find these very same UFOs you intended to come back to and finish, having forgotten you cannibalized them.
As one of my friends remarked, “I’m going to have to live a very long time, or else I won’t get anything done!”
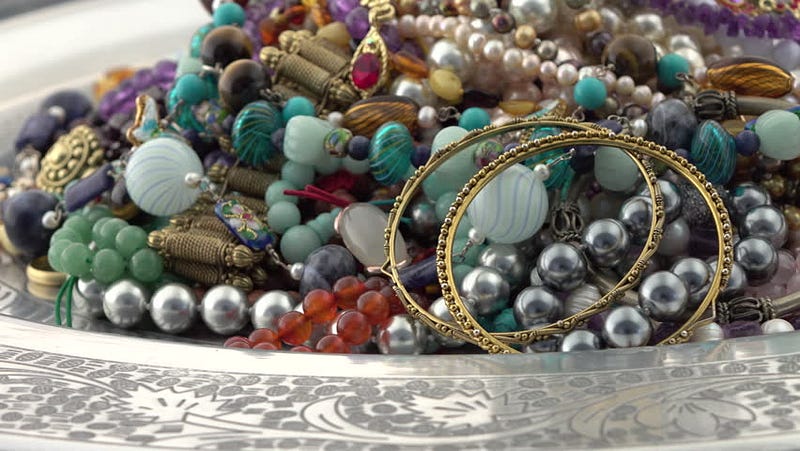
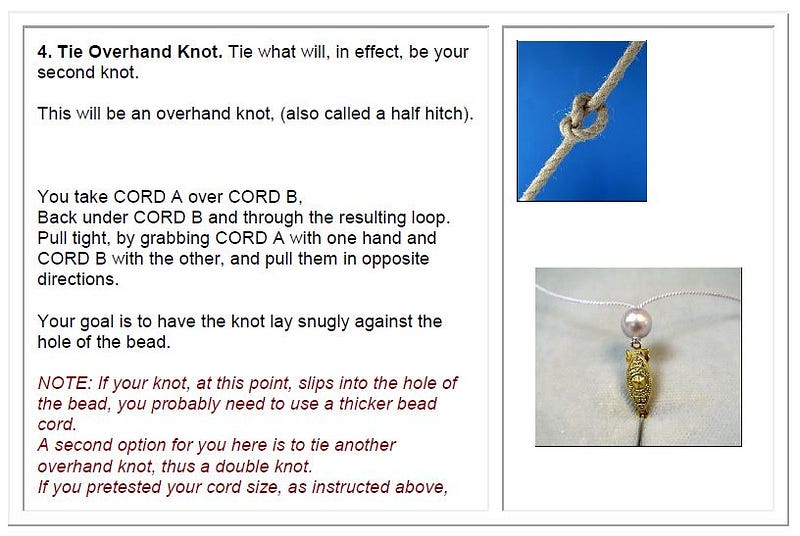
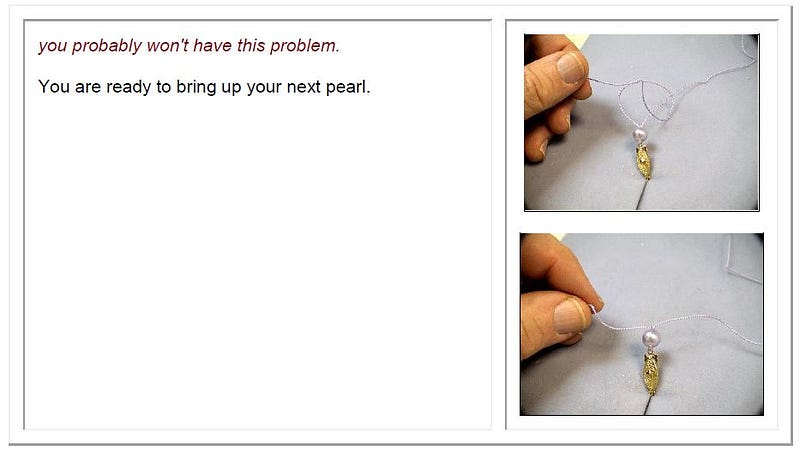
People do funny things with their unfinished projects. One woman I know puts them in a clear jar, and let’s them stack up as an artwork in progress. Some people work on them in rotation, with some kind of system, lazy-susan-tray or otherwise. Others take the time to tear them up and reclaim the parts. That’s definitely not me. I leave them laying around, piled up on bead trays. Many people swap them.
I hate people who finish each bead project before starting another. Don’t you?
How can they? How much true-grit can anyone person have, or be allowed to have? Getting a grip on one’s beadwork — Is that really possible? Can you really weed out your unfinished projects, and reclaim your beads, and make clear, definite, timely decisions about which projects you will start, which projects you will finish, and which ones you won’t? Is there a pill for this? Either a stimulant or a cure?
My friend Adonna wrote to me…
“I am so jealous of people who finish things. I have tons of ufo’s and I want to keep learning new stuff. Beaded beads really do fascinate me… like the sparkly wheels. I have clipped the instructions, printed off the net, bought stuff from Halpenny and Ruby Fisch and have yet to sit down in a quiet space and do it. Then there is all the polymer clay ideas. If I had a room like Linda’s…… I’d be paralyzed with what to do FIRST… I guess I have to learn to go to my small room I now have and really get the stuff into separate corners. Beads, sewing, polymer, wire… then put the TV and dvd player in middle on a swivel stand, and close the door.
“I have realized LONG ago, that the fun is in starting something new, the challenges of finding all the pieces to work with, and learning and doing the beginning. When I can visualize the END, I stop and move on. You should see the ufo’s in quilting, doll/bear making, even a few pieces of clothes, and all of the useable incorrect size patterns and not to mention the 1,910+ collectibles.
“Some of the problems in finishing is surely the ‘Now What?’ concept of what to do with it all. I cannot wear all the finished jewelry. Certainly NOT give it away….would rather throw it away or let the executor deal with it at the junk shop than to give it to people who just politely say “thank you” and have no intention of wearing it even once a year.”
Most beaders like to bring their beads wherever they go. Lest they end up in some jail charged with terrorism, today’s air traveling presents special challenges for beading on a plane.
While the rules for what you can and what you cannot bring on a plane seem to vary frequently, you can be sure that scissors, crochet hooks, knitting needles, and many hardware tools, will tend to get you pulled over for a major search, and maybe a major loss of these as well.
Dental floss containers are good substitutes for scissors. And they hold your bobbin of thread in a good, tight way, as well. Supposedly, if your scissors are blunt-ended, they are OK.
Circular knitting needles are usually acceptable. Straight needles made of wood, plastic, or bamboo stand a better chance than metal ones.
Bamboo crochet hooks won’t get taken up.
Keep your beads tightly packaged, and your projects small. You don’t want your beads flying all over the plane. And the seats and tray tables are tight and small.
In case your stuff gets confiscated, bring with you a stamped, self-addressed envelop, so you can have these mailed back to you, instead of tossed in the garbage.
Try to get an EXIT row — more leg room.
Soft tackle boxes make excellent carry-on luggage.
You may want to ship your heavy duty tools and materials to your destination ahead of time, instead of playing the odds of bringing them onto a plane.
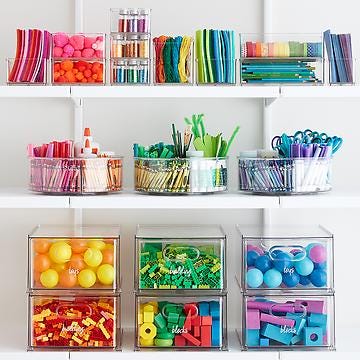
It’s hard to contain a beader’s or craft person’s delight for containers.
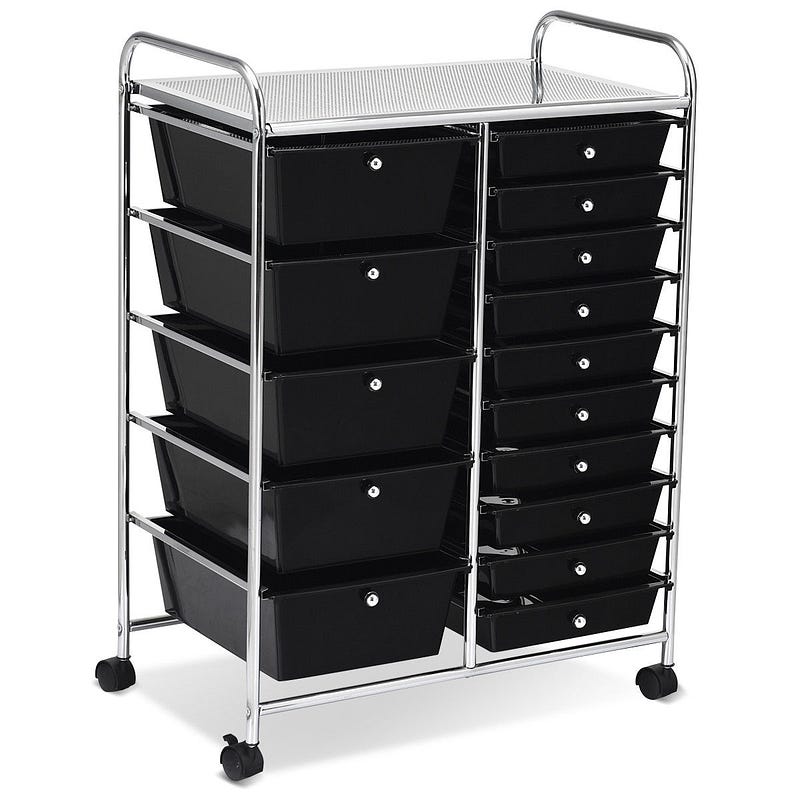
Boxes. Boxes with lids. Boxes with drawers. Boxes with neatly inset boxes with lids and drawers. Boxes on wheels. Boxes on wheels that fit neatly into the limited space between two cabinets. Boxes that rotate. And boxes that levitate.
There are at least three challenges that every beader faces.
First is finding the best container.
Second is deciding how to organize your beads and craft supplies and tools and all your containers. And if you keep notes and sketches, how to keep these organized and accessible, as well.
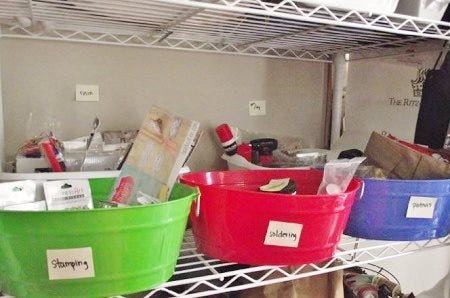
Third is labeling and keeping track of everything.
Containers are everywhere. Bead stores have some good ones, but you find the best ones at hardware stores (tool boxes) and tackle stores (fishing boxes) and kitchen and bath stores (organizers).
There are many things which make good containers. These include egg boxes, muffin pans, deviled egg trays, cosmetic cases, containers and accessories for lipsticks, nail polishes and brushes, contact lens cases, and tic-tac mint boxes. Better containers are things you can see through.
It is not uncommon for beaders and crafters to completely re-organize a previously well-organized bead or craft work set up, upon finding new and different containers for organizing beads.
Containers, you see, are just another excuse for handling beads and crafts. And while making a necklace or beading a doll requires exercising the creative mind in very taxing ways, containers and their re-organizing are less so.
Susan found her Ultimate Beading-2000 container set-up at Lowes. It was a large multi-drawer tool cabinet made from red plastic. It had a top that lifted up. It had a pull out work-shelf. And it had drawer after drawer after drawer, each dividable with adjustable section-dividers into 1”x3” spaces — Perfect. The unit even had wheels. She thought to herself, she could easily bring the unit onto an airplane, or in a car, or to the doctor’s office. Perfect.
She bought six of them. And she began the routine of re-organizing everything in her studio. And her studio was vast. Even people with vast studios would think hers was vast-er. After many days of mornings and afternoons, evenings and nights, after diligence upon diligence upon diligence, after conversing with her Freudian mother and Jungian best friend and Horney-ian sister and Bayley-ian cousin, Susan was done. Everything was re-organized.
A smile. A satisfaction. A relief. Until, that is, Susan remembered to check inside one more closet and one more desk and a kitchen cabinet and a file cabinet in her garage. Yes, Susan had forgotten about a few beads and findings that she had stashed away throughout her house. Many “few” things. Many, many “few” things. So many, in fact, that Susan had to re-organize again from scratch.
As Susan, and many other experienced beaders and crafters know, you need different kinds of containers for different kinds of situations. This amplifies the fun in finding containers.
Susan is not quite here yet, … or is she?
You need containers to store your beads. You need something to carry your beads in your purse. You need containers to hold all your beads and supplies for a particular project, and these usually must fit inside a canvas tote bag. You need containers to bring things with you on a plane. You need containers that help you bead while traveling in car. You need containers to help you sort through things. And you need containers because everyone you know has containers.
Part of the art of “container-ing” is placement. If on a desk or work surface, it must aid the flow of work and not distract from it. If on the floor, it must ideally fit within or under something, or somehow disguise itself as part of the furniture. If to be stacked, each component must rest upon the other in some natural, inherent and perfectly rational way. If there are other containers for items associated with non-beading crafts, these must somehow not contaminate those for beads. You don’t want to block anything — a doorway, the bathroom, the dining room table.
Once the containers are set, (until, of course, you find new more appealing containers), you must decide what goes in them. Easier said than done. In an internet survey I once did, most people wrote that they organize their beads by color. All the reds go in one place, all the blues in another, and so forth.
This creates a slight dilemma. Say you want to do a project with delica beads. Arrangements solely by color will mean that you’ll have to dig through a lot of different styles of beads to find the delicas you want. And you’ll have to do this for each color.
If you arrange by style, then it will be difficult to pull your beads, if you want to use several different colors.
If you arrange by materials — glass vs. gemstone vs. plastic vs. metal vs. ceramic — then it will be difficult to find and pull your beads, if you want to mix styles and colors.
If you arrange by palette, then it is easy to find colors you know that work well together. But it becomes more difficult to locate specific colors or specific sizes or specific shapes.
You might feel the urge to separate small hole from large hole beads.
You might want to keep letter beads in their own place.
You might want to have additional trays that contain all the beads and other pieces used for your favorite designs, so if you want to repeat them, all you have to do is grab one tray.
Do you mix vintage with new?
Small with large?
Holiday with general?
Beads for bead-weaving with beads for fiber embellishment and sewing?
Beads in-style with beads out-of-style?
Machine made with handmade?
Contemporary with ethnic?
Do you cut things off strands, or leave them on strands?
Do you mix up your tubes, or keep them separated?
Do you hang things on pegs on a wall, put them in drawers, put them in containers stacked on counters, or lay them in trays or on bead boards?
Ballen once told Krystal that one of the drawbacks to her container method was that there was some overlap of her categories. For instance, Lampwork, Shape-Beads (further broken down by Flora, Fauna, and Celestial/Symbols) and Large Glass Beads and On-Stone Pendants (in 6 color-grouped containers). She attempted to overcome this overlapping by giving priority to Stone Beads, then Pendants, then Shape-Beads, then Lampwork, then Large Glass Beads (which did not fit in with anything else already categorized).
And Krystal, in turn, got very confused. When she needed beads for classes, she found one arrangement of containers to be useful. But when she needed beads for projects, this same arrangement was unhelpful. Took too long to find what she needed. She could not come up with a set of rules for what should go where when.
And we haven’t begun to talk about stringing materials, jewelry findings, needles, glues, tools, and other beading accessories….
How do you label everything? How do you keep track of what you have and don’t have? How do you keep track of the color name, the color code, and the cost?
It is important to label everything: On your labels, you want some description, color name, where you bought it, any re-ordering code, and the date you bought it, as well as the price you paid for it. Save the price tags and package labels. Keep track of ideas — clippings, photos, sketches, internet notes, magazines and books. With patterns, instructions and designs, you want this categorized and kept in easily accessible and understandable file folders.
As one of our beader-friends said, “I have so many sketch books, that when I look for something, I don’t know where to start.” Moreover, “if I find the sketch I want, I don’t know where to safe-keep this, until I’m ready to begin the project, without losing it again.”
Where among all your containers in your already crowded workspace do you plan to situate the super-computer you’ll need to keep everything straight?
Whew!
Beads are so small! How can you possibly have difficulty organizing them? Or running out of space?
Which brings me to another important point. Anticipate growth!
For example, if you have allowed space for 300 colors of delica beads, leave some open space for some more. There are 35–60 new colors of delicas introduced each year. Delicas are usually ordered by code number. The code numbers do not reflect any system or logic about specific colors or finishes. New color code numbers are not only incremented from the previously highest number; many new code numbers are squeezed in among the previously existing order.
Beads and other craft supplies are power, and you will always want to accumulate more and more.
With all the containers you’ll need, and all the organizing and re-organizing you have to do and keep up with, will you ever have the time to take courses and develop your skills? Maybe, maybe not.
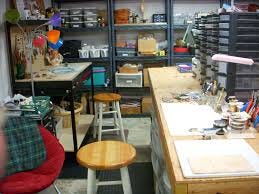
Every crafter, jewelry maker and beader has to decide which part of the house will be taken over by beads, craft supplies, and tools.
Often it’s the whole house.
James is a classic example. James never met a horizontal surface he couldn’t cover up with stuff. So his small beading table blossomed into multiple tables. These blossomed into several TV trays. And these blossomed into piles of stuff on chairs, counter-tops and couches. Stacks appeared in every room on the floors. It was not long before James had six projects on-going in the dining room, one in the kitchen, four in the bedroom, three in the TV room, one in the laundry room. James salivated about tool boxes, and so he bought tool box upon tool box upon tool box, in every size, with every arrangement of drawers and dividers and sections, in industrial colors of bright yellow, fire engine red, charcoal black, and steel gray.
We built a studio off our house. The studio, at first, was for silversmithing. It then also served for lampworking. And then for metal clay. And fused glass. And more beading. The studio then spilled right back into the house. So James wanted an additional studio room to accommodate yet more obsession. And we built an additional studio room off the house.
Years ago, in an internet survey we did about “Where People Beaded In Their Homes”, most people said their dining room or kitchen table was their Primary Creative Place. Meals were banished to the TV or living rooms, lest they be laced with beads. TV trays and cocktail tables were forced into new use. Most families, when queried, could no longer remember what colors the kitchen and dining room walls and cabinets were, as beads took over more and more of these rooms.
Another wrote that she would let us know about her special craft space, once she got things straightened up. She told us, “I don’t actually work there, because it looks like a tornado hit it. I just rush in to grab things, or dump things off, and run out.”
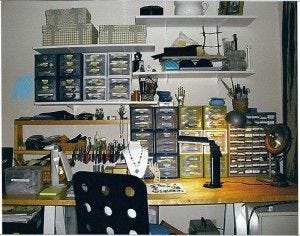
From Kathy Thomason: “I have a craft room lined with shelves and tables. I keep my beads in rolling carts, divided by color with each drawer labeled. I keep all my tools in a basket on one of the tables and I have all my findings in storage containers, divided by color and item and those sit on top of one of the rolling carts. I keep my wires in a drawer, where they are put into small trays and divided by color and type. I have beading trays set up on the tables with a rolling desk chair that can go from table to table. I get everything I need for my current project put on a tray, which I then carry to the living room to do the actual beading so I can be out where the family is.”
Some rooms did double-duty. There was the dining room/bead room. The TV room/bead room. The sewing room/bead room. And the laundry room/bead room. One person wrote that she had to share her bead room with her nursery. This created quite a dilemma in that beads and parts, plastic bags, needles, and threads were not a good fit with cradles and baby toys and baby blankets and, actually, not a good fit with babies.
Some beaders were blessed, however. Their spouses built them special spaces in attics, garages or the once-previously used bedroom. Some wealthier beaders had both a bead room, as well as another room devoted to another craft like sewing.
But most people were forced to take over the biggest table in the house, most often in the dining room.
Every workspace had to accommodate a lot of containers and a lot of room to layout different projects.
Organizing your work space, for some, can mean saving and salvaging their creative lives. Clutter and disorganization is distracting, and can prevent you from making progress on important projects. You don’t want to waste time looking for things. You want to be able to get rid of things you no longer use, without it becoming a major effort to do so. And you do not want to overwhelm yourself with too many half-finished projects laying all over the place.
I remember Ginny telling me about her desk. It just wasn’t big enough. So she abutted a folding table next to it. It just wasn’t big enough. So she got another folding table. Again, not big enough. Plus, at each edge the tables met, they were uneven. So she bought some large pieces of plywood, and hardware to nail them together, and lay over all her tables. She ran molding along the outer edges so that beads wouldn’t roll off. Her expanded table was soon over-run, so she set up another smaller table on the opposite wall, and towards which she could wheel her chair. She found herself working on the smaller table, and used her large table for storage.
Ginny had the best chair. Ergonomic. Great back support. Wheels. It spins. It was a chair she could sink into, relax, wheel herself from one side of the room to another. Heavenly. She could sit on it for hours without getting tired. It had good arm rests that didn’t get in the way of beading or stringing.
Ginny was determined to maximize her work space, any way she could. She attached shelving off the wall that would fold up, and fold out, depending on how much horizontal work surface she wanted. She took off the closet door, and built in shelves with drawers that pulled out. In three of these drawers, she stuffed fabric she had accumulated from an earlier obsession. She hung a hanging shoe bag off one side of the closet, and stored “projects-in-progress” in each of the shoe storage slots. She put up pegboard along all the open wall space. She hung over-the-door wire storage racks on the entry door to the room — one on the back and one on the front of the door.
She hated clutter. But each time she put into effect another plan to improve the efficiency of her bead room set-up, she ended up with more and more clutter. A jumble. Beads begat beads begat beads begat books, papers, half-finished projects, storage containers and more supplies.
She read a book by Jo Packham called Where Women Create: Inspiring Work Spaces of Extraordinary Women. She looked for beautiful and inspirational and practical ideas so that she could create in an environment conducive for creativity. One of many questions raised in the book, was “Do you like to listen to music while you create?” She did. Where would she put the stereo and the speakers now?
[Another question asked in this book was “Where did you like to work as a child?” Ginny liked to work in her bedroom under a blanket. ]
Ginny failed to anticipate the “administrivia” of it all. She had to keep everything labeled. She now had to keep records of what she bought at what price. She had sketch books of ideas. She had pictures torn out of magazines. She had pattern upon pattern of designs. She had lists of addresses, websites and phone numbers of sources. She had to coordinate trays of several unfinished projects. She needed to add two filing cabinets, which she shoved underneath one side of her expanded table.
She bought a computer and installed a phone and internet connection, so she could keep up with her bead research as she worked. She forgot to add some space to store all the bead and jewelry magazines she subscribed to and never threw away. She threw them in a pile on the floor in a corner and under part of her expanded table.
Her sister, who visited almost everyday, gave Ginny two hanging plants “for the studio.” Just what Ginny needed. But Ginny was too embarrassed not to find places for these, as well.
Ginny began to realize that her creative energies were getting used up in planning and maintaining her environment. She was too tired to think about making jewelry. So she moved some of her stuff, and her great ergonomic chair, to a table in what today is rumored to have been her dining room, and where she wouldn’t have to deal with it all. …And she moved just a few little things to a tray that sits on top of a throw pillow that sits on top of her living room couch.
As every beader has experienced, the beads take over more and more of your home. Eventually, if you keep beading and making jewelry long enough, you’ll need a second home. Or you’ll be forced to open up a bead store of your own.
As one of my friends remarked recently, in a controlled panic, “I’m out of space, and I have nowhere to go.”
And not to complicate things, but to complicate things…. If you are selling yourself, it is very advisable to set up a “Business” area separate from your “Craft” area.
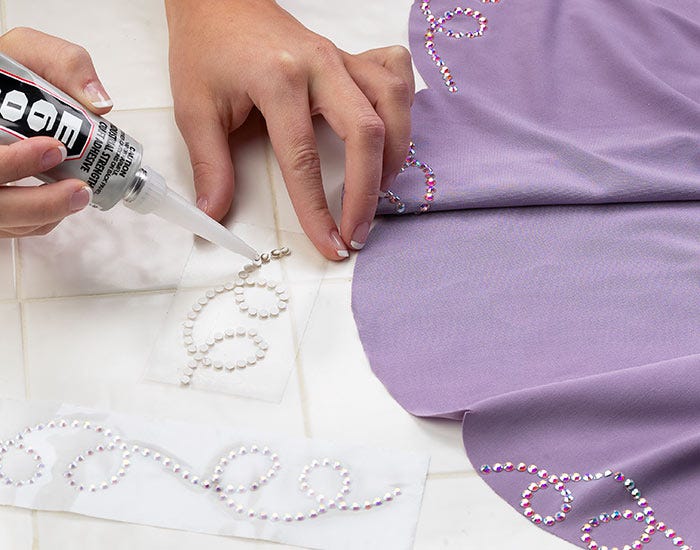
There are glue-on rhinestones and hot-fix rhinestones. They are equally as good.
For glue-on, prefer E6000 glue. Other glues either don’t hold well, or can ruin rhinestones.
When we use E6000 with rhinestones, we put a little drop of glue on the end of a pin.
Then we touch the glue to the back of the rhinestone.
We maneuver the pin-glue-rhinestone over the place where we want the stone to be.
Then we push the rhinestone in place with our finger, and simultaneously pull the pin away from the stone.
We rub the stone and around the stone with our finger or the pin to get any excess glue off.
Before it dries, E6000 rubs off like rubber cement.
E6000 takes 10 minutes to begin to set, so you can move things around for 10 minutes to get them to the position you want. At 20 minutes, the consistency is like rubber cement. You can use your finger or a tweezer and easily remove the excess glue. E6000 takes 24 hours to fully set.
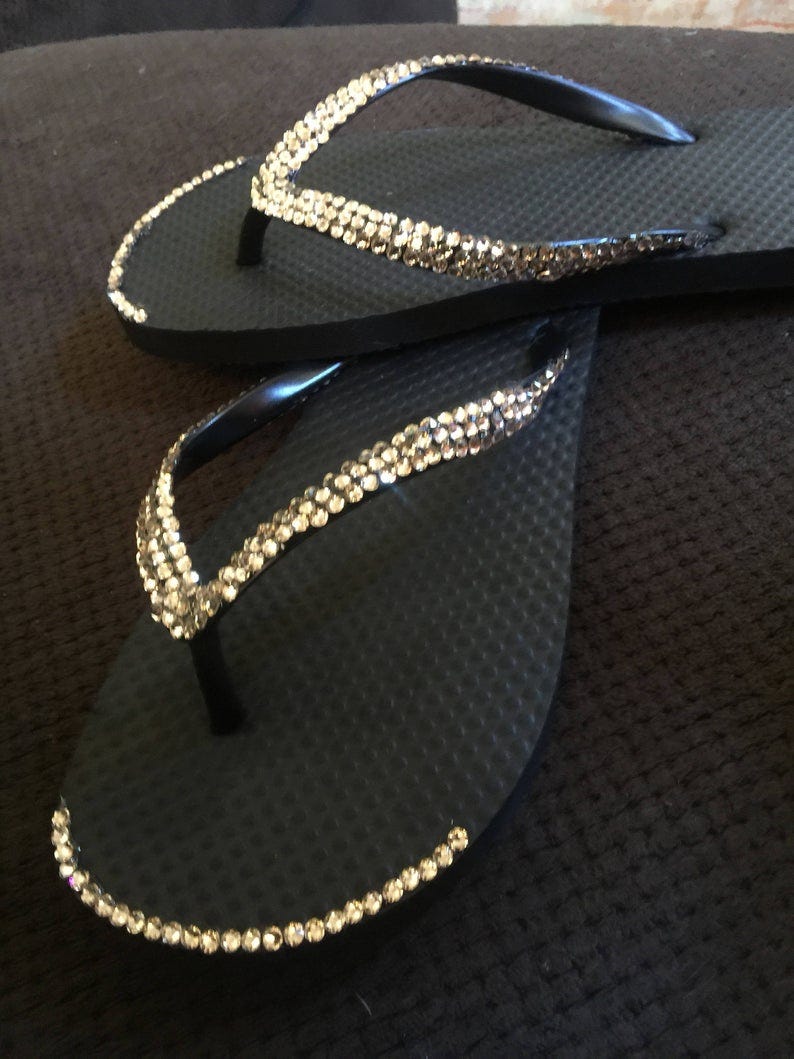
WHEN YOU DON’T WANT THAT POP!… Gluing Rhinestones to Flip Flops (or other Oily Surface)
Flip Flops are a fashion statement — especially when decorated with bright, shiny Austrian crystal rhinestones. Unfortunately, the rhinestones will pop off easily, if the surface of the flip flops isn’t treated first. You see, the rubber flip flops are very oily, and glue will not stick to them very long.
I suggest going to your local hardware store. Buy a can of wood-deck water-proofing sealant, and paint it on your flip flops. Let them dry. Then glue your rhinestoneson. I suggest using a glue like E6000 or Beacon 527.
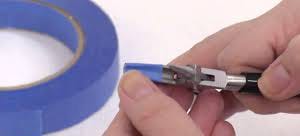
If you feel you are scratching up your pieces with your pliers, you can do one of two things.
You can replace your pliers with nylon tipped ones. This solves the scratching issues, but sometimes you don’t feel you have the same control over these, as you do with regular pliers. They tend to slip too easily when you are using them.
Or, you can take some duct tape, and tape over the jaws of your pliers. You can do this to your chain nose pliers, flat nose pliers, round nose pliers, and the like.
Since the duct tape is thin, you don’t lose that “feel”, as you manipulate the pliers with your hand.
WHEN THE CORD DOESN’T COME WITH A NEEDLE… What Should I Do?
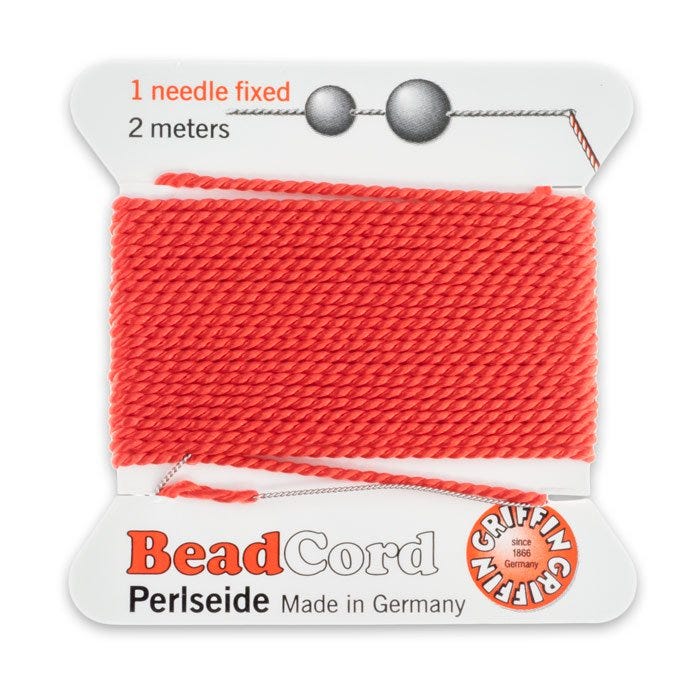
The Griffin bead cord, both nylon and silk, comes with a needle attached to the end of the cord. This makes it easier to string. It also makes it easier, when knotting, to use a thicker cord and get a larger knot.
However, many bead cord products, yarns, and other thicker cords come on spools and do not have needles attached. What do you do in this case?
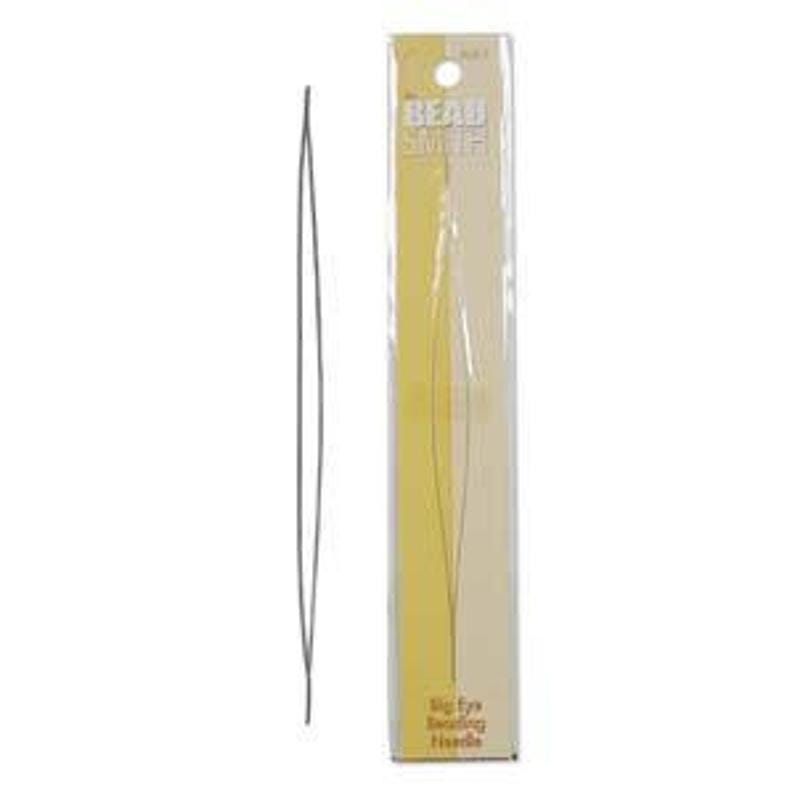
First, there are needles that work in this situation. There are two kinds of needles to use with bead cord, and you would probably want to have both on hand.
The first is called a Big Eye Needle. You wedge the end of the cord at one end of the needle, and that becomes your trailing end.
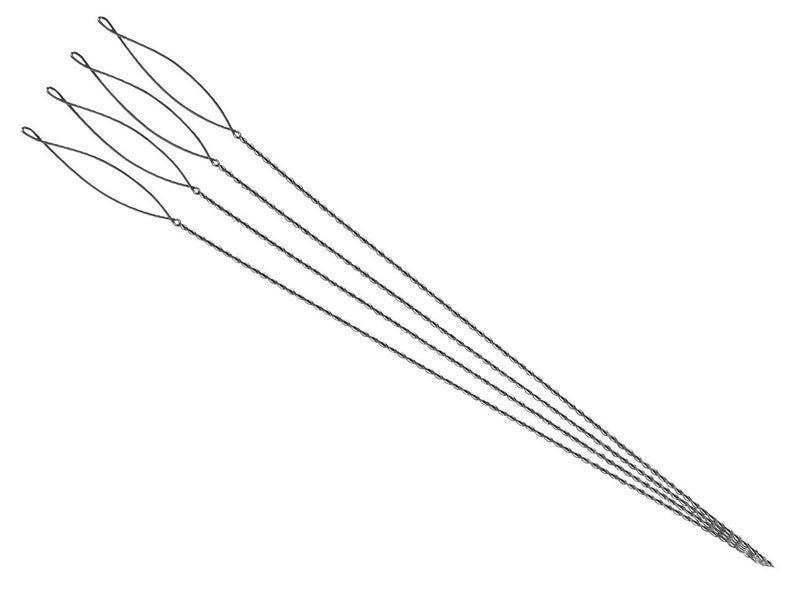
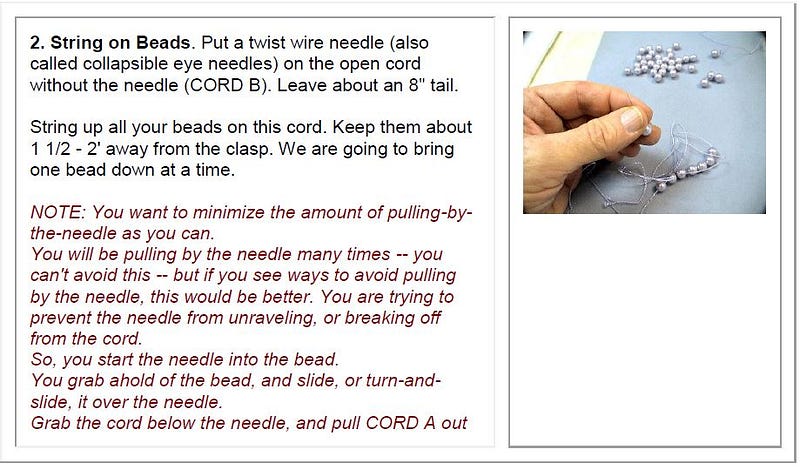
Twist Wire Needle (ska Collapsible Eye Needle)
The other is called a Twist Wire Needle (also known as a Collapsible Eye Needle). A medium size in this needle would probably work fine. Both needles have short life-spans, so you would need to have a bunch on hand at any one time.
Another thing people do with the nylon bead cord is either use superglue on one end, or take a bic lighter to one end to melt it. This makes the end stiff. Then you take a razor blade and cut the very end at an angle, so you have a “needle” at the end of the cord.
One final thing that people do. They take 26 gauge or 28 gauge wire, cut a 6–8″ piece, bend it in half, making a V-end. They wedge their stringing material into the V-end, and use this like a needle.
Bead shows travel across the country, back and forth, and come to many of the mid-sized and larger cities and towns across the US, as well as some smaller places.
Bead shows showcase many vendors who sell beads, gemstones, cabochons, findings, books, supplies, and other things related to beading and jewelry making. Some are small and may have 20 vendors; others are very large and have hundreds of vendors. The bead show of all bead shows occurs in Tucson, Arizona every January/February, with a smaller, though not by any means ‘small’, repeat in September.
The bead shows are there to overwhelm you with choices, and get you to part with all your money — the money you brought with you, that you found hidden away under the pillows in your couch, or planned to use to buy something else in the future. Very ENTICING. Fun. Exciting. Thrilling. Exhausting. This is one of those settings where you could easily use the phrase, “the energy in the room was palpable.”
I remember my first bead show visit. There were beads everywhere. I couldn’t catch my breath. I didn’t know where to start.
To get through these shows, to be sure you’ve seen the most important stuff for you, and to be sure you survive with some change left over for buying dinner, I offer a few tips:
o Wear comfortable shoes
o Bring copies of your tax form, if you buy wholesale
o Have a mix of cash, checks and credit cards. Some vendors might take cash, but not checks or credit cards. Others some different arrangement.
o Bring a tote bag.
o Bring a small ruler or gauge
o Wear your glasses. You might also bring a magnifier.
o Bring a small notebook and pen.
o Bring a bottle of water.
Do a Walk-Through first. Get the lay of the land, so to speak.
Set a budget and stick to this budget.
Collect business cards from all the vendors. If they have a website, be sure you leave with that information.
Ask the vendors you bought things from how you can re-order items from them.
Ask the vendors you bought things from when they might expect to be back in your town.
Especially if you are buying something directly from an artist, such as a lampwork artist, take some time to talk and get to know that person. You’ll learn a lot. It’s not often you get direct access to artists.
Play close attention to the quality of what you are buying. At these shows, quality varies widely. The prices of things are often lower than what you would find in your local bead store — but the quality might vary too.
A really good artist will wax their beading thread (Nymo, C-Lon, One-G) or cable thread (Fireline). Even if the thread says it’s been pre-waxed, you want to re-wax this thread.
We wax our thread to make it strong, less likely to fray, to straighten and stretch it a bit before using, to waterproof and protect the thread from weird body chemistries as well as cosmetics, perfumes and perfume oils and hair sprays, and pollutants in the air, to glide through the beads better, and to fill in the jagged edges of the hole of a bead to make it less likely to cut the thread.
There are different types of threads and conditioners.
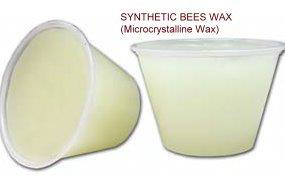
The primary choices are among pure beeswax, synthetic beeswax (also called microcrystalline wax), and a thread conditioner, like Thread Heaven. I suggest you always use beeswax, either pure or synthetic. I do not recommend a thread conditioner.
Thread conditioners reduce the chances your thread will get tangled or knotted up while you are weaving or stringing with it. It reduces the static electricity that builds up each time you pull the thread or cable thread through a bead. But it doesn’t have any of the positive impacts that wax does. It’s an either or choice. So I choose wax.
The synthetic wax is a little more expensive than the pure wax, but I prefer it. The synthetic does everything the pure one does, only better.
Waxing the thread takes very little time, and it can add years to the life of your bead art. Regular bees wax will protect your thread for 150 years. Synthetic bees way many more times this.
When waxing, we pull our thread through the wax two times. Then we take our two fingers, pinching the thread, and slowing moving down the full length of our thread. Our body temperature melts the wax into the thread. Our fingers also knock off any excess wax on the thread. Always pull by the thread, not by your needle, when waxing.
To feel the effects of waxing, try this:
Take an arm’s length (about 6 feet) of Nymo D or C-Lon D Thread it onto a Size #10 English beading needle.
Double it up, so that you now have your length of thread in half, with two equal lengths extending from either side of your needle’s eye hole.
At the needle end, wrap the thread around your forefinger a couple times. When we pull the thread through the wax, we want to pull by the thread, and NOT by the needle.
Wax the thread twice, then take your two fingers and go down the thread, allowing your body temperature to melt the wax into the thread.
Now un-double your thread.
Move your needle up to one end, leaving about an 8–10” tail.
Take your two fingers, pinching the thread, and feel down the length of the thread to find the area that was wrapped around your finger, and did not get waxed. Your fingers will slip.
Now wax two more times from that area on down.
Pinch your thread at one end, moving your fingers down the length to melt the wax into the thread.
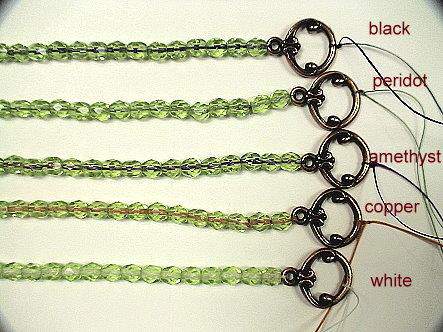
Thread color affects the viewer’s perception and evaluation of the piece.
People see the thread at the knots. They subconsciously see the threads between each bead. If you are using transparent or translucent beads, the thread color will affect the color of these beads. You can do the same piece using different colored threads, and each of these pieces will look very different.
Black always works. Can’t see the knots, only shadows. This makes your piece seem older, richer, more traditional. It gives your piece a patina.
White makes your pieces brighter, sharper, more contemporary looking.
Colors: Most people select a color that is the same or similar to the predominant color in the piece. In this case, there is no color affect. However, you can pick contrasting or complimentary colors, such as using an amethyst colored thread to string peridot colored beads. You can also change the colors of your thread as you work thru your piece.
Beading Threads are very thin ribbons, and are meant to be fully covered with beads, thus hidden within your pieces. They are typically waxed with beeswax to keep them from fraying. Threads, once waxed, are actually stronger and more durable than bead cords, but they are unsightly.
Threads are used in both bead weaving and bead stringing projects.
Beading Cords are threads that are braided together, to make them visually attractive. But you don’t wax bead cords — this would make them ugly. So Bead Cords will have problems of fraying and stretching that waxed Threads will not. When Bead Cord is waxed, the exposed waxed cord also picks up dirt and body oils, making it dirty and unsightly, and furthering weakening the cord.
Bead Cords are used for projects where you want the cord to show, like putting knots between beads, or tin cup necklaces where you have a cluster of beads, then a length of cord showing, and then another cluster of beads, then the cord, and so forth.
If you do not want your cord to show, then you would use a waxed Bead Thread or Cable Wire, which are much more durable than Bead Cords.
There are many types of stringing materials to choose from. Each has its own pros and cons. These types include,
o Beading Thread o Flexible Nylon Coated Cable Wires o Cable Threads (a hybrid between the cable wires and the beading threads, such as FireLine) o Bead Cord o Elastic String o Hard Wire
The primary choice is between needle and thread vs. cable wire.
You always get your best design or functional outcome with needle and beading thread. Projects strung on thread always take the shape of your body, so they move with the body, drape the best, feel the best. Needle and thread, however, is very involved — you have to use a needle, you have to wax the thread, you typically go through each bead at least 3 times. If you are trying to sell your pieces, it is almost impossible to get your labor out of a needle and thread project.
Flexible, nylon coated Cable Wires are much simpler and quicker to use. But the outcomes tend to be stiff, not move as well, or drape as well. However, by adding support systems, such as rings and loops, within your piece — ways to increase jointedness — you can make your cable wire project function a little more closely to that of needle and thread.
In terms of other stringing materials, cable threads (such as FireLine) often offer a good compromise between the functional qualities and marketing concerns of needle/thread and cable wire projects.
Bead Cords are threads braided together so they look pretty. Bead Cord is used when you want your stringing materials to show, such as when putting knots between beads, or doing something like a Tin-Cup necklace, where you have a cluster of beads, and the cord shows, another cluster of beads, the cord, and so forth. Bead Cord trades off durability for visual appearance. If you were covering the whole string with beads, you would not want to use bead cord.
Elastic String is very popular, and avoids the issues of attaching clasps; however, it is not a durable product and loses its “memory” over time.
A last choice is hard wire. Hard wire is not a stringing wire. You can’t put a strand of beads on hard wire and attach a clasp; the metal wire will bend, kink and break from bending back and forth. Hard wire is used to create structural components, chains or shapes, which you can begin to link up, that is, build in support systems, in order to construct a bracelet or necklace.
Basic Steps: Using Needle and Thread to String Beads
Needle/Thread Bead stringing is a technique for securing a clasp to beads strung on beading thread or cable thread. Here you tie knots to secure your beadwork to your clasp. The process is relatively simple and requires only a little practice.
Successful Needle/Thread Bead Stringing requires that you understand the following: 1. Which threads or cable threads are best for which projects 2. Which needles work best 3. How to wax your thread 4 . How the materials you use affect your success 5 . The mechanical process itself, how it works, why it works, and why we do each step
THE BASIC STEPS:
With needle and thread, you always go through your beads 3 times. In a bead strung piece,that means you are going to take your needle and thread back and forth 3 times.
In fact, we are going to do everything in 3’s. We are going to go back and forth 3 times. As we get to each end,we are going to tie 3 knots.
Create your pattern.
2. You would cut your thread — about 6′ (a wingspan).
3. Lay out all your beads and the clasp assembly parts on the bead board or some other work surface, in the order they are to be used.
4. Thread your needle.
5. Wax your thread.
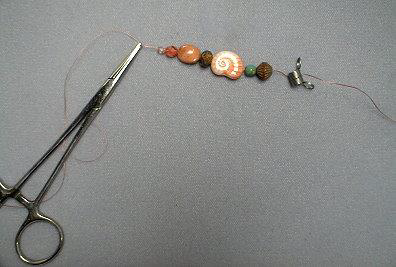
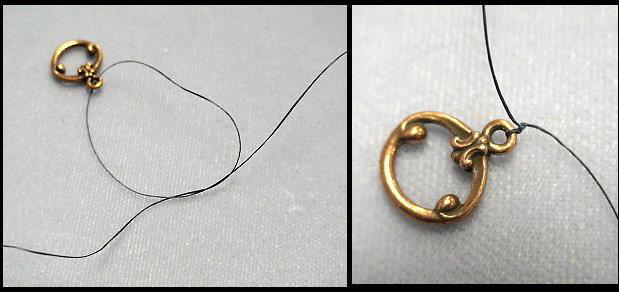
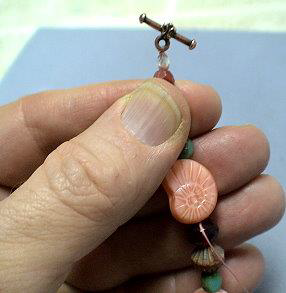
6. You would attach the largest part of your clasp — with Toggles, this is the ring — on one end, tying three overhand knots, and leaving a 8–10″ tail.
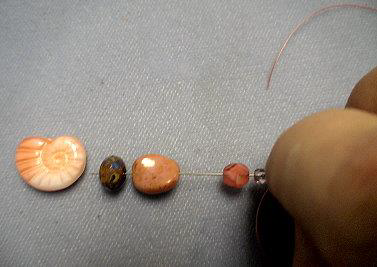
7. Slide on your beads, following the pattern.
NOTE: We only slide the beads over the thread spine, not the tail. With needle/thread work, we deal with the tails at the very end. They will be annoyingly in the way until then.
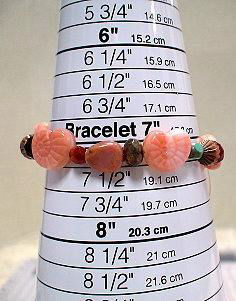
8. Determine the fit — both length and ease — by clamping or holding with your fingers the open end, and encircling a sizing cone or someone’s wrist with your bracelet. Remember here that the other end of the clasp will add another 1/2″ to this length.
Adjust the number or patterning of beads, if necessary.
NOTE: You need to make all your size and patterning adjustments BEFORE you attach the 2nd part of the clasp.
9. Tie off the other clasp-component — with the Toggle, this is the bar — making three knots.
10. Bring your needle/thread back to the ring side, and tie three more knots.
11. Bring your needle/thread one more time back to the bar side.
12. Tie three more knots.
13. Bring your needle/thread back through towards the ring about 1 1/2″ to 2″.
14. Tie 3 more knots.
15. Finishing off the tail. We want to see if we can pop any excess threads or knots which are showing back into the hole of that first bead.
Pinch the beads under the clasp and pull away from you while you grasp your thread and pull this towards you. Sometimes you will feel or see a pop.
Trim the tail.
16. Thread the tail on the other side of the bracelet onto a needle, and repeat these last two steps.
HOW TO USE NEEDLE AND THREAD To String a Bracelet, Including How to Wax Your Thread
There are many different types of stringing materials. The best outcomes are achieved using needle and thread. Beading threads are nylon. Most are shaped like a thin ribbon, rather than round, like sewing thread. Most are bonded, rather than twisted, fibers, which adds a lot of what is called “abrasion resistance.”
With beading threads, your stringing will be the strongest, it will last a long time, it will feel supple and soft, and it will drape and wear the best. It will take the shape of the body, and move the best with the body. These jewelry qualities are referred to as “ease.” Needle/Thread projects have a natural ease to them. Achieving good ease is much more problematic with other stringing materials.
With needle and thread, you tie knots to secure your clasps. Prominent beading threads including Nymo, C-Lon and One-G. One thread, Silamide is a pre-waxed thread and it is twisted, rather than bonded, which means it has no abrasion resistance. Although it is pre-waxed and little easier to manipulate through your beads, I don’t recommend it. I’m not big on anything that breaks easily.
Using needle and thread does add a lot of time to the creation of a piece. You have to use a needle, which can be awkward. You need to wax your thread, which takes more time. You need to go through your piece THREE times. If you are selling your pieces, very often it is difficult to recoup your labor costs, when using needle and thread. In this case, people often revert to using a cable wire as their stringing material.
Bead Stringing with cable wires goes very quickly and is easy to do. The cable wire is stiff enough to be its own needle. You don’t wax. You only have to go through your piece ONE time. The better cable wires are very strong. There is a stiffness to them that makes the pieces not feel as good when worn, in comparison to thread. You also have to use a crimp bead to hold the cable wires in place, and this is a weaker and somewhat riskier design element than tying a knot in the Clasp Assembly. Cable wire brands that I like include Soft Flex and Flexrite.
Pieces done on cable wire move in the opposite direction that your body moves. If I wear a needle/thread bracelet on my wrist, and move my wrist to the left, the bracelet will move with me. If I wear a cable wire bracelet on my wrist, and move my wrist to the left, the bracelet will actually move in the opposite direction to the right. The cable wire bracelet does not conform to and take the shape of your wrist, when worn. This becomes a major design problem not always dealt with easily.
Another alternative to beading thread is to use a hybrid cable thread, such as FireLine or PowerPro or Spiderwire. Cable threads are threads braided together and encased in nylon. Originally these were used as fishing line and adapted by craftspersons for stringing and weaving. You use needles with these cable threads, but you only have to go through your piece one time, instead of 3 times, as you do with thread. You can go through your piece more than once to make your piece stiffer, but you don’t have to. You do not have to wax these cable threads. You can wax them, however, if you want, to increase your thread tension, and add more security against the sharp bead-holes cutting the cable thread.
The cable thread pieces are stiffer than the regular beading threads, but drape better than the cable wires. You tie knots with the cable threads, like with regular beading threads, to secure your clasp. Since you still rely on a needle, using the cable threads goes more slowly than using the cable wires. The PowerPro is a little awkward to use. I really like the FireLine and Spiderwire.
Threads (nylon beading thread)
There are many types and brands of beading threads, each with some pros and each with some cons.
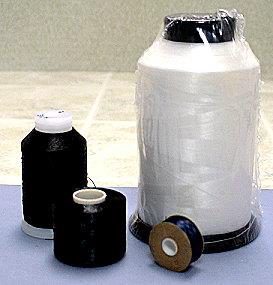
The original nylon beading thread is Nymo. Nymo was first developed by the shoe industry to attach the bottom of your shoe to the top of your shoe. It is widely used in upholstery. In the 1980s and earlier, if you wanted to buy Nymo, you bought it on a gigantic wheel — a five lifetime’s supply for us. As beading got more popular, Nymo packaged their thread on smaller and smaller entities, starting with a cone (a little bigger than a fist), then a spool (a little bigger than a thumb), and then a small bobbin. More recently the spool has been replaced by a large bobbin.
It turns out that the company could not get the same product onto a small bobbin. So, the thread on the small bobbin is weaker than the thread on the large bobbin, spool and cone. However, usually only white and black colors are available on the entities larger than the small bobbin.
Nymo is very strong. I suggest, if you have never worked with Nymo, to cut off about a 3 foot length, and try to pull on it and break it between your hands. It will break, but you’ll feel how tough it is. And in bead stringing, we typically go through each bead at least 3 times, so you have 3 thicknesses of this thread inside your piece.
When they make Nymo thread, it is a beige color. To make black, they dye the thread. The black dye tightens the thread, and makes it stronger. To make white, they bleach the thread. The bleach weakens the thread, so white is weaker than black. To make a color thread, they first bleach the thread white and then add a color dye. These color dyes further weaken the thread. So colors are weaker than white, and thus weaker than black. The colors of the thread, however, are consistent from batch to batch.
Nymo comes in many sizes. From smallest to largest, these include: OO, O, A, B, D, F, and G. The most popular and most often used size is D.
C-Lon is a newer thread. When they make C-Lon, whatever color it is, that is the color the thread starts as. So, all the colors AND the white AND the black are equally as strong. However, the color from batch to batch will vary, sometimes widely. Overall, we like C-Lon better, particularly for the white and the colors. Black C-Lon is equivalent in strength to the Black Nymo. For everything else, it is stronger. One drawback to C-Lon is that the ends of the thread fray easily, making it more difficult to get your thread into the eye-hole of the needle, than with Nymo. C-Lon only comes in two sizes — AA (smallest) and D (thickest).
ONE-G is a premium beading thread and is similar in strength to C-Lon. I think its best attribute is that it has a spring-i-ness to it, that makes it much less tiring to use, than Nymo or C-Lon. ONE-G only comes in size D and only in about 12 colors.
Silamide is a pre-waxed thread. The pre-waxing allows the thread to get less tangled up when you use it. However, Silamide breaks very easily, so I don’t recommend it. Why put in all that time into a project if there is a good chance your thread will break?
Beading thread is shaped flat like a ribbon. Sewing thread is shaped round. Sewing threads are not strong enough to use in beadwork.
There are two ways to thread a needle. The logical way, the way your mind and brain and eyeball and heart and gut all say to do is this:
– Take the thread in one hand, and the needle in the other. Push the needle onto the thread. Keep poking the thread with the needle until the thread meets the hole and slips through. Then pull on the thread.
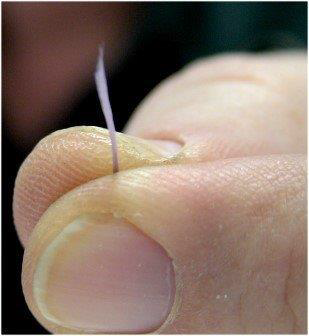
The illogical, but more correct way, is to pop the thread into the needle:
Put the thread between your thumb and fore-finger, and pinch it. Pull it down between your fingers so that the end slips just below the top surface of your fingers. Place the needle over your fingers, lining up the eye hole just above the gap between your two fingers where the thread is hiding, and keep the needle from moving. Squeeze your thumb and forefinger together, so that the thread pops straight up and into the eye-hole. Voila! Magic. Then pull on the thread.
When cutting your thread off the bobbin or spool, if you cut at a slight angle, it makes it easier to get the thread through the eye hole of the needle.
Another trick: Rather than wet the top end of your thread with spit by placing the thread in your mouth, wet the eye hole of your needle. The water that gets trapped in the eye hole will draw up the thread, as you put it to the hole.
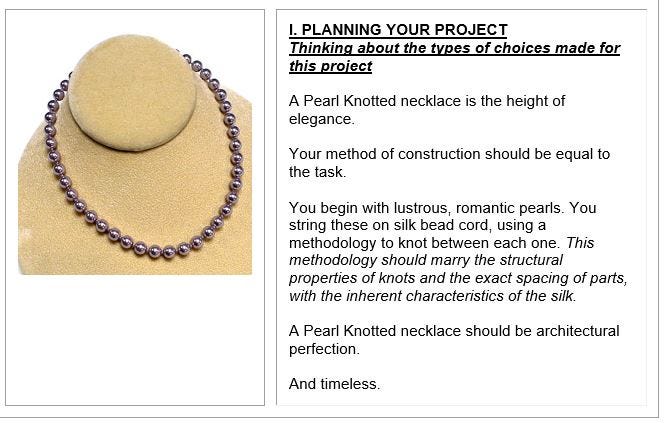
Classic Elegance! Timeless! Architectural Perfection! Learn a simple Pearl Knotting technique anyone can do. No special tools. Beautiful. Durable. Wearable. Easy.
“Over the years, I have found it very difficult for most students (and even my instructors) to get good knots and good hand-knotted construction using a traditional hand-knotting technique with tools. It is difficult to maneuver the knot close to the bead, and it is difficult to keep sufficient tension on your bead cords, as you make the knot. After much trial and experimentation, I developed this set of non-traditional steps. My students usually master this approach on their very first try!” — Warren
Pearl Knotting
Pearl knotting is a relatively easy technique. There are many variations in how to implement the technique. Here I present the steps for a non-traditional approach to pearl knotting. I feel that, for most people, the traditional approach, without a lot of practice, can be a bit awkward, and result in a less-than-desired functional outcome. The non-traditional approach I present here is easier to achieve a better outcome.
There are 4 different ways for starting and finishing off your pearl-knotted piece.
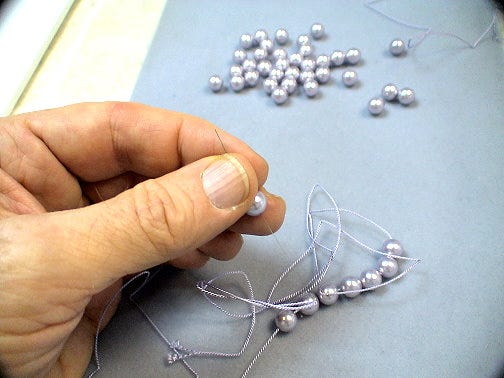
In this non traditional approach, we do NOT use any tools — like tweezers, awls, or tri-cord knotters — to make our knots. We do, however, pull two thicknesses of bead cord through each bead, as does the classical version of the traditional methodology. We minimize the use of glue.
Supplies:
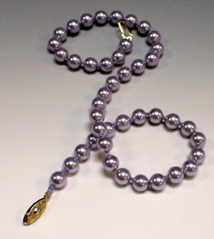
16″ strand of pearls, faux pearls or other beads, approximately 8mm in size, (44–45 beads)
Silk or nylon bead cord with needle attached to one end, matching color, (one 2-meter card). With 8mm Swarovski crystal pearls, you would need a bead cord between .65mm and .70mm in diameter, which, in the Griffin line, is a size 5 or 6.
Twist wire needles (also called Collapsible Eye Needles), size Fine, (2–3 on hand)
Pearl clasp, single strand, approximately 18–20mm long, (1 clasp)
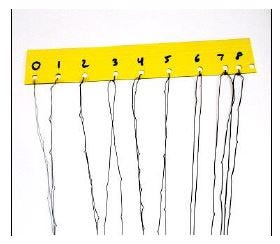
T-pins (or U-pins)
A pad into which you can stick the T-pin (or U-pin)
Scissors.
G-S hypo fabric cement (if your cord is silk)
Either a bic lighter or Beacon 527 glue (if your cord is nylon)
An awl
Chain nose pliers
Ruler
Necklace sizing cone
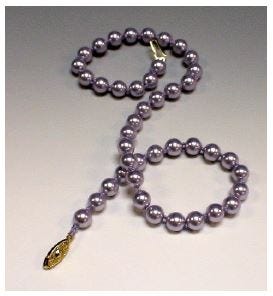
PEARL KNOTTED NECKLACE
ABOUT PEARLS IN HISTORY
I live in Tennessee, which has a special connection to freshwater pearls. Four and five hundred years ago, when French explorers came down through Canada and down the Mississippi River, they discovered that the Mississippi Indians in Tennessee collected pearls embedded in the local mussels which lived along the banks of the Tennessee River. The explorers traded for these pearls, and shipped them back to Europe, where they were reserved for royalty only, and were called “Royal Pearls”.
Tennessee River Pearls
Before the creation of cultured pearls in the early 1900s, natural pearls were rare and expensive. A jewelry item that today might be taken for granted, say, a 16-inch strand of perhaps 50 pearls, often cost between $500 and $5,000 at the time. Pearls are found in jewelry and mosaics as far back as Egypt, 4200 B.C. At the height of the Roman Empire, when pearl fever reached its peak, the historian Suetonius wrote that the Roman general Vitellius financed an entire military campaign by selling just one of his mother’s pearl earrings.
While Tennessee freshwater pearls are available to anyone today, many royal families in Europe continue to import these pearls. It is the custom, among many royals, and dating back to the time of these French explorers, to have a freshwater pearl sewn into their undergarments. The belief is, if the pearl touches your skin, you will continue to be prosperous and wealthy.
Pearls are harvested in both fresh water (from mussels) and sea water (from oysters). The pearls created by both types of mollusks are made of the same substance, nacre. Nacre is secreted by the mantle tissues of the mollusk. This secretion hardens. When the hardened nacre coats the inside of the shell, we call this Mother of Pearl. When the nacre forms around some irritant, forming a ball-like structure, these become Pearls. Saltwater pearls typically have some kind of bead nucleus around which the nacre forms and hardens. Freshwater pearls typically do not. Besides Tennessee, other major sources of pearls are Japan and China.
Nacre
Cultured pearls are real pearls produced by inserting a piece of mussel shell (or some other irritant) into the tissue of a mollusk. The mollusk coats this with nacre, creating the pearl. The more coats of nacre the mollusk produces, the more lustrous and pricey the pearl becomes. Mikimoto developed this process in Japan in the early 1900’s.
Pearls are soft and they absorb, as well as, reflect light.
NON-TRADITIONAL vs. TRADITIONAL PEARL KNOTTING TECHNIQUES
Hand-Knotting. We put knots between pearls for many reasons. Some reasons have to do with visual aesthetics; others, with structural and architectural concerns.
The knots protect the pearls, should the necklace break. When it breaks, you would lose only one pearl, not all the pearls on the piece.
Pearls are soft, and the surface can easily chip and scratch. Pearls are particularly vulnerable at the hole, where the forces from movement, when the jewelry is worn, force the stringing material to push against the vulnerable edges of the nacre, exposed around the hole of the pearl. Silk cord is very soft, and does not pose a major threat. All other stringing materials — such as nylon bead cord, nylon beading thread, and cable wires — do pose a threat. The knots provide some protection.
Without knots, the pearl’s integrity is threatened, not only by the stringing material, but by the next bead it bumps up against. Other adjacent pearl beads can cause scratches and chips. Metal beads and glass beads will work like hammers against the pearl, as the jewelry moves, when worn.
Knots, when done correctly, are visually attractive. We want our knots to be big enough so that they will not slip into the holes of our beads. We want our knots small enough so that they do not compete with the look of our pearls. The pearls, at all times, should attract the viewer’s focus. The pearls are the star of the piece. Nothing should distract. We want our knots to appear centered over the holes of our beads.
Visually, knots also set off each pearl, as if bracketing them or framing them. For the viewer, this heightens the visually attractiveness of each pearl, moreso, than had the necklace not been knotted.
Structurally, having a knot on either side of the bead, tied tightly in place, so that the bead cannot move freely. Bead cord frays easily,especially if it is silk. We want to restrict the ability of the pearl to move back and forth because of any slack between two knots. We want to restrict the pearl from rotating around the bead cord.
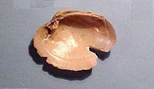
* First, the knots, plus the fact that we will be bringing two cords through each pearl, rather than one, keep the pearl from moving both up and down the cord, as well as around and around the cord, as the jewelry is worn. Pearl holes are very sharp. Picture a broken sea shell, and how sharp it feels as you move your finger along the edge. This is what the hole looks like. If the bead is allowed to move freely, the hole will quickly fray the cord, even cutting it.
Broken mussel shell
* Second, it forces the necklace, as it is subjected to punishing forces resulting from movement, to channel those forces towards the un-glued knots. These un-glued knots easily absorb this force, allowing the necklace to more easily conform to the body, and move with the body. Thus, the force is re-directed around the stringing material, that is, around the knot, instead of directly into it, forcing it against the sharp hole of the pearl. Again, the knots help preserve the integrity of your piece.
NOTE: When using karat gold beads, we do NOT knot on either side of these beads. The knots often force the karat gold beads to dent and squish, when the jewelry is worn. This is also true of many thinner-walled sterling silver beads.
NOTE: When using French wire bullion, we do NOT place a knot between the pearl and the bullion. Instead, we try to anchor the ends of the bullion into the opening of the hole in the pearl.
A Comparison of Traditional and Non-Traditional Techniques.
There are many, many variations on Pearl Knotting techniques.
The major difference between traditional and non-traditional methods is in how the knots are made. Traditional methods use tools, like tri-cord knotters, tweezers or awls, to guide the knots into place. Non-traditional methods do not.
Over the years, I have found it very difficult for most students to get good knots and good hand-knotted construction using tools. It is difficult to maneuver the knot close to the bead, and it is difficult to keep sufficient tension on your bead cords, as you make the knot. This is why I prefer the non-traditional method, which students master much more readily.
If using a traditional technique, I would suggest using a tri-cord knotter, and not a tweezers or awl.
Other Types of Variations Among Techniques:
(1) How many cords are pulled through the bead
I pull two cords through each bead. Some techniques pull only one.
I found that, with only one cord, you don’t get enough resistance to the bead spinning around the cord, when worn. This makes it more likely for the bead’s sharp hole to fray and cut into the cord.
Two cord approaches work best when the hole size from pearl to pearl are relatively consistent. One cord approaches work best when there is noticeable variation in hole size from pearl to pearl.
(2) How many cord thicknesses make up the knot
I pull two cords through the bead, and use one of the cords to tie an overhand knot over the other cord. So, my knot is two cords thick around the core. Some techniques tie a knot using both cords at once, and resulting in a 4-cord thickness knot around the core.
I find that 4-cord-thick knot to be too big, visually competing with the pearls, instead of complementing them. The size of the knot, however, does not impact its structural functionality. Best functionality is achieved with a non-glued knot, and with simpler knots like larks head or overhand knots.
(3) How knots are tied
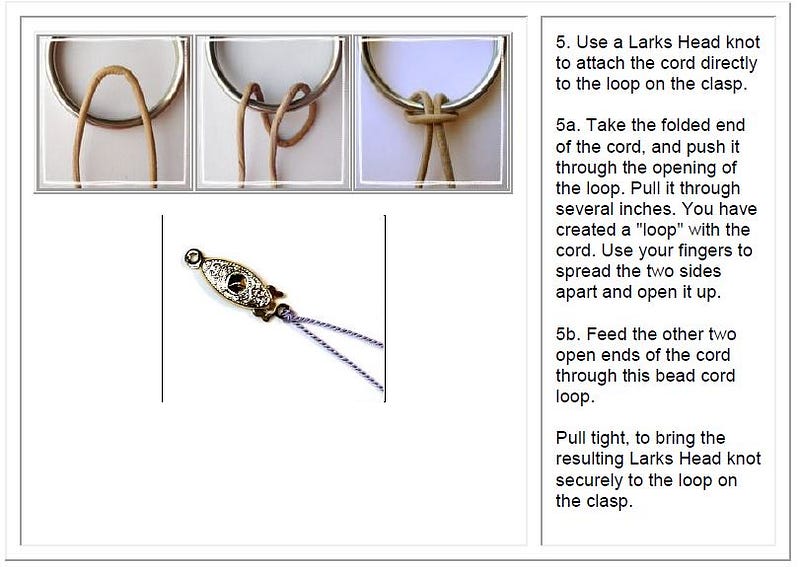
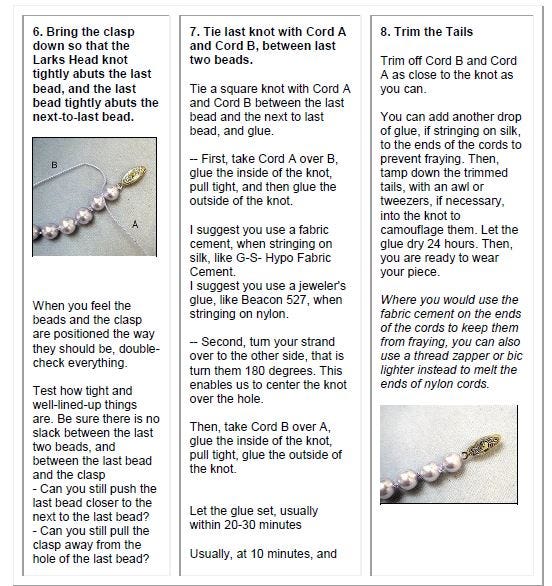
I use an overhand (half hitch) knot for the knots between beads, but a Larks Head knot to connect the piece to either side of the clasp. Some people use a Larks Head knot for all the knots.
I find that the Larks Head knot, when used between beads, often gets off-center. When the knots are too off-centered, not only can this be visually annoying, but it can force the pearls to sit crookedly all along the necklace line.
My final knot is a square knot, which secures both cords which I have pulled through my beads, and centers this knot between the last two pearls.
(4) How knots are tightened
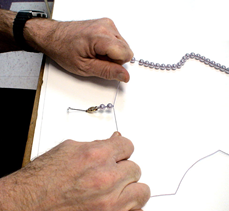
After you make each knot, you need to be sure to bring the knot as close and as tightly against the pearl as you can.
Visualize:I have two cords exiting the hole of my pearl. First, I take each of my two cords, and I pull them tightly away from each other. This pushes the pearl against the knot below it. Second, I tie an overhand knot and pull tight. Last, I grab each cord and tightly pull them away from each other one more time to be sure the knot is tight and abuts the top of the pearl.
Some techniques have you take your thumbnail, or the tip of your tweezers or awl, and push the knot towards the pearl’s hole. Traditionalists worry that by pulling the two cords apart, you will force the knot into the hole of the bead. However, by selecting the appropriate thickness of cord, and bringing two cords up through the hole of the bead, you will not have this problem.
I find that the thumbnail push doesn’t get close or tight enough. The use of the tools can fray and break the fibers in the cord. It’s one thing to use the tools to guide the knot into place. It’s another thing to use the tools to push and tighten the knots into place.
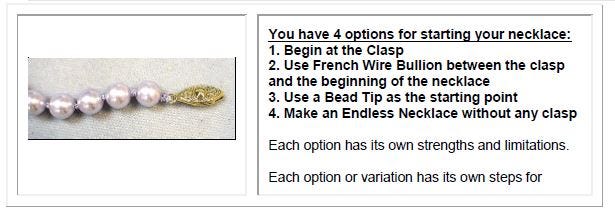
(5) Whether the piece begins and ends at the clasp, or with French wire bullion between the necklace and the clasp, or with bead tips between the necklace and the clasp, or with no clasp at all.
How you start and end your piece will vary a little bit, depending on whether you are attaching the piece directly to a clasp, using bullion or beads tips intervening between the piece and clasp, or using no clasp at all.
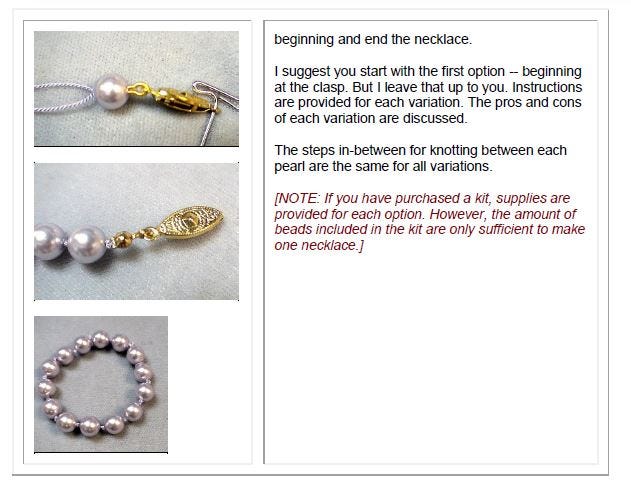
You connect the clasp differently in each case. You make your beginning and final knots differently in each case.
This is a personal choice.
Attaching the cord directly to the clasp is the most difficult. It uses the most technique, so, when I teach this class, this is the approach I use.
Using French wire bullion is a little easier. It looks very finished and pretty when your necklace is completed. But the bullion doesn’t age well. It gets black and dirty.
Using clam-shell bead tips is very easy and the most versatile. It extends the length of the clasp assembly, so there is some visual competition which might be annoying in some cases.
Making a continuous necklace is not that difficult, and allows you to make a long rope that does not need a clasp.
Whatever you do, you want to be sure that your resulting clasp assembly — that is, the clasp and all it takes to attach your beadwork to it — does not visually compete with the beauty of your pearls.
(6) How and where that last knot or last two knots are made
You can attach your last knot directly to the clasp, or bring your cord back through one or two beads, and then tie a knot.
You can run through steps for that last knot, which have you tying one cord off in one place, and tying the second cord off in another place.
You will find other instructions for tying off your cords in one place together.
When you make your last knot, you can tie a single knot, a double knot or a triple knot.
I approach this in a few different ways, depending on whether using a clasp only, or bullion, or bead tip, or no clasp.
If the final knot is going to show, I prefer NOT to end directly to the clasp, but to bring it back through one bead and tie it off between the last two beads.
My final knot is a square knot. This is the only knot in my pieces where I apply glue.
(7) Which Glue and How the Glue is Applied to the Knots
I prefer a “cement” over a regular “glue”. Cements bond immediately with the materials they are applied to. The bonds of most other types of glues are formed as the solvent in the glue evaporates into the air.
With silk, I prefer a fabric cement. I would never use super glue.
With nylon, I prefer to use a jeweler’s glue called Beacon 527 or hold it near a flame to melt the ends.
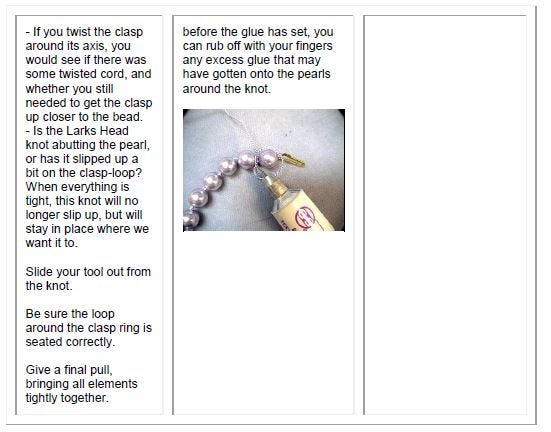
I prefer to place a very small drop of glue on the inside of the knot. I pull the knot tight, and put another drop of glue on the outside of the knot. This coats the bottom and the top of the knot. I let the glue set for 20–30 minutes. Then, I trim the tails very close to, but NOT right at the knot. Put another drop of glue on each tail, and tamp down on the tails with a tweezers or awl, so the tail-ends appear as part of that final knot, and make the knot pretty.
I try to minimize my use of glue, since glue will considerably diminish some of the structural support properties of the knot. I prefer to apply glue to only one knot in my piece — the very last knot made.
NOTE: With nylon bead cord, you can use a thread zapper or bic lighter to melt the ends of the cords. Where glue is to be used at the ends of the cords to keep them from unraveling, with nylon bead cord, you can melt the ends instead.
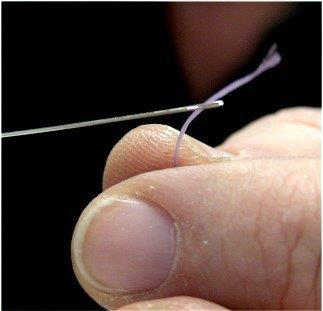
(8) Whether you use a flexible metal wire (steel or brass) needle, or make a self needle from the cord itself, using gum arabic.
Here we are using the wire needle that comes attached to the cord, plus a second twist wire (collapsible eye) needle.
What some pearl-knotters worry about is the metal needle snagging the bead cord, during the pearl knotting process. This weakens the cord.
To make a thread-needle, you would take a paring knife and shave the threads at the first 1 1/2″ at the end of your cord. Gently guide the paring knife over the cord until the nubs have been removed from the silk, and the thread has thinned. The more you shave, the thinner your needle will be. With an awl or tweezers, dab a small drop of gum arabic on the ends, and twist the threads between your fingers to make the needle. Cut off any stray fibers. Let dry for a few minutes until stiff.
I prefer the wire needle, because I find it easier to use, and longer lasting. Be aware, that should your wire needle begin to catch on the silk cord running through your bead, pull it out a bit, and then push it back through. It is not that difficult to minimize this problem. It is a lot easier to use the wire needle than your own home-made self-needle.
CHOOSING BEADS
Pearls come in different sizes and shapes, and a myriad of colors.
Some pearls are from nature. These include freshwater pearls (from mussels) and saltwater pearls (from oysters). Pearls can be naturally occurring, or cultured, where people have intervened in the process by introducing an irritant inside the mollusk shell.
Other pearls are “faux” or imitation. These are some kind of core bead with a pearlized finish around it. These are typically described by what makes up the core of the bead. The core could be plastic, glass, shell, or crystal. These are made in different countries around the world and vary in quality.
To differentiate between natural and faux pearls, try these things:
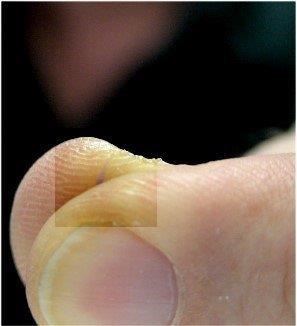
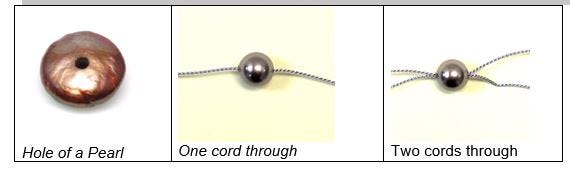
A) Always when buying pearls, check the hole. Most natural pearls have very small holes. The holes usually appear relatively smooth, but not perfectly smooth, round and centered as the holes in faux pearls do. The finishes on many faux pearls are not well applied, particularly at the hole. You often can see the finish chipping off or peeling away from the hole.
B) Rub the pearls against your front teeth. Faux pearls have very smooth surfaces. Natural pearls will have bumps and slightly uneven surfaces. You can feel the differences, when rubbed against your front teeth.
Pearls are typically described in terms of :
Luster: the way pearls seem to glow from within. It’s based on the depth of reflection due to the layering of the aragonite crystal.
Overtone: the translucent “coating” of color that some pearls have. A silver pearl may have a blue overtone or a green overtone, for example.
Orient (sometimes called iridescent orient): the variable play of colors across the surface of the pearl like a rainbow.
Shapes
Thanks to some new nucleating techniques, freshwater pearls can be found in a nearly endless variety of shapes, but the more traditional shapes include:
Round — Perfectly spherical, or very nearly so. These are primarily saltwater pearls. Stick — Long and thin with many irregularities. Rice — Small ovals drilled lengthwise. Potato — Often lumpy, these are typically rounder than rice pearls and may be drilled either lengthwise or widthwise. Nugget — Usually a little more square or pebble shaped than rice or potato pearls and almost always having a flat side. Coin — Large, circular and flat, often about the size of a dime, with the hole drilled end-to-end. Coin shapes include hearts, squares, ovals and large pears and drops. Keishi — Sometimes called “cornflake”, these are flat and highly irregular. Drop — Teardrop, pear or even peanut shapes, drilled either lengthwise, or widthwise at the narrowest end. Button — Rondelle shaped, often with a flatter side, and drilled through the “hub” of the wheel. Blister pearls — pearls that are still attached to the shell of the mollusk.
Colors
Most pearls are color enhanced to become a specific color. First they are bleached, then dyed.
Sizes
Pearl bead sizes are given in millimeters There are 25mm in an inch. Rulers are marked in inches on one side and millimeters on the other.
Hole Sizes
Hole sizes on pearls usually run smaller than on most other beads. The size of the hole is NOT in proportion to the size of the bead. Therefore, when selecting bead cord, you need to have one of your pearls handy, so that you can match the hole size to the cord.
CHOOSING CLASPS AND CLASP ASSEMBLIES
You can use any type of clasp that you prefer.
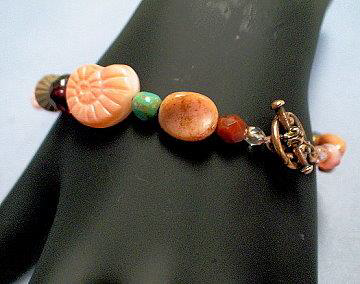
However, pearl knotted jewelry is very strongly associated with what are called pearl clasps or safety clasps. These are often marquis-shaped clasps, with a hook like tongue that pushes inside them. If the tongue should somehow come undone and slip out, it would catch on a bar in the clasp, saving you from losing your string of pearls.
In terms of that vintage-type look, other widely used clasps are filigree or other box clasps. These are pretty, but not as secure as safety clasps.
Usually, you will want your clasp to compliment and not compete visually with your pearl knotted piece. If you decide to use a very show’y clasp, it should blend organically with the rest of your piece.
You will be attaching your bead cord, either to the loop(s) on the clasp itself, or to soldered rings attached to these loops. You want both these loops, as well as any rings attached to them, to be closed, that is soldered — thus have no gaps in them. If there are attached rings, and they are open, you will want to remove these, and attach the cord to the closed loops on the clasp.
If you are making pearl knotted pieces for re-sale, you would be hard pressed Not to use a pearl or safety clasp, or some similar looking clasp.
The woman who originally owned the American Pearl Company in Tennessee was always looking for a clasp that would be durable, but attractive to her customers. The American Pearl Company made a lot of its money by selling finished jewelry. Safety clasps, particularly those made of 14KT gold, break easily. The tongue bends and breaks, and no longer can wedge into its marquis shaped home. Her biggest frustration was that the clasps on the necklaces and bracelets she sold broke too easily, and the pieces came back for repair. It’s a big effort to re-string pearl knotted pieces, since you have to cut off each pearl individually.
At first she tried switching to other types of clasps, like toggle clasps and lobster claws. But these pieces did not sell. People wanted pearl/safety clasps.
Next, she tried switching from 14KT gold to gold-filled clasps. These did not sell either. People wanted 14KT.
Finally, she gave in somewhat. She returned to the 14KT gold pearl/safety clasps. But she doubled her prices, to build in the cost of one re-stringing.
CHOOSING STRINGING MATERIALS
We recommend, if your project is all pearls, or mostly pearls, that you use silk beading cord.
If your project is very few pearls, or no pearls, say using glass, faux pearls or gemstones, that you use nylon beading cord.
Unfortunately, while nylon bead cord is much, much more durable than silk, nylon ruins pearls. Nylon cuts into the pearl at the bead hole, making the nacre start to chip and flake off. Silk does not do this.
Beading cords are threads which are braided together to make them look pretty. Beading cords are used in projects where you want your stringing material to show. Beading cords are less durable than waxed threads or flexible cable wires. We do not wax beading cord, because this would make the cord look ugly. Waxed beading threads and cable wires can cut into the pearls at the hole, and ruin them. By using beading cords, you are trading off visual appearance for durability.
Silk and nylon bead cord can be purchased in 2-meter (6 feet) lengths on cards with a needle attached, as well as on larger spools without a needle attached. Usually the silk or nylon on spools is a higher quality cord than that on cards. However, most people use the cards because of the convenience of having a needle attached.
At the same quality level, silk beading cord and nylon beading cord have the same pros and cons. They stretch the same, fray the same, get dirty the same — only the silk deteriorates, and the nylon does not.
You can pick a bead cord which matches the color of your beads, or which contrasts or otherwise highlights the color of your beads. In either case, the color should visually compliment, not compete, with the pearls themselves.
A NOTE ABOUT KNOTS AND THEIR FUNCTION
When we knot between beads, the un-glued knot becomes what is called a “support system”. Support systems in jewelry allow what is called “jointedness.” Un-glued knots are support systems, as are loops and rings, hinges and rivets. In this project, the pearls can rotate around the knots, and the knots can contract and expand in response to stresses and strains placed on the necklace when worn.
Support systems allow the piece, as worn, to move freely. When jewelry moves when worn, this puts a tremendous amount of force on each of the components. Support systems allow this force to be absorbed and dissipated, before anything bad happens.
If the piece is too stiff, such as when the knot has been glued, and cannot move freely, the components will break — the cord will break, the clasp will break, the beads will chip, crack and break.
A NOTE ABOUT GLUES AND GLUE-ING
Glue is usually the enemy of good design. We want to minimize its use.
Unfortunately, with hand-knotting, we need to secure the last knot, and, in some cases, the last two knots, with glue. When we finally trim the cord where we have tied that last knot, we use the glue for two reasons, (1) to keep the end of the cut cord from unraveling, and (2) to keep the knot from loosening up and coming un-done.
With silk beading cord, we suggest using a fabric cement. “Cement” is a type of glue which bonds instantly with the cord, when applied. With cement, the bond adheres to all the microfibers that make up the bead cord. “Glue” without the label cement on the package, usually bonds over a period of time while the solvent in the glue evaporates into the air and the bond dries. With glue, the bond tightens like a collar. In this project we suggest G-S Hypo Fabric Cement, because it has a very narrow applicator tip. But any fabric cement will do. You can purchase these at most craft stores and some bead stores.
With nylon beading cord, we suggest a jeweler’s glue like Beacon 527. This glue dries like rubber, and the bond acts like a shock absorber when confronted with excess force. This glue does not come with that great narrow tip, so we suggest applying the glue with a pin or toothpick. This glue dries quickly. Another widely used glue is G-S Hypo Cement which does come with that great tip, but doesn’t dry quickly enough, and I find the fully set bond too stiff. I would never use super glue for this purpose.
In selecting a glue, you want it to — dry quickly — dry clear — not harm the pearls (or other types of beads you are using) — be washable
While some glues dry quickly, most take about 24 hours to set and dry hard. You would not wear your pieces for 24 hours after gluing.
WHAT TOOLS DO I NEED?
In traditional pearl knotting, you use a tool to help you make and secure your knots. This tool would either be a tri-cord knotter, which works well. Or it might be a very pointed tweezers or awl, which are awkward for most people to use, without a lot of practice.
In our non-traditional approach, we do not use tools for knotting. Occasionally, we might use a chain nose pliers or a tweezers, to give us some more leverage, when pulling a cord through a bead. We use scissors to cut the cord. If using French wire bullion, we use a flush cutters to cut this. But we use only our hands to make our knots, position the knots, and tighten the knots.
Over the many, many years I have been in the beading and jewelry making business, I have seen few students able to get the knots done satisfactorily, using the tools, and following the traditional methods. A few students have practiced over and over again to master the technique. But most students give up long before they get to that point. The non-traditional method is mastered in one or two tries. That is one of the reasons we advocate for the non-traditional approach.
Also note, if you squeeze the cord too tightly with tools, you can damage the cord.
RE-STRINGING PEARLS
Know when to restring your pearls.
There are 5 tell-tale signs:
DIRT CHIPPING STRETCH DETERIORATION CLASP FAILURE
Re-string if the knots between your pearls are looking soiled or discolored. Silk, in particular, absorbs body oils and grime. Pearls are porous. They can absorb dirt and become permanently discolored. Sometimes, if there are no knots between beads, your pearls might adversely be affected by the beads next to them. For example, gold beads can blacken pearls, at the point they come in contact.
Re-string if your pearls become chipped, scratched or broken. Pearls are soft and can easily scratch, chip and break. Some of your pearls may need to be replaced, before re-stringing.
Re-string if your pearls are moving around too freely between the knots. Silk stretches over time. Cord which shows, thus is uncovered, increases the chances it will break. Your necklace also may get longer over time, and that extra length may no longer meet your fashion needs.
Re-string if your stringing material breaks.
Re-string if your clasp breaks.
How often do pearls need to be re-strung? This depends on how often you wear them, what they were strung on, and how they were stored and cared for.
In general, pearls need to be re-strung every 3–5 years. If you wear your pearls every day, you will need to re-string them annually. If they were strung on silk bead cord, which is our preference, then silk naturally deteriorates in 3–5 years, and you want to re-string them before the silk starts turning to dust. If they were strung on nylon bead cord or flexible cable wires, these materials do not easily break down, and you might wait 10 years before re-stringing.
If you store your pearls in an air-tight bag, and out of the air and sunlight, you may only have to re-string them every 10–15 years, even when strung on silk beading cord. The bag should be made of a natural material like silk or cotton. Plastic bags chemically interact with the pearl, and will ruin your pearls.
Before you re-string your pearls, you would need to clean them.
First, you should gently wash your pearls while they are still on the old string, with mild soap and warm water. Remove any dirt and hardened oils around the pearls, particularly near the holes. Rinse extremely well so that there is no soapy residue. While you are cleaning your pearls, you want to anticipate what might happen, should the string break. Be sure the drain is covered. You might want to wash the pearls by working inside a colander in your sink.
Next, you must carefully cut the pearls off the old string. To start, place your scissors on the knot between two pearls and cut through the middle of the knot. You don’t want to start on either side of the first knot because the knot could slip inside a pearl and be quite difficult to remove. For the rest of the pearls, snip each knot off by placing the scissors behind each knot and in front of the pearl. Again, work over a surface, where, if you dropped a pearl, you would not lose it.
If there is a pattern to the arrangement of the pearls on your necklace, you might want to lay them out in this pattern, as you cut each one off the string, say on a bead board.
A NOTE ABOUT BUYING PEARLS
When buying pearls, you want to examine:
— Shape — Consistency of shape along your strand. Either very round, or a very interesting shape is considered better. — Size — Consistency of size — either similarity of size or consistency of gradations in size — along your strand. Usually, the larger the pearl, the more valuable it is. — Color — A pleasing blending of color all around the bead, from every angle. Consistency of color along your strand. Rose or silver/white pearls tend to look best on fair skin tones, while cream and gold tones look better on darker complexions. — Luster — High luster and translucency is better than dull or chalky — Surface quality — Few blemishes is better than one with many irregularities. Absence of disfiguring spots, bumps or cracks. — Hole quality — If you see chips around the hole, this is a bad sign and indicative of other problems. Some hole sizes may be so small, that they would be extremely difficult to work with. — Nacre thickness — Thicker is better
A NOTE ABOUT CARING FOR PEARLS
Pearls will last a lifetime and beyond, if cared for properly.
Exposure to heat (such as the top of a TV set or near a stove or fire place), sunlight, and chemicals (such as those in hair spray, cosmetics and perfumes) can damage the nacre of pearls.
How do I safely clean pearls? Use a gentle detergent soap or mild shampoo without dyes and warm water. Be sure to clean around the hole of each pearl. Rinse thoroughly and let dry on a damp cloth overnight. Hot water can permanently damage your pearls. Do not let your pearls soak in the water. Let the pearls and string dry out for 24 hours before wearing.
Never wear your pearls when the string is still wet . Never hang the strand when wet.
Pearls are softer than other gemstones. Always wipe them with a soft cloth after wearing. Perfume oils, makeup, hair sprays and perfumes can spot and weaken their surfaces, as well as the cords they are strung on.
Pearls should be put on after the application of cosmetics, perfume or hair spray. They should be the LAST THINGS PUT ON and the FIRST THINGS TAKEN OFF.
Pearls should be kept away from hard or sharp jewelry that could scratch them.
Pearls are best stored in a soft cloth pouch, or in a separately lined segment of a jewelry box, and out of the air and sunlight. Do not store in a plastic bag. The plastic emits a chemical which makes the pearl surface deteriorate.
Do not shower or swim in your pearl jewelry.
Ammonia and alcohol will ruin pearls. They both draw out the oils in the pearls which give them their luster. Keep pearls away from metal cleaners and tarnish removers.
The more you wear your pearls, the more beautiful they become. Pearls’ luster is maximized when worn often because the oils from the skin react with the surface of the pearl. However, you want your pearls to glow, not yourself; perspiration can be slightly acidic, and eat away at the pearl.
The air in many safes and security deposit boxes is very dry, and can cause pearls to crack or discolor.
A NOTE ABOUT DRILLING PEARL HOLES TO MAKE THEM LARGER
Pearls typically have very small holes. The holes are small because it is too easy to chip and crack the nacre around the holes, when drilling them.
You can, however, make the holes a little larger. You would use a hand-held or battery-operated bead reamer to make the holes in your pearls larger. You want your drill beads to be diamond coated.
You want to work slowly but steadily.
Wear safety goggles. Pearl dust can adversely affect your eye-sight.
Until the 1970s, pearl holes were typically drilled by hand. Pearl companies from Japan would often have boys in India drill holes in pearls. They would hire and train boys who were 9 years old. By the time the boys were 14, many had lost their eye-sight. Thankfully, with the advent of mechanized ways to drill pearls, this practice no longer continues today.
STYLES AND LENGTHS OF PEARL NECKLACES
Because the history of pearls has been very much a part of the history of nobility, there have been many customs and social expectations that have arisen around pearls. One of these has to do with styles and lengths.
Graduated: Beads are graduated in size, with the largest in the center, and decreasing in size on either side towards the clasp.
Uniform: All the pearls are within .5mm of each other in size.
Choker: One or more strands worn just above the collarbone, typically 15 1/2″ to 16 1/2″.
Princess: 18″ length
Matinee: 22–24″ length
Opera: 30–32″ length
Continuous Strand: A necklace without a clasp, typically over 26″ in length so that it can slip over someone’s head.
Bib: A necklace with many strands, each one longer than the one above it.
Rope: 45″ or longer, sometimes referred to as a lariat.
A necklace enhancer, sometimes referred to as a “necklace shortener”, is like a ring with a latch on one side and a hinge on the other, which lets you open and securely close it. These are most often used with ropes, where you circle the rope over your head 2 or 3 times, to wear like a multi-strand choker. The necklace enhancer clips over the knots in the encircling strands, to secure them together and in place. If you cannot find a necklace enhancer, you might be able to use an S-clasp to achieve the same end.
Odd vs. Even number of strands: This is a personal choice. Traditionally, it was believed that an even number of strands was inappropriate and bad luck. It would be very unusual to see any royalty wear an even number of strands.
SELLING YOUR PEARL KNOTTING SKILLS
Selling your pearl knotting skills is a great way to make some money.
Most jewelry stores charge their customers to re-string their pearls between $4.00 and $6.00 per inch.
Most independent jewelry designers charge between $2.50 and $3.50 per inch. These designers re-string pearls on their own, or sub-contract with jewelry stores.
I have also found, when doing craft shows, that I can quickly hand-knot strands of attractive-looking beads, not necessarily pearls, and use these knotted pieces to fill out my inventory. These pieces sell very well, and are very profitable.
BEGINNING YOUR PROJECT
Pearl Knotting Basic Steps
Selecting and Testing Bead Cord 2. Variation #1: Attaching Clasp to Beginning of Necklace 3. Bringing Up The First Pearl and Tying the Knot 4. Continue Pearl Knotting To Get the Length You Want, But Stringing Last Two Beads Without Knotting Between Them 5. Attaching the Other Part of Your Clasp to the End of the Necklace, and Making the Final Knots
Selecting and Testing Bead Cord
We are going to pull two thicknesses of cord through our beads. The bead will be strung on one cord, and we will be pulling a second cord through the hole. We want noticeable resistance to this. Resistance to the point where we feel we need to direct our hand to pull a little harder than we first thought. You might need a chain nose pliers to help you pull the needle through.
You might want to prepare a sample Cord-Size Tester, like I have. Here I have attached cords between sizes 00 and 08. Each cord is doubled. One leg of each cord has a needle attached, and the other leg does not. This lets me test out both cord thickness, as well as knot size.
Most freshwater and saltwater pearls have very small holes. The sizes most used here are between 00 (.3mm) and 03 (.5mm), with 02 (.45mm) the most common.
Most glass beads and gemstone beads require cords between 04 (.6mm) and 08 (.8mm), with the most common 06 (.7mm).
When The Beads Have Different Size Holes…
You always want to start with beads that have very similarly sized holes.
If you buy a strand of real pearls, there is a good chance that the hole sizes might vary. You might need to work from 2 strands of beads to cull enough beads with similar size holes, to pearl-knot.
Another thing you might do, especially if there is a big variation in hole sizes, say when mixing both pearls, glass, metal and/or gemstone beads. You do not necessarily have to put knots between all your beads. You can separate the beads in terms of hole sizes, create a patterned layout, where you plan to knot between beads with similar hole sizes, and not knot between the rest.
It is also very typical that the hole on one side of the bead will be slightly larger than on the other. Picture a drill press. The drill bit pushes down into the bead to make this hole, with the thinner tip end of the bit coming out the other end. It’s risky to drill pearls, so they don’t take bit all the way through.
Another thing you might try: Match the cord size to the smallest hole size. Make double-knots between each bead instead of single knots.
What Length of Cord Will You Need…
The actual length of cord will depend on the size of your beads, thus how many knots you need to make along the length of your cord, as well as your specific hand-knotting technique.
In the traditional rule of thumb, you multiply the length of the necklace you want to make and multiply that by 4 and add 15″. This will give you enough cord to make the necklace, as well as about 15″ or so of cord to hold onto.
For example, using this traditional rule, a 16 1/2″ necklace would need about 81″ of cord. On the cord-on-cards, you get 2 meters or about 79″.
In our non-traditional method, we use about 12″ less of cord, so multiplying your length by 4 and adding 3″ would be the math. So, in our example, for a 16 1/2″ necklace, we would need about 69″ of cord.
With the non-traditional technique instructions below, you can get a 22″ necklace made up of 8mm beads from this 2-meter card.
NOTE: With your silk cord in particular, the last several inches near the attached needle get too frayed during the pearl knotting process, to be useful for your finished piece.
2. VARIATION #1: Attaching Clasp to Beginning of Necklace
Attaching The Clasp To The Beginning Of The Necklace
Open up your bead cord on the card, and unravel the cord off the card.
The cord will be kinky. Pinch the cord between your thumb and forefinger. Run your 2 fingers up and down the length of the cord a few times, pull the cord a bit as you do this, to smooth the kinks out. You do not have to get this perfectly smooth.
You can also run the cord over the edge of a table.
[For a project like a tin cup necklace, where a lot of the cord will show, you can steam iron the cord. Put a towel over the cord before you steam it.]
Test The Length
Let’s test the size of our necklace out, to be sure we have it long enough.
Use a necklace sizing cone or someone’s neck.
Hold the necklace around the cone or neck. Don’t forget to account for any additional length the final part of your clasp will add to your piece. One part of this clasp is already attached to the beginning of the necklace. The other part of the clasp may or may not add additional length.
You will also be making additional knots — at least 2 — and this will add 1/16″ per knot in length.
Necklace Sizing Cone
If you need to add additional beads, you can slide these onto cord B. Review the measurement table at the start of our instructions to determine how many more beads you might need to add.
Maneuver Cord A back down through that last bead, so you can tie a knot where you skipped a bead. Tie additional knots until you get to your last 2 beads.
Attaching the Other Part of Your Clasp to the End of the Necklace, and Making the Final Knots
The Process:
o We will slide the last bead off of Cord B, and re-string it onto Cord A.
o Begin to tie Cord A off to the clasp using a Larks Head knot. Fold Cord A in half about midway between the last bead and the end of the cord. Slip that folded spot through the ring on the clasp, and pull it through, to begin forming your loop.
o Un-anchor your pearl knotted strand.
o Make a “pile: your Cord B, the pearl knotted strand, and Cord A several inches below the clasp and Larks Head knot.
o Pull this “pile” through your Larks Head loop.
o Get everything orderly again: Cord B off to the side, re-anchored pearl knotting strand, clasp with beginnings of Larks Head knot with a big loop that will need to be closed above your pearl knotted strand, and your Cord A off to the other side.
THE CHEAT WAY: Instead of bringing this whole pile through the loop, just take the clasp itself through the loop.
o Bring Cord A back down through that last bead towards the next to last bead. Slip an awl or a tweezers through the loop on your Larks Head knot, preventing that loop from closing all the way onto the clasp. You are now positioned to begin to tighten that Larks Head knot.
o Carefully pull everything more and more tightly — all the beads abutting each other and the clasp.
You cannot do this in one step.
THIS IS HOW I LIKE TO DO THIS:
POSITION THE LAST BEAD SO IT SITS SNUGLY AGAINST THE NEXT-TO-LAST-BEAD
PULL ON THE LOOP, SO THAT YOU FORCE THE CLASP DOWN, SO THAT THE LOOP WITH THE CORD THROUGH IT SITS SNUGLY AGAINST THE LAST BEAD.
HOLD and push down on THE LAST 2 BEADS AND THE CLASP TIGHTLY IN PLACE, SO THEY CAN’T MOVE.
PULL TIGHTLY AND STEADILY ON CORD A, TO PULL OUT THE LOOP OF THE LARKS HEAD KNOT
REMOVE THE AWL
PULL AGAIN, TIGHTLY AND QUICKLY ON CORD A, TO TIGHTEN EVERYTHING UP.
o Double check that everything is tight, especially the clasp relative to the last bead, and the last bead relative to the bead before it.
o Tie a square knot with Cord A and Cord B between the last bead and next to last bead, and glue.
— First take Cord A over B, glue the inside of the knot, pull tight, glue the outside of the knot
— Second, flip the beads over to the other side (180 degrees) so our square knots ends up centered, rather than off to one side.
— Third take Cord B over A, glue the inside of the knot, pull tight, glue the outside of the knot
o Let the glue set, usually within 20–30 minutes.
o At about 10 minutes, and before the glue sets, rub off any excess glue that may have gotten onto the pearls, on either side of the knot.
o Trim off Cord B and Cord A as close to the knot as you can. You can add drop of glue to end of the cords to prevent fraying.
Then, tamp down the trimmed tails, with the awl or chain nose pliers or tweezers or your finger nails, if necessary, into the knot to camouflage them.
o At about 10 minutes, and before the glue sets, rub off any excess glue that may have gotten onto the pearls, on either side of the knot.