


Beading Calisthenics: Daisy Stitch Expansion
Posted by learntobead on April 21, 2020
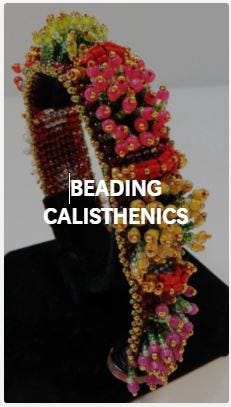
Beading Calisthenics
Beading requires a lot of mind-body coordination. That takes work. It is work.
Calisthenics are exercises you can do to improve and tone your mind-body coordination when bead weaving.
You have to be able to get from your fingers to the needle to the beads, back along the thread to the needle to the fingers, hands, arms, eyes, mind. And then again. And again. Over and over, one more time. You need to get into a rhythm. All these working parts need to be working. No time for cramping. No time to get tired. No time to lose concentration.
A rhythm. Needle, pick up bead, pull down along thread, check the tension, pick up a bead, pull down along thread, check the tension, pick up a bead….
I noticed that different instructors had various techniques and strategies for maintaining this rhythm. Yes, music was involved sometimes. Othertimes simple meditation or creative reading and discourse. Some people had some stretching exercises that they did. Others tested themselves before proceeding with their big project. Still others did small things to reconfirm their learning.
Throughout this Series, I introduce some of the beading calisthenics that I experienced along the way. If you want to gather materials up so that you can follow along with these calisthenics, here’s the list.
MATERIALS NEEDED FOR
ALL THE CALISTHENIC EXERCISES
(SUPPLY LIST):
notebook, pencil
1 tube each of Japanese 11/0 seed beads in gray, 3 different colors of orange, black, white, any other 4 colors
1 tube each of Japanese 8/0 seed beads in gray or silver, black, white, orange, any other 4 colors
1 tube each of Japanese 6/0 seed beads in gray or silver, black, white, orange, any other 4 colors
5 gray-scale colors of delicas or 11/0 seed beads
Nymo D or C-Lon D thread in black
Nymo D or C-Lon D thread in yellow
two toggle clasps
.018” or .019” flexible cable wire
assorted 4mm, 6mm and 8mm beads in various coordinating colors, including grays and oranges in your mix, as well
big bowl and a bowl-full of assorted beads
Size 10 English beading needles
Bees wax
scissors
beading dishes or trays
any kind of graph paper
work surface or pad
colored pencils
a few clasps, (toggles are easy to work with)
some crimp beads
crimping pliers
BEADING CALISTHENICS #10: Daisy Stitch Expansion
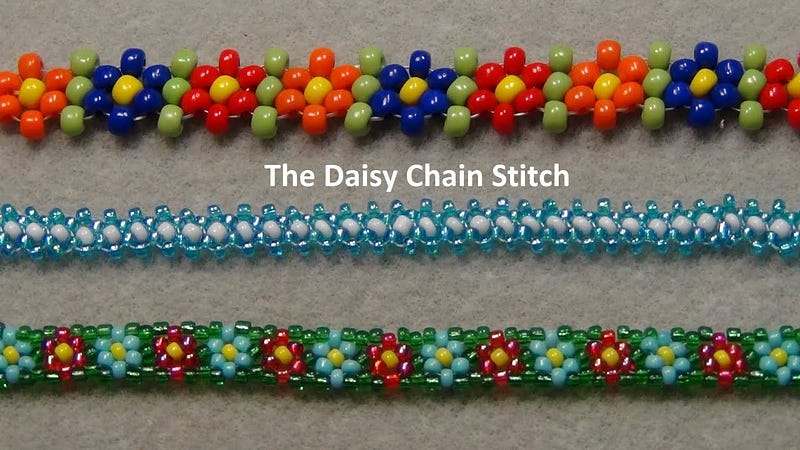
The challenge here is to see how many variations you can construct using the simple daisy chain stitch.
Simplest daisy chain: A stem and a flower with a center bead, then a stem and flower w/center, and so forth.
Start with a line of 5 beads.
Add 5 more beads to your thread. Make the 5th bead a different color. This is your “flower set”. The 5th bead is your center point.
Make a loop by going back through the first of these 5 beads in the set.
Add two more beads to the flower set, and bring the needle through 4th bead in that original set of 5.
So the daisy pattern goes: BEAD 1 to 2 to 3 to 4 to 5 (flower center point bead marked by X) back to 1 to 6 to 7 back to 4 and out.
Pull tight.
Add another line of 5 beads. Continue.
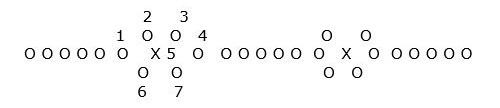
Try the daisy chain above without the stem, so that each flower set is interconnected by one bead — # 4 (which becomes #1 in the next flower). Make your 5th bead a different color.
Next, look at the modified daisy chain pattern below. Try another interconnected daisy pattern, where we would connect each subsequent flower by two beads, instead of one. Here we would make the first daisy’s 3 and 4 become the next daisy’s 1 and 6.
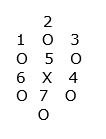
This would go: 1 to 2 to 3 to 4 to 5 (flower center) to 1 to 6 to 7 to 4 up through 3 and out. Then 3 becomes 1 in the next daisy link. The pattern continues in the second link as 1 to 2 to 3 to 4 to 5 (flower center) to 1 to 6 to 7 to 4 up through 3 and out. Then 3 becomes 1 again.
Try the same pattern, this time making the 2nd, 5th and 7th bead the same color, but different than the others.
Try again, making the 1st, 5th and 4th beads the same color, but different than the others.
Other Articles of Interest by Warren Feld:
Cleaning Sterling Silver Jewelry: What Works!
What Glue Should I Use When Making Jewelry?
Why Am I So Addicted To Beads?
A Very Abbreviated, But Not Totally Fractured, History of Beads
The Martha Stewart Beaded Wreath Project
When Choosing Colors Has You Down, Check Out The Magic Of Simultaneity Effects
The Use of Armature In Jewelry: Legitimate or Not?
Organizing Your Craft Workspace…Some Smart Pointers
You Don’t Choose Clasps, You Choose Clasp Assemblies
Know Your Anatomy Of A Necklace
Mini Lesson: Making Stretchy Bracelets
Mini Lesson: Making Adjustable Slip Knots With Thicker Cords
Mini Lesson: Attaching End Caps, Cones, Crimp Ends
Mini Lesson: Flat Even Count Peyote
Mini Lesson: Right Angle Weave
Everyone Has A Getting Started Story
The Nature-Inspired Creations of Kathleen
The Jewelry Designer’s Orientation To Glass Beads
The Jewelry Designer’s Orientation To Lampwork Beads
The Jewelry Designer’s Orientation To Crystal Beads
The Jewelry Designer’s Orientation To Seed and Cylinder Beads
The Jewelry Designer’s Orientation To Choosing and Using Clasps
How To Design An Ugly Necklace: The Ultimate Designer Challenge
I hope you found this article useful. Be sure to click the CLAP HANDS icon at the bottom of this article.
Also, check out my website (www.warrenfeldjewelry.com).
Subscribe to my Learn To Bead blog (https://blog.landofodds.com).
Visit Land of Odds online (https://www.landofodds.com)for all your jewelry making supplies.
Enroll in my jewelry design and business of craft video tutorials online.
Add your name to my email list.
Discover more from Warren Feld Jewelry
Subscribe to get the latest posts sent to your email.

Leave a comment