People think that they can copyright their designs, and this single act will be sufficient to prevent people from copying their work. However, to prove that someone has violated the copyright, and to sue them in court, is difficult, time-consuming and expensive to do.
A copyright is a grant from the United States Government for a specific jewelry design. It can cover the actual piece and the drawings for the piece, but cannot cover a specific idea or concept. You can only copyright something that is tangible.
Your registration covers the specific design, and may be flexible to cover a color change. However, if there is any obvious change in the piece — different shapes, different patterns, different sense of dimensionality — , you would want to register each variation on a core design.
You can also copyright a “collection of jewelry”, but you can’t add new designs to the collection, without getting new copyrights. In the collection, the pieces would need to share design elements and sensibilities, and these would need to be obvious.
Copyrights last for the life of the designer plus 70 years. Use form VA (Visual Arts). It usually takes about a year for the paperwork to go through, but your piece is considered copyrighted from the date you submitted your application.
The US Copyright Office will often reject jewelry designs for lacking authorship because they consist of common or usual shapes and forms. When submitting your application, you should present a well-reasoned argument, based on basic principles of jewelry design composition, form and function, as to why your jewelry and patterns should be copyrighted.
To bring a lawsuit, you must formally register your copyright with the US Library of Congress.
Federal law specifies the amount of damages you can sue for. In 2006, if your copyright registration was filed at least 3 months before the infringement, damages could range from $750 to $30,000 per infringement up to $150,000 maximum without having to prove that you had lost any profit. If your registration was last minute, you can only sue for your lost profit, and/or your infringer’s profits.
When is a copy an infringement? The standard is that the piece must be substantially similar and that the infringer copied the piece. There is a general idea that if the piece is 10% different, it is not an infringement. However, this is not a legal principle or standard. It’s “infringement” whether the person copied your design directly, or copied it from a photo or other image that someone had taken of your piece.
If you want to pursue any legal action, consult a copyright lawyer. A lawsuit can easily set you back $2,000–4,000.
The Mess over Copyright
It’s true. Many people copy other people’s jewelry. A large number of these folks want to copy other people’s jewelry exactly, bead by bead, clasp by clasp, part by part. They come into the store with pages torn from fashion or bead magazines, and want to make the same thing. They try to take photographs or make sketches of finished art-jewelry in our Open Window Gallery. They try to duplicate what they see others wearing — particularly the news ladies on the various programs on TV.
Over the years, beader after beader, and jewelry-maker after jewelry-maker, stood before us, plain scared that, if anyone saw their pieces, their designs would be stolen. After all, they saw it happening daily all around them. For too many of these artists, this was an insurmountable mountain. One of our friends would bring her pieces for us to see, but if another customer walked up to the counter, our friend would cover her pieces with her hands — shielding them from the potential design-thief. Over the 15 years we knew her, our friend was determined to launch herself into the jewelry design business — a business based on not allowing anyone to see her merchandise, for fear they would steal her designs. I’m sure she’ll be at this business enterprise of hers for 15 more years, as well. And not getting any further ahead.
If you want to sell your stuff, you have to put it out there. People will try to duplicate your pieces. So what? Successful businesses are successful, not just because they have great jewelry to sell, but because they’ve marketed well, placed their products well, priced their products fairly, distributed their products in a timely manner, and kept a tight control over the financial management of their businesses. They work, market, and invest in themselves so that eventually they create a “brand” recognition for their jewelry.
Jayden once took a lampworking class where the instructor was teaching one of her signature beads. However, in her instructions, she left out three pieces of critical information, which prevented her students from duplicating her work. The water of the lampwork-aquarium did not glisten blue. The dimensional arrangement of fish and plants could not be achieved. The students were very upset, because their pieces were inferior, by comparison, to those of the teacher. The students blamed themselves. But this teacher had been very dishonest and deceitful with them. She hadn’t really taught them how to make the bead they came to this class to learn to make.
If you want to teach classes or publish your work in a magazine or book, you have to put your instructions out there, (as well as present them so that anyone following them can come up with a result that is similar to the original as pictured). People will follow your instructions. They may teach your instructions. They may try to publish your instructions as their own in another book. So what? Successful instructors are successful, not just because they have great patterns to sell, but because they’ve marketed them well, placed them to maximize their visibility, priced them fairly, and created a steadfast brand loyalty on the part of their students and readers, who begin to associate particular looks, styles, steps and designs with particular designers.
If you don’t want the public to “consume your intellectual property,” don’t teach and don’t publish. I always felt that if you teach or publish instructions for the consumable public, then it’s like making a contract with them that they can follow and use those instructions. It’s no longer exclusively yours. As a teacher, it should be a natural part of the lesson to show your students how they might vary the instructions and make the piece their own. And ethically, it would be appropriate for any student or jewelry designer to reference the source of their ideas, if not their own, or not primarily their own.
This issue percolates to the surface every couple of years. Most notably was the shot heard around the world, when the editor, Mindy Brookes, at Bead & Button magazine wrote an editorial (June 2006 issue) about “When, if ever, is it acceptable to sell or teach another person’s designs?
From the editorial:
That’s a question we hear frequently at Bead & Button, and it tells us that many of our readers care about the ethical and legal issues involved when it comes to the money-making aspects of beading. Unfortunately, we also have first hand experience with beading’s darker side — the dishonest few who cause heartache and financial harm by cashing, in on another person’s original work. And when unethical people profit from ideas that don’t belong to them, it hurts us all.
Maybe it was inevitable that as beading became more popular, people would look for shortcuts to exploit the growing number of lucrative opportunities, and maybe there is nothing one editor one editorial can do to change that. So, it’s gratifying to know that my concerns about the ethics of beading are shared by the editors of other beading magazines, including Cathy Jakicic of BeadStyle, Marlene Blessing of Beadwork, Pamela Hawkins of BeadUnique, and Leslie Rogalski of Step by Step Beads. They will also be covering this topic in upcoming issues of their publications.
To address the question presented at the start of this editorial, Bead & Button’s position on copying designs is as follows:
It is unethical to copy an artist’s work to sell without the artist’s permission.
It is unethical to copy any work that has appeared in a magazine, book, or website and represent it in any venue as an original design.
It is unethical to teach a beading project that has appeared in a magazine, book, or website without the artist’s permission.
It is unethical to teach a beading project learned in another teacher’s class without the teacher’s permission.
If you agree, please help disseminate this message by including a copy of these statements with your class materials, your kits, and the pieces you sell. You can download a copyright-free version at beadandbutton.com.
The reactions of our customers, teachers and students in the store were strong, worried, concerned, angry, frustrated, soul-searching, and very questioning of the Bead & Button manifesto. The primary concern was that most people liked to try out the patterns in the magazine. Was this unethical? Many teachers took cues from the magazines about fun projects to teach. Was this now unethical?
How much, in percent, of a project would have to have been copied, to suggest that this copying was unethical?
If determining the correct percentage, what did you count? Color? Bead? Style? Stringing material? Pattern?
How many original designs can people truly come up with? What if the originators were some tribal or provincial group hundreds of years ago? With 54,000,000 people who bead or design jewelry in the United States, how many original ideas can there actually be?
What if someone created an important variation on someone else’s design? Who’s project would the project be, and would that variation have to be suppressed?
Should there be a distinction between “copying” and “learning new techniques”?
How could anyone find out what was already copyrighted in jewelry? Copyrights are filed by title, not design elements. There is no searchable database. There are so many books and magazines and so many hundreds of years of beading.
I had read of a court battle in Washington State of a glass artist suing two of his apprentices, who went off and started their own business. The original artist claimed that he had sole rights to create certain curvatures in glass. Can you really copyright or patent a curvature in glass — how many curvatures can there be, before the glass breaks? The original artist claimed that the work of the two apprentices was too similar to his own. To complicate the situation, the original artist had been physically unable to make his own pieces. He designed them, oversaw the work of the apprentices, and signed the pieces. If the original artist were to win in court, would this force all other glass artists out of business, because they would no longer have the rights to make certain curvatures in glass?
By trying to clarify the issue, I think Bead & Button muddied the water more. They confused the moral value of copying someone else’s work, with the legal value of copyrighted material.
What I say:
1. Don’t be a jewelry designer, teacher or craft-writer, if you don’t want people to copy your work.
2. Don’t copy someone else’s work and sell it or teach it, without at least referencing or acknowledging your source material.
3. When teaching or designing based on someone else’s work, set a goal for yourself to try to “make it your own”, by personalizing or varying the piece.
Needle and thread were very intimidating, and frankly, scared me. I could barely sew a button back on a shirt. My hands seemed so big and bulky — how could I hold onto these extremely thin beading needles? And thread the eye of the needle? And control things? The few times I had hemmed some torn pants, my thread path was more modern art, than functional perfection.
Jayden loved needle and thread. She made everything with it. She kept trying to force me to learn, but I resisted. For years. Resisted for many years. At one point, she retired, and I had to take over teaching her Attaching Clasps class. In that class, she taught both crimping and needle and thread bead stringing. So I had to learn it.
Not as painful as I anticipated. And the resulting pieces felt and moved and looked so much better than cable wires, that I took to it very quickly, and made it my own, so to speak. Needle and thread became my preferred approach. But when I made things to sell, I often reverted back to the cable wires. When cable threads, like FireLine, came along, these became a good compromise, at least for some projects, though not all of them.
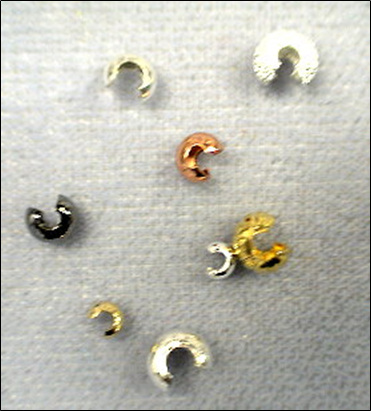
HOW TO USE NEEDLE AND THREAD To String a Bracelet, Including How to Wax Your Thread
There are many different types of stringing materials. The best outcomes, from the Art and Design Tradition, are achieved using needle and thread. Beading threads are nylon. Most are shaped like a thin ribbon, rather than round, like sewing thread. Most are bonded, rather than twisted, fibers, which adds a lot of what is called “abrasion resistance.” Twisted fibers have zero abrasion resistance.
With beading threads, your stringing will be the strongest, it will last a long time, it will feel supple and soft, and it will drape and wear the best. It will take the shape of the body, and move the best with the body. With needle and thread, you tie knots to secure your clasps. You do not use crimp beads.
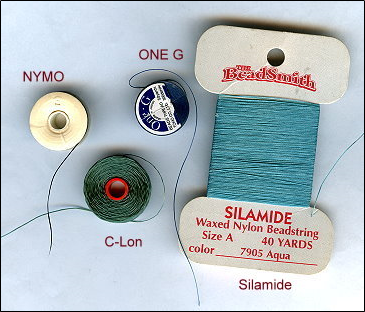
Prominent beading threads including Nymo, C-Lon and One-G. One thread, Silamide, is twisted, rather than bonded, which means it has no abrasion resistance. Beads have very sharp holes — picture broken glass — and Silamide breaks easily. Although it is pre-waxed and little easier to manipulate through your beads, I don’t recommend it. I’m not big on anything that breaks easily.
Using needle and thread does add a lot of time to the creation of a piece. You have to use a needle, which can be awkward. You need to wax your thread, which takes more time. You need to go through your piece THREE times. If you are selling your pieces, very often you won’t be able to recoup your labor, when using needle and thread.
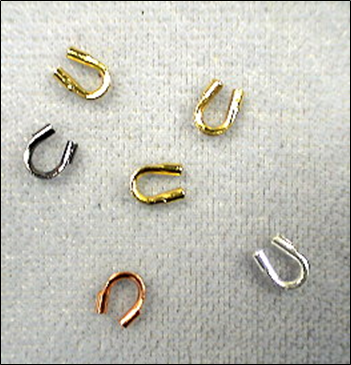
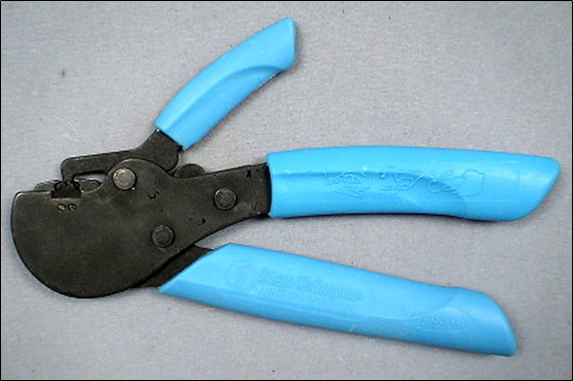
One alternative is to use a cable wire. This goes very quickly and is easy to do. The cable wire is stiff enough to be its own needle. You don’t wax. You only have to go through your piece ONE time. The better cable wires are very strong. There is a stiffness to them that makes the pieces not feel as good when worn, in comparison to thread. You also have to use a crimp bead to hold the cable wires in place, and this is a weaker and somewhat riskier design element than tying a knot in the Clasp Assembly. Cable wire brands that I particularly like and recommend include Soft Flex and Flexrite.
Pieces done on cable wire move in the opposite direction that your body moves. If I wear a needle/thread bracelet on my wrist, and move my wrist to the left, the bracelet will move with me. If I wear a cable wire bracelet on my wrist, and move my wrist to the left, the bracelet will actually move in the opposite direction to the right. The cable wire bracelet does not conform to and take the shape of your wrist, when worn. This becomes a major design problem not always dealt with easily.
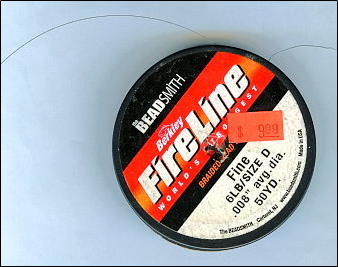
Another alternative to beading thread is to use a hybrid cable thread, such as FireLine or PowerPro or Spiderwire. Cable threads are threads braided together and encased in nylon. Originally these were used as fishing line and adapted by craftspersons for stringing and weaving. You use needles with these cable threads, but you only have to go through your piece one time, instead of 3 times, as you do with thread. You can go through your piece more than once to make your piece stiffer, but you don’t have to. You do not have to wax these cable threads. You can wax them, however, if you want, to increase your thread tension, and add more security against the sharp bead-holes cutting the cable thread.
The cable thread pieces are stiffer than the regular beading threads, but drape better than the cable wires. You tie knots with the cable threads, like with regular beading threads, to secure your clasp. Since you still rely on a needle, using the cable threads goes more slowly than using the cable wires. The PowerPro is a little awkward to use. I really like the FireLine and Spiderwire.
Threads(nylon beading thread)
Unfortunately for me, and for many beginning jewelry artists, the choices were not only about choosing thread instead of cable thread or cable wire. There were many types and brands of beading threads, each with some pros and each with some cons.
The original nylon beading thread is Nymo. Nymo was first developed by the shoe industry to attach the bottom of your shoe to the top of your shoe. It is widely used in upholstery. In the 1980s and earlier, if you wanted to buy Nymo, you bought it on a gigantic wheel — a five lifetime’s supply for us. As beading got more popular, Nymo packaged their thread on smaller and smaller entities, starting with a cone (a little bigger than a fist), then a spool (a little bigger than a thumb), and then a small bobbin. More recently the spool has been replaced by a large bobbin.
It turns out that the company could not get the same product onto a small bobbin. So, the thread on the small bobbin is weaker than the thread on the large bobbin, spool and cone. However, usually only white and black colors are available on the entities larger than the small bobbin.
Nymo is very strong. I suggest, if you have never worked with Nymo, to cut off about a 3 foot length, and try to pull on it and break it between your hands. It will break, but you’ll feel how tough it is. And in bead stringing, we typically go through each bead at least 3 times, so you have 3 thicknesses of this thread inside your piece.
When they make Nymo thread, it is a beige color. To make black, they dye the thread. The black dye tightens the thread, and makes it stronger. To make white, they bleach the thread. The bleach weakens the thread, so white is weaker than black. To make a color thread, they first bleach the thread white and then add a color dye. These color dyes further weaken the thread. So colors are weaker than white, and thus weaker than black. The colors of the thread, however, are consistent from batch to batch.
Nymo comes in many sizes. From smallest to largest, these include: OO, O, A, B, D, F, and G. The most popular and often used size is D (.008″). For a few years, the manufacturer, which had been stamping the size on the bobbin’s side, decided not to stamp any size on the bobbin. I guess people complained, understandably so, and they returned to their original practice.
C-Lon is a newer thread. When they make C-Lon, whatever color it is, that is the color the thread starts as. So, all the colors AND the white AND the black are equally as strong. However, the color from batch to batch will vary, sometimes widely. Overall, we like C-Lon better, particularly for the white and the colors. Black C-Lon is equivalent in strength to the Black Nymo. For white and colors in C-lon, these are stronger than their Nymo compatriots. One drawback to C-Lon is that the ends of the thread fray easily, making it more difficult to get your thread into the eye-hole of the needle, than with Nymo. C-Lon only comes in two sizes — AA (smallest) and D (thickest).
ONE-G is a premium beading thread and is similar in strength to C-Lon. I think its best attribute is that it has a spring-i-ness to it, that makes it much less tiring to use, than Nymo or C-Lon. ONE-G only comes in size D and only in about 12 colors.
Silamide is a pre-waxed thread. The pre-waxing allows the thread to get less tangled up when you use it. However, Silamide breaks very easily, so I don’t recommend it. Why put in all that time into a project if there is a good chance your thread will break?
Beading thread is shaped flat like a ribbon. Sewing thread is shaped round. Sewing threads are not strong enough to use in beadwork.
When choosing a thread to use, sometimes you have to make some compromises and trade-offs.
From one beader:
After finishing the pendant, I thought the necklace needed something more — like individual seed bead daisies attached to a handful of the beads in the necklace. I was working on the necklace on a Sunday night and told my friend I’d have it for her at work on Monday. I had limited thread options at hand: white Nymo or brown embroidery thread. The Nymo would have been a better thread choice, but the white was not aesthetically pleasing against the dark beads. So, I went with the brown embroidery thread. How bad could it be? Ugh! It was so hard to handle and kept fraying. Once the piece came back from photography, I did end up redoing it with brown Nymo.
I find myself switching thread brands and colors from project to project. For bead stringing, I rarely use any other size than D. I most often use the color black, and when I want to use black, I usually grab my ONE-G or Nymo. When I use a color thread, I go for ONE-G, if they have a good color; otherwise, I use C-Lon. If my piece uses any kind of crystal bead, I use FireLine or Spiderwire. There is a cable-thread product called C-Thru-B, which goes in and out of production, but is an excellent product to use with crystal beads and other beads with especially sharp holes.
Color Effects of Thread
Thread color affects the viewer’s perception and evaluation of the piece. People see the thread at the knots. They subconsciously see the threads between each bead. If you are using transparent or translucent beads, the thread color will affect the color of these beads. You can do the same piece using different colored threads, and each of these pieces will look very different.
Same bead, different colors of thread
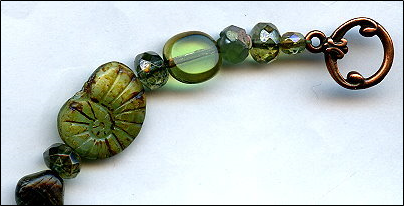
Black always works. Can’t see the knots, only shadows. This makes your piece seem older, richer, more traditional. It gives your piece a patina.
White makes your pieces brighter, sharper, more contemporary looking.
Colors: Most people select a color that is the same or similar to the predominant color in the piece. In this case, there is no color affect. However, you can pick contrasting or complimentary colors, such as using an amethyst colored thread to string peridot colored beads. You can also change the colors of your thread as you work thru your piece.
Needles
The eye of a beading needle is shaped like a rectangular funnel (the opening on one side of this funnel is larger than the opening on the other). Beading thread is shaped like a ribbon.
The eye of a sewing needle is round or a larger, rounder opening. Cotton sewing thread is round.
There are many styles of beading needles. The most used ones include:
English Beading Needles (Size #10 is good for bead stringing projects; Sizes #10 and #12 are used most often in bead weaving. There’s also a size #11.)
I like these because they have a little, but not too much, bend to them. They are stiff enough to push through your beads, but can bend a little to take some corners, or to get into the holes between two beads on a string.
Some people like to use Pony brand, rather than the English Beading Needles. Pony needles are made in India. They are a fraction of the cost of the English ones. However, they break very easily. I get too frustrated with my needles breaking too frequently, so I use the English.
Other people like to us Japanese beading needles. These have similar durability to the English ones, but are very stiff and lack that useful “bending” property that I prefer.
These needles come in many sizes. The #10 is the biggest, and the size of the eye hole relative to the needle is proportionately much bigger than that in the thinner sizes. You will also find Size #12, Size #13 and Size #15.
TULIP needles: These are the top of the line quality needles. They are made in such a way that they bend easily when you want to maneuver them through a bead, but straighten out after you have made your thread pass. A little pricey, but worth it, in my opinion. These come in several varieties and sizes.
Sharps Needles (shorts) Sharps needles are English but are shorter and considerably stiffer than regular English Beading Needles. These needles are primarily used in bead embroidery, where you have to push the needle through fabric, and a stiffer needle works better here. Some people like to use these for everything, but these are a bit too small for my hand. My hand cramps up when I use them.
These come in Size #10 and Size #12.
Loom Needles (long) Loom needles are longer than regular English beading needles. When you do loom work, you want to get as many beads on your needle as you can, when passing back and forth, to minimize the chances of snagging a warp thread with your needle.
These come in Size #12.
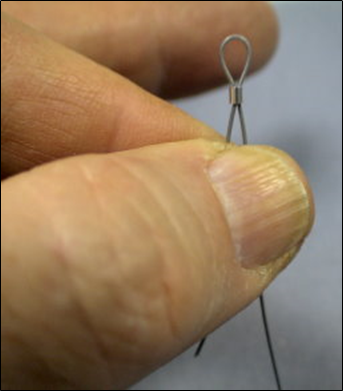
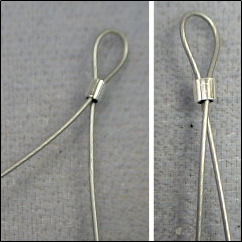
Big Eye Needles When your stringing material is ribbon or fabric or yarn or string, you would use a Big Eye Needle. This needle consists of two flexible needles, soldered at each end, and which open up to form a big eye. You wedge the end of your stringing material into one end, and this becomes your trailing end as you string your beads.
These come in a 2” length and a 5” length.
Twist Wire Needles Twist Wire Needles, sometimes called Collapsible Eye Needles, are used when you can’t get your stiff needle through, and you need to pass through a bead-hole one more time. You take your stiff needle off your thread, and re-thread on the Twist Wire Needle. This will usually go through a hole about three more times, before it begins to unravel. These needles come in many sizes, from Very Fine, Fine and Medium to Heavy and Extra Heavy.
Needle Threaders These work with sewing thread and needles, but not really with beading thread and needles. When you buy a kit of beading needles at a craft store, they usually come with needle threaders. These won’t work with beading needles. You can get the threader through the eye of the beading needle; however, when you try to pull it back through with the thread, it’s too thick and won’t come back out.
It’s always a good idea to have two or more beading needles on hand. They break. You don’t want to find yourself in the middle of your project and having to run to the store get another needle.
And you will occasionally poke yourself with the needle. Occupational hazard.
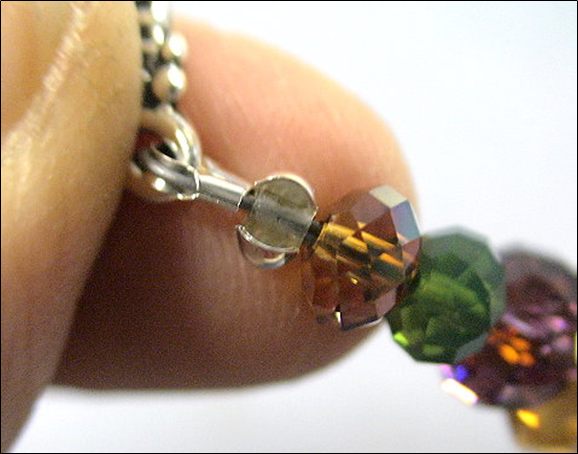
Hiding The Knot. When using thread, the knots are so small, that you don’t see them on the finished piece. This is especially true when using Black thread. With black thread, people see a shadow.
When using thicker cords and stringing materials, if you want to hide the knot, use a bead with a larger hole on either end, so that the hole swallows the knot. Or slide a crimp cover over the knot, so it seems like there is a bead there.
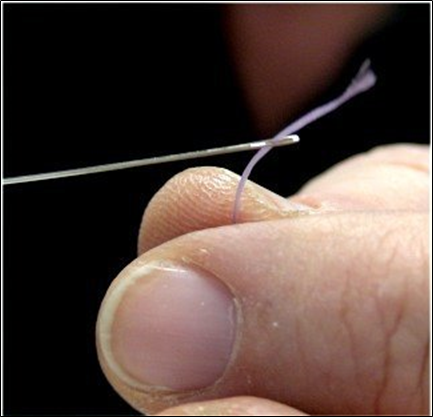
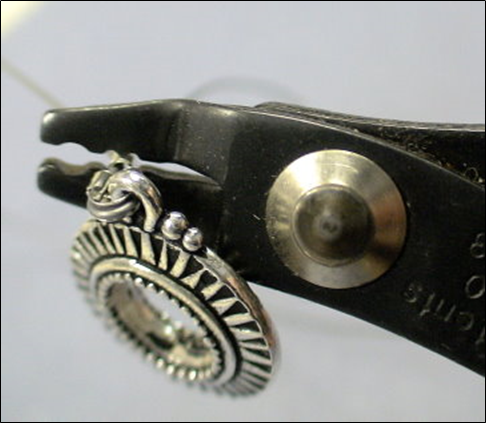
Getting Your Thread Onto Your Needle
Most people try to push the needle onto the thread. This works, but it takes a lot longer than what I am going to suggest. I like to hold the needle steady and pop the thread into the eye of the needle.
First, when using thread as your bead stringing material, you always begin with a wing-span (arm-to-arm’s) length, which is about 6 feet. Six feet of thread will make an 8”-bracelet.
Next, on one end of your length of thread, pinch it between your thumb and forefinger, with a little bit of the tail sticking up.
Pull the thread slowly down so that the top of the thread is at the same level as the top of your forefinger.
We are going to play with this thread. Pinch the thread to pop it up higher, and then pinch the thread to pop it back lower, just below the surface of your forefinger. Do this a couple times so that you can lock into your mind an image of where the thread will pop up..
Bring your needle down parallel with your forefinger. Hold the eye of your needle right above where your thread will pop up. Don’t move your needle. Pinch the thread to pop it right into the eye hole of your needle.
When threading your needle, often it is useful, if your thread is a dark color, to work over a light-colored surface, and if your thread is a light color, to work over a dark-colored surface.
NOTE: If you are using a cable thread like FireLine, this cable thread is round, not flat. To get it on the beading needle, you often have to flatten the end of the cable thread a bit. Run the end between your finger nails, or a tweezer, or a chain nose or flat nose pliers. Don’t pull it through your teeth; it can cut into your teeth.
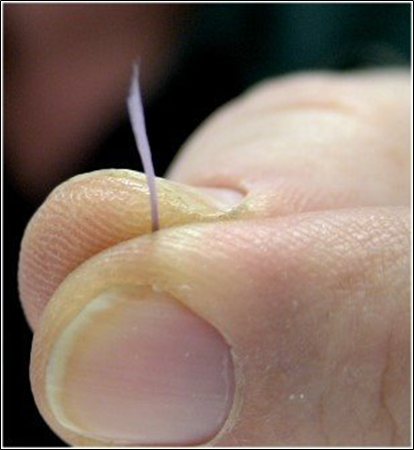
Wax. Wax. Wax.
A really good artist will wax their thread. Even if the thread says it’s been pre-waxed, you want to re-wax this thread.
We wax our thread to make it strong, less likely to fray, to straighten and stretch it a bit before using, to waterproof and protect the thread from weird body chemistries, from cosmetics, perfumes and hair sprays and from pollutants in the area, as well as to glide through the beads better, and to fill in the jagged edges of the hole of a bead to make it less likely to cut the thread.
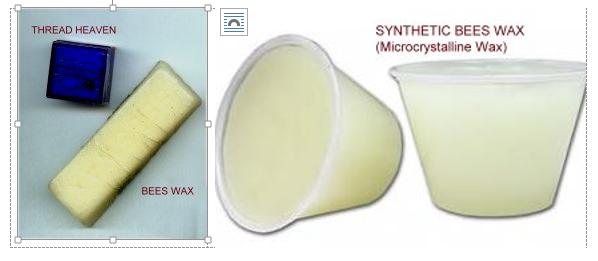
There are different types of threads and conditioners. The primary choices are among pure beeswax, synthetic beeswax (also called microcrystalline wax), and a product called Thread Heaven, which is a thread conditioner, not a wax.
Thread Conditions make the thread less likely to get tangled up and knotted, while you ware working it. Each time you pull the thread through the bead, static electricity builds up. The conditioner prevents this from happening. But it is not a wax. It doesn’t do anything the wax will do.
I suggest you always use beeswax, either pure or synthetic. I do not recommend thread heaven. Natural bees wax will protect the thread for 150 years. The synthetic wax is a little more expensive than the pure wax, but I prefer it. The synthetic does everything the pure one does, only better, and lasts an even much longer time.
Waxing the thread takes very little time, and it can add years to the life of your bead art.
When waxing, we pull our thread through the wax two times. Then we take our two fingers, pinching the thread, and slowing moving down the full length of our thread. Our body temperature melts the wax into the thread. Our fingers also knock off any excess wax on the thread. Always pull by the thread, not by your needle, when waxing.
To feel the effects of waxing, try this:
Take an arm’s length (about 6 feet) of nymo D or C-Lon D
Thread it onto a Size #10 English beading needle. Double it up, so that you now have your length of thread in half, with two equal lengths extending from either side of your needle’s eye hole. At the needle end, wrap the thread around your forefinger a couple times. When we pull the thread through the wax, we want to pull by the thread, and NOT by the needle.
Wax the thread twice, then take your two fingers and slowly go down the thread, allowing your body temperature to melt the wax into the thread. Now un-double your thread. Move your needle up to one end, leaving about an 8–10” tail. Take your two fingers, pinching the thread, and feel down the length of the thread to find the area that was wrapped around your finger, and did not get waxed. Your fingers will slip. Now wax two more times from that area on down. Pinch your thread at one end, moving your fingers down the length to melt the wax into the thread.
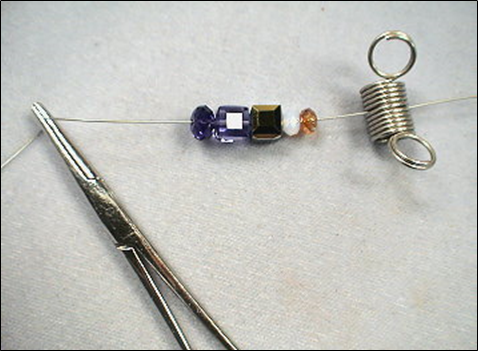
DOUBLING YOUR THREAD
Some people like to work with a doubled thread. I find this awkward and difficult to control. However, I leave this up to you.
ADDING THREAD
If you are making a piece, like a necklace, at some point, you will run out of thread. After all, 6’ of thread does about an 8” bracelet.
When the length of your thread looks like it will be too short to continue, then you need to tie off and anchor this thread. If you are at one end of your piece, you can tie the thread off to your clasp component. If you are somewhere in the middle of your piece, you would tie off your thread to the spine (that is, the thread already running through your piece. It is good to tie a double knot (two overhand knots).
You never cut your thread at the knot. So, after you have tied your knots, you will run your remaining thread through some beads. Then cut the thread as close to the bead-hole you can get. When you are adding new thread, you will go through a few beads before tying that knot.
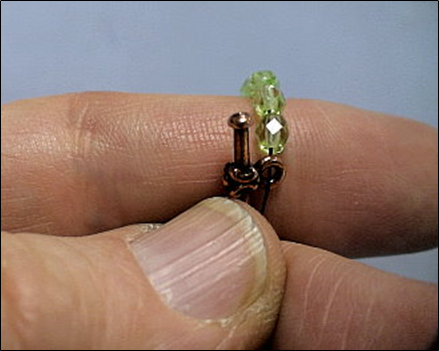
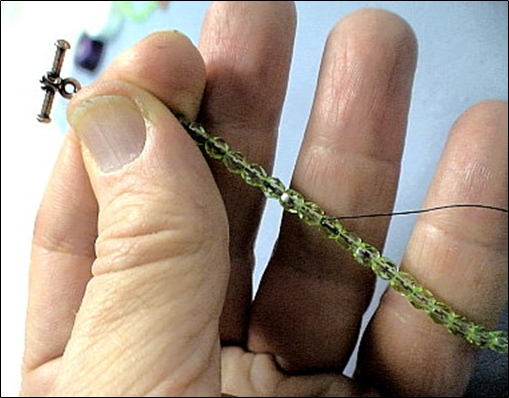
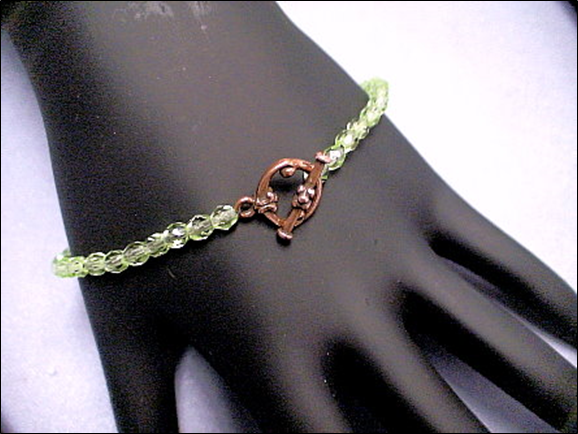
MAKING A BRACELET USING NEEDLE AND THREAD
Basic Steps
We are going to string a simple strand of beads, using needle and thread. If you wanted to do some planning and design work, for a fancier arrangement, you would play with your beads on a Bead Board, and temporarily string them, using bead stoppers or hemostats on either end, to secure them in place, until you are satisfied with your layout and design.
We are going to do everything in 3’s. We are going to go through the beads three times. We are going to tie 3 knots each time we reach and/or return to an end.
Supplies: 1 strand 4mm round fire polish or druk beads Nymo, Size D thread in black 2 size #10 English Beading Needles Toggle Clasp Bees Wax
Scissors Work Surface OPTIONAL: Bracelet Sizing Cone OPTIONAL: Bead Board OPTIONAL: Bead Stoppers or Hemostats
LAY OUT YOUR BEADS ON A BEAD BOARD OR WORK SURFACE.
1. THREAD. Cut a length of thread measured from hand to hand of your outstretched hands. (about 6 feet)
2. NEEDLE. Thread onto a #10 English beading needle. Leave an 8–10” tail. You will need this length of tail in order to finish off your piece.
NOTE: Unlike with cable wire, where you deal with your tails immediately, you deal with the tails from needle/thread work at the very end of your project. So these tails will always be annoyingly in the way while you are making your piece.
3. WAX. Wax your thread
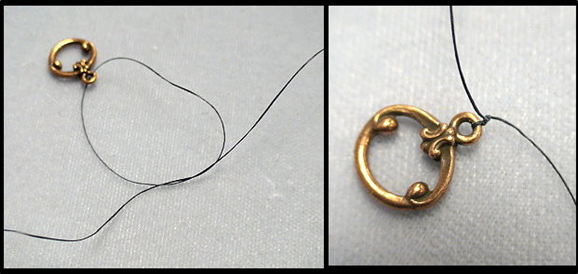
4. ATTACH FIRST CLASP PART. On the end opposite the one with the needle, string on the largest piece of your clasp set. Leave about 8–10” of a tail. Don’t short-change yourself on the tail length. You will need 8–10” to finish off your piece at the end.
Tie 3 over-hand knots. Thus, you take the tail, go over the spine, under the spine, and back up through this developing loop. Pull tight.
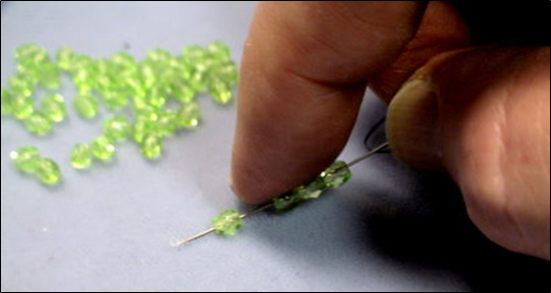
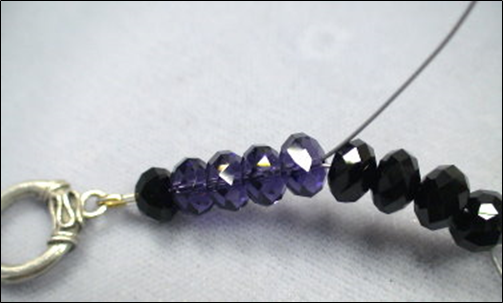
5. STRING YOUR BEADS. Using your needle, put enough beads on the thread until you have made the correct bracelet length, as you want it. Push these beads down so they are flush against the clasp.
The best way to get the beads on the needle, is to use one hand, hold your needle, and spear the hole of your target bead, lifting it up and letting it slide down a bit of your needle. Do this again and again, until you have 4 or more beads on the needle.
Then take your other hand, and push the beads all the way down to your clasp, tied off on the other end. If you can use only one and to pop your beads onto your needle, then you will increase your speed. But if you have to use two hands to get your beads on the needle, that’s OK.
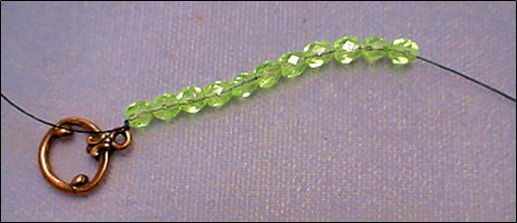
Do NOT string the beads over the tail. The beads, with needle and thread, are strung over the spine only. We deal with the tails at the very end of the process. [This is unlike with cable wire, where we cover both the spine and the tail at this point.]
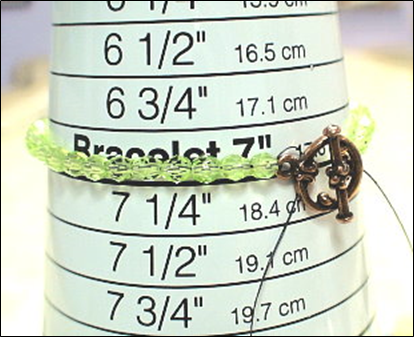
6. TEST LENGTH. Test the length of the bracelet on your wrist or against a sizing cone before tying off the second end. Make any necessary adjustments, such as adding or subtracting beads.
Remember, when you add the 2nd clasp part, you could be adding more length to your piece. With a toggle clasp, you will be adding about 1/2″ more to the length of your piece at this point.
7. ATTACH 2nd CLASP PART. You will be taking the second (and smaller) part of the clasp set and tying this off.
REMEMBER: After this point, you will not be able to make any changes in design, length or ease.
You need to maintain your tension on the beads while doing this. We are going to be using a fancier version of the simple overhand knot. This fancier version gives you more control over your thread tension. If you don’t want to do this, or forget how to do this, you can always tie simple overhand knots.
Let’s begin.
You are the artist. Your finger is your easel. Your thumb is your clamp. The thread is your canvas. The beads are your paints.
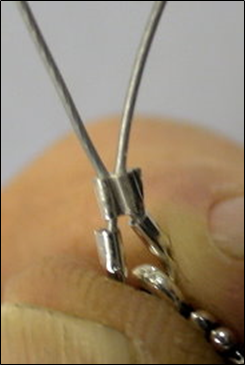
a. Put the length of beads over your forefinger, (from over there towards you) with the already tied-off part of the clasp at the top, and laying in front of your finger, closest to your body.
b. Push the clasp part off to the side, and clamp the beads, the clasp part, and the tension all in place with your thumb.
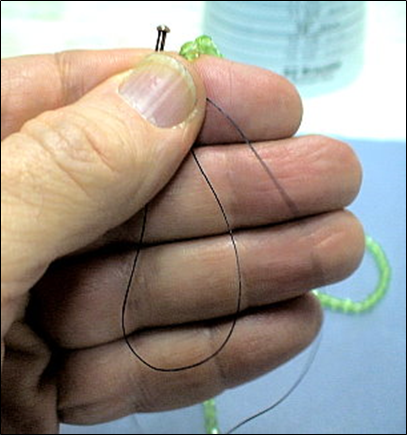
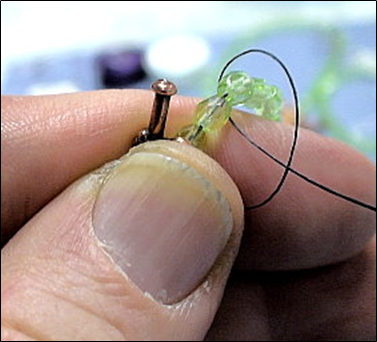
2. Make a U shape with your thread, and tuck under your thumb to hold in place. The U is actually part of your knot.
d. Take the end with the needle, and come from behind the string of beads (from outer space towards you), and under the beadwork, but stay over the U-thread and your working thread.
DO NOT take your needle through the U. The U is part of the knot, and you don’t want to tangle up your working thread with your knot.
Don’t pull your bracelet up into the air while working on it. Leave most of it resting on your work surface, pulling the end you are working on up towards you a bit.
e. Pull, pull, pull, pull, pull and watch the loop getting smaller. Before it gets too small, put your needle down, and work the rest with your hand. Move this ever-decreasing-in-size loop in place between your first bead and the clasp part. You’ll have to let go with your thumb until you have the loop positioned. Clamp down again with your thumb.
f. Pull tight, and pull out the U.
g. One more pull — give the thread a good tug — to tighten things up. With your fingers on one hand, pinch the clasp part and hold tight and steady. With the fingers on your other hand, grab your working thread and pull the clasp part tightly against the first beads. You don’t want any thread to be showing.
The first time you do this step is the most important. After this, your clasp is locked in place close to that first bead.
h. This is your first knot.
i. Repeat this fancy version of an overhead knot two more times
NOTE: Your knots are tied around the thread or your previous knot. You could also, instead, have gone back through the loop coming off your clasp component, but this is not necessary. With our instructions, less thread and knots will show at the clasp.
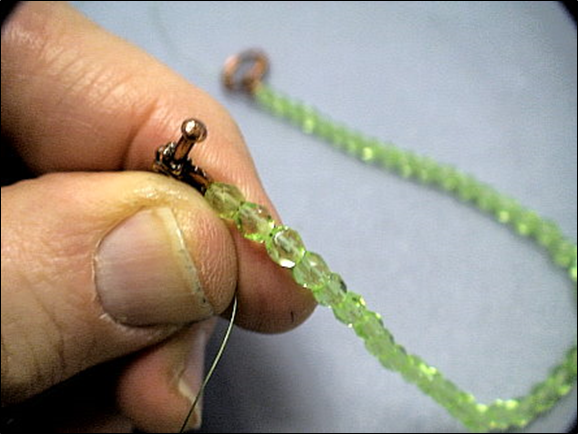
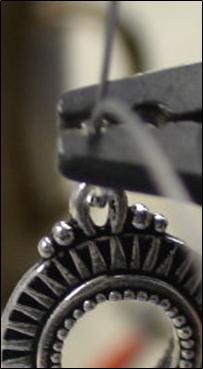
8. 2nd Pass With Needle/Thread. Take your needle, and thread all the way back to the other side of your bracelet (where the larger part of your clasp is).
You cannot do this in one step. You will have to pull your needle out every inch or two. When you pull your needle out, give your thread a tug. You don’t want it to bunch up inside the bead holes.
9. Three More Fancy Knots. Tie three of these special knots with the U.
When you get to your second side, there will be an 8–10” tail annoyingly in the way. Push this behind your hand, so it doesn’t get tangled up with your working thread, as you are trying to tie this fancy knot.
10. 3rd Pass With Needle/Thread. Take your needle, and thread all the way back to the other side.
11. Three More Fancy Knots. Tie three more of these special knots with the U.
12. Finishing Off The Tail. Take you needle and thread, and thread back about 2–3” of beads, and pull your thread through.
At this point, you have a lot of thread and knots near and in the hole of that first bead next to the clasp. You may have to push your needle through and out of that first bead first, and then go back through several other beads.
13. Can You Pop The Knot Back Into The Hole Of The First Bead? Pinch the beads right below the clasp end with your thumb and forefinger. Push these away from you, and, at the same time, pull the tail-thread towards you. You are trying to have the knots next to the clasp pop into the hole of the first bead. Usually you’ll hear and feel a pop. But not always. If you were able to maintain a very tight tension throughout, there may not be a pop.
14. Trim The Tail. Pull the thread away from you, and cut it as close to the bead hole as you can get.
15. Finish Off The Tail On The Other Side. Take your needle off the thread, and put the remaining tail of thread onto your needle.
Repeat steps 12 thru 14.
Give It The Once Over…
Once your bracelet is done, look it over carefully. Be sure your thread, where you trimmed your tails, isn’t showing. Be sure that it has sufficient ease.
Needle and thread work loosens up a bit with wear. If your tension is a little on the tighter side, then this will loosen up. If your tension is loose at this point, you may want to run another thread through your piece, anchoring it to both ends, to tighten things up.
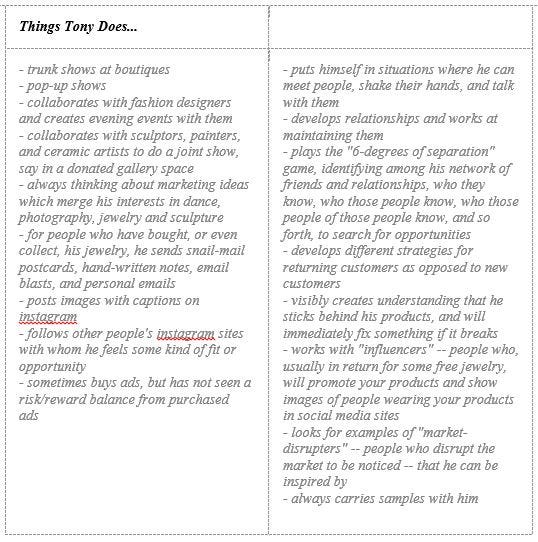
How Do You Clarify What You Do In Your Practice As A Jewelry Designer? Building that relevance into your work
What do you (or will you) say to people who ask you what you do for a living? When you say, “Jewelry Designer”, you probably get a “That’s nice” or “Oh, you make jewelry,” and perhaps a far-away look. Most people can’t imagine exactly what you do. Their images and experiences with jewelry and what it can look like, the materials available to use, the techniques applied are somewhat limited. Not everyone knows you can craft jewelry by hand, not just by machine.
It can be difficult to define jewelry design. What you do as an artist and designer may involve several different kinds of tasks. Your process may be conventional or unconventional. And it’s not just the “What do you do” aspect of the question, but the concurrently implied “Can you make a living at this” aspect of the question, as well. It’s almost as if they are about to say, “What do you really do?”
The response you want to come up with is your personal understanding and recognition about your passion for design, and all the things that drive this passion. Your excitement in telling your story will become infectious, and, while they still might not comprehend everything you do or the how and why you do it, they will certainly see that you are a jewelry designer, one who is intent on achieving some level of success within the profession.
Your Practice, and how you define and live and succeed in it depends on gaining some clarity in terms of…,
(1) Having a definition of what success as a designer means to you
(2) Developing a production (and marketing) routine
(3) Creating a consistent and coherent body of work
(4) Being very organized
(5) If selling or exhibiting, taking a multi-venue approach
(6) Developing a Criticality where you are reflecting, evaluating, validating, legitimizing, being very metacognitive
(7) Self-Care and finding balance in your life
(1) Defining Success
Not every designer is going to define success in the same way. In fact, there will be dramatic differences. Some people may want to focus on applying their creative skills. They search for artistic excellence. Others may want to make money. They want monetary gain and, perhaps, financial stability. Still others may want to be a part of a social network of other creative types. They might want a support network, seek collaboration, or find recognition.
Some people want to do this full time, and others part time. Some want to earn enough money to pay for their habit; others want to make money to supplement their income; still others want to make enough money to be self-supporting.
Success is all about you. What do you want? How much effort and organization will it take to match your ambition and goals? How much time and money do you want to invest in your education and development? Are you aiming to be a crafter, an artist, or a designer?
Success depends on many factors. But key to all, and foremost, is that you brainstorm with yourself, be brutally honest, and list the goals you prefer and want to achieve. Prioritize these. More successful designers find some balance among creativity, business, and recognition. But your ambitions may be different, and just as legitimate in finding success.
Know that achieving any level or definition of success will take time and effort, often sacrifices. The jewelry designer should set expectations and work strategies accordingly.
(2) The Day-To-Day Routine
While everyone has their own process and their own flow, more successful designers establish some kind of work routine. They allocate a specific work space within which to create. They keep their inventory of parts and finished pieces very organized. And, key here, they set up a schedule for (a) researching ideas and inspirations, (b) working in a production mode, c) presenting or marketing their work to others, (d) reflecting on their practice.
Periodically, evaluate your process. Are there things you can do to improve your efficiency or effectiveness? Can you better manage your productivity? Do you work better at a certain time of day, or day of the week? Have you programmed in breaks? Is there a comfortable balance between work time and break time? Would it be helpful to take the last 15 minutes of your day to set up for tomorrow?
Plot out your weekly schedule on a calendar or spreadsheet. Set some objectives about how many pieces you want to finish per week or per month. If interruptions, say from friends or family, get too annoying, make them aware of your schedule and ask them to help you protect your creative time and space.
It is important to note here that there is a fundamental tension between productivity and creativity. The former tries to put you in a box. The latter tries to keep you from getting stuck in a box. This can be frustrating.
Yet artists and designers, overall, who are able to provide some structure to their creative time tend to be more successful in their practice. These artists and designers set a routine and schedule for both making jewelry time as well as thinking about designing time. They also structure in time for introducing their ideas publicly as well as reflecting on the efficiency and effectiveness of everything they do — tangible and otherwise.
(3) Creating A Consistent and Coherent Body Of Work
Jewelry designers are free to create whatever they want. And usually, novices would be wise to try out a lot of different techniques, and use a lot of different materials, and create a lot of different designs. Think of this as play and experimentation. It’s how you learn to be a designer.
But as you develop more as a designer, it makes more sense to set some limits and begin to define a personal style, coherency and brand identity.
Your style reflects what you are passionate about. It may focus on a particular technique, material or design. Or it may focus on integrating and combining several things. But with all the things you do, there is some coherence to it. It becomes more associated and identified with you and you become more recognized with it. The consistency ties you to your work.
This doesn’t limit variation and creativity in your work. It primarily means that wearers and buyers and collectors of your jewelry can sense the artist’s hand, that is you, reflected by the pieces you create.
Coherency has several dimensions to it. The designer achieves a level of coherency in how the majority of these dimensions, not necessarily all dimensions, are reflected in any one piece. Thus, the designer still has a lot of room for variation in their work and style.
These dimensions of coherency about which designers are selective include,
– The choice of materials
– The choice of techniques
– How pieces are presented, displayed, organized, situated with other pieces
– How pieces and collections are named
– Packaging
– Color palettes
– The use of forms and themes
– Personalization, differentiation and originality
– The use of negative vs. positive space
– The use of point, line, plane and shape
– Arrangements, placements, distributions of design elements within the piece
– Control over light, shadow, bright, dull
– The marriage and resulting tradeoffs between aesthetics and functionality
– Silhouettes
– Quality in materials, quality in craftsmanship, quality in finish, quality in presentation
(4) Organization
Good organization involves
(a) Inventory (how you organize, track and replenish it)
(b) Work space (how you create productive areas for creative work, business and creative reflection)
c) Bookkeeping and accounting (how you manage your finances)
(d) Business logistics, such as researching venues, getting to venues, tracking your pieces, shipping, marketing, web-presence and social media management (how you manage the other business aspects of what you do)
Good organization will help you avoid a lot of frustration and disarray. Learn to use spreadsheets and apps. These will save you a lot of time and minimize a lot of grief and worry. You’ll have more time to create, and need less time to keep things organized and up-to-date.
Think of and treat your inventory of materials, and all that it takes to achieve a satisfactory level of quality in your pieces, as investments, rather than costs. It gets more productive to reflect on What Is Your Return On Investment (ROI)?, rather than on What Does This Cost? This will go a long way in clarifying for you what is important, and what is less so, and how to prioritize things in the face of limits on time and other resources.
Your workspace might be a part of a room, it might be an entire room in your home, or even a complete studio space outside your home.
Divide your “work space” into three distinct areas: where you create, where you handle all the business things, and where you relax, think and reflect.
As you develop your work and related spaces, you should try to anticipate what it will take to scale each of these up, as you get more established as a jewelry designer. Are your spreadsheets and computer apps robust enough to grow with your developing career and business, as well?
(5) A Multi-Venue Approach Towards The Creative Marketplace
Successful jewelry designers are able to get the visibility and legitimacy they want and deserve. They know what to expect when exposing their work publicly within the creative marketplace.
They are good at communicating their ideas and their value, when approaching art and craft show vendors, stores and boutiques, galleries, and buyers and collectors, or applying for art grants or doing demonstrations. They are able to get articles written about them in blogs, newspapers, magazines and jewelry editorials. And, very importantly, they use a multi-venue approach (diversification) when introducing their jewelry into the marketplace. At a minimum, this multi-venue approach will include both an on-line strategy and a bricks-and-mortar strategy.
Legitimacy as an artist requires massive exposure, most often in diverse locations and venues. It is unusual for a single venue or location, whether you are looking for exhibitions or for sales, to be sufficient for a designer to become successful. You will need to have your jewelry pieces in many venues. There are many online directories and other resources to help you find the wide variety of venues useful to the further development of your jewelry design career.
What To Expect When Exposing Your Work Publicly
No jewelry designer works in a vacuum, and no piece of jewelry is complete until it has been shared with an audience.
No wearer or purchaser of jewelry is going to see the piece as merely an object of adornment. They will interact with the piece in a much more intimate way, and very much so influenced by the jewelry creator and all the choices made in design.
Part of the jewelry designer’s development as a professional involves an ability to anticipate and understand how various audiences express desire and how various audiences judge a piece of jewelry to be finished and successful. Jewelry is here to amaze and intrigue. It is here to entice someone to wear it, purchase it, show it around. It is here to share the inspiration and prowess of the designer with those who see, feel, touch and inhabit it.
The more successful designer takes the time to explore how an audience is engaged with the piece. The designer learns insights in how any piece of jewelry evokes emotions and resonates with others. The designer is very sensitive to the experience people have at the point of purchase or gifting. Finish and presentation are very important. Acquiring jewelry is special and unique a process. Jewelry is not something we must have to meet some innate need; rather, it is something we desire because it stirs something in us.
Approaching Stores and Galleries
Although some jewelry designers may feel uneasy mixing art with business, for most it is a necessity. You do not have to sacrifice wonder for reality. Most designers sell their pieces, so recognizing the things about coordinating art with business become very important.
Typically small stores and boutiques, websites and online sales platforms, and galleries will sell your jewelry, either outright, or on consignment. Their goal is to turn a profit, and they are at greater risk than the artist. It is the venue that displays, promotes, prices, trains employees to talk about your jewelry to customers, and keeps the pieces clean. Available selling-space is always limited. When your jewelry takes up space in these venues, it is an opportunity cost to the business — they lose the opportunity to carry someone else’s work which might be more appropriate to the setting, or might sell better.
There are different types of stores, websites and galleries. Each satisfies a different market niche for jewelry. Each has a different level of understanding about what jewelry really is, and all the choices the jewelry designer has made to design and create each piece.
When approaching stores or galleries to display and sell your pieces, it is critical that the artist understand how each specific venue functions, who their audiences are, and what the attendant risks to them are, should they decide to exhibit and/or sell your pieces.
The first step is to be your authentic, passionate self. Your jewelry will not speak for itself. So, in spite of any feelings of vulnerability you might have when approaching stores and galleries, you will need to talk about yourself and your jewelry. You do not want to feel “salesy” when speaking with business or gallery owners and representatives. You do not want to feel pushy. Or desperate. But you want them to get to Yes.
You speak to them on their terms. They want to know the real you. What excites you. The history behind the design choices you make. Your understanding of yourself as an artist, and your understanding of your virtual client, her desires, wants and motivations. How do you connect to your audience through your jewelry?
o Who are your best customers likely to be? o How would you describe them: demographics, shopping behaviors, wants and desires? o Why are they attracted to your work? o How and where do they find out about you and your work? o What is your Getting Started story? o How would you go about persuading someone to buy a piece of jewelry you made — what’s in it for them? How does it connect with them emotionally? How would it make their lives better?
Do some research ahead of time. The internet has a wealth of information you can pull up. Before you meet with them, get an understanding of the types of jewelry artists and their materials they carry in their venues. These venues are always on the lookout for new talent. They are most likely to say Yes to a jewelry designer whose style and materials fit in, but do not duplicate, what they already are showing.
Also research who their customer base is. They are most likely to say Yes to a jewelry designer whose audience either mirrors their existing customer base, or incrementally adds to and expands it at the margin. They most likely will not want to spend resources (and add risk) by going after a completely new and different customer base.
One more thing. You can either push your way in, or use pull to get in. For most of us, particularly when we are getting started, have only push at our disposal. We might cold call, or set up a formal interview, or initiate a conversation with someone at a gallery opening or art show.
But pull always works better. Here we leverage something or someone to get to the right place or person at the right time. An established designer or academic might set up an appointment for you with one of their contacts, for example.
Influencers
In today’s world, there is a manic competition for attention. Then, also, a frenetic effort to retain and manipulate that attention. Attention creates value. Often, it is difficult for the individual jewelry artist to get a leg up in this world without some significant help. Again, as mentioned above, if you can use pull, you’ll go farther, faster than if you have to rely on push.
Influencers are one of the backbones of internet culture and one way to use pull. Their business model centers on ways to shape everything we do in our lives from how we shop to how we learn to how we dress. Influencers are part micro-celebrity and part entrepreneur. They are opinion leaders and have been able to garner a large audience. They have proven themselves to be able to exploit how people distribute their time and attention.
Influencers typically work on a quid-pro-quo basis. In exchange for some products you give them, they promote them. Sometimes a fee may be involved. They take photos, they interact with audiences, they get your message out on different platforms, they sponsor content.
The Value of Collaboration
It can be so easy for any jewelry designer to get so wrapped up in creating things that they isolate themselves. But this is not the ideal situation.
At a minimum, it is very helpful, and very healthy, to have a support group. People you can talk to and talk things out with. People who can give you good feedback.
It is also very invigorating to collaborate on a project with someone else — A2A, that is, artist to artist. You can get an infusion of new ideas, sensibilities and strategies. You can get challenged. You become more self-aware of your own styles and preferences. You come up with new ideas about coordinating your own authentic, creative self with that of someone else.
Maintaining A Client Base
Much of any jewelry designer’s success comes down to maintaining a high level of visibility. Regularly keeping in touch with your client base is extremely important here.
Keep good documentation about who bought your pieces, when, why, for how much, and their address, email, phone numbers.
Maintain a web presence, either as a unique website, and/or a presence on social media platforms.
Create a mailing/emailing list, and use it frequently.
Have business cards handy at all times.
Do promotions to expand your mailing/emailing lists. Call to actions are very effective, such as offering a ‘discount coupon good for the next 7 days’. Or directing them to see your new pieces online by clicking a link.
Keep them up-to-date about where your pieces may be found, and what you are working on now.
(6) Criticality
Criticality is something you want to build into your Practice. It is not something to avoid or minimize.
Criticality is about making choices. It is about separating and confronting and going beyond your piece in order to build in that relevance jewelry needs as it gets exposed to the public.
Criticality helps you close the distance between the jewelry you create and the person it has been created for.
Criticality aids you in revealing the implications and consequences of all your choices. About materials. About techniques. About colors and patterns and textures and forms. Each form of jewelry requires endless and constant adjustments, and you should be very critically aware of what, why and how.
Criticality is necessary for you to continue to grow and develop as a professional jewelry designer.
Criticality is not a put-down of the artist. Rather it is a way of reflecting, evaluating and being very metacognitive of all the choices made in design and construction, and a lot of what-if envisioning and analysis of possible alternative choices. It is an exploratory thing. It adds understanding and comprehension.
Criticality assists in creating a dialog between artist and all the various audiences with whom the artist interacts. Towards that end, it is helpful to actively bring others into that criticality discussion, where we now have the prospects of many voices merging into a form. It can be difficult to be objective about your own work. And you may not be aware of how the quality of your work stacks up with others, and where it needs to be.
Legitimacy
Your legitimacy as a jewelry designer, your reputation, your visibility, your opportunities, to some degree, flow from this process of criticality. Legitimacy comes from both local and more general validation. Validation results from these processes of critical observation and analysis of your work and of how you conduct yourself within your practice.
Your various audiences that view your work critically, in turn, bring your work in contact with the external world. They look for a high level of coherence within the design and its execution. They describe it critically as to its qualifications for matching desire, establishing appeal, having personal or general value and meaning. For successful jewelry designers, this contagion continues, diffuses, and grows.
Legitimacy engenders a deeper level of confidence among artist, wearer and viewer. The relationships are stimulated, enriched, given more and more value. Jewelry is more than a simple object; it is a catalyst for interaction, for relationships, for engagement, for emotion. Legitimacy results in trust and validation.
With globalization and rapid technological changes, the jewelry designer is confronted with additional burdens, making the effort to achieve legitimacy ever more difficult. That is because these larger forces bring about more and more standardization of jewelry. They rapidly bring fashions and styles to the fore, only to scrap them, in the seemingly blink of an eye, for the next hot thing. They channel images of jewelry pieces around and around the world taking on a sameness, and lowering people’s expectations to what jewelry could be about.
If the products around the world are essentially the same, then the only thing the customer will care about is price. They won’t care who made it. They won’t care about quality.
Innovation begins to disappear. With its disappearance, the role of the jewelry designer diminishes. The jewelry designer becomes more a technician with no professional identity or concerns. The jewelry simply becomes the sum of its parts — the market value of the beads, metals and other components. There are few, if any, pathways to legitimacy.
That’s not what we want. And that makes it ever more important that jewelry designers see themselves as professionals, and develop their disciplinary literacy — fluency, flexibility and originality in design. Aspects of design which cannot be globalized. Or standardized. Or accomplished without the work, knowledge, skills, understandings and insights of a professional jewelry designer.
(7) Finding Balance — Self Care
Making jewelry and living a creative life can wear and tear on both your physical, as well as mental, health. It’s important that you have a plan of self-care and balance that you have thought about and structured ahead of time.
Take breaks. Play. Experiment. Take walks. Don’t isolate yourself. Develop a support system.
Exercise. Take good care of your hands, finger nails, wrists, arms, neck, back and eyes. If you need to read with glasses, then you need to make jewelry with glasses. There are lots of different tools specific to different situations — use them all. Elastic wrist bands, thumb-support gloves, elbow bands do great to preserve your fingers, wrists and elbows. There are lots of ergonomic tools and chairs and lighting. With a lot of metalsmithing and lampworking, you’ll need goggles, perhaps special lenses to filter out the glare of torch flames. Make these your friends.
There will be creative aspects to what you do, and administrative aspects to what you do. Find some balance between your right brain and your left brain.
Spend a lot of time feeding your creative well with ideas, inspirations, motivations and a deep appreciation for what artists do well.
Take some time to explore new materials, techniques and technologies.
There will be slow times and seasonal ups and downs. Plan ahead of time how you will occupy yourself during slow periods.
There will be times you will have designer’s block. You will be stuck, usually difficulty getting started, or if your piece is getting developed over a long period of time, some difficulty staying motivated. Develop strategies you can refer to on how to stay motivated, and on how to stop yourself from sabotaging your progress. It is important to know what you can and cannot control.
Train yourself with a mindset for rejection. Not everyone will like what you do. Not everyone will want to wear or buy the pieces you’ve invested your heart and soul in. That’s not your problem. It’s their problem. Don’t make it yours.
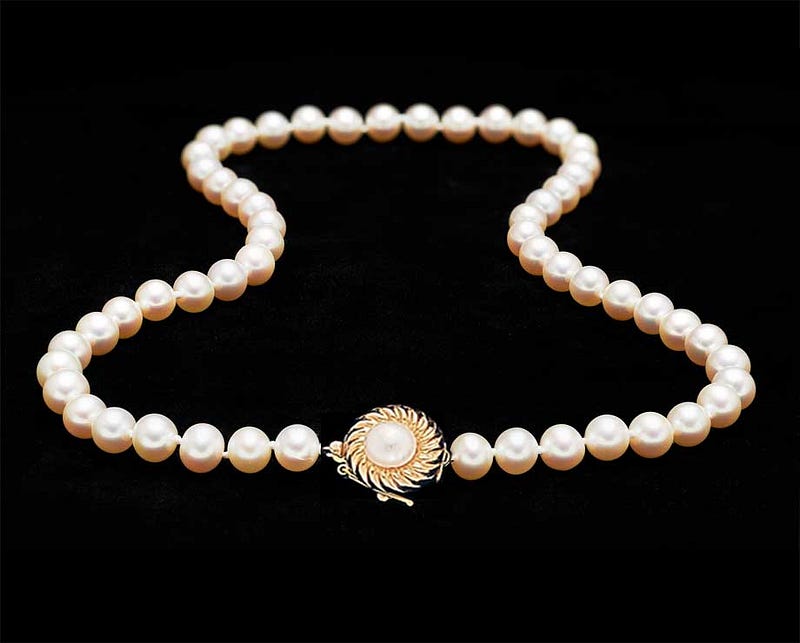
Because the history of pearls has been very much a part of the history of nobility, there have been many customs and social expectations that have arisen around pearls. One of these has to do with styles and lengths.
Graduated: Beads are graduated in size, with the largest in the center, and decreasing in size on either side towards the clasp.
Uniform: All the pearls are within .5mm of each other in size.
Choker: One or more strands worn just above the collarbone, typically 15 1/2″ to 16 1/2″.
Princess: 18″ length
Matinee: 22–24″ length
Opera: 30–32″ length
Continuous Strand: A necklace without a clasp, typically over 26″ in length so that it can slip over someone’s head.
Bib: A necklace with many strands, each one longer than the one above it.
Rope: 45″ or longer, sometimes referred to as a lariat.
A necklace enhancer, sometimes referred to as a “necklace shortener”, is like a ring with a latch on one side and a hinge on the other, which lets you open and securely close it. These are most often used with ropes, where you circle the rope over your head 2 or 3 times, to wear like a multi-strand choker. The necklace enhancer clips over the knots in the encircling strands, to secure them together and in place. If you cannot find a necklace enhancer, you might be able to use an S-clasp to achieve the same end.
Odd vs. Even number of strands: This is a personal choice. Traditionally, it was believed that an even number of strands was inappropriate and bad luck. It would be very unusual to see any royalty wear an even number of strands.
Pearls will last a lifetime and beyond, if cared for properly.
Exposure to heat (such as the top of a TV set or near a stove or fire place), sunlight, and chemicals (such as those in hair spray, cosmetics and perfumes) can damage the nacre of pearls.
How do I safely clean pearls? Use a gentle detergent soap or mild shampoo without dyes and warm water. Be sure to clean around the hole of each pearl. Rinse thoroughly and let dry on a damp cloth overnight. Hot water can permanently damage your pearls. Do not let your pearls soak in the water. Let the pearls and string dry out for 24 hours before wearing.
Never wear your pearls when the string is still wet . Never hang the strand when wet.
Pearls are softer than other gemstones. Always wipe them with a soft cloth after wearing. Perfume oils, makeup, hair sprays and perfumes can spot and weaken their surfaces, as well as the cords they are strung on. Pearls should be put on after the application of cosmetics, perfume or hair spray. They should be the LAST THINGS PUT ON and the FIRST THINGS TAKEN OFF.
Pearls should be kept away from hard or sharp jewelry that could scratch them.
Pearls are best stored in a soft cloth pouch, or in a separately lined segment of a jewelry box, and out of the air and sunlight. Do not store in a plastic bag. The plastic emits a chemical which makes the pearl surface deteriorate.
Do not shower or swim in your pearl jewelry.
Ammonia and alcohol will ruin pearls. They both draw out the oils in the pearls which give them their luster. Keep pearls away from metal cleaners and tarnish removers.
The more you wear your pearls, the more beautiful they become. Pearls’ luster is maximized when worn often because the oils from the skin react with the surface of the pearl. However, you want your pearls to glow, not yourself; perspiration can be slightly acidic, and eat away at the pearl.
The air in many safes and security deposit boxes is very dry, and can cause pearls to crack or discolor.
DIRT. Re-string if the knots between your pearls are looking soiled or discolored. Silk, in particular, absorbs body oils and grime. Pearls are porous. They can absorb dirt and become permanently discolored. Sometimes, if there are no knots between beads, your pearls might adversely be affected by the beads next to them. For example, gold beads can blacken pearls, at the point they come in contact.
CHIPPING. Re-string if your pearls become chipped, scratched or broken. Pearls are soft and can easily scratch, chip and break. Some of your pearls may need to be replaced, before re-stringing. Once the nacre starts to chip, especially at or near the hole, it will set off a chain reaction and start chipping all over the pearl. Be sure to string your natural pearls on silk cord. Nylon cord will cut into the pearl at the hole.
STRETCH. Re-string if your pearls are moving around too freely between the knots. Silk stretches over time. Cord which shows, thus is uncovered, increases the chances it will break. Your necklace also may get longer over time, and that extra length may no longer meet your fashion needs. The hole of a pearl is very sharp. If the pearl moves back and forth between knots because of slack, or rotates too freely around the cord because there is not enough thickness of cord within the hole, the sharp holes will shred the cord, especially if it is silk.
DETERIORATION.Re-string if your stringing material breaks. Silk cord naturally deteriorates in 3–5 years. It breaks easily, and literally begins to turn to dust.
CLASP FAILURE. Re-string if your clasp breaks. Pearl clasps and box clasps break easily.But these clasps provide the “look” that people prefer with pearl knotted jewelry.
How often do pearls need to be re-strung? This depends on how often you wear them, what they were strung on, and how they were stored and cared for.
In general, pearls need to be re-strung every 3–5 years. If you wear your pearls every day, you will need to re-string them annually. If they were strung on silk bead cord, which is our preference, then silk naturally deteriorates in 3–5 years, and you want to re-string them before the silk starts turning to dust. If they were strung on nylon bead cord or flexible cable wires, these materials do not easily break down, and you might wait 10 years before re-stringing. But these non-silk stringing materials can ruin your pearls by cutting into the pearl at the hole.
If you store your pearls in an air-tight bag, and out of the air and sunlight, you may only have to re-string them every 10–15 years, even when strung on silk beading cord. Make sure the bag is a natural material like silk or cotton. Plastic bags actually ruin pearls. There is a negative chemical reaction between the plastic and the pearl.
Before Re-Stringing, You Need To Clean Them
Before you re-string your pearls, you would need to clean them.
First, you should gently wash your pearls while they are still on the old string, with mild soap and warm water. Remove any dirt and hardened oils around the pearls, particularly near the holes. Rinse extremely well so that there is no soapy residue. While you are cleaning your pearls, you want to anticipate what might happen, should the string break. Be sure the drain is covered. You might want to wash the pearls by working inside a colander in your sink.
Next, you must carefully cut the pearls off the old string. To start, place your scissors on the knot between two pearls and cut through the middle of the knot. You don’t want to start on either side of the first knot because the knot could slip inside a pearl and be quite difficult to remove. For the rest of the pearls, snip each knot off by placing the scissors behind each knot and in front of the pearl. Again, work over a surface, where, if you dropped a pearl, you would not lose it.
If there is a pattern to the arrangement of the pearls on your necklace, you might want to lay them out in this pattern, as you cut each one off the string, say on a bead board.
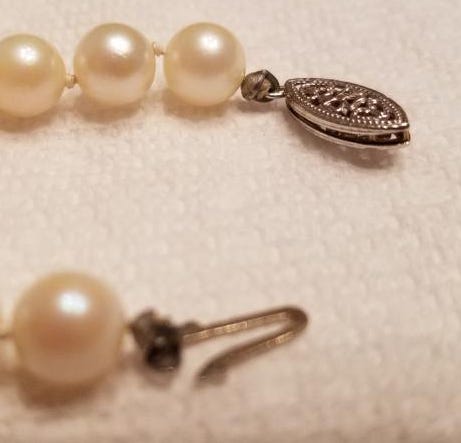
However, pearl knotted jewelry is very strongly associated with what are called pearl clasps or safety clasps. These are often marquis-shaped clasps, with a hook like tongue that pushes inside them. If the tongue should somehow come undone and slip out, it would catch on a bar in the clasp, saving you from losing your string of pearls.
box clasps
In terms of that vintage-type look, other widely used clasps are filigree or other box clasps. These are pretty, but not as secure as safety clasps.
Usually, you will want your clasp to compliment and not compete visually with your pearl knotted piece. If you decide to use a very show’y clasp, it should blend organically with the rest of your piece.
You will be attaching your bead cord, either to the loop(s) on the clasp itself, or to soldered rings attached to these loops. You want both these loops, as well as any rings attached to them, to be closed, that is soldered — thus have no gaps in them. If there are attached rings, and they are open, you will want to remove these, and attach the cord to the closed loops on the clasp.
Whatever Your Preference, You Would Be Hard Pressed Not To Use A Pearl Clasp
If you are making pearl knotted pieces for re-sale, you would be hard pressed Not to use a pearl or safety clasp, or some similar looking clasp.
The woman who originally owned the American Pearl Company in Tennessee was always looking for a clasp that would be durable, but attractive to her customers. The American Pearl Company made a lot of its money by selling finished jewelry.
Pearl and Safety clasps, particularly those made of 14KT gold, break easily. The tongue bends and breaks, and no longer can wedge into its marquis shaped home. Her biggest frustration was that the clasps on the necklaces and bracelets she sold broke too easily, and the pieces came back for repair. It’s a big effort to re-string pearl knotted pieces, since you have to cut off each pearl individually, and then re-knot between each bead. And there is some obligation within a reasonable amount of time (say, 3–6 months), where it is the seller’s responsibility to cover the costs of repair.
At first she tried switching to other types of clasps, like toggle clasps and lobster claws. But these pieces did not sell. People wanted pearl/safety clasps.
Next, she tried switching from 14KT gold to gold-filled clasps. Gold-filled is real gold fused to brass, sometimes copper. Gold-filled has the value of real gold, but is very durable, retaining the color, shine, shape and value over many years, even decades. These did not sell either. People wanted 14KT.
Finally, she gave in somewhat. She returned to the 14KT gold pearl/safety clasps. But she doubled her prices, to build in the cost of one re-stringing.
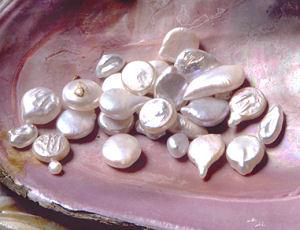
Pearls come in different sizes and shapes, and a myriad of colors.
Some pearls are from nature. These include freshwater pearls (from mussels) and saltwater pearls (from oysters). Pearls can be naturally occurring, or cultured, where people have intervened in the process by introducing an irritant inside the mollusk shell.
Other pearls are “faux” or imitation. These are some kind of core bead with a pearlized finish around it. These are typically described by what makes up the core of the bead. The core could be plastic, glass, shell, ceramic or crystal. These are made in different countries around the world and vary in quality.
To differentiate between natural and faux pearls, try these things:
A) Always when buying pearls, check the hole.
Most natural pearls have very small holes. The holes usually appear relatively smooth, but not perfectly smooth, round and centered as the holes in faux pearls do.
The finishes on many faux pearls are not well applied, particularly at the hole. You often can see the finish chipping off or peeling away from the hole.
Look inside the hole. In natural pearls, the hole will seem to be a solid tube all the way through. In faux pearls, usually you will see a thin rim, and the hole past the rim seems hollow.
B) Rub the pearls against your front teeth.
Faux pearls have very smooth surfaces. Natural pearls will have bumps and slightly uneven surfaces. You can feel the differences, when rubbed against your front teeth.
Grades or Qualities of Pearls
Pearls are typically described in terms of :
luster
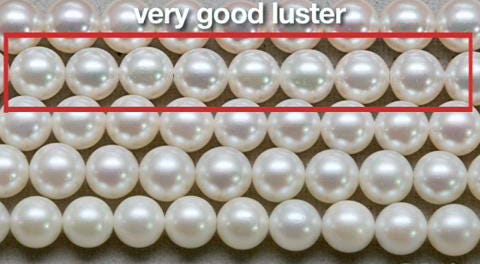
Luster: the way pearls seem to glow from within.
It’s based on the depth of reflection due to the layering of the aragonite crystal.
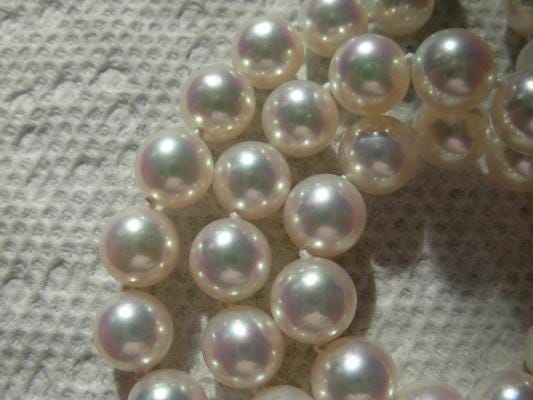
overtones
2. Overtone: the translucent “coating” of color that some pearls have.
A silver pearl may have a blue overtone or a green overtone, for example.
3. Orient (sometimes called iridescent orient):
The variable play of colors across the surface of the pearl like a rainbow.’
I’m a store dog, from a long line of store dogs. My name is Lily. I’m part Chihuahua and part Shiatsu. Other store dogs have it much easier than I do, because I work in a Bead Shop. Wherever I try to lay down, there are beads. In the classroom, people are talking, talking, talking and waiving those needles all around. In the front, everyone wants to pet me and make nice — not my thing. And, try as I may, and feign as I might, I don’t think I’ll ever master this — beading and jewelry making.
5/5
Warren took me aside, and held me tight. He told me Connie had died yesterday.
I am so sad. I lost my best friend. I know Connie is together with Rosie by her side. – Lily
5/1 Thunder and lightning all day. Sorry Warren, No McCabe workshop for you. I come first. – Lily
4/27 Again, Daisy. Jayden dropped Daisy off at the store. And what is the first thing she does when she walks into the store? She runs to everyone, one at a time, and kisses each of them. Daisy, THOSE ARE MY PEOPLE!!!!! Paws off! – Lily
4/25 It was Daisy all week. Daisy on Monday. Daisy on Tuesday. Daisy on Wednesday. Daisy on Thursday and Friday and Saturday. All she does is sleep in her green cushioned chair in the front of the store. She slept right through Attaching Clasps and Bead Study and Wire Clinic and Pearl Knotting. And I saw Vera sneak Daisy and extra treat. – Lily
4/20 Have you ever gotten a bead stuck in the matted hair on your snout just below your eyes? Quite a perspective. – Lily
4/18 Daisy, dastardly daisy doodle, got in trouble yesterday. She jumped up on the bead table, and was taken to the dark bathroom for time out.
A Vanderbilt professor did a study that showed that dogs didn’t really smile. Then, what’s this! -Lily
4/17 They waxed the floors last night.
Wheeeeeeeeeeeee!!!! #^Vdkla@)(!%
Oooh, they missed a bead. – Lily
4/15 These substitute UPS drivers don’t get it.
Nip or Treat!
No treat, you get nipped. – Lily
4/12 “Do you think we should give Lily a T.R.E.A.T.?” That means, Bark twice, Whine moderately, and Paw up. Mmmmmm… – Lily
4/10 Thunder and lightning, Oh My!
The only safe place to hide is under Warren’s chair.
Too bad it’s on wheels. – Lily
4/8 Connie was worth waiting for!
I love Connie! – Lily
4/7 Tomorrow is Bead Study. Can’t wait. Connie takes good care of me. That’s why I like to jump up on the seat next to her, and curl up and look cute.
She’s very good about not dropping beads on top of me. – Lily
4/4 Becky came to the store again today. I thought she was shy. Now she’s all store dog — barking, greeting, kissing.
A lady came in, bent over, and Becky kissed her! No, no, no, that’s not how it’s supposed to be done. I’m the only kissy-face around here! – Lily
4/3 I laid on my back, my soft tummy up waiting for someone to rub it. 20 minutes. 30 minutes. Nothing.
I know what to do in this situation.
“Lily, WHEWWWW!!!!” – Lily
4/1 — even later I was playing with my baby toy, as I do after work each day. Somehow, I fell over off the chair, and rolled a bit. A bit too far, and right into Jayden’s TV tray, where she was working. It’s too high up to see.
The tray fell over, and now I see what she was working on — very pretty.
And Jayden smiled a big smile. Or was it a frown? I can’t tell this far away on the ground. I know she loves me. – Lily
4/1 — later Daisy came to work today. I don’t know why she bothers. You could slap her up and down the side of the snout with beads, and she wouldn’t care.
I’ve dug a secret hole for Daisy in the back yard, near the rear fence and the bamboo. She’s stronger than I am, so I’m a bit afraid to push her in.
But consider her warned….. – Lily
4/1 Richard stuck a red price tag on the hair on the back of my neck. He said it showed everyone how precious I am. Then why were they laughing? – Lily
3/31 Jayden likes to play dress-up with dogs and anyone else around her. I’ve been through it all — bows, hair clips, ribbons, Austrian crystal necklaces, Austrian crystal leashes, sweaters, embellished sweaters and embellished sweaters with further embellishment. Thank God I don’t have any lips, or she’d be putting lipstick on me.
Recently, she’s been struggling about how to dress-up Daisy. Her hair is too short for hair clips and bows. And her breast is broad and large, but her neck is tiny and narrow. She can’t pull off those necklaces of hers. – Lily
3/30 I have a pronounced underbite. Girls think it’s cute. It goes with my pug nose. I’m still able to crush the crimp onto the wire, though, but I can’t get my jaw and teeth to re-round them. – Lily
3/29 Oooh! Some of my hair got sewn into one of Warren’s works.
I hope he doesn’t notice. – Lily
3/28 Got myself tangled up here in black Nymo thread. Around my paws a few times, and my tail, and it feels like it’s cutting up into my butt. I’ve been chewing at it for hours now.
Thank God it’s the Nymo on the bobbin and not on the spool. I’d never be able to chew through that. – Lily
3/24 I sat through another Orientation class of Warren’s.
Rosie, one of the last store dogs, went to every class and soaked in all the material.
I can’t help it if she mastered tubular peyote after two years. That damn step up.
In a bead store, “adorable” just gets you so far.
Mastering the step up — now that will get you put on a doggy pedestal for life.- -Lily
3/18 I can’t believe Warren got even smaller treats.
I expect everyone to give me a treat every day, or at least, ever time they come in.
That means, Marje and Richard and Nola and Linda and Nancy and Tiffany and Connie and Vera and Cecilia and Bonnie and Ethel and Mary and Andrea and The Postman and The UPS Man and The FedEx Man and Beverly and Kathleen (even though she doesn’t like dogs) and Susan and Susie and Dagmar and Terry and Sandy and Warren and Jayden. -Lily
3/17 Richard put a green self-stick label on me, so I could wear the green like everyone else.
At least, I think that’s why he did it. -Lily
2/24 Ronnie brought Becky today and Jayden left Daisy at the store.
NO NOT AGAIN.
Becky is too big to play with. Daisy gets all the attention, and she doesn’t even like to bead. -Lily
2/24— later Becky found Daisy’s bone and hid it.
Daisy found it. And hid it somewhere else.
Becky found it. [“It’s there, you big dog,” I said.] Then hid it.
Daisy found it again, and took it somewhere else.
Fun to watch, but they’re both slobbering over all the beads on the floor. -Lily
2/3 Stepped on another needle today.
I guess Size #10 needles ARE bigger than Size #12’s. – Lily
1/11 Dastardly Daisy Doodle came to work again today. I don’t know why she doesn’t stay home. She doesn’t like to bead.
Today, as usual, Daisy slipped her rubber bone with the wheel on it into Vera’s larger than life, at least larger than Daisy, canvas bag.
And in return, copped one of Vera’s peyote stitched pieces. I wonder how long it will take Vera to notice. -Lily
I can’t help it if she could Square Stitch. After all, she had a much larger snout than I do.
It was much easier for her to thread the needle. -Lily
1/4 I snorted a bead today. It was an 11/0 Japanese Miyuki seed bead in turquoise luster.
I guess it’s true what they say about seed beads. They are not all exactly the same size. The 11/0 aqua transparent I snorted yesterday was much smaller. -Lily
I was driving down the interstate, not really going anywhere, but enjoying the ride. As the billboards passed, and the cows passed, and the gas-stations passed, and as I passed car after car and truck after truck, I began to begin to suppose — suppose I used some particular beads, with these other beads, in this configuration, with this design. Just suppose.
My mind wandered a bit for a moment, distracted by something along the side of the road I caught in the corner of my eye, and then I returned to thinking about my piece and its design. I needed a sense of the clasp and how it fit with my visualization of the beads. I wanted to evoke a feeling. An emotion. A sensibility. A restrained elegance. Something different than for my sweaty body, somewhat tired and disheveled, somewhat stiff, driving an older car along a long stretch of road. Flat. The same grass, bush, tree, grass, bush, tree, grass, bush, tree over and over again.
I wanted to create five segments, each with a subtle color and pattern variation. The clasp had to fit in with that pattern. Should I string it on cable wire, thread or FireLine (a cable thread)? This one would be FireLine. I’d go through three times to steady the beads from wobbling on the line. Black FireLine. Black was important this time.
I wanted to try to bead-weave off the bead-strung piece. I’d need to subtly build in some delicas into the patterning, and some way to drop them down from the line of the string, so I could weave off them. I wanted to use some shapes I hadn’t made much use of before — 15mm angel wings, 12x6mm bell flowers, and fireballs or crystals. Police lights in the distance. A purple-y blue. Blinking rapidly. In succession. I slowed down. And slowed down some more. I lost my train of thought and wondered for a few seconds to remember what I had been thinking about.
My lady wearing my necklace would be in a long, slimming gown, with a low cut neckline, and hair pulled back. She was busty, but not too busty. She would be walking rapidly down ramps and stairs, through rooms and parties, turning frequently to talk to one person, then another. My necklace had to move with her, like a natural extension of her persona. That meant colors would have to flash and sparkle from every angle of every bead, and from every segment of beads.
But too much sparkle would be overwhelming, so I’d need some subtle color shadings and blendings that would catch the eye, but not hurt it. That would intrigue, and not disappoint. That would flatter, and not make clownish. And that necklace would have to stay in one place. That means thread or FireLine, and a well-jointed and supported clasp assembly, starting with a simple hook and eye.
It was an accident.
Oh, no, not my fantastic fantasy of a necklace. The cars, police lights, police cars, fire engine, and the police, and a few by-standers. My necklace would be no accident. It would be a star upon a star upon a star. Whoops, I’m veering a little bit off the roadway here. I’m still within eye-sight of those police troopers, so I don’t want to do that. Got to pay more attention to the road. Stop designing jewelry in my head. At least, for now.
I’ll soon be at the next big town on the map, to check out all the bead stores there.
DESIGN — MORE THAN A BUMP IN THE ROAD
Design is more than a road trip. It’s more than a day-dream interrupted by a bump in the road. It’s not triggered by flashing lights, nor disrupted by them. Design doesn’t suddenly drape itself around you because you’ve visited every bead store between here and there. It doesn’t become a part of you because you’ve attended X-number of bead shows and taken Y-number of jewelry making workshops. Design is something more.
Design means having some intention in life. It means screaming Here I Am without having to scream. It means interpreting the inner you for the outer them. To Design with Beads makes this process wondrous. It means capturing light and shifting shadows within colors and shapes and sizes and materials, front, left, center, curve and crevice, inside-out and outside-in. Design doesn’t get any better than designing with beads.
But there is a self-awareness factor. As an artist. A creator. Someone who esteems themselves. With courage. And direction. And meaning. With curiosity. Attention. And detail.
It’s something more than calling yourself a Jewelry Designer. And it’s something more than other people, upon seeing your work, calling you a Jewelry Designer — only because that is what you call yourself. Designers are artists who find their inner designer self — creating resplendently, appropriately, exuding desire, fantasy and a certain edginess in appeal. Their designs may speak loudly or softly, but in each case, they resonate.
Most people who call themselves Designers, avoid design. They might follow trends or fads. They might shy away from choosing colors or patterns. They might rely on simple rhythms, unthreatening, un-announcing, un-tantalizing, un-sexy. They might resort to simple lines, instead of shapes and forms. They compensate for a lack of understanding of contemporary jewelry design principles by over-embellishing, or using overly-expensive materials, or placing their jewelry in overwhelming packages with tissues and informational cards and business cards and perfumed essences of something.
How many times, I cannot tell you, have I walked through craft shows and jewelry shows, or paged through jewelry and bead magazines, or examined the pictures of the winners and runners-up of numerous and prominent jewelry design competitions, and been disappointed. Dull. Unwearable. Inappropriate materials, clasps and components. Unimaginative. Seemingly copied. Weak color choice. Boring rhythms. Balance for the sake of balance, symmetry for the sake of symmetry. Predictable. Safe. Unreflective of the artist’s unique human hand. Overly embellished. Ignorant of the art in craft, or the craft in art.
The good designer sees jewelry as art as it is worn. No matter where the person is. No matter what the person looks like. No matter what the person is doing. Jewelry must hold up as art as it is worn. It can only do so if the artist has attended to design principles.
Design Principles help us understand why people find some jewelry attractive, and other jewelry not. The first set of these design principles we call Rules of Composition. Using these rules is more a conviction, than an established, conscious fact.
But way, way before you get to these rules, you go through a trial and error, almost happenstance, process of discovery. It’s in the little things, some clever strategy, some fortuitous decision, some working down an unknown pathway to see what happens. This is how you begin to discover the designer in you. This is how a few jewelry designers discovered art and design for themselves.
For Arynthia, today a prominent jewelry designer and instructor, she felt she crossed that initial threshold with her bead woven garden urn. She created a vessel with little beads that kept its shape. No easy feat, especially at the time.
Her vessel took hundreds of hours in figuring out how to create it. And she created and re-created it many, many times. Three dimensional bead woven pieces tend to collapse on themselves from the weight of the beads, and the lack of structural supports to keep their shapes. Most bead woven vessels and 3-dimensional objects are woven over another object — a jar, a vase, a ball, a piece of wood or Styrofoam — to keep the shape.
With Arynthia’s urn, she gave it four shoulders. Arynthia had always sewn. She was adept at making jackets that kept their shape at the sleeves and shoulders. She applied these insights to her bead weaving strategy in making her garden urn. She created a shoulder at the North, East, South and West points at the top of her circular urn. It worked. She had solved the core design problem before her.
The first time she made her successfully structured garden urn, she said it looked like a strawberry. So there were more design decisions to come, before she claimed final success — an urn that held its shape and looked like a garden urn. She had told me that the garden urn evolved through 25 or so versions, until she was satisfied with the design. And she, as a designer, evolved with her piece, as well.
Lanie, (another noted jewelry instructor), took a different path in her design evolution. When she initially got into beading, she would deconstruct existing pieces, and analyze the stitches. When she began her career, there were few contemporary bead weaving artists. There were many Native Americans and Africans creating bead weavings, and they provided most of her examples. How did they hold the piece together? How did they function? What about the stitchery allowed the piece to flow, curve, and move without breaking? What were the specific steps involving in stitching? Were there any commonalities and universals among pieces from different bead weaving artists?
Lanie translated what she saw into contemporary designs. Her observations about structure became explanations about structuring bead woven pieces. Things clicked. She became a designer.
And finally, we have Geoff. Geoff had no particular goals or aspirations when he started making jewelry. It was something that kept him busy. Kept his mind from wandering and his attention focused and grounded. Allowed him to be creative. He tried every technique — bead stringing, netting, peyote, brick, right angle weave. He went back and forth. Beading is somewhat addictive, and he found himself addicted. But nothing at the moment felt like self-expression.
Geoff began to teach the peyote stitch. He was rigorous. He drove his students to try more and more things. And then more things. He was never satisfied. He wanted to achieve something he could not articulate. His students suffered for it. He was disappointed in them. And he distanced himself from them.
While playing with another stitch — the right angle weave — he found he could build upon the stitch, and layer it. Not only could he layer it, but he could give it dimension and shape. He constructed mattresses filled with coils of beads which formed multidimensional objects — a certain realism and sculpture-like precision. With this same stitch, it was easy to create layers of beads over these mattresses, resulting in beautiful forms and objects. He broke out of his box with these discoveries in techniques.
With this more dimensional and sculptural right angle weave as his base, he found his calling. His new insights created more new insights as he applied his ideas in different situations, with different goals and with different materials. He began blossoming as a designer.
As the Jewelry Artist comes to know jewelry and discovers their personal take on style or technique, the Jewelry Artist comes face to face with Design. Every artist’s pathway is different.
Jewelry Design is the application of basic principles of artistic expression. These principles involve:
1. COMPOSITION 2. MOVEMENT, Flow, Drapery, and Torque 3. FORMS in Relationship to the Body and the Mind, including Functionality and Support 4. TECHNIQUES and MATERIALS
These principles are merely rules for making choices about how to proceed, or not to proceed. About what to include in your pieces, and what not to include. How to anticipate wearer and viewer issues, and how not to screw up here. What techniques will work best, and which will not.
The jewelry designer delineates the Design Process, something that works for her or him, and something that allows her/him to apply the rules.
The jewelry designer articulates for her- or himself an Inspiration, sometimes very specifically, but other times vaguely.
The jewelry designer Plans out his or her designs, with the rules in mind.
S/he sets Goals for the piece — its attributes and their justification for why they must be included, and other attributes excluded, in the piece, and again, with the rules in mind.
S/he defines Standards about quality, wearability, context-sensitivity, timeliness and the like, with the rules in mind.
The jewelry designer then sets up a Schedule and a Routine, things that work for her or him, and begins to work.
And day-dreaming about jewelry design can take you to all sorts of places.
I swear I keep sticking my needle into my finger to reality-check that I’m still alive. Good, Red … I’m still alive. That this mess of a jewelry making project before me, one I keep starting, then stopping, then starting, then putting it away, and then retrieving it, and starting it again is more than a blur, a fog of my imagination. I have this great, intricate beaded necklace to make. And I can’t seem to get it done.
I’ve gone through two packs of 25 beading needles. I pick another one up. I bend it. The needle-hole catches my eye. My eye twitches a bit. Why would I ever want to thread this needle and start this project one more time? Bend now. I can’t wait for you to bend when I’m in the middle of things.
Oh, and the guilt. Everytime I stop, I think I’m being selfish. If I go outside, someone will get sick. If I complain that I’m BORED, CLIMBING UP THE WALLS, SAYING NASTY THINGS ABOUT JESUS, someone will die.
And I love beading and making jewelry. I do it all the time. Almost every day. Hours a day. Never one iota of boredom. Mind never wandering. Until now. Until I’m forced to stay inside.
I can’t focus. I can’t read. I am even getting tired of complaining to my husband. Who doesn’t care. Has never pierced his finger with a needle. And should he ever, he wouldn’t know what to do, anyway. [You know I just want to take this needle and see how he reacts. But I won’t.]
I can’t believe, and you won’t believe, what I just did. For the 8th time just in the last couple hours. I ali-kazam’d with my fingers and commanded the beads to usher themselves into this spectacular, wonderful, beautimous piece of jewelry. And did they? No. Out of spite? Now I’m losing focus again.
My house has become the Hanoi Hilton Hotel. John McCain is in the cell next to mine. He has a window. But the floors lay at a 30-degree angle. My floors are flat. But he has a window. I’ve managed to chip off over 60 pieces of brick off the walls. I’ve spent the last 375 days trying to drill holes in them with whatever I can find. A shard of glass. A rusted nail. A piece of metal I’ve wedged off the bars. I’ve slowly, with cleverly pinched fingers, positioned just so, manipulated the threads in my pants, rolling them, working them off in long threads. I am so sure I can drill those holes. My confidence has me believing I can secure the material to string them on.
But I digress.
They say you can survive a quarantine with a smile. I’m better off than a Neanderthal because I have a roof over my head and a grocery that delivers. That should make me smile. Neanderthals lived and hunted and played in packs. I am free to live and hunt and play by myself. This should make me smile. Neanderthals never knew what was going to happen next. I don’t know what’s going to happen next either. This should make me smile. Neanderthals never expected perfection. I do. I’m not smiling.
The news is making me crazy. So I turn it off. Now no news is making me crazy. I spend more time with my friends on Facebook. My friends are getting whiny and beginning to repeat themselves — over and over again. So I stopped linking on to Facebook. I miss my friends. I made a schedule for myself to keep me occupied and, frankly, feeling some sense of safety and security. I cannot keep to it for the life of me. So I threw it out. And made another schedule.
They say sit back and relax. There have been worse times in our history. Be helpful to one another. Show kindness, understanding. Be flexible. Get outside, if possible. Eat well. Get enough sleep. Try to connect with one person each day. Be positive.
I’m trying.
I decided to do small beading projects — ones I can finish in a few hours. This keeps me from getting overwhelmed. It gives me a feeling of accomplishment. I can sense I am living each day by day, instead of feeling I’m losing touch with time.
I do other things between projects, instead of one project after another. I go outside. Make a phone call. Bake something.
I pick projects which will develop a skill I’m unfamiliar with, or further develop a skill that I already know. Learning is very rewarding, and keeps me focused and happy.
And instead of keeping to a routine per se, I spend some time re-organizing my supplies and workroom. I feel better in my re-organizing mode, rather than following a schedule.
If we’re to cope with our beading addiction, we may have to figure out, at least part of the way, how to bead in a car. We’re not talking water beading on the car when it gets wet. We are talking about taking beads and stringing material and clasps and all those other little pieces, and making jewelry, while traveling in a car. As the passenger. Not the driver. Or, I think not the driver. Addictions can be very powerful.
So, this all begs the question: How DO you bead in a car?
Most people say, “Don’t!”
Or, “Only if the light is Red!”
But others say it is possible under certain circumstances.
Bonnie’s Advice:
Put two pillows on your lap, and wedge them between you and the dash board, to create a type of table and shock absorber.
Use a “lap desk” that has ridges around it. Lay fleece on it.
If also using dishes or containers, put fleece in each one, as well. The fleece “holds the beads”. Regular material does not work.
The pillows absorb a lot of the bumps.
Don’t put too many beads out at a time.
For bead stringing, use long bracelet gift boxes, or something with a deep groove in it.
You can also take a piece of fleece and put it OVER your beadwork as you’re working. Or you can put your beadwork into a ziplock sandwich bag, and work on it at the opening of the bag.
Vera’s Advice:
Put beads in a fleece-lined Frisbee.
Have a towel folded up on you on the other side of the console to cushion the frisbee, so it doesn’t move.
Kathleen’s Advice: As the passenger, for bead crochet: Real easy. Use a tray lined with fleece. Pray to God you don’t hit bumps and stuff.
Pullencreek:
It is not easy beading in a car as a passenger but it can be done if you are persistent and determined. I use a shoebox lid with soft suede underneath my beadwork but it is difficult to thread while riding down the road.
Satine: Definitely NOPT while you are driving! LOL
I’ve tried beading in a car. First off, take a lot, a lot, a lot of extra beads, unless you want to spend most of your trip trying to pick them up off the floor, under the seats, in the water cup holders, in fact, they fly everywhere. Don’t bother. Just bring a lot of beads.
Learn how to shift your hands in sequence and harmony with bumps. You let them move up and back down at the same time, and with the same rhythm as your car goes up, and then back down. If one arm moves at a different rate, or to one side or the other, instead of straight up and down, it can be all over. You have to start again. And if both arms move too fast or too slow, OOPS, you have to start again.
A few times, I tried to incorporate a lot of double-sided tape and some velcro to keep things in place. Especially on those side roads. They are a killer. Doesn’t work as good as shifting your body up and down in sync with the car over it goes over humps and bumps and pot holes and changes from asphalt to concrete.
Be sure to be stern with the driver. You cannot have them hollering at you to stop. Or laughing at you. Or giving you directions. They need to be quiet.
Don’t work on major, massive projects. Keep things simple. Do things in very, very small steps. And for God’s sake, don’t worry about perfection.
You might first practice with make-up. See if you can put on lipstick and mascara and face powder while traveling in a car. If you master that, making jewelry won’t seem so hard.
But, if you’re OCD, and can’t stand things being out of place, don’t even think about bringing your beads and beading supplies into your car!
Tony: “I have memories of always being surrounded by the arts.”
Tony comes from a family that was very arts-oriented, and very supportive of him pursuing the arts and crafts — wherever it took him. His mom was a watercolorwatercolorist and oil painter. His father was a small business owner as well as a photographer. His dad’s dad sculpted for Lockheed, and even was a street dancer. He had a great uncle in New York who had a jewelry business, and Tony remembers, even at age 5 or 6, his uncle was always making jewelry for everyone in the family.
Starting out with gymnastics, Tony graduated to dancing (because his older sister danced). As a dancer, he had to teach himself to sew for costumes as his Mom was much better with a glue gun then a needle. He remembers his family always making things — food, pastry, lapidary, painting. He has fond memories of always being surrounded by art and creativity.
A family friend — Frank — taught him how to bead weave the summer he was ten. That Summer Frank and his wife exposed Tony to the artisan craft as well lapidary, jewelry festivals and much more.
Warren: “Do you think now, with all the creative things you are doing, that you, in some respects are re-creating your childhood?”
Tony: “Oh, for sure! I would say that’s part of a goal I have. I swore I would never be a teacher, but kids gravitate towards me like a moth to a flame. I realized it is because I am ‘5’. Kids get me, which should be the other way around. I am young at heart. I think trying to retain that naivete, that sort of blissful ignorance, especially as a Creative, just allows you to be a little more free with your aspirations. All of a sudden you grow up. It’s like Peter Pan. You lose that sense of innocence and exploration.”
Tony grew up in Los Angeles, spent some time pursuing a career in fashion in New York City. He moved back to Los Angeles for a few years. And then he came to Nashville with his wife who is a singer-songwriter. Today Tony wears several hats: Jewelry Designer, Dance Educator, Choreographer, Costume Designer, Jewelry Design Educator.
Tony: “Growing Up, I always thought I had to do one of these things, or the other. Before I moved to Nashville, jewelry making was just a hobby. When I moved here, one of my goals was how do I interweave all of the creative aspects that make me whole. I think a lot of creatives are creative in more than one discipline, as well. So I’m just trying to figure out how to make it one — one happy world.”
KEEPING GOING
Warren:”Today, how would you describe what your jewelry making is like today?”
Tony:”I describe Lock & Key as a modern interpretation honoring an artisan craft. I am doing something that is ancient in terms of its art, as a form of communication and expression. The loom that I use is about 80 years old at this point, so it’s touched many different hands and many different stories. It’s definitely art jewelry. I describe what I do as boho eclecticism. Tribal influences, so I say it is international in feel. One of the main feedbacks I get is that it is fashion, but not trendy.”
Tony continues by describing his core consumer.
Tony:”My core consumer is 40+. Is a woman who appreciates artisan product, as well as pieces which make them feel modern with a sense of timeless appeal.”
Warren:”So, that first day you decided to become a business. What was that like?”
Tony’s first piece, done around 1998, was a custom piece. He was asked to design a piece for the head designer at Betsey Johnson, a New York fashion designer of clothes and accessories. It was a loomed piece, 1 1/2″ wide choker with multi-colored skulls in it and dangling feathers. He was excited, to say the least. He shared the story about making this one piece, which inspired other people to ask him to design a piece. People responded to his authenticity, and then it became all about the product.
When Tony moved to Nashville, he decided to focus on jewelry. It was part, what was he going to do to make a living? Part, honoring his childhood mentor who had made the Indian jewelry. Part passion about his loom, and gradually adding precious metal clay to the mix of media he relied on for his jewelry designs.
Tony:”And I still love it. Exhausted. Up until 3am getting production ready. Fingers chewed up by my drill bits. But I absolutely still love it!
CREATIVE PROCESS
In describing a typical piece, Tony begins with multi-media. This includes some loom bead weaving. He incorporates ball and chain. He likes to use a lot of color and texture, and mix matte and glossy. People respond well to his color sensibility. He uses many square shaped beads with round beads. With the beadwork, he includes a piece of metal, like a sculpted metal clay piece, either an integral part of the piece, or as a pendant. He often includes semi-precious stones. He likes to mix metal finishes.”Silver and Gold is the same conversation as Navy and Black. If it is well-balanced, it makes it very versatile.”
Tony mentions that, to understand his creative process, you have to go back to his goal of trying to meld together all his creative worlds. His creative process is not a linear process.
He cites as an example a very successful pair of earrings he designed which are precious metal clay based. But they were flowers, which is very specific seasonal iconography. When he started thinking about what he wanted to do the next season, he thought about how he could adapt these earrings. He mentioned that a lot of his pieces and his bead weaving have an almost art deco or art nouveau feeling to them. At the time, there was an Egyptian revival style that was prominent because of a world wide tour of Egyptian antiquities.
He reflected on his artistic style and the current revival trend, and asked himself: This was a successful piece. I’m thinking business here. How do I creatively then come up with the next version of it? So for the Fall holiday he explored hieroglyphics and lotus flower motifs. And for the following Spring, he thought about incorporating the scarab and other Egyptian touches.
Tony: “Things started to trend in High Fashion — snakes, beetles, insects, and bees. I have a scarab beetle tattooed on my back that is about 14” long, the whole width of my back. It’s an icon that is important to me. It symbolizes the sun god Ra. It represents newness and renewal, and I have chronic back pain, so it was interconnected. It started from something that was authentic and meaningful for me, and which started to become a trend years after I had gotten my tattoo. I introduced this sculpt and coupled it with beadwork. People responded to it. Then I started thinking how to tie this all up from a business perspective. If we’re just creating ‘pretty’, who cares? You have to be able to speak to an audience.”
Tony discussed that jewelry artists have to be able to synergize the Business-Creative Mind. Both worlds need to be respected. It’s a hard business, he agrees. Artists have to monetize their creative output and still remain authentic to themselves.
Frequently, he asks himself: Do I need to break up with my design? It is OK, he indicated, to say Yes! His scarab beetle was a good idea, but some reality testing was in order. Was it too early before the trend? Would it be marketable?
On a second business level, Tony poses the question: Can I stand behind my product?Can the store that sells his pieces be able to stand behind his products?
A third major consideration is whether he has successfully differentiated his products from the mass market. That is one reason he incorporates glass seed beads and Czech beads within his work. Glass beads allow him to inject colors, where more mass market pieces are mostly metal and look very machine made.
MOVING ALONG
Tony reflects daily how art jewelry, as opposed to jewelry mass produced overseas, will be accepted by the general public.
He sees that consumer demand for artisan jewelry is on the rise, but there are still nagging questions whether you can make a viable business out of it. Can you make enough product? Can you do it efficiently? Can you transition from a one person designer business to having staff make the pieces, as well? Meeting business goals gets more complicated if you are not going to produce your jewelry overseas.
One of his biggest challenges coming up is to create sufficient infrastructure — studio space, supplies and personnel — to be able to easily kick out 30 pieces of 20 styles on demand.
MARKETING
Tony is natural marketer, so I asked him what kinds of things he does to reach his target audience. The extent of things he does can provide a lot of ideas and insights for all of us.
Tony:”I always try to make marketing creative so I still enjoy it.”
FUTURE PLANNING
Tony is a planner. He’s developed a clear vision for the future. Some of the things he wants to accomplish over the next 3 years include,
— maintaining a 60% year-over-year rate of growth — grow from a more regional line to a national one — focus on his infrastructure — studio space, materials and personnel — to keep production, shipping/receiving, website and marketing all on track
The big questions before him: How does he meet demand that he has created for his jewelry? How does he enhance his brand? How does he grow his ability to distribute his products?
He wants to contine to be flexible, given the instability of our economy. He wants to maintain his constant rate of sales so his business can sustain itself. He sees, perhaps, his line represented in a showroom. Perhaps he can gain more presence in museum shops.
Tony:”I have a lot of jobs right now and it would be great to have one focus. Or add a couple hours to the day.”
FINAL WORDS
Tony: “The true test of a good designer is an ability to sell it.”
Tony: “If I don’t get that gut feeling that my piece is going to be successful, it’s time to move on.”
Tony has had to create the opportunities himself. This has involved a lot of reflection, reality testing and planning. He has created a business plan framework with year over year goals for design, production, and distribution.
Tony:”In today’s world, you always have to be creating your own rules to stay on your feet. There is wide competition. Email inundation. I like the challenge but it’s exhausting.”
Tony: “Whether or not these jewelry artists work professionally, they need patrons, and that sometimes is even more important than being an artist.”
Tony wishes there was more of a connected jewelry designer/artist community in Nashville. It is still very fragmented. He finds that politics gets in the way of creative collaboration.
Tony:”There’s room at the table for everyone.”
He wants to call artists attention to the Arts and Business Council of Nashville, as well as their Periscope program. There are opportunities for networking, expanded contacts, a support system of creatives and their ideas, developing business skills and confidence.
Jewelry designers in Nashville still need a more functional, consistent support system, particularly to thread the business-needle better. Help to find studio space. Getting a small business loan. Finding an angel investor. Connecting to mentors. This is all important, and we need more organized systems to make these kinds of things easier, smoother and more reliable.
WHERE TO FIND TONY’S JEWELRY
Tony has taken a shot-gun approach to getting his jewelry out there. He does a little direct retail through an e-commerce site. He finds that this is a great billboard for him, but not a great selling outlet. He does art and craft festivals. He likes to focus on juried or well-curated shows in particular.
He wholesales his products to stores. Sometimes this involves cold-calling on stores, with product in hand. But he also does wholesale markets, like the Atlanta Gift and Apparel Market. In 2017, he did 2 shows there; in 2018, he plans on doing 4 shows. His pieces currently are in 28 stores in the United States and the Virgin Islands. He is looking at other wholesale markets. He is exploring options to lock in with a jewelry rep or a jewelry show room.
You may find Tony’s jewelry locally at:
Two Old Hippies (the Gulch) 401 12th Ave S, Nashville, TN 37203
Tony has an eye out to find his ideal studio-showroom. He pictures it full of natural light. Small and intimate. A low wall separating the front from the studio. Inspirational and calming. A sancturary.
Be Dazzled Beads is a community of Creatives. Some people use our beads to make jewelry. Some to do mosaics. Some to adorn and embellish costumes. Some to enhance things like wine classes or drapes or mirrors or sweaters or cross stitch patterns. Some to embellish paintings or sculptures. Some actually use our beads in science experiments. To us, all Creatives are Designers. That is, they make artistic and functional choices about how to incorporate the types of supplies we sell into personal visions. Some design for themselves. Some design for friends and family. Some design as a business. It is not as much fun to work alone or isolated when you realize you are part of the larger Be Dazzled, Land of Odds and Nashville communities. We can learn a lot of insights from each other. We can support each other. It’s all about Connection!
How to Crimp Using Crimp Beads, a Crimp Pliers and Flex Wire
Crimping is a technique for securing a clasp to beads strung on cable wires. Here crimp beads are used instead of tying knots.
Mechanically, crimping does three things:
In the first steps in crimping, you need to separate two wires that lead to the clasp component. One wire is your spine — what your beads are strung on. The other wire is your tail — extra wire you will need to cut off.
Second, you need to create a lock to literally lock the two wires in place.
Last, you need to make it pretty. The crushed crimp is ugly, and you need to make it look more like a bead again.
So with your pliers and your crimp bead, you separate the wires and create a lock and make things pretty again. The process is relatively simple and requires only a little practice.
If using a traditional crimping pliers, you would follow the 4-Steps listed below.
However, you can also use what is called a One-Step Crimper. This crimping pliers does all four steps in one step. If crimping is a technique that you will be doing often, then I suggest investing in a One-Step Crimper.
My warnings to you:
(a)Usually the instructions on the package that comes with your crimping pliers is inadequate to the task. Better designers know this from experience. Less experienced designers, however, rely on these inadequate instructions.
(b) There are over 55 different crimping pliers on the market. The only ones that truly work are the original and the more recent One-Step Crimper. The originals are made in China. I’ve noticed that the major craft stores now sell copies of the original ones. These are made in India. Total disaster. They don’t do the job at all because they have a poor configuration of the jaws.
(c ) When students and customers say they are having trouble crimping, they usually blame themselves or the pliers. What I have found is that have bought cheap crimp beads, usually from one of the craft stores. With crimp beads, you get what you pay for. The plated aluminum ones sold in craft stores break when you crush them. The cheap sterling ones have nickel in the alloy (sterling is 92.5% silver and 7.5% something else we call an alloy), which makes the sterling brittle. Sterling is supposed to have copper in the alloy, which makes it malleable, but many manufacturers substitute nickel to keep the cost of sterling down.
Successful crimping requires that you understand the following:
1 . Which cable wires are best for which projects
2 . How the materials you use affect your success
3. The mechanical process itself, how it works, why it works, and why we do each step
CABLE WIRES
Cable wires are nylon coated, braided wires and are very flexible. These are made for stringing.
[What is called Hard Wire — wire that is not braided and is not encased in nylon — in contrast, is not meant for stringing.]
Cable Wires come in 3 quality grades.
Tiger Tail.The low end is called Tiger Tail. Tiger Tail was the original cable wire product. Today it is the low end of the cable wire line. Most spools of Tiger Tail do not have the words “tiger tail” on their labels. You know it is Tiger Tail because of the price — typically $5.99 or less for a 30ft spool you would find in a bead or craft store.
Tiger Tail wire breaks very easily in and of itself. It kinks easily, and even with the beads on the wire, the kink often shows. The way you attach Tiger Tail to a clasp is that you take the wire through the loop on the clasp, and tie an over-hand knot. You can tie a single knot or a double knot. This actually gives you a very secure connection to the clasp. This is one positive of Tiger Tail.
Unfortunately, when you use crimp beads with Tiger Tail, they too easily cut into the Tiger Tail and make it break. So that is why we suggest tying knots. If you do not like the look of the knotted cable wire here, you can either use beads on each end and which have larger holes so that they swallow the knots. Or, you can slide a crimp cover over the knots, press the two ends on the cover together, and you have something that looks a like a bead to hide your knots.
Flex Wire. The middle quality level — what I suggest people start with, if they want to use cable wire as their stringing material — is called Flex Wire. This wire does not break easily. It does not kink easily. However, it is difficult to tie into a knot. So, we use a crimp bead to secure the wire in place.
The price on this is considerably more than the Tiger Tail. It will start between $10.00 and $20.00 for that 30-foot spool.
Professional or Artistic Wire. The top of the line is referred to as Professional or Artistic Wire. Most of these wires are very expensive, and we don’t suggest this level as the place to start.
There are many brands of cable wire. I am particularly fond of two brands — Soft Flex and Flexrite. I find the wire of other brands too stiff, and sometimes not strong enough.
Cable Wires come in different diameters or widths, usually stated in inches.
We recommend the following:
.014″ — .015″ for necklaces: here you want the best drape you can get, and still have a durable piece
.018″ — .019″ for bracelets: here you want the most durability, yet your piece still feels good when worn
.019″ — .024″ for eyeglass leashes: here durability is you primary factor
About Selecting Cable Wires
There is a lot of information on the labels of cable wires. However, while most of this information is necessary, it is not sufficient for determining which wire is best.
The only true measure of cable wire strength is called Tensile Strength, and you will not find this information on the labels. The strength of a cable wire will come from what the wire is made of, what the nylon sheathing is made of, and how thick that nylon sheathing is. You cannot assume that a 49-strand product is stronger than a 21-strand product, without knowing more about the wire composition and the sheathing. That 49-strand product may actually be weaker.
Nor can you assume that a product, the label of which indicates 20-pound strength is necessarily stronger than a product that indicates 10-pound strength. “Pound Strength” is very unreliable as a measure. In most cases, these pound strength numbers on the label are somewhat made up.
Governments provide two definitions for pound strength — what it takes to hold up a fish of a certain weight, and what it takes to reel in a fish of a certain weight. But they leave it up to the factory to determine exactly how to measure and report pound strength. So you are at the mercy of some factory worker in a place like Taiwan, high on Toluene, having the motivation to maintain a pound strength standard.
On most cable wire products, measures of pound strength are not included. Many years ago, pound strength was listed on all cable wires. The people at the factories responsible for the labels, however, could never get the same pound strength listed from batch to batch. One time it might list 20 pounds; another 2 pounds; another 6 pounds; then back to 20 pounds. So the manufacturers told them to leave this information off.
It is very difficult to compare cable wires across brands. Each company organizes its line, from low end to high end, differently. Some companies, like Beadalon, use 7-strands for Tiger Tail, 19-strands for Flex wire, and 49-strands for their Professional wire. But other companies do not use this ordered arrangement of number of strands to quality. In the Soft Flex line, their top-of-the-line 7-strand product is stronger than their 49-strand middle-range product. And don’t assume one brand’s 49-strand wire is equivalent to another’s. They are not. The Soft Flex 49-strand middle range produce is stronger and more subtle than Beadalon’s top of the line 49-strand product.
I actually only recommend 2 brands — Soft Flex and Flex Rite. These are considerably stronger and more subtle than other brands.
Know this: What makes cable wire strong is the nylon sheathing’s ability to maintain the twist in the cable wire. As soon as the integrity of the nylon sheathing is violated, the wires inside immediately untwist and break. I find that the nylon sheathing on most brands is very thin, sometimes porous, and weak chemically.
CRIMP BEADS, CRIMP COVERS, and HORSESHOE WIRE PROTECTORS
Crimp Beads
Crimp beads come in many styles, sizes and finishes. These are used to secure cable wires to clasps. You take your cable wire up through the crimp bead, through the loop on the clasp, and back down through the crimp, forming a loop. The crimping process involves crushing the crimp onto the cable wire loop, first, separating the tail and spine wires, then, locking them in place, and finally, re-shaping the crushed crimp so it looks like a bead again.
Sterling silver crimps are usually made the best, especially ones you buy in places other than the big craft stores. For plated crimps, if they are plated over brass (and years ago, they all were plated over brass), than they were very good. Brass is your best jewelry metal. The major issue was that the plating would wear off and you would have a black crimp (basically, tarnished brass). Now, most plated crimps are over aluminum. These break easily when crimped.
I tend to use sterling silver crimps for every piece, though my crimp covers and horseshoes may or may not be sterling, based on the value of the piece, and the finish colors I want to end up with.
Crimp Covers
These are U-shaped parts that slip over the crushed crimp. You can slide crimp covers over your crushed crimps. You can also use these to slide over any knots, to hide the knots. Crimp covers come in different sizes, finishes, and texturing. Crimp covers are optional pieces. They act as lamp-shades to hide something ugly, but they serve no structural role, per se.
Closing a crimp cover is done in 2-steps, not one.
(1) Using the tips of your crimping pliers, you push the two sides of the U together, so you have a pretty bead. These are made of a soft metal, so you don’t want to push too hard, or you will crush them. After you get the two sides to meet, you’ll find that the lip on either side doesn’t meet up perfectly, line up perfectly or close perfectly.
(2) At this point, you return the crimp cover to your crimping pliers, this time resting it between the top notch in each jaw. Gently push the jaws to force the lips to meet more perfectly. Sometimes you have to position the pliers in an awkward or odd position, in order to push in the desired direction. The two half-cup shaped ditches in the top position on each jaw helps to keep your crimp cover rounded while you apply pressure to it and shift the relative positioning of each open side.
Horseshoe Wire Protectors
This part is basically a bent tube, with the top of the tube at the arch cut out. These come in many finishes and metals. There is some variation in size relative to how wide an opening the tube has.
Using these serve several purposes.
It forces you to leave the correct size loop in the cable wire, so that you have the appropriate support system or jointedness. Without the loop, you would be pushing the crimp all the way to the clasp. This is a No-No. You never push the crimp all the way to the clasp — this creates stiffness with metal parts, and general movement would cause these to break.
The horseshoe also makes the loop more finished looking — better than a bare-wire loop. Your eye/brain wants you to push the crimp all the way to the clasp. It hates a bare, exposed loop. The horseshoe fools the eye/brain here, making it think that the loop is finished and more organically a part of the whole composition.
The horseshoe prevents the cable wire from folding into a “V-shape” over a period of time and wear. If the wire were to change from an arched loop to a V-loop, the wire then would more easily bend back and forth and eventually break.
You will find that the legs of some horseshoes you will buy have too-narrow openings and won’t fit your cablewire. Also, the thickness of the cablewire along its length will vary somewhat. And sometimes where you cut your cablewire, it sometimes broadens or flattens out the end, making it too big to shove up into the leg. The morals here: have extra horseshoes on hand, and be prepared to cut off some more of the cablewire to get to that area on the wire that has the perfect width.
There are many choices to make when selecting crimp beads:
– Do you want to use a tube shape or a round shape
A crimp is a crimp. There is no difference in “holdability” between the tube and the round, but most people prefer the tubes. They sense that the tube covers more area, so it will be more secure.
A round bead actually starts as a tube. They blow air into the tube to puff it up and make it look round.
– If you want to maintain a silver color, how do you do that?
You have several choices here, each with pros and cons. You can use a sterling silver crimp. Sterling silver softens at body temperature. If your sterling crimp rests on the wrist or the neck, there is some risk that it will soften and release its hold. From experience, this risk, if you have crimped correctly, is very small, but the risk exists.
Another option is to use a silver-plated crimp. Silver plated crimps are plated usually over brass. Brass is your best jewelry design metal. Once you crush that brass, you never have to lose any sleep over it. Unfortunately, the plating wears away somewhat quickly, and you are left with a black crimp — basically tarnished brass.
Some people use silver plated crimps and slide sterling crimp covers over them. This adds about $0.90 per piece.
Another option: Use an argentium silver crimp. Both argentium silver and sterling silver are 92.5% silver. It’s the alloy that is different. Argentium is more expensive. There is no risk of argentium silver softening at body temperature.
– How do you achieve a satisfactorily re-rounded bead?
In the traditional crimping processing, you flatten the crimp and then you re-round it so that it looks like a bead again. You do not end up with a great look. Some people can live with this; for others, they are bothered by not seeing a perfectly round bead again.
There is a crimping pliers, which I do not recommend, called the Magical Crimping Pliers. This re-rounds that bead perfectly, but I find, in doing so, it weakens the hold.
You can always crush your crimp bead, and then slide a crimp cover over it, to get that pretty look.
– How many crimp beads should you use on each end — 1 crimp or more than one?
If you have crimped correctly, using 1 crimp on each end of your piece is more than sufficient, even if your beads are very heavy.
Using more than 1 crimp on each end is too risky. Sometimes your mind, or your best friend, thinks that if 1 is good, 2 or more would be better. No! When you crush your crimp onto the wire, it becomes like a little razor blade. All jewelry moves, so your crimp is constantly trying to saw through the cable. Using more than one crimp on each end increases the chances that one will saw through. All you are doing is adding razor blades.
– Should you use a plain tube or a twisted tube?
The twisted tubes (sometimes called Tornado or Cyclone crimps) are a little more expensive than the plain ones. When you crush the twisted tubes, they look decorative enough that you don’t have to re-round them. You definitely need to re-round the plain ones.
– Should you use regular and long tubes or short and half tubes?
Short tubes or half tubes are primarily used in pieces like illusion necklaces, where you have a cluster of beads, and the cord shows, another cluster of beads, the cord shows, etc. Half tubes are used on either side of the clusters to keep the beads in place. When you crush the half tube, the volume of space it takes up is not noticeable. When you crush the regular sized tube, its volume of space is too noticeable and detracts from the general look of the piece.
One mistake people make with the short or half tubes, is that, when they use them to finish off the ends of jewelry, their mind tells them, since these are shorter than usual, to use 2 or 3 of them so that they will “hold better.” A crimp is a crimp, and if you crimped correctly, there is no difference in holdability between the short and longer tubes. Each crushed crimp you add becomes like a little razor blade. All jewelry moves, so you’re increasing the chances one of these crimps will cut through the cable wire. One crimp on either end is enough.
– Are there differences or variations on quality/grade of crimp beads?
The short answer is Yes! Basically, you get what you pay for!
Here’s how crimp beads are made: You start with a sheet of metal. You roll the metal into a tube. You buff along the seam where the two sides meet, so that it looks like it’s been soldered together. However, there’s really a seam there.
So often, people come into our shop and tell sad tales of failed crimps and broken bracelets and necklaces. They blame themselves. They blame the pliers. But they never blame the crimp beads. In most cases, the crimp is at fault.
Cheap crimps, usually bought in small packages, usually at craft stores, are not made well. When you crush these, they tend to split along the seam. Sometimes you can see the split. Othertimes, you can’t quite see that the two sides of the tube have started to separate. Your cable wires pull out. Or your crimp edges have cut into the cable wire.
An A- grade crimp, usually costing about 3 times what the cheap crimps cost, can hold up to your initial crushing, as well as another 8 or so clamping down on it during the re-rounding process.
There are heavy-duty or A+ grade crimps. These run about 6–8 times what the cheap crimps do. You don’t have to worry about any splitting, no matter how much you work the crimp bead with your pliers.
– How do you know what size of crimp bead to buy?
Manufacturers are inconsistent in how they label the sizes of crimp beads. In general, although you may not know exactly what their measurement refers to, when they list:
2mm, this is the average size For .014, .015, .018, .019 cable wires
1.5mm, this is small For .010 and .012 cable wires
2.5mm, this is slightly more than average For .019 and .024 cable wires
3.0mm and 4.0mm, these are large for .024 cable wires, or thicker cords, or bringing more than 1 strand through at a time
LET’S PRACTICE OUR CRIMPING
How to Crimp Using Crimp Beads, a Crimp Pliers and Flex Wire
Supplies: 2mm sterling silver crimp tubes silver plated crimp cover silver-plated horseshoe wire protectors .019” soft flex cable wire toggle clasp enough beads to make a bracelet
Chain Nose Pliers Crimping Pliers Flush Cutters or Cable Wire Cutters
Work Surface Bracelet Sizing Cone Bead Board Bead Stoppers or Hemostats
Before we get started on our bracelet, we are going to practice crimping.
The Traditional Crimping “Pliers”
The traditional crimping pliers works with all sizes of crimp beads. In fact, I find it works better than most other types of crimping pliers, whether the micro-crimpers, macro-crimpers or magical crimpers.
If you look closely at the jaws, you will see that each jaw has two notches or ditches on it. The bottom notch or ditch in each jaw (those closest to your hand) is a full ditch on one side, and a ditch with a pyramid or triangle in it on the other side. It is important that you be able to see that pyramid. This is critical to the crimping process. Sometimes when you buy these, and other times when you use these awhile, the pyramid isn’t there or wears away.
The top notch in each jaw (furthest from your hand) has a full ditch on either side.
There are four steps in the crimping process. Basically, you use the crimping pliers first to separate the two wires (spine and tail), then second, to lock them in place. The last step is to make things pretty again.
We do the first two steps using the bottom notch in each jaw. We do the last two steps using the top notch in each jaw.
Hold your pliers parallel to the table, with curved part of jaws facing you.
[NOTE: There is also a new 1-step crimping pliers which works very well.]
The “Loop”
Position the crimp and the wires, so you leave an adequate “loop” (joint).
The clasp should be able to move freely.
You never push the crimp bead all the way up to the clasp.
Your eye/brain cognition wants you to push the crimp all the way up to the clasp; it sees the bare loop as ugly. You must fight your inner self on this, in order to build in appropriate level of support or jointedness. You are going to have to sacrifice some beauty in order to build in more durability and adaptability to movement.
When crimp/wire/clasp are too tight, and can’t move, then you basically have stiff metal bending back and forth against itself, and it breaks. If the bare loop bothers you, you can always cover the loop with 15/0 or 11/0 seed beads, or 13/0 charlottes.
Or you can use a horseshoe wire protector to cover the loop. What I like about the horseshoe wire protector is that it forces you to leave an ideal sized loop, and also makes what was a bare loop look very finished and appealing.
The “Tail”
You need to leave about a 3–4” tail on either side. You want to hold the tail so that it runs parallel to the spine, though not touching.
When you crimp by closing and letting go of your pliers, don’t let go of the tail. This is a mistake many people make. When they let go of the pliers, they let go of the tail. Don’t do this. If you let go of the tail at the same time, the tail will either bend over far to one side, creating a “V” with it and the spine. Or, it will cross over the spine.
When we trim our tails, we do not cut them off at the crimp. Instead, we feed back the tail through at least the first (or last) bead, and preferably several other beads, and then cut the tail as close to the hole of the bead it is exiting as possible. You want to be sure that at least your first bead and your last bead have large enough holes, so that they can slip over both the spine and the tail.
Tail sticking out too far and tail crossing over wire:
Finishing Your Piece Off and TrimmingThe Tails
On the first side of your bracelet or necklace, you secure your clasp component with your crimped wire. You then string on your beads. You want at least the first bead, and preferably several beads to slip over both the spine and the tail wires. When you get to the other side, you will add your crimp bead and horseshoe wire protector, slide your remaining clasp component over the tail up into the horseshoe. You need to have a 3–4″ tail remaining. Grab your tail, and bring it back through (top to bottom) of your crimp bead, and through at least your last bead, and preferably several beads.
Now you want to pull things tight, but not too tight, before you crimp that second crimp bead. Hold onto your clasp (or your horseshoe wire protector ) with one hand, and pull the wire with the other, to get everything tight, but not too tight. You do not want your bracelet to have poor “ease” and be too stiff. You should test the length of the bracelet one more time, using a sizing cone or someone’s wrist. Make any necessary adjustments to ease and length.
If your tail is showing on your first side of the bracelet, then trim it off now. Flush cutters or cable wire cutters work well here. If you pull your tail away from the bead, this creates a bit of tension, and when you cut the wire, the wire coming out your bead will pull back a bit into the hole of the bead.
If you haven’t been able to cut the wire flush enough with the bead, and some wire is poking out, work it with your fingers into the hole of the next bead on the string.
Re-check your length and ease.
Now crimp your ending side. Trim the remaining tail as close to the hole of your bead as possible.
NOTE: If you can’t work the tail back through the first bead, then cut it off as close to the crimp as possible. There will be two sharp edges. One will be the crushed crimp itself. The other will be the cable wire. You can’t really cut the wire totally flush with the crimp, so a little bit of a nipple will be protruding. Use an emery board or nail file or metal file and smooth out the rough edges of the crimp, and sharp point of the cable wire. Feel with your finger, until it is smooth. This is not your best option. Your piece will look less finished and be less secure.
Camouflaging the Crimp Bead
You can always make your crimp beads the second and next to last beads, instead of the first and last. In this case, the crimp will look like it is part of a pattern. The ends will look very finished.
Let’s Crimp: A Practice Exercise
Cut a 15″ length of cable wire.
Horseshoe on first. Take your horseshoe wire protector, holding it so that the arch is toward the ceiling and the legs are to the floor. Take your wire from floor to ceiling, up into the leg, over the arch, and back down through the over leg. Give yourself a 3–4″ tail past the horseshoe.
Slide on clasp component. Take your tail wire through the loop on the ring end of your Toggle clasp, and slide that ring’s loop right up into the horseshoe.
Add Crimp Bead. Slide a crimp bead onto the spine of your cable wire, and bring it all the way up to the legs of the horseshoe. As you get close to the tail, you want your crimp to slide over both the spine and the tail.
Pinch the legs of the horseshoe closer together, and get your crimp as close to the legs as possible. You can use your fingers or the tips of your crimping pliers to pinch the horseshoe legs.
Be sure your have left yourself as 3–4″ tail. Make any adjustments.
Crimp. Now grab your crimping pliers, holding them parallel to your table, curved part of the jaws bending towards you.
Pinch the tail and spine near to your crimp bead with your thumb and forefinger, making sure that your tail is parallel, but not touching, the spine.
In Bottom Notches (closet to your hand): ditch on one side, and pyramid on the other
STEPS 1 and 2: Your goal is to separate the wires. The pyramid in your pliers jaw pushes the wires apart, and makes a scoring line down the middle of your crimp, turning it into a double-tube, one wire in each channel.
Step 1: Crush
Sit your crimp bead between the bottom notches in each side. The loop/horseshoe should be laying horizontally, parallel to the table.
Crush the pliers all the way down onto the crimp bead, and let go of the pliers (but not the tail).
Step 2: Turn over 180 degrees, and crush again
When we crushed the first time, the part of the crimp closest to our hand crushed down, but the part furthest from our hand actually flared out a bit. In Step 2, we crush down the part that had flared up.
You end up with a flat pancake. If you look at this flat pancake, you will see a scoring line down the middle. This line was made by our pyramid.
So we turn the crimp over to its other side, and crush again.
In Top Notches (furthest from your hand): Ditch on either side
STEP 3: The goal is to create a lock.
Step 3: Fold flat pancake to make half-a-flat pancake
Sit your crimp bead between the top pair of notches. Hold so that your loop/horseshoe is vertical, thus perpendicular to the table.
Hold the crushed crimp vertically, and crush, to fold this flat pancake in half along the scoring line. You end up with half a flat pancake.
STEP 4: Your goal here is to make things pretty.
Step 4: Re-Round
Use the top notches to gently force and push the flat crimp back into a rounded tube shape again. If you look at either end of the crimp — from the loop end and from the tail end — you want to see a circular shape again, rather than a rectangular slit. It’s best to keep your pliers steady in one place, and turn your wire/crimp bead as you work the pliers. You do notCRUSH; you PUSH on the metal with your pliers to re-round.
Now, your crimp bead is wider than the width of the jaws the pliers. So, you will have to work the top and bottom of the crimp a little bit independently, so that both ends are round again.
NOTE: Instead of Step 4, you can use a crimp cover, and slide this over the crushed crimp to hide it.
But if using a crimp cover, be sure to do Steps 1 thru 3.
Putting The Beads On.
If you were creating a piece from scratch, and not following a pattern, you would probably use something like clamps, hemostats or bead stoppers. You would cut a length of cable wire — about 12″ more than the bracelet or necklace length you want to end up with. You lay out all your beads and the parts of the clasp assembly on a bead board or other work surface. Then you would clamp one end of your cable wire, slide beads on, and clamp the other end. This would let you add and subtract beads, or change your mind about the patterning, before you finished off the ends with the clasp assembly.
Otherwise, if you are following a particular pattern, you would start by securing one end with a crimp bead, and stringing the rest of the beads on. You would cut your cable wire — about 12″ more than the bracelet length you want to end up with.
Lay out all your beads and the clasp assembly parts on the bead board or some other work surface, in the order they are to be used.
You would attach the largest part of your clasp first — with Toggles, this is the ring — on one end, crimping it in place, and leaving a 3–4″ tail.
Slide on your beads, following the pattern. At least your first bead should slide over both the spine and the tail.
Determine the fit — both length and ease — by clamping or holding with your fingers the open end, and encircling a sizing cone or someone’s wrist with your bracelet. Remember here that the other end of the clasp will add another 1/2″ to this length.
“Ease” — You do not want to pull the cable wire too tight, making it stiff, thus uncomfortable to wear. And you do not want to pull the cable not tight enough, thus allowing the cable wire to show between the beads and the beads and the clasp.
Adjust the number of beads, if necessary.
Add your crimp bead, horseshoe wire protector, the other end of the clasp — in our case, the bar.
Don’t actually crimp things on this side, or trim your tail yet.
Slide the tail back through some beads. Pull tight enough to get an acceptable ease. Test the length and ease again.
POOR EASEGOOD EASE
When satisfactory, do your final crimping. Slide the tail through some more beads, if possible. Trim the tails on both ends.
Using a Crimp Cover
Use your pointer finger as an easel and your thumb as a clamp.
Sit your crimp cover on the top of the pad on your pointer finger, as if the cover were a cradle (open side up).
Set your crushed crimp on your cable wire right inside the crimp cover.
Immediately, clamp down over the loop/clasp part with your thumb. Your thumb is pushing down on the wire loop/clasp, so that the crimp cover can’t move.
We close the crimp cover in 2 steps.
Take your crimping pliers, and use the tips of each jaw. With these tips, push the opening of the crimp cover closed as best as you can. Press firm but gently. It is easy to crush these crimp covers. The two lips on each side will not meet perfectly, will not be aligned, and there may be a gap.
The second step is to put the crimp cover between the two top ditches on your crimp pliers (both ditches are open), and gently push to get things in place.
You may have to orient your pliers in some weird angles to get the two halves of your crimp covered lined up correctly.
Give It The Once Over…
Once your bracelet is done, look it over carefully. Be sure your cable wire isn’t showing. Be sure that it has sufficient ease.