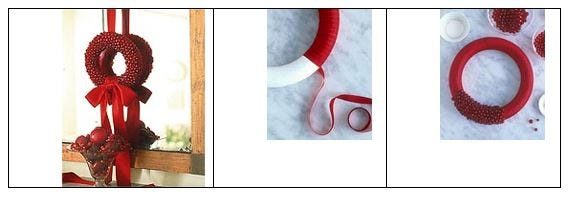
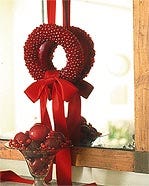
Supplies needed: 8″ — 10″ floral wreath styrofoam form 3 or 4 sizes of round druk beads (6mm, 8mm, 10mm and 12mm) Straight pins like you would use when sewing Red nail polish (to paint over the pin heads) Red wrapping tape or ribbon for wrapping the styrofoam form Wide ribbon or cloth for a bow
The Martha Stewart Wreath
In 1999, Martha Stewart, on her TV show, demonstrated how to make a Christmas Wreath, using round druk beads. (“Druk” means plain, smooth, roundish beads.) And she started an avalanche of orders. Her powers to send millions of women to their bead stores was, and still is, enormous. So big, in fact, that it is difficult to visualize. With this project, there were not enough red druk beads in the entire world to fill the demand in 1999 and several years afterward.
This first year saw over 2800 orders to our Land of Odds website. We were able to fill about 1700 of them before the beads started running out. In both 1999 and 2000, (and now, by this time, the instructions also had been published in a Martha Stewart Christmas Projects book), our suppliers ran out of the 10mm size druks around October, and we were unable to fill orders past the first few days of December. The 10mm beads started coming back in stock in February or March. The 12mm size ran out soon after, but wasn’t available again until much later. (NOTE: There are 25mm in an inch.)
Traditionally, there has never been a large supply of larger beads — 10mm and 12mm — in any color, because the main purpose of beads is to be used in jewelry, and these larger sizes tend to be heavy, and usually not in style. When a particular bead in size and color runs out, it usually takes 3 or more months before it is back in stock.
This is because these beads come from the Czech Republic and must be imported, and also because every color, type and size of bead is not always in production all the time. Beads are usually produced from lightest to darkest. That is, they try to make clear and light colors first in the kiln, and gradually over the course of a few months make darker and darker beads. In this way, they can use the kiln for the longest period of time before having to clean it out.
Martha Stewart provided one set of directions in 1999, and a new set of directions in 2000. In both, we believe she underestimated the number of beads needed, so with some interpretation, your two design choices are:
Design Option A. 300 each of 6mm, 8mm and 10mm for a 10-inch wreath (the original 1999 version)
Design Option B. 200 each of 6mm, 8mm, 10mm and 12mm for an 8-inch wreath (the new 2000 version)
We have a personal preference for choice “A”.
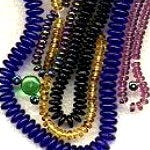
Colors: Ruby (also called Siam) is the color of choice. A slightly lighter Light Siam works well also. For a contrast, either Red Opal or Garnet will work.
Red is one of the most expensive colors to make, so there are few color choices in this area for the druk line of round beads. Many of the reds that exist are very close in color in this particular bead, so do not provide much if any contrast. We offer ruby (also called siam), and suggest either garnet (very dark, almost black), and/or red opal (a translucent red), as workable contrasting or complimentary colors. There is a cherry red, but this doesn’t have the same effect as the transparent and translucent colors. There is also a dark ruby (or dark siam, sometimes called light garnet) which we do not offer.
Using the smaller 4mm beads, such as in a 4–6–8mm configuration, doesn’t work very well. It doesn’t look realistic enough.
NOTE: It is also important to get your styrofoam wreath form. Stores run out of these as well. Try these types of places: Wal-Mart, K-Mart, craft stores, floral shops and floral supply places. We prefer the 10-inch wreath that is a half dome in shape. On this wreath, you only cover the domed part, not the back of the wreath. You can also use a completely round (tube) wreath, which you would cover entirely with beads.
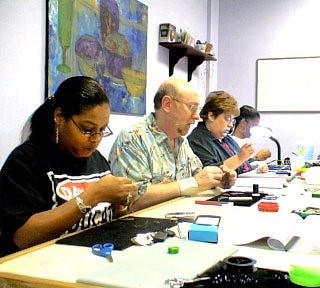
How many people throughout time have heard the sound of a dropped bead on the floor?
Or the sharp whoosh of air that comes from the cutting of a cord?
Or the dull oomph you hear when you crush a metal clasp into place?
Or the feel of the tug and pull of the thread as the needle is pulled through the cloth?
Or the resistance of the tensile strength of the wire as it is bent into a shape?
Did they see a sudden flash of light, a sudden recognition of artistic achievement? Probably not.
But it meant something to them. Subtle. Unconscious. The exercise of the hand in craft often taps into some sense of self-expression or –awareness. Creativity rewards you. It reaffirms who you are. Your worth, your value, your artistry. It is fulfilling, fun, happy, reassuring, exciting, introspective.
The exercise of your hand in craft, art and design often reconfirms that you are part of some larger group or culture, as well. You have a shared sense of what expression and awareness mean. You repeat the same steps in creation. You choose similar parts or design compatible patterns. People recognize your creative efforts when they see or wear your pieces.
Hand Craft. The feel on the fingertips and on the palm of your hand. The pattern of light that registers on your eye and then gets translated by your brain. The anticipated weight and movement of the piece as it’s worn.
The shared implications of all this, and the full range of possibilities are understood by everyone. This mutual understanding helps you cement relationships with other groups or individuals. Relationships and meanings are extensions of your hand in craft.
Hand Crafts. Beads and Jewelry. Beads and Jewelry. Beads and Jewelry. Beads and Jewelry as Hand Crafts. Beads and Jewelry have been used all throughout time. They appear in every culture in the world. Although they are not always used in the same ways or for the same reasons.
Wampum
SOMETIMES BEADS ARE USED INSTEAD OF MONEY
Sometimes beads are used instead of Money. When people look at beads, they have an intrinsic value that people seem to recognize and share. In many cultures, people place more confidence in using their beads as their Money, instead of their own coins and currency.
And in our own world, this is often true as well, as we go to bead swaps, or swap one piece of jewelry for something else of value. We barter with beads. We do this all the time. Beads and beaded jewelry have a monetary life all their own. “I’ll give you this______ , if I can have the beaded bracelet you are wearing.”
And so many times, people will come in the shop and ask to work for beads. And we have plenty for them to do.
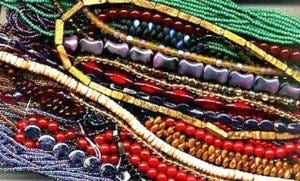
Trade Beads
BEADS WERE USED IN TRADE
In a similar way, beads were used in Trade. This is more true historically than today, but a little bit today. When two groups want to trade with each other, it’s hard to come to terms. Because people, for whatever reasons, seem to be able to come to agreement on the value of beads, beads were used in various ways during the negotiation process.
Global Trade Routes
About 300, and 400 and 500 years ago, explorers set out from various European countries, and visited far-away places like China and India and Africa, and North and South America. When they set off on their explorations, they brought with them what we call Trade Beads. These were glass beads that were made in Venice, Bohemia and the Netherlands.
In Europe at this time, the folks looked down on glass beads. They used them in projects involving bead embroidery and mimicking tapestries where they could get a more 3-dimensional look with the beads than they could with the fibers.
But they shied away from glass beads in jewelry. Too cheap. Too low class. Glass was trash. For jewelry, they preferred the high test octane beads made from gemstones and precious metals. But those darn glassmakers in Venice and Bohemia and The Netherlands kept churning glass beads out. I think there were some technological improvements that occurred at this time, that made it easier/cheaper/ more efficient to make glass beads, but I don’t know this for a fact. Still, no one really wanted them.
The explorers took these glass beads with them, and at first gave them away as gifts. They assumed that people from other, “less sophisticated” cultures, would dismiss these glass beads as well. But alas and alack, these other “less worldly” men and women did not. They liked the glass beads. They liked them a lot. Some cultures even saw spiritual qualities in these glass beads.
It wasn’t long before the explorers started trading these beads, instead of giving them away. Some of the trade beads made in Europe were very generic; others were more specialized designs, colorations or etchings specific to certain countries or regions, like Africa or Persia.
When these explorers came to North America, the Indians here, at first, wanted blue beads. You see, they couldn’t easily make a blue color with the natural materials they were using — stones, shells, antler and wood. The explorers were thrilled about this. Blue was the cheapest color to make. So, the explorers found this trade to be very profitable. It wasn’t too long, however, before the Indians met their needs for blue, and started asking for yellow and red. You see, it takes real gold to make the colors yellow and red. And the trading became nearer and dearer for the explorers.
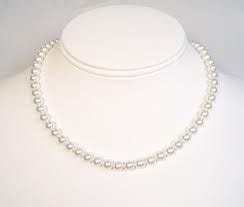
These French Traders continued their explorations down the Missouri and Mississippi Rivers. They discovered the freshwater pearl cultures of the Mississippi Indians in the area around Tennessee, and traded beads for these pearls which they sent back to Europe. These freshwater pearls soon earned the name “Royal Pearls”, and were restricted for use and wear by the royalty across Europe.
Even today, royal families continue to import Tennessee freshwater pearls. They have these sewn into their undergarments. After all, it’s widely believed that wearing a pearl against your skin ensures your future wealth.
And, I always wondered if you could speculate why the Indians sided with the French in the French and Indian Wars, against the British. Could it have been that the French supplied them with beads, and the British did not?
People With The More Beads Have The More Power!
ANOTHER WAY PEOPLE USE BEADS IS FOR POWER
Another way people use beads is for reasons of Power. People with the more beads have the more power. When you get into beading, you learn this very quickly. Who has the most beads? The most Reds? The most Purples? The most delicas? Beads, in this sense, define social relationships, who’s more important than whom, and pathways of success.
Ogalala Sioux Indian Reservation Lands
About 400 years ago, among the Oglala Sioux Indians in the Dakotas, there was a big women’s movement. The women of this tribe wanted greater say and control over tribal matters, they saw an opportunity to assert themselves, which they did, and they won. This whole incident was oriented around beads.
So what happened four hundred years ago? You had French traders traveling through Canada, and coming down into the Dakotas. They brought with them these glass Trade Beads, and traded them for pelts. One of the major roles of women in Indian tribes was to make beads. They would spend all day, every day, making beads out of stones and wood and antlers and shells. When these French traders came with these pre-made beads, it freed up a lot of time. And in this one tribal group, the women took advantage of this free time, asserted themselves, and won.
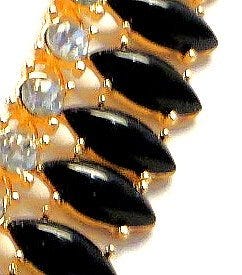
Sioux bead embroidery
One of the things the women did to mark their success was to change the costuming of the men. Before the movement, men wore beaded embroidery strips tacked down linearly along their sleeves. After the movement, the women tacked down only part of the embroidery strips — the rest allowed to flow out like ribbons. So when the men went off hunting or fighting or whatever they did, they wore the mark of the women — their ribbons would flow.
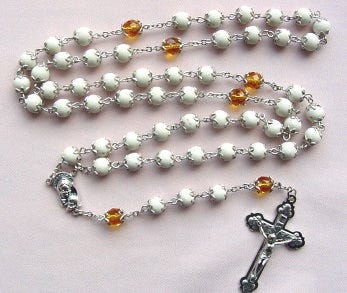
Rosary
SOMETIMES BEADS ARE USED FOR SPIRITUAL AND RELIGIOUS REASONS
Sometimes, beads are used for Spiritual and Religious Reasons. You can picture a rosary in the Catholic Church. By touching and moving your hand along this bead chain, it helps you feel closer to God. It helps you feel more spiritual. It helps you remember the rituals. In Buddhism, they use something like a rosary. In Confucianism in China they use something like a rosary called Immortal Beads.
The threatened Pope
During the Middle Ages in Europe, only priests were allowed to wear rosaries and have beaded adornments. Priests had their parishioners make them rosaries and beaded this and beaded that. After awhile, the priests with the more rosaries and the more elaborate rosaries, gained higher status. So they kept accumulating, and accumulating, and accumulating, until, at one point, one of the Popes felt very threatened. Many priests were becoming as adorned as he was. So the Pope issued an edict that said everyone could wear rosaries and have beaded adornments.
The fact that you can wear beaded jewelry today, instead of making them for your priest or minister or rabbi or imam or whatever, goes back to the insecurity of one of those Popes.
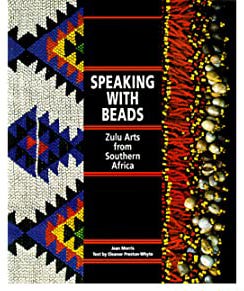
Zulu Beadwork
LAST, BEADS ARE USED FOR PURPOSES OF COMMUNICATION
Last, beads are sometimes used for Communication. They are used symbolically. Different colors have different meanings. Different patterns have different meanings. Different shapes have different meanings.
Among the Zulu Tribes in South Africa during Apartheid, you had some Zulu tribes who adopted Christianity and identified with the colonialists. And you had other tribes that did not. Among the tribes that did not, they developed a very elaborate communication system using beads. Besides what colors were next to each other, they used a lot of triangles in their patterns. It was important if the triangle faced down, or up, and again what the colors were.
SPEAKING WITH BEADS. Zulu Arts from Southern Africa. by J. (photographs), E. Whyte. Morris New York , 1994
These folks might bead a necklace, or a loin-cloth. They might do a beaded doll, or a hat, or a blanket or tapestry. Something beaded. They would come out during the day, and flash the results of their secrecy, plotting and chicanery. They might say something very general with their beadwork, like “I’m mad at the world today”. Or they might get very specific, such as “I’d like to get together with you tomorrow night at 8:00, but not before I’ve met with your brother.”
These Zulu tribes kept up this communication system for about 70–80 years — all during Colonialism and Apartheid. When Apartheid ended, no one carried on the tradition. Not a complete surprise.
Today Zulu beadwork is very fashionable, particularly in Europe. But no one knows what they are saying. They are just doing pretty patterns.
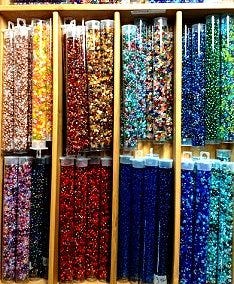
Beading in the United States Today
A Social Movement Dating Back to the 1960s
Today, beading in the United States has been part of an ever-growing social movement that began in the 1960s, and, whether you know it or not, you are caught up in it, even unto today.
In the early 1960s, two new stringing materials were developed and introduced to beading. The first — NYMO Thread — was a nylon thread created by the shoe industry to attach the bottom of the shoe to the top of the shoe. This is widely used in upholstery. The second was called Tiger Tail. This was a flexible, nylon-coated cable wire. Cable wires are wires that are braided together and encased in nylon.
Before the 1960s, there really wasn’t a durable stringing material. People mostly used either cotton or silk thread, or nylon fishing line. Cotton and silk thread naturally deteriorate in about 3–5 years, so anything done on these has to be re-done every 3–5 years. Fishing line dries out and cracks when exposed to ultraviolet light and heat, that is, sunshine.
Because there was not a durable stringing material, beading, for the most part historically, was viewed as just a home craft. It did not attract artists. It did not attract fine craftspersons. It did not attract academics. It did not encourage people to experiment and push the envelop with the craft.
While occasionally in history, if you look back, you do see elaborate bead work, such as Russian bead embroidery during the 1800s and French beaded purses in the 1920’s, — this intricate beadwork was most often done by people who were slaves, or serfs or indentured servants. When they were freed, their beadwork stopped or diminished. So, when the Czar was deposed at the turn of the century, there began a major decline in Russian bead embroidery. Or when France passed labor laws in the late 1930’s, there were no more beaded purses. A rational person doesn’t want to spend all that money on beads, and take all that time making something, if it is going to fall apart.
With the introduction of Nymo and Tiger Tail in the 1960s — materials that do not break down easily — beading began to attract academics and artists and fine craftspersons. This movement began in Southern California, and gradually spread across the country. The first bead society was founded in Los Angeles in the 1960s. Today there are over 200 bead societies across the United States. The explosion in the availability of bead magazines didn’t begin until the latter part of the 1990s. The fact that you can get very excited about beads today, even thinking about selling jewelry made with them — 40 to 50 years ago, you wouldn’t have had those thoughts.
Beading has a very different energy and dynamic than a lot of other crafts, because it is only very recently begun to be thought of as an art form.
Getting Started Beading and Making Jewelry “Channeling your excitement”
CATCHING THE “BEAD-BUG”
As someone once told me, “I bought some beads, dumped them all out on the table, and I was hooked!”
She began making simple bracelets and necklaces, and was hooked some more.
And then she learned wire working, and made wire bezels and bails, wire clasps and ear-wires, and wire-constructed bracelets, and yes, she was hooked some more.
She sold several pieces, and now, even her husband started getting hooked.
And she learned bead weaving and some silversmithing, some polymer clay and metal clay, some kumihimo and micro-macrame, and now, not just herself and her husband, but her three children and her mother and her next-door neighbor were hooked.
She spent hours and hours organizing her beads. And organizing some more, as her beads and her ongoing projects took up more and more room in her house.
She was overwhelmed by choices. And was very hooked. And, although she kept buying up bead after bead, and learning technique after technique, and organizing workspace after workspace, she allowed very little time for “design.”
Yet, we need to give her a chance to get started. To catch her breath. To learn how to learn. To learn how to organize and work. To learn how to manage all the emotions and anxieties which come with so many choices, and so many colors, and so many parts, and so many different ways to go about making jewelry and beadwork. Before she is ready to wander that path. And bump into her Inner Designer.
What Can You Do With Beads?
A BEAD is anything that has a hole in it. And you can do a lot of things with things that have holes.
You can put these things on string.
You can sew these things onto fabric.
You can weave these things together with threads.
You can knot or braid or knit or crochet these things together.
You can combine and wrap and en-cage these things with metal wires and metal sheets.
You can work these things into projects with clay, polymer clay and metal clay.
You can embellish whatever you can think of — dolls, tapestries, clothes, shoes, scrapbooks, pillows, containers, and vases.
You can use these things in scientific experiments.
You can fuse these things together.
You can incorporate these things into projects involving stained glass, mosaics, or multi-media art.
You can decorate your house and your household things with these things.
You can texture surfaces with these things, using glues, cements or resins.
You can buy these pre-made, or make your own.
You can do a lot of things with beads.
Most people begin by Stringing beads, and graduate to things like Weaving beads, Embellishing with beads on Fiber, Knotting and Braiding with beads, and Wire Working with beads. A few people learn to hand-make Lampwork glass beads, or learn to sculpt with Polymer Clay or Precious Metal Clay, or learn to solder using Silver-Smithing techniques.
And you can feel self-satisfied and secure in the knowledge that, should everything else in the world around you go to pot, we will all be back to bartering with beads.
And you will have them.
So, beads are good.
Getting Started
Everyone has a Getting-Started story. Some people were always crafty, and beading was a natural extension to what they were doing. Others were driven by the allure of beads and jewelry. They saw fabulous earrings and necklaces and bracelets in magazines, department stores and boutiques at prices out of reach, and they said to themselves: I can do this — and for less. And still others were drawn by the beads themselves — beautiful objects to be adorned. And played with. And fondled.
Vanessa told me how she got started. She had bought a strand of beads. She possessed them. They possessed her. She kept them with her at all times. In her pocket. In her purse. Between her hands. Inside a zip-lock bag. Then outside the zip-lock bag. And back into the zip-lock bag. After weeks of taking them out, putting them away, and then taking them out again, she sat herself down at her kitchen table. She lay the strand of beads on the table, ever-so-gently. She reached for the sharpened scissors. And cut the strand.
The beads rolled all over the table. Vaness’s eyes got wide. She told me she couldn’t stop looking at them and touching them and playing with them. The look on her face was sinful, almost pornographic.
Vanessa returned to the local bead store. And bought some more beads.
Terry had been crafty her whole life, ever since she was a little girl. She didn’t remember when she first started making jewelry. But she did remember when she was lucky enough to get paid for it. She made more jewelry. She sold more jewelry. And made more. And sold more.
Hessie loved to watch the jewelry home shopping network. She imagined herself modeling the jewelry on TV, and telling her audience how wonderful the beads and the colors and the stones and the designers all were. She began watching the craft shows on cable, and studying the instructors and every little thing they said and did. She started bead stringing jewelry and learning some wirework.
If you had walked into Renee’s bedroom, you would have seen boxes and boxes of jewelry — all in need of repair. She kept meaning to fix each piece, but the cost and inconvenience were too high. Finally, she convinced herself, “I can do this myself.”
Darita was a fiber artist. She had become frustrated, a bit, because she wanted more life in her projects. By a happy accident — a shattered car window and shards of glass sticking into several fiber projects on the front seat of her car — she discovered she could add beads. These beads added light and interplays on light. Darita was very happy with the results.
I always find myself asking our customers and students how they got started. Here’s how some of them finished the sentence, “When I started beading…”
“… I needed jewelry for my prom.”
“… My neighbor made me do it.”
“… A friend wanted a pair of earrings.”
“… I visited my first bead shop.”
“… I needed someone to repair a necklace, and couldn’t find anyone to do it.”
“… I needed to make some extra money.”
“… I was thinking about what to do after I retired.”
“… I ordered a kit on-line.”
“… I dreamed about beads and designed in my sleep.”
“… My dad brought me a beaded Indian doll, and I had to learn how to make something so similar.”
“… I was recuperating in the hospital from some surgery, and the volunteer brought me some beadwork to keep me busy.”
“… I begged a friend of mine to make me a bracelet like hers, but she never did. So I made one for myself.”
“… I decorated a scrapbook with some beads, and suddenly found myself switching craft careers.”
“… I needed an escape, something relaxing, something meditative.”
“… I was a baby in diapers learning to walk by following my mother holding some big beads dangling from a string.”
When I started beading in the late 1980’s, there were no major bead magazines — like Bead & Button or Beadwork. There were very few stringing material options, and in fact, many people used dental floss or sewing thread or fishing line. There were few choices of clasps and other findings — especially for stringing on thicker cords like leather or waxed cotton. I had to go to hardware stores and sewing notion stores and antique stores and flea markets to find things, and make them work. I cannibalized a lot of old jewelry for their parts.
I was in Nashville, Tennessee, at the time. There wasn’t much of a beading culture here. It was difficult to find advice and direction. This was pre-Internet. I mostly strung beads, and got hooked early on. Probably because I sold so much of what I made. Selling your stuff gets you addicted very fast.
Life Has A Way of Linking You Up To Beads
I grew up in a semi-rural part of New Jersey, where every year they published the Farms Report. The Report indicated how many farms were left in each county in New Jersey. There were 300 farms left in Somerset County when I left for college in Massachusetts. The year was 1971. My parents owned a small independent pharmacy. Their business could be traced back to before the Civil War, though it moved up and down the street several times on what was called The Old York Road. I worked in the store from when I was very young, and always loved the retail setting. Healthcare, my professional occupation, not so much.
As most upwardly mobile young adolescents do in the New Jersey/New York corridor, I pursued a professional track. I studied anthropology and psychology at Brandeis. I pursed a masters degree in City and Regional Planning at Rutgers. Got a job as a city health planner in New Brunswick, NJ. And eventually went on to get my doctorate in Public Health at the University of North Carolina.
I held a series of progressively more responsible jobs in healthcare. Initially, I was an assistant professor at Ole Miss in Oxford, Mississippi. I taught graduate students health law, medical anthropology, epidemiology, and health planning. Loved Ole Miss. Loved Oxford. Loved Mississippi. At the time, however, I wasn’t so keen on teaching, and was never a big fan of working in the healthcare field.
I went on to become a health policy planner for the State of Tennessee. That’s how I got to Nashville. And then director of the Tennessee Primary Care Association. But, at that point, I could push myself to stay in healthcare no more. In spite of the great pay. In spite of the prestige. In spite of the power base I had created for myself. In spite of wanting to help people get access to care. I finally reached a point where I no longer cared as much about the money. And I cared much more about bringing back some more authenticity in my life. Some other “Fool” could step in and take over all these professional responsibilities. I had paid my dues to society.
So, I took the plunge.
With my partner Jayden, we opened a bead shop. We sold all the parts, as well as finished pieces we made. We repaired jewelry. Jayden did some teaching and instruction. We were in the right place with the right products at the right time. Business sky-rocketed. I had assumed that I would have had to continue doing some healthcare consulting, mostly with HCA, and some teaching at the graduate program with Meharry Medical College and Tennessee State University.
But I never had to. And, over the next 30+ years, never had to again.
Connie Welch was the greatest bead lover you could ever meet. She was one of our first store customers. She was instrumental in our success — on many levels. In 2009, she passed away.
It seems like only yesterday morning, Connie Welch and I were chatting about our very successful and exciting Laura McCabe workshops over the weekend before Connie’s death. We had all been together with our closest friends and bead-mates, and had met several more we immediately included with our group.
Connie had been very excited about the workshops. She loved the projects. They were fun, challenging and appealing. She learned many new things. She couldn’t wait to ask Laura to come back to Nashville again. Connie and I remarked how the workshop reflected the results of so many years she, I and others had spent creating and developing and fostering and participating in The Center for Beadwork & Jewelry Arts — the name we gave our educational program at Be Dazzled Beads.
Connie was instrumental in bringing a professional bent to beadwork in Nashville. She played very key roles in helping Jayden and I grow our business and raise all our dogs, especially Rosie.
So you can imagine how shocked and saddened Jayden and I were to learn that Connie had passed away. We miss her deeply.
Connie was part of our original advisory groups which researched beading education around the world, distilled this information into sets of critical ideas, and then wove these ideas into our educational program at CBJA and Be Dazzled Beads. The first things Connie worked on were identifying critical bead-weaving skills, like managing thread tension. She worked with the group to developmentally order these skills, and then link them to specific courses. But her proudest moment and claim to fame was her development of our Advanced Bead Studies program. Connie took the leadership role in organizing these Bead Studies over 9 years.
Connie had shopped in our stores since our beginnings. She took it upon herself to make sure that we were always in the know about major things happening in the bead world. She was our “deputized” market researcher. She followed bead trends, bead magazines, bead websites and bead artists. She brought her knowledge of color and graphics to the fore. She made us aware of the local bead scene in Nashville, the major players, the stores, the groups and opportunities.
And Connie made sure that all our store dogs — Rosie, Dottie, Stormy, Lily and Daisy — were treated like royalty. Connie loved all our dogs, but had a special place in her heart for Rosie. And Rosie had a special series of sounds to announce each time that Connie was arriving at our store’s front door.
Connie loved to bead. She loved beads, beaders and anything beading related.
Connie’s enthusiasm affected all around her — almost as if she imbued them with all the visual and textural and sensual and emotional powers of the beads she so lovingly contemplated herself. Connie made everyone want to bead. And she made everyone want to share in the addiction.
I received this note about Connie after her death:
“I knew Connie from the AOL boards from years ago. I live in the Phoenix area and when she’d come in Sept, or then Aug, for the fiber convention, my job was to, on Fridays, drive to Walgreens, buy coke for her, hit the hotel, and she would yell at Jim (her husband) and I all afternoon as we tore up the hotel room, reinvented the furniture, and set up the displays to her satisfaction.
“She took us to dinner at a place called Sam’s every time, for working for her. Saturdays I would return and spend all day with her, beading, showing our stuff to each other, and she often shared stories of the Land of Odds, and the folks she met and the classes she took there.
“She told me some great stuff over the few years we did this. I’d return on Sundays and we’d visit again, but then Jim and I had to tear down and repack all of the show supplies to Connie’s barked orders.
“One time she sent me to another vendor to identify some stone beads. As it turned out, the woman was new to beading so I ended up giving her all sorts of information, and leads on other local stores besides where she had obtained said beads. The other vendor and her daughter spent much of that show buying the beads and buttons I had just learned to make along with things I had hauled in from Tucson, and ended up trading some beads for some silk ribbons I had. I’d had no idea what they were worth. I just showed them to her, and her eyes got big as saucers.
“While sitting in Connie’s showroom, we used to laugh hard and bead, and this drew in the “bead curious” who would have otherwise walked past her salesroom.
“Sometimes it would result in a sale, sometimes potential customers for either one of us as one time she let me display some beads in there — I just recalled that. But always Connie ramped up that person’s enthusiasm for beads, or learning to incorporate beads into their fiber work. When there was no one around, she loved to tell stories of beads and beading and however Cleo (her cat) got involved.
“Connie was generous with information and she was also really curious about how I figured things out. I was a self-taught beader and to date have still only ever taken 2 classes, maybe 3. Admiring her beautiful work inspired me to go further with my freeform work. She taught me now to make the little “boats” to start a freeform peyote pouch, and I have had some good success with that project.”
QUESTION: Can you make serious money by making jewelry?
ANSWER: Yes you can, but you have to be smart about it.
I offer a series of business of craft classes in Nashville. One of my most popular classes is called PRICING AND SELLING YOUR JEWELRY. In it, I go over a pricing formula that is easy to do, accounts for costs of PARTS, LABOR and OVERHEAD, and fits with the realities the jewelry designer faces, most notably, that they wear different hats — manufacturer, wholesale and retailer — and each “hat” requires a different way or related costs to prices.
I also go over various business and marketing strategies very related to Pricing.
In this article, I go over…
BUSINESS STRATEGIES 2. PRICING STRATEGIES 3. APPLYING PRICING FORMULA 4. PROFIT and POST-PROFIT 5. MARKETING YOUR JEWELRY 6. RETAIL, CONSIGNMENT, WHOLESALE 7. BRANDING
BUSINESS STRATEGIES
a.Buy Parts Cheaply When starting, go after depth rather than breadth of inventory. Buy a limited selection of parts, colors, sizes, so you can purchase in greater volume, thus getting a lower price
Don’t try to meet every contingency. If someone wants the piece in red, and you only have purple, don’t try to get the pieces in red. You won’t be able to buy them in volume and get a good price on them.
Learn how to say “NO!” to the face.
“Pretty Please, Pretty Please, Pretty Please”
“Do It For Me” “I’m your best friend.” “I’m your sister”
“I’ll show everyone what you made for me”
“Please please please!!!!”
You have to hold your ground for 60 seconds. Just 60 seconds. Then the person usually says, OK, I’ll take it in the color you have. (Most people cannot hold their ground for 60 seconds …. But, you have to.)
Initially, you will move from a creative mode to a production mode. A lot of jewelry artists give up and fail right at this point.
When in “production” mode, you will need to develop strategies to keep from getting “bored”. After 1 year of selling, you can begin to change strategies. You can add another color or size and expand your inventory. Eventually, you will be able to add colors/styles and have more fun, freedom and flexibility to create.
b.Know Your Market
Who are your customers? What are they willing to pay? What will it cost you to link up with this market (travel, displays, packaging, timing)?
c.Know Your Competition Check out similar merchandise in places your customer base goes to. What are they charging? How are they merchandising and marketing their products? How are they presenting their competitive advantages? What is their reputation?
d.Mark Up and Price To Make A Sufficient Profit
A sufficient profit… …covers ALL costs …gives yourself some payment …allows you to reinvest 15–25% into expanding your inventory …means your customer feels they got a fair deal
NOTE: It is always easier to lower a price than to raise it. So it’s better to start on the high end, than on the low end, when you decide on a price.
e.Don’t discount to family, friends and co-workers Through word of mouth, this ends up spreading expectations about getting low prices from you. It is easy to lower prices, but very difficult to raise them.
They are already getting a discount. Your price will be much lower than if they bought the same piece in a boutique or department store.
2. PRICING STRATEGIES
Most jewelry designers (and other craft artists) are not smart about pricing their jewelry.
Often, they “underprice” their pieces. They give friends, relatives and co-workers discounts. They don’t charge for their labor. They feel awkward asking for a higher price.
Othertimes, designers and artists “overprice” their pieces. They see high prices in high end boutiques, and think they should match these prices. They sometimes overvalue their labor.
In either case, there is a lack of knowledge about the true costs of all the parts and activities that go into creating a piece of jewelry, and how to manage all these costs. Also making things confusing is that the artist often wears 3 hats: manufacturer, distributor, and retailer.
3 Pricing Strategies:
A. Keystone B. What Market Will Bear C. Fair Value
A. Keystone-ing (multiply cost by 2x) Triple Keystone = multiply cost by 3x)
Works well for a gift store or jewelry store where the owner buys already made pieces and puts them out for sale. Does not work so well for jewelry designer who has to accommodate having to make items, have parts inventory on hand, and has to market items.
B. What the market will bear (highest price you think you can get)
Works well in tourist areas where customers are not regulars, and expect to pay somewhat higher prices. Very short term strategy. While at time of sale, seller and customer are happy, when the customer returns home and finds out they paid too much for an item, they may, even if never returning to the area, may spread bad word of mouth.
C. Fair Value (both seller and customer get good value, leave the transaction happy, and stay happy) This method is more long term. This method forces the artist to account for all costs involved, and in the process, forces the artist to more realistically evaluate whether a particular piece of jewelry will sell at a particular price.
This is the formula I teach, and what is discussed and outlined below.
3. APPLYING PRICING FORMULA
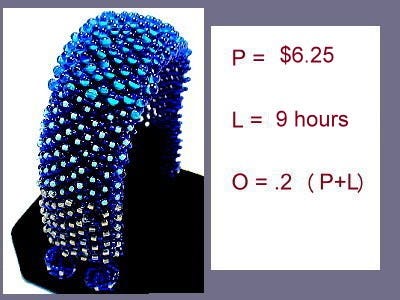
THE BASIC RETAIL FORMULA (To compute “minimum” fair retail price (MinFRP)
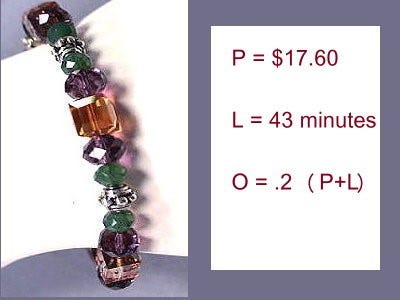
P = “typical” cost of parts
L = labor
O = overhead estimate
NOTE:”typical cost” is what you’d normally expect to pay; if you purchased at discount, you do NOT use that discounted price. “Labor” is make-it time, NOT design-it time. “Overhead” stands for everything else: rent, electricity, wear and tear on equipment, admin time, etc.
So, MinFRP = 2P+L+.2(P+L)
If parts cost $15.00, you spent 43 minutes making the piece, then,
We have 5 variables. We list these in a column. We fill in correct information after each “=” sign.
where the variables in the formula are… P = parts L = labor Overhead estimated with .2(P+L)
FIRST, write these 5 pieces of variable information into a column:
*ROW 1: One times P =
*ROW 2: Two times P =
*ROW 3: Labor = Usually figured as $10/hour, charged off in 15 minute intervals. Thus, 12 minutes = $2.50 17 minutes = $5.00
*ROW 4: Sum of one times P plus one times L)
*ROW 5: 2/10 times the sum of P plus L
SECOND, plug these numbers into our FORMULA, and compute a MINIMUM FAIR PRICE:
The FORMULA uses ROW 2 + ROW 3 + ROW 5 pieces of information.
THIRD: Use the BASIC RETAIL FORMULA TO COMPUTE A MAXIMUM FAIR PRICE. (To compute a “maximum” fair retail price)
We multiply the “minimum fair price” by 1.5.
Thus, we end up with a range of possible acceptable and fair prices, and we pick a price within this range.
If the price we think we can get in reality is either below or above this range, we need to do some re-thinking. We cannot just charge a lower (or higher price) outside our range, because then the price would no longer be fair.
So, we have to re-think our project.
We can do different things to bring the lower (or higher) price within an acceptable range. The formula actually tells us what we can manipulate. Change quality of parts. Charge less or more for labor. Change the setting we are manufacturing things in. Change our target market niche. Change our design. Change packaging.
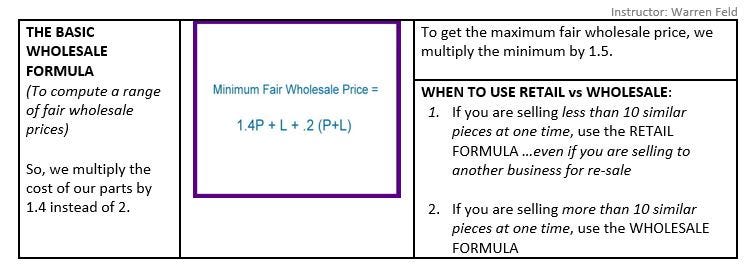
THE BASIC WHOLESALE FORMULA
(To compute a range of fair wholesale prices)
So, we multiply the cost of our parts by 1.4 instead of 2.
To get the maximum fair wholesale price, we multiply the minimum by 1.5.
WHEN TO USE RETAIL vs WHOLESALE:
1. If you are selling less than 10 similar pieces at one time, use the RETAIL FORMULA …even if you are selling to another business for re-sale
2. If you are selling more than 10 similar pieces at one time, use the WHOLESALE FORMULA
PRACTICE MAKES PERFECT
Example 1: Bead Strung Piece
Example 1: Bead Strung Piece
Let’s practice applying the Pricing Formula. 2P + L + .2(P + L) = Minimum Fair Retail Price 1.5 (Minimum Fair Retail Price) = Maximum Fair Retail Price
Minimum Fair Retail Price =
Maximum Fair Retail Price =
Example 2: Bead Woven Piece
Example 2: Bead Woven Piece
Let’s practice applying the Pricing Formula. 2P + L + .2(P + L) = Minimum Fair Retail Price 1.5 (Minimum Fair Retail Price) = Maximum Fair Retail Price
Minimum Fair Retail Price =
Maximum Fair Retail Price =
Example 3: Wire Work Piece
Example 3: Wire Work Piece
Let’s practice applying the Pricing Formula. 2P + L + .2(P + L) = Minimum Fair Retail Price 1.5 (Minimum Fair Retail Price) = Maximum Fair Retail Price
Let’s also compute the minimum and maximum wholesale prices.
Can the artist sell this piece to the retailer at a fair wholesale price so that the retailer can sell it at a fair retail price?
You know ahead of time that the retailer will want to at least double the cost of the piece (that is, the price the retailer will pay you).
If you set a price within the fair range of the wholesale prices you are going to charge the retailer, what would his world look like? You can determine that by applying the retail formula, because that represents what the retailer would think about. Assuming the retailer will double what he pays you, will he end up with a fair price he can charge his customers?
4. PROFIT and POST-PROFIT
Many people think that if a necklace cost them $5.00 to make, and they sold it for $20.00, that they have $15.00 profit to put in their pockets. However, they do not. This $15.00 represents “Pre-Profit”. Typically, the true, bottom line profit will be about 8–15% of your gross sales. So in this case, there are a lot of Post-Profit costs that will leave you with about $1.60 to $3.00 of money you can put in your pocket.
PRE-PROFIT COSTS
Costs of inputs (inventory, supplies, equipment, personnel)
Costs of throughputs (travel, phone, time, brochures, business cards, costs of getting suppliers; costs of getting personnel; costs of doing marketing or selling)
POST-PROFIT COSTS
Costs of outputs (pay off credit card debt and interest; pay sales taxes; pay income taxes; pay bank loan/interest; reinvest profits to expand inventory; repair, upkeep, replace equipment and tools; pay overhead like rent and utilities)
All these costs will have to be accounted for when you are setting prices for your merchandise.
Maintaining a level of “Velocity” in your sales. Velocity represents the rate of turn, from making pieces to selling pieces to making more pieces to sell and then selling them and so forth. Maintaining a constant (or increasing) velocity will keep you from having cash flow issues and going out of business. With jewelry (and other crafts), there are usually seasonal variations in velocity. You need to have strategies about how to bring in money during those times when the velocity has slowed down too much.
Your Profit: PRICE — TOTAL OF ALL COSTS = PROFIT
5. MARKETING YOUR JEWELRY
A lot of your success will come down to how well you market. Marketing is more than advertising. There are several steps or components to marketing. You need to become an expert in each one.
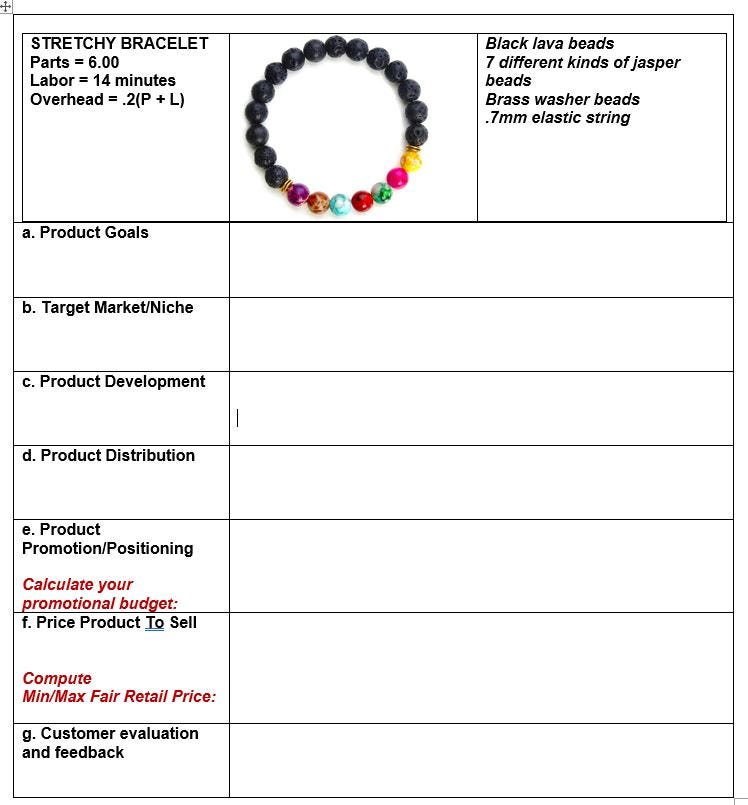
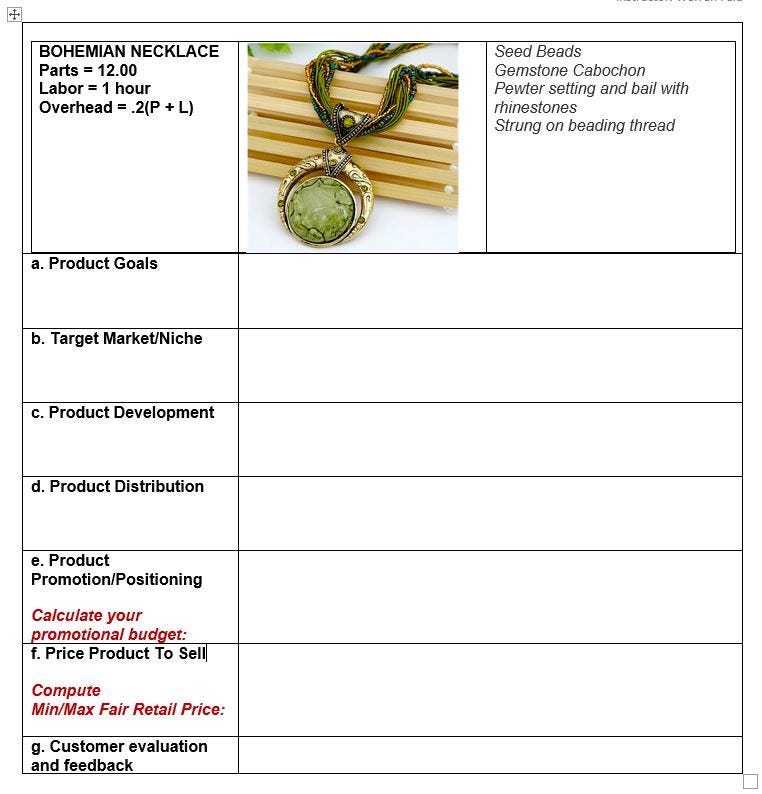
a.Product Goals: Your product is designed to meet what customer need(s)?
What are your customer’s needs, and how can this product meet those needs? What is your “competitive advantage”? That is, why should your product be perceived as better than anyone else’s? (attractiveness, price, access, uniqueness, other)
b. Target Market/Niche: What are your customer shopping behaviors? Where do your customers live and shop? What are their typical shopping behaviors? What are your market boundaries? (by location, by age, by lifestyle) Are you targeting a more narrow market segment within these boundaries?
c. Product Development: What aspects of your product are critical in attracting attention, and what are the associated costs involved in attracting that attention? What are your product’s attributes? What are your product’s benefits? What are the costs associated with your product? What kinds of things (tangible and intangible) have to be in place in order to make your product? What should product be named? Should product be part of series or collection?
d. Product Distribution: Where will your products be sold, and how will they get there? Where will your product be sold? How will it get there?
e. Promote/Position Your Product: How will you gain visibility for your product? How will your target market come to know about your product, and be able to buy it? What is your target message — those words/images/phrases that will motivate your target market to make the effort to buy your product?
Set your promotional budget: Your promotional budget is usually 5–20% of your product costs. Example: If you are trying to sell 50 pieces which cost you $5.00 each, your promotional budget will be between $12.50 and $50.00 (.05 * $250.00 to .20 * $250.00). f. Pricing To Sell: How will you determine a fair price? Use the pricing formula to compute a minimum and maximum fair retail price. Then step back. The formula is a guide, not an absolute. What influences the price in your local market? If you think your target market is not willing to spend the minimum fair price, then what kinds of things can you change, to bring the price in line with this market? If you think your target market is willing to spend more than the maximum fair price, then what kinds of things can you change, to bring the price in line with this market?
Things you can change:
g. Evaluation and Feedback: How will you get feedback about whether you are on the right track, or not? Formally and/or informally, get your customers’ reactions to your product. Think about things you can measure: survey, likes, feedback, returns of merchandise, repeat sales. Get your own reactions to your product. Are there improvements in efficiency or effectiveness that you can make?
MORE PRACTICE
STRETCHY BRACELET
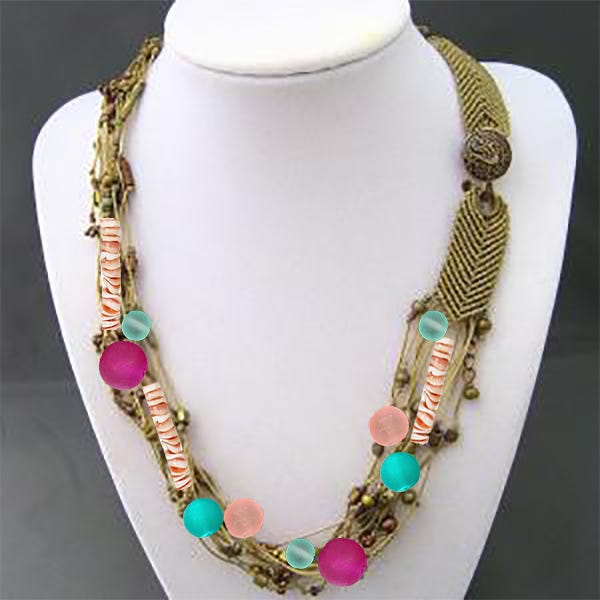
2. BOHEMIAN NECKLACE
6. RETAIL, CONSIGNMENT, WHOLESALE
It is important to understand the differences among retail, consignment and wholesale.
Retail: Here, you have an original manufacturer (called the jobber), usually a go-between called a distributor or rep (called the wholesaler), and a seller, in this case, a retailer. Wholesalers buy from jobbers, usually at a mark-up of 25–40% (that is, the wholesale price is 25–40% above the jobber price). Retailers buy from wholesalers, usually at a mark-up of 100 or more % (that is, the retail price is typically at least twice what the wholesale price was — this is called “keystone”). In jewelry, the retail mark-up is often 3x the wholesale cost (this is called “triple keystone”).
Consignment: Here you bring items to a shop or gallery, and work out a deal with the shop’s owner. In exchange for the shop taking a risk and taking up shelf space (and in a few cases, costing advertising dollars) with your pieces(s), you agree to receive a certain percentage when the piece sells. You don’t get any money up front, and it may be months before you get any money. A typical “deal” is to get 40% and the store keeps 60%. In consignment, the store always is taking the greater risk. Any split greater than 40/60 or 60/40, such as 70/30 or 30/70, is a yellow flag. It suggests the business owner does not understand consignment and its risk for their store. Because of this, it suggests to the artist that s/he may never get paid, or that the business won’t put any effort towards selling/marketing your pieces, or even keeping them clean and displayed well.
Consignment may be the only option for getting started. If your pieces do well on consignment at a particular location, try to re-negotiate your arrangement to a wholesale one.
Wholesale: When you sell wholesale, you usually drop your price (thus, gross profit), considerably, in exchange for selling more pieces (volume). When you sell wholesale, there is a great savings to you in selling more pieces, and knowing ahead of time that you will be selling more pieces. So, it’s easier to lower your price in exchange for volume.
As a guide, you are ready to sell “wholesale” when you are selling 10 or more similar pieces at a time to a particular business.
7. BRANDING
One of the most important marketing goals for a designer is to be “branded”.
This means positioning yourself so that you stick out among the competition. This means building relationships and emotional connections with your customers.
Marketing is what you do. Branding is what you are. You can market, market, market without success because you failed to have a branding strategy.
Branding includes…
…developing a signature style and unique design approach
…coherency and consistency among your products in terms of materials, styles, prices, ways they are packaged and displayed
…telling your story (or other techniques) to form an emotional attachment between your customer and your products
…having great business name, product names and logo
…delivering to your customer what they expect to be delivered — quality, emotional connection, connection to you the artist, an understanding of your vision as an artist
…rewarding your customers who love your brand, to cultivate loyalty and have them spread positive word-of-mouth about you
…staying relevant and flexible — well managed brands always make adjustments; branding is an ongoing process
…measure its effectiveness
Develop Your Elevator Pitch Develop catchy elevator pitch — a 30 second summary of you, your work and personality -o- just in case you meet some body really important in the elevator and have his or her full attention. This pitch should be reflected in your marketing materials and “personal story”. It should be something that you can enthusiastically repeat over and over again.
Develop Your Tag Line Develop a killer tag line. This has to be concise and clear, pronounceable and sound pleasant to the ear. It has got to be less than a mouthful. Remember this will be repeated over and over and over again. It has to make your customer say “Ohhhhh!” or “Sweeeeet!” or “Yes!!!”. The tag line represents your brand image and gives it a voice.
Here’s to your continued Jewelry Business successs!!!!
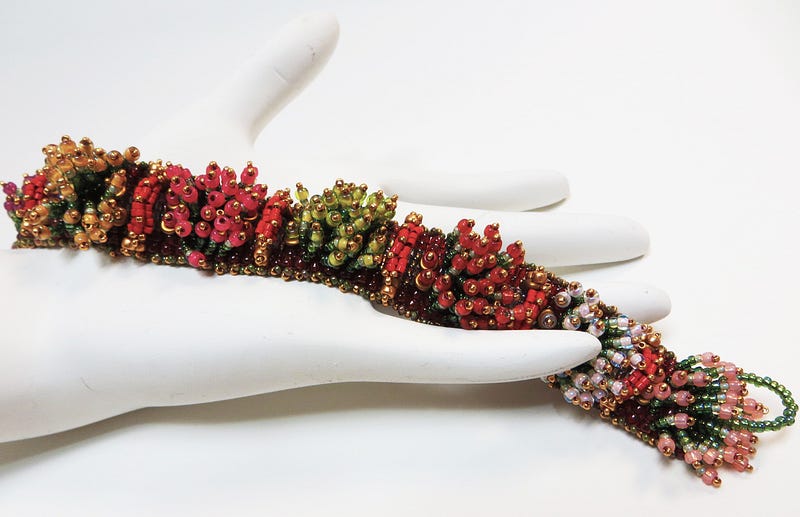
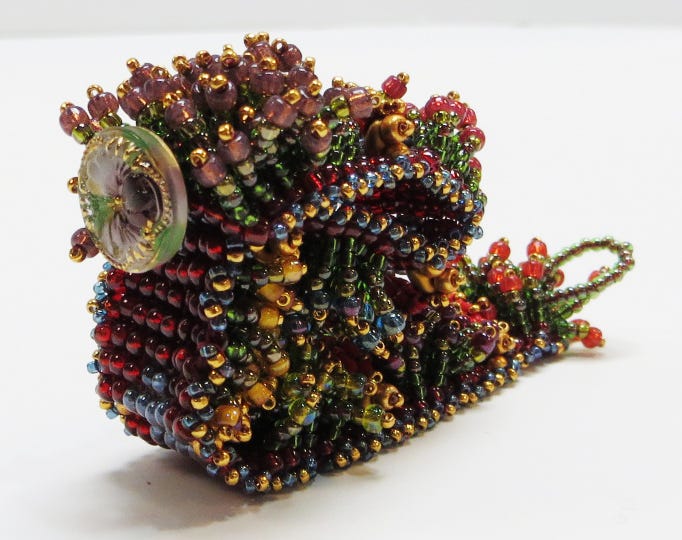
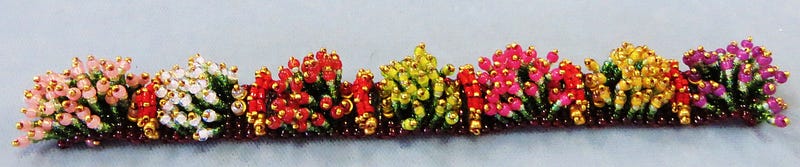
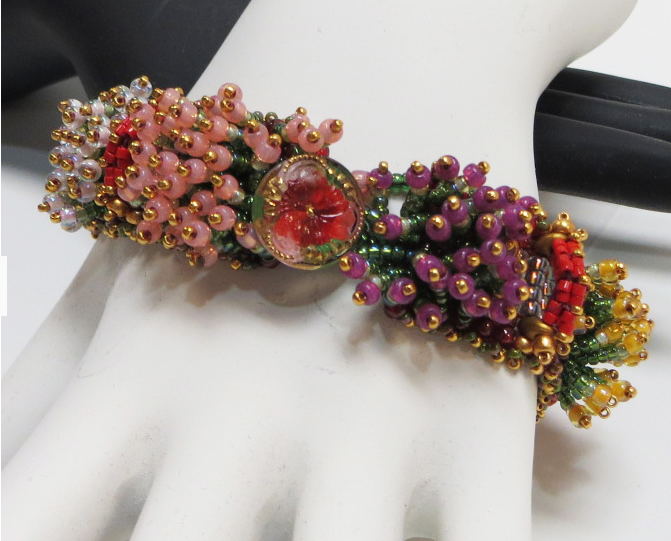
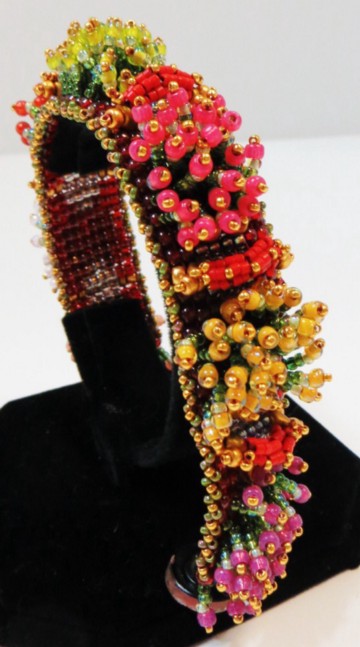
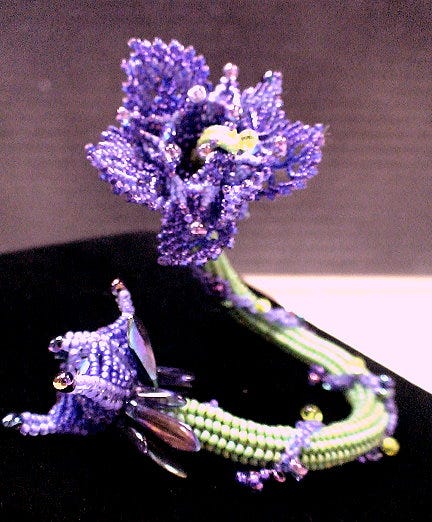
PLANNING YOUR PROJECT Thinking about the types of choices made for this project
The Japanese Garden Bracelet is a fun project that students love. It is for students who have some familiarity with bead weaving. I had been experimenting with various strategies for bead weaving an “arch” shape (parabolic arch) which can keep its physical shape while the bracelet is worn. Not an easy task. It has required hours and hours of trial and error. The final choices here were influenced by the architecture of Antonio Gaudi, building a column in segments, and then forcing it into a tight arch configuration.
This project is also a good example of how you can use a natural setting for inspiration. This setting influences color choice, color positioning, as well as shape and its placement. This is the image that inspired this piece.
In this fragrance garden landscape, we see the red moon bridge over a glistening pond of water. Commonly used Japanese garden plants that unfurl flowers include peony, chrysanthemum and, near water features, Japanese water iris. Flowering shrubs include azalea, camellia and hydrangea, all of which provide strong winter interest.
We feel that each plant, walkway, stone and other related elements have been deliberately placed, some shaped and others allowed to grow at will. Japanese gardens are designed to express their cultural values and philosophies. The gardens express the fragility of existence as well as time’s unstoppable advance. I believe the Japanese Fragrance Garden Bracelet captures all this.
It is important, I believe, for a contemporary piece of jewelry to have a sense of dimensionality, movement, and a strong use of color. In contemporary pieces, we also want some sense of the violation of straight lines and flat planes.
MANAGING SUPPORT SYSTEMS AND OTHER ARCHITECTURAL ISSUES
Whenever you create a piece of jewelry, it is important to try to anticipate how your choice of techniques and materials might positively or negatively affect how the piece moves and feels when worn, as well as your piece’s overall durability.
Towards this end, it is important to redefine your techniques and materials in architectural terms. The important term or concept we think about when we begin our piece is called a “Support System”. A support system is anything that gives your piece “jointedness”, that is, allows the piece to move easily when worn, and allows the piece to adapt to the negative forces any movement places on your piece, making your piece feel more comfortable to wear and more durable.
The bridges are basically parabolic arches.
Parabolic ArchParabolic Arches by Antonio Gaudi
Antonio Gaudi is a famous architecture from Barcelona, Spain. Much of his fantastical work is organized around and supported by parabolic arches.
The arch is made up of a series of stacked stones, each fitted together, then shaped. They way these segments are pieced together supports the shape, and this shape supports the weight of the structures resting on them. I tried to mimic his architectural/construction ideas with bead weaving.
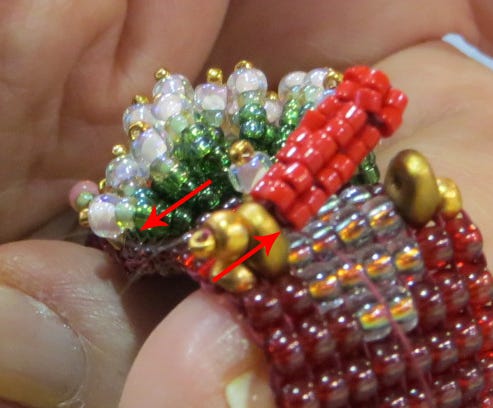
After a lot of trial and error, my “arch” (which is called a “bridge” in this project) is constructed using 2-stack ladder stitch. It is made up of 4 ladder stitched components. Within each component, all the beads need to be very tightly stitched together. Between any two components, the stitched connection needs to be looser. When the bridge is attached to the foundation of the bracelet, a 15/0 seed bead is wedged between each of the 4 ladder stitched components to force that arching shape, and keep that arching shape, no matter the stresses or strains put on the bracelet when worn.
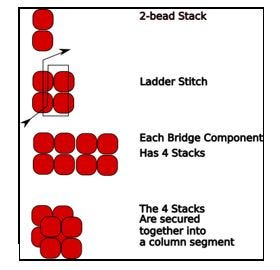
The Ladder Stitch and the Bridge Construction
The bridge is constructed using a 2-drop ladder stitch. “2-drop” means that we pick up 2 beads at a time, and treat them as “one”.
Each 2 beads or drops is referred to as a “stack”.
The ladder stitch is used to connect stacks.
The bridge consists of 4 connected stacks.
The 4 connected stacks are, in turn, connected together into what is called a “Column Segment”.
Each bridge consists of 4 connected Column Segments.
All the beads in any one column segment should be tight enough to “move as one”.
The connection between any two column segments is looser, so they can move somewhat independently, and thus be able to bend into an arch.
STEP:Making the Bridge
Column Segment Component 1 of 4
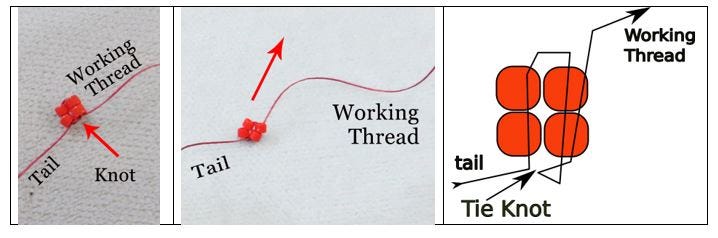
Start with 3–4’ of thread. Wax your thread.
Pick up 4 COLOR Q (11/0 delicas).
Slide these beads down to one end, leaving 6” tail.
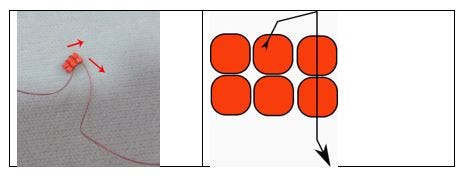
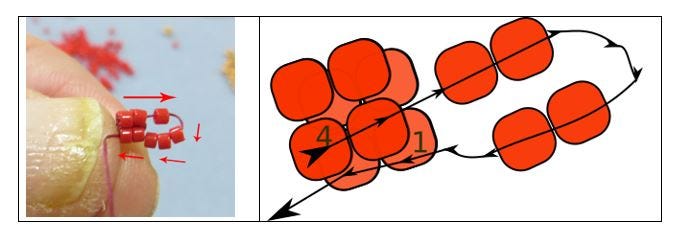
STEP: Create 2 Stacks
Return through the first bead added, and continue through the other three beads to make a circle.
DOUBLE CHECK that you still have your 6” tail.
With your fingers, push beads together so that you have 2 stacks of 2 beads side by side.
Take the tail and the working thread and tie an overhand knot. This will make getting started to create your column segment easier to manage.
Take your needle through 1 stack so it is exiting the opposite side from the tail.
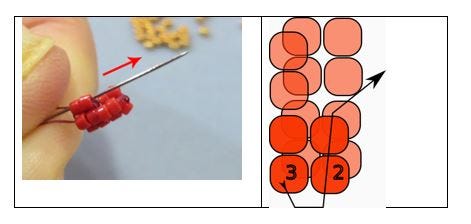
STEP: Add 3rd Stack, Column Segment One
Pick up 2 more COLOR Q.
Make a “circle” by returning through the opposite side, exiting where you started.
STEP: Secure 3rd Stack
Continue your “circle” through the 2-bead-stack you just added.
STEP: Add 4th Stack, Column Segment One
Add 1 more 2-bead-Stack.
Pick up 2 beads.
“Circle” back through the previous Stack.
Return through the new stack.
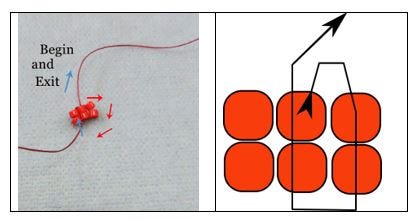
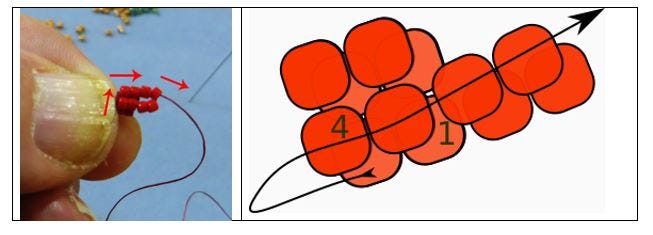
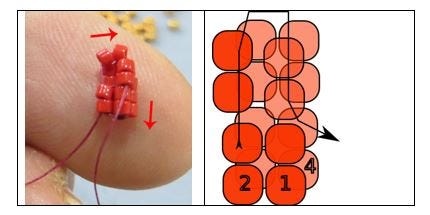
STEP: Connect 4th Stack to the 1st Stack To Finish Column Segment Component
Attach the last Stack to the first to create a column segment.
Fold the stacks so that two stacks are sitting in front of the other two stacks.
“Circle” through first 2-bead stack, back through the last 2-bead stack.
NOTE: If you are not on the opposite side of the tail, keep circling until you are.
Tighten this up.
You are now positioned to add the 2nd column segment to our bridge component.
Create Column Segment 2 of 4
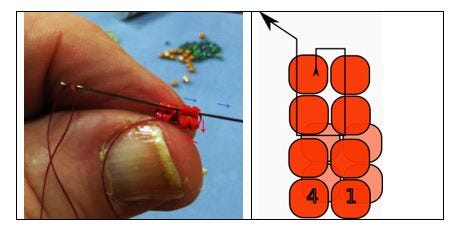
STEP: Create 2nd Column segment
Pick up 4Q.
Return back down the previous stack. [Pick up 4 beads] [Down 2 beads]
Pull tight.
You should have 2 new stacks sitting on top of 2 existing stacks.
STEP: Return
Return back up the original stack, and the new 2-bead stack. [Up 4 beads]
STEP: Circle around two new Stacks
Circle around the 2 new stacks, exiting where you started. [Down 2 beads, then up 2 beads]
Pull tight. You can push the new paired stacks towards the first column segment beneath it.
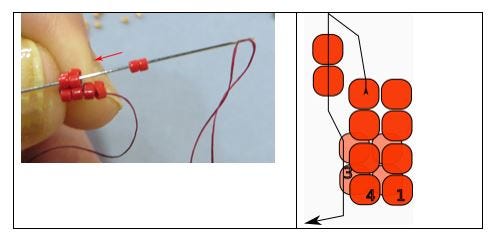
STEP: Add 3rd Stack to 2nd Column Segment
Pick up 2Q.
Return back down through (un-topped) Stack in previous column segment, (in this case, 1st column segment). [Pick up 2 beads] [Down 2 beads]
STEP: Return
Return up through remaining “untopped” Stack in previous column segment (in this case 1st column segment). [Up 2 beads]
STEP: Add 4th Stack to Column Segment 2
Add 4th Stack to 2nd column segment.
Pick up 2Q.
Return through previous stack in new column segment (in this case segment 2)
[Pick up 2 beads] [Down 2 beads]
NOTE: Do NOT travel all the way down through column segment one.
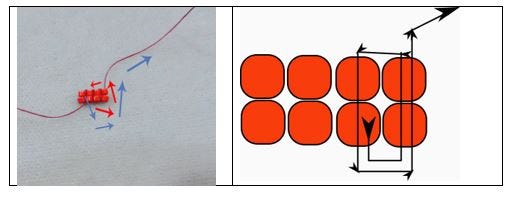
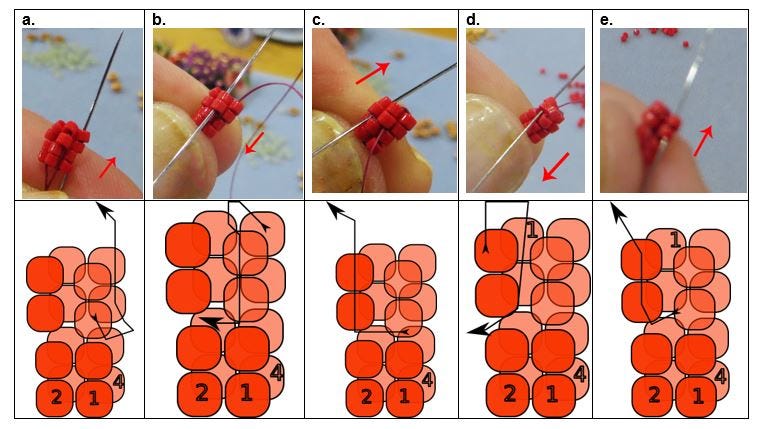
STEP: Secure Stacks
Your thread is exiting the bottom of a 2-bead stack.
a. Return back one more stack to the previous stack. Come up this stack.
b. Come forward one stack. Go down this stack.
c. Go forward and up the next stack.
d. Continue forward, going down the next stack.
e. Return back one stack. Go up this stack.
[BACK ONE, FORWARD THREE, BACK ONE:
Return back one stack. Up 2. Go forward one stack. Down 2. Go forward one stack. Up 2. Go forward one more stack. Down 2. Return back. Up 2 ]
*REALITY CHECK: If you created the thread path correctly, all 4 stacks in new segment (in this case segment 2) should be connected. You cannot push any stack aside like you would opening a curtain drape.
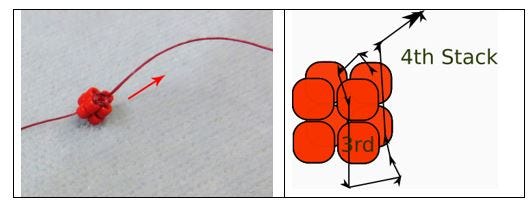
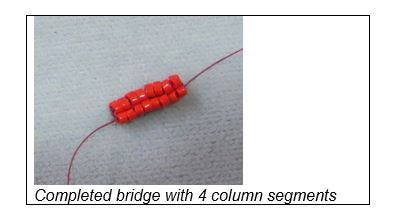
STEP 29: Add 3rd and 4th column segments
Completed bridge with 4 column segments
Repeat the pattern in STEPS 22–28.
NOTE: Remember: You are securing the new column segment to the previous column segment only.
NOTE: So, when adding 3rd column segment, you begin by picking up 4Q, returning back down 2-bead stack in column segment 2.
DO NOT go all the way back through column segment 1.
I don’t mean to drag a poor Elephant by its tail, kicking and screaming, into our bead world against its wishes. Nor do I perceive the elephant to be a threat, like you might see an Elephant in the boudoir, or the fine china store. And I don’t want you to shut your eyes and pretend not to notice that this Elephant is here, standing shoulder to shoulder with every beader and jewelry maker around.
The Elephant is not a joke. And the fact that it is “Rogue” makes it more important than ever to figure out why it’s here, among size #10 English beading needles, and Czech size 11/0 seed beads, and Austrian crystal beads. It seems so worldly, yet other-worldly, our Elephant. It’s not our muse. It’s not our Cassandra. It has no secret plan or strategy. It does not depend on its size to make its point. It does not hesitate to stomp and chomp and clomp because the beads before it are raku or glass or gemstone or crystal or metal or plastic. But a Rogue Elephant in the middle of our craft room forces upon us a completely different logic, so that we can make sense of it all.
Only the beader or jewelry artist who is willing to submerge her- or him-self completely in this wonderfully off-centered picture — Rogue Elephant, beads, stringing materials, clasps and all — will really get the fullness of this humor, this wisdom, and the splendor of beading and jewelry making as a form of art that is worn.
And that’s what happened with me. Though not all at once. Struggling excitedly, creative frustration, wondrous illusion — that’s how I would describe my over 30 years stringing beads, weaving beads, combining wire with beads, soldering silver with beads, entangling fibers with beads.
Somewhere along the way I felt that Rogue Elephant staring at me from a distance. I moved closer to him. And all the applications and all the techniques and all the materials and all the making-selling-making-selling-making-selling began to cohere into something very real. Very meaningful. Integrally resonant. I discovered my Rogue Elephant and beaded him.
How do you stop an elephant from passing through the eye of a needle?
Tie a knot in its tail.
The issues and inspirations that drive the artist
This is a fable for all jewelry artists who aspire to become one with Design. How to Bead a Rogue Elephant becomes an evolving tale and collection of personal perspectives and experiences on the issues and inspirations that drive me, and that drive other bead and jewelry-making artist in their designs.
“Design” is the operative word here. A Rogue Elephant does not present an obstacle, nor create any opportunities, for the artist, unless that artist understands, follows through and is committed to Jewelry as an Art Form, and realizes that jewelry is art only as it is worn.
Jewelry as art isn’t a happenstance. It is made up of a lot of different kinds of parts. These must be strategically and thoughtfully brought together. They are brought together as a kind of construction project. The results of this project must be beautiful and appealing. They must be functional and wearable. And this all comes about through design. Jewelry must be designed. And designed it is.
Rogue Elephants are big, and jewelry design is a big task. Rogue Elephants move in unpredictable, yet forceful ways. And jewelry must be designed with movement in mind. Rogue Elephants come with a surface scape, texture and environment, against which the jewelry must look good. And again, good jewelry emerges primarily from the design perspective and the control of the bead, and all the other incumbent parts by the jewelry artist.
Most beaders and jewelry makers don’t get to the point where they can fully answer Why some pieces of their jewelry get good attention, and others do not? They have fun making things. They match outfits. They give gifts. They sell a few pieces. They use pretty beads and other components. And sometimes they get compliments. Other times they do not.
Thus, they don’t necessarily know what to do with the pieces they are playing with. They don’t control these pieces, or the process of combining them. They follow patterns and instructions. And do these again. And again and again. Their artistic goals are to complete the steps and end up with something. They might stick to one or a few techniques they feel comfortable with. There is an unfamiliarity with the “bead” –What is it? Where did it come from? What makes it special as a medium of art and light and shadow? How does it relate to other beads or clasps or stringing materials or jewelry findings? What happens to the bead over time? When they look at the bead, what do they see?
But luckily, beading for many artists is an evolving obsession. This obsession leads them to contemplate the bead and its use. The bead and its use in art. The bead and its use in jewelry. The bead and its relationship to the artist’s studio. Beads are addictive. Their addictiveness leads the beader or jewelry maker to seek out that Rogue Elephant that haunts them along the distant horizon. They know they want to bead it. They’re not sure how. But they steer themselves along the pathway to find out. This pathway isn’t particularly straight, level or passable. But it’s a pathway nonetheless. And the ensuing possibilities for learning and growing as an artist and designer along the way reap many worthwhile and satisfying rewards. I call this CONTEMPLATION.
The first step in this pathway is to figure out how to get started with beads and jewelry making. You need supplies. You need work spaces and storage strategies and understanding how to get everything organized. You need to anticipate bead spills and many unfinished projects. You need to learn to plan your pieces. You need to get a handle on the beads (and all the other pieces), and how to use them. I call this PLAY.
Whatever the reason, most beaders and jewelry makers don’t get past PLAY. They are content following patterns and making lots of pieces, according to the step-by-step instructions in these patterns. They might fear testing themselves against broader rules of artistic expression. They might not want to expend the mental and physical energy it takes to get into design. They just want to have fun. And if they never notice that Rogue Elephant hugging the horizon, that’s fine with them.
At some point, some beaders and jewelry makers will want to start educating themselves to get a little below the surface. Rather than mechanically following a set of steps, or randomly assembling things bead by bead, you want to know more about what is really going on. How do I hold my piece to work it? How do I manage my thread tension? How do I select colors? What clasp might work best? If you find yourself at this point, PLAY is not enough. You need to start DABBLING.
But for those beaders and jewelry makers for whom the Rogue Elephant is very disturbing, no matter how far away he may be, there are these wonderfully exciting, sensually terrific, incredibly fulfilling things that you find as you try to bead your Rogue Elephant, ear, trunk, feet, bodice and all. You learn to play with and dabble with and control the interplay of light and shadow, texture and pattern, dimensionality and perspective, strategy and technique, form and function, structure and purpose. You begin sharing your designs with friends and strangers, perhaps even teaching classes about how to make your favorite project, or do your preferred technique. You might also create a small business for yourself and sell your pieces. Your sense of artistry, your business acumen, your developing design perspective — you need all this, if you are to have any chance of catching up with your Rogue Elephant, let alone beading him. As you begin to evolve beyond the simple craft perspective to one of artistry and then design, you enter the stage I call CREATE.
As your jewelry pieces become more the result of your design intuition and acuity, you begin to wonder how other artists capture, be-jewel, and release their own Rogue Elephants. How did they get started? What was their inspiration? What motivated them to delve into beading, stick with it, and take it to the next level? Do they make their pieces for show or for sale? You begin to recognize how some pieces of beadwork and jewelry are merely “craft”, and others are “art”. You get frustrated with beautiful pieces that are unwearable and fashionable pieces that lack durability and pieces that sell that are poorly constructed. You see many good ideas, some well-executed, but many not. I call this SAFARI.
Part of this SAFARI is historical. And the more recent socio-cultural-artistic history of beading in America is a fantastic tale of curiosity, grit, creative expression, ambition and technological advances in materials. Beading exploded across America in the late 1980s and 1990s and owes much to its many fore-mothers and a few fore-fathers that began their beadwork careers at this time, as well as those who founded the many beadwork magazines so prominent today. The other part of the SAFARI is learning life’s lessons, and incorporating these into beadwork and jewelry making approaches and designs.
As you begin to articulate what works and does not work in various pieces in terms of form, structure, art theory, relationships to the body, relationships to psychological and cultural and sociological constructs, you complete your evolution as a jewelry designer. You add a body of design theory and practice to your already honed skills in art, color, bead-stringing, bead-weaving and wire working. You find and bead your Rogue Elephant. I call this GALLERY HOPPING.
As you compare yourself as Designer to other jewelry designers all over the world, this is partly a personal adventure as you self-experience your intellectual growth as an artist. And it is partly an adventure of evaluating how well other artists have succeeded in this same quest, as well. One very revealing pathway is following how artists contemporize traditional designs. Still another follows the artist who revives vintage styles. Or the pathway that finds the artist elevating fringe, edging, strap, bail and surface embellishment to the same level of “art” as the centerpiece. And yet another pathway which looks at multimedia beadwork, and how artists seek to maintain the integrity of each medium within the same piece. You might explore that pathway which involves collaboration. I call this stage DESIGN MANAGEMENT.
Your adventure along this pathway towards design — your success at beading your Rogue Elephant — is very fulfilling. Whether you walk, run, skip or crawl or some mix of the above, it’s a pathway worth following. You’ve learned to transcend the physicality and limitations of your workplace, tools and supplies. You’ve learned to multi-task and organize and construct your project as if you were architecting or engineering a bridge. You have discovered how to dress and present yourself for success, including strategies for self-promotion. You’re a Designer. You have learned to present yourself and promote yourself as a Jewelry Artist. You’ve evolved as a Beader and Jewelry-Designer and are feeling a true SATISFACTION.
Beading requires a lot of mind-body coordination. That takes work. It is work.
Calisthenics are exercises you can do to improve and tone your mind-body coordination when bead weaving.
You have to be able to get from your fingers to the needle to the beads, back along the thread to the needle to the fingers, hands, arms, eyes, mind. And then again. And again. Over and over, one more time. You need to get into a rhythm. All these working parts need to be working. No time for cramping. No time to get tired. No time to lose concentration.
A rhythm. Needle, pick up bead, pull down along thread, check the tension, pick up a bead, pull down along thread, check the tension, pick up a bead….
I noticed that different instructors had various techniques and strategies for maintaining this rhythm. Yes, music was involved sometimes. Othertimes simple meditation or creative reading and discourse. Some people had some stretching exercises that they did. Others tested themselves before proceeding with their big project. Still others did small things to reconfirm their learning.
Throughout this Series, I introduce some of the beading calisthenics that I experienced along the way. If you want to gather materials up so that you can follow along with these calisthenics, here’s the list.
MATERIALS NEEDED FOR ALL THE CALISTHENIC EXERCISES (SUPPLY LIST):
notebook, pencil 1 tube each of Japanese 11/0 seed beads in gray, 3 different colors of orange, black, white, any other 4 colors 1 tube each of Japanese 8/0 seed beads in gray or silver, black, white, orange, any other 4 colors 1 tube each of Japanese 6/0 seed beads in gray or silver, black, white, orange, any other 4 colors 5 gray-scale colors of delicas or 11/0 seed beads Nymo D or C-Lon D thread in black Nymo D or C-Lon D thread in yellow two toggle clasps .018” or .019” flexible cable wire assorted 4mm, 6mm and 8mm beads in various coordinating colors, including grays and oranges in your mix, as well big bowl and a bowl-full of assorted beads Size 10 English beading needles Bees wax scissors beading dishes or trays any kind of graph paper work surface or pad colored pencils a few clasps, (toggles are easy to work with) some crimp beads crimping pliers
BEADING CALISTHENICS #1: 5-Finger Stretchies
This exercise is used to prevent your fingers from cramping. Often, when beading, you are holding your hand and fingers in a very tight, controlled, sometimes unnatural or uncomfortable position. You should stop periodically, and do 5-Finger Stretchies. This is a wonderful exercise which relaxes the muscles in your hands.
Take one hand and hold it arm out, palm forward. Your arm is parallel to the floor. Your palm, fingers up, is perpendicular to the floor. Tighten every muscle in every finger, and pull each finger inward and downwards towards the point they meet the palm, but don’t touch the palm. Picture making a claw with your pulled back fingers.
Squeeze the tension, release. Squeeze, release. Squeeze, release. Do this rapidly, perhaps 4 squeeze/releases a second. Do this for 10 seconds.
Now do this with the other hand. 10 seconds.
Do this a couple times with each hand.
Then return to your beading.
BEADING CALISTHENICS #2: Zen Needle Threading
Take a length of Nymo size D thread and a size #10 English beading needle. Thread the needle the way you are accustomed to doing this. Take the thread end, and thread it again. You may have to trim the tip of the thread.
Now try to thread your needle, this time keeping your eyes closed.
Visualize in your mind what you had just seen with your eyes.
Feel with your hands and body what you had just felt with your hands and body.
Unsuccessful? Then try again. Thread the needle twice with eyes open. Close your eyes. Try again. Visualize. Make your body and mind one with the needle and one with the thread.
BEADING CALISTHENICS #3: Head Turning / Turning Beads
Enough 4mm-8mm beads to make an 18” necklace Nymo D or C-Lon D thread .019” or .018” thick flexible cable wire, such as Soft Flex or Flexrite 2 toggle clasps
Using any sized and color beads, string an 18” necklace using Nymo D or C-Lon D thread and a toggle clasp.
Using the same number, size and color beads, string an 18” necklace using .018” or .019” flexible cable wire, crimp beads and a toggle clasp.
Put on the necklace strung on the thread. Bend over as if you were picking up something off the ground. Stand straight, then twist your body to the left. Note the positioning of the clasp. Note how the necklace feels on, and feels when you move. Take the necklace off.
Put on the necklace strung on the cable wire. Again, bend down as if you were picking up something off the ground. Stand straight, then twist your body to the left. Note the positioning of the clasp. Note how the necklace feels on, and feels when you move. Take the necklace off.
Typically, when you use needle and thread in stringing, the piece conforms to the body and moves in the same direction as the body.
Typically, when you use cable wire, the piece does not conform to the body, and will move in the opposite direction the body moves in.
BEADING CALISTHENICS #4: Two-Needle Race Up The Ladder
For each person:2 size #10 English beading needles Nymo D or C-Lon D thread Size 8/0 Japanese seed beads
Here, you need two or more people, or you can compete against yourself. This is a race.
We are going to use two needles and one length of thread to work up through the ladder stitch.
The ladder technique: Double your length of thread. Thread a needle on the end of each side. Pick up the same number of beads on the two needles. Pass the needles in opposite directions through the top beads on each needle. Pull the tension tight. For your first loop (or rung), you’ll need one extra bead on each needle, than for subsequent loops (rungs).
You might start with 4 beads on each needle for the first rung, then 3 beads on each needle for each additional run. Pick up 4 on each needle, crossover. Pull the tension tight. Pick up 3 on each needle, crossover. Pull the tension tight. Keep repeating with 3 beads on each needle.
The ladder looks like this:
Run the race to see who can be the first to make a ladder that is 12 inches long.
The goal here is to learn a little about managing thread tension.
Pick a favorite bead weaving stitch, such as Peyote, Brick or Ndbele (Herringbone). Plan out how to make a flat length of the weave, about ½” wide and 6” long. You can also do 6 separate pieces about ½” wide and 1” long.
For the first inch, keep a tight tension. For the 2nd inch, make the tension tighter. For the 3rd inch, make it even tighter. For the tightest tension, you might even want to reinforce your stitching, by going through each bead again and again with your thread.
For the fourth inch, try to get a tension a little looser than you typically use. Then the next inch, get even looser. For your final inch, make this the loosest of all.
Now pick a stitch like the Chevron Stitch or the Right Angle Weave Stitch. Work it for a length of 3–4”. These stitches start out very loose.
What different kinds of strategies can you employ to tighten the tension? — Reinforcement? Reinforcement after each small segment of stitches? Or Reinforcement after you’ve completed the whole piece? Changing the type of stringing material you are using? Stitching over a solid form, such as a dowel, pencil or straw or vase or ball? Adding additional beads at key joints? There are these and lots of possibilities. Try them out.
BEADING CALISTHENICS #6: Aren’t You Glad You Used Orange
Orange is a difficult color for most people to work with. So this challenge is a simple bead stringing one.
Create an appealing, satisfying necklace, using at least 30 or more 4–6mm beads in orange, and 30 or more 4–6mm beads in each of two other colors.
Stand back from your piece and examine it. If you added or subtracted any one color, could you make the necklace more satisfying?
What makes the particular combination that you ended up with the best combination?
BEADING CALISTHENICS #7: Composition in Gray and Gray
5 gray-scale colors of delicas or 11/0 seed beads gray colored Nymo or C-lon thread, size D yellow colored Nymo or C-lon thread, size D
You can use an existing peyote, brick stitch or loom pattern, or create your own. Try to use or create a pattern that is about 3 inches square. Assign your colors using your 5 gray-scale colors of delicas or 11/0 seed beads.
Evaluate your resulting bead-weaving:
To what extent have you been able to create obvious or desired boundaries between sections or forms within the piece?
To what extent have you been able to create a sense of dimensionality, or forward/receding qualities?
To what extent have you had control over the lines, forms, sections and other design elements, using only gray?
To what extent have you been able to achieve an energy/vitality within the piece, as if it had been multi-colored?
Additional Exercises:
1. Repeat the pattern, using your 5-gray-scale bead colors, and use a bright yellow Nymo or C-Lon Size D thread
2. Repeat the pattern, and substitute a rich colored blue or red bead for one of the grays, plus the other original 4 colors of gray, and the gray Nymo or C-Lon thread
BEADING CALISTHENICS #8: Speaking With Beads
During Apartheid in South Africa, there were those Zulu tribes that adopted Christianity and identified with the colonialists, and there were those tribes that did not. The tribes that did not created a very elaborate communication system using beads.
Besides what colors were next to each other, they used a lot of triangles in their patterns. It was important if the triangle faced up or down, and again what the colors were. With their beadwork, they could “say” something very general, like “I’m mad at the world,” or something very specific, like “I’d like to get together with you tomorrow night at eight, but not before I’ve met with your brother.”
The challenge here is to create your own symbolic communication system using beads and their patterning within a piece of jewelry.
First write a sentence or paragraph about something that you will want to reduce to symbols, and illustrate by constructing a necklace.
Second develop a cipher: This would be a list of each symbol and its meaning or referent. For example, “red” might stand for “women” and “blue” might stand for “men”. A diagonal line leaning left might be “safety”, and one leaning right might be “danger.” Someone using your cipher should be able to make sense of your beadwork and what statement you are trying to make with it.
Third, using graph paper and colored pencils, sketch out what your piece would look like, in order to express the statement you want to make. Have a friend use your cipher and see if they can “read” your piece of jewelry, as drawn on the graph paper.
BEADING CALISTHENICS #9: Bead Massage
Fill a large bowl with beads of any sort and size. Put your hands into the beads, and squeeze, let go, let the beads run over your hands, feel them in your hands, squeeze them in your hands.
Start to squeeze them in your hands and through your fingers starting with your pinkies, and working across your hand slowly until you get to your thumbs and forefingers, and squeeze them through these. Start again at your pinkies.
Put your palm flat onto the top surface of the bowl of beads. Push down. Then make a fist, and let the beads run through your fingers.
Repeat. Repeat again.
BEADING CALISTHENICS #10: Daisy Stitch Expansion
The challenge here is to see how many variations you can construct using the simple daisy chain stitch.
Simplest daisy chain: A stem and a flower with a center bead, then a stem and flower w/center, and so forth.
Start with a line of 5 beads.
Add 5 more beads to your thread. Make the 5th bead a different color. This is your “flower set”. The 5th bead is your center point.
Make a loop by going back through the first of these 5 beads in the set.
Add two more beads to the flower set, and bring the needle through 4th bead in that original set of 5.
So the daisy pattern goes: BEAD 1 to 2 to 3 to 4 to 5 (flower center point bead marked by X) back to 1 to 6 to 7 back to 4 and out.
Pull tight.
Add another line of 5 beads. Continue.
Try the daisy chain above without the stem, so that each flower set is interconnected by one bead — # 4 (which becomes #1 in the next flower). Make your 5th bead a different color.
Next, look at the modified daisy chain pattern below. Try another interconnected daisy pattern, where we would connect each subsequent flower by two beads, instead of one. Here we would make the first daisy’s 3 and 4 become the next daisy’s 1 and 6.
This would go: 1 to 2 to 3 to 4 to 5 (flower center) to 1 to 6 to 7 to 4 up through 3 and out. Then 3 becomes 1 in the next daisy link. The pattern continues in the second link as 1 to 2 to 3 to 4 to 5 (flower center) to 1 to 6 to 7 to 4 up through 3 and out. Then 3 becomes 1 again.
Try the same pattern, this time making the 2nd, 5th and 7th bead the same color, but different than the others.
Try again, making the 1st, 5th and 4th beads the same color, but different than the others.
I hope you found this article useful. Be sure to click the CLAP HANDS icon at the bottom of this article.
At several jewelry shows over the past 5 years, we have marveled at a continually evolving fashion trend towards reproduction vintage looks using new, more recently available materials.
It is important to understand, however, that, when purchasing fashion jewelry, there is more to consider than how a piece looks. You need to understand something about the materials used and the overall construction. Only in this way can you be sure that you are purchasing what we would call “collectible costume jewelry.”
The reproduction vintage looks are obvious — a reference to the stylish pieces of the 1930s, 40s, 50s and 60s, using modern materials and construction technologies. Great colors. Strong and soft colors. Lots of faceting and sparkle.
The use of new materials includes higher end acrylics, new metallic composites, specialized glass and Chinese crystal.
These green components, in the piece shown above, are made out of Chinese crystal, not plastic. To the naked eye, you might see a similar piece where the components are plastic, looking like but definitely not crystal. The eye can deceive itself. Simple test: click bead against a stiff surface or front teeth. If crystal or glass, you will hear a sharp click; if plastic, you will hear a dull click.
These new fashion pieces should be considered “collectable” costume jewelry. But, again, it is important to understand what you are buying. There are many lower quality copies — what we’d call “disposable jewelry” — you’ll find at discount stores and online. You want to be sure you are buying the quality we would call “collectible”. The price will reflect whether the jewelry is “collectible” or “disposable.”
So, You Want Your Fashion Jewelry To Be Made With…
* Glass, Crystal and/or Advanced Plastics
Typically, you will find a mix of materials within you piece. Materials you do not want would include enameled or colored ceramics or regular plastic or metalized plastic or plastic pearls.
* Advanced Plastics, if any components are plastic
Just like with things like wood or metal, there are many grades of quality among plastics. The differences between advanced plastics and regular plastics can be as widely divergent as between metals like gold and aluminum.
The higher end plastics, even when up close, look very similar to the gemstones or crystals they are meant to resemble. Jade plastic looks like real jade. Plastic opals look like real opal. And so forth.
For high end costume jewelry, the “point-hardness” of these advanced plastics, that is, how easily the material can be scratched, will be much higher, thus less easily scratched, than cheaper plastics.
When you see patterns or designs in regular plastic, these typically are decals applied to the surface, or just under a clear encasing at the surface. With advanced plastics, these patterns or designs flow throughout the entire piece.
Better metal composites and finishes, with more substance and realistic finishes
In these lines of jewelry, whether higher end or lower end, very little is real 100% metal these days. The chains are composites. The settings for the stones are composites.
In the metal-composite chains and settings used in the lower quality jewelry, at close inspection, you will find them to be cheap, flimsy and light-weight. The metal finishes flake or wear off quickly. Moreover, the metallic finish-colors are off the mark and look somewhat fake. For example, the actual color that may be representing gold, when compared to other quality pieces, may not look like gold at all. There may be rough spots that can get caught on clothing or scratch the skin.
In higher end pieces, manufacturers check their quality, to make sure there are no rough spots. The durability and the finishes hold up well over time. It is difficult to distinguish the composite from the actual metal it is imitating and approximating.
But always inspect your jewelry before you leave the store. When purchasing any piece of costume jewelry, you should feel all over the piece to be sure there are no rough spots
* Better set stones
Stones are typically glued in. If the setting does not have much surface area, the glue will not hold for very long.
In some pieces, the designs give the illusion of “prong-set” stones. In the lower end, the prongs have very sharp points. In the higher end, the prongs have smooth or balled-up tips.
Things To Do To Increase Longevity Of Your New Fashion Jewelry
After purchasing your new pieces of Fashion Jewelry, you will have the option to do two things to make them more durable and lasting:
If the piece has stones which have been glued in, and have open settings on the backs, apply some more glue to the backs of the settings, all along the edges. Use a glue like E6000 or Beacon 527. This will keep the stones from ever popping out. Reason: The glue manufacturers typically use dries hard, with no flexibility. If the pieces are accidentally dropped or hit against something, the shock can make the stone pop away from the hard glue.
By reinforcing them with the E6000 or Beacon 527, these bonds dry like rubber and act like a shock absorber. Thus the stones are less likely to pop off.
Necklace with stones set in settings with open backs
Open back on set stones in necklace
2. On all areas which have metal plated finishes and which will be touching the skin, apply two coats of clear nail polish to these surfaces. This will preserve the plated finishes for a very long time, yet doesn’t affect the shine or sheen of the metal underneath it.
NOTE: This is very generalized advice. Every person’s body oils and chemistry have different effects on the metal finishes. A person may be able to wear a piece of costume jewelry for months and years and it may not disintegrate on them; another person might wear it for a few months, and the metal finishes deteriorate
3. Unfortunately, much of this jewelry is strung on monofilament (clear fishing line). This stringing material dries out and cracks from exposure to ultraviolet light and heat — basically from sunshine.
If you have the change re-string these pieces on cable wire (which is a flexible, nylon coated stringing wire). Two brands of cable wire I especially recommend are Soft Flex and Flexrite. (Most other brands of cable wire have other issues which make them considerably less desirable to use in jewelry).
Cleaning
All jewelry has to be maintained and kept clean. Follow this simple advice for keeping your new jewelry pieces clean and sparkling.
Periodically, give your jewelry a quick bath. In a bowl, mix a very-little-amount of baby shampoo and cold water. Immerse the whole piece of jewelry in this bath, just long enough to loosen any dirt. Take it out.
Under cold water, rinse it off. Take a paper towel or cloth, and dry the piece off. NOTE: “Pat Dry” with the towel. Don’t “Rub”.
Then, you might take a hair dryer, setting it on the lowest setting, and keeping it 6–8” away from your piece, and blow dry. DON’T LET YOUR PIECES GET TOO HOT. An alternative strategy is to put your piece of jewelry in front of a small fan.
Dry both sides. Leave your piece out in the open air over night, to be sure there is no moisture trapped in closed crevices.
Always remember that the side laying against the towel or cloth may still be more damp than the side facing up. So, before storing your piece, check and be sure it is dry.
Store your piece flat in a zip lock plastic bag. Be sure to push the air out of bag before sealing bag. One simple way to do this is to insert a straw into the bag, and seal the top as close to the straw as you can get. Suck out the air, remove the straw, and finish sealing the zip-lock bag closed.
Then lay your bagged up piece on flat surface. You do not want your piece to be jumbled into a pile. You do not want to hang your jewelry on a stand. The weight of the beads will stretch out the stringing material.
Put your pieces in a cool, dry place out of sunlight. Never store two pieces on top of each other without something to separate them. Don’t pile up jewelry on top of other jewelry.
At a restaurant, if you drip gravy on your necklace, how do you clean it off? If it is something that has caked or dried on it, you may have to soak it in a solution of a very-little-amount of baby shampoo and cold water. Use a q-tip to clean away the spotted areas.
Your Reproduction Vintage Pieces Should Be Around For 30, 40, even 50 years
Your goal is to have your reproduction vintage to be around 30, 40, 50 years from now. It will keep its value. These pieces should not be disposable.
Go to your antique stores, ask to see their vintage jewelry from the 1930s, 40s to 60s, and look and see at the availability, quantity and cost of high-end costume jewelry. This will give you an idea of what you’re getting with your investment.
In these older pieces, some were made from Lucite or other high-end plastics of the time. And other pieces were copies crafted in regular plastic. Lucite is a glass-like acrylic resin. It has a resilience, a hardness, and a malleability which made it perfect for costume jewelry. Regular plastic lacks the clarity and sparkle, yellows with age, and scratches much more easily.
Your new higher-end fashion jewelry — better made, more attractive, more appealing — will increase in value over the decades instead of ending up in the trash.
QUESTION: What was your initiation into that phenomenon called “Bead Spill”?
This was mine..
“Yikes!” she screamed, shaking the ground, the store, the parking lot, in fact, the whole wide world, and I was, to everyone’s regret, caught in that earth-shattering scream. I was carefully balancing twelve trays of loose beads, moving them to their new shelves when, behind my back, I heard that cry for help, that screech of fear, that siren of bead hell.
I instinctively turned. It wasn’t something I thought out and planned rationally. It wasn’t something that arose intuitively from my gut. It was pure animal instinct. Stimulus-Response. Lust. Fear. Gluttony. Raw Emotion. I tried to juggle the twelve trays as they fled my nurturing hands and arms.
And I urgently called to the beads. Which had been in the trays. Which were now flying out of my hands.
As if to calm them, I said, “Beads, you won’t fall.” You won’t get hurt. You won’t leave the safety and sanctity of these trays. Good beads. Good, good beads.
And, for a brief moment, I thought I had saved all these little, little, beautiful, beautiful, very round, very round beads from a fate almost worse than death. The trays were juggling and for a moment, I believed they had started to re-stack themselves. They were home free. One back on top of another on top of another….
If it weren’t for that scream and that deep primal instinct ripping my fear and anxiety from the depths of my soul, and the fact that it is hard to pivot wearing sneakers on a hard wood floor, juggle twelve trays of ever-more terrified loose glass beads, and respond to a lady in distress, the situation would have come to a pleasant end.
But alas, that was not to be.
With some shame, some guilt, much surprise and yes, a lot of embarrassment, this was to be my grand initiation into the phenomenon commonly known as The Bead Spill. What a mess!
I know a lot of people have a fantasy where they are bathing in a tub of beads. It’s sensuous. Caressing. You’re at one with the God of the Beads.
This wasn’t like that. This was thousands of round objects falling and running and spreading every which way. Along the walls, behind the legs of chairs and tables, under people’s feet. In with the dust, the dog hairs, and previously spilled beads or beads that had mysteriously escaped their trays.
She should have whispered, “Shoo Fly!”
Not screamed “Yikes!”.
YIKES!
I’ve never carried twelve trays of loose beads at once again.
Bead spills are not rare occurrences. In fact, some people spill beads like other people drink water.
There are the people who like to carry big purses in small places. These people are prone to sudden turns and distractions. Guaranteed spills!
These people need to understand the interrelationships between space, lack of space and time. Simple physics. Bead spills have physics, and I’m sure could easily be considered a science. Like, if you drop a bead, in what direction does it go? How far does it go? How fast does it travel? Do red beads behave similarly as blue beads? If someone dropped you from the top of a building, would you end up going in the same direction, and as far? Probably not.
So what is it about beads that makes things happen like dropping them off to the right, and finding them off to the left? Bead spills do not have the same physics as pick-up-sticks. That is for sure. They have laws of gravity and mass and energy all of their own.
Then there are the people who are torn between their love of beads and their love for their pets. It doesn’t matter if it’s a cat, a dog, a parrot or a fish. Beads spill. It could be a monkey or a ferret or even a Rogue Elephant. Beads spill. Sometimes it’s a dog AND a cat or a parrot AND a ferret. Beads spill.
People need to understand that animals understand the situation. Animals do not want to share their love — especially with beads. Beads are beautiful, but don’t need water or food. Beads are comforting to touch, but don’t need grooming. Beads are glorious in their splendor, but will not bite. It should come, then, as no surprise, that animals, when near any pile of beads, will instinctively have the urge to make them spill in ways you never thought of. Animals spill beads, but for more selfish reasons than humans.
The strategies of animals are legend, and have been written down in a secret book — Bead Spill Techniques for Dogs and Cats. You’ve seen these techniques in practice. Your cat angling for attention, moves toward you to sit in your lap — of course, moves toward you over your tray of beads. Your dog taking the pose to beg for treats while you’re moving your tray of beads from one end of the table to the other. Your pet actually eating those particular beads you’re working with right now. You catch them, but suddenly their tail goes swoof, and you are down on your hands and knees again picking up millions and millions of tiny, very small, eye-straining beads.
These animal-based-skills are very practiced and endless. Animals do not like playing second fiddle to beads. And if the pile of beads has been organized to accommodate the needs of a particular project, well, so much the better. They score more bead spill points.
Picking up spilled beads is a familiar routine. There’s nothing like dropping 14KT gold delica seed beads onto a gold shag carpet, getting on your hands and knees, and delving into product reclamation. Picking up bead spills works better when set to jazzercise music, but no music will suffice as well. Some people get crafty, and stretch a nylon stocking across the intake collection valve of a vacuum cleaner. Other people, however, are just plain tired of picking up beads. They let them stay where they fall. On the floors. In the couches. In clothing, in boxes, in food, in pots and pans.
New beaders seem especially concerned and anal-compulsive about spilled beads. They spot an errant bead, and rush to pick it up and place it in a container somewhere. Seasoned beaders have learned to live with such minor nuisances as combing beads out of their hair.
I again find myself writing a set of instructions for a piece to appear in a bead magazine later this year. It can be such a frustrating process for ME — the writer. And that’s because I don’t want it to be a frustrating process for anyone else. This is not easy to do.
Because this is for a magazine, I have to considerably stream-line my instructions and diagrams. Often that means assuming the reader has some experience and understanding with certain techniques or certain materials. Sometimes this means leaving out some things which are thought to be “obvious”. And it means leaving out a lot of the “Why.”
With this particular project, I don’t have space to explain why I chose FireLine rather than regular beading thread, though this was a critical choice to the success of the piece. I don’t have space to explain why I use peanut beads the way I do, though this too is critical for success. You could not substitute another bead for the peanut beads because this particular shape plays an important structural role in the piece. But no one reading the instructions will know this.
There is no room allowed for explaining why I changed the right angle weave thread-path from the traditional approach. And I don’t have any space to detail all the inspirational factors and color theory choices which influenced my design. If someone knew these, they probably could do more than merely re-make my piece. They could make my piece their own.
Diagrams are often critical for understanding how to proceed. Hopefully not in this case, but with other magazine articles, the editors have taken five or more separate diagrams and combined them into one. Try following the thread paths and you get vertigo. You get a searing headache. You get Jackson Pollock’s version of bead weaving on a page.
It is difficult enough to write instructions without them getting edited down to 2 or 3 magazine pages.
But for the instructions I give to my students in my classes, I no longer worry about page-length. I use some of the narrative to “think aloud” so my students can see the selection criteria I use and the choices I make. I present each step three ways: (1) written out, (2) photograph of piece at that stage, and (3) a diagram.
Some pointers I’ve learned for writing, at least, better instructions:
1) People learn in different ways. Some can read the text. Some need to look at a series of progressive images. Others are great at following diagrams. You need to be good at all three.
2) Include pictures of critical points in the project’s progress. Also include a picture of the finished piece.
3) Know how to begin the process. Include more details, images and diagrams related to beginning the process.
4) Write the steps logically and in order.
5) Keep each Step “short and simple”, and manageable.
6) Do not over-assume about your reader’s ability.
7) More problems occur for the reader when moving from one step to the next step, than accomplishing each particular step itself.
8) Provide encouragement along the way.
9) Show milestones and ways for people to track their progress.
10) Anticipate problems that might occur, or where your reader might get lost.
11) Pretest your instructions.
12) Clearly list all materials and tools needed. If some materials might be difficult or too pricey for someone to acquire, list substitutes.
13) If there are more than 7–10 steps to do, then categorize and group the steps into sets that are no longer than 7–10 steps.
14) Provide informational warnings so that people will be able to figure out if they have done something incorrectly or have started down the wrong track.
Instructions are often some of the worst-written documents you can find. Like me, you have probably had many infuriating experiences with badly written instructions.
By the point in your career where you become comfortable creating your own projects, and writing your own instructions, you probably have a lot of what is called “assumptive knowledge.” These are the kinds of things you do over and over again, to the point where you no longer think about them. They don’t end up getting included in your instructions because of this phenomenon. But these “assumptive knowledge” steps are often the key things novice jewelry makers trip up on. They need to be spelled out.
The piece pictured was supposed to be a straight line of beadwork, to be connected into a consistently-sized tube. Our local bead group was making this piece, and 10 of 11 of us did it wrong. All our tubes started to look snake-like and crooked. These instructions jumped from Step 1 to Step 4, back to Step 2, then over to Step 9. They were full of contingencies — do Step 1 if such and such is happening, but Step 5 if something else is happening. Almost each step had its own set of footnotes. There were 25 Steps and only 2 diagrams summarizing all the steps, each illustrating about 15 separate thread paths.
QUESTION: At what point did you realize you were addicted to beads?
People are always saying how addicting beads are. They express surprise that the pull of beads is so strong. They can’t stop buying and accumulating beads. They can’t go anywhere without stopping at the local bead store for a bead fix. They find themselves intentionally fooling or deceiving themselves about how many beads they actually have, or how much money they have spent on them.
Yes, beads are very addicting. Even though your drawers are full, you never have enough.
We asked our students, customers and colleagues to complete this sentence:
I never knew how addicting this was until….
…My car automatically turned into the parking lot in front of the bead store.
…I was laying in bed looking at my ceiling tiles and realized they were done in a “Peyote” stitch pattern!
…I made my beaded fish in progress into a screen-saver. It is all about the process, when will I finish? who cares… I have this beautiful thing to handle and see as I work. Such a pleasure!
… I began hiding a stash of money to buy beads: “It’s not like I’m sleeping around….I’m just buying beads.”
… I went shopping for clothes, but came back with only one bag — a bag of mixed beads.
…. I used 3 checks to pay for my order — one from a joint account with my husband, a second from an account in my name only, and a 3rd from my son’s account — luckily I had his checkbook in my purse. So now, my husband will think that I’m only spending a little bit, I can fool myself, and my son doesn’t care one way or the other.
… I converted my dining room to a bead room, and made my family eat in the den on TV trays.
… I found that despite my long and mostly constant love of fabric — I am after all a lifetime seamstress, having been comforted by the smell and color of fabric stores and the chush, chush, chushing of my mom’s Kenmore machine since first memories — could not resist the magnetic pull into the unknown. There, standing at the front door of my local craft store with nothing on my mind or agenda but 2 yards of multi-colored backing fabric for a client’s project, I saw the front of my wobbly plastic basket steering to the Northwest (Fabric is definitely to the Southwest) with such abandon that the lovely glass shelves in the center front of the store were in danger!
…I turned to beads for solace and a quiet focus. I have been going through a very hard time trying to keep a very ailing relationship together and when I could have been stressed out and worrying, I spent the time quietly beading. When I just wanted to go to bed and stay there for days, I was able to sit in my living room with my son and do bead work. To him, I was being with him and calm; to me, I was hiding in my beadwork and being near him. Beads have been my refuge. I have even read where hand needle work is a stress reliever, I am a living testament to that!
…I saw seed beads in what I scooped out of my cat box! I took my bead work and worked in the car on vacation. Every time I vacuum the sound of beads is heard. It seems every purse I clean out has some beads in it. I find beads on the back porch, when I sweep. It is a really tough decision, when I come to the off ramp which leads to the bead store and I really need to get home! I have more beads than projects for them!
…I gave up a Shoe Addiction for this…it better be worth it!
Today, it is imperative that that any jewelry designer who wants to sell their pieces must have an online presence. This could be as simple as a listing in a online directory like Yelp. You might have a Facebook page or Instagram account or a Pinterest board. You might have a website that functions like a billboard. Or you may have a website with its own commercial shopping cart.
Many jewelry designers, however, choose to place their business on one of the many craft marketplaces online. Etsy, perhaps, is the most widely known. Like anything else, this approach has some pros and some cons. Below I list some things to think about before choosing one or more sites. It is a smart move, however, to be located on more than one marketplace site.
I have found that many people get frustrated with these sites, in that sales can be minimal, or the numbers of people they are competing with seems daunting. But I have found these same people not doing all the necessary “good business” tasks, such as some intensive and persistent marketing of their wares, and smart photo and text detail for their pieces.
Question: WHAT KINDS OF EXPERIENCES HAVE YOU HAD, and WHAT KINDS OF TIPS CAN YOU OFFER?
Here’s some of the things I have found.
First, there are many, many online marketplaces to choose from. Some let you set up your own website, and others show your merchandise as part of a larger marketplace. Each has pros and cons. Perhaps one lesson is: “Don’t put all your eggs in one basket.”
The PROS to look for with any site: – low commission on sales – good traffic – ease of setting up your shop – having a lot of control over how your shop looks; how customizable it is – no monthly fees – web host does a lot of promotion – site has a good search function – site has good statistics, and lets you easily track traffic and what has sold, at what price point, and when, for both of your specific merchandise, as well as for all merchants with similar merchandise
The CONS to look for with any site: – high commissions and/or fees – when site is too big, may be difficult to get noticed – host limits how you list and present your items – host restricts your contact with your customers
Other types of questions to ask:
– Does site handle the billing and payments for you? – What kind of marketing does the site do? – Is it relatively easy to set up your site and keep it updated? – Are there any limitations on the numbers of items you might list at one time? – Are there any limitations on the number or size of photos you can include on your site? – How and where will your items appear in a search listing on the host’s site?
NOTE: Many sites put you at the front of the line for the first 30 days you have registered with them. Then they apply their regular ranking and rating algorithm, which, when you are new, puts you toward the bottom of the listing.
– What payment methods/options are allowed? – Does the site restrict items to “Handmade” only, and how is “Handmade” defined? You do not want to compete with cheap, imported, machine made jewelry. – How easy is it to contact customer service? Do they provide a lot of easy-to-follow tutorials for setting up and managing your site?
Different types of fees that might be assessed: 1. Listing fee 2. Sales commissions, usually as a percent of sale 3. Renewal fees (when listings are time limited) 4. Monthly site maintenance fees 5. Share of advertising fees 6. An extra shipping or postage charge to use when they handle your shipping, or enable you to purchase and print out a shipping label on the website
Some Tips and Advice:
(1) Your items should be different enough from others to set you apart, and get you remembered (2) If your items are similar to others, you might consider competing on price (3) Do NOT depend on the host to promote your site; you must actively — that means, almost every day — do things to promote your site. (4) Don’t just list your items and let them sit there (5) Excellent photos are a must (6) Treat your online shop as a business, not a hobby (7) Categorize and label your jewelry and jewelry lines; picture the words someone might type into a search bar in order to find this jewelry, and use those as key words in your labeling (8) Let your passion shine
Many, many people you will be competing with do not necessarily have good business sense, particularly when it comes to pricing their jewelry. People, in general, tend to underprice their pieces. They go out of business quickly. But while they’re in business, you are competing with them, and often you find it hard to compete on price.
This is a given. That means you have to spend more energy on marketing your competitive advantages, in order to justify the prices you need to charge, in order to stay in business. Some of this will come down to better presentation — more facts and great detailed images about your jewelry, and more details about the how your jewelry will benefit your customer. Better presentation equals more trust; more trust should translate into more sales. Some more competitive advantages: your jewelry is better made; it uses better materials; your line of jewelry is broader; you have better customer care policies; your style is more unique; your jewelry supports as “cause”.
And many, many more people you will be competing with have very good business sense. There are over 6 million items of jewelry on sale on Etsy at any one time — many by sharp, savvy artists. To get seen, heard and responded to takes emphasizing your competitive advantages, as well as persistent, broadly targeted marketing.
While I occasionally use armatures in my beadwork projects, I have a psychological aversion to them as somehow contaminating my beadwork, making it less pure, taking the sacred and making it profane. I think what I viscerally react to is how often, the way people use the armatures, makes the piece look more crafty or less finished.
Nevertheless, when you need your beadwork to hold a shape, what other things can you resort to?
What kinds of experiences do you have with armatures? What kinds of materials have you used, and which to you like to use best?
How do you marry the beadwork with the armature? Camouflage?
About Armature
Armature is used to create and preserve shape within a piece. It is a type of “skeleton” or internal structure.
Your goals, as a bead artist and jewelry designer, are to select an appropriate material and size of the armature, so that it does not compete or detract from your finished piece. You do not want your piece to look or feel “crafty.” You want it to look and feel artistic and well-designed. You do not want your piece to feel weak, or somehow insufficient, given the wearer’s and the viewer’s expectations.
You do not want the essence of the armature’s materials in any way to work against the essence of the material(s) your beads are made of. Usually, but not always, this means hiding the armature inside the piece.
In making your selection of armature, you need to understand the design-relationships between those sections of the piece requiring armature, and why they require it.
One reason is to create or preserve a Shape. In Autumn’s End (pictured), Kathleen Lynam wanted to turn the somewhat soft, floppy and flimsy Ndebele tube into a solid, 3-dimensional tube which maintained a consistence 3-D s cylindrical shape.
A second reason to use an armature is to Pose. In Autumn’s End, she wanted the Ndebele tube to make a circle around a person’s wrist, and, once there, stay in form and place. Thus, our armature needs some degree of flexibility, but at the same time, it must be able to hold the pose, as well.
A third reason has to do with Action. She was concerned with Action, when a part of her piece had to be animated in some way. This is somewhat important with Autumn’s End, in that our wearer will have to pull open and push closed on the wristlet, to get it on and off, and to position it comfortably on the wrist..
There are many types of materials bead artists and jewelry designers use to make armatures. Sometimes this involves stuffing with cotton or fiber fill. It might involve using tin foil. Othertimes, we might use a toothpick, dowel, straw, tubing, wire, or metal rod. We can also create the armature using glue or floor wax to create a solid or stiffened structure. We can also create our armature from sculpted clay, like polymer clay or metal clay or plastic wood.
Given the shape and pose requirements of Autumn’s End, her choices came down to plastic aquarium tubing, a thick-gauge wire, or plumber’s solder. The tubing would not have met her “pose” and “action” requirements anywhere near as well as the solder does. Nor would a thick gauge wire.
In this piece, she used the idea of “Armature” in a secondary way. She painted the flowers and leaves with acrylic floor wax. This stiffened the threads — what would be considered the canvas of the piece — so that these threads, too, turned into a type of armature preserving “shape” and “pose”.
Sometimes, jewelry must conform to a type of numerology — odds or evens or multiples of some number, like the number 3 — related to the numbers of beads or the numbers of strands or the numbers of drops.
Do you have a personal preference for ODDS or EVENS?
Such as,
— The number of beads on a strand?
— The number of strands in a necklace or bracelet?
— Or the number of bangle bracelets you wear on one arm?
— Or the number of beads you use to begin a peyote stitch project?
— Or the number of drops you include in your piece, or dangles you include in an earring?
— Or the number of colors or elements repeated in a pattern or jewelry segment?
— Or the number of fringes on an earring?
Is this ODDS/EVENS preference consistent all the time?
Or is it situational? That is, in certain circumstances you prefer ODDS, and in others, EVENS.
Is there any experiential, aesthetic or hypothetical basis for your preferences?
If you have a preference for one over the other, has does that affect your design process?
Do you get more compliments, when you are wearing one- or three-strand necklaces, than when you are wearing a two-strand or four-strand necklace?
Historically in Europe, it was considered bad luck and inappropriate to have an EVEN number of strands in a necklace. If you had a very long necklace that you would occasionally wrap around your neck multiple times, then it had to be long enough so that you could wrap it around an ODD number of times — such as tripled, never doubled. Even today, in etiquette books, such as “Miss Manners”, the rule is “Always Wear Odd Numbers of Strands of Pearls.” No explanation is given.
Russians even believe that you should never give an even number of flowers to your wife or girlfriend!
In ancient Babylon, even numbers were believed to be unlucky and somewhat demonic. To them, something should never be repeated an even number of times.
An ODD number of beads lets you define a specific center and focus.
Cognitively we prefer things with clear pointers and with clear symmetry.
But we also like balance and harmony and things to be distributed EVENLY.
Where do you come down in this ODDS vs. EVENS debate?