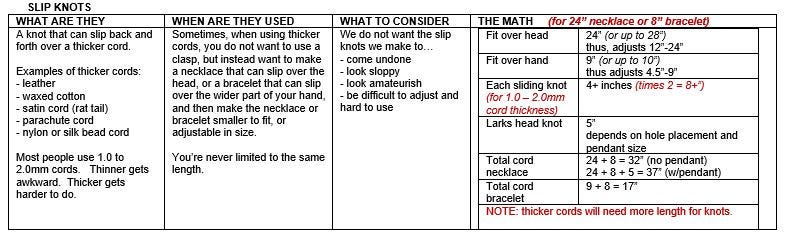
You want to use round thong elastic string. You do NOT want to use the flat, elastic floss. It shreads. The cloth covered elastic cord is not a great choice. It’s meant to be sewn into fabric, like for a waste-band, but not to be exposed as in jewelry.
2. Grab each end. Stretch it 25 times, by pulling on it firmly, but NOT with all your strength. Yes, that number is 25. Get your daily exercise in.
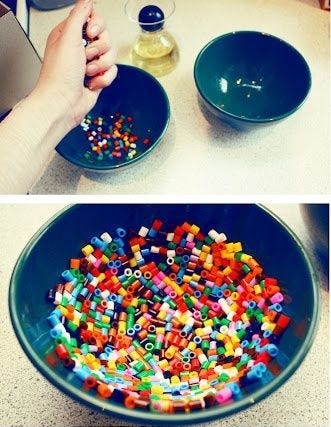
3. String on your beads; make sure it’s the correct size for your wrist. Avoid very heavy beads.
NOTE: If a CENTER-POINT or DROP, make this center of bracelet, opposite side of knot.
NOTE: If creating a pattern, remember that both ends of bracelet will be brought back together.
4. Tie an overhand knot and pull tight to pull your beads together.
Overhand knot: One end goes over the other, then back through the loop.
5. Tie a surgeon’s knot to secure the knot. We do this in 2 steps:
Surgeons’ knot: Similar to overhand knot, but you go over the other side twice. So, one end goes over the other, then over the other again, and then back through the loop. This prevents you from tying a knot which will slip.
a. As you are pulling the knot together, you want to put a drop of glue on the inside of the knot (any glue except superglue).
b. Pull the knot tight. Put another drop of glue on the outside of the knot (any glue except superglue). In 10 minutes, wipe off excess glue.Allow the glue to dry (about 20 minutes).
6. Now you want to finish the piece off.
a. If you can thread one of the tails through the bead next to the knot, do so. Pull the tail through. Put a drop of glue (any glue except superglue) on the knot. Use the tail to pull the knot into the hole of the bead next to it, and let it dry inside the hole (about 20 minutes). In 10 minutes, wipe off excess glue.After it dries, trim the tails.
b. If you cannot thread one of the tails through the bead next to the knot, but you can pull the knot into that hole, follow these steps. Put a drop of glue (any glue except superglue) on the knot. Use the elastic string between two beads on your bracelet to pull the knot into the hole. Let it dry inside the hole (about 20 minutes). In 10 minutes, wipe off excess glue.After it dries, trim the tails.
c. If you cannot even get the knot into the hole of the bead next to it, then put a drop of glue on the knot (any glue except superglue), let it dry 20 minutes, then, after it dries, cut both tails close to but not all the way to the knot. If you don’t like the look of the knot, put a drop of glue on the knot, and then you can slide a crimp cover over it. In 10 minutes, wipe off excess glue.
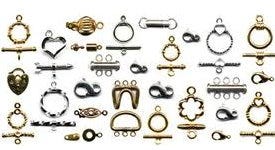
So many little parts. So many little things. Are you supposed to know what to do with them all? Do you really need that many? I never learned how to use all these things. What are they for?
I thought, when I started, there was just one kind of clasp. Or maybe two. I didn’t even know how to use these things.
Too many choices.
When I started stringing beads, I always used my favorite clasp at the time — the lobster claw. I put a lobster claw on everything, and any old lobster claw I could find, no matter what it was made of. The guy-proof special. The student-proof special. The special that always worked and that everyone knew how to operate.
The tricky part, though, was what to put on the other side. It needed a ring, but what kind of ring? If you used a jump ring, the split in it was often difficult to adjust so that there was no gap. Even if you adjusted it so there was no gap, after wearing your necklace a few times, suddenly there was a gap. The string pulled through. Or the lobster claw pulled through. The top of the lobster claw broke or bent out easily. You couldn’t always manipulate and operate the thing. That mechanical mechanism inside was designed for people with very small hands, long and narrow fingers and even longer finger nails.
I never liked the barrel clasps — another very guy-proof special. The threads always stripped on me. Or they would unscrew themselves, as my body moved my necklace, and the necklace moved the clasp. Some had eye-lets, and these would always break — again from moving back and forth, and up and down, and back and forth and up and down. Metal breaks when you bend it back and forth. These broke.
At one point, I graduated to toggle clasps. These were and are considered the best clasps. They are considered the easiest to get on and off and the most secure. But I never really liked them personally because they were always out of proportion to my necklace and bracelet designs. Always too big. Always un-sexy. And the less expensive ones broke. Virtually all toggles are cast, and cast pieces break when confronted with excess force. They crumble and break. Especially the cheaper ones.
Most people, however, buy either Toggle Clasps or Lobster Claws.
Over the years, I discovered that there are many other types of clasps, and each has pros and cons in terms of usability and durability. My personal favorites are variations on the Hook & Eye Clasp. These don’t compete with my beadwork. You can always find something that coordinates with the beads, so that the viewer is not impeded from cognitively “making that complete circle.” That is, the clasp feels organically a part of the piece. They pass the “Guy Test” — guys can figure out how to open and close them. But these are my choices I make for myself. Everyone needs to decide which types of clasps they prefer and under what circumstances. There really isn’t a perfect clasp for every situation.
And that’s an important lesson: There isn’t a perfect clasp for every situation.
For most clasps, you usually attach your bead work to separate rings on each end (preferably a soldered ring, if this will work), and then attach the rings to either side of the clasp.
In a similar way, if using a cable wire, you don’t want to push your crimp bead all the way up to the clasp. You want to allow a small loop in the cable wire between the crimp and the clasp. This allows what is called support — things which enable your pieces to move, drape and flow.
You want to build in support, jointedness and movement. You want the clasp to be able to rest on the neck (or the wrist), and not move when the wearer moves. You want the beadwork, on the other hand, to be able to move freely and independently of the clasp, as the wearer moves. If there is any resistance to movement in your piece, if things are too stiff, if there are too many stresses and strains, everything breaks — the clasp breaks, the string breaks, the beads break. If you can’t build in sufficient support systems into your piece, you might as well have a mannequin for a client.
Another lesson: The best clasps are ones that have no moving parts.
A toggle has no moving parts. An S-clasp has no moving parts.
When we talk about moving parts, in jewelry design, there are the obvious mechanical mechanisms, like in a spring ring or lobster claw.
Then the more subtle things in jewelry design we call moving parts. Whenever we have a metal piece that must bend back and force when used, we consider this a moving part, because through movement, it can break. For example, a box clasp has 2 moving parts. It has the tongue which gets pushed in and out. And it has a mechanism inside the box which holds the tongue in place, and gets pushed in and out.
Now, it doesn’t mean you don’t use clasps with moving parts. It just means, that if your clasp has moving parts, you need to do addition design things, such as adding more support components, to compensate for any potential vulnerabilities.
Some more clasps:
SPRING RING
This is the cheapest and worst clasp. I really hate these. Its mechanical mechanism breaks easily. Too easily. But, on the other hand, it is also sleek and dainty, and there are few other clasps which are. If you are making a dainty piece, and you know it will only be worn occasionally, you might get away with using this clasp. Otherwise, if you’ve bought a piece with a spring ring clasp, you’ll probably want to replace it before it breaks.
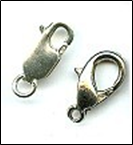
LOBSTER CLAW
This is a very popular style, but it has some weak design elements. The lip (top curved part) is not designed to handle excess force that comes from tugging or pulling or getting your jewelry caught on something. Its mechanical mechanism breaks easily. Often the levers are difficult to maneuver. However, this clasp does pass the guy test. Guys can figure out how to open and close it.
It’s relatively inexpensive. There are many styles of lobster claws, so you usually can always find something which can work organically with the design and flow of your piece. These clasps are OK for inexpensive to moderate pieces. They are inappropriate for more expensive pieces of jewelry, say over $200.00. When I see lobster claws on expensive pieces of jewelry, this is usually a sign that there are other construction flaws in the piece.
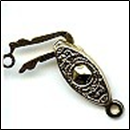
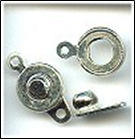
PEARL or SAFETY CLASP
These are clasps that if the hook comes undone, something (ie, a bar inside the other piece of the clasp) catches it before the necklace or bracelet falls off. Very popular clasp, and a traditional element in many pieces, such as a pearl-knotted necklace or a Victorian style necklace. In fact, you would be hard-pressed to use an alternative clasp in a pearl-knotted necklace or vintage piece, because people expect to see this type, or similar type of clasp, such as a filigree box clasp. Not a great design, however. The hook element must be bent back and forth many times as it is taken in and out of the clasp. It’s a moving part. This causes it to break sooner than later.
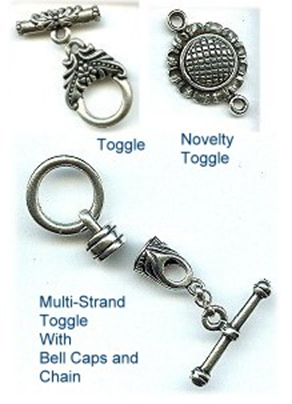
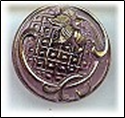
TOGGLE and BUTTON CLASPS
If the Toggle Clasp visually fits with your design, this is considered the best clasp. It is considered the easiest to get on and off, and the most secure. Almost every toggle has been cast, and the ring and the bar are very tightly engineered to work with each other. NEVER mix and match rings and bars. Always use these as a set.
The main drawback, for me, of the toggle clasp, is that they tend to look bulky, often presenting a visual issue for me. They do make novelty toggles, such as the sunflower one pictured above, or a leaf and stem or flower and stem or butterfly and butterfly wing. These work. Also, in some simpler designs, the toggle clasp becomes that visual center — the natural focal point we like to design in to our pieces .
Another major thing to keep in mind with toggle clasps is that the last half inch or so of beads on the side of the piece connected to the bar, must be small enough to slip the width of the bar PLUS the width of these beads far enough through the ring part of the toggle, that you can seat the bar correctly, like in a saddle. When using larger beads in your piece, you might need to begin and end your strand with smaller beads.
For multiple strand pieces, you would typically add a string of jump rings or a piece of chain to the bar side, and stagger each strand up the chain. Say you have a 3-strand necklace. You could add a 3-link piece of chain to the bar side. You would attach one strand to the top link; the second strand to the middle link; and the third strand to the bottom link. In this way, when you pull the bar through the ring, you are only pulling 1 thickness of beads plus the bar through the hole — not three multiple thicknesses of beads. You do not need to do this on the ring side, but many people do, for symmetry purposes.
Most people use toggles. What a lot of people don’t know is that you should not mix and match your rings and bars. Toggles should always be used as a set. When you go into a store to buy these, if they sell them mix-and-match, you don’t want to buy there. In a large store like ours, if you’re putting a bunch of toggles on a tray, be sure you know what goes with what. When they get bagged up at the register, be sure there’s no confusion about what goes with what. And store them so that there is no confusion about what goes with what.
Button
You can make your own toggle-style clasps, using buttons or large beads. You have so many more colors, looks, textures to play with, when using buttons and beads, rather than the pre-made clasps you would find in the store. One side of your piece is a button and the other side is a loop. The button can be a real button, or a large bead. The great thing about button clasps is that you can incorporate the clasp as part of the design of the piece. You can match colors and beads that blend right in with the piece itself.
In a bead strung piece, you would tie off a button or large bead at one end, string your beads on, and make a loop with your stringing material at the other end. You would come back through about 2–3” through the beads in your piece, to anchor off your stringing material. To make this loop attractive, people cover it with seed beads, like size 11/0, 8/0 or 15/0 seed beads. Some designers use 15/0 or 13/0 sized charlottes. Charlottes are seed beads with one facet on one side of each bead. Using charlottes ups the visual perception of the value of the piece, though not the cost of doing so.
For bead-woven bracelets, the button clasp (a form of a toggle) sometimes works better from a design standpoint.
Making the button clasp:
The hardest part in making a button clasp is the button hole. If the hole is too small, it’s hard to get the button or bead in and out. If the hole is too large, the button or bead can slide out and the piece will be lost.
To make the button hole (loop), attach a thread to the piece, preferably a little further back from the end of the piece. Where exactly you locate the button loop depends on your design; however, in most pieces, stepping back from the edge ends up with a better looking and more durable product.
After anchoring the thread to the piece where you want it, now string several small beads — usually size 11/0 or size 8/0 seed beads — until you have a line of beads when looped, will fit snugly over your button or bead. Some designers like to use size 13/0 charlottes to cover the loop. This makes the loop feel like it’s an attractive metal piece.
Bring the needle and thread around and anchor the loop to the piece.
Tie it. Now bring your needle and thread back through the loop, one or more additional times (until it’s getting very tight inside the bead), reinforcing the bead hole.
Now tie it off, and weave the loop end into the piece, hiding the end of the thread.
Now, take your bead or button, and attach it to the other end of your bracelet. Ideally, you want to step the bead or button a bit back from the edge. When choosing a bead, it must be large enough for the loop to be secured underneath it.
Do not attach a bead or button flush to the surface of the piece. Allow enough space for the loop to clasp underneath it. This is easily achieved by placing a size 11/0 or 8/0 seed bead between your piece and the bead or button. Or make a tight loop of beads to connect the surface of the piece through the button shank. When making this kind of loop, usually size 15/0 seed beads work best.
If the bead is elongated, you must anchor it at the center, not through either end. Otherwise, there would be no place for the loop to clasp beneath the bead.
There is not a sure-fire way to measure a loop to fit perfectly over a button or bead. So don’t beat yourself up if you don’t get it right the first time or two. As a general rule of thumb, the loop should be a bit more than twice the diameter of the button or bead. Keep practicing and you will get to a point where it will work by instinct.
So, to repeat, you would preferably locate the loop and the button a little bit back from each edge of the piece. When you start at the edge, this is the weakest part of the piece, and the pulls and tugs on the clasp will start to tear at this edge. Also, if you start at each edge, when you put the loop over the button, you’ll have an area of skin showing. Hence, the viewer won’t be able to make a circle around the piece. When you set both the loop and button back a ways from the edge, when you put the loop over the button, it draws the two edges together. This makes it easier for the viewer to make that complete circle.
If we look at the button from the side of the piece, you would want to put an 11/0 or 8/0 seed bead between the button and the surface of the piece. This accomplishes two things. First, when the loop goes over the button, it will rub on a bead, not the threads. This prevents these threads from fraying. It also turns out that when the loop goes over the button and rests on a bead, it sits it better, thus reducing the amount of back and forth movement that occurs as the bracelet is worn on the wrist.
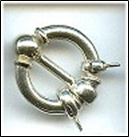
S-CLASPS
From a functional standpoint, this is a great necklace clasp. From a usability standpoint, however, it’s a disaster. Most people don’t know how to use these properly. When you don’t use them properly, they don’t function as well.
The simple S-Clasp Assembly consists of an S-shaped piece and 2 soldered rings (one on each side). These rings are your “support system” or “jointedness”. They allow the S-clasp to maintain its position behind the neck, and the beadwork to move freely, as the wearer moves.
Using these: First you do your beadwork. Then you tie off each end to the soldered rings. Then you position each hook-arm relative to the spine. On one side of the “S”, you should position the hook-arm so the O-ring cannot slide out, as if the arm had been soldered to the spine. On the other side of the “S”, you need to position the hook-arm so that the O-ring can slide out, but only with some resistance by the hook.
Most people are clueless about the need to position the hook-arms, and how you do it. So they end up bending each arm back and forth, and they break off, or they slip off the soldered rings. If the arms are not positioned correctly, the S-clasp doesn’t rest securely behind the neck, or allow the beadwork to move freely as the person moves.
S-clasps come in a wide range of styles and prices. You can always find something that allows the viewer to make the complete circle.
HOOK & EYE CLASPS
This is a very good clasp for necklaces, but not as functionally good as the toggle or s-clasps. This is the type of clasp that I prefer to use on my pieces. It is very user friendly. I can always find a design that allows that organic fit. These don’t compete with my beadwork as “art.”
The hook and eye clasp consists of two parts — a hook and a ring or figure 8. If you can position the hook so that the O-ring can slide out, but only with some resistance by the hook, you can use this both on bracelets and necklaces. If the hook-arm is a cast piece and will not move, they tend to only work with necklaces.
Always assume your wearer is right handed. When the wearer reaches back behind her neck for the hook, she should be grabbing this with her right hand.
These come in many styles and price points. You can always find something that will allow your viewer to make that complete circle.
People can usually and easily figure out how to use these. They don’t compete with the artistry of your beadwork.
They have a slight functional flaw in that the hook can work itself free from the ring, when the piece is worn. If you can do this with your piece, you want the hook to face up, (not down).
A choker clasp is special kind of hook and eye clasp. These are usually for multiple strand pieces. The “ring” side is a length of chain, so that the hook can attach in more than one place. This makes the length adjustable.
I find it useful to build in some length-adjustability into all my pieces. This is easy to do with hook and eye clasps by adding a short piece of chain on one side.
MAGNETIC CLASPS
People in general hate clasps, so they love these. These work well in necklaces. While people love these for bracelets, functionally they pose some issues.
To open and close a magnetic clasp, you never pull on them. This weakens the settings for the magnets, and the magnets eventually pop out. Instead, slide the two sides apart, or crack them open like a nut, or as if one side was on a hinge. Never pull.
You can see on a bracelet how the wearer might be tempted to pull them open. The bracelet wearer may also pull on the beadwork itself to open the clasp, thus weakening the bracelet.
Always do some extra reinforcement on the two ends of your pieces where they attach to the clasp.
Magnets come in different strengths, but are not labeled as such. You need to test the strength before you use them.
I suggest adding a safety chain to a bracelet. We hear over and over again stories of how people lost their bracelets to the ravages of an all-too-metallic environment. They’ve lost them to the refrigerator door. One woman lost hers to a car door on her visit to the mall. Luckily for her, when she returned to her car — There it was!
SNAP CLASPS
Snap clasps are like the snaps you have on a blouse or pair of pants. These are usually used in bead woven pieces, but they can be used on strung pieces. They are generally easy to get open and closed. They become part of the piece and its design itself, thus not competing with the artistry of the bead weaving. These clasps do wear out, as they are repeatedly opened and closed. There are many manufacturers and brands of these clasps, and variations in styles. The best ones are made of brass or steel, and have the “male” part be as square-ish as possible. If the base is too narrow, the ring slips off easily.
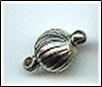
BARREL CLASPS AND SCREW CLASPS
Barrel clasps are very popular with college age and early 20’s. Never use a sterling silver barrel clasp. As the silver softens at body temperature, the threads soften and strip. Barrel clasps have a weak design element on each end where the clasp is to be connected to the ends of the piece. Most barrel clasps use a type of eye pin/head pin, and these break as they get bent back and forth from movement. So, not a good idea to attach your beadwork directly to the clasp. With barrel clasps, you should always use another intervening ring — a jump ring, split ring or soldered ring — to attach your beadwork to the clasp.
For most types of clasps and other jewelry findings, though not all, you need to use an intervening ring — a soldered ring, a split ring or a jump ring . You attach your beadwork to the ring and the ring to the clasp or finding. Only in this way will you get enough support and jointedness.
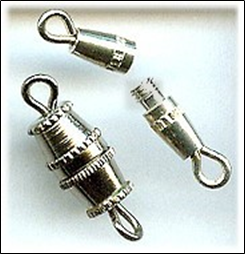
Screw claspstend to look like a bead with a loop on either side.
Usually, one side, sometimes both sides, screw open. These are very attractive and work very well to maintain the organic flow of your piece — making that complete circle. However, the threads strip easily, and it’s difficult to readily figure out how to screw/unscrew the loop out from the bead. Usually the wearer ends up ruining the clasp after a few wearings, since it’s difficult to figure out which way to turn each screw-end — especially while wearing the piece — and the threads strip.
FOLDOVER CLASP
These clasps are found on a lot of jewelry. They are pretty easy to attach. They are pretty easy for the wearer to use them. On one side of the clasp, there is a closed loop. This is attached to one end of the piece, usually with a jump ring. It is fixed. The other end is a tongue that snaps over a base and is held in place by friction. This tongue slips over a ring on the other side of the piece, and then tightly onto its base. After opening and closing this clasp several times, the tongue tends to bend upward, thus losing its friction-based tight close. You can use a chain-nose pliers to push the tongue back and regain the friction. Eventually this tongue breaks off.
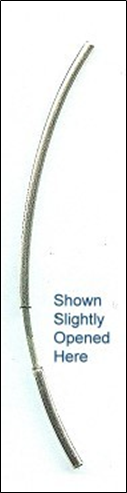
FRICTION CLASP or BAYONETTE CLASP
Here a curved wire on one side slips into a curved tube on the other, and is held in place by friction. Or a straight pin is pushed into a rubber tube, where the tube fits snugly around the pin, holding it in place. These come long and sleek, or squat and fat.
The friction clasp pictured above looks great on sleek pieces. For most of these, it’s easy to slip beads or charms over the clasp without having to partially or fully dis-assemble it. These are usually soldered or glued and clamped on to the piece. You need to pay attention to the size of the internal diameter of the opening. You want your cable wire or cord to fit snugly into this opening. Put some glue (any glue except Super Glue, and preferably a jewelers glue like E6000 or Beacon 527) on the cable wire or cord. Stick it in. Use a chain nose pliers to clamp the ends down snug. Don’t clamp them flat. When you clamp them flat, it looks weird and annoying .
Super Glue has few uses in jewelry. The jeweler’s version of Super Glue is called G-S Hypo Cement, which takes longer to set. Super Glue dries like glass, so the bond becomes like a piece of glass. Movement causes the bond to shatter like a piece of glass. And the broken bond looks like a broken piece of glass.
The jeweler’s glues, like E6000 and Beacon 527 dry like rubber. The bond acts like a shock absorber.
BOX CLASP
The basic design here is a box where a bent piece of metal (called a tongue) slips into one side of the box, and is held in place by an internal latch. We consider the tongue and the internal latch moving parts, since these can break.
Box Clasps often look great, but they don’t last a long time. The internal latch often wears out. The tongue is bent up and down each time it is place in or removed from the clasp. After too many times, the metal breaks. It’s hard to find replacements. What’s nice about these are that they come in a wide range of prices and styles, and can adapt easily to the organic sensibility of your piece. Great for moderately priced jewelry. Functionally a bit of a risk for more expensive jewelry, but visually may be just what the designer ordered.
Sterling box clasps pose a problem, if the clasp rests on the wrist or neck. Sterling softens at body temperature. When the internal latch softens, it releases the tongue. Jewelry coming out of Mexico is notorious for this happening. Say you have a problematic clasp. You don’t have to throw it away. You can use larger beads on either side of the clasp, so that it never rests on the skin.
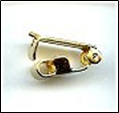
LANYARD CLASP
This is a wire that is bent into a clasp shape. One end of the wire overlaps that of the other side, and is “springy”. These clasps will lose their “springy-ness” over time. You see these a lot with name badge jewelry. I like to use these clasps with hemp necklaces. They work well with thick cords. They have a primal feel about them.
From a design theory perspective, the base of the clasp is an interesting element. It is basically an arch pinched at its base. This completely changes the mechanical properties of the arch, turning it into a spring. The spring absorbs all the force of the arm, when the arm is bent back and forth to open and close the clasp. If this arch were a V-shape, bending it back and forth would break it. In the Curved-Shape, bending back and forth will also break it. But pinching it, the movement is accommodated by and the forces absorbed by the clasp.
Lanyard clasps come very functional like that pictured. They come fancier, as well. Some of the fancier ones are good substitutes for lobster claws. Lanyard clasps are widely used in name-badge lariats and necklaces.
SLIDE CLASP
These are made for multi-strand necklaces and bracelets, from 2-strand to 9-strand. They are basically two inter-fitting tubes with loops soldered onto them. They are very sleek. They come plain and patterned. They work with friction. They don’t compete with your beadwork. They work for bracelets and necklaces. This is one of the only clasps that has been coming down in price over time. The market is telling you that this is a good clasp, and I agree with the market.
I especially like these clasps for bracelets. They have a way of keeping all the strands of a multi-strand piece laying nicely and separately and spread out. With a lot of other clasps, the multiple strands overlap, get entangled, and don’t lay as well as intended. Usually, one person, wearing a bracelet using these slide clasps, can maneuver these on and off without much difficulty. Another plus.
In many flat, wide beadwoven pieces, I often suggest sewing these in place to use as the clasp.
You do not need to use any intervening rings with this clasp.
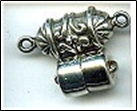
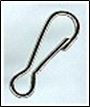
DOOR KNOCKER CLASPS
Here we have a loop with a slight opening, with a bar and knob that moves from the base of the loop, over and into the slight opening. These are attractive. They are relatively easy to use. They do loose their friction in holding the knob into the opening.
With these, two removable loops (soldered rings) hold the beadwork in place. You could make many strands of bead work, ending each with a soldered ring wide enough to slip the clasp, and use them interchangeably with this clasp. Or you could use this clasp when you want to change the number of strands of beads you want to wear at one time.
Picture: One Clasp plus a set of necklaces, worn singly, or together.
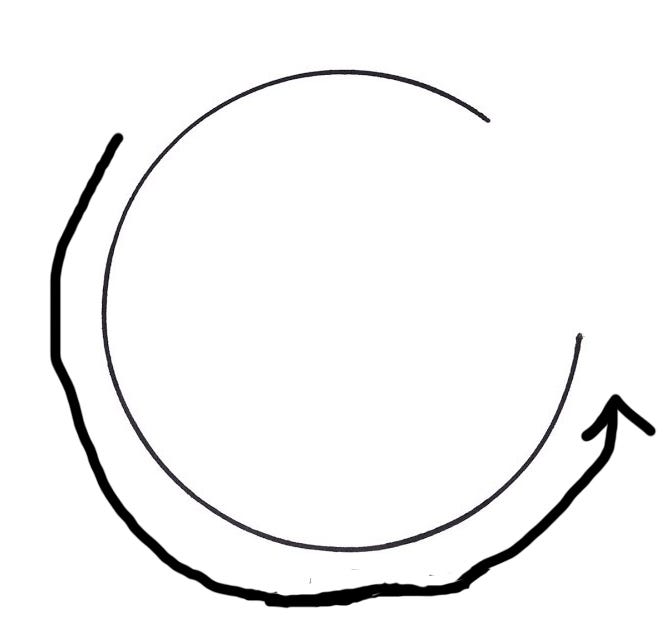
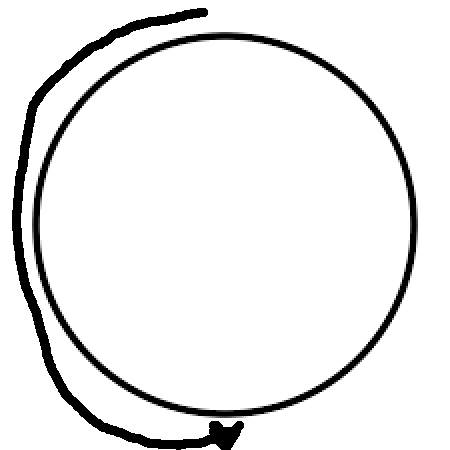
The First Cognitive Thing The Viewer Wants To Do Is Make A Complete Circle
The Cognitive Processes of the Viewer
As a Designer, one thing you need to anticipate is how the piece will be viewed and understood. It turns out that jewelry plays some very important psychological functions for both the wearer and the viewer. By understanding these perceptual and cognitive processes, you the designer have some powerful information to play with. Here I discuss two cognitive processes that happen immediately when the viewer first interacts with a piece of jewelry.
When a viewer walks into a room, and in the room is a stranger who also happens to be wearing a necklace, the viewer has to very quickly determine whether the situation is safe or not. We are pre-wired with an anxiety response, so that we can assess the situation almost instantaneously, and flee or fight, so to speak. The eye/brain looks for clues. One clue is provided by the necklace the stranger in the room is wearing. The eye/brain focuses on the jewelry and performs two simple tests.
When our viewer first cognitively interacts with the piece, her eye/brain tries to “make a complete circle around the piece”. Very simple: Make a Complete Circle. If something about the piece slows her down, or otherwise disrupts this natural cognitive process of trying to visualize a complete circle, she begins to feel some anxiety or discomfort or edginess. This might be a clasp that doesn’t coordinate well with the beadwork. It might be an inappropriate or poor use of color, shape, texture, pattern, or size. It might be a clasp assembly that takes up too much space along the yoke of the piece.
The eye/brain looks to see a complete circle. The viewer, in turn, begins to react to and translate this situation, where things get in the way of or somehow disrupt the process of visualizing that complete circle, as seeing the piece as monotonous or boring or ugly or some other negative, less satisfying characteristic or scary or will cause death. If the brain gets edgy, then the interpretation of the stimuli becomes a negative emotion-laden response. The viewer’s anxiety response is telling this person that it may be time to consider turning around and fleeing, instead of going forward, approaching or even fighting.
These negative traits of the jewelry quickly get associated by implication, with the wearer. The wearer begins to get defined as monotonous or boring or ugly or some other negative, less satisfying characteristic or scary or will cause death. As a designer, you don’t want this to happen.
The Second Cognitive Thing The Brain Wants To Do Is Find A Natural Place For The Eye To Come To Rest
The second thing the brain tries to do, after making that complete circle, is “come to rest.” The eye/brain looks for a natural place to come to rest.
We usually achieve this by creating a focal point. We might use a pendant. We might graduate the size of the beads, or graduate the color intensity or value.
In a very simple piece, the clasp assembly itself might be the natural place for the eye/brain to come to rest. In pieces where there is not a natural place for the eye/brain to make a complete circle and then come to rest, the brain starts to get edgy and feel some anxiety. The piece, in turn, begins to get interpreted as monotonous, boring, ugly, some other negative, less satisfying characteristic, scary, will cause death.
As the piece gets labeled, so does the wearer. Again, you don’t want this to happen. Not to the wearer when wearing one of your pieces. As the viewer runs screaming from the room.
People are prewired with an avoidance response. This occurs in our brain-stem. This protects the viewer from things like snakes and spiders, by making them want to avoid things which are ugly or dangerous.
When someone views the jewelry for the first time, they have to interpret it. One cultural and often subconscious reason people wear jewelry is to make people feel comfortable around them.
As a designer, you can anticipate all this. You now know that the viewer, cognitively when interacting with a piece of jewelry, will first try to make a complete circle, and then will want the eye to come to rest. Otherwise, the brain will start to get edgy and feel anxiety. The person might want to turn around and flee.
The eye/brain wants to make a complete circle, then come to rest.
Design accordingly.
Just one more note: Our brains process a lot of information at once — what we call parallel processing. Other perceptions cognitions co-occuring withthe anxiety response might mitigate the viewer’s reaction. Or might amplify it. Who knows?
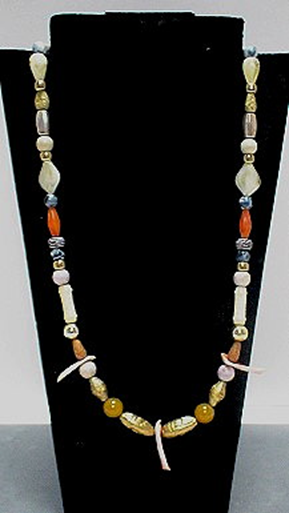
Below are two images of one of the entries to our The Ugly Necklace Contest, which somewhat illustrates the point about what happens cognitively. The image on the left shows the whole necklace. The image on the right shows the lower half of the necklace. Look at each image. For each, get a feeling for how motivated you are to make the complete circle, or how satisfied you feel about the necklace.
NECKLACE FULL VERSION: With these beads and this rhythm and configuration, are you less motivated to make the complete circle around the whole piece, or less satisfied when doing so?NECKLACE CUT IN HALF VERSION: With the necklace shown shorter, with these beads and this rhythm and configuration, are you more motivated to make the complete circle around the whole piece, or more satisfied when doing so?
People typically find that the full version takes more work to motivate yourself to make the complete circle. While the beads vary a bit, they are basically the same color tone. A pattern is set in the lower half of the piece, and the upper half adds little or no new information to excite the viewer. It becomes more work to make that complete circle. It becomes boring.
In the half version, people feel a little more satisfied with it. The artist has made her point, without additional repetition of what feels like monotonous components. People see it as less monotonous, less boring, less ugly. (…And of course, less scary and less likely to cause death.)
In this necklace, the designer created a pendant drop as the natural place rest. There is some awkward treatment, positioning and placement of the protruding elements near the bottom of the necklace, which makes the place to come to rest it a little less satisfying.
A necklace, or any type of jewelry, has a structure and an anatomy. Each part has its own set of purposes, functions and aesthetics. Understanding each type of structure or physical part is important to the designer.
If we looked at these sections of a necklace from solely an Art standpoint, we might primarily focus on the centerpiece of the jewelry and consider The Strap (and most other parts) as supplemental and less important to the piece, in a similar relationship as the frame to a painting or the pedestal to a sculpture.
However, jewelry is a 3-dimensional object serving both aesthetic as well as functional purposes. As such, we need to be more sensitive to the entire jewelry-anatomy and both its Art and Architectural reason for being. This kind of thinking is at the core of what makes jewelry design, as a discipline, different than art.
Typical structural parts of a necklace might include,
The Strap:The entire linear component of the piece, comprising Yoke, Clasp Assembly, and Frame
The Yoke:The part of The Strap behind the neck, typically 6–7” including clasp assembly
The Clasp Assembly:Part of The Yoke, and includes, not only the clasp itself, but rather all the pieces it takes to attach your Strap to the Clasp, including clasp, rings, loops or knots or crimps at ends of stringing material
The Frame:The visually accessible part of The Strap, connecting to The Yoke at The Break point. On a 16” necklace, The Frame might be 9–10”
The Break:The point where The Yoke connects to The Frame, often at the collar bone on either side of the neck. Very often, this point is one of a critical change in vector — that means, the angle The Frame lays radically changes from the angle of The Yoke. Think of this as an inflection point.
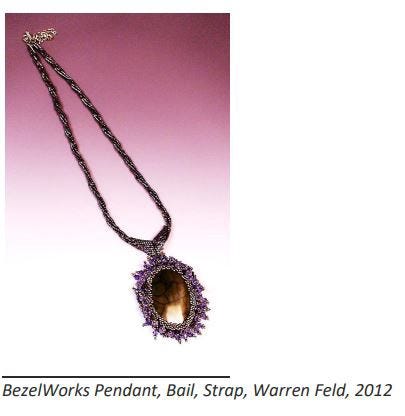
The Bail:A separate part which drops the centerpiece or pendant drop below the line of the Frame
The Focal Point, Centerpiece, or Pendant Drop: A part which emphasizes or focuses the eye, usually dropped below the line of The Frame, but is sometimes a separate treatment of The Frame itself
The Canvas:Typically the stringing material or foundation of the piece
The Embellishment:Things added to the surface or edge of The Canvas, The Strap, or the Centerpiece which serve as decorative, rather than structural or supportive roles
Each part of the body of a necklace poses its own special design challenges for the jewelry artist. These involve strategies for resolving such issues as:
— Making connections
— Determining angularity, curvature, and roundedness
— Transitioning color, pattern and texture
— Placing objects
— Extending lengths
— Adding extensions
— Creating balance and coherency
— Anticipating issues about compression, stretching, bending, load-bearing, and distortion
— Anticipating issues related to physical mechanics, both when the piece is static (not moving when worn) and dynamic (moving when worn)
— Keeping things organic, so nothing looks like an afterthought, or an outlier, or out of place, or something designed by a committee
— Determining which parts are critical to understanding the piece of jewelry as art as it is worn, and which parts are merely supplemental to the piece
The Strap
The Strap is that continuous line that extends from one end of the clasp to the other. The Strap may or may not consist of the exposed Canvas. The Strap typically delineates a silhouette or boundary. This usually sends the message to the viewer about where they may comfortably and appropriately place their gaze on the wearer’s body.
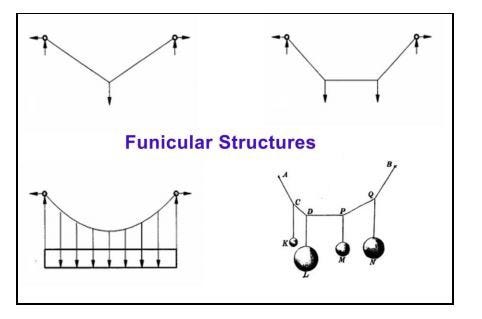
The Strap is a type of funicular structure. A funicular structure is one where something like a string or chain or cable is held up at two points, and one or more loads are placed on it. Loads increase tension. Loads lead to compression.
The placement can be centered or off-centered. If more than one object is placed on The Strap, each object can vary in mass, volume and weight. We do not want The Strap to break because of the weight or placement of any load or loads. We do want to control the resulting shape of the silhouette or curvature of The Strap which results from the weight or placement of any load or loads.
The span of The Strap is very sensitive to force and stress. A piece of jewelry may have more than one Strap. In this case, the span of each Strap, and their built in support and structural systems, must be tightly coordinated, if to respond optimally to forces and stresses.
The Yoke
The Yoke is one section of the Strap which is the part around the back of the neck, typically including The Clasp Assembly. The length of The Yoke, and whether the beginning and end parts of The Yoke should be exposed on the front of the body is something to be determined by the designer. The designer must also determine the proportional size of The Yoke relative to the remaining part of The Strap. The designer must determine what role the elements, such as beads, which comprise The Yoke, will play, and whether they should be an active part of the visual composition, and/or a critical part in the functional success of the piece, or merely supplemental. The Yoke balances the load requirements of the remaining Strap (The Frame), Bail and Pendant.
The Break
At the point The Yoke connects to the remaining Strap (called The Break leading to The Frame) on either side of the neck, this is a point of vulnerability, often assisted and reduced with the addition of support elements. Because it is at this point — The Break — where The Strap may alter its vector position in a dramatic way — that is, the angular positioning of the Strap at the point of The Break may vary a lot as The Strap continues around the front of the body — this is a major point of vulnerability.
There are always transitional issues at The Break. The designer needs to have strategies for managing these transitions. This might involve using visual cues and doing something with color or pattern/texture or rhythm or sizes. The designer might add support systems, such as rings, at this point. The designer must decide the degree The Frame should be visually distinct from The Yoke.
The Clasp Assembly
The Clasp Assembly is most often part of The Yoke. The Clasp Assembly includes, not just the clasp itself, but also all the other parts necessary to attach it to the Strap. There might be some additional soldered rings. There might be loops left at the ends of the stringing material. There might be crimp beads or knots or glue or solder.
Whenever choosing a clasp, it is more important to think in terms of choosing a clasp assembly. You might want to use a very attractive clasp, but it may take so many parts and turns to attach it to your beadwork, that you end up with a visually ugly clasp assembly.
Occasionally, The Clasp Assembly is part of The Frame. This will present a different set of architectural issues and considerations.
The Frame
The Frame is that part of The Strap which connects to either side of The Yoke at The Break.
Too often, when the designer does not recognize the Yoke as distinct from The Frame — even if the transition is to be very subtle — less-than-satisfying things happen. Proportions may be off. The piece may not lay or sit as envisioned. The Strap may have too much embellishment going too high up The Strap. Sometimes the balance between Yoke and Frame is off — too much Yoke and not enough Frame. The change in vector angles between The Yoke and The Frame may pose many architectural issues for the designer.
Bi-Furcated Frame: A Frame visually split in half, usually at the center and in two equal parts, with a centerpiece focal bead or pendant drop in the middle. Here the designer needs to think whether the two lengths should move in a coordinated fashion, or not.
The Focal Point, Centerpiece or Pendant Drop
While not every necklace has a focal point, centerpiece or pendant drop, most do. The Focal Point gives the viewer’s eye a place to rest or focus. Usually this is done with a Centerpiece or Pendant Drop.
Othertimes, The Focal Point is more integrated with The Strap. This might be created by graduating the sizes or beads or playing with color or playing with rhythm or playing with fringe.
A Centerpiece would be a part that extends beyond the line of The Frame, usually below it, around it, or in front of it. This forces transitional concerns between it and The Frame.
There should be a natural visual as well as functional transition from The Strap to The Focal Point, Centerpiece or Pendant Drop.
The Bail
The Bail is a part that drops the Centerpiece below the Frame, forcing additional transitional visual and functional concerns among Centerpiece, Bail and Frame. We are concerned about its impact on emphasis, harmony, balance, distribution of size and proportion, point, line, plane and shape. We are concerned about its ability to maintain stability, given the effects of gravity, the weight of the drop, and its relationship with and fit to The Frame of The Strap. Most Bails would be considered vertical structures.
The Canvas
The Canvas typically refers to the stringing materials. However, in a layered piece, may refer to any created “background or foundation” off of which or around which the main composition is built. The Canvas might be either a horizontal structure (like an arch or truss) or a vertical structure (like a wall or frame). It might be exposed, partially covered, or fully covered. It might change materials or construction systems along its length, such as transitioning from a cable wire to a chain.
It is important to know what The Canvas is made of, and how its function and appeal might improve or weaken as its Span is lengthened or shortened, widened or narrowed, over time. The steepness of its slope or positioning might also affect its integrity.
Sometimes more than one Canvas are interconnected. You can picture a necklace with additional strands crossing the chest from one side of The Strap to the other. You might also have a necklace where strands radiate out at angles from the neck and across the chest.
Architecturally, additional Canvases which span from one side to the other of a piece of jewelry operate like Trusses, Arches or Support Beams. These types of structures are referred to as Horizontal Structures.
The Embellishment
The Embellishment includes things like fringe, edging and surface decoration. Embellishments are decorative elements added for purposes of improving the visual appeal of a piece. Embellishments typically do not play any support or structural roles.
ARCHITECTURAL BASICS OF JEWELRY DESIGN: Building In The Necessary Support and Structure
AbstractWhenever you create a piece of jewelry, it is important to try to anticipate how your choice of materials, techniques and technologies might positively or negatively affect how the piece moves and feels (called Support) when worn and how its components maintain shape and integrity (called Structure). Towards this end, it is important to redefine your techniques and materials in architectural terms. Every jewelry making technique is an applied process (called a Design System) with the end goal of trying to reach some type of equilibrium. That is, steps taken to balance off all the external and internal forces impacting the piece. Achieving this balance means that the piece of jewelry is at its point of least vulnerability. This is where all the materials, techniques and technologies have been leveraged to optimize the four S’s: Strength, Suppleness, Stability and Synergy. I find that most jewelry designers do not learn their techniques with architectural principles in mind. They arrange a set of materials into a composition, and assume its success is solely based on the visual grammar they applied. But if the piece of jewelry doesn’t wear well, feels uncomfortable, gets in a weird position making the wearer look clownish, or breaks or comes apart too easily, the jewelry designer has failed in their mission.
ARCHITECTURAL BASICS OF JEWELRY DESIGN: Building In The Necessary Support and Structure
Everything boils down to support and structure.
Support is anything about the materials, techniques or technologies used which allow the finished piece to best move, drape and flow while the piece is worn.
Structure is anything about the materials, techniques, or technologies used which allow the finished piece to maintain its shape and integrity while the piece is worn.
Constructing a bracelet or a necklace is really not much different than engineering and building a bridge. Bridges have purpose and functions. Jewelry has purpose and functions. These are very much the same. The jewelry designer needs to anticipate how the piece will purpose and function within a context or situation or environment, as worn.
Designers have to worry about the bracelet or necklace maintaining its shape and not falling apart, in the face of many stresses which come from movement, adjustments, obstructions, twisting, body geography and contour, aging of materials, environmental conditions, and so forth. They need to anticipate how the piece will comfortably move, drape and flow while worn. They have to construct something that is appealing and friendly to the user. Designers have to be fluent in, and be able to apply, not just a visual grammar, but a functional grammar, as well.
This means that the jewelry artist needs to know a little bit about physical mechanics. A little bit about how to create, control and maintain shape. A little bit about how to build in support and jointedness. A lot about materials, how they go together and how they age together over time. A lot about how various jewelry making techniques enhance or impede support and structure over time. Some comfort about making tradeoffs and judgement calls between aesthetics and functionality. And their finished jewelry needs to reflect all this jewelry artist knowledge and fluency, so it maintains its appeal, but doesn’t fall apart when worn.
We have all heard and seen the complaints.
o Clasp slips around neck to the front
o Necklace bezel settings turn around ending up facing backwards
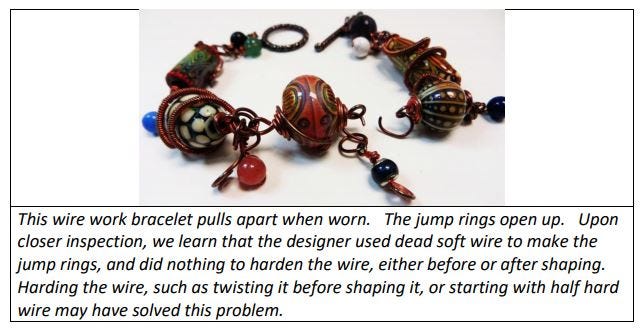
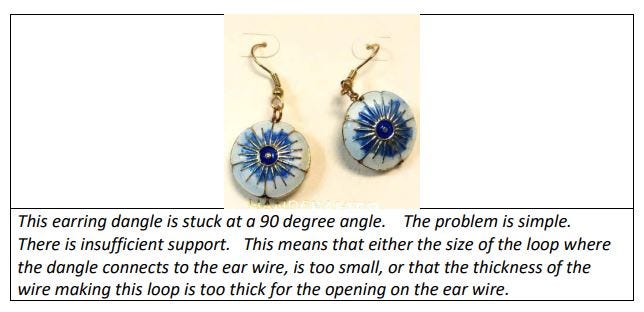
o Earring dangle gets locked in a 90 degree angle o Jump rings open up and bracelet pulls apart
o Necklace doesn’t lay flat o Earring dangles don’t face the right way
o Stone pops out of its setting
o Stringing material breaks or pulls apart
o Finishes on beads and components flake off
o Necklace or bracelet breaks at the crimp
o Solder or glue doesn’t hold
o Beads crack and string breaks in overly tight pieces
These kind of things which happen are not natural to jewelry. They are examples of bad jewelry design. They can be corrected by building in an architectural awareness of how materials and techniques function. They may need more support, such as loops, rings, and hinges, for example. They may need better structure, such as smarter selection of materials, or more strategic implementation of technique, or extra reinforcement at points of potential weakness.
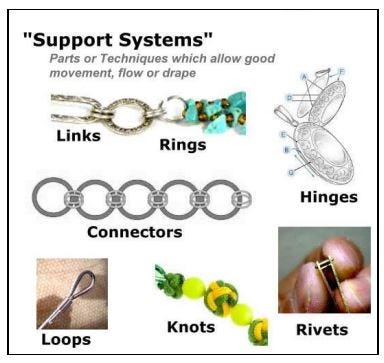
SUPPORT SYSTEMS
Support systems are components or design elements we build into our pieces, which allow good movement, flow, and drape. This is known as support or jointedness. Sufficient support allows for the absorption or channeling of stress so that negative impacts on a piece of jewelry when worn are minimized.
These may be things like
— Rings
— Loops
— Links
— Hinges
— Rivets
— Knots (unglued)
They may involve different kinds of chaining or connecting.
I include knots as support systems. Unglued knots provide a lot of support and jointedness. Glued knots do not. Glued knots are stiff, and increase the risk of breakage or support failure. Some knots are looser, like lark’s head knots or weaver’s knots or overhand knots. Looser knots provide a lot of support and jointedness. Other knots are tighter, like square knots and surgeon’s knots, and provide less support and jointedness.
Without these kinds of support systems, pieces of jewelry become stiff. When jewelry is worn, movement puts a tremendous amount of force on all our parts. There is a lot of stress and strain on our beads, our stringing materials and other adornments. There is a lot of stress on the clasp assembly. There is a lot of stress on our larger components and forms. If everything is too stiff, movement would force these components to crumble, chip, crack or break.
The designer’s choices about clasps, materials, string, technique, and design all affect the success or failure of the support systems integral to their pieces of jewelry.
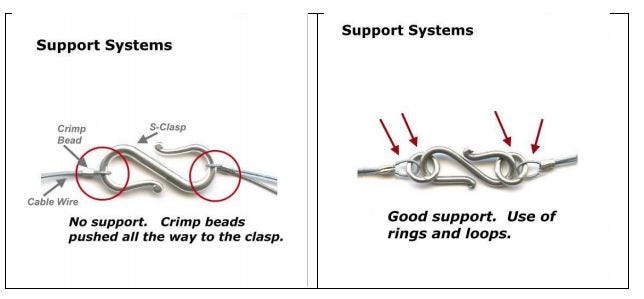
Often, when people string beads on cable wire, and crimp the ends of the wire to secure the clasp, they ignore concerns about support or jointedness. If the artist pushed the crimp all the way up to the clasp, the connection between crimped wire and clasp would be too stiff. It would not allow movement. It could not absorb any forces placed on the piece, such as from moving, pulling, tugging, getting caught on something, and the like.
When the connection between wire and clasp is too stiff, the metal pieces will bend back and forth, eventually breaking. In this case, the crimp bead is metal, the cable wire is metal and the clasp is metal. When someone wears a necklace or bracelet where no joint or support is created at the clasp, a couple of things might happen. The necklace or bracelet will start to pull on itself, and as the person moves, and necklace or bracelet moves, and the clasp slides up to the front. The turning around of the necklace or bracelet is that piece’s response for alleviating the forces of stress. If, for some reason, the necklace or bracelet cannot turn around, then all these metal parts will bend back and forth and break.
The better designer, one more familiar with architectural considerations, will avoid these kinds of design flaws which result from leaving an inadequate amount of support or jointedness within the piece. Leaving an adequately sized loop on the cable, as it attaches to the clasp, thus never pushing the crimp all the way up to the clasp, allows for movement and support.
When there is sufficient support, in our necklace example, the clasp will always rest securely on the back of the neck, no matter if the wearer is sitting, dancing, or bending forward to pick something up. It will not turn around. It will not break.
You will find that most clasps, and most jewelry findings, will need an extra intervening ring — either a jump ring, split ring or soldered ring, in order to have sufficient support and jointedness.
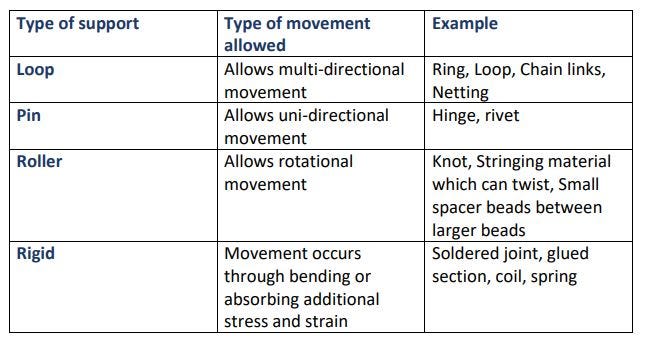
There are 4 key types of support systems:
STRUCTURAL SYSTEMS
As designers, we always want to think about our piece of jewelry, its construction and execution in terms of what might happen when:
— Pulling left and right, up or down (horizontal movement)
— Bearing weight (vertical movement)
— Balancing from side to side or section to section or twisting (rotational movement)
These structures are described in reference to how external forces operate on them. The labels of horizontal, vertical and rotational do not refer to the placement or positioning of these structures, per se.
The structures we build into our jewelry help us manage shapes and their integrity as the piece of jewelry is worn. They help us achieve that sweet-spot among the four S’s: strength, suppleness, stability and synergy.
Horizontal structuresassist us in managing the effects of horizontal movement, such as pulling, tugging, stretching. Horizontal structures are the most common ones we build into jewelry. Think of spans, and the things we hang off of spans, which, in turn, put stress on the places where each end of the span is attached. These include arches and trusses, funicular structures, and nets or webs. Horizontal structures can more easily deflect and deform their shapes in response to adverse forces pulling and tugging on them.
They may require adjustments in lengths to achieve better stability. Better stability might require inward sloping, thus shorter lines, as things get connected closer to the neck, and elongated outer boundaries. Well-designed Funicular and other horizontal structures will distribute the weight and channel the stresses placed on the piece in an equitable way. They will alleviate dead space, drooping, and unsatisfying drape and flow. Horizontal structures designed for strength will allow for more dimensionality, and allow the piece to include arches and puffed out components (vaults).
The success of horizontal systems is very dependent on the length of their span. Their ability to adapt to the adverse effects of mechanical forces may decrease (or increase) with their increasing length. As the length shortens, it becomes more important how well these structures can bend. As the length increases, it becomes more important how well these structures can deflect these forces.
Vertical structures assist us in managing the effects of vertical movement, such as bearing weight or resisting bending. They hold things up and are used to build and secure shapes. These include things like walls, cantilevers and frames. They may be foundational bases for compositions. They may be a set of wires bounded together to secure them and leverage their properties in the finished piece. They may be bails or connectors for drops or charms. They may be columns. Most vertical structures are characterized by a certain amount of inflexibility, but will vary somewhat in flexibility by type or dimension (width, length, height). With vertical structures, we sometimes worry about shift or drift or bending out of shape.
Vertical structures, like Walls, are things which allow jewelry or jewelry components to find a satisfying point of stability between the effects of gravity and the effects of their own weight (loads).
This point of stability must hold when the jewelry is static (no movement when worn) as well as when it is dynamic (thus, movement when worn).
A Cantilever looks and functions like a tree with branches. This vertical structure allows for a lot of bending. You might visualize a necklace with a lot of charms or pendant drops cantilevered off a strap.
The Moment Frame is an additional type of vertical structure which allows for some temporary give and take. The Moment Frame might involve the addition of several support systems, like loops, rings or rivets, and may allow some bending and compression without deformity of the piece.
A Braced Frame involves the placement of some kind of diagonal element across a section of the piece, thus bracing two sides at that section. This functions similar to Trusses, and allows for bending and compression without deformity of the piece.
Rotational structures assist us in managing the effects of rotational movement, such as twisting, rotating, slipping over or under, or curling. They enable these structures to deform without breaking. Rotational structures can be either horizontal or vertical. What is key is how they are attached. The Moment Frame is a good example. The points of connection are allowed to rotate, temporarily adjusting or bending in shape in response to outside forces, but then rotating back in place.
EVERY JEWELRY MAKING TECHNIQUE IS A TYPE OF DESIGN SYSTEM
Jewelry designers apply many different approaches to the creation of jewelry. They may string. They may bead weave. They may wire work. They may silversmith. They may work with fibers or glass or other unusual materials to create components and appealing arrangements for people to wear as jewelry.
Every technique has, at its heart and the ways it should be best implemented, things which allow it to give jewelry support, and things which allow it to give jewelry structure. Some techniques have a good balance between steps or strategies which support movement, drape and flow, with steps or strategies which structure shape and the maintenance of its integrity. I would label these more advanced techniques. Other techniques are sometimes stronger in one side of the equation, say support, and weaker on the other side, which would be structure, or vice versa. I would label these more primitive techniques.
Every technique or design system is an applied process with the end goal of trying to reach some type of equilibrium. Each piece of jewelry is the designer’s effort at figuring out, given the materials, techniques and technologies at hand, how to balance off all the external forces and internal stresses impacting the piece. Achieving this balance means that the finished and successful piece of jewelry is at its point of least vulnerability. This is where the materials, techniques and technologies have been leveraged to best concurrently optimize all of our four S’s: Strength, Suppleness, Stability and Synergy.
Achieving this balance or equilibrium is partly a function of the materials chosen, and technologies applied, but mostly a function of how the designer selects techniques, makes choices about their implementation, and manages support and structure. Every technique will have some steps which require stronger, heavier, firmer, tighter efforts, and some steps which require looser, lighter, weaker efforts. Where the particular steps of the technique are supposed to lend more support, usually the designer will lighten up, and where the particular steps are supposed to lead to greater structural integrity, the designer will tighten up
I find that most jewelry designers do not learn their techniques with architectural principles in mind. They arrange a set of materials into a composition, and assume its success is solely based on the visual grammar they applied. But if the piece of jewelry doesn’t wear well, feels uncomfortable, gets in a weird position making the wearer look clownish, or breaks or comes apart too easily, the jewelry designer has failed in their mission.
I also find most jewelry designers apply their techniques with the same amount of strength, tightness, tension, sizing and proportion throughout, rather than learn to vary, manage and control these over the course of creating the piece. This suggests they are unaware of how the techniques they apply result in more or less support, and more or less structural integrity.
Let’s explore some bead weaving examples. Bead weaving encapsulates and easily shows how all these support and structural issues come into play.
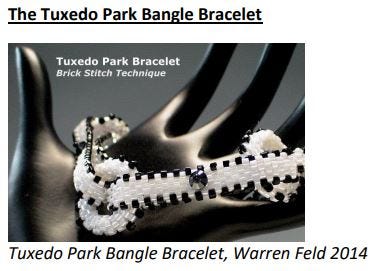
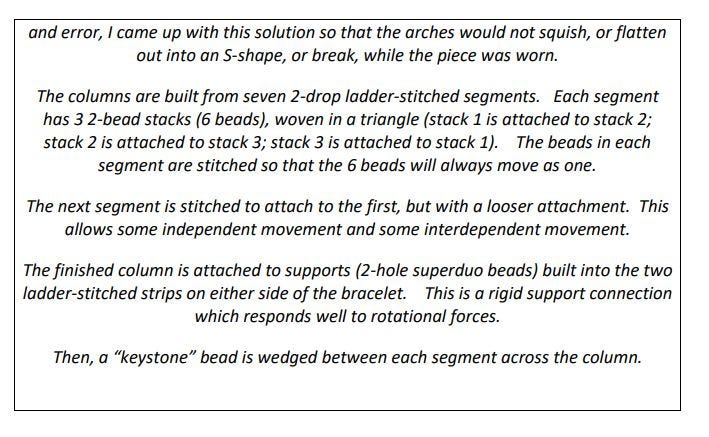
The Tuxedo Park Bangle Bracelet is bead woven using a technique called brick stitch. The brick stitch is a very robust bead weaving stitch, in that it allows for a lot of support while at the same time allows for good structure. To phrase this another way, the brick stitch allows the piece to keep its shape and integrity, yet respond to all the forces and stress of movement. The thread pathway of this stitch allows each individual bead to self-adjust in response to stress, while concurrently influencing all the beads around it in how they individually adjust to this same stress.
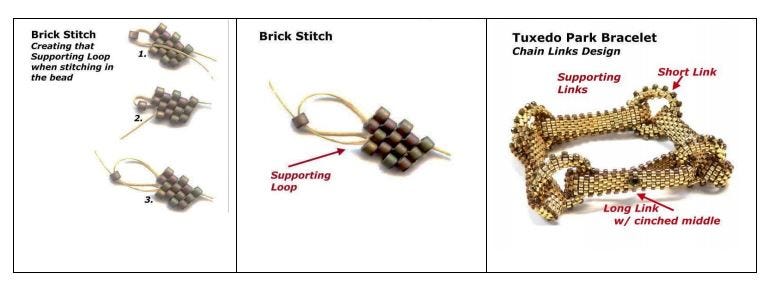
There are two major support systems in this bracelet.
The first support system is the thread path design system of the brick stitch itself. The brick stitch attaches the new bead to the previous row by snagging a thread loop between two beads. This looping not only ties all the beads together within our composition, but also, allows each bead and each row to bend in response to the forces of movement and then bend back into its original position. And, importantly, it allows this flexing all the while maintaining the solidity and shape of our component.
The thread-looping pattern of the stitch also allows us to manipulate the flat beadwork into a curve. It allows us to slide and stretch the bangle over our hand and also return to its original shape as it sits on the wrist.
It is important, while weaving the brick stitch, to maintain the integrity of the support systems, that is, of each thread-looping-over-thread intersection as best as can be. Anything done which disrupts this looping, will begin to stiffen the joints, so to speak. So, if our needle pierces an existing thread as we create the next loop-connection, this will begin to impede the support, or in a sense, those “swinging” properties of the looping. If we tie off the thread into a knot, such as when we end an old thread and begin a new one, this too will impede support. If we glue any knot, this will end all the support properties at that point in the piece.
The second major support system is in the design of the Tuxedo Park Bangle Bracelet itself. We are creating a chain of links. These links or “rings” provide support. That is, they allow the bangle to easily curve around the wrist and to freely move when worn.
In our long link, we have cinched and sewn down the middle of the link. This begins to disrupt that support in our chain-link. So, we have to be comfortable with the size, thus support, of our now bi-furcated two new ring openings on either side of this cinched long link. If these new openings are too small, one ring would lock into place with the preceding one, making the piece stiff, and thus, uncomfortable to wear, and perhaps putting too much pressure on the parts.
It is important to understand each technique you use, whether a bead stringing technique, or wire working technique, or bead weaving stitch, or silversmithing technique, in terms of how it might enhance or impede support or structure. How might it allow movement. How might it absorb and direct the forces this movement places on our beads, stringing materials and other components within our piece. How it allows the piece to encompass a shape and maintain that shape as worn.
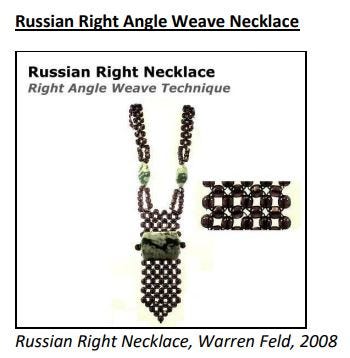
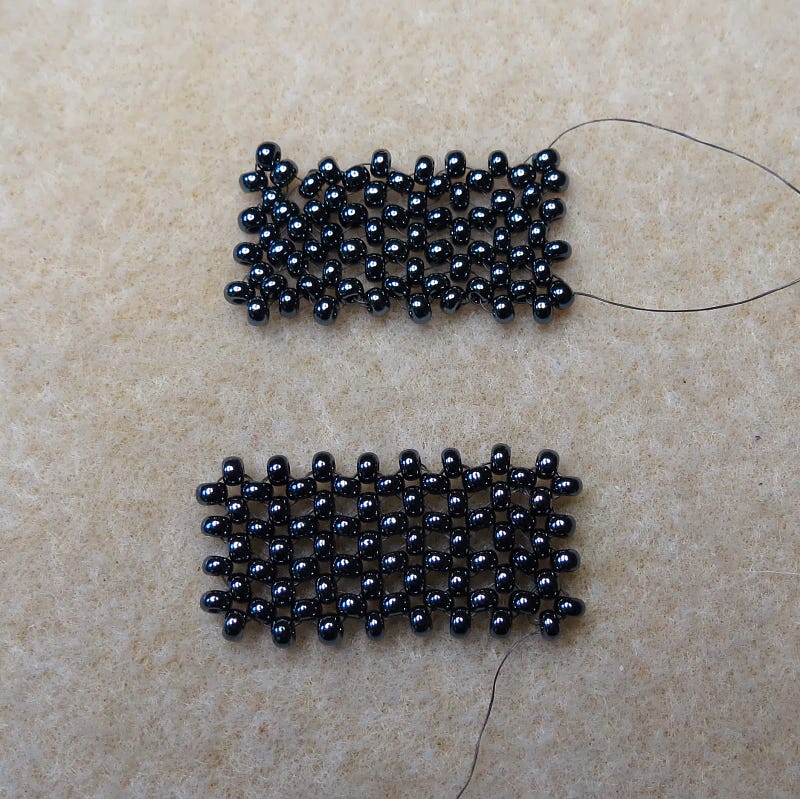
The Russian Right Angle Weave Necklace is an example of another bead weaving stitch which has great properties allowing for both support and structure.
The basic right angle weave stitch begins with a circle of 4 beads. It then moves on to create a second circle of four beads. These two circles are linked with one shared bead, common to both circles, and which acts like a hinge.
Architecturally, we want each circle of 4 beads — what we call a right angle weave unit, to move in tandem, that is, all at the same time. We want, as well, for each right angle weave unit to be able to influence the movement of all other right angle weave units within the piece, but to also move somewhat independently of all other right angle weave units within our piece. Each unit should move as one. Each unit should be allowed to somewhat self-adjust to stress independently, but at the same time, affect the interdependency of all units within the piece.
The right angle woven piece should move like a coil spring mattress. Picture someone lying down on this mattress. Each coil adjusts somewhat independently to the pressure of the body part immediately above it. Yet each coil with the mattress also adjusts relative to the movement of the other coils as well. Nothing gets out of line. No matter what the person laying on the mattress does, or how they move around, all the coils adjust to the changes in weight very smoothly and coherently.
This is how right angle weave works, and maintains itself as a support system. To achieve the optimal performance with right angle weave, the designer would want their four beads within a unit to be as tightly connected as possible, so that they always move and respond to forces as a whole unit. The designer would want a looser tension at the place each right angle unit connects to another at the point of their shared bead.
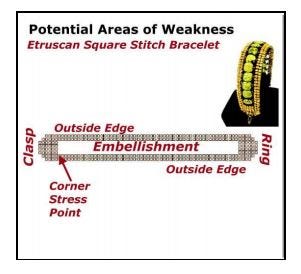
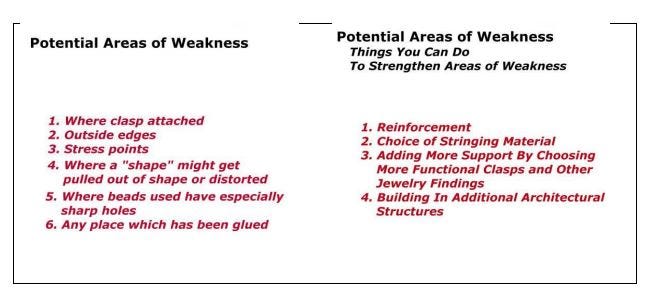
VULNERABILTY: Areas of Potential Instability and Weakness
Whenever a project is begun, it is important to carefully anticipate and identify potential areas of instability and weakness. Where might your piece be vulnerable? Where might the forces of movement — horizontal, vertical or rotational, when the piece is worn, cause the stringing material or threads or beads or clasps to loosen up, pull apart, and perhaps break. Or the wire or metal to bend, distort or deform?
Most often, places of vulnerability occur where the structures or supports in place take on the shapes of either H, L, T, or U. Think of these shapes as hazards. These shapes tend to split when confronted with external or internal forces. They tend to split because each leg is often confronted with different levels or directions of force. The legs are not braced. These hazardous shapes cry out for additional reinforcements or support or structural systems.
Vulnerability and instability will also occur where the structures or supports are very thin or very soft or very brittle. They will occur at points where there is a slant or a wedge or an unusual angle.
Pieces are vulnerable because the jewelry designer has made poor choices in selecting materials, techniques, or technologies, and in managing design from inspiration to execution. REMEMBER: A piece of jewelry results from a Design System. This system is a back and forth process of anticipating how others will judge the piece to be finished and successful, how choices are made and implemented regarding materials, techniques, arrangements and technologies in light of these shared understandings coupled with the artist’s intent.
If the piece is vulnerable, then the designer has failed to reflect upon what things will make the piece endure. What will be expected of the piece when the person wearing it moves? As the piece moves from a static place, say from in a jewelry box, and then must transition to the body as a person begins to put it on, what are those transitional issues the piece must accommodate? What parts of the piece must always maintain their shape or position? What happens when the piece has to either shrink, elongate or expand? Does the piece need to bend or rotate for any reason? What happens to all the materials and pieces over time?
Reinforcements at points of potential instability and vulnerability can take many forms, such as:
o Anchoring
o Bracing
o Framing
o Attaching/Securing
o Connecting
o Blocking
o Adding in slack or elasticity
o Isolating the area
THE 4 S’s: Strength, Suppleness, Stability and Synergy
Jewelry must be designed, from an architectural standpoint, to find a special point of equilibrium. We call this the point of least vulnerability. This equilibrium point is a sweet efficient and effective spot among Strength, Suppleness, Stability and Synergy. As our choices force us to deviate from this optimized sweet-spot, our pieces of jewelry become more vulnerable when worn. They are more likely to distort and deform, pull apart, lose tension, and break.
To find this sweet-spot for any particular piece of jewelry, we first assess what shared understandings our various audiences will apply when determining if the piece is finished and successful. A big part of this is figuring out how a piece will be worn, how often a piece will be worn, and how long a duration this piece is expected to hold up. The designer assesses all this, then begins to incorporate personal artistic intent into the design process.
Strength involves choices we make about materials and techniques which prevent breaking. For example, a well-done soldering joint or correctly crimping to secure a clasp to cable wire, would increase the strength. A thicker cord might provide more strength than a thinner cord of the same material.
Suppleness involves choices we make about materials and techniques which maximize elasticity and flexibility. For example, the addition of intervening rings to various jewelry findings would increase suppleness. The use of stringing thread rather than a stringing wire, would increase suppleness.
Stability involves choices we make about materials and techniques which prevent deterioration, malformation or collapse. For example, we might reject coated beads for a project, or might use a multi-strand rather than a single-strand clasp for a multi-strand piece of jewelry. We might add extra reinforcement to the ends and the corners of pieces. We might wax our stringing materials to place a barrier between environmental and body chemicals which might affect them.
Synergy involves choices we make about materials, techniques, and technologies which not only reinforce our design, but also increase, enhance or extend the design’s appeal and functionality. For example, a tight clustering of beads into an attractive pendant drop might be many times stronger, more supple, more stable and/or more appealing than any one bead alone.
ANATOMY OF A NECKLACE
A necklace, or any type of jewelry, has a structure and an anatomy. Each part has its own set of purposes, functions and aesthetics. Understanding each type of structure or physical part is important to the designer.
If we looked at these sections of a necklace from solely an Art standpoint, we might primarily focus on the centerpiece of the jewelry and consider The Strap (and most other parts) as supplemental and less important to the piece, in a similar relationship as the frame to a painting or the pedestal to a sculpture.
However, jewelry is a 3-dimensional object serving both aesthetic as well as functional purposes. As such, we need to be more sensitive to the entire jewelry-anatomy and both its Art and Architectural reason for being. This kind of thinking is at the core of what makes jewelry design, as a discipline, different than art.
Typical structural parts of a necklace might include,
The Strap:The entire linear component of the piece, comprising Yoke, Clasp Assembly, and Frame
The Yoke:The part of The Strap behind the neck, typically 6–7” including clasp assembly
The Clasp Assembly:Part of The Yoke, and includes, not only the clasp itself, but rather all the pieces it takes to attach your Strap to the Clasp, including clasp, rings, loops or knots or crimps at ends of stringing material
The Frame:The visually accessible part of The Strap, connecting to The Yoke at The Break point. On a 16” necklace, The Frame might be 9–10”
The Break:The point where The Yoke connects to The Frame, often at the collar bone on either side of the neck. Very often, this point is one of a critical change in vector — that means, the angle The Frame lays radically changes from the angle of The Yoke. Think of this as an inflection point.
The Bail:A separate part which drops the centerpiece or pendant drop below the line of the Frame
The Focal Point, Centerpiece, or Pendant Drop: A part which emphasizes or focuses the eye, usually dropped below the line of The Frame, but is sometimes a separate treatment of The Frame itself
The Canvas:Typically the stringing material or foundation of the piece
The Embellishment:Things added to the surface or edge of The Canvas, The Strap, or the Centerpiece which serve as decorative, rather than structural or supportive roles
Each part of the body of a necklace poses its own special design challenges for the jewelry artist. These involve strategies for resolving such issues as:
— Making connections
— Determining angularity, curvature, and roundedness
— Transitioning color, pattern and texture
— Placing objects
— Extending lengths
— Adding extensions
— Creating balance and coherency
— Anticipating issues about compression, stretching, bending, load-bearing, and distortion
— Anticipating issues related to physical mechanics, both when the piece is static (not moving when worn) and dynamic (moving when worn)
— Keeping things organic, so nothing looks like an afterthought, or an outlier, or out of place, or something designed by a committee
— Determining which parts are critical to understanding the piece of jewelry as art as it is worn, and which parts are merely supplemental to the piece
The Strap
The Strap is that continuous line that extends from one end of the clasp to the other. The Strap may or may not consist of the exposed Canvas. The Strap typically delineates a silhouette or boundary. This usually sends the message to the viewer about where they may comfortably and appropriately place their gaze on the wearer’s body.
The Strap is a type of funicular structure. A funicular structure is one where something like a string or chain or cable is held up at two points, and one or more loads are placed on it. Loads increase tension. Loads lead to compression.
The placement can be centered or off-centered. If more than one object is placed on The Strap, each object can vary in mass, volume and weight. We do not want The Strap to break because of the weight or placement of any load or loads. We do want to control the resulting shape of the silhouette or curvature of The Strap which results from the weight or placement of any load or loads.
The span of The Strap is very sensitive to force and stress. A piece of jewelry may have more than one Strap. In this case, the span of each Strap, and their built in support and structural systems, must be tightly coordinated, if to respond optimally to forces and stresses.
The Yoke
The Yoke is one section of the Strap which is the part around the back of the neck, typically including The Clasp Assembly. The length of The Yoke, and whether the beginning and end parts of The Yoke should be exposed on the front of the body is something to be determined by the designer. The designer must also determine the proportional size of The Yoke relative to the remaining part of The Strap. The designer must determine what role the elements, such as beads, which comprise The Yoke, will play, and whether they should be an active part of the visual composition, and/or a critical part in the functional success of the piece, or merely supplemental. The Yoke balances the load requirements of the remaining Strap (The Frame), Bail and Pendant.
The Break
At the point The Yoke connects to the remaining Strap (called The Break leading to The Frame) on either side of the neck, this is a point of vulnerability, often assisted and reduced with the addition of support elements. Because it is at this point — The Break — where The Strap may alter its vector position in a dramatic way — that is, the angular positioning of the Strap at the point of The Break may vary a lot as The Strap continues around the front of the body — this is a major point of vulnerability.
There are always transitional issues at The Break. The designer needs to have strategies for managing these transitions. This might involve using visual cues and doing something with color or pattern/texture or rhythm or sizes. The designer might add support systems, such as rings, at this point. The designer must decide the degree The Frame should be visually distinct from The Yoke.
The Clasp Assembly
The Clasp Assembly is most often part of The Yoke. The Clasp Assembly includes, not just the clasp itself, but also all the other parts necessary to attach it to the Strap. There might be some additional soldered rings. There might be loops left at the ends of the stringing material. There might be crimp beads or knots or glue or solder.
Whenever choosing a clasp, it is more important to think in terms of choosing a clasp assembly. You might want to use a very attractive clasp, but it may take so many parts and turns to attach it to your beadwork, that you end up with a visually ugly clasp assembly.
Occasionally, The Clasp Assembly is part of The Frame. This will present a different set of architectural issues and considerations.
The Frame
The Frame is that part of The Strap which connects to either side of The Yoke at The Break.
Too often, when the designer does not recognize the Yoke as distinct from The Frame — even if the transition is to be very subtle — less-than-satisfying things happen. Proportions may be off. The piece may not lay or sit as envisioned. The Strap may have too much embellishment going too high up The Strap. Sometimes the balance between Yoke and Frame is off — too much Yoke and not enough Frame. The change in vector angles between The Yoke and The Frame may pose many architectural issues for the designer.
Bi-Furcated Frame: A Frame visually split in half, usually at the center and in two equal parts, with a centerpiece focal bead or pendant drop in the middle. Here the designer needs to think whether the two lengths should move in a coordinated fashion, or not.
The Focal Point, Centerpiece or Pendant Drop
While not every necklace has a focal point, centerpiece or pendant drop, most do. The Focal Point gives the viewer’s eye a place to rest or focus. Usually this is done with a Centerpiece or Pendant Drop.
Othertimes, The Focal Point is more integrated with The Strap. This might be created by graduating the sizes or beads or playing with color or playing with rhythm or playing with fringe.
A Centerpiece would be a part that extends beyond the line of The Frame, usually below it, around it, or in front of it. This forces transitional concerns between it and The Frame.
There should be a natural visual as well as functional transition from The Strap to The Focal Point, Centerpiece or Pendant Drop.
The Bail
The Bail is a part that drops the Centerpiece below the Frame, forcing additional transitional visual and functional concerns among Centerpiece, Bail and Frame. We are concerned about its impact on emphasis, harmony, balance, distribution of size and proportion, point, line, plane and shape. We are concerned about its ability to maintain stability, given the effects of gravity, the weight of the drop, and its relationship with and fit to The Frame of The Strap. Most Bails would be considered vertical structures.
The Canvas
The Canvas typically refers to the stringing materials. However, in a layered piece, may refer to any created “background or foundation” off of which or around which the main composition is built. The Canvas might be either a horizontal structure (like an arch or truss) or a vertical structure (like a wall or frame). It might be exposed, partially covered, or fully covered. It might change materials or construction systems along its length, such as transitioning from a cable wire to a chain.
It is important to know what The Canvas is made of, and how its function and appeal might improve or weaken as its Span is lengthened or shortened, widened or narrowed, over time. The steepness of its slope or positioning might also affect its integrity.
Sometimes more than one Canvas are interconnected. You can picture a necklace with additional strands crossing the chest from one side of The Strap to the other. You might also have a necklace where strands radiate out at angles from the neck and across the chest.
Architecturally, additional Canvases which span from one side to the other of a piece of jewelry operate like Trusses, Arches or Support Beams. These types of structures are referred to as Horizontal Structures.
The Embellishment
The Embellishment includes things like fringe, edging and surface decoration. Embellishments are decorative elements added for purposes of improving the visual appeal of a piece. Embellishments typically do not play any support or structural roles.
PHYSICAL MECHANICS: Statics and Dynamics
Mechanics represents the behaviors of the jewelry when subjected to the forces which arise when wearing a piece. These forces include movement. They include pulling, tugging, bending, stretching, realigning, readjusting, bearing weight, carrying weight, securing weight, brushing against, rubbing against, curving and taking the shape of the body, loose- to just-right- to tight-fit, positioning, repositioning, and the like.
Statics are descriptions of jewelry behaviors when that piece of jewelry is on the body, but at rest.
Dynamics are descriptions of jewelry behaviors when that piece of jewelry is on the body, and the body is in motion.
Forces are external to the piece of jewelry.
Stresses are internal to the piece of jewelry.
Strains result from the deformation of the jewelry, as it responds to either external forces or internal stresses.
As jewelry designers, we want to understand jewelry mechanical behaviors in terms of our 4 S’s. We do not need to go into any of the math here. We primarily need to be aware of the kinds of things we need to think about, manage and control. Some of these things will be forces external to the materials and construction of our piece of jewelry. Other things will be internal stresses within our piece of jewelry. Our jewelry will strain to respond to either forces or stresses or both, until it can strain no more and it loses its shape, bends, dents, squishes, breaks or otherwise becomes unwearable.
We want to anticipate jewelry mechanical behaviors at the points of (a) maintaining shape (strength), (b) maintaining comfort (suppleness), (c )maintaining position or placement (stability), and (d) right at that point where all the materials, techniques, and technologies are leveraged and optimized to their full effect (synergy).
Think about what the flow of forces through the piece of jewelry would be as worn in different situations. The wearer could be sitting, perhaps writing at a desk. The wearer might be walking, running, dancing, skipping, crouching, bending over, bending backwards. With mechanics, again, we want to think about our piece of jewelry, its construction and execution in terms of what might happen when:
— Pulling left and right, up or down (horizontal movement)
— Bearing weight (vertical movement)
— Balancing from side to side or section to section, or twisting (rotation)
What about our choices of materials, techniques or technology leads us to design jewelry which mechanically achieves these points of equilibrium of forces? What about the structures we use and the support systems we build in allows us (or prevents us) from achieving this point of force/stress equilibrium or least vulnerability?
DESIGNING IN ANTICIPATION OF THE EFFECTS OF PHYSICAL MECHANICAL FORCES
The fluent jewelry designer can think about art and about architecture and context. He or she can be able to anticipate the types of issues that arise, and the types of solutions that might be available. And he or she can evaluate and reflect upon the choices and successes or failures.
Jewelry takes quite a beating when worn. We want it to hold up. We don’t want it to break. We don’t want it to stretch out or distort or deform. We don’t want the materials we use to fail, such as the finishes fading or rubbing off, the material cracking, or the material becoming too brittle or too soft relative to how it should function in the piece. We do not want the individual components to shift positions, or inadvertently glom on top of each other. We want the jewelry to make the person wearing look good, feel good, and get that sense of connectedness they seek when wearing a piece of jewelry.
The architecturally-sensitive designer will design for strength, suppleness, stability and synergy. The forces and stresses affecting these can be very complex. They might depend upon or vary based on physical dimensions (width, length, height and depth). They might depend upon or vary based on environmental considerations, such as cosmetics, perfumes, body oils, pollution in the air, or certain chemicals in someone’s sweat. And of course they are dependent and may vary based on anything that causes movement or prevents movement, such as the movement of the wearer, the wind, getting something caught on something, brushing against something, twisting, bending, shaking, and the like.
Jewelry is both art and architecture, and must be thought about and implemented as such.
It is always important to remember to think about any technique applied as a design system.
This design system will include the characteristics of the materials used, the strategy for implementing the technique, the technology incorporated into the process, support and structure, and finding equilibrium — that point of least vulnerability — among the 4 S’s.
The design system is a process that is to be managed and controlled by the jewelry designer, in line with assessments about shared understandings and artist intent.
It is always important to visually and functionally specify how the design incorporates support.
It is always important to visually and functionally specify how the design incorporates structure.
And it is always important to remember we want to achieve a point of equilibrium — that point of least vulnerability — among the four S’s: Strength, Suppleness, Stability and Synergy.
Left: Clasp Assembly with no support. Right: Clasp Assembly with support.
CHOOSING CLASPS AND CLASP ASSEMBLIES AND SUPPORT SYSTEMS
From a design perspective, when we speak of “choosing a clasp,” we are referring to something almost always broader, longer and with more volume than the clasp itself. We are referring to what is called the “Clasp Assembly”.
The “Clasp Assembly” is everything that has to come together in order to attach your beadwork to the clasp. The “CLASP ASSEMBLY” usually consists of several parts. Besides the Clasp itself, there are probably jump rings and connectors, crimp beads, clamps or other jewelry findings. If we had an S-clasp, the clasp assembly would also include 2 soldered rings (one on each side) plus, if using a cable wire, the loop created with the cable wire and crimp bead which attach and secure the wire around the soldered rings.
The “Clasp Assembly” is a more specific term for the more general jewelry-design terminology called a Support System. The Clasp Assembly is the most important support system in any piece of jewelry.
In any one piece, there are usually 1 or more support systems. In a bracelet, you might only have the one support system — the clasp assembly. In a necklace you might have three or five.
Support Systems are built into jewelry for many reasons. You want your clasp assembly to be able to adjust to your wearer’s movements somewhat independently of how your beadwork adjusts to this movement. Often, you want the clasp to stay in one place, while the beadwork moves to and fro, out and in, up and down, with the wearer’s movements. This only works if you build support systems into your piece. When you see someone whose necklace has turned around on her neck, this is an example of poor Design. This is not natural to necklaces. Usually the poor design has to do with insufficient support systems built into the necklace.
The most obvious support systems or joints are interconnected “rings” and “loops” and “knots.” Other support systems include “hinges” and “rivets” among other concepts. The support systems through a necklace or bracelet play several roles, and are similar to the joints in your body. They aid in movement. They prevent any one piece from being adversely affected by the forces this movement brings to the piece. They make the piece look and feel better, when worn. They keep segments within the piece from getting too stiff or too tight or too rigid. They help absorb excess force placed on your components because of movement, keeping them from cracking, splitting apart or breaking.
With needle and thread bead stringing, one of the more important support systems is the knot you tie to secure your beadwork to the clasp. The knot absorbs excess force. It allows the bracelet or necklace to move easily on and with your body. Because of this support function that knots play, it usually is NOT a good idea to apply glue to the knots. This would cause the knots to stiffen up, create lots of tension on the thread, and cause it to break from force and movement. They would lose their support function.
The best clasp is one that has no moving parts. These include toggles, buttons, slides, S-clasps, and hook & eye clasps.
One clasp element that we jewelry designers call a “moving part” is a tongue. If a metal piece is bent into a “V” or “Arch” shape, and is forced to move back and forth as it gets pushed in and pulled out of the basic clasp, we consider this a moving part. When you bend metal back and forth, it breaks. When metal is bent into a V or Arch, and is pushed/pulled, it will break. In any clasp, where you have a metal part that is bent back and forth in use, we call this a moving part.
The clasp should be proportional to the beads used in the piece. The full Clasp Assembly should be proportional to the piece as a whole. If half your bracelet is taken up by the Clasp Assembly, then there’s a problem here.
Don’t forget that you can also use clasps in a way where they can be worn on the front, not just behind the neck. They can be used to sit on the side or on the bottom. Clasps which are very decorative are used in this way.
All clasps work well in necklaces. In bracelets, however, care and consideration should be paid to how difficult or easy it is to secure and undo the clasp — especially if the wearer has to accomplish these steps by her or himself.
In better pieces, the clasp seems as if it is an organic and integral part of the rest of the piece. It does not feel as it were an add-on.
Beading requires a lot of mind-body coordination. That takes work. It is work.
Calisthenics are exercises you can do to improve and tone your mind-body coordination when bead weaving.
You have to be able to get from your fingers to the needle to the beads, back along the thread to the needle to the fingers, hands, arms, eyes, mind. And then again. And again. Over and over, one more time. You need to get into a rhythm. All these working parts need to be working. No time for cramping. No time to get tired. No time to lose concentration.
A rhythm. Needle, pick up bead, pull down along thread, check the tension, pick up a bead, pull down along thread, check the tension, pick up a bead….
I noticed that different instructors had various techniques and strategies for maintaining this rhythm. Yes, music was involved sometimes. Othertimes simple meditation or creative reading and discourse. Some people had some stretching exercises that they did. Others tested themselves before proceeding with their big project. Still others did small things to reconfirm their learning.
Throughout this Series, I introduce some of the beading calisthenics that I experienced along the way. If you want to gather materials up so that you can follow along with these calisthenics, here’s the list.
MATERIALS NEEDED FOR ALL THE CALISTHENIC EXERCISES (SUPPLY LIST):
notebook, pencil 1 tube each of Japanese 11/0 seed beads in gray, 3 different colors of orange, black, white, any other 4 colors 1 tube each of Japanese 8/0 seed beads in gray or silver, black, white, orange, any other 4 colors 1 tube each of Japanese 6/0 seed beads in gray or silver, black, white, orange, any other 4 colors 5 gray-scale colors of delicas or 11/0 seed beads Nymo D or C-Lon D thread in black Nymo D or C-Lon D thread in yellow two toggle clasps .018” or .019” flexible cable wire assorted 4mm, 6mm and 8mm beads in various coordinating colors, including grays and oranges in your mix, as well big bowl and a bowl-full of assorted beads Size 10 English beading needles Bees wax scissors beading dishes or trays any kind of graph paper work surface or pad colored pencils a few clasps, (toggles are easy to work with) some crimp beads crimping pliers
BEADING CALISTHENICS #10: Daisy Stitch Expansion
The challenge here is to see how many variations you can construct using the simple daisy chain stitch.
Simplest daisy chain: A stem and a flower with a center bead, then a stem and flower w/center, and so forth.
Start with a line of 5 beads.
Add 5 more beads to your thread. Make the 5th bead a different color. This is your “flower set”. The 5th bead is your center point.
Make a loop by going back through the first of these 5 beads in the set.
Add two more beads to the flower set, and bring the needle through 4th bead in that original set of 5.
So the daisy pattern goes: BEAD 1 to 2 to 3 to 4 to 5 (flower center point bead marked by X) back to 1 to 6 to 7 back to 4 and out.
Pull tight.
Add another line of 5 beads. Continue.
Try the daisy chain above without the stem, so that each flower set is interconnected by one bead — # 4 (which becomes #1 in the next flower). Make your 5th bead a different color.
Next, look at the modified daisy chain pattern below. Try another interconnected daisy pattern, where we would connect each subsequent flower by two beads, instead of one. Here we would make the first daisy’s 3 and 4 become the next daisy’s 1 and 6.
This would go: 1 to 2 to 3 to 4 to 5 (flower center) to 1 to 6 to 7 to 4 up through 3 and out. Then 3 becomes 1 in the next daisy link. The pattern continues in the second link as 1 to 2 to 3 to 4 to 5 (flower center) to 1 to 6 to 7 to 4 up through 3 and out. Then 3 becomes 1 again.
Try the same pattern, this time making the 2nd, 5th and 7th bead the same color, but different than the others.
Try again, making the 1st, 5th and 4th beads the same color, but different than the others.
Beading requires a lot of mind-body coordination. That takes work. It is work.
Calisthenics are exercises you can do to improve and tone your mind-body coordination when bead weaving.
You have to be able to get from your fingers to the needle to the beads, back along the thread to the needle to the fingers, hands, arms, eyes, mind. And then again. And again. Over and over, one more time. You need to get into a rhythm. All these working parts need to be working. No time for cramping. No time to get tired. No time to lose concentration.
A rhythm. Needle, pick up bead, pull down along thread, check the tension, pick up a bead, pull down along thread, check the tension, pick up a bead….
I noticed that different instructors had various techniques and strategies for maintaining this rhythm. Yes, music was involved sometimes. Othertimes simple meditation or creative reading and discourse. Some people had some stretching exercises that they did. Others tested themselves before proceeding with their big project. Still others did small things to reconfirm their learning.
Throughout this Series, I introduce some of the beading calisthenics that I experienced along the way. If you want to gather materials up so that you can follow along with these calisthenics, here’s the list.
MATERIALS NEEDED FOR ALL THE CALISTHENIC EXERCISES (SUPPLY LIST):
notebook, pencil 1 tube each of Japanese 11/0 seed beads in gray, 3 different colors of orange, black, white, any other 4 colors 1 tube each of Japanese 8/0 seed beads in gray or silver, black, white, orange, any other 4 colors 1 tube each of Japanese 6/0 seed beads in gray or silver, black, white, orange, any other 4 colors 5 gray-scale colors of delicas or 11/0 seed beads Nymo D or C-Lon D thread in black Nymo D or C-Lon D thread in yellow two toggle clasps .018” or .019” flexible cable wire assorted 4mm, 6mm and 8mm beads in various coordinating colors, including grays and oranges in your mix, as well big bowl and a bowl-full of assorted beads Size 10 English beading needles Bees wax scissors beading dishes or trays any kind of graph paper work surface or pad colored pencils a few clasps, (toggles are easy to work with) some crimp beads crimping pliers
BEADING CALISTHENICS #9: Bead Massage
Fill a large bowl with beads of any sort and size. Put your hands into the beads, and squeeze, let go, let the beads run over your hands, feel them in your hands, squeeze them in your hands.
Start to squeeze them in your hands and through your fingers starting with your pinkies, and working across your hand slowly until you get to your thumbs and forefingers, and squeeze them through these. Start again at your pinkies.
Put your palm flat onto the top surface of the bowl of beads. Push down. Then make a fist, and let the beads run through your fingers.
Beading requires a lot of mind-body coordination. That takes work. It is work.
Calisthenics are exercises you can do to improve and tone your mind-body coordination when bead weaving.
You have to be able to get from your fingers to the needle to the beads, back along the thread to the needle to the fingers, hands, arms, eyes, mind. And then again. And again. Over and over, one more time. You need to get into a rhythm. All these working parts need to be working. No time for cramping. No time to get tired. No time to lose concentration.
A rhythm. Needle, pick up bead, pull down along thread, check the tension, pick up a bead, pull down along thread, check the tension, pick up a bead….
I noticed that different instructors had various techniques and strategies for maintaining this rhythm. Yes, music was involved sometimes. Othertimes simple meditation or creative reading and discourse. Some people had some stretching exercises that they did. Others tested themselves before proceeding with their big project. Still others did small things to reconfirm their learning.
Throughout this Series, I introduce some of the beading calisthenics that I experienced along the way. If you want to gather materials up so that you can follow along with these calisthenics, here’s the list.
MATERIALS NEEDED FOR ALL THE CALISTHENIC EXERCISES (SUPPLY LIST):
notebook, pencil 1 tube each of Japanese 11/0 seed beads in gray, 3 different colors of orange, black, white, any other 4 colors 1 tube each of Japanese 8/0 seed beads in gray or silver, black, white, orange, any other 4 colors 1 tube each of Japanese 6/0 seed beads in gray or silver, black, white, orange, any other 4 colors 5 gray-scale colors of delicas or 11/0 seed beads Nymo D or C-Lon D thread in black Nymo D or C-Lon D thread in yellow two toggle clasps .018” or .019” flexible cable wire assorted 4mm, 6mm and 8mm beads in various coordinating colors, including grays and oranges in your mix, as well big bowl and a bowl-full of assorted beads Size 10 English beading needles Bees wax scissors beading dishes or trays any kind of graph paper work surface or pad colored pencils a few clasps, (toggles are easy to work with) some crimp beads crimping pliers
BEADING CALISTHENICS #8: Speaking With Beads
Zulu Beadwork
During Apartheid in South Africa, there were those Zulu tribes that adopted Christianity and identified with the colonialists, and there were those tribes that did not. The tribes that did not created a very elaborate communication system using beads.
Besides what colors were next to each other, they used a lot of triangles in their patterns. It was important if the triangle faced up or down, and again what the colors were. With their beadwork, they could “say” something very general, like “I’m mad at the world,” or something very specific, like “I’d like to get together with you tomorrow night at eight, but not before I’ve met with your brother.”
The challenge here is to create your own symbolic communication system using beads and their patterning within a piece of jewelry.
First write a sentence or paragraph about something that you will want to reduce to symbols, and illustrate by constructing a necklace.
Second develop a cipher: This would be a list of each symbol and its meaning or referent. For example, “red” might stand for “women” and “blue” might stand for “men”. A diagonal line leaning left might be “safety”, and one leaning right might be “danger.” Someone using your cipher should be able to make sense of your beadwork and what statement you are trying to make with it.
Third, using graph paper and colored pencils, sketch out what your piece would look like, in order to express the statement you want to make. Have a friend use your cipher and see if they can “read” your piece of jewelry, as drawn on the graph paper.
Beading requires a lot of mind-body coordination. That takes work. It is work.
Calisthenics are exercises you can do to improve and tone your mind-body coordination when bead weaving.
You have to be able to get from your fingers to the needle to the beads, back along the thread to the needle to the fingers, hands, arms, eyes, mind. And then again. And again. Over and over, one more time. You need to get into a rhythm. All these working parts need to be working. No time for cramping. No time to get tired. No time to lose concentration.
A rhythm. Needle, pick up bead, pull down along thread, check the tension, pick up a bead, pull down along thread, check the tension, pick up a bead….
I noticed that different instructors had various techniques and strategies for maintaining this rhythm. Yes, music was involved sometimes. Othertimes simple meditation or creative reading and discourse. Some people had some stretching exercises that they did. Others tested themselves before proceeding with their big project. Still others did small things to reconfirm their learning.
Throughout this Series, I introduce some of the beading calisthenics that I experienced along the way. If you want to gather materials up so that you can follow along with these calisthenics, here’s the list.
MATERIALS NEEDED FOR ALL THE CALISTHENIC EXERCISES (SUPPLY LIST):
notebook, pencil 1 tube each of Japanese 11/0 seed beads in gray, 3 different colors of orange, black, white, any other 4 colors 1 tube each of Japanese 8/0 seed beads in gray or silver, black, white, orange, any other 4 colors 1 tube each of Japanese 6/0 seed beads in gray or silver, black, white, orange, any other 4 colors 5 gray-scale colors of delicas or 11/0 seed beads Nymo D or C-Lon D thread in black Nymo D or C-Lon D thread in yellow two toggle clasps .018” or .019” flexible cable wire assorted 4mm, 6mm and 8mm beads in various coordinating colors, including grays and oranges in your mix, as well big bowl and a bowl-full of assorted beads Size 10 English beading needles Bees wax scissors beading dishes or trays any kind of graph paper work surface or pad colored pencils a few clasps, (toggles are easy to work with) some crimp beads crimping pliers
BEADING CALISTHENICS #7: Composition in Gray and Gray
5 gray-scale colors of delicas or 11/0 seed beads gray colored Nymo or C-lon thread, size D yellow colored Nymo or C-lon thread, size D
You can use an existing peyote, brick stitch or loom pattern, or create your own. Try to use or create a pattern that is about 3 inches square. Assign your colors using your 5 gray-scale colors of delicas or 11/0 seed beads.
Evaluate your resulting bead-weaving:
To what extent have you been able to create obvious or desired boundaries between sections or forms within the piece?
To what extent have you been able to create a sense of dimensionality, or forward/receding qualities?
To what extent have you had control over the lines, forms, sections and other design elements, using only gray?
To what extent have you been able to achieve an energy/vitality within the piece, as if it had been multi-colored?
Additional Exercises:
1. Repeat the pattern, using your 5-gray-scale bead colors, and use a bright yellow Nymo or C-Lon Size D thread
2. Repeat the pattern, and substitute a rich colored blue or red bead for one of the grays, plus the other original 4 colors of gray, and the gray Nymo or C-Lon thread
Beading requires a lot of mind-body coordination. That takes work. It is work.
Calisthenics are exercises you can do to improve and tone your mind-body coordination when bead weaving.
You have to be able to get from your fingers to the needle to the beads, back along the thread to the needle to the fingers, hands, arms, eyes, mind. And then again. And again. Over and over, one more time. You need to get into a rhythm. All these working parts need to be working. No time for cramping. No time to get tired. No time to lose concentration.
A rhythm. Needle, pick up bead, pull down along thread, check the tension, pick up a bead, pull down along thread, check the tension, pick up a bead….
I noticed that different instructors had various techniques and strategies for maintaining this rhythm. Yes, music was involved sometimes. Othertimes simple meditation or creative reading and discourse. Some people had some stretching exercises that they did. Others tested themselves before proceeding with their big project. Still others did small things to reconfirm their learning.
Throughout this Series, I introduce some of the beading calisthenics that I experienced along the way. If you want to gather materials up so that you can follow along with these calisthenics, here’s the list.
MATERIALS NEEDED FOR ALL THE CALISTHENIC EXERCISES (SUPPLY LIST):
notebook, pencil 1 tube each of Japanese 11/0 seed beads in gray, 3 different colors of orange, black, white, any other 4 colors 1 tube each of Japanese 8/0 seed beads in gray or silver, black, white, orange, any other 4 colors 1 tube each of Japanese 6/0 seed beads in gray or silver, black, white, orange, any other 4 colors 5 gray-scale colors of delicas or 11/0 seed beads Nymo D or C-Lon D thread in black Nymo D or C-Lon D thread in yellow two toggle clasps .018” or .019” flexible cable wire assorted 4mm, 6mm and 8mm beads in various coordinating colors, including grays and oranges in your mix, as well big bowl and a bowl-full of assorted beads Size 10 English beading needles Bees wax scissors beading dishes or trays any kind of graph paper work surface or pad colored pencils a few clasps, (toggles are easy to work with) some crimp beads crimping pliers
BEADING CALISTHENICS #6: Aren’t You Glad You Used Orange
Orange is a difficult color for most people to work with. So this challenge is a simple bead stringing one.
Create an appealing, satisfying necklace, using at least 30 or more 4–6mm beads in orange, and 30 or more 4–6mm beads in each of two other colors.
Stand back from your piece and examine it. If you added or subtracted any one color, could you make the necklace more satisfying?
What makes the particular combination that you ended up with the best combination?
Beading requires a lot of mind-body coordination. That takes work. It is work.
Calisthenics are exercises you can do to improve and tone your mind-body coordination when bead weaving.
You have to be able to get from your fingers to the needle to the beads, back along the thread to the needle to the fingers, hands, arms, eyes, mind. And then again. And again. Over and over, one more time. You need to get into a rhythm. All these working parts need to be working. No time for cramping. No time to get tired. No time to lose concentration.
A rhythm. Needle, pick up bead, pull down along thread, check the tension, pick up a bead, pull down along thread, check the tension, pick up a bead….
I noticed that different instructors had various techniques and strategies for maintaining this rhythm. Yes, music was involved sometimes. Othertimes simple meditation or creative reading and discourse. Some people had some stretching exercises that they did. Others tested themselves before proceeding with their big project. Still others did small things to reconfirm their learning.
Throughout this Series, I introduce some of the beading calisthenics that I experienced along the way. If you want to gather materials up so that you can follow along with these calisthenics, here’s the list.
MATERIALS NEEDED FOR ALL THE CALISTHENIC EXERCISES (SUPPLY LIST):
notebook, pencil 1 tube each of Japanese 11/0 seed beads in gray, 3 different colors of orange, black, white, any other 4 colors 1 tube each of Japanese 8/0 seed beads in gray or silver, black, white, orange, any other 4 colors 1 tube each of Japanese 6/0 seed beads in gray or silver, black, white, orange, any other 4 colors 5 gray-scale colors of delicas or 11/0 seed beads Nymo D or C-Lon D thread in black Nymo D or C-Lon D thread in yellow two toggle clasps .018” or .019” flexible cable wire assorted 4mm, 6mm and 8mm beads in various coordinating colors, including grays and oranges in your mix, as well big bowl and a bowl-full of assorted beads Size 10 English beading needles Bees wax scissors beading dishes or trays any kind of graph paper work surface or pad colored pencils a few clasps, (toggles are easy to work with) some crimp beads crimping pliers
The goal here is to learn a little about managing thread tension.
Pick a favorite bead weaving stitch, such as Peyote, Brick or Ndbele (Herringbone). Plan out how to make a flat length of the weave, about ½” wide and 6” long. You can also do 6 separate pieces about ½” wide and 1” long.
For the first inch, keep a tight tension. For the 2nd inch, make the tension tighter. For the 3rd inch, make it even tighter. For the tightest tension, you might even want to reinforce your stitching, by going through each bead again and again with your thread.
For the fourth inch, try to get a tension a little looser than you typically use. Then the next inch, get even looser. For your final inch, make this the loosest of all.
Now pick a stitch like the Chevron Stitch or the Right Angle Weave Stitch. Work it for a length of 3–4”. These stitches start out very loose.
What different kinds of strategies can you employ to tighten the tension? — Reinforcement? Reinforcement after each small segment of stitches? Or Reinforcement after you’ve completed the whole piece? Changing the type of stringing material you are using? Stitching over a solid form, such as a dowel, pencil or straw or vase or ball? Adding additional beads at key joints? There are these and lots of possibilities. Try them out.
Beading requires a lot of mind-body coordination. That takes work. It is work.
Calisthenics are exercises you can do to improve and tone your mind-body coordination when bead weaving.
You have to be able to get from your fingers to the needle to the beads, back along the thread to the needle to the fingers, hands, arms, eyes, mind. And then again. And again. Over and over, one more time. You need to get into a rhythm. All these working parts need to be working. No time for cramping. No time to get tired. No time to lose concentration.
A rhythm. Needle, pick up bead, pull down along thread, check the tension, pick up a bead, pull down along thread, check the tension, pick up a bead….
I noticed that different instructors had various techniques and strategies for maintaining this rhythm. Yes, music was involved sometimes. Othertimes simple meditation or creative reading and discourse. Some people had some stretching exercises that they did. Others tested themselves before proceeding with their big project. Still others did small things to reconfirm their learning.
Throughout this Series, I introduce some of the beading calisthenics that I experienced along the way. If you want to gather materials up so that you can follow along with these calisthenics, here’s the list.
MATERIALS NEEDED FOR ALL THE CALISTHENIC EXERCISES (SUPPLY LIST):
notebook, pencil 1 tube each of Japanese 11/0 seed beads in gray, 3 different colors of orange, black, white, any other 4 colors 1 tube each of Japanese 8/0 seed beads in gray or silver, black, white, orange, any other 4 colors 1 tube each of Japanese 6/0 seed beads in gray or silver, black, white, orange, any other 4 colors 5 gray-scale colors of delicas or 11/0 seed beads Nymo D or C-Lon D thread in black Nymo D or C-Lon D thread in yellow two toggle clasps .018” or .019” flexible cable wire assorted 4mm, 6mm and 8mm beads in various coordinating colors, including grays and oranges in your mix, as well big bowl and a bowl-full of assorted beads Size 10 English beading needles Bees wax scissors beading dishes or trays any kind of graph paper work surface or pad colored pencils a few clasps, (toggles are easy to work with) some crimp beads crimping pliers
BEADING CALISTHENICS #4: Two-Needle Race Up The Ladder
For each person:2 size #10 English beading needles Nymo D or C-Lon D thread Size 8/0 Japanese seed beads
Here, you need two or more people, or you can compete against yourself. This is a race.
We are going to use two needles and one length of thread to work up through the ladder stitch.
The ladder technique: Double your length of thread. Thread a needle on the end of each side. Pick up the same number of beads on the two needles. Pass the needles in opposite directions through the top beads on each needle. Pull the tension tight. For your first loop (or rung), you’ll need one extra bead on each needle, than for subsequent loops (rungs).
You might start with 4 beads on each needle for the first rung, then 3 beads on each needle for each additional run. Pick up 4 on each needle, crossover. Pull the tension tight. Pick up 3 on each needle, crossover. Pull the tension tight. Keep repeating with 3 beads on each needle.
The ladder looks like this:
Run the race to see who can be the first to make a ladder that is 12 inches long.